display SUZUKI SWIFT 2017 5.G Owners Manual
[x] Cancel search | Manufacturer: SUZUKI, Model Year: 2017, Model line: SWIFT, Model: SUZUKI SWIFT 2017 5.GPages: 336, PDF Size: 6.24 MB
Page 19 of 336
BEFORE DRIVING
74LH0-74E
BEFORE DRIVINGKeys ......................................................................................... 2-1
Door Locks .............................................................................. 2-2
Central Door Locking System (if equipped) ........................ 2-2
Keyless Push Start System Remote Controller/Keyless
Entry System Transmitter ..................................................... 2-6
Security System (Vehicle With Keyless Entry System) ....... 2-12
Security System
(Vehicle With Keyless Push Start System) ........................... 2-20
Windows .................................................................................. 2-22
Mirrors ..................................................................................... 2-23
Heated Rear Window Switch (if equipped) .......................... 2-24
Front Seats .............................................................................. 2-25
Rear Seats ............................................................................... 2-26
Folding Rear Seat (if equipped) ............................................. 2-27
Seat Belts and Child Restraint Systems .............................. 2-28
Driver’s Seat Belt Reminder (if equipped) ........................... 2-32
Supplemental Restraint System (air bags)
(if equipped) ............................................................................ 2-38
Instrument Cluster ................................................................. 2-44
Warning and Indicator Lights ................................................ 2-46
Speedometer ........................................................................... 2-51
Tachometer (if equipped) ...................................................... 2-51
Fuel Gauge .............................................................................. 2-51
Temperature Gauge ............................................................... 2-52
Brightness Control ................................................................. 2-52
Information Display ................................................................ 2-53
Lighting Control Lever ........................................................... 2-60
Headlight Leveling Switch ..................................................... 2-61
Turn Signal Control Lever ..................................................... 2-61
Hazard Warning Switch ......................................................... 2-62
Windshield Wiper and Washer Lever ................................... 2-62
Tilt Steering Lock Lever ......................................................... 2-64
Horn ........................................................................................ 2-64
2
Page 22 of 336
2-3
BEFORE DRIVING
74LH0-74E
58MS003
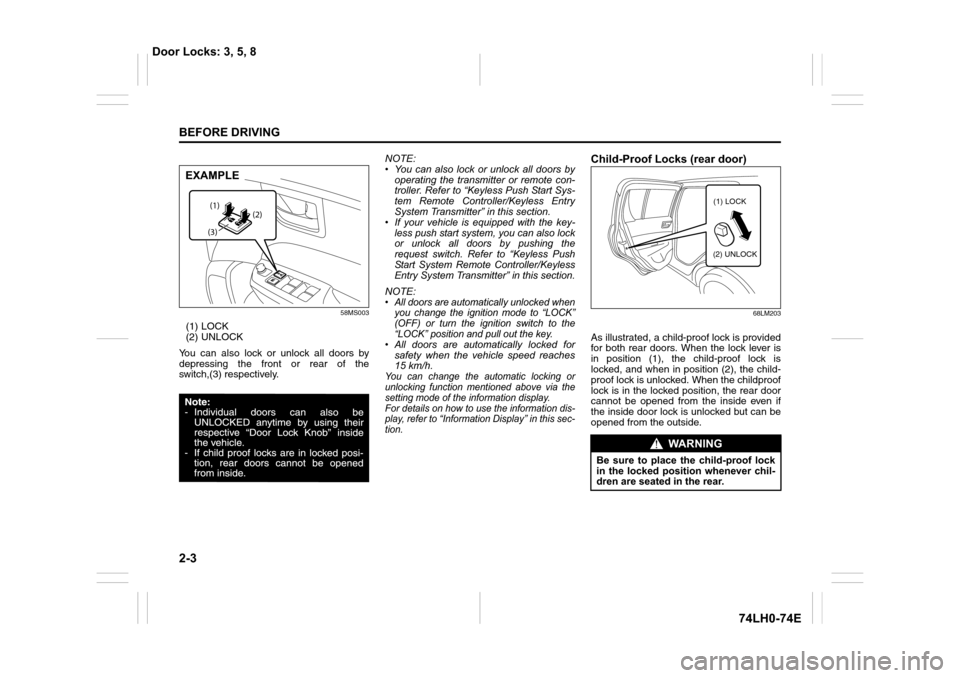
(1) LOCK
(2) UNLOCK
You can also lock or unlock all doors by
depressing the front or rear of the
switch,(3) respectively.NOTE:
• You can also lock or unlock all doors by
operating the transmitter or remote con-
troller. Refer to “Keyless Push Start Sys-
tem Remote Controller/Keyless Entry
System Transmitter” in this section.
• If your vehicle is equipped with the key-
less push start system, you can also lock
or unlock all doors by pushing the
request switch. Refer to “Keyless Push
Start System Remote Controller/Keyless
Entry System Transmitter” in this section.
NOTE:• All doors are automatically unlocked when
you change the ignition mode to “LOCK”
(OFF) or turn the ignition switch to the
“LOCK” position and pull out the key.
• All doors are automatically locked for
safety when the vehicle speed reaches
15 km/h.
You can change the automatic locking or
unlocking function mentioned above via the
setting mode of the information display.
For details on how to use the information dis-
play, refer to “Information Display” in this sec-
tion.
Child-Proof Locks (rear door)
68LM203
As illustrated, a child-proof lock is provided
for both rear doors. When the lock lever is
in position (1), the child-proof lock is
locked, and when in position (2), the child-
proof lock is unlocked. When the childproof
lock is in the locked position, the rear door
cannot be opened from the inside even if
the inside door lock is unlocked but can be
opened from the outside.
(2) (1)
(3)
EXAMPLE
WA R N I N G
Be sure to place the child-proof lock
in the locked position whenever chil-
dren are seated in the rear.
(1) LOCK
(2) UNLOCK
Door Locks: 3, 5, 8
Page 26 of 336
2-7
BEFORE DRIVING
74LH0-74E
about 15 seconds and then fade out. If you
press the engine switch during this time,
the light will start to fade out immediately.
Be sure the doors are locked after you oper-
ate the “LOCK” button (1).
If no door is opened within about 30 seconds
after the “UNLOCK” button (2) is operated,
the doors will automatically lock again.
Car locator functionCar locator function helps in locating the
vehicle.
Push both of the “LOCK” button (1) and
“UNLOCK” button (2) for more than 3 sec-
onds.
The turn signal lights will blink for about
27.5 seconds. Also, the siren will sound for
about 27.5 seconds at the same time.
To cancel the car locator funciton, press any
button (LOCK or UNLOCK). You can also
press the engine switch to change the igni-
tion mode to “ON” to cancel the car locator
function.
NOTE:
The car locator function will not activate
when the ignition mode is “ACC” or “ON” or
pre warning / full blast warning by shock
sensor or alarm is in activated condition.
• If you lock the doors using the remote con-
troller when the tail gate or engine hood
are open, the siren will sound 3 times to
remind you.
• If the security system was triggered due
to an unauthorized entry into the vehicle
and then you unlock the doors using theremote controller, the siren will sound 4
times to remind you. If this happens,
check whether your vehicle has been
broken into while you were away from it.
• Once you push both of the “LOCK” button
(1) and “UNLOCK” button (2), then you
push one of the buttons within 5 seconds,
the siren will not sound. However, If you
push one of the buttons twice within 5 sec-
onds, or push one of the buttons 5 sec-
onds later, the siren will sound.
• You can set whether the siren sounds
when locking or unlocking the door(s) via
the setting mode of the information display.
For details on how to use the information
display, refer to “Information Display” in
this section.
NOTE:
• The maximum operating distance of the
remote controller is about 5 m (16 ft.),
but this can vary depending on the sur-
roundings, especially near other trans-
mitting devices such as radio towers or
CB (Citizen’s Band) radios.
• The door locks cannot be operated with
the remote controller if the ignition mode
is other than the “LOCK” (OFF).
• If any door is open, you cannot lock the
door by operating the remote controller,
however unlock the door.
• If you lose one of the remote controllers,
ask your MARUTI SUZUKI dealer as soon
as possible for a replacement. Be sure to
have your dealer program the new remotecontroller code in your vehicle’s memory
so that the old code is erased.
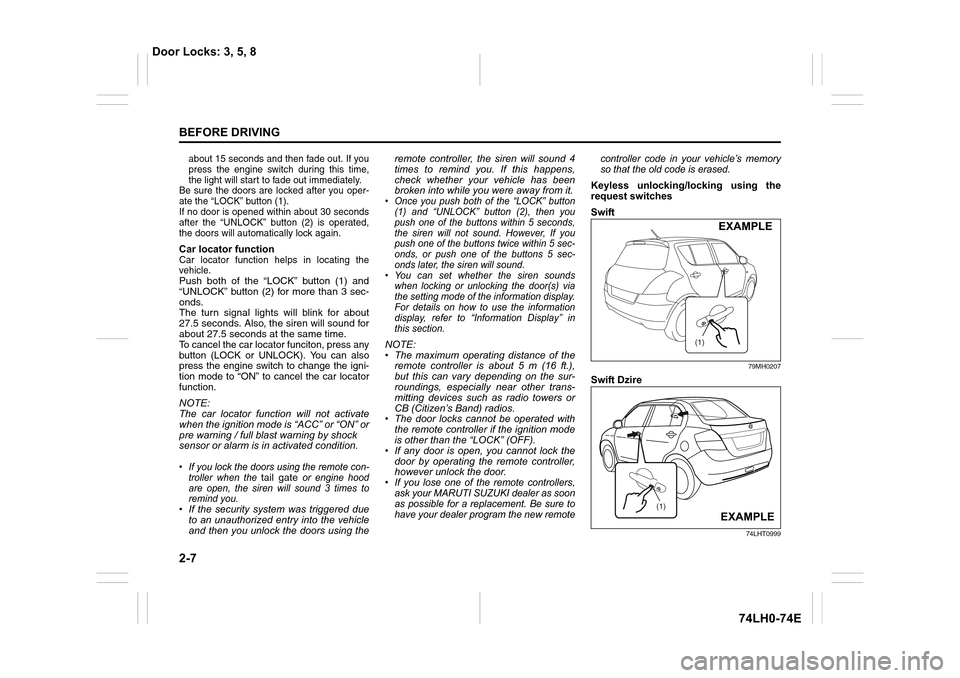
Keyless unlocking/locking using the
request switches
Swift
79MH0207
Swift Dzire
74LHT0999
(1)
EXAMPLE
(1)
EXAMPLE
Door Locks: 3, 5, 8
Page 39 of 336
2-20
BEFORE DRIVING
74LH0-74E
Security System (Vehicle with Key-
less push start system)
The security system is armed after you
lock all doors (including engine hood and
trunk/tailgate) by using the keyless push
start system remote controller or request
switch.
Once the system is armed, any attempt to
open a door by using any other means (*)
than the keyless push start system remote
controller or open the engine hood, will
cause the alarm to be triggered.
* These means include the following:
–The key
– The lock knob on a door
– The central door locking switch
– The tailgate unlatch button (if
equipped)
– The trunk lid unlatch button (if
equipped)
Also, in case that you have set the shock
sensor to enabled state and set sensitivity
of the pre-warning function and full blast
warning function to a level other than 0, the
warning will be triggered in case of any
attempt to tamper with the vehicle. The
shock sensor can be selected enabled or
disabled state, and sensitivity of each
warning can be adjusted as desired. To set
the shock sensor, ask your MARUTI
SUZUKI dealer or use the setting mode of
the information display.NOTE:
• The default setting of the shock sensor
is in the disabled state. Set to the
enabled state and adjust sensitivity of
each warning according to your prefer-
ence. For details on how to use the infor-
mation display, refer to “Information
Display” in this section.
• Your dealer may have already set the
shock sensor of the vehicle to the
enabled state before you purchase it.
Consult your dealer for further informa-
tion.
NOTE:
• The security system generates alarms
when any of the predetermined condi-
tions is met. However, the system does
not have any function of blocking unau-
thorized entry into the vehicle.
• Always use the keyless push start system
remote controller to unlock the doors when
the security system has been armed.
Using a key instead will trigger the alarm.
• If a person who does not know the secu-
rity system is going to drive the vehicle,
we recommend you explain the system
and its operation to the person. Mistak-
enly triggering the alarm may cause a
nuisance to others.
• Even if the security system is armed,
you should still be careful to guard
against theft. Do not leave money or
things of value in the vehicle.How to arm the security system
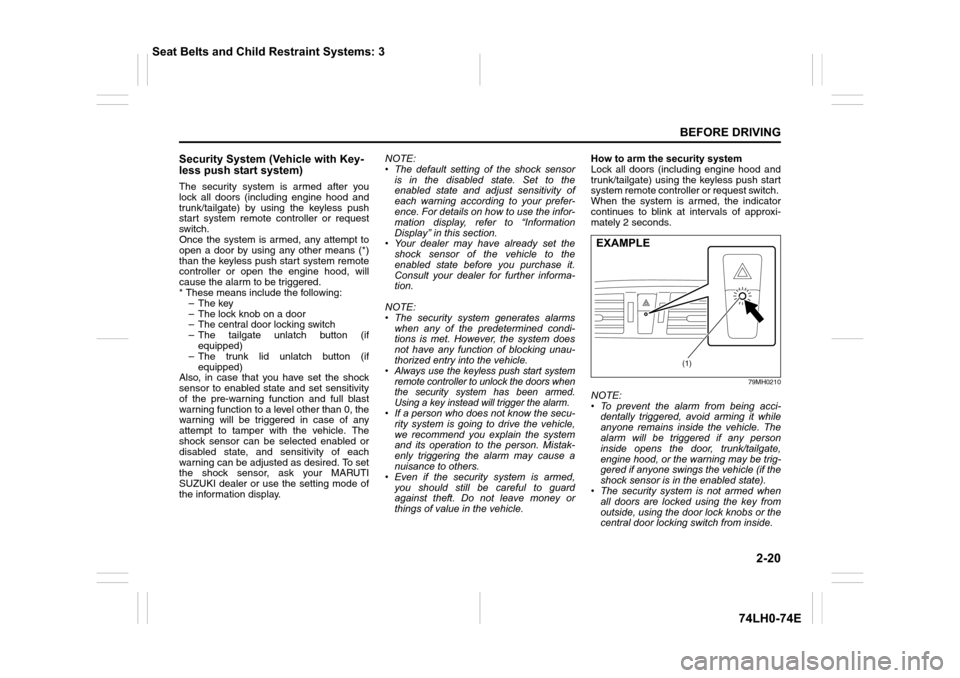
Lock all doors (including engine hood and
trunk/tailgate) using the keyless push start
system remote controller or request switch.
When the system is armed, the indicator
continues to blink at intervals of approxi-
mately 2 seconds.
79MH0210
NOTE:
• To prevent the alarm from being acci-
dentally triggered, avoid arming it while
anyone remains inside the vehicle. The
alarm will be triggered if any person
inside opens the door, trunk/tailgate,
engine hood, or the warning may be trig-
gered if anyone swings the vehicle (if the
shock sensor is in the enabled state).
• The security system is not armed when
all doors are locked using the key from
outside, using the door lock knobs or the
central door locking switch from inside.
(1)
EXAMPLE
Seat Belts and Child Restraint Systems: 3
Page 40 of 336
2-21
BEFORE DRIVING
74LH0-74E
• If any door is not operated within approx-
imately 30 seconds after the doors have
been unlocked using the keyless push
start system remote controller, the doors
are automatically locked again. When
the doors are locked, the security sys-
tem will be armed.
• If the security system indicator (1) blinks
when the ignition mode is “ON”, there
may be something wrong with the secu-
rity system. Ask your MARUTI SUZUKI
dealer to inspect the system.
How to disarm the security system
Simply unlock the doors using the keyless
push start system remote controller. The
security system indicator will go out, indi-
cating that the security system is dis-
armed.
How to stop the alarm
Should the alarm be triggered accidentally,
unlock the doors using the keyless push
start system remote controller or request
switch, or in case of emergency, press the
engine switch to change the ignition mode
to “ON”.
NOTE:
• Even after the alarm has stopped, if you
lock the doors using the keyless push
start system remote controller, the secu-
rity system will be rearmed.
• If you disconnect the battery while the
security system is in the armed condition
or the alarm is actually in operation, thealarm will be re-triggered when the bat-
tery is then reconnected.
• Even after the alarm has stopped at the
end of the predetermined operation time,
it will be triggered again if any of the
doors, trunk/tailgate or engine hood is
opened, or the warning may be triggered
if the vehicle feels a shock (if the shock
sensor is in the enabled state), without
disarming the security system.
Checking whether the alarm has been
triggered during parking
If the alarm was triggered and you then
turn the ignition mode is “ON”, the security
system indicator will blink rapidly for about
8 seconds and a buzzer will beep 4 times
during this period. If this happens, check
whether the vehicle has been broken into
while you were away from it.
Security system indication
• If any of the doors or trunk/tailgate are
opened without unlocking by the keyless
push start system remote controller, all
turn signal lights start to blink and the
interior buzzer beeps intermittently. After
5 seconds, the siren will sound for about
27.5 seconds. The security system indi-
cator continues to blink during this time.
• If the engine hood is opened, all turn sig-
nal lights blink, and the siren sounds for
about 27.5 seconds. The security sys-
tem indicator continues to blink during
this time.• If the shock sensor is in the enabled
state and the vehicle feels a shock
higher than the pre-warning sensitivity,
the siren sounds for about 2 seconds
(pre-warning). If the vehicle feel a shock
higher than the full blast warning sensi-
tivity, siren will sound for about 4.5 sec-
onds (full blast warning). The security
system indicator continues to blink
during this time.
NOTE:
If you set the full blast warning sensitivity
higher than the pre-warning sensitivity in
the setting mode of the information display,
or the vehicle feels such shock as to be
able to trigger the full blast warning, the full
blast warning will be triggered preferen-
tially. In this case, the pre-warning will not
be triggered.
Seat Belts and Child Restraint Systems: 3
Page 63 of 336
2-44
BEFORE DRIVING
74LH0-74E
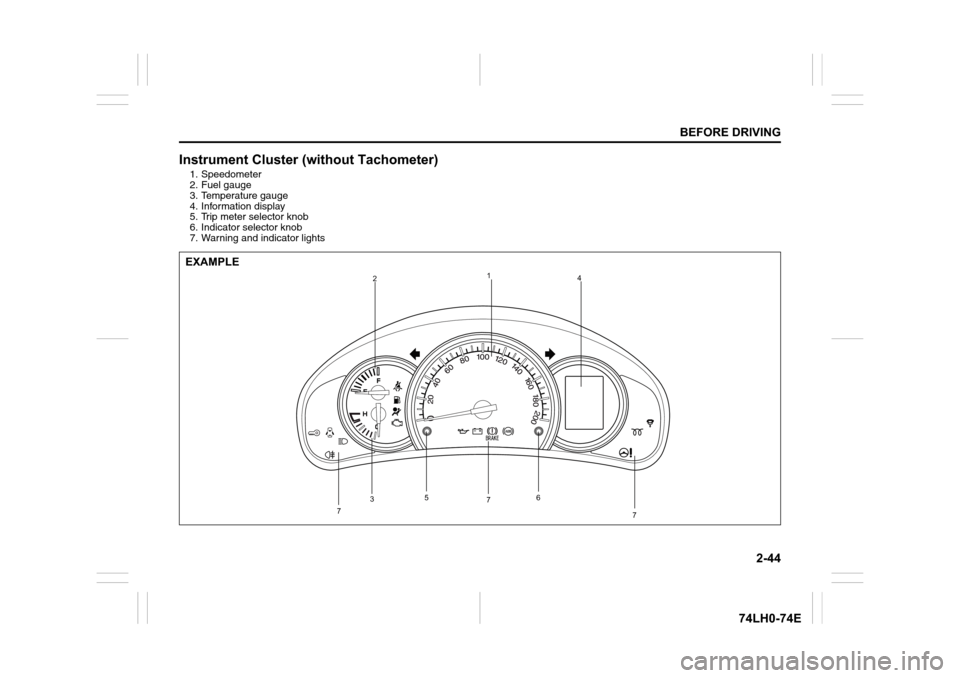
Instrument Cluster (without Tachometer)
1. Speedometer
2. Fuel gauge
3. Temperature gauge
4. Information display
5. Trip meter selector knob
6. Indicator selector knob
7. Warning and indicator lights
1
2
34
56
7
7
7
EXAMPLE
Page 64 of 336
2-45
BEFORE DRIVING
74LH0-74E
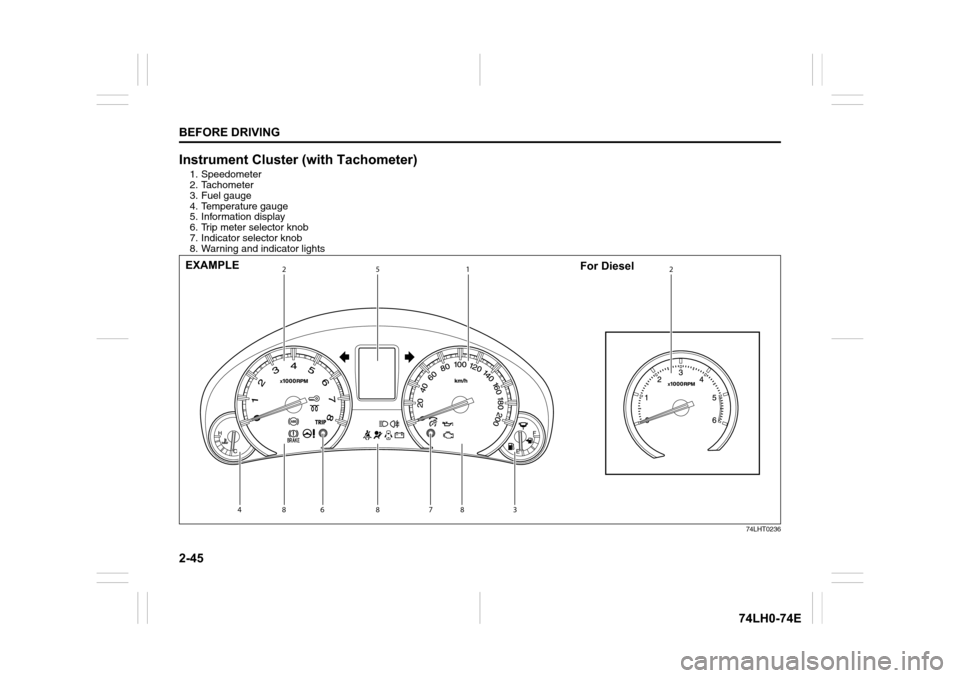
Instrument Cluster (with Tachometer)
1. Speedometer
2. Tachometer
3. Fuel gauge
4. Temperature gauge
5. Information display
6. Trip meter selector knob
7. Indicator selector knob
8. Warning and indicator lights
74LHT0236
1 2
3 45
67 8882EXAMPLE
For Diesel
Page 71 of 336
2-52
BEFORE DRIVING
74LH0-74E
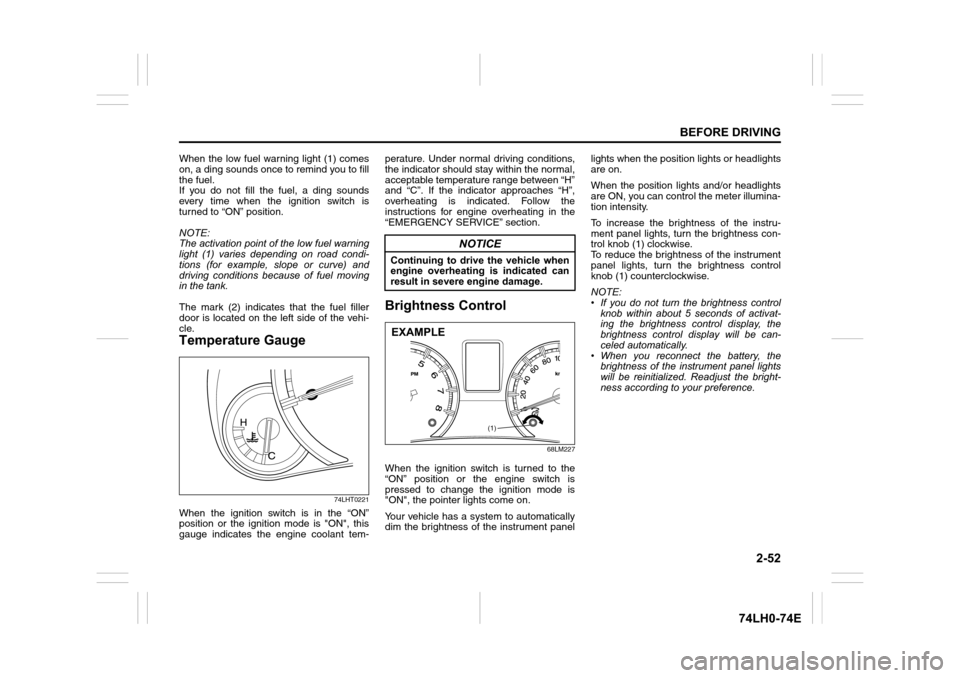
When the low fuel warning light (1) comes
on, a ding sounds once to remind you to fill
the fuel.
If you do not fill the fuel, a ding sounds
every time when the ignition switch is
turned to “ON” position.
NOTE:
The activation point of the low fuel warning
light (1) varies depending on road condi-
tions (for example, slope or curve) and
driving conditions because of fuel moving
in the tank.
The mark (2) indicates that the fuel filler
door is located on the left side of the vehi-
cle.
Temperature Gauge
74LHT0221
When the ignition switch is in the “ON”
position or the ignition mode is "ON", this
gauge indicates the engine coolant tem-perature. Under normal driving conditions,
the indicator should stay within the normal,
acceptable temperature range between “H”
and “C”. If the indicator approaches “H”,
overheating is indicated. Follow the
instructions for engine overheating in the
“EMERGENCY SERVICE” section.
Brightness Control
68LM227
When the ignition switch is turned to the
“ON” position or the engine switch is
pressed to change the ignition mode is
"ON", the pointer lights come on.
Your vehicle has a system to automatically
dim the brightness of the instrument panellights when the position lights or headlights
are on.
When the position lights and/or headlights
are ON, you can control the meter illumina-
tion intensity.
To increase the brightness of the instru-
ment panel lights, turn the brightness con-
trol knob (1) clockwise.
To reduce the brightness of the instrument
panel lights, turn the brightness control
knob (1) counterclockwise.
NOTE:
• If you do not turn the brightness control
knob within about 5 seconds of activat-
ing the brightness control display, the
brightness control display will be can-
celed automatically.
• When you reconnect the battery, the
brightness of the instrument panel lights
will be reinitialized. Readjust the bright-
ness according to your preference.
NOTICE
Continuing to drive the vehicle when
engine overheating is indicated can
result in severe engine damage.
(1)
EXAMPLE
Page 72 of 336
2-53
BEFORE DRIVING
74LH0-74E
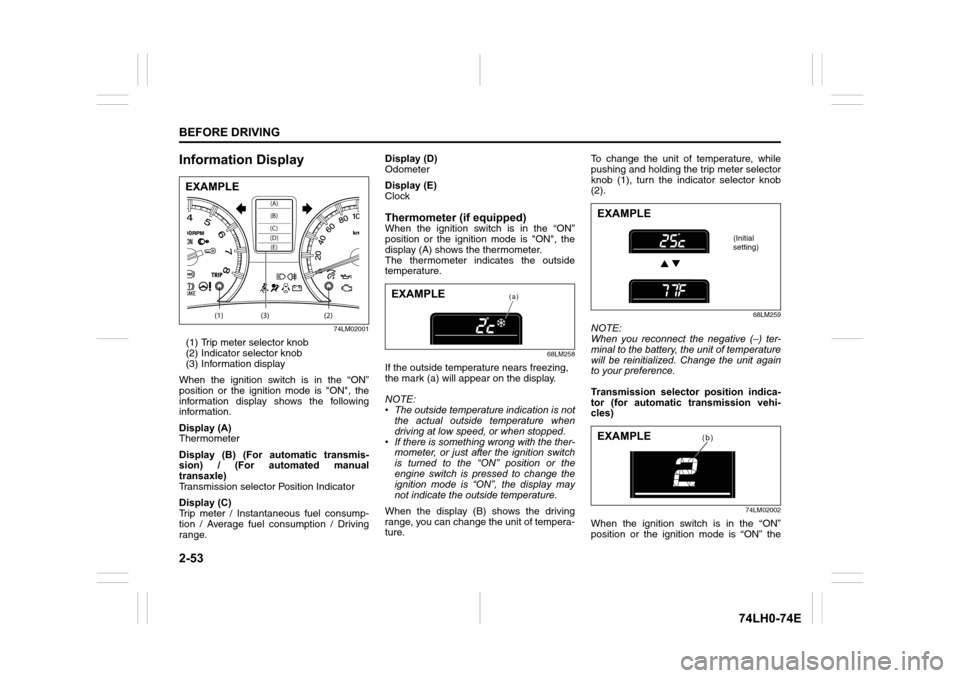
Information Display
74LM02001
(1) Trip meter selector knob
(2) Indicator selector knob
(3) Information display
When the ignition switch is in the “ON”
position or the ignition mode is "ON", the
information display shows the following
information.
Display (A)
Thermometer
Display (B) (For automatic transmis-
sion) / (For automated manual
transaxle)
Transmission selector Position Indicator
Display (C)
Trip meter / Instantaneous fuel consump-
tion / Average fuel consumption / Driving
range.Display (D)
Odometer
Display (E)
Clock
Thermometer (if equipped)When the ignition switch is in the “ON”
position or the ignition mode is "ON", the
display (A) shows the thermometer.
The thermometer indicates the outside
temperature.
68LM258
If the outside temperature nears freezing,
the mark (a) will appear on the display.
NOTE:
• The outside temperature indication is not
the actual outside temperature when
driving at low speed, or when stopped.
• If there is something wrong with the ther-
mometer, or just after the ignition switch
is turned to the “ON” position or the
engine switch is pressed to change the
ignition mode is “ON”, the display may
not indicate the outside temperature.
When the display (B) shows the driving
range, you can change the unit of tempera-
ture.To change the unit of temperature, while
pushing and holding the trip meter selector
knob (1), turn the indicator selector knob
(2).
68LM259
NOTE:
When you reconnect the negative (–) ter-
minal to the battery, the unit of temperature
will be reinitialized. Change the unit again
to your preference.
Transmission selector position indica-
tor (for automatic transmission vehi-
cles)
74LM02002
When the ignition switch is in the “ON”
position or the ignition mode is “ON” the
(1) (2)(3)
(D)(B) (A)
(C)(E)
EXAMPLE
(a)EXAMPLE
EXAMPLE
(Initial
setting)
(b)EXAMPLE
Page 73 of 336
2-54
BEFORE DRIVING
74LH0-74E
display (B) indicates the gear position (b).
For details on how to use the transmission
refer to “Using the transmission in the
“OPERATING YOUR VEHICLE” section.
Gear position indicator (for Auto
Gear Shift models)
76MH0A044
When the ignition switch is in the “ON”
position, the display (D) indicates the gear
position.
For details on how to use the transaxle,
refer to “Using the Transaxle” in the
“OPERATING YOUR VEHICLE” section.
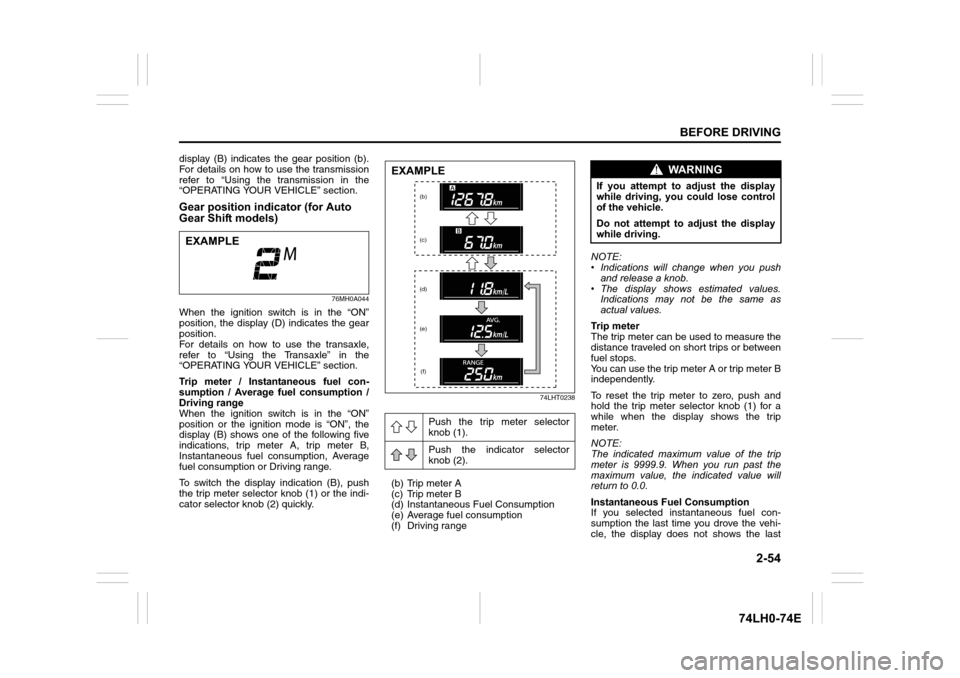
Trip meter / Instantaneous fuel con-
sumption / Average fuel consumption /
Driving range
When the ignition switch is in the “ON”
position or the ignition mode is “ON”, the
display (B) shows one of the following five
indications, trip meter A, trip meter B,
Instantaneous fuel consumption, Average
fuel consumption or Driving range.
To switch the display indication (B), push
the trip meter selector knob (1) or the indi-
cator selector knob (2) quickly.
74LHT0238
(b) Trip meter A
(c) Trip meter B
(d) Instantaneous Fuel Consumption
(e) Average fuel consumption
(f) Driving rangeNOTE:
• Indications will change when you push
and release a knob.
• The display shows estimated values.
Indications may not be the same as
actual values.
Trip meter
The trip meter can be used to measure the
distance traveled on short trips or between
fuel stops.
You can use the trip meter A or trip meter B
independently.
To reset the trip meter to zero, push and
hold the trip meter selector knob (1) for a
while when the display shows the trip
meter.
NOTE:
The indicated maximum value of the trip
meter is 9999.9. When you run past the
maximum value, the indicated value will
return to 0.0.
Instantaneous Fuel Consumption
If you selected instantaneous fuel con-
sumption the last time you drove the vehi-
cle, the display does not shows the last
EXAMPLE
Push the trip meter selector
knob (1).
Push the indicator selector
knob (2).
EXAMPLE
(b)
(c)
(d)
(e)
(f)
WA R N I N G
If you attempt to adjust the display
while driving, you could lose control
of the vehicle.
Do not attempt to adjust the display
while driving.