time SUZUKI SWIFT 2017 5.G Owners Manual
[x] Cancel search | Manufacturer: SUZUKI, Model Year: 2017, Model line: SWIFT, Model: SUZUKI SWIFT 2017 5.GPages: 336, PDF Size: 6.24 MB
Page 9 of 336
0-1
FOREWORDThis manual is an essential part of your
vehicle and should remain with the vehicle
when resold or otherwise transferred to a
new owner or operator. Please read this
manual carefully before operating your
new MARUTI SUZUKI and review the
manual from time to time. It contains
important information on safety, operation
and maintenance. You are invited to avail
the three Free Inspection Services as
described in the manual. Three free
inspection coupons are attached to this
manual. Please show this manual to your
dealer while you take your MARUTI
SUZUKI for any Service.
To prolong the life of your vehicle and
reduce maintenance cost, the periodic
maintenance must be carried out accord-
ing to “PERIODIC MAINTENANCE
SCHEDULE” described in “INSPECTION
AND MAINTENANCE” section of this man-
ual. It is essential for preventing trouble
and accidents to ensure your satisfaction
and safety.
Daily inspection and care as per “DAILY
INSPECTION CHECKLIST” described in
the “INSPECTION AND MAINTENANCE”
section of this manual is essential for pro-
longing the life of the vehicle and for safe
driving. MARUTI SUZUKI INDIA LIMITED believes
in conservation and protection of Earth’s
natural resources.
To that end, we encourage every vehicle
owner to recycle, trade-in or properly dis-
pose of, as appropriate, used Engine Oil,
coolant and other fluids, batteries and
tyres etc.
MARUTI SUZUKI INDIA LIMITED
All information in
this manual is based
on the latest product information avail-
able at the time of publication. Due to
improvements or other changes, there
may be discrepancies between informa-
tion in this manual and your vehicle.
MARUTI SUZUKI INDIA LIMITED
reserves the right to make production
changes at any time, without notice and
without incurring any obligation to
make the same or similar changes to
vehicles previously built or sold.
This vehicle may not co mply with stan-
dards or regulations of other countries.
Before attempting to register this vehi-
cle in any other country, check all appli-
cable regulations and make any neces-
sary modifications.
Page 11 of 336
0-3
WARRANTY POLICYMaruti Suzuki India Limited (hereinafter called “Maruti Suzuki”),
warrants that each new Maruti Suzuki vehicle distributed in India
by Maruti Suzuki and sold by an authorised Maruti Suzuki dealer
will be free, under normal use and service, from any defects in
material and workmanship at the time of manufacture SUBJECT
TO THE FOLLOWING TERMS AND CONDITIONS:(1) Qualification:To qualify for this warranty the vehicle must be delivered by a
Maruti Suzuki authorised dealer and set-up, and serviced by a
Maruti Suzuki authorised dealer / service station.(2) Term:The term of the warranty shall be twenty-four (24) months or
40,000 kilometers (whichever occurs first) from the date of
Invoice to the first owner.(3) Maruti Suzuki Warranty Obligation:If any defect(s) should be found in a Maruti Suzuki vehicle within
the term stipulated above, Maruti Suzuki’s only obligation is to
repair or replace at its sole discretion any part shown to be defec-
tive, with a new part or the equivalent at no cost to the owner for
parts or labour, when Maruti Suzuki acknowledges that such a
defect is attributable to faulty material or workmanship at the time
of manufacture. The owner is responsible for any repair or replace-
ments which are not covered by this warranty.
(4) Limitation:This warranty shall not apply to:
(a) Normal maintenance service required other than the three free services, including without limitation, oil and fluid
changes, headlight aiming, fastener retightening, wheel bal-
ancing, wheel alignment and tyre rotation, cleaning of injec-
tors, adjustments of clutch and valve clearance.
(b) The replacement of normal wear parts including without lim- itation, bulbs, tyres and tubes, spark plugs, belts, hoses, fil-
ters, wiper blades, brushes, contact points, fuses, clutch
disc, brake shoes, brake pads, cable and all rubber parts
(except oil seal and glass run).
(c) Any vehicle which has been used for competition or racing.
(d) Any repairs or replacement required as a result of accidents or collision.
(e) Any defects caused by misuse, negligence, abnormal use or insufficient care.
(f) Any vehicle which has been modified or altered, including
without limitation, the installation of performance accesso-
ries.
(g) Any vehicle on which parts or accessories not approved by
Maruti Suzuki have been used.
(h) Any vehicle which has not been operated in accordance with the operating instructions in this Owner’s Manual and Ser-
vice Booklet.
(i) Any vehicle which has not received, during the warranty term, the service inspections prescribed in this Owner’s Manual
and Service Booklet.
(j) Any vehicle which has been assembled, disassembled, adjusted or repaired by other than an Maruti Suzuki autho-
rised dealer/service station.
(k) Any vehicle which has been used for purposes other than what it was designed for.
(l) Any damage or deterioration caused by industrial pollution and bird droppings.
Page 12 of 336
0-4
55KS0-74E
(m) Insignificant defects which do not affect the function of thevehicle including without limitation, sound, vibration and fluid
seep.
(n) Any natural wear and tear including without limitation, aging
etc.
(o) Installation and usage of domestic LPG gas/LPG Cylinder.
(p) V-belts, hoses and gas leaks.
(q) Any vehicle retrofitted with LPG/CNG kits.(5) Extent of Warranty:This warranty is the entire written warranty given by Maruti Suzuki
for Maruti Suzuki vehicles and no dealer or its or his agent or
employee is authorised to extend or enlarge this warranty and no
dealer or its or his agent or employee is authorised to make any
oral warranty on Maruti Suzuki’s behalf.
Maruti Suzuki reserves the right to add any improvements or
change the design of any model at any time with no obligation to
make the same changes on units previously sold.(6) Warranty Service:To obtain warranty service, th e complete vehicle must be pre-
sented at the owner’s expenses to any authorised Maruti Suzuki
dealer.(7) Owner’s Warranty Responsibilities:It is responsibility of each owner to: – Make certain that the PDl card was completed at the time ofdelivery of the vehicle;
–
Have performed, at his own expenses, by an Maruti Suzuki
authorised dealer/service station all the service inspections
specified in the Maruti Suzuki “Owner’s Manual and Service
Booklet and maintain adequate proof that such service
inspections have been performed.
–
Make certain that the Maruti Suzuki authorised dealer/ser-
vice station performing the service inspection has certified
the work on the “Maintenance Service Record” page in the
“Owner’s Manual and Service Booklet and
–
Present the Maruti Suzuki “Owner’s Manual and Service
Booklet to the authorised Maruti Suzuki dealer whenever
requesting service inspections or warranty service.
If the “Owner’s Manual and Service Booklet should be lost or
destroyed the owner should consult the authorised Maruti Suzuki
dealer from whom the vehicle was purchased for instructions con-
cerning replacement of the “Owner’s Manual and Service Booklet.
(8) Disclaimer of Consequential Damage:Maruti Suzuki assumes no responsibility for loss of vehicle, loss of
time, inconvenience or any other indirect incidental or consequen-
tial damage resulting from the vehicle not being available to the
owner because of any defect covered by this warranty.(9) Change of OwnerEven if ownership of the vehicle changes, the remaining warranty
period is effective for the new owner.
Page 26 of 336
2-7
BEFORE DRIVING
74LH0-74E
about 15 seconds and then fade out. If you
press the engine switch during this time,
the light will start to fade out immediately.
Be sure the doors are locked after you oper-
ate the “LOCK” button (1).
If no door is opened within about 30 seconds
after the “UNLOCK” button (2) is operated,
the doors will automatically lock again.
Car locator functionCar locator function helps in locating the
vehicle.
Push both of the “LOCK” button (1) and
“UNLOCK” button (2) for more than 3 sec-
onds.
The turn signal lights will blink for about
27.5 seconds. Also, the siren will sound for
about 27.5 seconds at the same time.
To cancel the car locator funciton, press any
button (LOCK or UNLOCK). You can also
press the engine switch to change the igni-
tion mode to “ON” to cancel the car locator
function.
NOTE:
The car locator function will not activate
when the ignition mode is “ACC” or “ON” or
pre warning / full blast warning by shock
sensor or alarm is in activated condition.
• If you lock the doors using the remote con-
troller when the tail gate or engine hood
are open, the siren will sound 3 times to
remind you.
• If the security system was triggered due
to an unauthorized entry into the vehicle
and then you unlock the doors using theremote controller, the siren will sound 4
times to remind you. If this happens,
check whether your vehicle has been
broken into while you were away from it.
• Once you push both of the “LOCK” button
(1) and “UNLOCK” button (2), then you
push one of the buttons within 5 seconds,
the siren will not sound. However, If you
push one of the buttons twice within 5 sec-
onds, or push one of the buttons 5 sec-
onds later, the siren will sound.
• You can set whether the siren sounds
when locking or unlocking the door(s) via
the setting mode of the information display.
For details on how to use the information
display, refer to “Information Display” in
this section.
NOTE:
• The maximum operating distance of the
remote controller is about 5 m (16 ft.),
but this can vary depending on the sur-
roundings, especially near other trans-
mitting devices such as radio towers or
CB (Citizen’s Band) radios.
• The door locks cannot be operated with
the remote controller if the ignition mode
is other than the “LOCK” (OFF).
• If any door is open, you cannot lock the
door by operating the remote controller,
however unlock the door.
• If you lose one of the remote controllers,
ask your MARUTI SUZUKI dealer as soon
as possible for a replacement. Be sure to
have your dealer program the new remotecontroller code in your vehicle’s memory
so that the old code is erased.
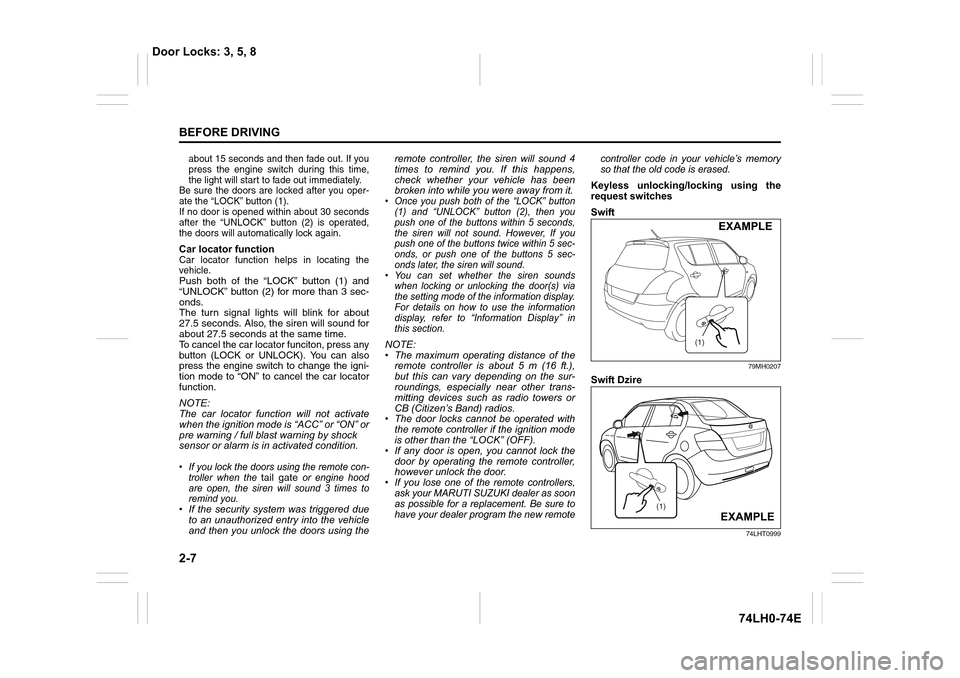
Keyless unlocking/locking using the
request switches
Swift
79MH0207
Swift Dzire
74LHT0999
(1)
EXAMPLE
(1)
EXAMPLE
Door Locks: 3, 5, 8
Page 27 of 336
2-8
BEFORE DRIVING
74LH0-74E
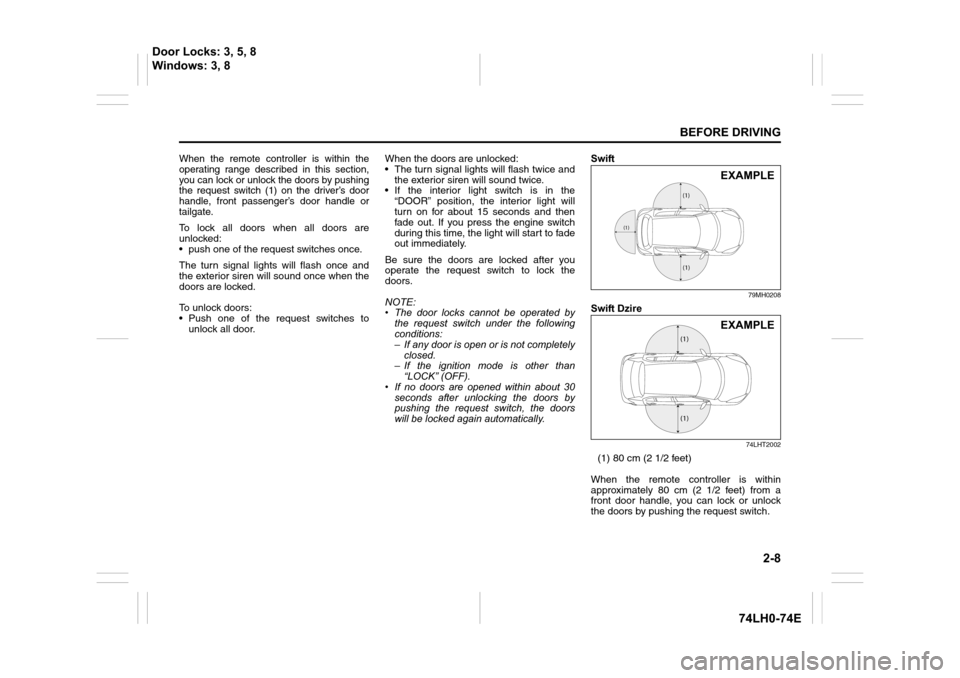
When the remote controller is within the
operating range described in this section,
you can lock or unlock the doors by pushing
the request switch (1) on the driver’s door
handle, front passenger’s door handle or
tailgate.
To lock all doors when all doors are
unlocked:
• push one of the request switches once.
The turn signal lights will flash once and
the exterior siren will sound once when the
doors are locked.
To unlock doors:
• Push one of the request switches to
unlock all door.When the doors are unlocked:
• The turn signal lights will flash twice and
the exterior siren will sound twice.
• If the interior light switch is in the
“DOOR” position, the interior light will
turn on for about 15 seconds and then
fade out. If you press the engine switch
during this time, the light will start to fade
out immediately.
Be sure the doors are locked after you
operate the request switch to lock the
doors.
NOTE:
• The door locks cannot be operated by
the request switch under the following
conditions:
– If any door is open or is not completely
closed.
– If the ignition mode is other than
“LOCK” (OFF).
• If no doors are opened within about 30
seconds after unlocking the doors by
pushing the request switch, the doors
will be locked again automatically.Swift
79MH0208
Swift Dzire
74LHT2002
(1) 80 cm (2 1/2 feet)
When the remote controller is within
approximately 80 cm (2 1/2 feet) from a
front door handle, you can lock or unlock
the doors by pushing the request switch.
(1)
(1)
(1)
EXAMPLE
(1)
(1)
EXAMPLE
Door Locks: 3, 5, 8
Windows: 3, 8
Page 31 of 336
2-12
BEFORE DRIVING
74LH0-74E
• If the interior light switch is in the
“DOOR” position, the interior light will
turn on for about 15 seconds and then
fade out. If you insert the key into the
ignition switch during this time, the light
will start to fade out immediately.
Be sure the doors are locked after you
operate the “LOCK” button (1). If no door is
opened within about 30 seconds after the
“UNLOCK” button (2) is operated, the
doors will automatically lock again.NOTE:
• The maximum operating distance of the
keyless entry system transmitter is about
5 m (16 ft.), but this can vary depending
on the surroundings, especially near
other transmitting devices such as radio
towers or CB (Citizen’s Band) radios.
• The door locks cannot be operated with
the transmitter, if the ignition key is
inserted in the ignition switch.
• If any door is open, you cannot lock the
door by operating the transmitter, how-
ever unlock the door.
• If you lose one of the transmitters, ask
your MARUTI SUZUKI dealer as soon
as possible for a replacement. Be sure
to have your dealer program the new
transmitter code in your vehicle’s mem-
ory so that the old code is erased.Security System (Vehicle with
Keyless entry system)
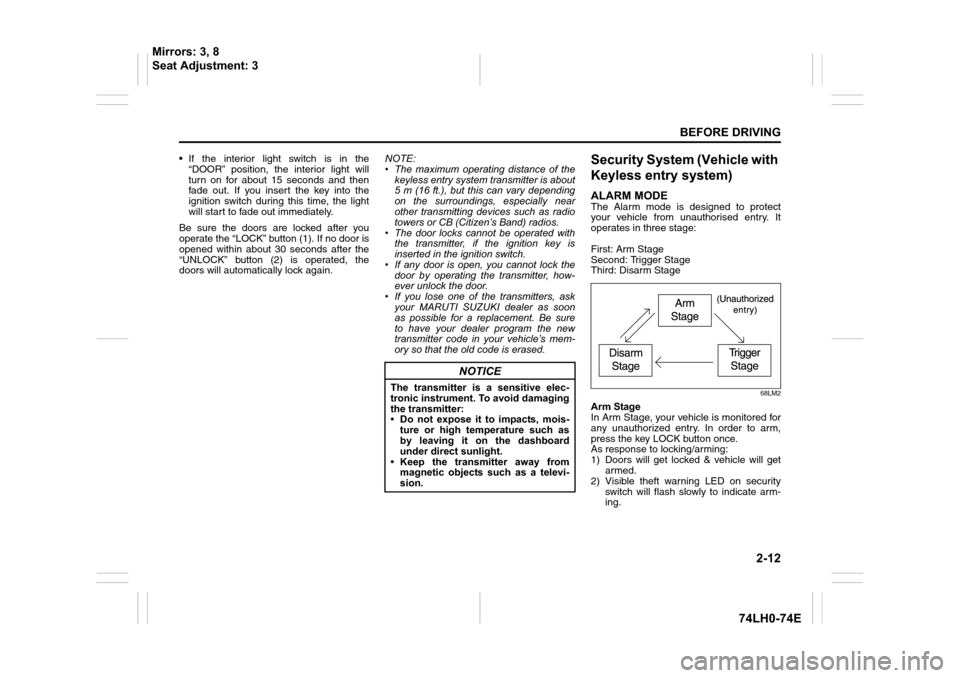
ALARM MODEThe Alarm mode is designed to protect
your vehicle from unauthorised entry. It
operates in three stage:
First: Arm Stage
Second: Trigger Stage
Third: Disarm Stage
68LM2
Arm Stage
In Arm Stage, your vehicle is monitored for
any unauthorized entry. In order to arm,
press the key LOCK button once.
As response to locking/arming:
1) Doors will get locked & vehicle will get
armed.
2) Visible theft warning LED on security
switch will flash slowly to indicate arm-
ing.
NOTICE
The transmitter is a sensitive elec-
tronic instrument. To avoid damaging
the transmitter:
• Do not expose it to impacts, mois-
ture or high temperature such as
by leaving it on the dashboard
under direct sunlight.
• Keep the transmitter away from
magnetic objects such as a televi-
sion.
Mirrors: 3, 8
Seat Adjustment: 3
Page 33 of 336
2-14
BEFORE DRIVING
74LH0-74E
GENERAL FEATURES
Illuminated Entry
When vehicle is unlocked, the room lamp
will turn ON to facilitate illuminated entry
into the vehicle. If no door is opened in
about 15 seconds of above operation,
room lamp will fade out.
If any door is opened after 15 seconds, the
room lamp turns ON again and after 15
seconds of closing all doors room lamp will
fade out.
If within 15 seconds after closing all the
doors the driver inserts the key into the key
cylinder, then the room lamp will fade out.
Illuminated Exit
When key is removed from the key cylin-
der,the room lamp will turn ON to facilitate
illuminated exit. If no door is opened in
about 15 seconds of key removal from key
cylinder, the room lamp will fade out.
When door is opened to exit the vehicle,
the room lamp will turn ON again (if it has
turned OFF after 15 seconds of key
removal from key cylinder) and will turn
OFF after 15 seconds of closing all the
doors.
If within 15 seconds of all doors closure,
vehicle is locked by pressing the LOCK
button, the room lamp will fade out.
NOTE: Room lamp will fade out gradually
approximately in 2 seconds.Mute Lock/Unlock
To Lock/Unlock the vehicle without siren
chirps use this function.
a) Press and release the Key LOCK &
UNLOCK buttons simultaneously.
b) Press and release Key LOCK or
UNLOCK button for desired function.
Example: To Lock the system without the
Siren chirp sound, press and release the
Key LOCK & UNLOCK button simultane-
ously, then press and release the Key
LOCK button once.
Auto Rearm
In case of accidental Unlock/Disarm of
vehicle by Key, vehicle will automatically
Lock & Arm within 30 sec. without any indi-
cation. Auto rearm cycle gets canceled if
user does any of the following operation
within 30sec :
1. Open any door (including back door).
2. Open Engine Hood.
3. Key On.Radio Frequency Lock Out
Key Lock/Unlock/Car locator function will
cease to function when Key is inside Key
cylinder.
68LM2
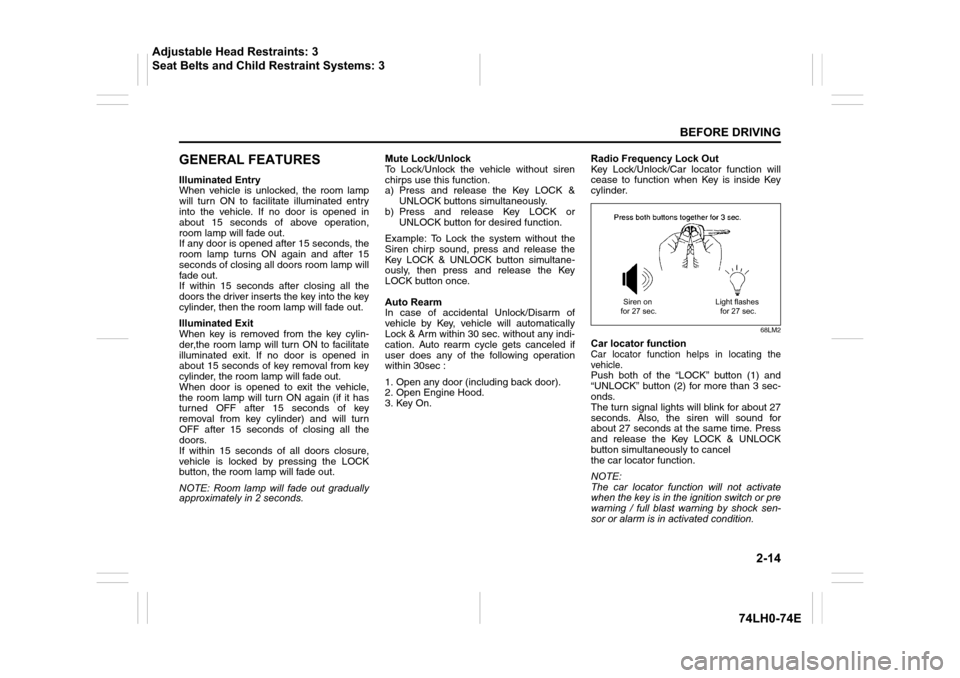
Car locator functionCar locator function helps in locating the
vehicle.
Push both of the “LOCK” button (1) and
“UNLOCK” button (2) for more than 3 sec-
onds.
The turn signal lights will blink for about 27
seconds. Also, the siren will sound for
about 27 seconds at the same time. Press
and release the Key LOCK & UNLOCK
button simultaneously to cancel
the car locator function.
NOTE:
The car locator function will not activate
when the key is in the ignition switch or pre
warning / full blast warning by shock sen-
sor or alarm is in activated condition.
Siren on
for 27 sec.Light flashes
for 27 sec.
Adjustable Head Restraints: 3
Seat Belts and Child Restraint Systems: 3
Page 34 of 336
2-15
BEFORE DRIVING
74LH0-74E
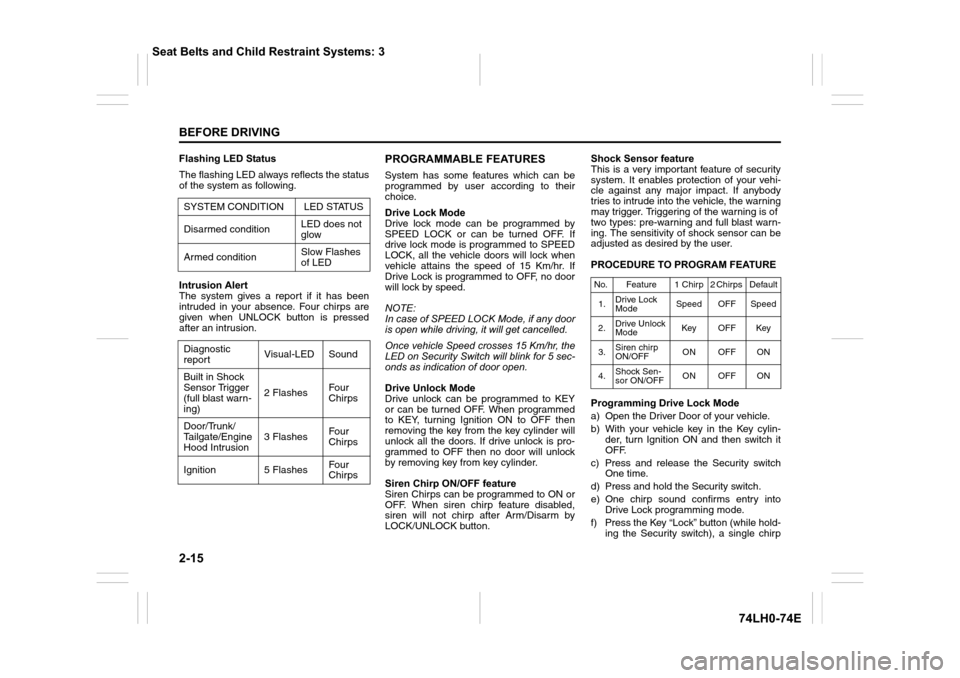
Flashing LED Status
The flashing LED always reflects the status
of the system as following.
Intrusion Alert
The system gives a report if it has been
intruded in your absence. Four chirps are
given when UNLOCK button is pressed
after an intrusion. PROGRAMMABLE FEATURES
System has some features which can be
programmed by user according to their
choice.
Drive Lock Mode
Drive lock mode can be programmed by
SPEED LOCK or can be turned OFF. If
drive lock mode is programmed to SPEED
LOCK, all the vehicle doors will lock when
vehicle attains the speed of 15 Km/hr. If
Drive Lock is programmed to OFF, no door
will lock by speed.
NOTE:
In case of SPEED LOCK Mode, if any door
is open while driving, it will get cancelled.
Once vehicle Speed crosses 15 Km/hr, the
LED on Security Switch will blink for 5 sec-
onds as indication of door open.
Drive Unlock Mode
Drive unlock can be programmed to KEY
or can be turned OFF. When programmed
to KEY, turning Ignition ON to OFF then
removing the key from the key cylinder will
unlock all the doors. If drive unlock is pro-
grammed to OFF then no door will unlock
by removing key from key cylinder.
Siren Chirp ON/OFF feature
Siren Chirps can be programmed to ON or
OFF. When siren chirp feature disabled,
siren will not chirp after Arm/Disarm by
LOCK/UNLOCK button. Shock Sensor feature
This is a very important feature of security
system. It enables protection of your vehi-
cle against any major impact. If anybody
tries to intrude into the vehicle, the warning
may trigger. Triggering of the warning is of
two types: pre-warning and full blast warn-
ing. The sensitivity of shock sensor can be
adjusted as desired by the user.
PROCEDURE TO PROGRAM FEATURE
Programming Drive Lock Mode
a) Open the Driver Door of your vehicle.
b) With your vehicle key in the Key cylin-
der, turn Ignition ON and then switch it
OFF.
c) Press and release the Security switch
One time.
d) Press and hold the Security switch.
e) One chirp sound confirms entry into
Drive Lock programming mode.
f) Press the Key “Lock” button (while hold-
ing the Security switch), a single chirp SYSTEM CONDITION LED STATUS
Disarmed conditionLED does not
glow
Armed conditionSlow Flashes
of LED
Diagnostic
reportVisual-LED Sound
Built in Shock
Sensor Trigger
(full blast warn-
ing)2 FlashesFour
Chirps
Door/Trunk/
Tailgate/Engine
Hood Intrusion3 FlashesFour
Chirps
Ignition 5 FlashesFour
Chirps
No. Feature 1 Chirp 2 Chirps Default
1.Drive Lock
ModeSpeed OFF Speed
2.Drive Unlock
ModeKey OFF Key
3.Siren chirp
ON/OFFON OFF ON
4.Shock Sen-
sor ON/OFFON OFF ON
Seat Belts and Child Restraint Systems: 3
Page 35 of 336
2-16
BEFORE DRIVING
74LH0-74E
sound confirms mode changed to
speed lock.
g) Two-Siren chirp sound confirms Drive
lock mode OFF.
h) Release the Security switch.
i) Turn the Ignition ON.
Programming Drive Unlock Mode
a) Open the Driver Door of your vehicle.
b) With your vehicle key in the Key cylin-
der, turn Ignition ON and then switch it
OFF.
c) Press and release the Security switch
two times.
d) Press and hold the Security switch.
e) Two-chirp sound confirms entry into
Drive unlock programming mode.
f) Press the Key Lock button (while hold-
ing the Security switch), a single chirp
sound confirms the mode changed to
key Unlock.
g) Two-siren chirp sound confirms the
mode changed to Drive Unlock mode
OFF.
h) Release the Security switch.
i) Turn the Ignition ON.Programming Siren Chirp ON/OFF
a) Open the Driver Door of your vehicle.
b) With your vehicle key in the Key cylin-
der, turn Ignition ON and then switch it
OFF.
c) Press and release the Security switch
Three times.
d) Press and hold the Security switch.
e) Three-chirp sound confirms entry into
Siren Chirp ON/OFF programming
mode.
f) Press the Key Lock button (while hold-
ing the Security switch), a single chirp
sound confirms the mode changed to
Siren Chirp ON.
g) Two-Siren chirp sound confirms the
mode changed to Siren Chirp OFF.
h) Release the Security switch.
i) Turn the Ignition ON.
Programming Shock Sensor ON/OFF
a) Open the Driver Door of your vehicle.
b) With your vehicle key in the Key cylin-
der, turn Ignition ON and then switch it
OFF.
c) Press and release the Security switch
Four times.
d) Press and hold the Security switch.
e) Four-chirp sound confirms entry into
Shock Sensor ON/OFF programming
mode.
f) Press the Key Lock button (while hold-
ing the Security switch), a single chirpsound confirms the mode changed to
shock sensor ON.
g) Two-Siren chirp sound confirms the
mode changed to shock sensor OFF.
h) Release the Security switch.
i) Turn the Ignition ON.
Shock Sensor Sensitivity Adjustment
via Key
Full Blast adjustment
Full Blast can be adjusted in 16 levels as
mentioned below.
a) Press Unlock button on Key to Unlock/
Disarm the System.
b) Press Lock button (within 2 seconds of
key UNLOCK) on Key to Lock/Arm the
System.
c) Within 2 sec press Lock & Unlock button
simultaneously for at least 3 sec. Siren
will give Long chirp to confirm entry into
sensitivity adjustment mode
i) Press Lock button to adjust the sen-
sitivity one step lower. Siren will give
one chirp every time lock button is
pressed till at level 1 where it will
give a long chirp. When adjusted to
level 1, Full Blast will turn OFF
ii) Press unlock button to adjust the
sensitivity one step higher. Siren will
give two chirp every time unlock but-
ton is pressed till at level 16 where it
will give a long chirp.
Seat Belts and Child Restraint Systems: 3
Page 36 of 336
2-17
BEFORE DRIVING
74LH0-74E
Pre-warn Adjustment
Pre-warn can be adjusted in 16 levels as
mentioned below:
a) Press Lock button on Key to Lock/Arm
the System
b) Press Unlock button (within 2 seconds
of key LOCK) on Key to Unlock/Disarm
the System
c) Within 2 sec press Lock & Unlock button
simultaneously for at least 3 sec. Siren
will give Long chirp to confirm entry into
Sensitivity Adjustment Mode.
i) Press Lock button to adjust the sen-
sitivity one step lower. Siren will give
one chirp every time lock button is
pressed till at level 1 where it will
give a long chirp. When adjusted to
level 1, pre-warn will turn OFF.
ii) Press Unlock button to adjust the
sensitivity one step higher. Siren will
give two Chirp every time Unlock
button is pressed till at level 16
where it will give a long chirp.
Program Customer Pin-code
(Personalized Pin-code)
If transmitter is not working properly, then it
is possible to disarm the system by Per-
sonalized pin code.
The Personalized 4-digit number can be
changed from the factory default to ensure
Personalized Security.Pin code entry
a) Disarm the system.
b) Open the Driver Door.
c) Turn Ignition ON then OFF.
d) Within 5 seconds press and release
Valet switch 5 times. A short chirp fol-
lowed by long chirps confirms entry into
Pin Code programming mode.
e) Press Lock button on Key, after a single
chirp enter the First digit (within 1-9) by
pressing Valet switch (for e.g. to enter 2
press and release Valet switch two
times).
f) Press Lock button on Key, after two
chirp enter the Second digit (within 1-9)
by pressing Valet switch.
g) Press Lock button on Key, after 3-chirps
enter the Third digit (within 1-9) by
pressing Valet switch.
h) Press Lock button on Key, after 4-chirps
enter the Fourth digit (within 1-9) by
pressing Valet switch.
Emergency Disarm by Personalized pin
code
The Personalized 4- Digit Pin Code acts as
a secret Key, to Emergency Disarm the
vehicle.
a) Turn the Ignition ON, OFF and then ON.
b) Enter the First digit (for e. g. to enter 2
press and release Valet switch twice)
c) Turn the Ignition OFF then ON.
d) Enter the Second digit.e) Turn the Ignition OFF and then ON.
f) Enter the Third Digit.
g) Turn the Ignition OFF and then ON
h) Enter the Last Digit.
i) Turn the Ignition OFF and then ON.
j) The vehicle will get disarmed.
NOTE:
The default pin will be provided by the
dealer at the time of delivery. It is recom-
mended to personalize the pin for
increased security. The pin must be
remembered as it is not possible to retrieve
a lost pin.
Seat Belts and Child Restraint Systems: 3