Fuel System SUZUKI SX4 2006 1.G Service User Guide
[x] Cancel search | Manufacturer: SUZUKI, Model Year: 2006, Model line: SX4, Model: SUZUKI SX4 2006 1.GPages: 1556, PDF Size: 37.31 MB
Page 47 of 1556
Downloaded from www.Manualslib.com manuals search engine Table of Contents 1-iii
EGR Valve Removal and Installation (If
Equipped).......................................................... 1B-4
EGR Valve Inspection (If Equipped) ................... 1B-4
PCV Hose Inspection .......................................... 1B-5
PCV Valve Inspection ......................................... 1B-5
Special Tools and Equipment ............................. 1B-5
Special Tool ........................................................ 1B-5
Engine Electrical Devices ....................... 1C-1
Repair Instructions .............................................. 1C-1
Engine Control Module (ECM) Removal and
Installation ......................................................... 1C-1
Manifold Absolute Pressure (MAP) Sensor
Inspection (If Equipped) .................................... 1C-2
Electric Throttle Body Assembly On-Vehicle
Inspection.......................................................... 1C-2
Electric Throttle Body System Calibration ........... 1C-5
Accelerator Pedal Position (APP) Sensor
Assembly On-Vehicle Inspection ...................... 1C-5
Accelerator Pedal Position (APP) Sensor
Assembly Removal and Installation .................. 1C-5
Accelerator Pedal Position (APP) Sensor
Assembly Inspection ......................................... 1C-6
Engine Coolant Temperature (ECT) Sensor
Removal and Installation................................... 1C-7
Engine Coolant Temperature (ECT) Sensor
Inspection.......................................................... 1C-7
Heated Oxygen Sensor (HO2S-1 and HO2S-
2) Heater On-Vehicle Inspection (If
Equipped).......................................................... 1C-8
Heated Oxygen Sensor (HO2S-1 and HO2S-
2) Removal and Installation (If Equipped) ......... 1C-8
Camshaft Position (CMP) Sensor Removal
and Installation .................................................. 1C-9
Camshaft Position (CMP) Sensor Inspection ...... 1C-9
Crankshaft Position (CKP) Sensor Removal
and Installation ................................................ 1C-10
Crankshaft Position (CKP) Sensor Inspection .. 1C-11
Knock Sensor Removal and Installation ........... 1C-11
Main Relay, Fuel Pump Relay, Starting Motor
Control Relay, Throttle Actuator Control
Relay and Radiator Cooling Fan Relay
Inspection........................................................ 1C-12
Mass Air Flow (MAF) and Intake Air
Temperature (IAT) Sensor On-Vehicle
Inspection........................................................ 1C-12
Mass Air Flow (MAF) and Intake Air
Temperature (IAT) Sensor Removal and
Installation ....................................................... 1C-13
Intake Air Temperature (IAT) Sensor
Inspection........................................................ 1C-13
Specifications..................................................... 1C-14
Tightening Torque Specifications ...................... 1C-14
Engine Mechanical .................................. 1D-1
General Description ............................................. 1D-1
Engine Construction Description ......................... 1D-1
Camshaft Position Control (VVT Variable
Valve Timing) System Description .................... 1D-3Diagnostic Information and Procedures ............1D-5
Compression Check ............................................1D-5
Engine Vacuum Check........................................1D-6
Valve Lash (Clearance) Inspection .....................1D-7
Repair Instructions ............................................1D-10
Air Intake System Components.........................1D-10
Air Cleaner Filter Removal and Installation .......1D-10
Air Cleaner Filter Inspection and Cleaning........1D-10
Air Cleaner Assembly Removal and
Installation .......................................................1D-11
Cylinder Head Cover Removal and
Installation .......................................................1D-11
Throttle Body and Intake Manifold
Components ....................................................1D-13
Throttle Body On-Vehicle Inspection.................1D-14
Electric Throttle Body Assembly Removal and
Installation .......................................................1D-14
Throttle Body Cleaning......................................1D-14
Intake Manifold Removal and Installation .........1D-15
Engine Mountings Components ........................1D-16
Engine Assembly Removal and Installation ......1D-17
Timing Chain Cover Components .....................1D-22
Timing Chain Cover Removal and Installation ..1D-23
Timing Chain Cover Inspection .........................1D-25
Oil Control Valve Removal and Installation
(For Engine with VVT) .....................................1D-26
Oil Control Valve Inspection (For Engine with
VVT) ................................................................1D-26
Timing Chain and Chain Tensioner
Components ....................................................1D-27
Timing Chain and Chain Tensioner Removal
and Installation ................................................1D-27
Timing Chain and Chain Tensioner Inspection ..1D-31
Camshaft, Tappet and Shim Components ........1D-32
Camshaft, Tappet and Shim Removal and
Installation .......................................................1D-33
Camshaft, Tappet and Shim Inspection ............1D-36
Valves and Cylinder Head Components ...........1D-39
Valves and Cylinder Head Removal and
Installation .......................................................1D-40
Valves and Cylinder Head Disassembly and
Assembly.........................................................1D-42
Valves and Valve Guides Inspection.................1D-45
Cylinder Head Inspection ..................................1D-47
Valve Spring Inspection ....................................1D-48
Pistons, Piston Rings, Connecting Rods and
Cylinders Components ....................................1D-49
Pistons, Piston Rings, Connecting Rods and
Cylinders Removal and Installation .................1D-49
Pistons, Piston Rings, Connecting Rods and
Cylinders Disassembly and Assembly ............1D-51
Cylinders, Pistons and Piston Rings
Inspection ........................................................1D-52
Piston Pins and Connecting Rods Inspection ...1D-54
Crank Pin and Connecting Rod Bearings
Inspection ........................................................1D-55
Main Bearings, Crankshaft and Cylinder
Block Components ..........................................1D-59
Main Bearings, Crankshaft and Cylinder
Block Removal and Installation .......................1D-60
Page 48 of 1556
Downloaded from www.Manualslib.com manuals search engine 1-iv Table of Contents
Crankshaft Inspection .......................................1D-63
Main Bearings Inspection ..................................1D-65
Sensor Plate Inspection ....................................1D-70
Rear Oil Seal Inspection ...................................1D-70
Flywheel Inspection...........................................1D-70
Cylinder Block Inspection ..................................1D-70
Specifications .....................................................1D-71
Tightening Torque Specifications ......................1D-71
Special Tools and Equipment ...........................1D-73
Recommended Service Material .......................1D-73
Special Tool ......................................................1D-73
Engine Lubrication System.....................1E-1
General Description ............................................. 1E-1
Engine Lubrication Description ........................... 1E-1
Diagnostic Information and Procedures ............ 1E-2
Oil Pressure Check ............................................. 1E-2
Repair Instructions .............................................. 1E-3
Oil Pan and Oil Pump Strainer Components....... 1E-3
Oil Pan and Oil Pump Strainer Removal and
Installation ......................................................... 1E-4
Oil Pan and Oil Pump Strainer Cleaning ............. 1E-5
Oil Pump Components ........................................ 1E-6
Oil Pump Removal and Installation ..................... 1E-6
Oil Pump Disassembly and Reassembly ............ 1E-6
Oil Pump Inspection ............................................ 1E-7
Specifications ....................................................... 1E-9
Tightening Torque Specifications ........................ 1E-9
Special Tools and Equipment ............................. 1E-9
Recommended Service Material ......................... 1E-9
Special Tool ........................................................ 1E-9
Engine Cooling System ........................... 1F-1
General Description ............................................. 1F-1
Cooling System Description ................................ 1F-1
Coolant Description ............................................. 1F-1
Schematic and Routing Diagram ........................ 1F-2
Coolant Circulation .............................................. 1F-2
Diagnostic Information and Procedures ............ 1F-3
Engine Cooling Symptom Diagnosis ................... 1F-3
Repair Instructions .............................................. 1F-4
Cooling System Components.............................. 1F-4
Coolant Level Check ........................................... 1F-5
Engine Cooling System Inspection and
Cleaning ............................................................ 1F-5
Cooling System Draining..................................... 1F-5
Cooling System Flush and Refill ......................... 1F-6
Cooling Water Pipes or Hoses Removal and
Installation ......................................................... 1F-6
Thermostat Removal and Installation.................. 1F-7
Thermostat Inspection......................................... 1F-7
Radiator Cooling Fan Assembly On-Vehicle
Inspection .......................................................... 1F-8
Radiator Cooling Fan Relay Inspection............... 1F-8
Radiator Cooling Fan Assembly Removal and
Installation ......................................................... 1F-8
Radiator Cooling Fan Disassembly and
Reassembly ...................................................... 1F-9
Radiator On-Vehicle Inspection and Cleaning .... 1F-9Radiator Removal and Installation ...................... 1F-9
Water Pump / Generator Drive Belt Tension
Inspection and Adjustment.............................. 1F-10
Water Pump / Generator Drive Belt Removal
and Installation ................................................ 1F-10
Water Pump Removal and Installation .............. 1F-11
Water Pump Inspection ..................................... 1F-12
Specifications ..................................................... 1F-12
Tightening Torque Specifications ...................... 1F-12
Special Tools and Equipment ........................... 1F-12
Recommended Service Material ....................... 1F-12
Fuel System ............................................. 1G-1
Precautions .......................................................... 1G-1
Precautions on Fuel System Service ................. 1G-1
General Description ............................................ 1G-2
Fuel System Description .................................... 1G-2
Fuel Delivery System Description ...................... 1G-2
Fuel Pump Description ....................................... 1G-2
Schematic and Routing Diagram ....................... 1G-3
Fuel Delivery System Diagram........................... 1G-3
Diagnostic Information and Procedures ........... 1G-3
Fuel Pressure Inspection ................................... 1G-3
Fuel Cut Operation Inspection ........................... 1G-4
Repair Instructions ............................................. 1G-5
Fuel System Components .................................. 1G-5
Fuel Hose Disconnecting and Reconnecting ..... 1G-6
Fuel Pressure Relief Procedure ......................... 1G-7
Fuel Leakage Check Procedure......................... 1G-8
Fuel Lines On-Vehicle Inspection ...................... 1G-8
Fuel Pipe Removal and Installation.................... 1G-8
Fuel Injector On-Vehicle Inspection ................... 1G-9
Fuel Injector Removal and Installation ............... 1G-9
Fuel Injector Inspection .................................... 1G-10
Fuel Filler Cap Inspection ................................ 1G-12
Fuel Tank Inlet Valve Removal and
Installation ...................................................... 1G-12
Fuel Tank Inlet Valve Inspection ...................... 1G-12
Fuel Tank Removal and Installation ................. 1G-13
Fuel Tank Inspection ........................................ 1G-14
Fuel Tank Purging Procedure .......................... 1G-15
Fuel Pump On-Vehicle Inspection.................... 1G-15
Fuel Pump Assembly Removal and
Installation ...................................................... 1G-15
Main Fuel Level Sensor Removal and
Installation ...................................................... 1G-16
Fuel Pump Inspection ...................................... 1G-17
Specifications .................................................... 1G-17
Tightening Torque Specifications ..................... 1G-17
Special Tools and Equipment .......................... 1G-18
Special Tool ..................................................... 1G-18
Ignition System ........................................ 1H-1
General Description .............................................1H-1
Ignition System Construction ..............................1H-1
Schematic and Routing Diagram ........................1H-2
Ignition System Wiring Circuit Diagram...............1H-2
Component Location ...........................................1H-3
Ignition System Components Location................1H-3
Page 50 of 1556
Downloaded from www.Manualslib.com manuals search engine 1-1 Precautions:
Engine
Precautions
Precautions
Precautions for EngineS6RW0D1000001
Air Bag Warning
Refer to “Air Bag Warning in Section 00”.
Precautions on Engine Service
Refer to “Precautions on Engine Service in Section 1A”.
Precautions in Diagnosing Trouble
Refer to “Precautions in Diagnosing Trouble in Section 1A”.
Precautions of ECM Circuit Inspection
Refer to “Precautions of ECM Circuit Inspection in Section 1A”.
Precautions on Fuel System Service
Refer to “Precautions on Fuel System Service in Section 1G”.
Precaution for CAN Communication System
Refer to “Precaution for CAN Communication System in Section 00”.
Precautions for Catalytic Converter
Refer to “Precautions for Catalytic Converter in Section 00”.
Precautions for Electrical Circuit Service
Refer to “Precautions for Electrical Circuit Service in Section 00”.
Page 52 of 1556
Downloaded from www.Manualslib.com manuals search engine 1A-2 Engine General Information and Diagnosis:
• When checking ECM for DTC, keep in mind that DTC
is displayed on the scan tool as follows depending on
the scan tool used.
– SUZUKI scan tool displays DTC detected by ECM.
– CAN communication OBD generic scan tool
displays DTC detected by each of ECM and TCM
(for A/T model) simultaneously.
• Priorities for diagnosing troubles
If two or more DTCs are stored, proceed to the DTC
flow which has been detected earliest in the order and
follow the instruction in that flow.
If no instructions are given, troubleshoot DTCs
according to the following priorities.
a. DTCs other than DTC P0171 / P0172 (Fuel
system too lean / too rich), DTC P0300 / P0301 /
P0302 / P0303 / P0304 (Misfire detected) and
DTC P0401 / P0402 (EGR flow malfunction)
b. DTC P0171 / P0172 (Fuel system too lean / too
rich) and DTC P0401 / P0402 (EGR flow
malfunction)
c. DTC P0300 / P0301 / P0302 / P0303 / P0304
(Misfire detected)
• Be sure to read “Precautions for Electrical Circuit
Service in Section 00” before inspection and observe
what is written there.
• ECM replacement:
When substituting a known-good ECM, check for the
following conditions. Neglecting this check may cause
damage to a known-good ECM.
– Resistance value of all relays, actuators is as
specified respectively.
– MAP sensor, A/C refrigerant pressure sensor (if
equipped with A/C), accelerator pedal position
(APP) sensor and TP sensor are in good condition
and none of power circuits of these sensors is
shorted to ground.
• Communication of ECM, BCM, combination meter,
keyless start control module (if equipped with keyless
start control system), 4WD control module (if
equipped), TCM (for A/T model) and ABS control
module, is established by CAN (Controller Area
Network). (For more detail of CAN communication for
ECM, refer to “CAN Communication System
Description”). Therefore, handle CAN communication
line with care referring to “Precaution for CAN
Communication System in Section 00”.
• Immobilizer transponder code registration after
replacing ECM (Immobilizer model)
When ECM is replaced with new one or with another
one, make sure to register immobilizer transponder
code to ECM correctly according to “Procedure after
ECM Replacement in Section 10C”.Precautions for DTC TroubleshootingS6RW0D1100003
• Before performed trouble shooting, be sure to read
the “Precautions of ECM Circuit Inspection”.
• When measuring circuit voltage, resistance and/or
pulse signal at ECM connector, connect the special
tool to ECM and/or the ECM connectors referring to
“Inspection of ECM and Its Circuits”.
• Upon completion of inspection and repair work,
perform “DTC Confirmation Procedure” and confirm
that the trouble has been corrected.
Precautions of ECM Circuit InspectionS6RW0D1100004
• ECM connectors are waterproofed. Each terminal of
the ECM connectors is sealed up with the grommet.
Therefore, when measuring circuit voltage, resistance
and/or pulse signal at ECM connector, do not insert
the tester’s probe into the sealed terminal at the
harness side. When measuring circuit voltage,
resistance and/or pulse signal at ECM connector,
connect the special tool to the ECM connectors. And,
insert the tester’s probe into the special tool’s
connectors at the harness side, and then measure
voltage, resistance and/or pulse signal. Or, ECM and
its circuits may be damaged by water.
• Wire colors of the special tool’s connectors are
different from the ones of the ECM connectors.
However, the circuit arrangement of the special tool’s
connectors is same as the one of the ECM
connectors. Therefore, measure circuit voltage and
resistance by identifying the terminal location subject
to the measurement.
Precautions of Electric Throttle Body System
Calibration
S6RW0D1100005
After performing one of works described below, it is
necessary to re-register the completely closed throttle
valve reference position stored in memory of ECM. (For
detailed information, refer to “Description of Electric
Throttle Body System Calibration”.) For the procedure to
register such data in ECM, refer to “Electric Throttle
Body System Calibration in Section 1C”.
• To shut off backup power of ECM for such purposes of
battery replacement or “DOME” fuse removal
• To erase DTCs P0122, P0123, P0222, P0223, P2101,
P2102, P2103, P2111, P2112, P2119 and/or P2135
• To replace ECM
• To replace throttle body and/or accelerator pedal
position (APP) sensor assembly
Page 56 of 1556
Downloaded from www.Manualslib.com manuals search engine 1A-6 Engine General Information and Diagnosis:
• As a condition for detecting a malfunction in some
areas in the system being monitored by ECM and
turning ON the malfunction indicator lamp (1) due to
that malfunction, 2 driving cycle detection logic is
adopted to prevent erroneous detection.
• When a malfunction is detected, engine and driving
conditions then are stored in ECM memory as freeze
frame data. (For the details, refer to description on
“Freeze Frame Data: ”.)
• It is possible to communicate via DLC (3) by using not
only SUZUKI scan tool (2) but also CAN
communication OBD generic scan tool. (Diagnostic
information can be accessed by using a scan tool.)
Warm-Up Cycle
A warm-up cycle means sufficient vehicle operation such
that the coolant temperature has risen by at least 22 °C
(40 °F) from engine starting and reaches a minimum
temperature of 70 °C (160 °F).
Driving Cycle
A “Driving Cycle” consists of engine startup and engine
shutoff.2 Driving Cycle Detection Logic
The malfunction detected in the first driving cycle is
stored in ECM memory (in the form of pending DTC) but
the malfunction indicator lamp does not light at this time.
It lights up at the second detection of same malfunction
also in the next driving cycle.
Pending DTC
Pending DTC means a DTC detected and stored
temporarily at 1 driving cycle of the DTC which is
detected in the 2 driving cycle detection logic.
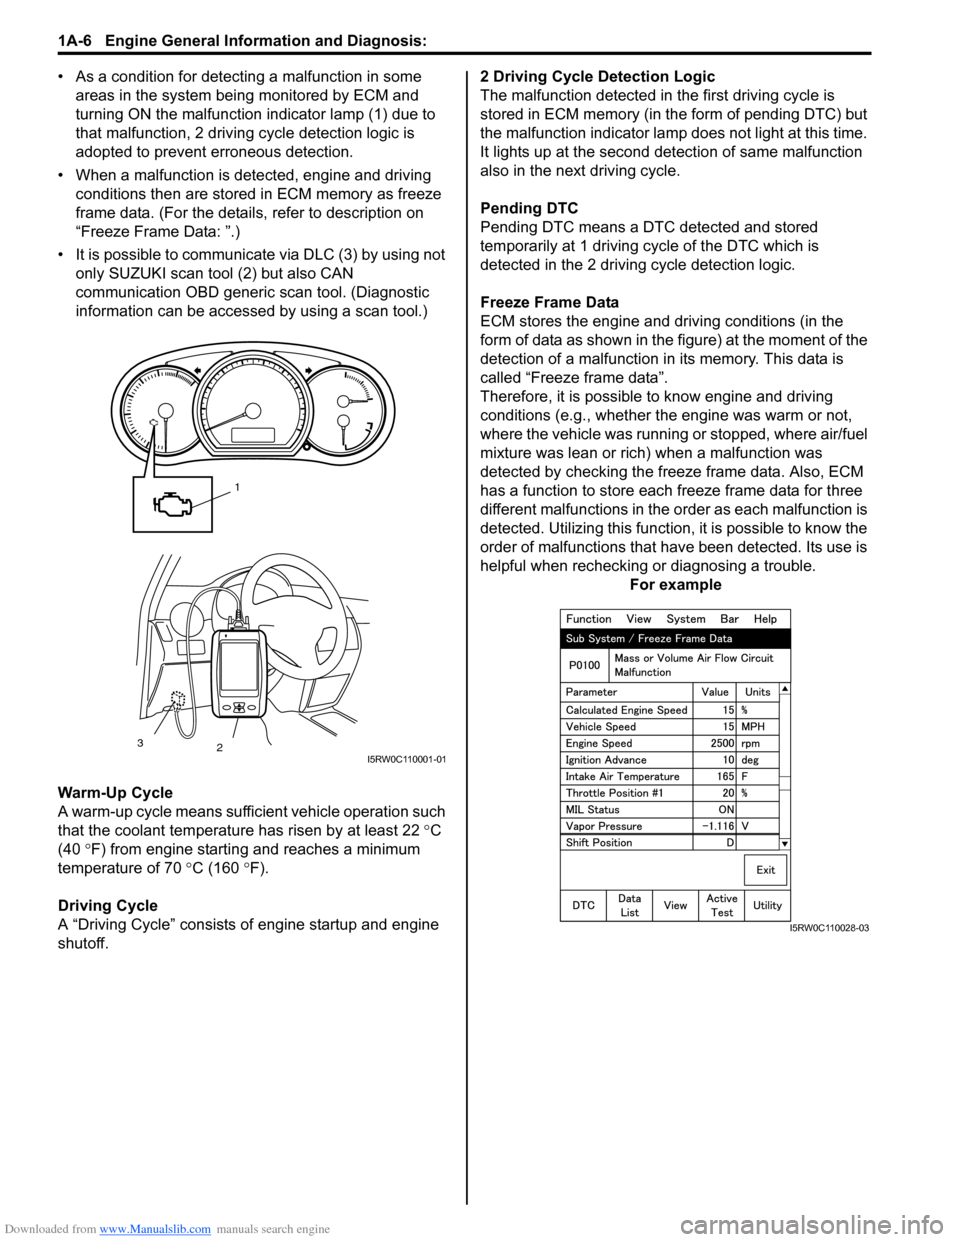
Freeze Frame Data
ECM stores the engine and driving conditions (in the
form of data as shown in the figure) at the moment of the
detection of a malfunction in its memory. This data is
called “Freeze frame data”.
Therefore, it is possible to know engine and driving
conditions (e.g., whether the engine was warm or not,
where the vehicle was running or stopped, where air/fuel
mixture was lean or rich) when a malfunction was
detected by checking the freeze frame data. Also, ECM
has a function to store each freeze frame data for three
different malfunctions in the order as each malfunction is
detected. Utilizing this function, it is possible to know the
order of malfunctions that have been detected. Its use is
helpful when rechecking or diagnosing a trouble.
For example
1
2 3
I5RW0C110001-01
I5RW0C110028-03
Page 57 of 1556
Downloaded from www.Manualslib.com manuals search engine Engine General Information and Diagnosis: 1A-7
Priority of freeze frame data:
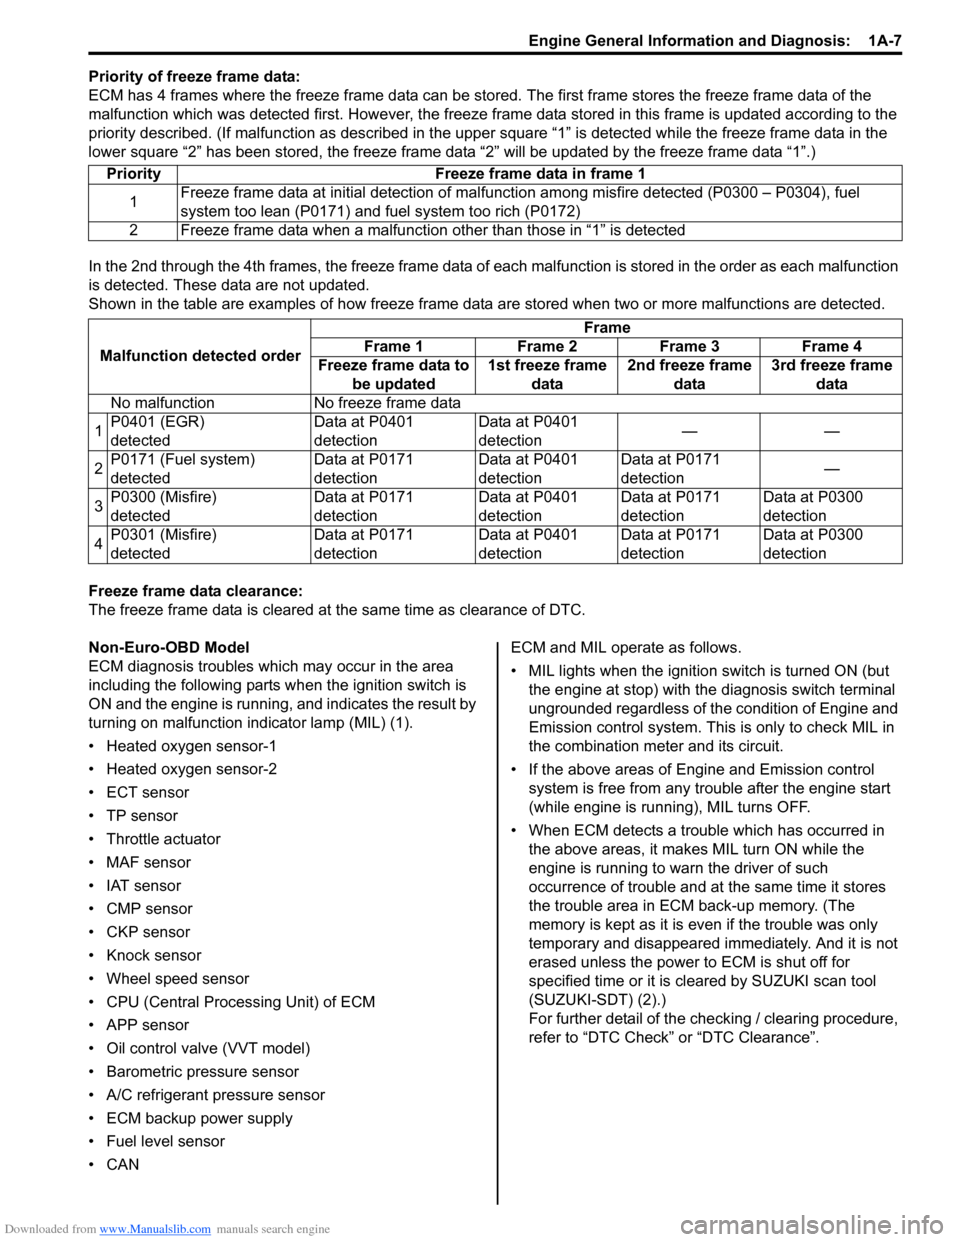
ECM has 4 frames where the freeze frame data can be stored. The first frame stores the freeze frame data of the
malfunction which was detected first. However, the freeze frame data stored in this frame is updated according to the
priority described. (If malfunction as described in the upper square “1” is detected while the freeze frame data in the
lower square “2” has been stored, the freeze frame data “2” will be updated by the freeze frame data “1”.)
In the 2nd through the 4th frames, the freeze frame data of each malfunction is stored in the order as each malfunction
is detected. These data are not updated.
Shown in the table are examples of how freeze frame data are stored when two or more malfunctions are detected.
Freeze frame data clearance:
The freeze frame data is cleared at the same time as clearance of DTC.
Non-Euro-OBD Model
ECM diagnosis troubles which may occur in the area
including the following parts when the ignition switch is
ON and the engine is running, and indicates the result by
turning on malfunction indicator lamp (MIL) (1).
• Heated oxygen sensor-1
• Heated oxygen sensor-2
• ECT sensor
•TP sensor
• Throttle actuator
• MAF sensor
• IAT sensor
• CMP sensor
• CKP sensor
• Knock sensor
• Wheel speed sensor
• CPU (Central Processing Unit) of ECM
• APP sensor
• Oil control valve (VVT model)
• Barometric pressure sensor
• A/C refrigerant pressure sensor
• ECM backup power supply
• Fuel level sensor
•CANECM and MIL operate as follows.
• MIL lights when the ignition switch is turned ON (but
the engine at stop) with the diagnosis switch terminal
ungrounded regardless of the condition of Engine and
Emission control system. This is only to check MIL in
the combination meter and its circuit.
• If the above areas of Engine and Emission control
system is free from any trouble after the engine start
(while engine is running), MIL turns OFF.
• When ECM detects a trouble which has occurred in
the above areas, it makes MIL turn ON while the
engine is running to warn the driver of such
occurrence of trouble and at the same time it stores
the trouble area in ECM back-up memory. (The
memory is kept as it is even if the trouble was only
temporary and disappeared immediately. And it is not
erased unless the power to ECM is shut off for
specified time or it is cleared by SUZUKI scan tool
(SUZUKI-SDT) (2).)
For further detail of the checking / clearing procedure,
refer to “DTC Check” or “DTC Clearance”. Priority Freeze frame data in frame 1
1Freeze frame data at initial detection of malfunction among misfire detected (P0300 – P0304), fuel
system too lean (P0171) and fuel system too rich (P0172)
2 Freeze frame data when a malfunction other than those in “1” is detected
Malfunction detected orderFrame
Frame 1 Frame 2 Frame 3 Frame 4
Freeze frame data to
be updated1st freeze frame
data2nd freeze frame
data3rd freeze frame
data
No malfunction No freeze frame data
1P0401 (EGR)
detectedData at P0401
detectionData at P0401
detection——
2P0171 (Fuel system)
detectedData at P0171
detectionData at P0401
detectionData at P0171
detection—
3P0300 (Misfire)
detectedData at P0171
detectionData at P0401
detectionData at P0171
detectionData at P0300
detection
4P0301 (Misfire)
detectedData at P0171
detectionData at P0401
detectionData at P0171
detectionData at P0300
detection
Page 58 of 1556
Downloaded from www.Manualslib.com manuals search engine 1A-8 Engine General Information and Diagnosis:
For information about the following items, refer to “Euro
OBD model: ”.
• Warm-up cycle
• Driving cycle
• 2 driving cycle detection logic
• Pending DTC
Data Link Connector (DLC)S6RW0D1101011
NOTE
There are two types of OBD system
depending on the vehicle specification.
For identification, refer to “Precaution on On-
Board Diagnostic (OBD) System”.
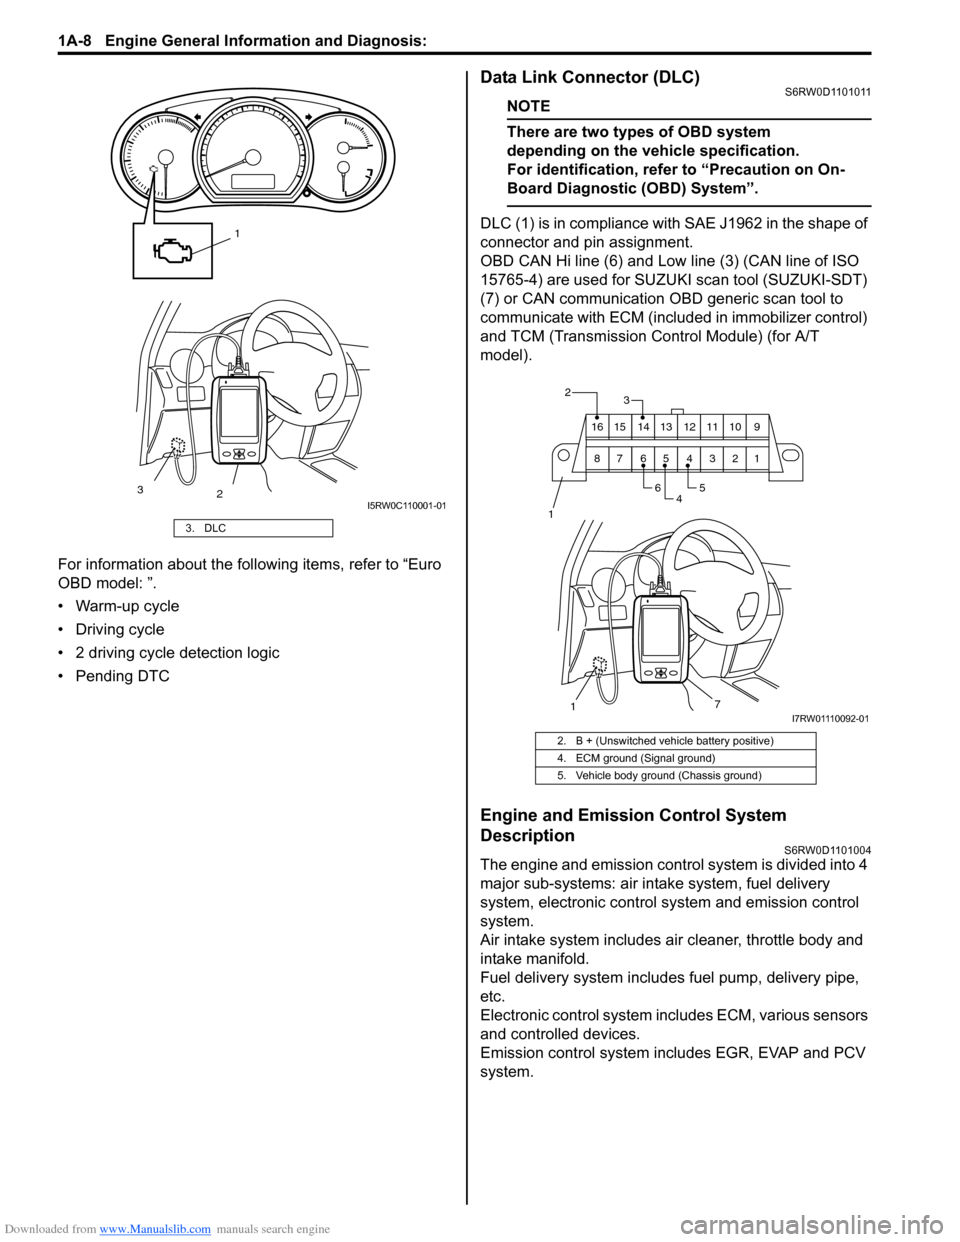
DLC (1) is in compliance with SAE J1962 in the shape of
connector and pin assignment.
OBD CAN Hi line (6) and Low line (3) (CAN line of ISO
15765-4) are used for SUZUKI scan tool (SUZUKI-SDT)
(7) or CAN communication OBD generic scan tool to
communicate with ECM (included in immobilizer control)
and TCM (Transmission Control Module) (for A/T
model).
Engine and Emission Control System
Description
S6RW0D1101004
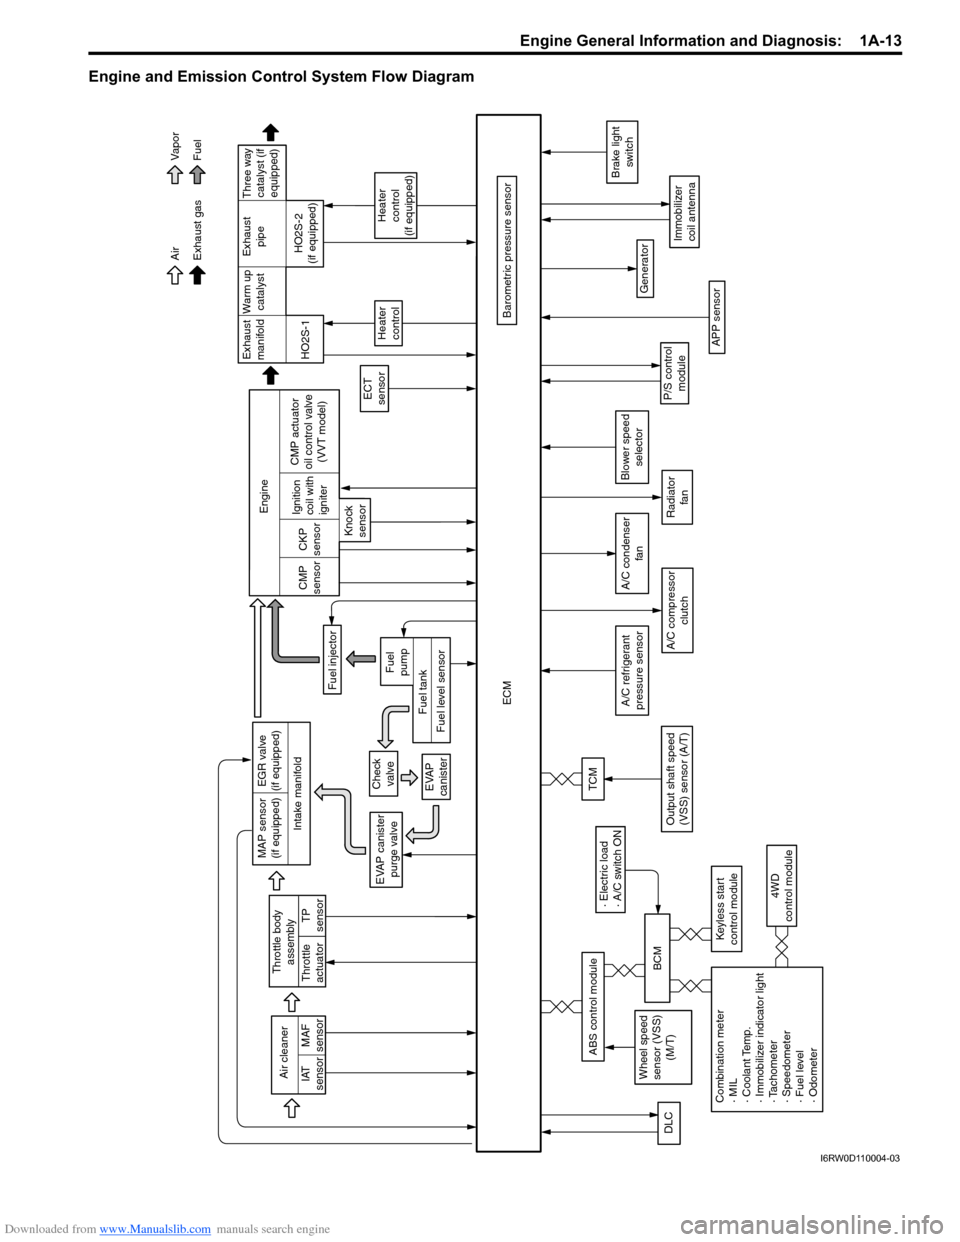
The engine and emission control system is divided into 4
major sub-systems: air intake system, fuel delivery
system, electronic control system and emission control
system.
Air intake system includes air cleaner, throttle body and
intake manifold.
Fuel delivery system includes fuel pump, delivery pipe,
etc.
Electronic control system includes ECM, various sensors
and controlled devices.
Emission control system includes EGR, EVAP and PCV
system.
3. DLC
1
2 3
I5RW0C110001-01
2. B + (Unswitched vehicle battery positive)
4. ECM ground (Signal ground)
5. Vehicle body ground (Chassis ground)
2
45 6
1
9 10 11 12 13 14 15 16
1 2 3 4 5 6 7 8
7
3
1I7RW01110092-01
Page 62 of 1556
Downloaded from www.Manualslib.com manuals search engine 1A-12 Engine General Information and Diagnosis:
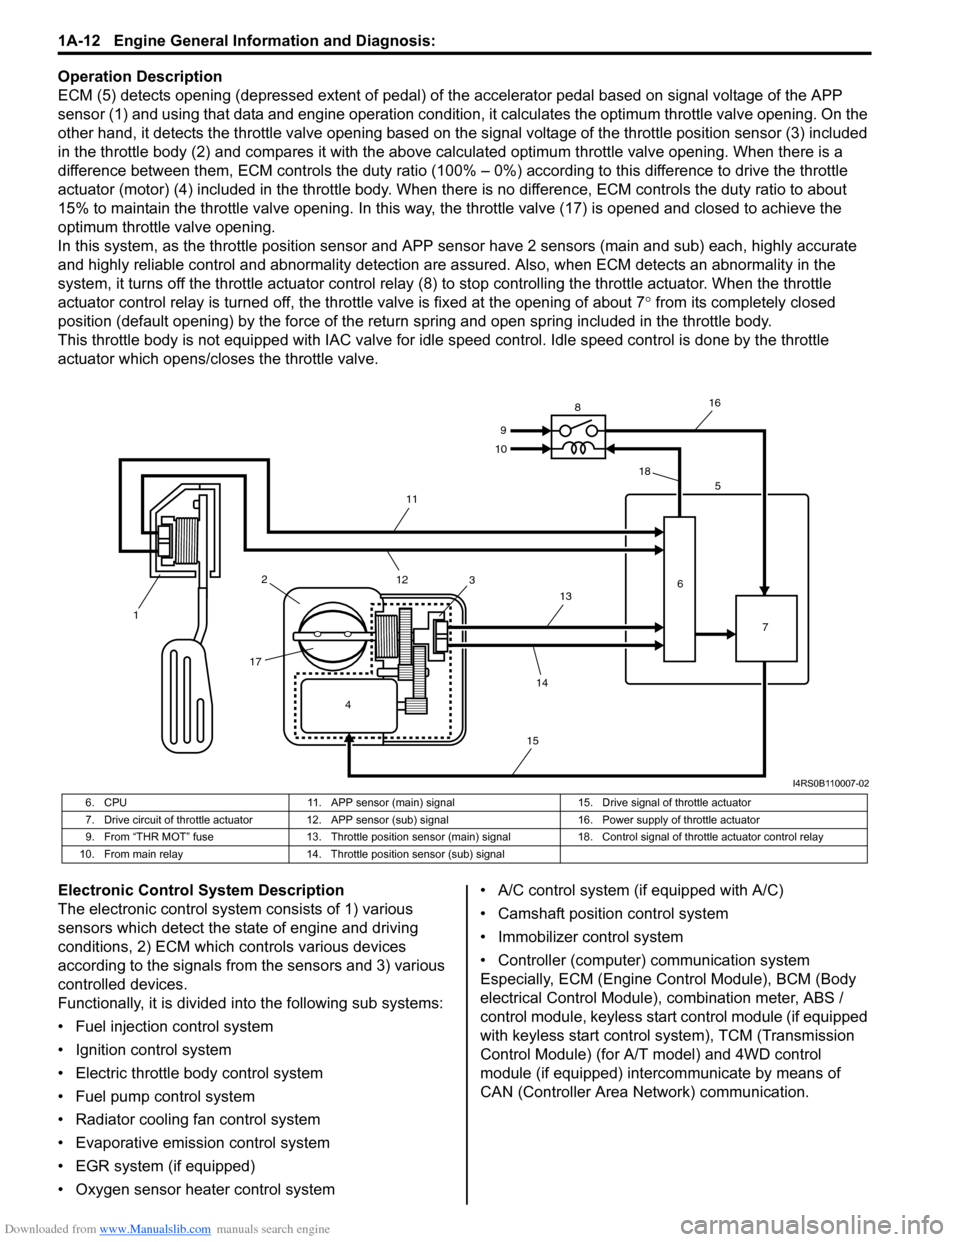
Operation Description
ECM (5) detects opening (depressed extent of pedal) of the accelerator pedal based on signal voltage of the APP
sensor (1) and using that data and engine operation condition, it calculates the optimum throttle valve opening. On the
other hand, it detects the throttle valve opening based on the signal voltage of the throttle position sensor (3) included
in the throttle body (2) and compares it with the above calculated optimum throttle valve opening. When there is a
difference between them, ECM controls the duty ratio (100% – 0%) according to this difference to drive the throttle
actuator (motor) (4) included in the throttle body. When there is no difference, ECM controls the duty ratio to about
15% to maintain the throttle valve opening. In this way, the throttle valve (17) is opened and closed to achieve the
optimum throttle valve opening.
In this system, as the throttle position sensor and APP sensor have 2 sensors (main and sub) each, highly accurate
and highly reliable control and abnormality detection are assured. Also, when ECM detects an abnormality in the
system, it turns off the throttle actuator control relay (8) to stop controlling the throttle actuator. When the throttle
actuator control relay is turned off, the throttle valve is fixed at the opening of about 7° from its completely closed
position (default opening) by the force of the return spring and open spring included in the throttle body.
This throttle body is not equipped with IAC valve for idle speed control. Idle speed control is done by the throttle
actuator which opens/closes the throttle valve.
Electronic Control System Description
The electronic control system consists of 1) various
sensors which detect the state of engine and driving
conditions, 2) ECM which controls various devices
according to the signals from the sensors and 3) various
controlled devices.
Functionally, it is divided into the following sub systems:
• Fuel injection control system
• Ignition control system
• Electric throttle body control system
• Fuel pump control system
• Radiator cooling fan control system
• Evaporative emission control system
• EGR system (if equipped)
• Oxygen sensor heater control system• A/C control system (if equipped with A/C)
• Camshaft position control system
• Immobilizer control system
• Controller (computer) communication system
Especially, ECM (Engine Control Module), BCM (Body
electrical Control Module), combination meter, ABS /
control module, keyless start control module (if equipped
with keyless start control system), TCM (Transmission
Control Module) (for A/T model) and 4WD control
module (if equipped) intercommunicate by means of
CAN (Controller Area Network) communication.
4 12
1735
6
7 8
9
10
11
12
13
14
1516
18
I4RS0B110007-02
6. CPU 11. APP sensor (main) signal 15. Drive signal of throttle actuator
7. Drive circuit of throttle actuator 12. APP sensor (sub) signal 16. Power supply of throttle actuator
9. From “THR MOT” fuse 13. Throttle position sensor (main) signal 18. Control signal of throttle actuator control relay
10. From main relay 14. Throttle position sensor (sub) signal
Page 63 of 1556
Downloaded from www.Manualslib.com manuals search engine Engine General Information and Diagnosis: 1A-13
Engine and Emission Control System Flow Diagram
Intake manifoldExhaust
manifold
Exhaust gas Air
Fuel Vapor
War m up
catalystExhaust
pipe
EVAP canister
purge valve
Fuel injector
ECT
sensor
ECM
Heater
control
Heater
control
(if equipped)
Barometric pressure sensor HO2S-1HO2S-2
(if equipped) Engine
CMP
sensorCKP
sensor
Knock
sensorIgnition
coil with
igniter
APP sensor
A/C compressor
clutch
Generator
Immobilizer
coil antenna
P/S control
module
Brake light
switch
Air cleaner
IAT
sensorMAF
sensor
A/C refrigerant
pressure sensor
TP
sensor Throttle body
assembly
Throttle
actuator
A/C condenser
fan
DLC
Radiator
fan
Combination meter
· MIL
· Coolant Temp.
· Immobilizer indicator light
· Tachometer
· Speedometer
· Fuel level
· Odometer4WD
control module
Wheel speed
sensor (VSS)
(M/T)
· Electric load
· A/C switch ON
BCM
Keyless start
control module
ABS control module
Blower speed
selector
MAP sensor
(if equipped)EGR valve
(if equipped)
Check
valve
EVAP
canister
Fuel level sensorFuel tankFuel
pump
CMP actuator
oil control valve
(VVT model)
TCM
Output shaft speed
(VSS) sensor (A/T)
Three way
catalyst (if
equipped)
I6RW0D110004-03
Page 66 of 1556
Downloaded from www.Manualslib.com manuals search engine 1A-16 Engine General Information and Diagnosis:
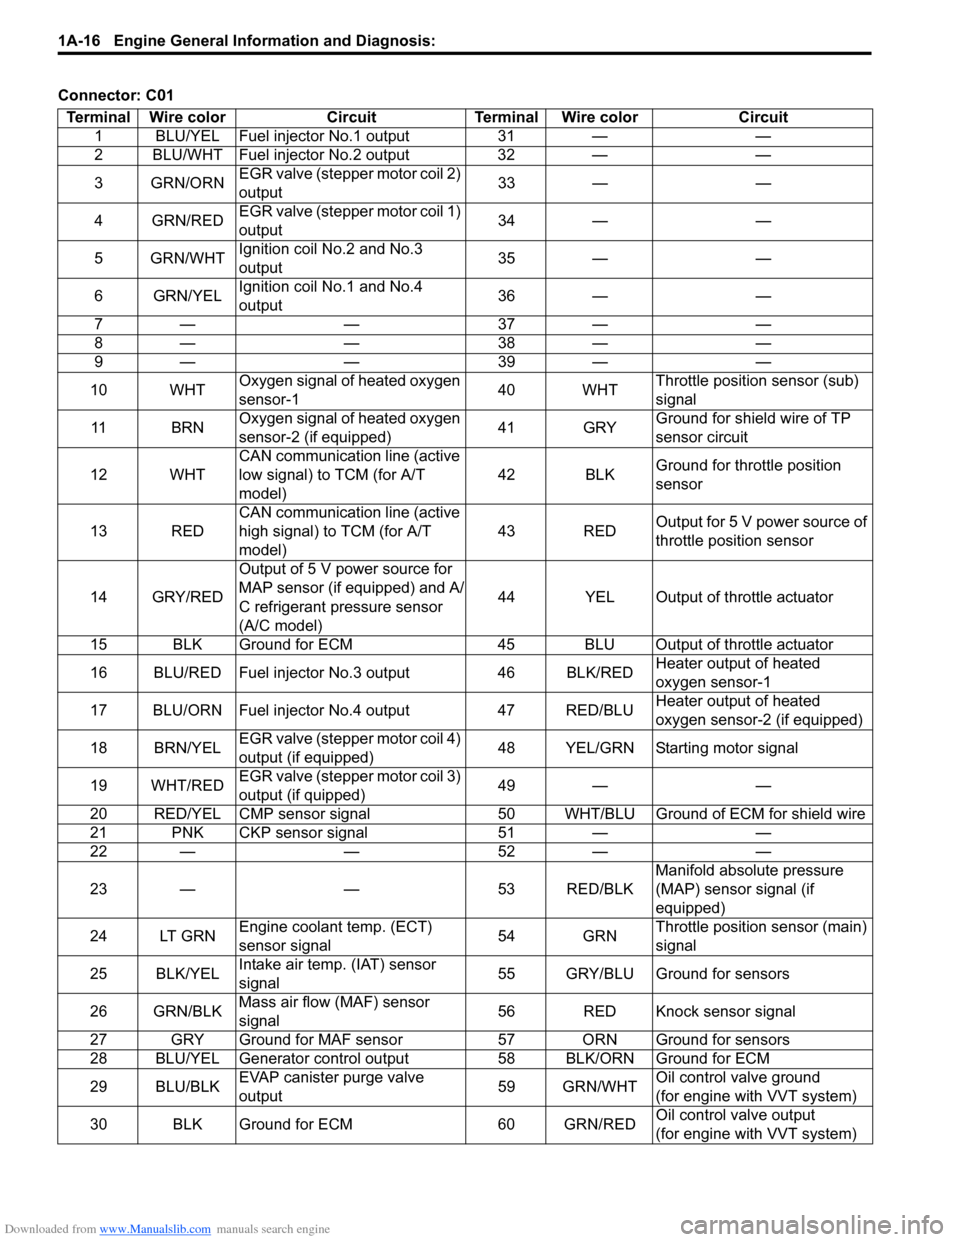
Connector: C01
Terminal Wire color Circuit Terminal Wire color Circuit
1 BLU/YEL Fuel injector No.1 output 31 — —
2 BLU/WHT Fuel injector No.2 output 32 — —
3 GRN/ORNEGR valve (stepper motor coil 2)
output33 — —
4 GRN/REDEGR valve (stepper motor coil 1)
output34 — —
5 GRN/WHTIgnition coil No.2 and No.3
output35 — —
6 GRN/YELIgnition coil No.1 and No.4
output36 — —
7— — 37— —
8— — 38— —
9— — 39— —
10 WHTOxygen signal of heated oxygen
sensor-140 WHTThrottle position sensor (sub)
signal
11 B R NOxygen signal of heated oxygen
sensor-2 (if equipped)41 GRYGround for shield wire of TP
sensor circuit
12 WHTCAN communication line (active
low signal) to TCM (for A/T
model)42 BLKGround for throttle position
sensor
13 REDCAN communication line (active
high signal) to TCM (for A/T
model) 43 REDOutput for 5 V power source of
throttle position sensor
14 GRY/REDOutput of 5 V power source for
MAP sensor (if equipped) and A/
C refrigerant pressure sensor
(A/C model)44 YEL Output of throttle actuator
15 BLK Ground for ECM 45 BLU Output of throttle actuator
16 BLU/RED Fuel injector No.3 output 46 BLK/REDHeater output of heated
oxygen sensor-1
17 BLU/ORN Fuel injector No.4 output 47 RED/BLUHeater output of heated
oxygen sensor-2 (if equipped)
18 BRN/YELEGR valve (stepper motor coil 4)
output (if equipped)48 YEL/GRN Starting motor signal
19 WHT/REDEGR valve (stepper motor coil 3)
output (if quipped)49 — —
20 RED/YEL CMP sensor signal 50 WHT/BLU Ground of ECM for shield wire
21 PNK CKP sensor signal 51 — —
22 — — 52 — —
23 — — 53 RED/BLKManifold absolute pressure
(MAP) sensor signal (if
equipped)
24 LT GRNEngine coolant temp. (ECT)
sensor signal54 GRNThrottle position sensor (main)
signal
25 BLK/YELIntake air temp. (IAT) sensor
signal55 GRY/BLU Ground for sensors
26 GRN/BLKMass air flow (MAF) sensor
signal56 RED Knock sensor signal
27 GRY Ground for MAF sensor 57 ORN Ground for sensors
28 BLU/YEL Generator control output 58 BLK/ORN Ground for ECM
29 BLU/BLKEVAP canister purge valve
output59 GRN/WHTOil control valve ground
(for engine with VVT system)
30 BLK Ground for ECM 60 GRN/REDOil control valve output
(for engine with VVT system)