Air flow sensor SUZUKI SX4 2006 1.G Service Owner's Manual
[x] Cancel search | Manufacturer: SUZUKI, Model Year: 2006, Model line: SX4, Model: SUZUKI SX4 2006 1.GPages: 1556, PDF Size: 37.31 MB
Page 118 of 1556

Downloaded from www.Manualslib.com manuals search engine 1A-68 Engine General Information and Diagnosis:
3) Start engine and run it for 10 sec.
4) Check DTC and pending DTC.
DTC Troubleshooting
NOTE
Before this troubleshooting is performed, read the precautions for DTC troubleshooting referring to
“Precautions for DTC Troubleshooting”.
Step Action Yes No
1Was “Engine and Emission Control System Check”
performed?Go to Step 2. Go to “Engine and
Emission Control
System Check”.
2MAF sensor and its circuit check
1) Connect scan tool to DLC with ignition switch turned
OFF.
2) Start engine and check MAF value displayed on scan
tool. (Refer to “Scan Tool Data” for normal value.)
Is normal value indicated?Intermittent trouble.
Check for intermittent
referring to “Intermittent
and Poor Connection
Inspection in Section
00”.Go to Step 3.
3MAF sensor power supply voltage check
1) Disconnect connector from MAF and IAT sensor with
ignition switch tuned OFF.
2) Turn ON ignition switch, measure voltage between
engine ground and “BLK/RED” wire terminal of MAF and
IAT sensor connector.
Is voltage 10 – 14 V?Go to Step 4. “BLK/RED” wire is open
circuit.
4MAF sensor ground circuit check
1) Turn OFF ignition switch, measure resistance between
“GRY” wire terminal of MAF and IAT sensor connector
and engine ground.
Is resistance below 5
Ω?Go to Step 6. Go to Step 5.
5Ground circuit check
1) Remove ECM from its bracket with ECM connectors
connected.
2) Measure resistance between “C01-27” terminal of ECM
connector and engine ground.
Is resistance below 5
Ω?“GRY” wire is open or
high resistance circuit.ECM grounds “C01-58”,
“C01-15”, “C01-30” and/
or “E01-31” circuit are
open or high resistance.
If wires are OK,
substitute a known-
good ECM and recheck.
6MAF sensor signal circuit check
1) Disconnect connectors from ECM with ignition switch
turned OFF.
2) Measure voltage between “GRY/BLK” wire terminal of
MAF and IAT sensor connector and engine ground.
Is voltage 0 V?Go to Step 7. “GRY/BLK” wire is
shorted to other circuit.
7MAF sensor output signal check
1) Connect connector to MAF and IAT sensor and ECM
with ignition switch turned OFF.
2) Measure voltage between “C01-26” and “C01-27”
terminal of ECM connector referring to “Mass Air Flow
(MAF) and Intake Air Temperature (IAT) Sensor On-
Vehicle Inspection in Section 1C”.
Is each value within specified range?Substitute a known-
good ECM and recheck.Faulty MAF and IAT
sensor.
Page 120 of 1556

Downloaded from www.Manualslib.com manuals search engine 1A-70 Engine General Information and Diagnosis:
DTC Troubleshooting
NOTE
Before this troubleshooting is performed, read the precautions for DTC troubleshooting referring to
“Precautions for DTC Troubleshooting”.
DTC P0107: Manifold Absolute Pressure Circuit Low InputS6RW0D1104021
Wiring Diagram
Refer to “DTC P0106: Manifold Absolute Pressure Range / Performance”.
DTC Detecting Condition and Trouble Area
DTC Confirmation Procedure
1) Connect scan tool to DLC with ignition switch turned OFF.
2) Turn ON ignition switch and clear DTC using scan tool and warm up engine completely.
3) Run engine at idle speed for 1 min.
4) Check DTC and pending DTC. Step Action Yes No
1Was “Engine and Emission Control System Check”
performed?Go to Step 2. Go to “Engine and
Emission Control
System Check”.
2MAP sensor and its circuit check
1) Connect scan tool to DLC with ignition switch turned
OFF.
2) Turn ON ignition switch.
3) Check DTC.
Is there DTC P0107 or DTC P0108?Go to applicable DTC
diag. flow.Go to Step 3.
3MAP sensor output signal check
1) Check MAP sensor according to “Manifold Absolute
Pressure (MAP) Sensor Inspection (If Equipped) in
Section 1C”.
Is it in good condition?Go to Step 4. Faulty MAP sensor.
4MAP sensor circuit check
1) Check MAP sensor circuit referring to Step 3 to 6 of
“DTC P0107: Manifold Absolute Pressure Circuit Low
Input” or Step 3 to 8 of “DTC P0108: Manifold Absolute
Pressure Circuit High Input”.
Is circuit in good condition?Go to Step 5. Repair or replace.
5Air intake system check
1) Check air intake system for clog or leak.
Is it in good condition?Substitute a known-
good ECM and recheck.Repair or replace.
DTC detecting condition Trouble area
Manifold absolute pressure sensor output voltage is lower
than specified value for specified time.
(1 driving cycle detection logic)• Manifold absolute pressure sensor circuit
• Manifold absolute pressure sensor
• A/C refrigerant pressure sensor (if equipped with A/C)
•ECM
Page 143 of 1556
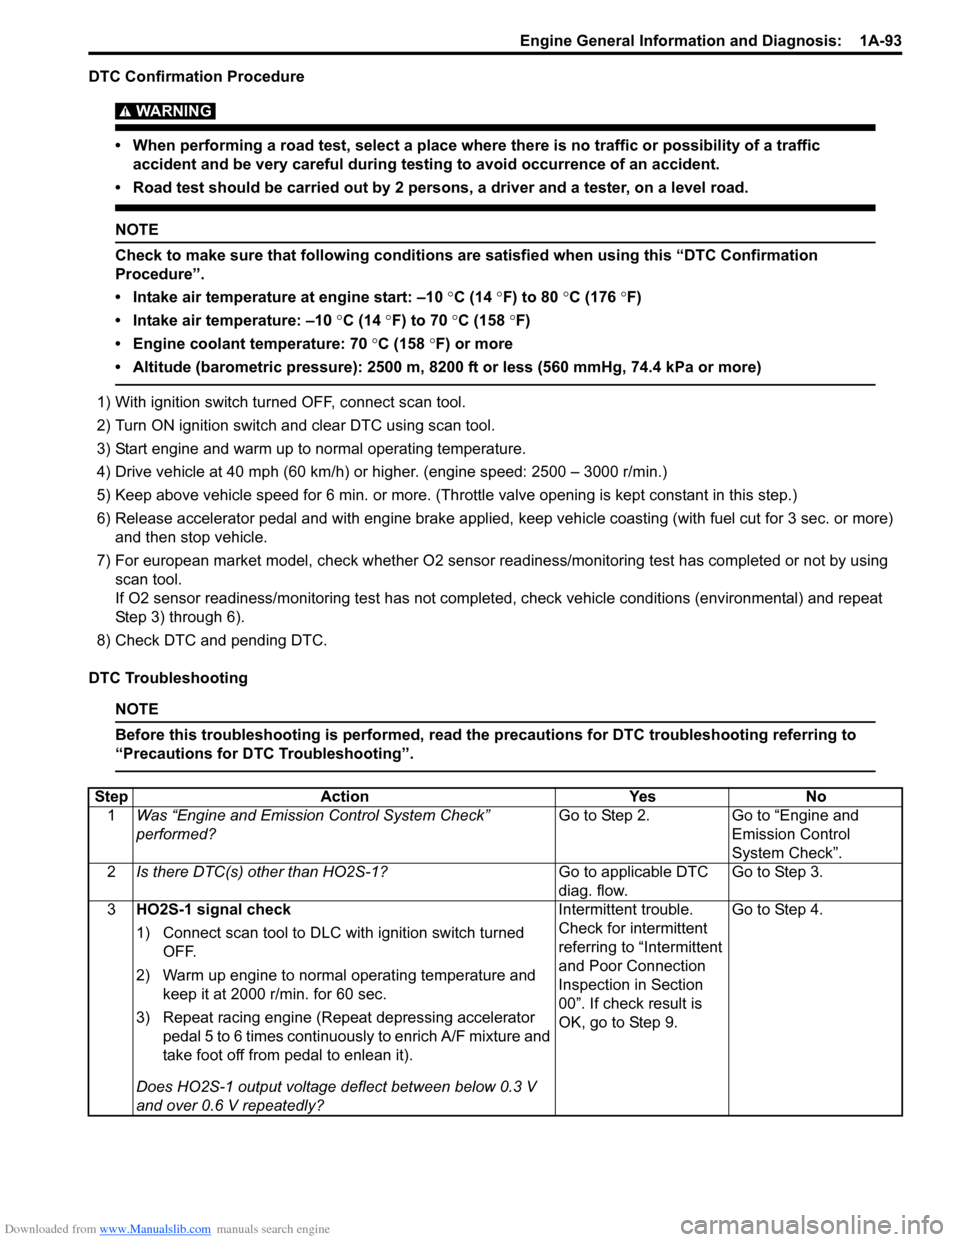
Downloaded from www.Manualslib.com manuals search engine Engine General Information and Diagnosis: 1A-93
DTC Confirmation Procedure
WARNING!
• When performing a road test, select a place where there is no traffic or possibility of a traffic
accident and be very careful during testing to avoid occurrence of an accident.
• Road test should be carried out by 2 persons, a driver and a tester, on a level road.
NOTE
Check to make sure that following conditions are satisfied when using this “DTC Confirmation
Procedure”.
• Intake air temperature at engine start: –10 °C (14 °F) to 80 °C (176 °F)
• Intake air temperature: –10 °C (14 °F) to 70 °C (158 °F)
• Engine coolant temperature: 70 °C (158 °F) or more
• Altitude (barometric pressure): 2500 m, 8200 ft or less (560 mmHg, 74.4 kPa or more)
1) With ignition switch turned OFF, connect scan tool.
2) Turn ON ignition switch and clear DTC using scan tool.
3) Start engine and warm up to normal operating temperature.
4) Drive vehicle at 40 mph (60 km/h) or higher. (engine speed: 2500 – 3000 r/min.)
5) Keep above vehicle speed for 6 min. or more. (Throttle valve opening is kept constant in this step.)
6) Release accelerator pedal and with engine brake applied, keep vehicle coasting (with fuel cut for 3 sec. or more)
and then stop vehicle.
7) For european market model, check whether O2 sensor readiness/monitoring test has completed or not by using
scan tool.
If O2 sensor readiness/monitoring test has not completed, check vehicle conditions (environmental) and repeat
Step 3) through 6).
8) Check DTC and pending DTC.
DTC Troubleshooting
NOTE
Before this troubleshooting is performed, read the precautions for DTC troubleshooting referring to
“Precautions for DTC Troubleshooting”.
Step Action Yes No
1Was “Engine and Emission Control System Check”
performed?Go to Step 2. Go to “Engine and
Emission Control
System Check”.
2Is there DTC(s) other than HO2S-1?Go to applicable DTC
diag. flow.Go to Step 3.
3HO2S-1 signal check
1) Connect scan tool to DLC with ignition switch turned
OFF.
2) Warm up engine to normal operating temperature and
keep it at 2000 r/min. for 60 sec.
3) Repeat racing engine (Repeat depressing accelerator
pedal 5 to 6 times continuously to enrich A/F mixture and
take foot off from pedal to enlean it).
Does HO2S-1 output voltage deflect between below 0.3 V
and over 0.6 V repeatedly?Intermittent trouble.
Check for intermittent
referring to “Intermittent
and Poor Connection
Inspection in Section
00”. If check result is
OK, go to Step 9.Go to Step 4.
Page 145 of 1556
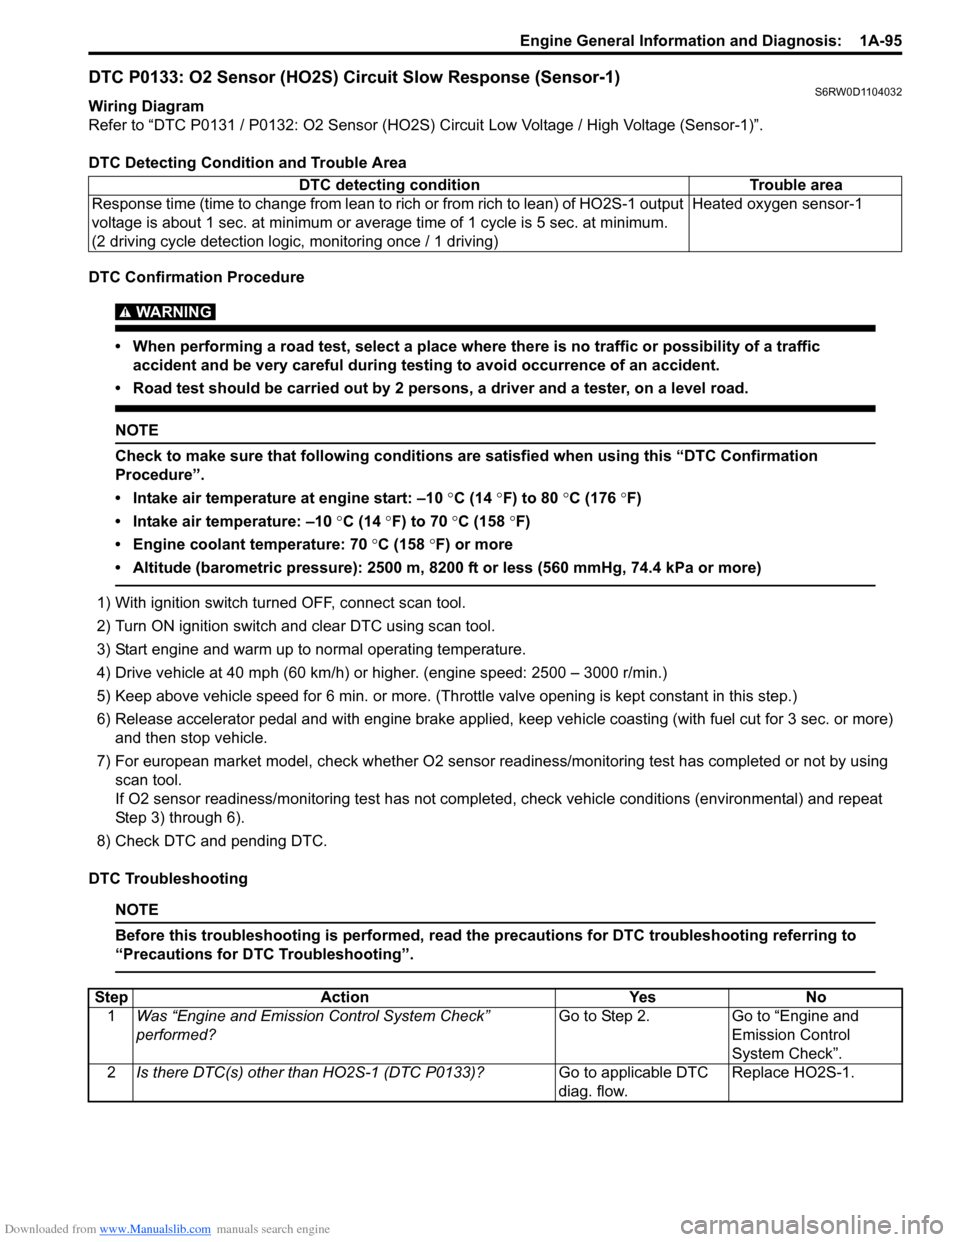
Downloaded from www.Manualslib.com manuals search engine Engine General Information and Diagnosis: 1A-95
DTC P0133: O2 Sensor (HO2S) Circuit Slow Response (Sensor-1)S6RW0D1104032
Wiring Diagram
Refer to “DTC P0131 / P0132: O2 Sensor (HO2S) Circuit Low Voltage / High Voltage (Sensor-1)”.
DTC Detecting Condition and Trouble Area
DTC Confirmation Procedure
WARNING!
• When performing a road test, select a place where there is no traffic or possibility of a traffic
accident and be very careful during testing to avoid occurrence of an accident.
• Road test should be carried out by 2 persons, a driver and a tester, on a level road.
NOTE
Check to make sure that following conditions are satisfied when using this “DTC Confirmation
Procedure”.
• Intake air temperature at engine start: –10 °C (14 °F) to 80 °C (176 °F)
• Intake air temperature: –10 °C (14 °F) to 70 °C (158 °F)
• Engine coolant temperature: 70 °C (158 °F) or more
• Altitude (barometric pressure): 2500 m, 8200 ft or less (560 mmHg, 74.4 kPa or more)
1) With ignition switch turned OFF, connect scan tool.
2) Turn ON ignition switch and clear DTC using scan tool.
3) Start engine and warm up to normal operating temperature.
4) Drive vehicle at 40 mph (60 km/h) or higher. (engine speed: 2500 – 3000 r/min.)
5) Keep above vehicle speed for 6 min. or more. (Throttle valve opening is kept constant in this step.)
6) Release accelerator pedal and with engine brake applied, keep vehicle coasting (with fuel cut for 3 sec. or more)
and then stop vehicle.
7) For european market model, check whether O2 sensor readiness/monitoring test has completed or not by using
scan tool.
If O2 sensor readiness/monitoring test has not completed, check vehicle conditions (environmental) and repeat
Step 3) through 6).
8) Check DTC and pending DTC.
DTC Troubleshooting
NOTE
Before this troubleshooting is performed, read the precautions for DTC troubleshooting referring to
“Precautions for DTC Troubleshooting”.
DTC detecting condition Trouble area
Response time (time to change from lean to rich or from rich to lean) of HO2S-1 output
voltage is about 1 sec. at minimum or average time of 1 cycle is 5 sec. at minimum.
(2 driving cycle detection logic, monitoring once / 1 driving)Heated oxygen sensor-1
Step Action Yes No
1Was “Engine and Emission Control System Check”
performed?Go to Step 2. Go to “Engine and
Emission Control
System Check”.
2Is there DTC(s) other than HO2S-1 (DTC P0133)?Go to applicable DTC
diag. flow.Replace HO2S-1.
Page 154 of 1556
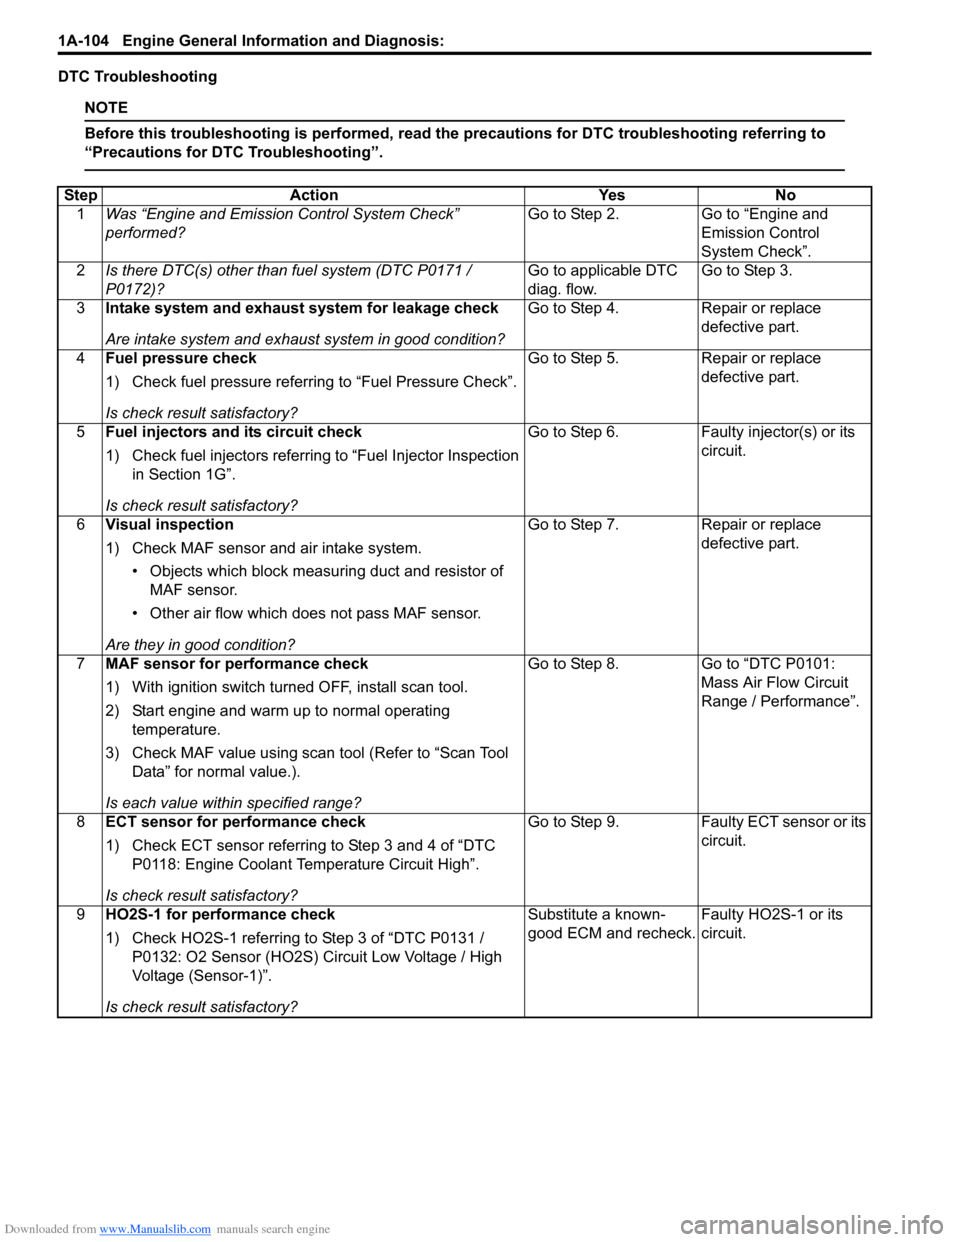
Downloaded from www.Manualslib.com manuals search engine 1A-104 Engine General Information and Diagnosis:
DTC Troubleshooting
NOTE
Before this troubleshooting is performed, read the precautions for DTC troubleshooting referring to
“Precautions for DTC Troubleshooting”.
Step Action Yes No
1Was “Engine and Emission Control System Check”
performed?Go to Step 2. Go to “Engine and
Emission Control
System Check”.
2Is there DTC(s) other than fuel system (DTC P0171 /
P0172)?Go to applicable DTC
diag. flow.Go to Step 3.
3Intake system and exhaust system for leakage check
Are intake system and exhaust system in good condition?Go to Step 4. Repair or replace
defective part.
4Fuel pressure check
1) Check fuel pressure referring to “Fuel Pressure Check”.
Is check result satisfactory?Go to Step 5. Repair or replace
defective part.
5Fuel injectors and its circuit check
1) Check fuel injectors referring to “Fuel Injector Inspection
in Section 1G”.
Is check result satisfactory?Go to Step 6. Faulty injector(s) or its
circuit.
6Visual inspection
1) Check MAF sensor and air intake system.
• Objects which block measuring duct and resistor of
MAF sensor.
• Other air flow which does not pass MAF sensor.
Are they in good condition?Go to Step 7. Repair or replace
defective part.
7MAF sensor for performance check
1) With ignition switch turned OFF, install scan tool.
2) Start engine and warm up to normal operating
temperature.
3) Check MAF value using scan tool (Refer to “Scan Tool
Data” for normal value.).
Is each value within specified range?Go to Step 8. Go to “DTC P0101:
Mass Air Flow Circuit
Range / Performance”.
8ECT sensor for performance check
1) Check ECT sensor referring to Step 3 and 4 of “DTC
P0118: Engine Coolant Temperature Circuit High”.
Is check result satisfactory?Go to Step 9. Faulty ECT sensor or its
circuit.
9HO2S-1 for performance check
1) Check HO2S-1 referring to Step 3 of “DTC P0131 /
P0132: O2 Sensor (HO2S) Circuit Low Voltage / High
Voltage (Sensor-1)”.
Is check result satisfactory?Substitute a known-
good ECM and recheck.Faulty HO2S-1 or its
circuit.
Page 169 of 1556
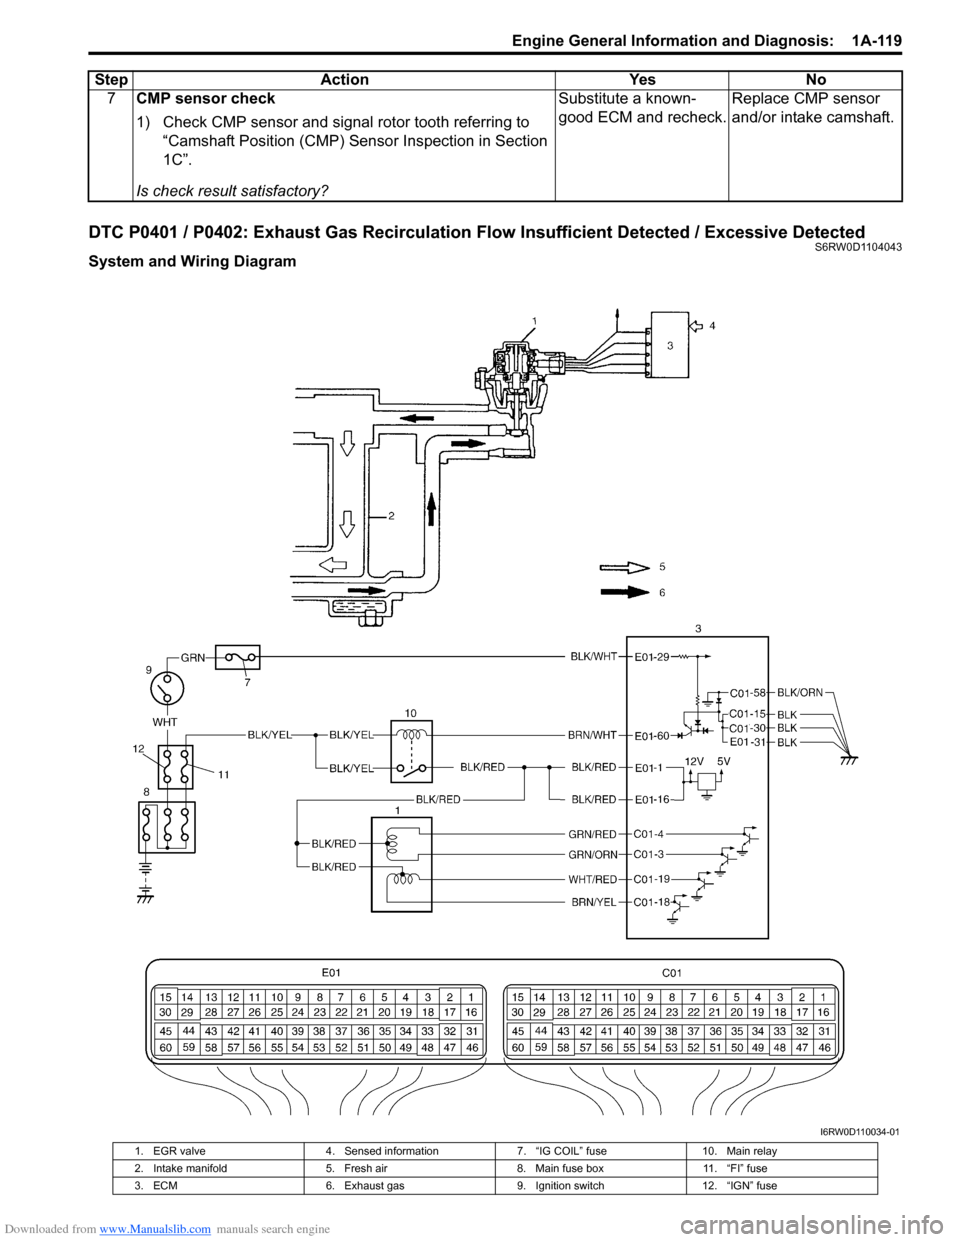
Downloaded from www.Manualslib.com manuals search engine Engine General Information and Diagnosis: 1A-119
DTC P0401 / P0402: Exhaust Gas Recirculation Flow Insufficient Detected / Excessive DetectedS6RW0D1104043
System and Wiring Diagram7CMP sensor check
1) Check CMP sensor and signal rotor tooth referring to
“Camshaft Position (CMP) Sensor Inspection in Section
1C”.
Is check result satisfactory?Substitute a known-
good ECM and recheck.Replace CMP sensor
and/or intake camshaft. Step Action Yes No
I6RW0D110034-01
1. EGR valve 4. Sensed information 7. “IG COIL” fuse 10. Main relay
2. Intake manifold 5. Fresh air 8. Main fuse box 11. “FI” fuse
3. ECM 6. Exhaust gas 9. Ignition switch 12. “IGN” fuse
Page 225 of 1556
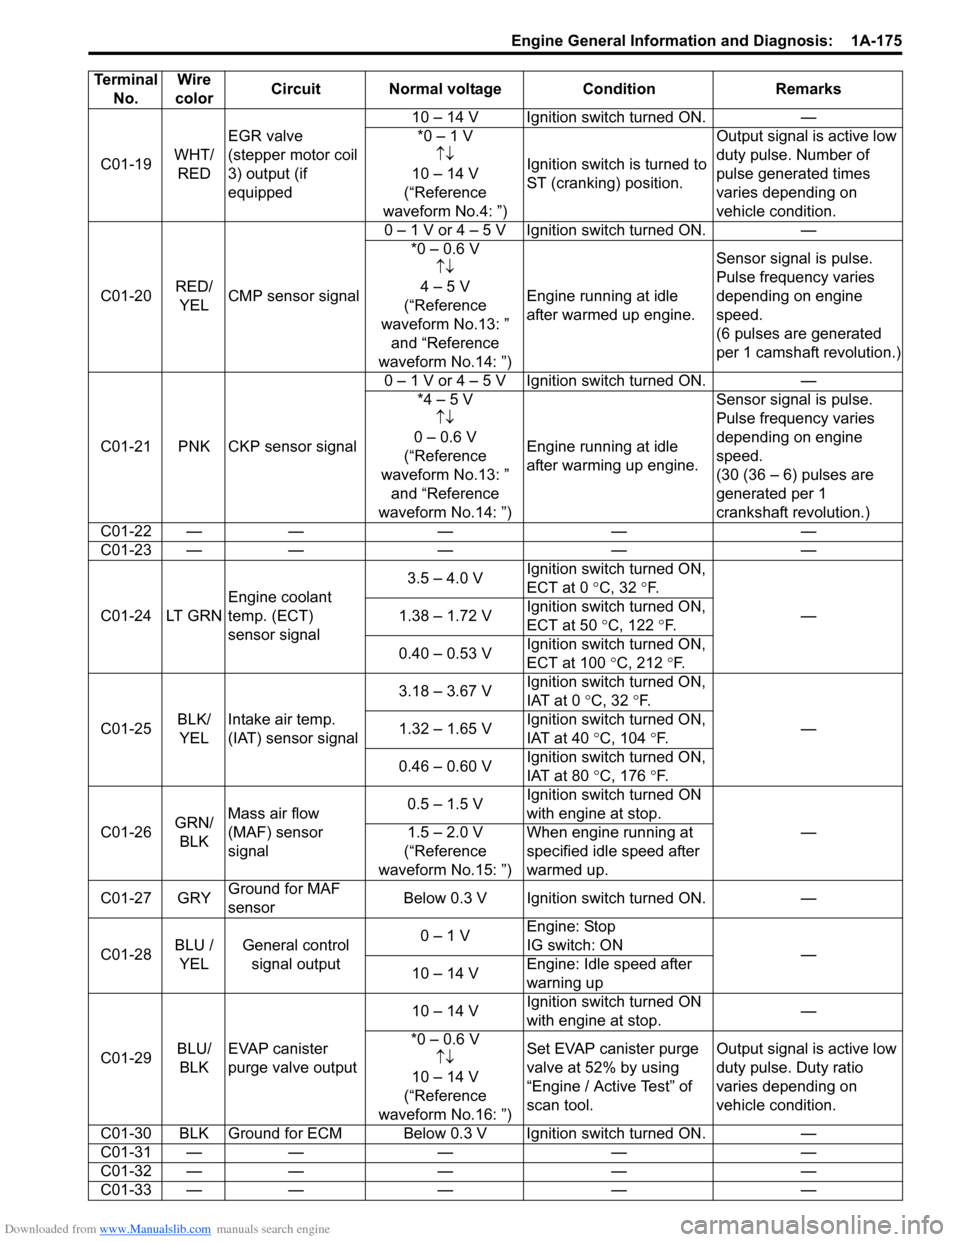
Downloaded from www.Manualslib.com manuals search engine Engine General Information and Diagnosis: 1A-175
C01-19WHT/
REDEGR valve
(stepper motor coil
3) output (if
equipped10 – 14 V Ignition switch turned ON. —
*0 – 1 V
↑↓
10 – 14 V
(“Reference
waveform No.4: ”)Ignition switch is turned to
ST (cranking) position.Output signal is active low
duty pulse. Number of
pulse generated times
varies depending on
vehicle condition.
C01-20RED/
YELCMP sensor signal0 – 1 V or 4 – 5 V Ignition switch turned ON. —
*0 – 0.6 V
↑↓
4 – 5 V
(“Reference
waveform No.13: ”
and “Reference
waveform No.14: ”)Engine running at idle
after warmed up engine.Sensor signal is pulse.
Pulse frequency varies
depending on engine
speed.
(6 pulses are generated
per 1 camshaft revolution.)
C01-21 PNK CKP sensor signal0 – 1 V or 4 – 5 V Ignition switch turned ON. —
*4 – 5 V
↑↓
0 – 0.6 V
(“Reference
waveform No.13: ”
and “Reference
waveform No.14: ”)Engine running at idle
after warming up engine.Sensor signal is pulse.
Pulse frequency varies
depending on engine
speed.
(30 (36 – 6) pulses are
generated per 1
crankshaft revolution.)
C01-22 — — — — —
C01-23 — — — — —
C01-24 LT GRNEngine coolant
temp. (ECT)
sensor signal3.5 – 4.0 VIgnition switch turned ON,
ECT at 0 °C, 32 °F.
— 1.38 – 1.72 VIgnition switch turned ON,
ECT at 50 °C, 122 °F.
0.40 – 0.53 VIgnition switch turned ON,
ECT at 100 °C, 212 °F.
C01-25BLK/
YELIntake air temp.
(IAT) sensor signal3.18 – 3.67 VIgnition switch turned ON,
IAT at 0 °C, 32 °F.
— 1.32 – 1.65 VIgnition switch turned ON,
IAT at 40 °C, 104 °F.
0.46 – 0.60 VIgnition switch turned ON,
IAT at 80 °C, 176 °F.
C01-26GRN/
BLKMass air flow
(MAF) sensor
signal0.5 – 1.5 VIgnition switch turned ON
with engine at stop.
— 1.5 – 2.0 V
(“Reference
waveform No.15: ”)When engine running at
specified idle speed after
warmed up.
C01-27 GRYGround for MAF
sensorBelow 0.3 V Ignition switch turned ON. —
C01-28BLU /
YELGeneral control
signal output0 – 1 VEngine: Stop
IG switch: ON
—
10 – 14 VEngine: Idle speed after
warning up
C01-29BLU/
BLKEVAP canister
purge valve output10 – 14 VIgnition switch turned ON
with engine at stop.—
*0 – 0.6 V
↑↓
10 – 14 V
(“Reference
waveform No.16: ”)Set EVAP canister purge
valve at 52% by using
“Engine / Active Test” of
scan tool.Output signal is active low
duty pulse. Duty ratio
varies depending on
vehicle condition.
C01-30 BLK Ground for ECM Below 0.3 V Ignition switch turned ON. —
C01-31 — — — — —
C01-32 — — — — —
C01-33 — — — — — Terminal
No.Wire
colorCircuit Normal voltage Condition Remarks
Page 237 of 1556
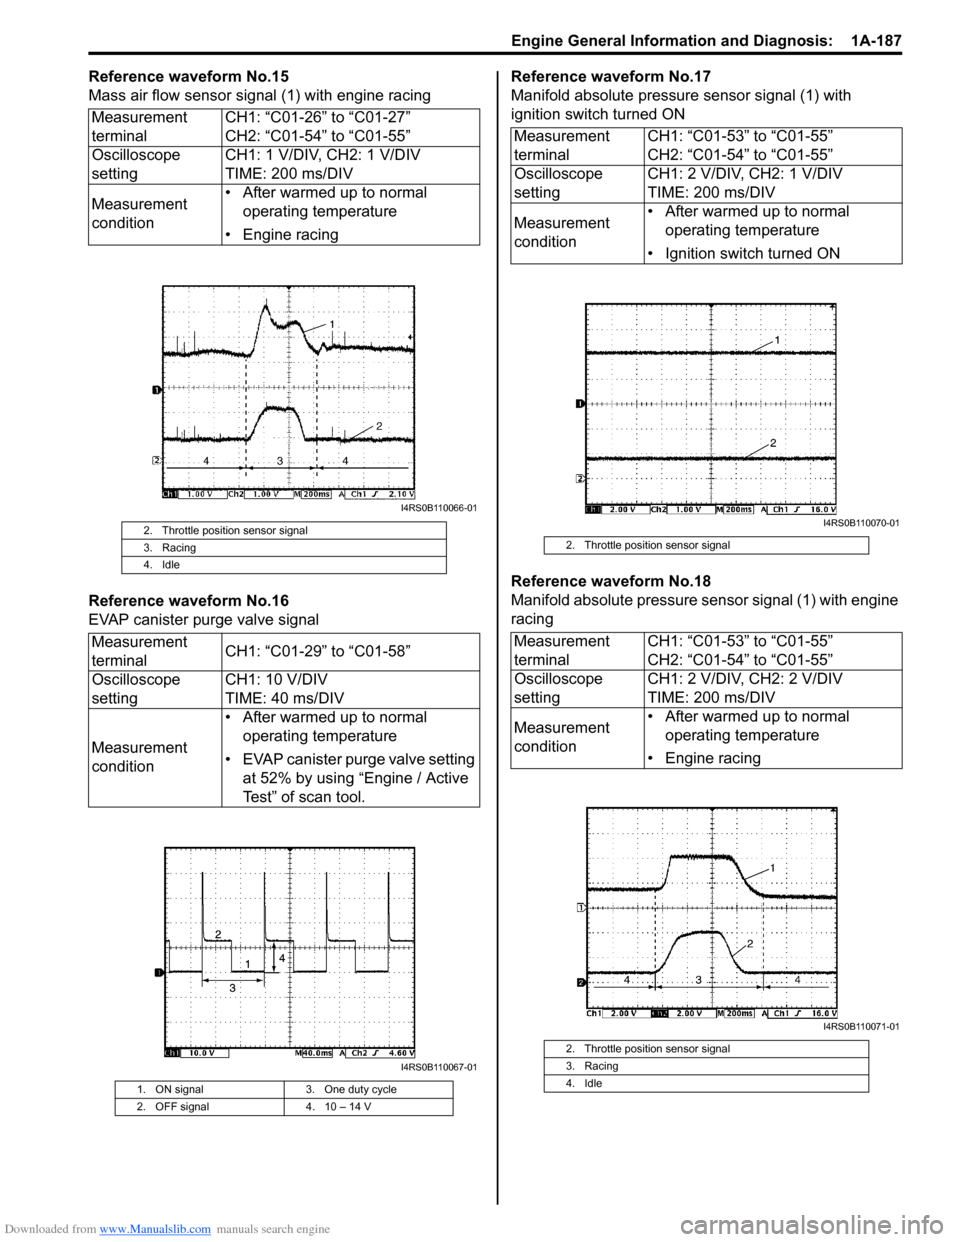
Downloaded from www.Manualslib.com manuals search engine Engine General Information and Diagnosis: 1A-187
Reference waveform No.15
Mass air flow sensor signal (1) with engine racing
Reference waveform No.16
EVAP canister purge valve signalReference waveform No.17
Manifold absolute pressure sensor signal (1) with
ignition switch turned ON
Reference waveform No.18
Manifold absolute pressure sensor signal (1) with engine
racing Measurement
terminalCH1: “C01-26” to “C01-27”
CH2: “C01-54” to “C01-55”
Oscilloscope
settingCH1: 1 V/DIV, CH2: 1 V/DIV
TIME: 200 ms/DIV
Measurement
condition• After warmed up to normal
operating temperature
• Engine racing
2. Throttle position sensor signal
3. Racing
4. Idle
Measurement
terminalCH1: “C01-29” to “C01-58”
Oscilloscope
settingCH1: 10 V/DIV
TIME: 40 ms/DIV
Measurement
condition• After warmed up to normal
operating temperature
• EVAP canister purge valve setting
at 52% by using “Engine / Active
Test” of scan tool.
1. ON signal 3. One duty cycle
2. OFF signal 4. 10 – 14 V
I4RS0B110066-01
I4RS0B110067-01
Measurement
terminalCH1: “C01-53” to “C01-55”
CH2: “C01-54” to “C01-55”
Oscilloscope
settingCH1: 2 V/DIV, CH2: 1 V/DIV
TIME: 200 ms/DIV
Measurement
condition• After warmed up to normal
operating temperature
• Ignition switch turned ON
2. Throttle position sensor signal
Measurement
terminalCH1: “C01-53” to “C01-55”
CH2: “C01-54” to “C01-55”
Oscilloscope
settingCH1: 2 V/DIV, CH2: 2 V/DIV
TIME: 200 ms/DIV
Measurement
condition• After warmed up to normal
operating temperature
• Engine racing
2. Throttle position sensor signal
3. Racing
4. Idle
I4RS0B110070-01
I4RS0B110071-01
Page 256 of 1556
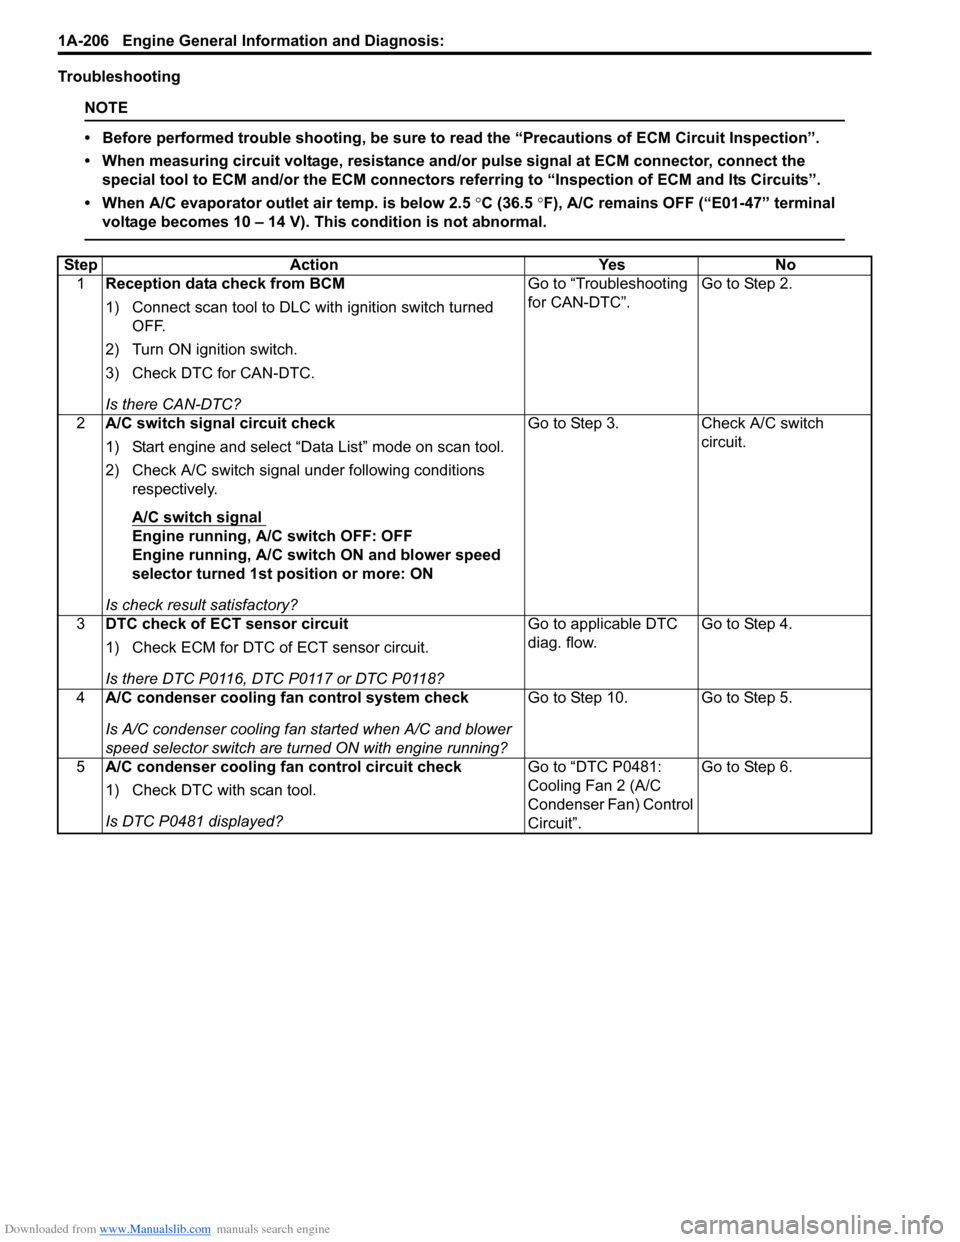
Downloaded from www.Manualslib.com manuals search engine 1A-206 Engine General Information and Diagnosis:
Troubleshooting
NOTE
• Before performed trouble shooting, be sure to read the “Precautions of ECM Circuit Inspection”.
• When measuring circuit voltage, resistance and/or pulse signal at ECM connector, connect the
special tool to ECM and/or the ECM connectors referring to “Inspection of ECM and Its Circuits”.
• When A/C evaporator outlet air temp. is below 2.5 °C (36.5 °F), A/C remains OFF (“E01-47” terminal
voltage becomes 10 – 14 V). This condition is not abnormal.
Step Action Yes No
1Reception data check from BCM
1) Connect scan tool to DLC with ignition switch turned
OFF.
2) Turn ON ignition switch.
3) Check DTC for CAN-DTC.
Is there CAN-DTC?Go to “Troubleshooting
for CAN-DTC”.Go to Step 2.
2A/C switch signal circuit check
1) Start engine and select “Data List” mode on scan tool.
2) Check A/C switch signal under following conditions
respectively.
A/C switch signal
Engine running, A/C switch OFF: OFF
Engine running, A/C switch ON and blower speed
selector turned 1st position or more: ON
Is check result satisfactory?Go to Step 3. Check A/C switch
circuit.
3DTC check of ECT sensor circuit
1) Check ECM for DTC of ECT sensor circuit.
Is there DTC P0116, DTC P0117 or DTC P0118?Go to applicable DTC
diag. flow.Go to Step 4.
4A/C condenser cooling fan control system check
Is A/C condenser cooling fan started when A/C and blower
speed selector switch are turned ON with engine running?Go to Step 10. Go to Step 5.
5A/C condenser cooling fan control circuit check
1) Check DTC with scan tool.
Is DTC P0481 displayed?Go to “DTC P0481:
Cooling Fan 2 (A/C
Condenser Fan) Control
Circuit”.Go to Step 6.
Page 257 of 1556

Downloaded from www.Manualslib.com manuals search engine Engine General Information and Diagnosis: 1A-207
6A/C evaporator outlet air temp. sensor check
1) Disconnect connectors from ECM with ignition switch
turned OFF.
2) Check for proper connection to “E01-57” and “E01-54”
wire terminals of ECM connector.
3) If OK, measure resistance between “E01-57” and “E01-
54” wire terminals of ECM connector.
Evaporator temp. sensor resistance
At 0 °C: 6.3 – 6.9 kΩ
At 25 °C: 1.8 – 2.2 kΩ
Is resistance within specification?Go to Step 7. Faulty A/C evaporator
outlet air temp. sensor
or its circuit.
7DTC check of A/C refrigerant pressure sensor circuit
1) Connect scan tool to DLC with ignition switch turned
OFF.
2) Turn ON ignition switch.
3) Check ECM for DTC of A/C refrigerant pressure sensor
circuit.
Is there DTC P0532 or DTC P0533?Go to applicable DTC
diag. flow.Go to Step 8.
8A/C refrigerant pressure sensor voltage check
1) Check A/C refrigerant pressure sensor voltage referring
to “Inspection of ECM and Its Circuits”.
Is voltage within specified value?Go to Step 9. Check amount of
refrigerant. If OK,
replace A/C refrigerant
pressure sensor.
9A/C condenser cooling fan check
1) Check A/C condenser cooling fan referring to
“Condenser Cooling Fan Inspection in Section 7B”.
Is check result satisfactory?A/C condenser cooling
fan drive circuit
malfunction. If circuit is
OK, go to Step 6.Replace A/C condenser
cooling fan motor.
10A/C compressor control system check
Is A/C compressor started when A/C and blower speed
selector switch are turned ON with engine running?A/C system is in good
condition.Go to Step 11. Step Action Yes No
7
6
5
4
3
2
1
10
20
30
4050 010
2030
60 70
80 ResistanceTemperatureI3RB0A110053-01