wheel torque SUZUKI SX4 2006 1.G Service Workshop Manual
[x] Cancel search | Manufacturer: SUZUKI, Model Year: 2006, Model line: SX4, Model: SUZUKI SX4 2006 1.GPages: 1556, PDF Size: 37.31 MB
Page 18 of 1556
Downloaded from www.Manualslib.com manuals search engine 00-11 Precautions:
Fastener CautionS6RW0D0000010
CAUTION!
When fasteners are removed, always reinstall
them at the same location from which they
were removed. If a fastener needs to be
replaced, use the correct part number
fastener for that application. If the correct
part number fastener is not available, a
fastener of equal size and strength (or
stronger) may be used. Fasteners that are not
reused, and those requiring thread-locking
compound, will be called out. The correct
torque value must be used when installing
fasteners that require it. If the conditions are
not followed, parts or system damage could
result.
Suspension CautionS6RW0D0000011
CAUTION!
• All suspension fasteners are an important
attaching part in that it could affect the
performance of vital parts and systems,
and/or could result in major repair
expense. They must be replaced with one
of the same part number or with an
equivalent part if replacement becomes
necessary. Do not use a replacement part
of lesser quality or substitute design.
Torque values must be used as specified
during reassembly to assure proper
retention of this part.
• Never attempt to heat, quench or
straighten any suspension part. Replace it
with a new part or damage to the part may
result.
Wheels and Tires CautionS6RW0D0000012
CAUTION!
All wheel fasteners are important attaching
parts in that they could affect the
performance of vital parts and systems, and/
or could result in major repair expense. They
must be replaced with one of the same part
number or with an equivalent part if
replacement becomes necessary. Do not use
a replacement part of lesser quality or
substitute design. Torque values must be
used as specified during reassembly to
assure proper retention of all parts.
There is to be no welding as it may result in
extensive damage and weakening of the
metal.
Brake CautionS6RW0D0000013
CAUTION!
All brake fasteners are important attaching
parts in that they could affect the
performance of vital parts and systems, and/
or could result in major repair expense. They
must be replaced with one of same part
number or with an equivalent part if
replacement becomes necessary. Do not use
a replacement part of lesser quality or
substitute design. Torque values must be
used as specified during reassembly to
assure proper retention of all parts. There is
to be no welding as it may result in extensive
damage and weakening of the metal.
Page 23 of 1556
Downloaded from www.Manualslib.com manuals search engine Table of Contents 0- i
0
Section 0
CONTENTS
General Information
General Information ................................ 0A-1
General Description ............................................. 0A-1
Abbreviations ...................................................... 0A-1
Symbols .............................................................. 0A-2
Wire Color Symbols ............................................ 0A-2
Fasteners Information ......................................... 0A-3
Vehicle Lifting Points ........................................... 0A-5
Vehicle Identification Number ............................. 0A-6
Engine Identification Number .............................. 0A-6
Transmission Identification Number .................... 0A-6
Component Location ........................................... 0A-7
Warning, Caution and Information Labels
Location ............................................................ 0A-7
Maintenance and Lubrication ................. 0B-1
Precautions........................................................... 0B-1
Precautions for Maintenance and Lubrication ..... 0B-1
Scheduled Maintenance ...................................... 0B-1
Maintenance Schedule under Normal Driving
Conditions ......................................................... 0B-1
Maintenance Recommended under Severe
Driving Conditions ............................................. 0B-2
Repair Instructions .............................................. 0B-3
Accessory Drive Belt Inspection.......................... 0B-3
Accessory Drive Belt Replacement ..................... 0B-3
Valve Lash (Clearance) Inspection ..................... 0B-3
Engine Oil and Filter Change .............................. 0B-4
Engine Coolant Change ...................................... 0B-5
Exhaust System Inspection ................................. 0B-5
Spark Plug Replacement .................................... 0B-5
Air Cleaner Filter Inspection ................................ 0B-6
Air Cleaner Filter Replacement ........................... 0B-6
Fuel Lines and Connections Inspection .............. 0B-6
Fuel Filter Replacement ...................................... 0B-6
Fuel Tank Inspection ........................................... 0B-6PCV Valve Inspection ......................................... 0B-6
Fuel Evaporative Emission Control System
Inspection .......................................................... 0B-6
Brake Discs and Pads (Front) Inspection............ 0B-7
Brake Drums and Shoes (Rear) Inspection ........ 0B-7
Brake Hoses and Pipes Inspection ..................... 0B-7
Brake Fluid Replacement .................................... 0B-7
Brake Lever and Cable Inspection ...................... 0B-7
Clutch Fluid Inspection ........................................ 0B-8
Tires Inspection ................................................... 0B-8
Wheel Discs Inspection ....................................... 0B-8
Wheel Bearing Inspection ................................... 0B-8
Suspension System Inspection ........................... 0B-9
Steering System Inspection ................................ 0B-9
Drive Shaft (Axle) Boots Inspection .................... 0B-9
Propeller Shaft (4WD) Inspection...................... 0B-10
Manual Transaxle Oil Inspection ....................... 0B-10
Manual Transaxle Oil Replacement .................. 0B-10
Automatic Transaxle Fluid Level Inspection...... 0B-10
Automatic Transaxle Fluid Replacement .......... 0B-10
Automatic Transaxle Fluid Cooler Hose
Inspection ........................................................ 0B-10
Transfer Oil Inspection (4WD)........................... 0B-10
Transfer Oil Replacement (4WD) ...................... 0B-10
Rear Deferential Oil Inspection (4WD) .............. 0B-10
Rear Deferential Oil Replacement (4WD) ......... 0B-10
All Latches, Hinges and Locks Inspection......... 0B-10
HVAC Air Filter (If Equipped) Inspection ........... 0B-11
HVAC Air Filter (If Equipped) Replacement ...... 0B-11
Final Inspection for Maintenance Service ......... 0B-11
Specifications .....................................................0B-12
Tightening Torque Specifications ...................... 0B-12
Special Tools and Equipment ...........................0B-12
Recommended Fluids and Lubricants............... 0B-12
Special Tool ...................................................... 0B-12
Page 25 of 1556
Downloaded from www.Manualslib.com manuals search engine General Information: 0A-2
S:
SAE: Society of Automotive Engineers
SDM: Sensing and Diagnostic Module (Air Bag
Controller, Air bag Control Module)
SDT: Smart Diagnostic Tester
SFI: Sequential Multiport Fuel Injection
SOHC: Single Over Head Camshaft
T:
TBI: Throttle Body Fuel Injection (Single-Point Fuel
Injection, SPI)
TCC: Torque Converter Clutch
TCM: Transmission Control Module (A/T Controller, A/T
Control Module)
TDC: Top Dead Center
TP Sensor: Throttle Position SensorTVV: Thermal Vacuum Valve (Thermal Vacuum
Switching Valve, TVSV, Bimetal Vacuum Switching
Valve, BVSV)
TWC: Three Way Catalytic Converter (Three Way
Catalyst)
2WD: 2 Wheel Drive
U:
USB: Universal Serial Bus
V:
VIN: Vehicle Identification Number
VSS: Vehicle Speed Sensor
VVT: Variable Valve Timing (Camshaft Position Control)
W:
WU-OC: Warm Up Oxidation Catalytic Converter
WU-TWC: Warm Up Three Way Catalytic Converter
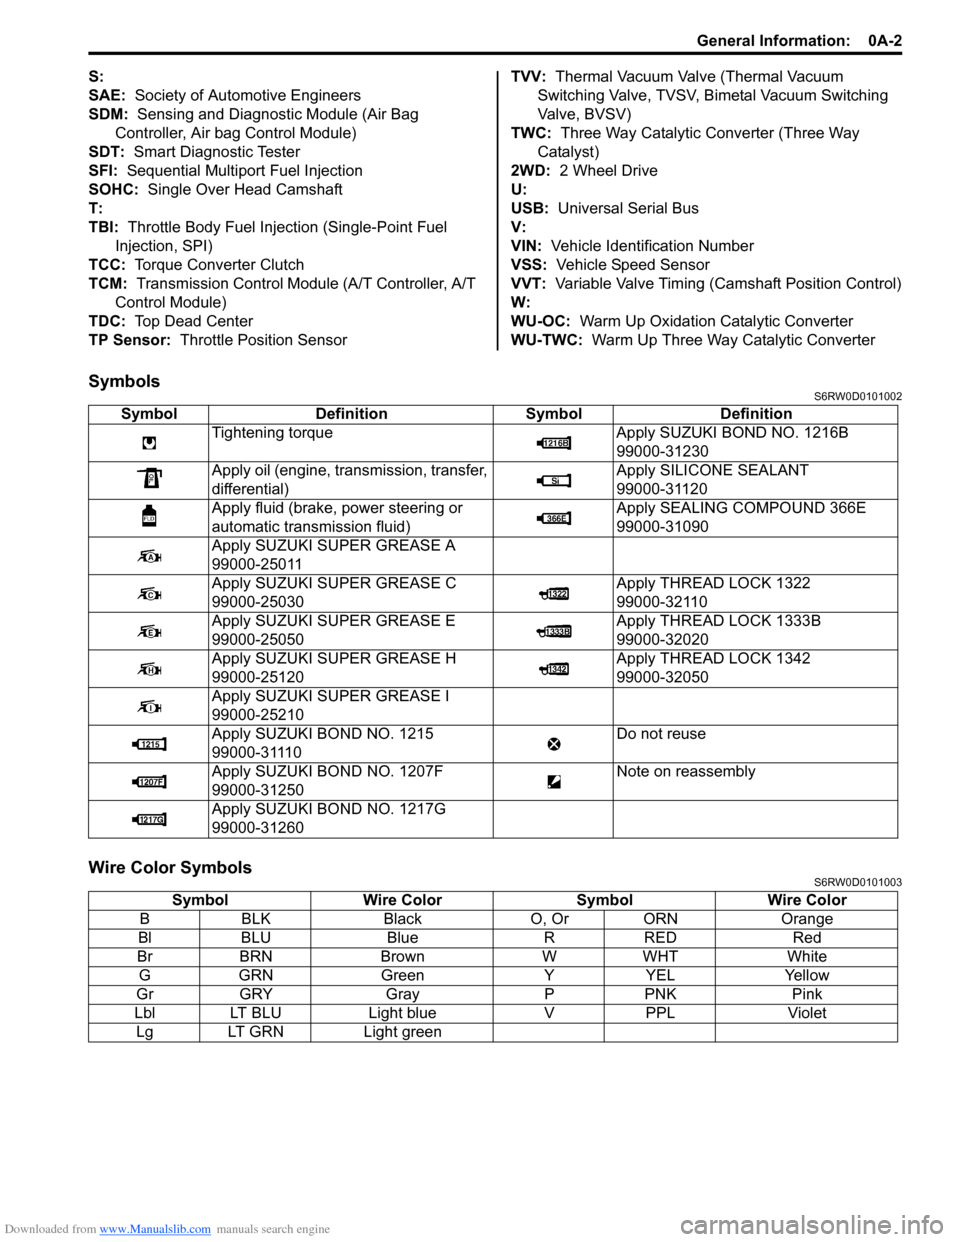
SymbolsS6RW0D0101002
Wire Color SymbolsS6RW0D0101003
Symbol Definition Symbol Definition
Tightening torque Apply SUZUKI BOND NO. 1216B
99000-31230
Apply oil (engine, transmission, transfer,
differential)Apply SILICONE SEALANT
99000-31120
Apply fluid (brake, power steering or
automatic transmission fluid)Apply SEALING COMPOUND 366E
99000-31090
Apply SUZUKI SUPER GREASE A
99000-25011
Apply SUZUKI SUPER GREASE C
99000-25030Apply THREAD LOCK 1322
99000-32110
Apply SUZUKI SUPER GREASE E
99000-25050Apply THREAD LOCK 1333B
99000-32020
Apply SUZUKI SUPER GREASE H
99000-25120Apply THREAD LOCK 1342
99000-32050
Apply SUZUKI SUPER GREASE I
99000-25210
Apply SUZUKI BOND NO. 1215
99000-31110Do not reuse
Apply SUZUKI BOND NO. 1207F
99000-31250Note on reassembly
Apply SUZUKI BOND NO. 1217G
99000-31260
Symbol Wire Color Symbol Wire Color
B BLK Black O, Or ORN Orange
Bl BLU Blue R RED Red
Br BRN Brown W WHT White
G GRN Green Y YEL Yellow
Gr GRY Gray P PNK Pink
Lbl LT BLU Light blue V PPL Violet
Lg LT GRN Light green
Page 38 of 1556
Downloaded from www.Manualslib.com manuals search engine 0B-7 Maintenance and Lubrication:
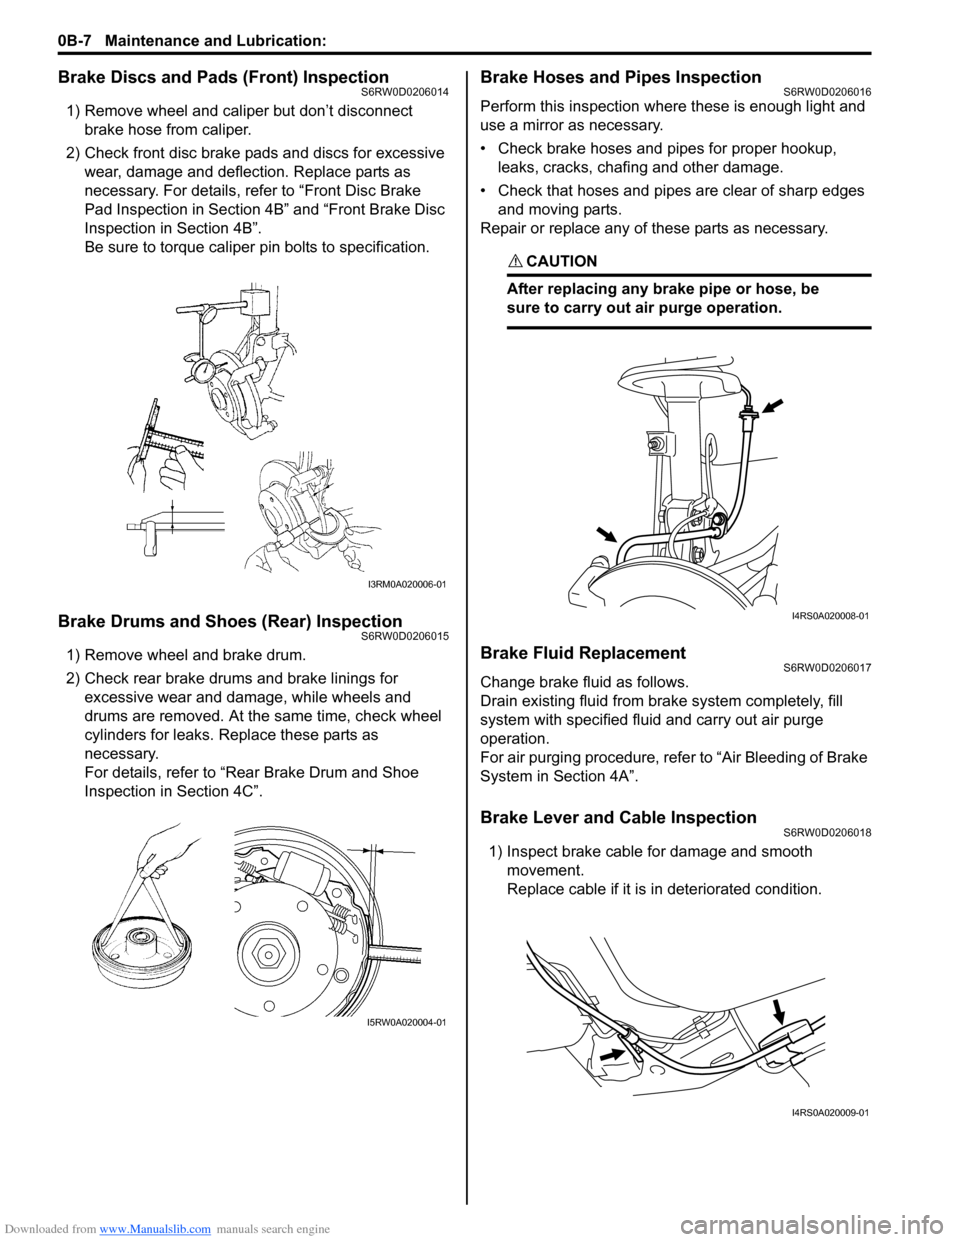
Brake Discs and Pads (Front) InspectionS6RW0D0206014
1) Remove wheel and caliper but don’t disconnect
brake hose from caliper.
2) Check front disc brake pads and discs for excessive
wear, damage and deflection. Replace parts as
necessary. For details, refer to “Front Disc Brake
Pad Inspection in Section 4B” and “Front Brake Disc
Inspection in Section 4B”.
Be sure to torque caliper pin bolts to specification.
Brake Drums and Shoes (Rear) InspectionS6RW0D0206015
1) Remove wheel and brake drum.
2) Check rear brake drums and brake linings for
excessive wear and damage, while wheels and
drums are removed. At the same time, check wheel
cylinders for leaks. Replace these parts as
necessary.
For details, refer to “Rear Brake Drum and Shoe
Inspection in Section 4C”.
Brake Hoses and Pipes InspectionS6RW0D0206016
Perform this inspection where these is enough light and
use a mirror as necessary.
• Check brake hoses and pipes for proper hookup,
leaks, cracks, chafing and other damage.
• Check that hoses and pipes are clear of sharp edges
and moving parts.
Repair or replace any of these parts as necessary.
CAUTION!
After replacing any brake pipe or hose, be
sure to carry out air purge operation.
Brake Fluid ReplacementS6RW0D0206017
Change brake fluid as follows.
Drain existing fluid from brake system completely, fill
system with specified fluid and carry out air purge
operation.
For air purging procedure, refer to “Air Bleeding of Brake
System in Section 4A”.
Brake Lever and Cable InspectionS6RW0D0206018
1) Inspect brake cable for damage and smooth
movement.
Replace cable if it is in deteriorated condition.
I3RM0A020006-01
I5RW0A020004-01
I4RS0A020008-01
I4RS0A020009-01
Page 43 of 1556
Downloaded from www.Manualslib.com manuals search engine Maintenance and Lubrication: 0B-12
Steering
• Check to ensure that steering wheel is free from
instability, or abnormally heavy feeling.
• Check that the vehicle does not wander or pull to one
side.
Engine
• Check that engine responds readily at all speeds.
• Check that engine is free from abnormal noise and
abnormal vibration.
Body, Wheels and Power Transmitting System
Check that body, wheels and power transmitting system
are free from abnormal noise and abnormal vibration or
any other abnormal condition.Meters and Gauge
Check that speedometer, odometer, fuel meter,
temperature gauge, etc. are operating accurately.
Lights
Check that all lights operate properly.
Windshield Defroster
Periodically check that air comes out from defroster
outlet when operating heater or air conditioning.
Set mode control lever to defroster position and fan
switch lever to highest position for this check.
Specifications
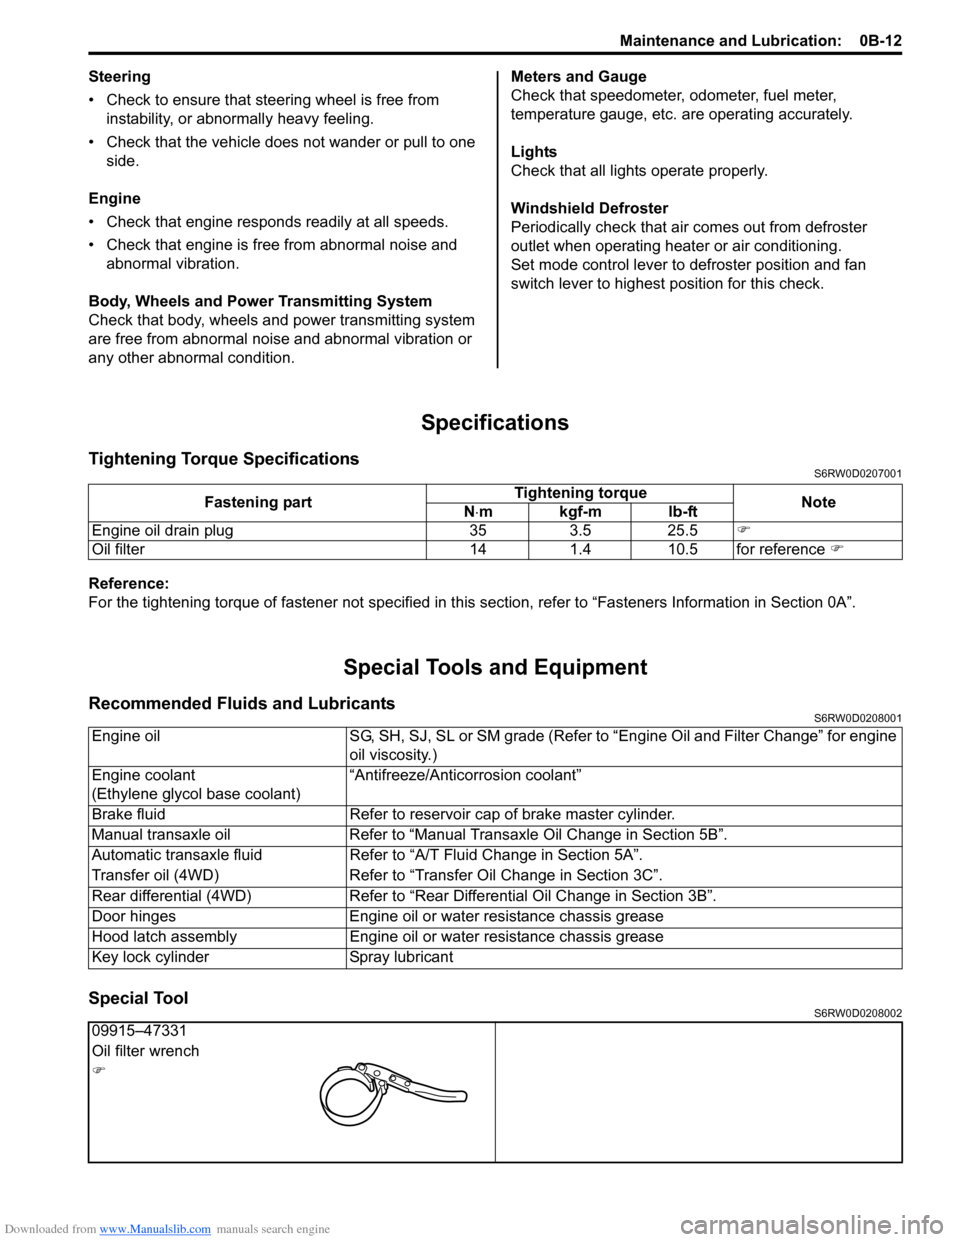
Tightening Torque SpecificationsS6RW0D0207001
Reference:
For the tightening torque of fastener not specified in this section, refer to “Fasteners Information in Section 0A”.
Special Tools and Equipment
Recommended Fluids and LubricantsS6RW0D0208001
Special ToolS6RW0D0208002
Fastening partTightening torque
Note
N⋅mkgf-mlb-ft
Engine oil drain plug 35 3.5 25.5�)
Oil filter 14 1.4 10.5 for reference �)
Engine oil SG, SH, SJ, SL or SM grade (Refer to “Engine Oil and Filter Change” for engine
oil viscosity.)
Engine coolant
(Ethylene glycol base coolant)“Antifreeze/Anticorrosion coolant”
Brake fluid Refer to reservoir cap of brake master cylinder.
Manual transaxle oil Refer to “Manual Transaxle Oil Change in Section 5B”.
Automatic transaxle fluid Refer to “A/T Fluid Change in Section 5A”.
Transfer oil (4WD) Refer to “Transfer Oil Change in Section 3C”.
Rear differential (4WD) Refer to “Rear Differential Oil Change in Section 3B”.
Door hinges Engine oil or water resistance chassis grease
Hood latch assembly Engine oil or water resistance chassis grease
Key lock cylinder Spray lubricant
09915–47331
Oil filter wrench
�)
Page 48 of 1556
Downloaded from www.Manualslib.com manuals search engine 1-iv Table of Contents
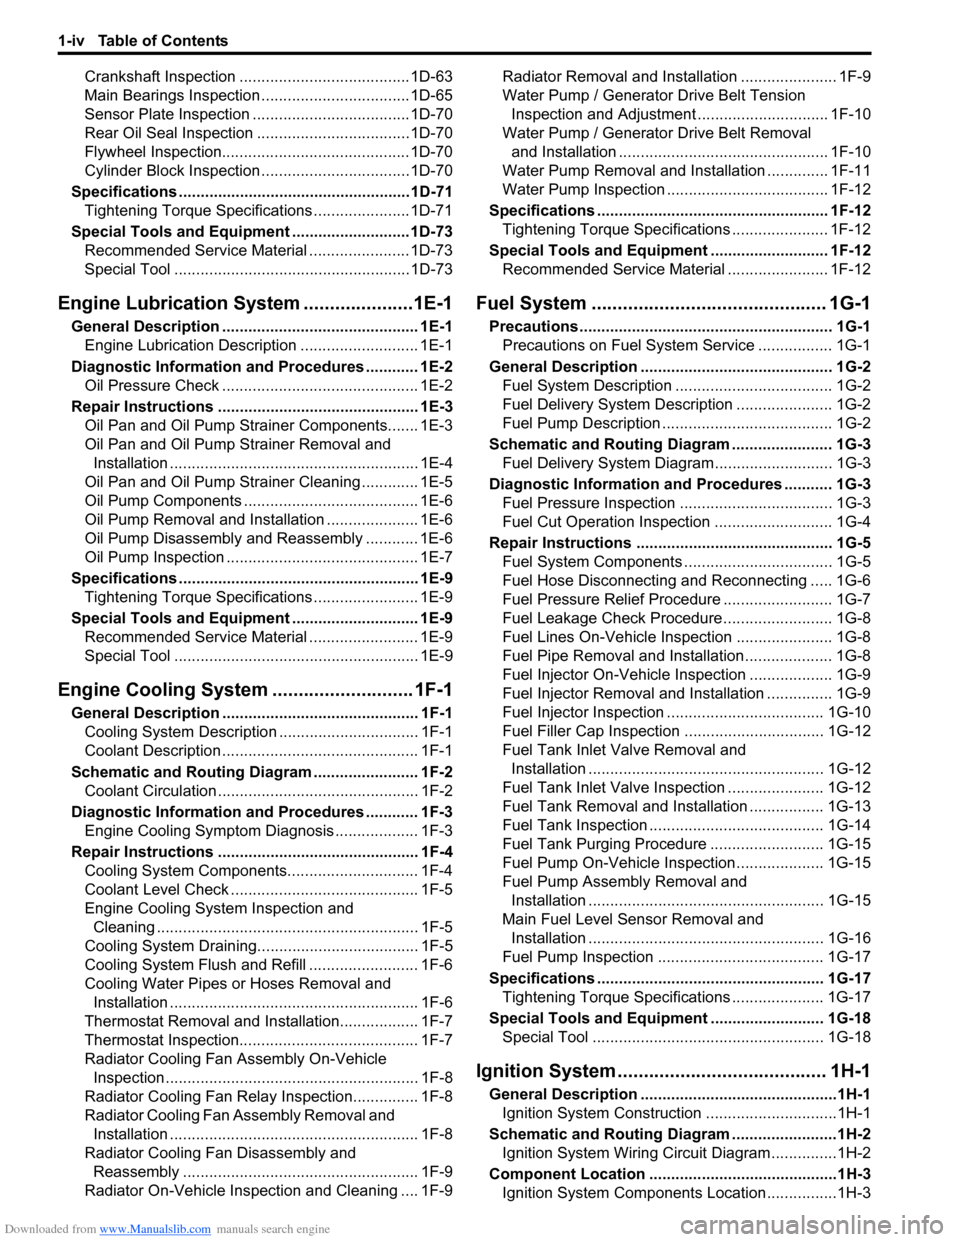
Crankshaft Inspection .......................................1D-63
Main Bearings Inspection ..................................1D-65
Sensor Plate Inspection ....................................1D-70
Rear Oil Seal Inspection ...................................1D-70
Flywheel Inspection...........................................1D-70
Cylinder Block Inspection ..................................1D-70
Specifications .....................................................1D-71
Tightening Torque Specifications ......................1D-71
Special Tools and Equipment ...........................1D-73
Recommended Service Material .......................1D-73
Special Tool ......................................................1D-73
Engine Lubrication System.....................1E-1
General Description ............................................. 1E-1
Engine Lubrication Description ........................... 1E-1
Diagnostic Information and Procedures ............ 1E-2
Oil Pressure Check ............................................. 1E-2
Repair Instructions .............................................. 1E-3
Oil Pan and Oil Pump Strainer Components....... 1E-3
Oil Pan and Oil Pump Strainer Removal and
Installation ......................................................... 1E-4
Oil Pan and Oil Pump Strainer Cleaning ............. 1E-5
Oil Pump Components ........................................ 1E-6
Oil Pump Removal and Installation ..................... 1E-6
Oil Pump Disassembly and Reassembly ............ 1E-6
Oil Pump Inspection ............................................ 1E-7
Specifications ....................................................... 1E-9
Tightening Torque Specifications ........................ 1E-9
Special Tools and Equipment ............................. 1E-9
Recommended Service Material ......................... 1E-9
Special Tool ........................................................ 1E-9
Engine Cooling System ........................... 1F-1
General Description ............................................. 1F-1
Cooling System Description ................................ 1F-1
Coolant Description ............................................. 1F-1
Schematic and Routing Diagram ........................ 1F-2
Coolant Circulation .............................................. 1F-2
Diagnostic Information and Procedures ............ 1F-3
Engine Cooling Symptom Diagnosis ................... 1F-3
Repair Instructions .............................................. 1F-4
Cooling System Components.............................. 1F-4
Coolant Level Check ........................................... 1F-5
Engine Cooling System Inspection and
Cleaning ............................................................ 1F-5
Cooling System Draining..................................... 1F-5
Cooling System Flush and Refill ......................... 1F-6
Cooling Water Pipes or Hoses Removal and
Installation ......................................................... 1F-6
Thermostat Removal and Installation.................. 1F-7
Thermostat Inspection......................................... 1F-7
Radiator Cooling Fan Assembly On-Vehicle
Inspection .......................................................... 1F-8
Radiator Cooling Fan Relay Inspection............... 1F-8
Radiator Cooling Fan Assembly Removal and
Installation ......................................................... 1F-8
Radiator Cooling Fan Disassembly and
Reassembly ...................................................... 1F-9
Radiator On-Vehicle Inspection and Cleaning .... 1F-9Radiator Removal and Installation ...................... 1F-9
Water Pump / Generator Drive Belt Tension
Inspection and Adjustment.............................. 1F-10
Water Pump / Generator Drive Belt Removal
and Installation ................................................ 1F-10
Water Pump Removal and Installation .............. 1F-11
Water Pump Inspection ..................................... 1F-12
Specifications ..................................................... 1F-12
Tightening Torque Specifications ...................... 1F-12
Special Tools and Equipment ........................... 1F-12
Recommended Service Material ....................... 1F-12
Fuel System ............................................. 1G-1
Precautions .......................................................... 1G-1
Precautions on Fuel System Service ................. 1G-1
General Description ............................................ 1G-2
Fuel System Description .................................... 1G-2
Fuel Delivery System Description ...................... 1G-2
Fuel Pump Description ....................................... 1G-2
Schematic and Routing Diagram ....................... 1G-3
Fuel Delivery System Diagram........................... 1G-3
Diagnostic Information and Procedures ........... 1G-3
Fuel Pressure Inspection ................................... 1G-3
Fuel Cut Operation Inspection ........................... 1G-4
Repair Instructions ............................................. 1G-5
Fuel System Components .................................. 1G-5
Fuel Hose Disconnecting and Reconnecting ..... 1G-6
Fuel Pressure Relief Procedure ......................... 1G-7
Fuel Leakage Check Procedure......................... 1G-8
Fuel Lines On-Vehicle Inspection ...................... 1G-8
Fuel Pipe Removal and Installation.................... 1G-8
Fuel Injector On-Vehicle Inspection ................... 1G-9
Fuel Injector Removal and Installation ............... 1G-9
Fuel Injector Inspection .................................... 1G-10
Fuel Filler Cap Inspection ................................ 1G-12
Fuel Tank Inlet Valve Removal and
Installation ...................................................... 1G-12
Fuel Tank Inlet Valve Inspection ...................... 1G-12
Fuel Tank Removal and Installation ................. 1G-13
Fuel Tank Inspection ........................................ 1G-14
Fuel Tank Purging Procedure .......................... 1G-15
Fuel Pump On-Vehicle Inspection.................... 1G-15
Fuel Pump Assembly Removal and
Installation ...................................................... 1G-15
Main Fuel Level Sensor Removal and
Installation ...................................................... 1G-16
Fuel Pump Inspection ...................................... 1G-17
Specifications .................................................... 1G-17
Tightening Torque Specifications ..................... 1G-17
Special Tools and Equipment .......................... 1G-18
Special Tool ..................................................... 1G-18
Ignition System ........................................ 1H-1
General Description .............................................1H-1
Ignition System Construction ..............................1H-1
Schematic and Routing Diagram ........................1H-2
Ignition System Wiring Circuit Diagram...............1H-2
Component Location ...........................................1H-3
Ignition System Components Location................1H-3
Page 60 of 1556
Downloaded from www.Manualslib.com manuals search engine 1A-10 Engine General Information and Diagnosis:
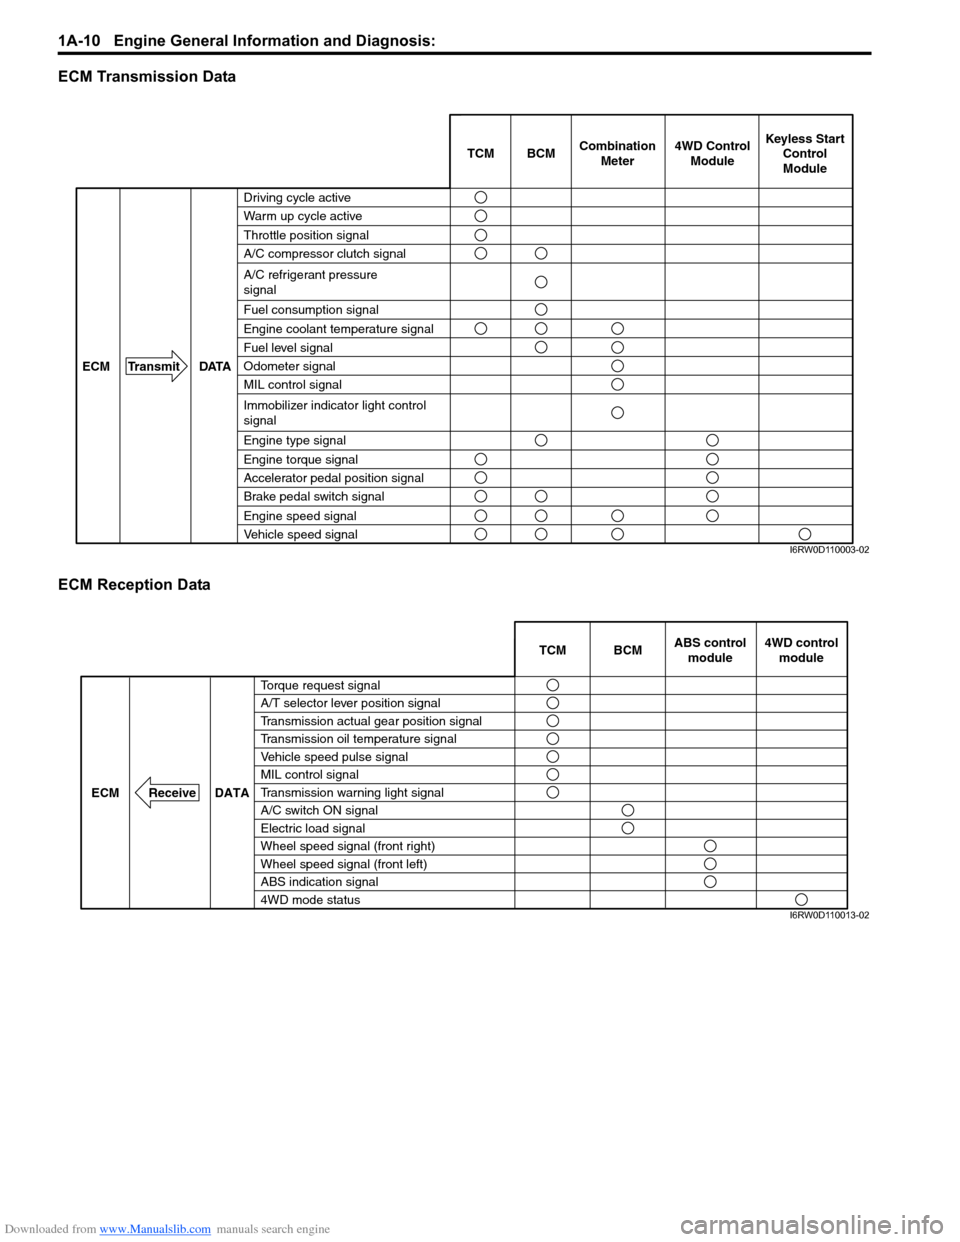
ECM Transmission Data
ECM Reception Data
BCM TCMCombination
Meter
DATA ECM Transmit
Brake pedal switch signal
Vehicle speed signal
Engine speed signal
Engine torque signal
Accelerator pedal position signal
4WD Control
ModuleKeyless Start
Control
Module
A/C refrigerant pressure
signal
A/C compressor clutch signal
Engine type signal
Immobilizer indicator light control
signal
MIL control signal
Engine coolant temperature signal
Fuel level signal
Fuel consumption signal
Throttle position signal
Driving cycle active
Warm up cycle active
Odometer signal
I6RW0D110003-02
DATA ECM Receive
ABS control
module
Transmission oil temperature signal
Transmission warning light signal Vehicle speed pulse signal A/T selector lever position signal
Transmission actual gear position signal
Wheel speed signal (front right)
Wheel speed signal (front left)
ABS indication signal
A/C switch ON signal
Electric load signalBCM
4WD mode status
Torque request signalTCM
MIL control signal4WD control
module
I6RW0D110013-02
Page 287 of 1556
Downloaded from www.Manualslib.com manuals search engine Engine Mechanical: 1D-5
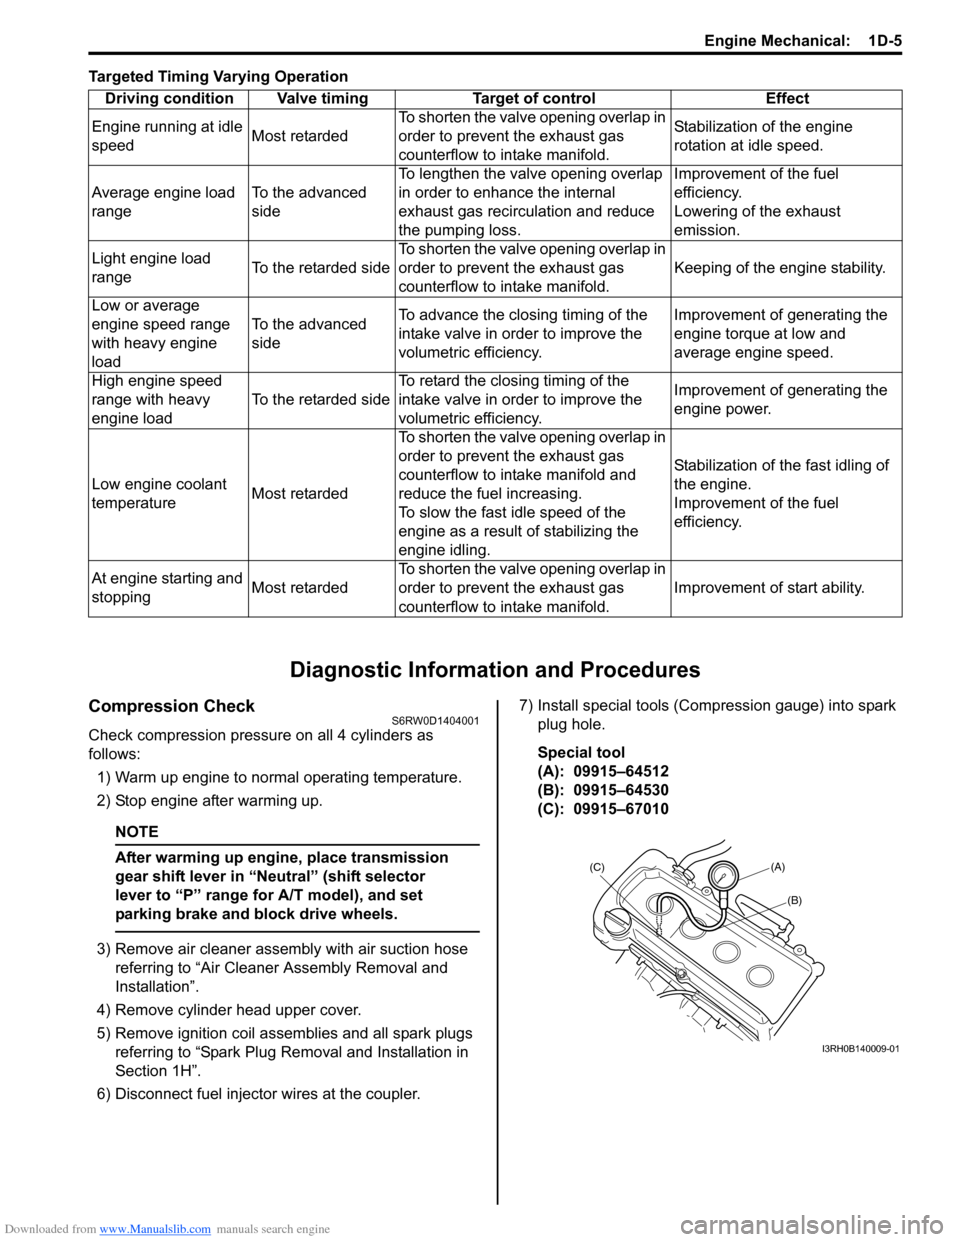
Targeted Timing Varying Operation
Diagnostic Information and Procedures
Compression CheckS6RW0D1404001
Check compression pressure on all 4 cylinders as
follows:
1) Warm up engine to normal operating temperature.
2) Stop engine after warming up.
NOTE
After warming up engine, place transmission
gear shift lever in “Neutral” (shift selector
lever to “P” range for A/T model), and set
parking brake and block drive wheels.
3) Remove air cleaner assembly with air suction hose
referring to “Air Cleaner Assembly Removal and
Installation”.
4) Remove cylinder head upper cover.
5) Remove ignition coil assemblies and all spark plugs
referring to “Spark Plug Removal and Installation in
Section 1H”.
6) Disconnect fuel injector wires at the coupler.7) Install special tools (Compression gauge) into spark
plug hole.
Special tool
(A): 09915–64512
(B): 09915–64530
(C): 09915–67010 Driving condition Valve timing Target of control Effect
Engine running at idle
speedMost retardedTo shorten the valve opening overlap in
order to prevent the exhaust gas
counterflow to intake manifold.Stabilization of the engine
rotation at idle speed.
Average engine load
rangeTo the advanced
sideTo lengthen the valve opening overlap
in order to enhance the internal
exhaust gas recirculation and reduce
the pumping loss.Improvement of the fuel
efficiency.
Lowering of the exhaust
emission.
Light engine load
rangeTo the retarded sideTo shorten the valve opening overlap in
order to prevent the exhaust gas
counterflow to intake manifold.Keeping of the engine stability.
Low or average
engine speed range
with heavy engine
loadTo the advanced
sideTo advance the closing timing of the
intake valve in order to improve the
volumetric efficiency.Improvement of generating the
engine torque at low and
average engine speed.
High engine speed
range with heavy
engine loadTo the retarded sideTo retard the closing timing of the
intake valve in order to improve the
volumetric efficiency.Improvement of generating the
engine power.
Low engine coolant
temperatureMost retardedTo shorten the valve opening overlap in
order to prevent the exhaust gas
counterflow to intake manifold and
reduce the fuel increasing.
To slow the fast idle speed of the
engine as a result of stabilizing the
engine idling.Stabilization of the fast idling of
the engine.
Improvement of the fuel
efficiency.
At engine starting and
stoppingMost retardedTo shorten the valve opening overlap in
order to prevent the exhaust gas
counterflow to intake manifold.Improvement of start ability.
(A)
(C)
(B)
I3RH0B140009-01
Page 332 of 1556
Downloaded from www.Manualslib.com manuals search engine 1D-50 Engine Mechanical:
Installation
1) Apply engine oil to pistons, rings, cylinder walls,
connecting rod bearings and crank pins.
NOTE
Do not apply oil between connecting rod and
bearing or between bearing cap and bearing.
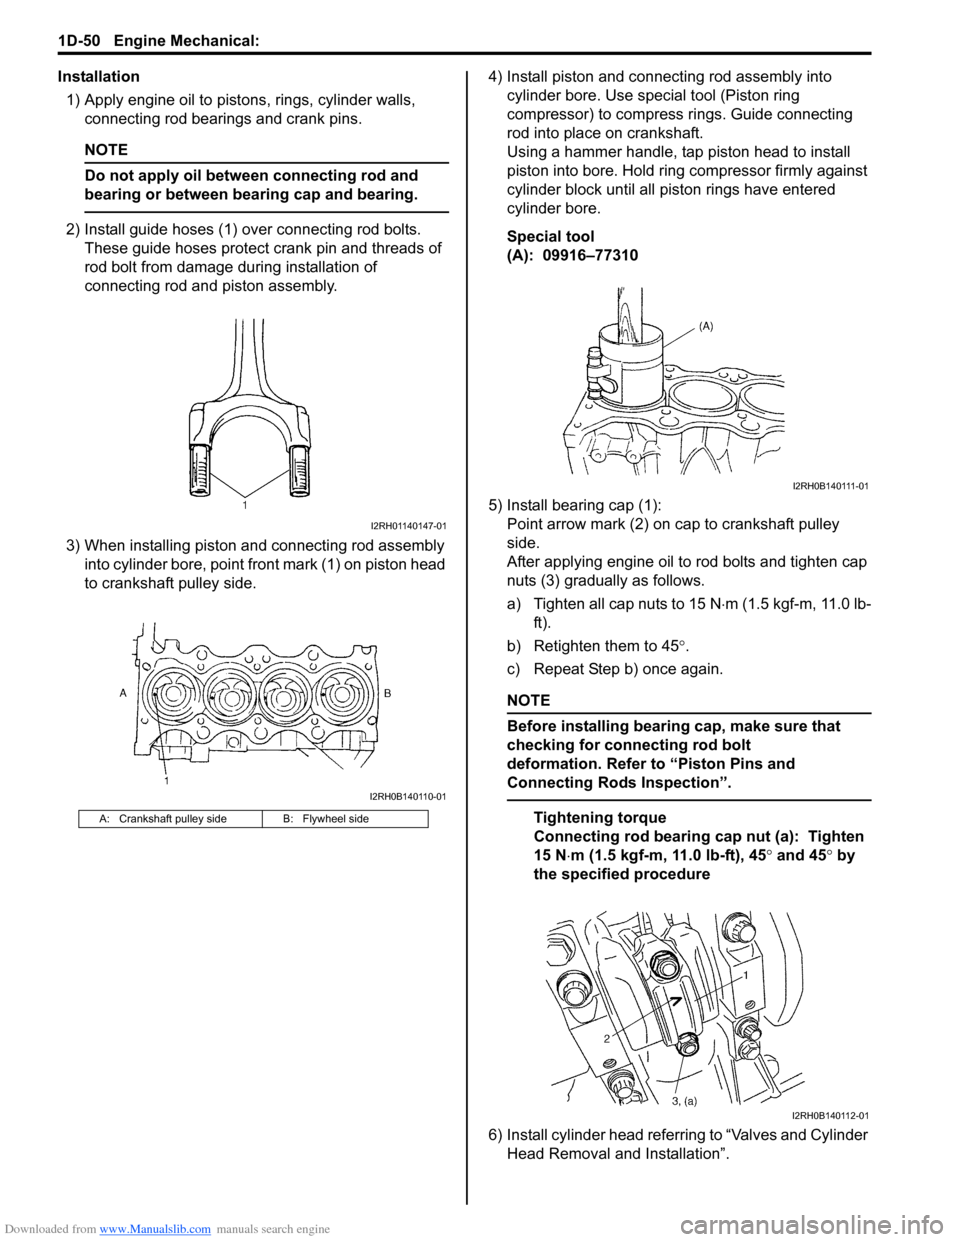
2) Install guide hoses (1) over connecting rod bolts.
These guide hoses protect crank pin and threads of
rod bolt from damage during installation of
connecting rod and piston assembly.
3) When installing piston and connecting rod assembly
into cylinder bore, point front mark (1) on piston head
to crankshaft pulley side.4) Install piston and connecting rod assembly into
cylinder bore. Use special tool (Piston ring
compressor) to compress rings. Guide connecting
rod into place on crankshaft.
Using a hammer handle, tap piston head to install
piston into bore. Hold ring compressor firmly against
cylinder block until all piston rings have entered
cylinder bore.
Special tool
(A): 09916–77310
5) Install bearing cap (1):
Point arrow mark (2) on cap to crankshaft pulley
side.
After applying engine oil to rod bolts and tighten cap
nuts (3) gradually as follows.
a) Tighten all cap nuts to 15 N⋅m (1.5 kgf-m, 11.0 lb-
ft).
b) Retighten them to 45°.
c) Repeat Step b) once again.
NOTE
Before installing bearing cap, make sure that
checking for connecting rod bolt
deformation. Refer to “Piston Pins and
Connecting Rods Inspection”.
Tightening torque
Connecting rod bearing cap nut (a): Tighten
15 N⋅m (1.5 kgf-m, 11.0 lb-ft), 45° and 45° by
the specified procedure
6) Install cylinder head referring to “Valves and Cylinder
Head Removal and Installation”.A: Crankshaft pulley side B: Flywheel side
I2RH01140147-01
I2RH0B140110-01
I2RH0B140111-01
I2RH0B140112-01
Page 345 of 1556
Downloaded from www.Manualslib.com manuals search engine Engine Mechanical: 1D-63
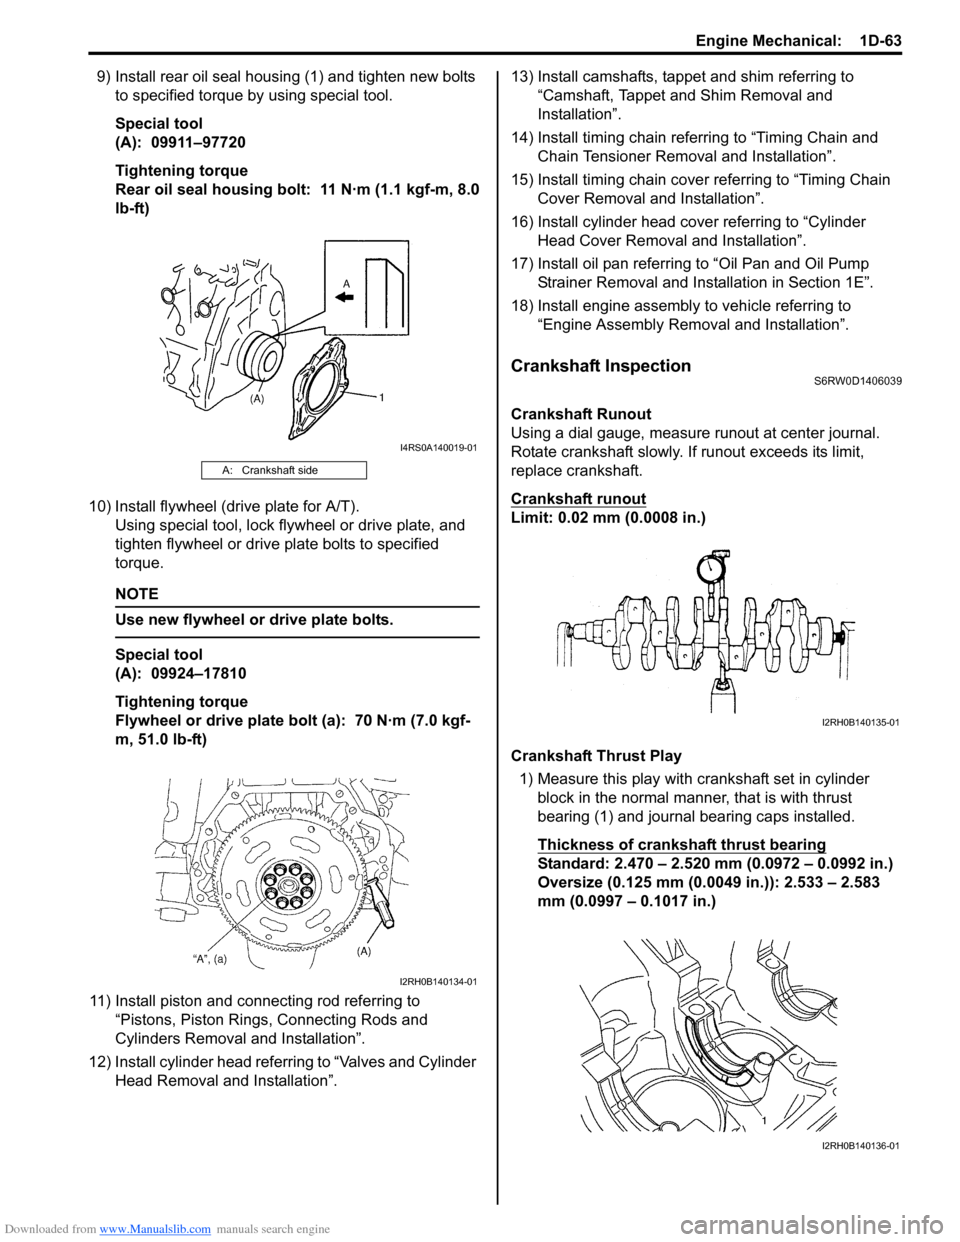
9) Install rear oil seal housing (1) and tighten new bolts
to specified torque by using special tool.
Special tool
(A): 09911–97720
Tightening torque
Rear oil seal housing bolt: 11 N·m (1.1 kgf-m, 8.0
lb-ft)
10) Install flywheel (drive plate for A/T).
Using special tool, lock flywheel or drive plate, and
tighten flywheel or drive plate bolts to specified
torque.
NOTE
Use new flywheel or drive plate bolts.
Special tool
(A): 09924–17810
Tightening torque
Flywheel or drive plate bolt (a): 70 N·m (7.0 kgf-
m, 51.0 lb-ft)
11) Install piston and connecting rod referring to
“Pistons, Piston Rings, Connecting Rods and
Cylinders Removal and Installation”.
12) Install cylinder head referring to “Valves and Cylinder
Head Removal and Installation”.13) Install camshafts, tappet and shim referring to
“Camshaft, Tappet and Shim Removal and
Installation”.
14) Install timing chain referring to “Timing Chain and
Chain Tensioner Removal and Installation”.
15) Install timing chain cover referring to “Timing Chain
Cover Removal and Installation”.
16) Install cylinder head cover referring to “Cylinder
Head Cover Removal and Installation”.
17) Install oil pan referring to “Oil Pan and Oil Pump
Strainer Removal and Installation in Section 1E”.
18) Install engine assembly to vehicle referring to
“Engine Assembly Removal and Installation”.
Crankshaft InspectionS6RW0D1406039
Crankshaft Runout
Using a dial gauge, measure runout at center journal.
Rotate crankshaft slowly. If runout exceeds its limit,
replace crankshaft.
Crankshaft runout
Limit: 0.02 mm (0.0008 in.)
Crankshaft Thrust Play
1) Measure this play with crankshaft set in cylinder
block in the normal manner, that is with thrust
bearing (1) and journal bearing caps installed.
Thickness of crankshaft thrust bearing
Standard: 2.470 – 2.520 mm (0.0972 – 0.0992 in.)
Oversize (0.125 mm (0.0049 in.)): 2.533 – 2.583
mm (0.0997 – 0.1017 in.)
A: Crankshaft side
I4RS0A140019-01
I2RH0B140134-01
I2RH0B140135-01
I2RH0B140136-01