display SUZUKI SX4 2008 1.G Owners Manual
[x] Cancel search | Manufacturer: SUZUKI, Model Year: 2008, Model line: SX4, Model: SUZUKI SX4 2008 1.GPages: 278, PDF Size: 4.07 MB
Page 39 of 278
2-26
BEFORE DRIVING
80J21-03E
60A039
To unfasten the belt, push the red
“PRESS” button on the buckle and allow
the belt to retract.
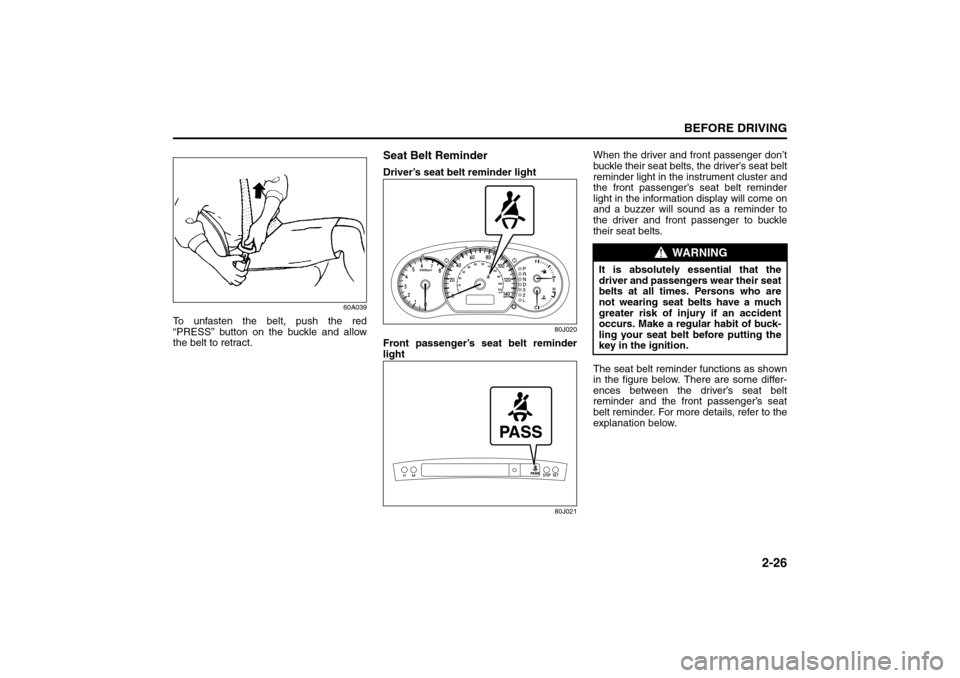
Seat Belt ReminderDriver’s seat belt reminder light
80J020
Front passenger’s seat belt reminder
light
80J021
When the driver and front passenger don’t
buckle their seat belts, the driver’s seat belt
reminder light in the instrument cluster and
the front passenger’s seat belt reminder
light in the information display will come on
and a buzzer will sound as a reminder to
the driver and front passenger to buckle
their seat belts.
The seat belt reminder functions as shown
in the figure below. There are some differ-
ences between the driver’s seat belt
reminder and the front passenger’s seat
belt reminder. For more details, refer to the
explanation below.
WARNING
It is absolutely essential that the
driver and passengers wear their seat
belts at all times. Persons who are
not wearing seat belts have a much
greater risk of injury if an accident
occurs. Make a regular habit of buck-
ling your seat belt before putting the
key in the ignition.
Seat Belts and Child Restraint Systems: 3
Page 77 of 278
INSTRUMENT PANEL
4
80J21-03E
60G406
INSTRUMENT PANELInstrument Panel ................................................................. 4-1
Instrument Cluster .............................................................. 4-2
Warning and Indicator Lights ............................................ 4-3
A/T Selector Position Indicator (if equipped) ................... 4-10
Speedometer/Odometer/Trip meter ................................... 4-11
Tachometer .......................................................................... 4-12
Fuel Gauge ........................................................................... 4-12
Temperature Gauge ............................................................ 4-13
Hazard Warning Switch ...................................................... 4-13
“ESP OFF” Switch (if equipped) ........................................ 4-13
Instrument Light Brightness Control ................................ 4-14
2WD/i-AWD (intelligent All Wheel Drive) Switch
(if equipped) ......................................................................... 4-14
Heated Rear Window and Heated Outside Rearview
Mirrors (if equipped) Switch ............................................... 4-15
Fog Light Switch (if equipped) ........................................... 4-16
Cigarette Lighter and Ashtray (if equipped) ..................... 4-16
Information Display ............................................................. 4-17
Glove Box ............................................................................ 4-20
Heating and Air Conditioning System ............................... 4-21
Audio Systems .................................................................... 4-32
Page 78 of 278
4-1INSTRUMENT PANEL
80J21-03E
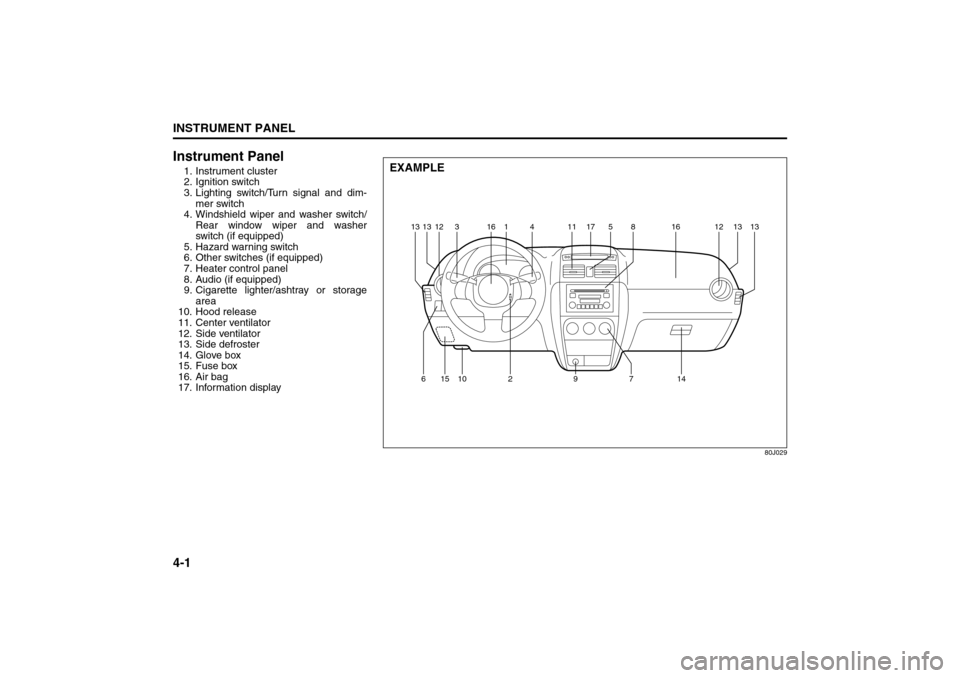
Instrument Panel1. Instrument cluster
2. Ignition switch
3. Lighting switch/Turn signal and dim-
mer switch
4. Windshield wiper and washer switch/
Rear window wiper and washer
switch (if equipped)
5. Hazard warning switch
6. Other switches (if equipped)
7. Heater control panel
8. Audio (if equipped)
9. Cigarette lighter/ashtray or storage
area
10. Hood release
11. Center ventilator
12. Side ventilator
13. Side defroster
14. Glove box
15. Fuse box
16. Air bag
17. Information display
80J029
EXAMPLE
12 13
13
13 31614 11 517
8161213
15 10
629714
Instrument Panel: 3, 8
Page 88 of 278
4-11INSTRUMENT PANEL
80J21-03E
Speedometer/Odometer/Trip
meter
80J032
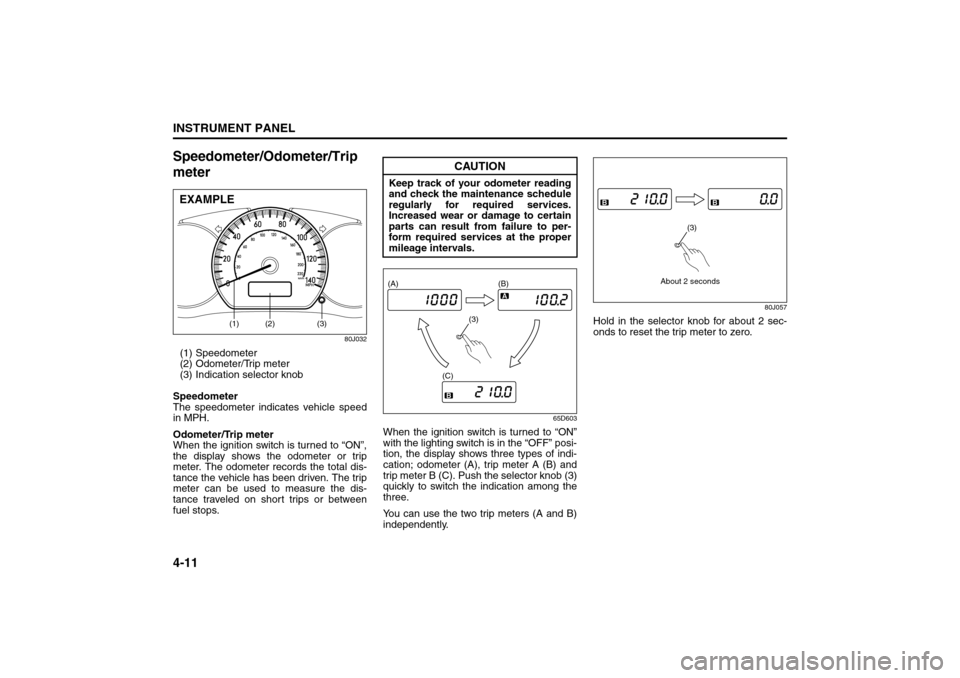
(1) Speedometer
(2) Odometer/Trip meter
(3) Indication selector knob
Speedometer
The speedometer indicates vehicle speed
in MPH.
Odometer/Trip meter
When the ignition switch is turned to “ON”,
the display shows the odometer or trip
meter. The odometer records the total dis-
tance the vehicle has been driven. The trip
meter can be used to measure the dis-
tance traveled on short trips or between
fuel stops.
65D603
When the ignition switch is turned to “ON”
with the lighting switch is in the “OFF” posi-
tion, the display shows three types of indi-
cation; odometer (A), trip meter A (B) and
trip meter B (C). Push the selector knob (3)
quickly to switch the indication among the
three.
You can use the two trip meters (A and B)
independently.
80J057
Hold in the selector knob for about 2 sec-
onds to reset the trip meter to zero.
(2)
(3)
(1)
EXAMPLE
CAUTION
Keep track of your odometer reading
and check the maintenance schedule
regularly for required services.
Increased wear or damage to certain
parts can result from failure to per-
form required services at the proper
mileage intervals.
(3) (A) (B)
(C)
About 2 seconds
(3)
Outside Rearview Mirrors Defroster Switch:
Fog Light Switch: 8
Cigarette Lighter and Ashtray: 3, 8
Page 89 of 278
4-12
INSTRUMENT PANEL
80J21-03E
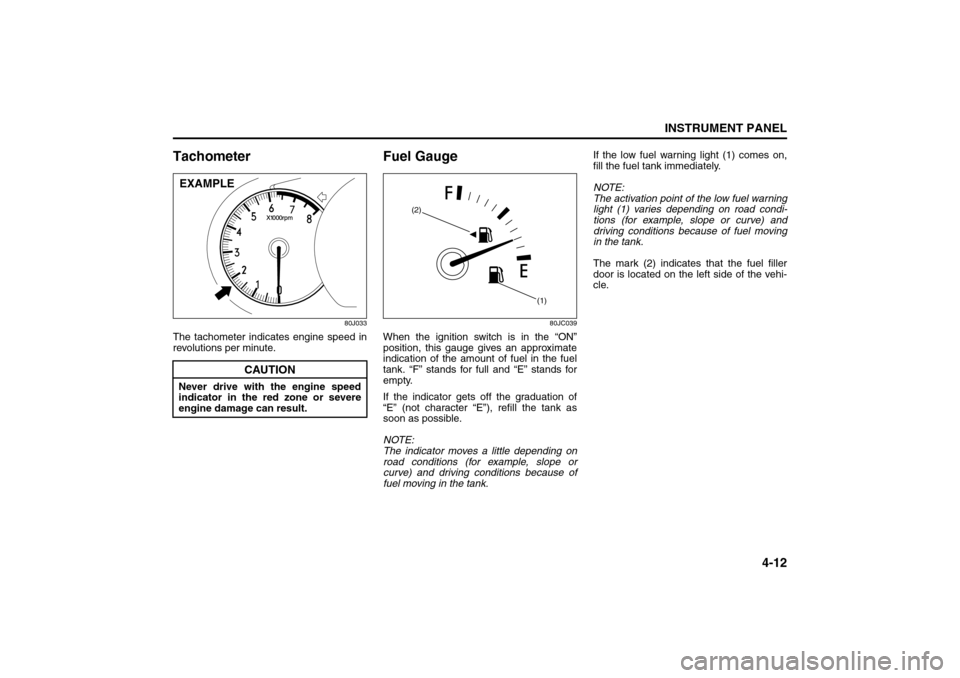
Tachometer
80J033
The tachometer indicates engine speed in
revolutions per minute.
Fuel Gauge
80JC039
When the ignition switch is in the “ON”
position, this gauge gives an approximate
indication of the amount of fuel in the fuel
tank. “F” stands for full and “E” stands for
empty.
If the indicator gets off the graduation of
“E” (not character “E”), refill the tank as
soon as possible.
NOTE:
The indicator moves a little depending on
road conditions (for example, slope or
curve) and driving conditions because of
fuel moving in the tank.If the low fuel warning light (1) comes on,
fill the fuel tank immediately.
NOTE:
The activation point of the low fuel warning
light (1) varies depending on road condi-
tions (for example, slope or curve) and
driving conditions because of fuel moving
in the tank.
The mark (2) indicates that the fuel filler
door is located on the left side of the vehi-
cle.
CAUTION
Never drive with the engine speed
indicator in the red zone or severe
engine damage can result.EXAMPLE
(1) (2)
Cigarette Lighter and Ashtray: 3, 8
Information Display:
Page 90 of 278
4-13INSTRUMENT PANEL
80J21-03E
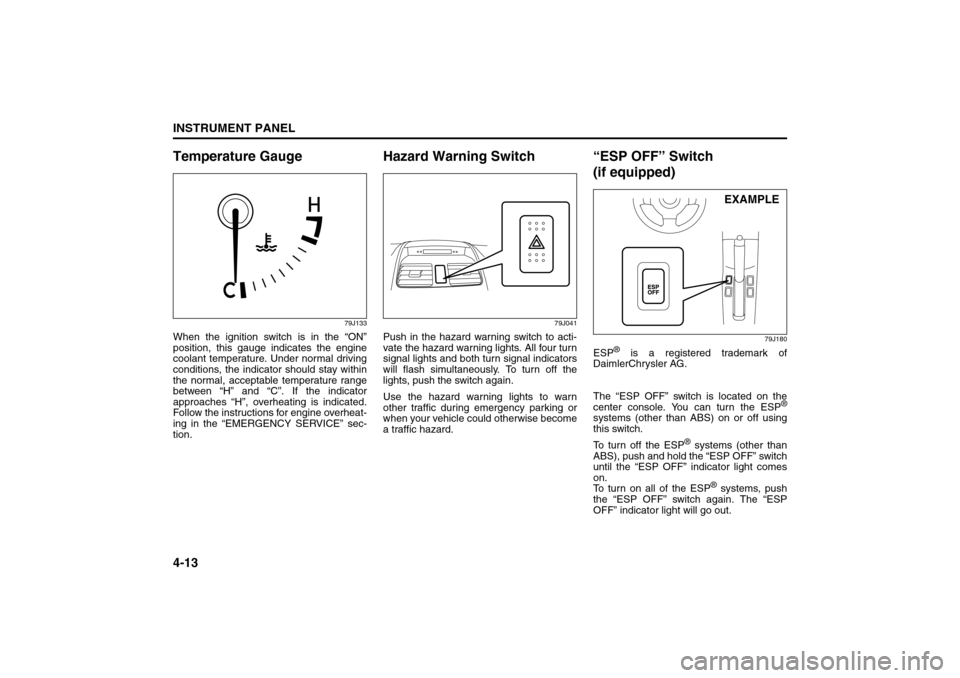
Temperature Gauge
79J133
When the ignition switch is in the “ON”
position, this gauge indicates the engine
coolant temperature. Under normal driving
conditions, the indicator should stay within
the normal, acceptable temperature range
between “H” and “C”. If the indicator
approaches “H”, overheating is indicated.
Follow the instructions for engine overheat-
ing in the “EMERGENCY SERVICE” sec-
tion.
Hazard Warning Switch
79J041
Push in the hazard warning switch to acti-
vate the hazard warning lights. All four turn
signal lights and both turn signal indicators
will flash simultaneously. To turn off the
lights, push the switch again.
Use the hazard warning lights to warn
other traffic during emergency parking or
when your vehicle could otherwise become
a traffic hazard.
“ESP OFF” Switch
(if equipped)
79J180
ESP
® is a registered trademark of
DaimlerChrysler AG.
The “ESP OFF” switch is located on the
center console. You can turn the ESP
®
systems (other than ABS) on or off using
this switch.
To turn off the ESP
® systems (other than
ABS), push and hold the “ESP OFF” switch
until the “ESP OFF” indicator light comes
on.
To turn on all of the ESP
® systems, push
the “ESP OFF” switch again. The “ESP
OFF” indicator light will go out.EXAMPLE
Information Display:
Page 91 of 278
4-14
INSTRUMENT PANEL
80J21-03E
For details of the ESP
® systems, refer to
“Electronic Stability Program (ESP
®)” in
the “OPERATING YOUR VEHICLE” sec-
tion.
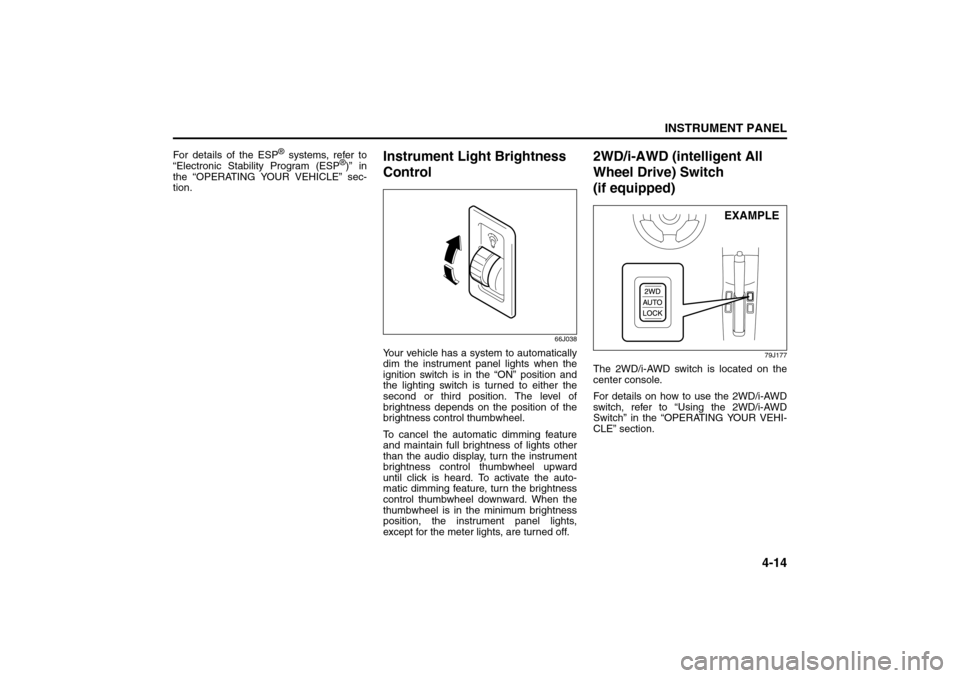
Instrument Light Brightness
Control
66J038
Your vehicle has a system to automatically
dim the instrument panel lights when the
ignition switch is in the “ON” position and
the lighting switch is turned to either the
second or third position. The level of
brightness depends on the position of the
brightness control thumbwheel.
To cancel the automatic dimming feature
and maintain full brightness of lights other
than the audio display, turn the instrument
brightness control thumbwheel upward
until click is heard. To activate the auto-
matic dimming feature, turn the brightness
control thumbwheel downward. When the
thumbwheel is in the minimum brightness
position, the instrument panel lights,
except for the meter lights, are turned off.
2WD/i-AWD (intelligent All
Wheel Drive) Switch
(if equipped)
79J177
The 2WD/i-AWD switch is located on the
center console.
For details on how to use the 2WD/i-AWD
switch, refer to “Using the 2WD/i-AWD
Switch” in the “OPERATING YOUR VEHI-
CLE” section.
EXAMPLE
Information Display:
Glove Box: 3
Page 94 of 278
4-17INSTRUMENT PANEL
80J21-03E
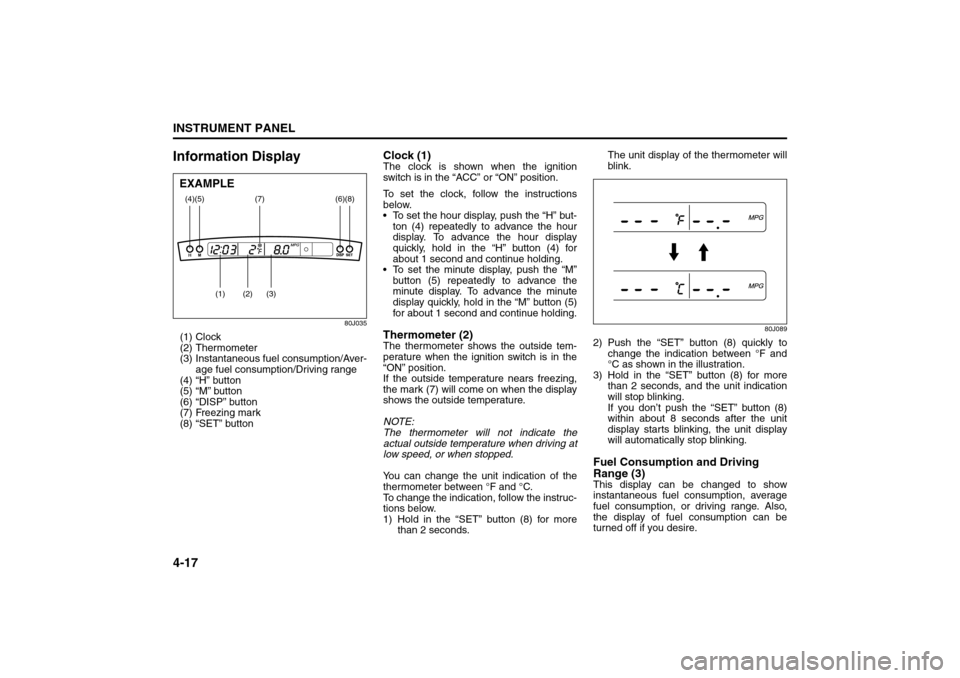
Information Display
80J035
(1) Clock
(2) Thermometer
(3) Instantaneous fuel consumption/Aver-
age fuel consumption/Driving range
(4) “H” button
(5) “M” button
(6) “DISP” button
(7) Freezing mark
(8) “SET” button
Clock (1)The clock is shown when the ignition
switch is in the “ACC” or “ON” position.
To set the clock, follow the instructions
below.
To set the hour display, push the “H” but-
ton (4) repeatedly to advance the hour
display. To advance the hour display
quickly, hold in the “H” button (4) for
about 1 second and continue holding.
To set the minute display, push the “M”
button (5) repeatedly to advance the
minute display. To advance the minute
display quickly, hold in the “M” button (5)
for about 1 second and continue holding.Thermometer (2)The thermometer shows the outside tem-
perature when the ignition switch is in the
“ON” position.
If the outside temperature nears freezing,
the mark (7) will come on when the display
shows the outside temperature.
NOTE:
The thermometer will not indicate the
actual outside temperature when driving at
low speed, or when stopped.
You can change the unit indication of the
thermometer between °F and °C.
To change the indication, follow the instruc-
tions below.
1) Hold in the “SET” button (8) for more
than 2 seconds.The unit display of the thermometer will
blink.
80J089
2) Push the “SET” button (8) quickly to
change the indication between °F and
°C as shown in the illustration.
3) Hold in the “SET” button (8) for more
than 2 seconds, and the unit indication
will stop blinking.
If you don’t push the “SET” button (8)
within about 8 seconds after the unit
display starts blinking, the unit display
will automatically stop blinking.Fuel Consumption and Driving
Range (3)This display can be changed to show
instantaneous fuel consumption, average
fuel consumption, or driving range. Also,
the display of fuel consumption can be
turned off if you desire.
(4)
(2)
(1)
(3)
(5)
(8)
(7)
(6)
EXAMPLE
Heating and Air Conditioning System: 4
Page 95 of 278
4-18
INSTRUMENT PANEL
80J21-03E
80J079
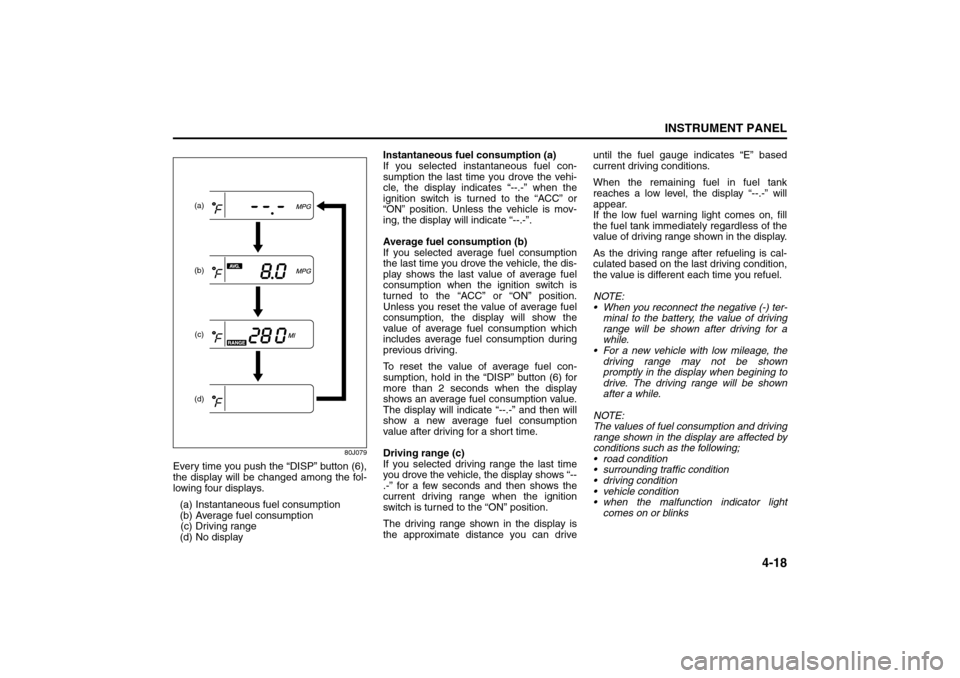
Every time you push the “DISP” button (6),
the display will be changed among the fol-
lowing four displays.
(a) Instantaneous fuel consumption
(b) Average fuel consumption
(c) Driving range
(d) No displayInstantaneous fuel consumption (a)
If you selected instantaneous fuel con-
sumption the last time you drove the vehi-
cle, the display indicates “--.-” when the
ignition switch is turned to the “ACC” or
“ON” position. Unless the vehicle is mov-
ing, the display will indicate “--.-”.
Average fuel consumption (b)
If you selected average fuel consumption
the last time you drove the vehicle, the dis-
play shows the last value of average fuel
consumption when the ignition switch is
turned to the “ACC” or “ON” position.
Unless you reset the value of average fuel
consumption, the display will show the
value of average fuel consumption which
includes average fuel consumption during
previous driving.
To reset the value of average fuel con-
sumption, hold in the “DISP” button (6) for
more than 2 seconds when the display
shows an average fuel consumption value.
The display will indicate “--.-” and then will
show a new average fuel consumption
value after driving for a short time.
Driving range (c)
If you selected driving range the last time
you drove the vehicle, the display shows “--
.-” for a few seconds and then shows the
current driving range when the ignition
switch is turned to the “ON” position.
The driving range shown in the display is
the approximate distance you can driveuntil the fuel gauge indicates “E” based
current driving conditions.
When the remaining fuel in fuel tank
reaches a low level, the display “--.-” will
appear.
If the low fuel warning light comes on, fill
the fuel tank immediately regardless of the
value of driving range shown in the display.
As the driving range after refueling is cal-
culated based on the last driving condition,
the value is different each time you refuel.
NOTE:
When you reconnect the negative (-) ter-
minal to the battery, the value of driving
range will be shown after driving for a
while.
For a new vehicle with low mileage, the
driving range may not be shown
promptly in the display when begining to
drive. The driving range will be shown
after a while.
NOTE:
The values of fuel consumption and driving
range shown in the display are affected by
conditions such as the following;
road condition
surrounding traffic condition
driving condition
vehicle condition
when the malfunction indicator light
comes on or blinks
(a)
(b)
(c)(d)
Heating and Air Conditioning System: 4
Page 96 of 278
4-19INSTRUMENT PANEL
80J21-03E
Unit indication of fuel consumption and
driving range
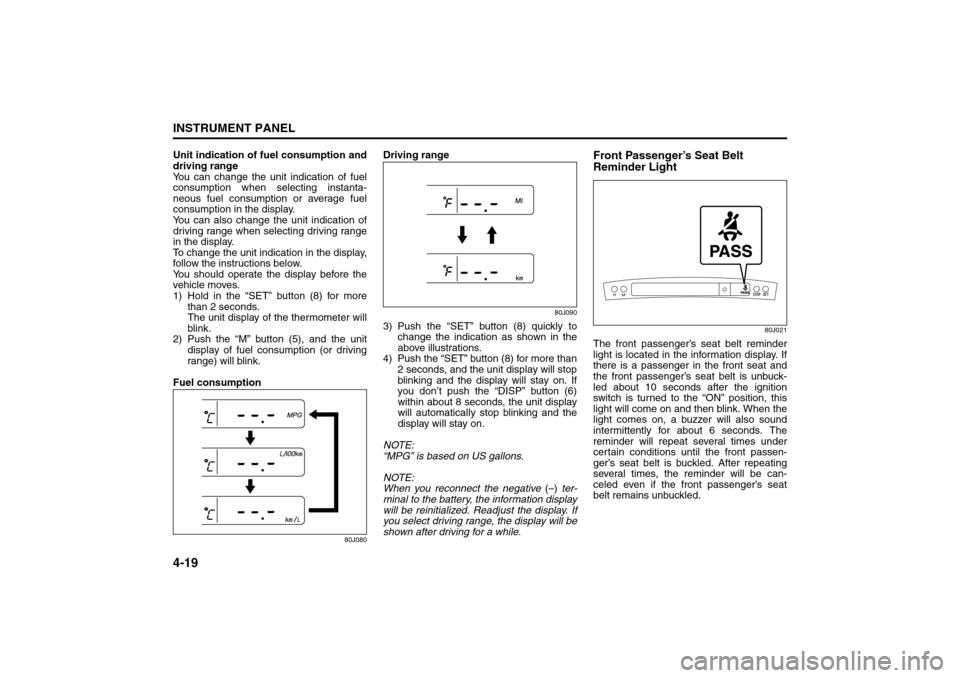
You can change the unit indication of fuel
consumption when selecting instanta-
neous fuel consumption or average fuel
consumption in the display.
You can also change the unit indication of
driving range when selecting driving range
in the display.
To change the unit indication in the display,
follow the instructions below.
You should operate the display before the
vehicle moves.
1) Hold in the “SET” button (8) for more
than 2 seconds.
The unit display of the thermometer will
blink.
2) Push the “M” button (5), and the unit
display of fuel consumption (or driving
range) will blink.
Fuel consumption
80J080
Driving range
80J090
3) Push the “SET” button (8) quickly to
change the indication as shown in the
above illustrations.
4) Push the “SET” button (8) for more than
2 seconds, and the unit display will stop
blinking and the display will stay on. If
you don’t push the “DISP” button (6)
within about 8 seconds, the unit display
will automatically stop blinking and the
display will stay on.
NOTE:
“MPG” is based on US gallons.
NOTE:
When you reconnect the negative (–) ter-
minal to the battery, the information display
will be reinitialized. Readjust the display. If
you select driving range, the display will be
shown after driving for a while.
Front Passenger’s Seat Belt
Reminder Light
80J021
The front passenger’s seat belt reminder
light is located in the information display. If
there is a passenger in the front seat and
the front passenger’s seat belt is unbuck-
led about 10 seconds after the ignition
switch is turned to the “ON” position, this
light will come on and then blink. When the
light comes on, a buzzer will also sound
intermittently for about 6 seconds. The
reminder will repeat several times under
certain conditions until the front passen-
ger’s seat belt is buckled. After repeating
several times, the reminder will be can-
celed even if the front passenger’s seat
belt remains unbuckled.
Heating and Air Conditioning System: 4