brakes SUZUKI SX4 2010 1.G User Guide
[x] Cancel search | Manufacturer: SUZUKI, Model Year: 2010, Model line: SX4, Model: SUZUKI SX4 2010 1.GPages: 297, PDF Size: 4.51 MB
Page 139 of 297
4-6
DRIVING TIPS
80J23-03E
WARNING
In addition to following the driving
tips in this section, it is important to
observe the following precautions.
Make sure your tires are in good
condition and always maintain the
specified tire pressure. Refer to
“Tires” in the “INSPECTION AND
MAINTENANCE” section for
details.
Do not use tires other than those
specified by SUZUKI. Never use dif-
ferent sizes or types of tires on the
front and rear wheels. For informa-
tion regarding the specified tires,
refer to the Tire Information Label
located on the driver’s side door
pillar.
Never use oversized tires or special
shocks and springs to raise (jack
up) your vehicle. This will change
its handling characteristics. Over-
sized tires may also rub against the
fender over bumps, causing vehicle
damage or tire failure.
(Continued)
WARNING
(Continued)
After driving through water, test the
brakes while driving at a slow
speed to see if they have main-
tained their normal effectiveness. If
the brakes are less effective than
normal, dry them by repeatedly
applying the brakes while driving
slowly until the brakes have
regained their normal effective-
ness.
Warning and Indicator Lights: 8
Page 205 of 297
INSPECTION AND MAINTENANCE
7
80J23-03E
60G410
INSPECTION AND MAINTENANCEMaintenance Schedule ....................................................... 7-2
Periodic Maintenance Schedule ........................................ 7-3
Maintenance Recommended under Severe Driving
Conditions ........................................................................... 7-7
Drive Belt ............................................................................. 7-11
Engine Oil and Filter ........................................................... 7-11
Engine Coolant .................................................................... 7-14
Air Cleaner ........................................................................... 7-16
Spark Plugs ......................................................................... 7-16
Gear Oil ................................................................................ 7-18
Clutch Pedal ........................................................................ 7-19
Continuously Variable Transaxle (CVT) Fluid .................. 7-20
Brakes .................................................................................. 7-21
Steering Wheel .................................................................... 7-23
Tires ...................................................................................... 7-24
Battery .................................................................................. 7-35
Fuses .................................................................................... 7-36
Headlight Aiming ................................................................. 7-39
Bulb Replacement ............................................................... 7-40
Wiper Blades ....................................................................... 7-46
Windshield Washer Fluid ................................................... 7-50
Air Conditioning System .................................................... 7-50
Page 226 of 297
7-21INSPECTION AND MAINTENANCE
80J23-03E
6) The handle of the CVT fluid dipstick is
colored red or orange for easy identifi-
cation.
Remove the dipstick, clean it and push
it back in until the cap seats. Pull out
the dipstick and read the fluid level.
The fluid level should be between the
two marks in the “HOT” range on the
dipstick.
7) Add just enough specified fluid through
the dipstick hole to fill the transaxle to
the proper level. It takes only 0.6 liters
(1.27 US pt) for CVT to raise the level
from “LOW” to “FULL”.Deterioration Checking or Chang-
ing OilSince special procedures, materials and
tools are required to check the deteriora-
tion of CVT oil or change, it is recom-
mended that you trust this job to your
authorized SUZUKI dealer.
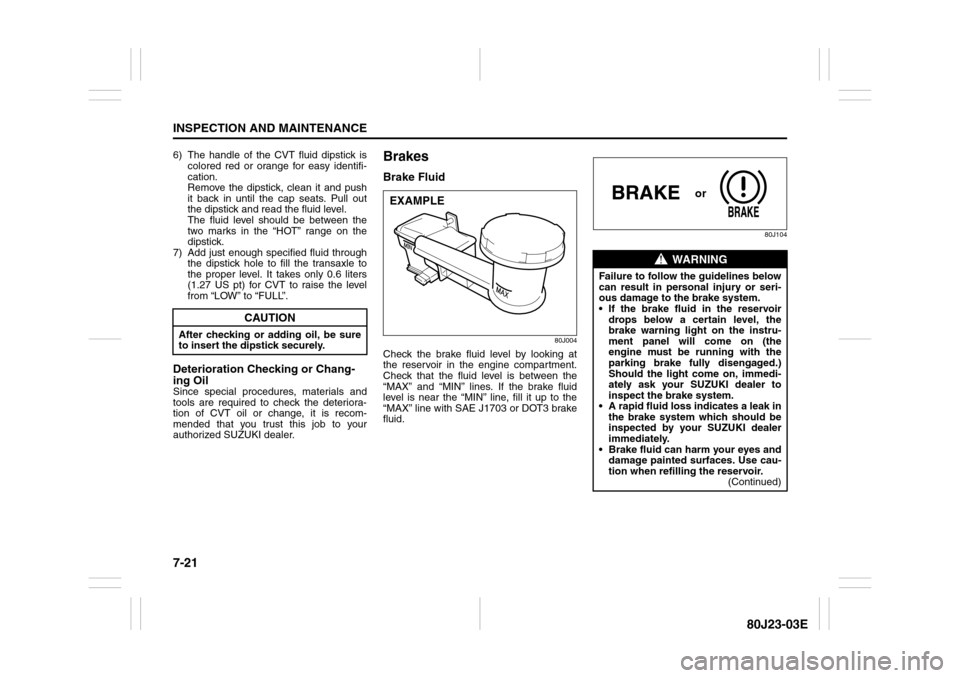
BrakesBrake Fluid
80J004
Check the brake fluid level by looking at
the reservoir in the engine compartment.
Check that the fluid level is between the
“MAX” and “MIN” lines. If the brake fluid
level is near the “MIN” line, fill it up to the
“MAX” line with SAE J1703 or DOT3 brake
fluid.
80J104
CAUTION
After checking or adding oil, be sure
to insert the dipstick securely.
EXAMPLE
WARNING
Failure to follow the guidelines below
can result in personal injury or seri-
ous damage to the brake system.
If the brake fluid in the reservoir
drops below a certain level, the
brake warning light on the instru-
ment panel will come on (the
engine must be running with the
parking brake fully disengaged.)
Should the light come on, immedi-
ately ask your SUZUKI dealer to
inspect the brake system.
A rapid fluid loss indicates a leak in
the brake system which should be
inspected by your SUZUKI dealer
immediately.
Brake fluid can harm your eyes and
damage painted surfaces. Use cau-
tion when refilling the reservoir.
(Continued)
or
Page 227 of 297
7-22
INSPECTION AND MAINTENANCE
80J23-03E
NOTE:
With disc brakes, the fluid level can be
expected to gradually fall as the brake
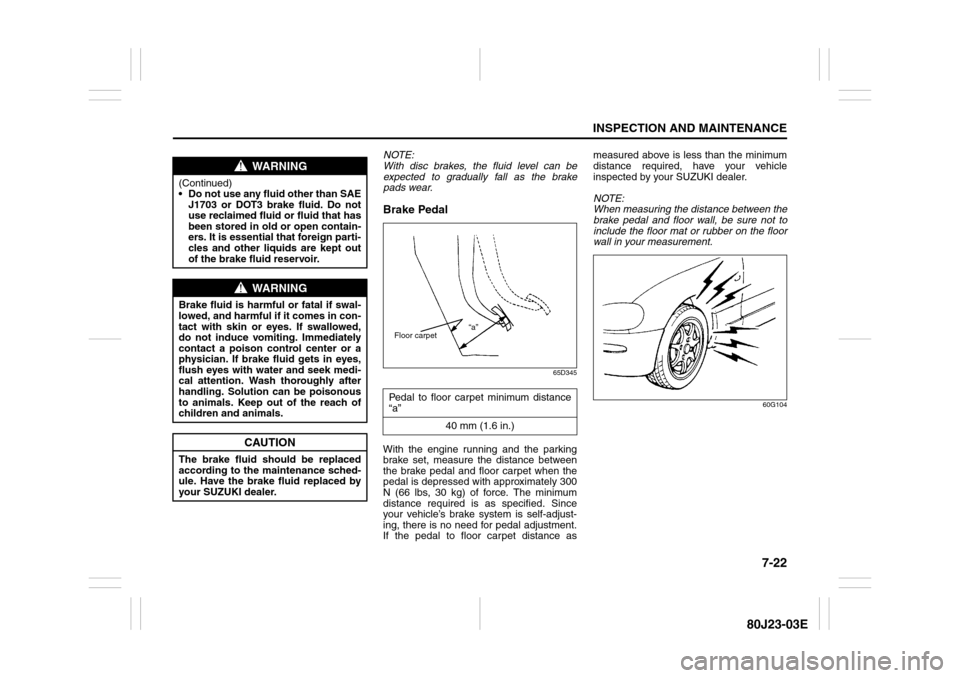
pads wear.Brake Pedal
65D345
With the engine running and the parking
brake set, measure the distance between
the brake pedal and floor carpet when the
pedal is depressed with approximately 300
N (66 lbs, 30 kg) of force. The minimum
distance required is as specified. Since
your vehicle’s brake system is self-adjust-
ing, there is no need for pedal adjustment.
If the pedal to floor carpet distance asmeasured above is less than the minimum
distance required, have your vehicle
inspected by your SUZUKI dealer.
NOTE:
When measuring the distance between the
brake pedal and floor wall, be sure not to
include the floor mat or rubber on the floor
wall in your measurement.
60G104
WARNING
(Continued)
Do not use any fluid other than SAE
J1703 or DOT3 brake fluid. Do not
use reclaimed fluid or fluid that has
been stored in old or open contain-
ers. It is essential that foreign parti-
cles and other liquids are kept out
of the brake fluid reservoir.
WARNING
Brake fluid is harmful or fatal if swal-
lowed, and harmful if it comes in con-
tact with skin or eyes. If swallowed,
do not induce vomiting. Immediately
contact a poison control center or a
physician. If brake fluid gets in eyes,
flush eyes with water and seek medi-
cal attention. Wash thoroughly after
handling. Solution can be poisonous
to animals. Keep out of the reach of
children and animals.
CAUTION
The brake fluid should be replaced
according to the maintenance sched-
ule. Have the brake fluid replaced by
your SUZUKI dealer.
Pedal to floor carpet minimum distance
“a”
40 mm (1.6 in.)
“a”
Floor carpet
Page 228 of 297
7-23INSPECTION AND MAINTENANCE
80J23-03E
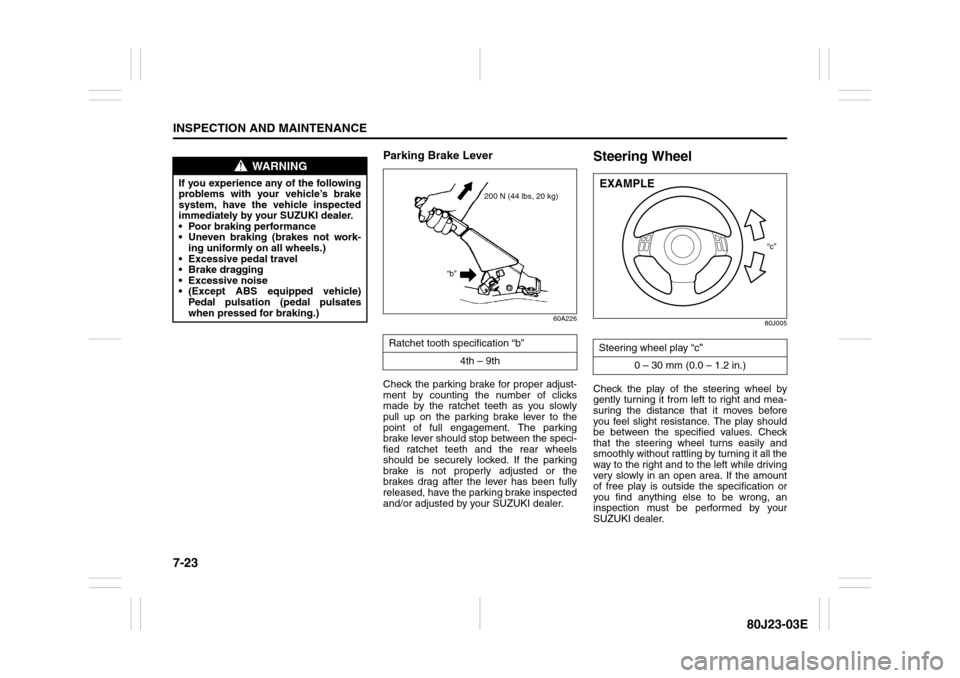
Parking Brake Lever
60A226
Check the parking brake for proper adjust-
ment by counting the number of clicks
made by the ratchet teeth as you slowly
pull up on the parking brake lever to the
point of full engagement. The parking
brake lever should stop between the speci-
fied ratchet teeth and the rear wheels
should be securely locked. If the parking
brake is not properly adjusted or the
brakes drag after the lever has been fully
released, have the parking brake inspected
and/or adjusted by your SUZUKI dealer.
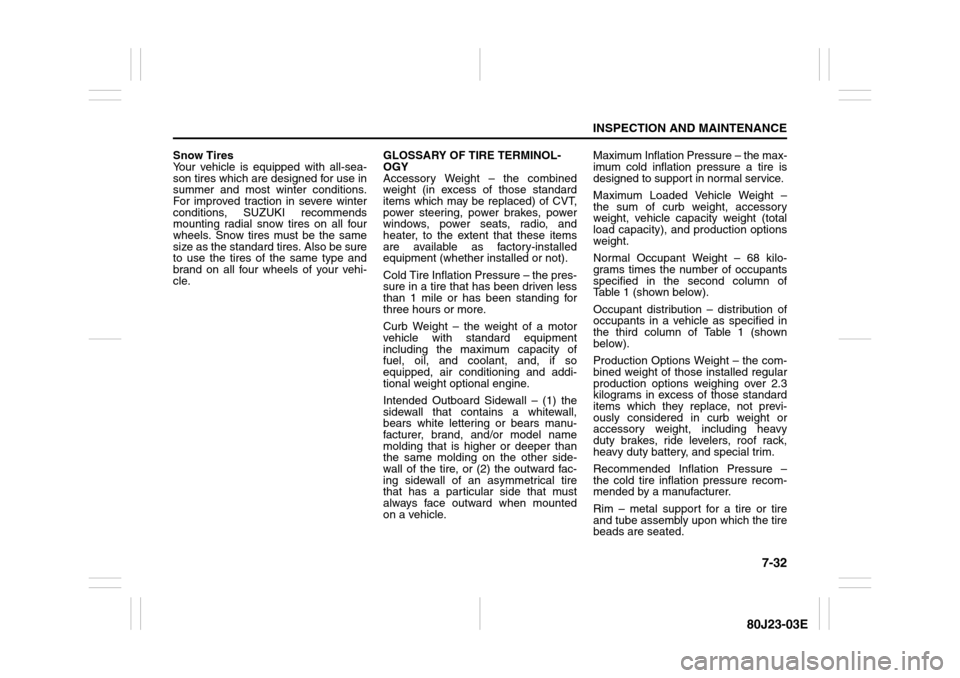
Steering Wheel
80J005
Check the play of the steering wheel by
gently turning it from left to right and mea-
suring the distance that it moves before
you feel slight resistance. The play should
be between the specified values. Check
that the steering wheel turns easily and
smoothly without rattling by turning it all the
way to the right and to the left while driving
very slowly in an open area. If the amount
of free play is outside the specification or
you find anything else to be wrong, an
inspection must be performed by your
SUZUKI dealer.
WARNING
If you experience any of the following
problems with your vehicle’s brake
system, have the vehicle inspected
immediately by your SUZUKI dealer.
Poor braking performance
Uneven braking (brakes not work-
ing uniformly on all wheels.)
Excessive pedal travel
Brake dragging
Excessive noise
(Except ABS equipped vehicle)
Pedal pulsation (pedal pulsates
when pressed for braking.)
Ratchet tooth specification “b”
4th – 9th
200 N (44 lbs, 20 kg)
“b”
Steering wheel play “c”
0 – 30 mm (0.0 – 1.2 in.)
“c”
EXAMPLE
Page 237 of 297
7-32
INSPECTION AND MAINTENANCE
80J23-03E
Snow Tires
Your vehicle is equipped with all-sea-
son tires which are designed for use in
summer and most winter conditions.
For improved traction in severe winter
conditions, SUZUKI recommends
mounting radial snow tires on all four
wheels. Snow tires must be the same
size as the standard tires. Also be sure
to use the tires of the same type and
brand on all four wheels of your vehi-
cle.GLOSSARY OF TIRE TERMINOL-
OGY
Accessory Weight – the combined
weight (in excess of those standard
items which may be replaced) of CVT,
power steering, power brakes, power
windows, power seats, radio, and
heater, to the extent that these items
are available as factory-installed
equipment (whether installed or not).
Cold Tire Inflation Pressure – the pres-
sure in a tire that has been driven less
than 1 mile or has been standing for
three hours or more.
Curb Weight – the weight of a motor
vehicle with standard equipment
including the maximum capacity of
fuel, oil, and coolant, and, if so
equipped, air conditioning and addi-
tional weight optional engine.
Intended Outboard Sidewall – (1) the
sidewall that contains a whitewall,
bears white lettering or bears manu-
facturer, brand, and/or model name
molding that is higher or deeper than
the same molding on the other side-
wall of the tire, or (2) the outward fac-
ing sidewall of an asymmetrical tire
that has a particular side that must
always face outward when mounted
on a vehicle.Maximum Inflation Pressure – the max-
imum cold inflation pressure a tire is
designed to support in normal service.
Maximum Loaded Vehicle Weight –
the sum of curb weight, accessory
weight, vehicle capacity weight (total
load capacity), and production options
weight.
Normal Occupant Weight – 68 kilo-
grams times the number of occupants
specified in the second column of
Table 1 (shown below).
Occupant distribution – distribution of
occupants in a vehicle as specified in
the third column of Table 1 (shown
below).
Production Options Weight – the com-
bined weight of those installed regular
production options weighing over 2.3
kilograms in excess of those standard
items which they replace, not previ-
ously considered in curb weight or
accessory weight, including heavy
duty brakes, ride levelers, roof rack,
heavy duty battery, and special trim.
Recommended Inflation Pressure –
the cold tire inflation pressure recom-
mended by a manufacturer.
Rim – metal support for a tire or tire
and tube assembly upon which the tire
beads are seated.
Page 262 of 297
8-5EMERGENCY SERVICE
80J23-03E
Jump Starting Instructions
When jump starting your vehicle, use
the following procedure:
60A269
1) Use only a 12-volt battery to jump start
your vehicle. Position the good 12-volt
battery close to your vehicle so that the
jumper cables will reach both batteries.
When using a battery installed on
another vehicle, DO NOT LET THE
VEHICLES TOUCH. Set the parking
brakes fully on both vehicles.2) Turn off all vehicle accessories, except
those necessary for safety reasons (for
example, headlights or hazard lights).
54G079
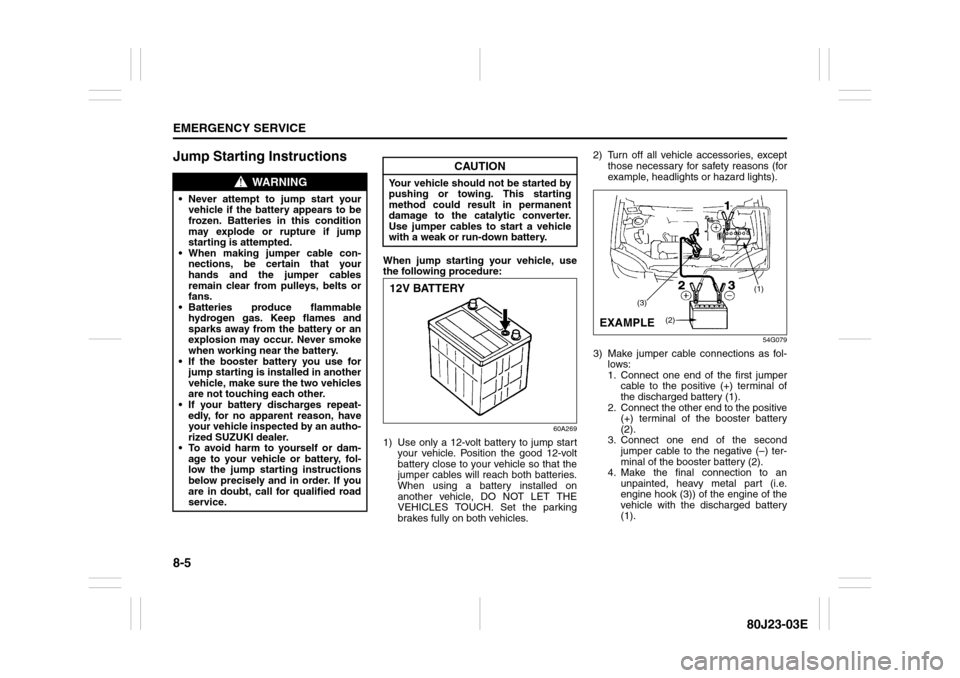
3) Make jumper cable connections as fol-
lows:
1. Connect one end of the first jumper
cable to the positive (+) terminal of
the discharged battery (1).
2. Connect the other end to the positive
(+) terminal of the booster battery
(2).
3. Connect one end of the second
jumper cable to the negative (–) ter-
minal of the booster battery (2).
4. Make the final connection to an
unpainted, heavy metal part (i.e.
engine hook (3)) of the engine of the
vehicle with the discharged battery
(1).
WARNING
Never attempt to jump start your
vehicle if the battery appears to be
frozen. Batteries in this condition
may explode or rupture if jump
starting is attempted.
When making jumper cable con-
nections, be certain that your
hands and the jumper cables
remain clear from pulleys, belts or
fans.
Batteries produce flammable
hydrogen gas. Keep flames and
sparks away from the battery or an
explosion may occur. Never smoke
when working near the battery.
If the booster battery you use for
jump starting is installed in another
vehicle, make sure the two vehicles
are not touching each other.
If your battery discharges repeat-
edly, for no apparent reason, have
your vehicle inspected by an autho-
rized SUZUKI dealer.
To avoid harm to yourself or dam-
age to your vehicle or battery, fol-
low the jump starting instructions
below precisely and in order. If you
are in doubt, call for qualified road
service.
CAUTION
Your vehicle should not be started by
pushing or towing. This starting
method could result in permanent
damage to the catalytic converter.
Use jumper cables to start a vehicle
with a weak or run-down battery.12V BATTERY
(1)
(3)
(2)
EXAMPLE
Page 271 of 297
9-4
APPEARANCE CARE
80J23-03E
WashingWhen washing the vehicle, follow the
instructions below:
1) Flush the underside of body and wheel
housings with pressurized water to
remove mud and debris. Use plenty of
water.2) Rinse the body to loosen the dirt.
Remove dirt and mud from the body
exterior with running water. You may
use a soft sponge or brush. Do not use
hard materials which can scratch the
paint or plastic. Remember that the
headlight covers or lenses are made of
plastic in many cases.
3) Wash the entire exterior with a mild
detergent or car wash soap using a
sponge or soft cloth. The sponge or
cloth should be frequently soaked in the
soap solution.
4) Once the dirt has been completely
removed, rinse off the detergent with
running water.
5) After rinsing, wipe off the vehicle body
with a wet chamois or cloth and allow it
to dry in the shade.6) Check carefully for damage to painted
surfaces. If there is any damage,
“touch-up” the damage following the
procedure below:
1. Clean all damaged spots and allow
them to dry.
2. Stir the paint and “touch-up” the
damaged spots lightly using a small
brush.
3. Allow the paint to dry completely.
WARNING
Never attempt to wash and wax
your vehicle with the engine run-
ning.
When cleaning the underside of the
body and fender, where there may
be sharp-edged parts, you should
wear gloves and a long-sleeved
shirt to protect your hands and
arms from being cut.
After washing your vehicle, care-
fully test the brakes before driving
to make sure they have maintained
their normal effectiveness.
CAUTION
When washing the vehicle, avoid
directing steam or hot water of
more than 80°C (176°F) on plastic
parts.
To avoid damaging engine compo-
nents, do not use pressurized
water in the engine compartment.
CAUTION
To avoid damage to the paint or plas-
tic surface, do not wipe the dirt off
without ample water. Be sure to fol-
low above procedure.
CAUTION
When using a commercial car wash
product, observe the cautions speci-
fied by the manufacturer. Never use
strong household detergents or
soaps.
CAUTION
If you use an automatic car wash,
make sure that your vehicle’s body
parts, such as spoilers, cannot be
damaged. If you are in doubt, consult
the car wash operator for advice.
Periodic Maintenance Schedule: 1, 2, 3, 4, 5, 6, 9, 10
Page 276 of 297
10-3GENERAL INFORMATION
80J23-03E
On-Board Vehicle Computers
and Event Data RecordersYour vehicle is equipped with on-board
computer systems which monitor and
control several aspects of vehicle per-
formance, including the following:
Emission-related components and
engine parameters such as engine
speed and throttle position are moni-
tored to provide emissions control
and to provide optimum fuel econ-
omy. Your vehicle also has an on-
board diagnostic system which mon-
itors and records information about
emission-related malfunctions.
Signals from various sensors are
monitored to provide air bag deploy-
ment.
If your vehicle is equipped with
antilock brakes, conditions such as
vehicle speed and brake perfor-
mance are monitored, so that the
ABS system can provide effective
antilock braking. If your vehicle has
an Electronic Stability Program
(ESP
®) system, conditions such as
yaw rate, lateral acceleration, and
brake fluid pressure are monitored,
so that the ESP
® system can help
the driver control the vehicle in diffi-
cult driving situations.
Some information may be stored by
the on-board computers during normaloperation of the vehicle. This stored
information can assist technicians in
repairing the vehicle when malfunc-
tions occur. Other information is stored
only in the event of crash, by computer
systems that are commonly called
Event Data Recorders (EDRs).
In a crash event, EDRs such as the
Airbag Sensing and Diagnostic Mod-
ule (SDM) in your vehicle may record
information about the condition of the
vehicle and how it was operated, such
as data related to airbag readiness,
airbag performance, safety belt usage,
and the severity of the collision. These
data can help provide a better under-
standing of the circumstances in which
crashes and injuries occur and lead to
the designing of safer vehicles. The
SDM in your vehicle does not collect
or store personal information.
To read the stored information, special
equipment is needed and access to
the vehicle or storage device is
required. SUZUKI will not access infor-
mation about a crash event or share it
with others other than with the consent
of the vehicle owner or lessee, in
response to an official request from
the police or similar government office,
as part of SUZUKI’s defense of litiga-
tion through the discovery process, or
as required by law.In addition, once SUZUKI collects or
receives data, SUZUKI may use the
data for research conducted by
SUZUKI, make the data available for
outside research if need is shown and
confidentiality is assured, or make
summary data which does not identify
specific vehicles available for outside
research.
Others, such as law enforcement per-
sonnel, may have access to the spe-
cial equipment that can read the
information if they have access to the
vehicle or storage device.
Jacking Instructions: 5
Page 291 of 297
13-1
INDEX
13
80J23-03E
INDEXSymbols“CRUISE” Indicator Light.................................................... 2-66
“ESP OFF” Indicator Light ......................................... 2-63, 3-25
“ESP” (Electronic Stability Program) Warning Light ....... 2-63
“ESP” Warning Light ........................................................... 3-25
“SET” Indicator Light .......................................................... 2-66AAccelerator Pedal .................................................................. 3-8
Accessory Socket ................................................................ 5-47
Adding Coolant .................................................................... 7-15
Adjusting Seat Position ...................................................... 2-21
Adjusting Seatbacks ........................................................... 2-22
AIR BAG Light ...................................................................... 2-65
Air Cleaner............................................................................ 7-16
Air Conditioning System ..................................................... 7-50
All Seat Belts ........................................................................ 2-31
Anti-Lock Brake System (ABS) .......................................... 3-21
Anti-Lock Brake System (ABS) Warning Light ................. 2-62
Anti-Lock Braking System (ABS) ....................................... 3-24
Armrest ................................................................................. 5-51
Assist Grips.......................................................................... 5-48
Audio Systems ..................................................................... 5-15
Automatic Heating and Air Conditioning System
(Climate Control).................................................................... 5-9
Automatic Locking Retractor (ALR)................................... 2-30
Average fuel consumption.................................................. 2-72BBasic Operations ................................................................. 5-18
Battery .................................................................................. 7-35Brake Assist System............................................................ 3-21
Brake Fluid............................................................................ 7-21
Brake Pedal.................................................................... 3-8, 7-22
Brake System Warning Light .............................................. 2-61
Brakes ................................................................................... 7-21
Braking .................................................................................. 3-20
Break-In ................................................................................... 4-1
Bulb Replacement ................................................................ 7-40
CCatalytic Converter ................................................................ 4-1
Changing Engine Oil and Filter........................................... 7-12
Changing Wheels ................................................................... 8-4
Charging Light...................................................................... 2-64
Child Lock System (rear doors) ............................................ 2-3
Child Restraint Systems ...................................................... 2-36
Cigarette Lighter and Ashtray............................................. 5-47
Clock ..................................................................................... 2-75
Clutch Pedal .................................................................. 3-8, 7-19
Compact Spare Tire ............................................................. 7-31
Continuously Variable Transaxle (CVT) ............................. 3-11
Continuously Variable Transaxle (CVT) Fluid ................... 7-20
Coolant Level Check ............................................................ 7-15
Coolant Replacement .......................................................... 7-16
Corrosion Prevention ............................................................ 9-1
Cruise Control ...................................................................... 3-18
Cup Holder and Storage Area ............................................. 5-49DDaily Inspection Checklist..................................................... 3-1
Daytime Running Light (D.R.L.) Indicator Light ................ 2-68
Daytime Running Light (D.R.L.) System ............................ 2-76
Door Locks ............................................................................. 2-1