fuel cap SUZUKI XL7 2007 2.G User Guide
[x] Cancel search | Manufacturer: SUZUKI, Model Year: 2007, Model line: XL7, Model: SUZUKI XL7 2007 2.GPages: 274, PDF Size: 6.12 MB
Page 214 of 274

5-30 SERVICE AND APPEARANCE CARE
78J00-03E
Vehicle Maximum Load on the Tire:
Load on an individual tire due to curb
weight, accessory weight, occupant
weight, and cargo weight.
Vehicle Placard:
A label permanently attached to a vehicle
showing the vehicle’s capacity weight and
the original equipment tire size and recom-
mended inflation pressure. Refer to “Tire
and Loading Information Label” under
“Loading Your Vehicle” in “Your Driving,
the Road, and Your Vehicle” in the “Driving
Your Vehicle” section.Inflation – Tire PressureTires need the correct amount of air pres-
sure to operate effectively.
A Tire and Loading Information label is
attached to the vehicle’s center pillar (B-
pillar). This label shows your vehicle’s orig-
inal equipment tires and the correct infla-
tion pressures for your tires when they are
cold. The recommended cold tire inflation
pressure, shown on the label, is the mini-
mum amount of air pressure needed to
support your vehicle’s maximum load car-
rying capacity.
For additional information regarding how
much weight your vehicle can carry, and
an example of the Tire and Loading Infor-
mation label, refer to “Loading Your Vehi-cle” in “Your Driving, the Road, and Your
Vehicle” in the “Driving Your Vehicle” sec-
tion. How you load your vehicle affects
vehicle handling and ride comfort. Never
load your vehicle with more weight than it
was designed to carry.
When to Check
Check your tires once a month or more. Do
not forget to check the compact spare tire,
it should be at 60 psi (420 kPa). For addi-
tional information regarding the compact
spare tire, refer to “Compact Spare Tire” in
this section.
How to Check
Use a good quality pocket-type gage to
check tire pressure. You cannot tell if your
tires are properly inflated simply by looking
at them. Radial tires may look properly
inflated even when they are under-inflated.
Check the tire’s inflation pressure when
the tires are cold. Cold means your vehicle
has been sitting for at least three hours or
driven no more than 1 mile (1.6 km).
Remove the valve cap from the tire valve
stem. Press the tire gage firmly onto the
valve to get a pressure measurement. If
the cold tire inflation pressure matches the
recommended pressure on the Tire and
Loading Information label, no further
adjustment is necessary. If the inflation
pressure is low, add air until you reach the
recommended amount.
CAUTION
Do not let anyone tell you that under-
inflation or over-inflation is all right. It
is not. If your tires do not have
enough air (under-inflation), you can
get the following:
Too much flexing
Too much heat
Tire overloading
Premature or irregular wear
Poor handling
Reduced fuel economy
If your tires have too much air (over-
inflation), you can get the following:
Unusual wear
Poor handling
Rough ride
Needless damage from road haz-
ards
Page 215 of 274
5-31 SERVICE AND APPEARANCE CARE
78J00-03E
If you overfill the tire, release air by push-
ing on the metal stem in the center of the
tire valve. Re-check the tire pressure with
the tire gage.
Be sure to put the valve caps back on the
valve stems. They help prevent leaks by
keeping out dirt and moisture.Tire Pressure Monitor SystemYour vehicle has a Tire Pressure Monitor
System (TPMS). This system uses radio
and sensor technology to check tire pres-
sure levels. TPMS sensors are mounted
onto each tire and wheel assembly, except
for the spare tire. The TPMS sensors mon-
itor the air pressure in your vehicle's tires
and transmit tire pressure readings to a
receiver located in the vehicle.
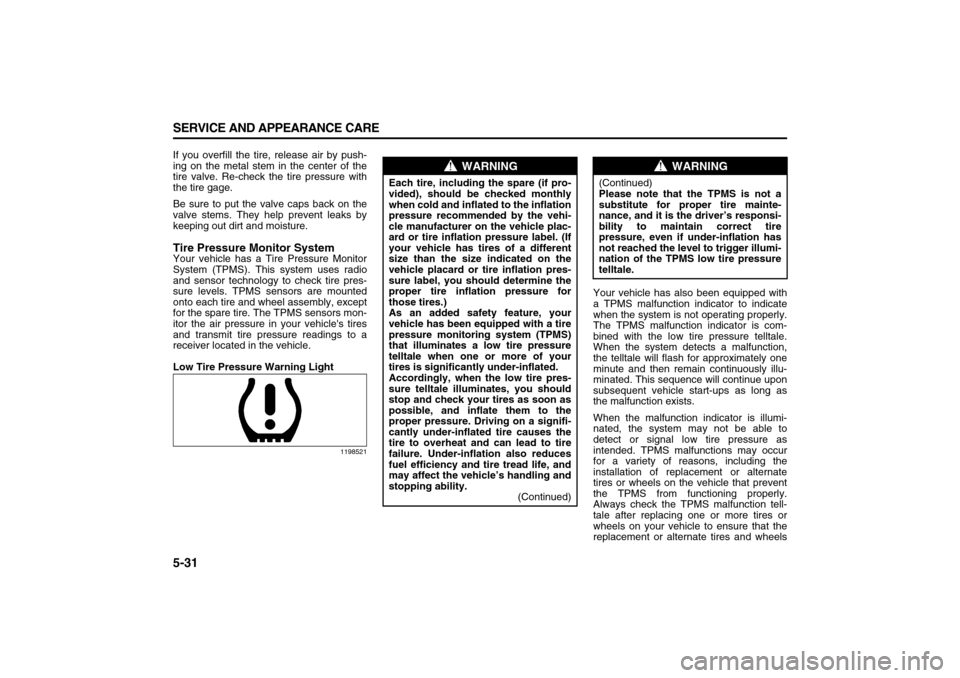
Low Tire Pressure Warning Light
1198521
Your vehicle has also been equipped with
a TPMS malfunction indicator to indicate
when the system is not operating properly.
The TPMS malfunction indicator is com-
bined with the low tire pressure telltale.
When the system detects a malfunction,
the telltale will flash for approximately one
minute and then remain continuously illu-
minated. This sequence will continue upon
subsequent vehicle start-ups as long as
the malfunction exists.
When the malfunction indicator is illumi-
nated, the system may not be able to
detect or signal low tire pressure as
intended. TPMS malfunctions may occur
for a variety of reasons, including the
installation of replacement or alternate
tires or wheels on the vehicle that prevent
the TPMS from functioning properly.
Always check the TPMS malfunction tell-
tale after replacing one or more tires or
wheels on your vehicle to ensure that the
replacement or alternate tires and wheels
WARNING
Each tire, including the spare (if pro-
vided), should be checked monthly
when cold and inflated to the inflation
pressure recommended by the vehi-
cle manufacturer on the vehicle plac-
ard or tire inflation pressure label. (If
your vehicle has tires of a different
size than the size indicated on the
vehicle placard or tire inflation pres-
sure label, you should determine the
proper tire inflation pressure for
those tires.)
As an added safety feature, your
vehicle has been equipped with a tire
pressure monitoring system (TPMS)
that illuminates a low tire pressure
telltale when one or more of your
tires is significantly under-inflated.
Accordingly, when the low tire pres-
sure telltale illuminates, you should
stop and check your tires as soon as
possible, and inflate them to the
proper pressure. Driving on a signifi-
cantly under-inflated tire causes the
tire to overheat and can lead to tire
failure. Under-inflation also reduces
fuel efficiency and tire tread life, and
may affect the vehicle’s handling and
stopping ability.
(Continued)
WARNING
(Continued)
Please note that the TPMS is not a
substitute for proper tire mainte-
nance, and it is the driver’s responsi-
bility to maintain correct tire
pressure, even if under-inflation has
not reached the level to trigger illumi-
nation of the TPMS low tire pressure
telltale.
Page 241 of 274
5-57 SERVICE AND APPEARANCE CARE
78J00-03E
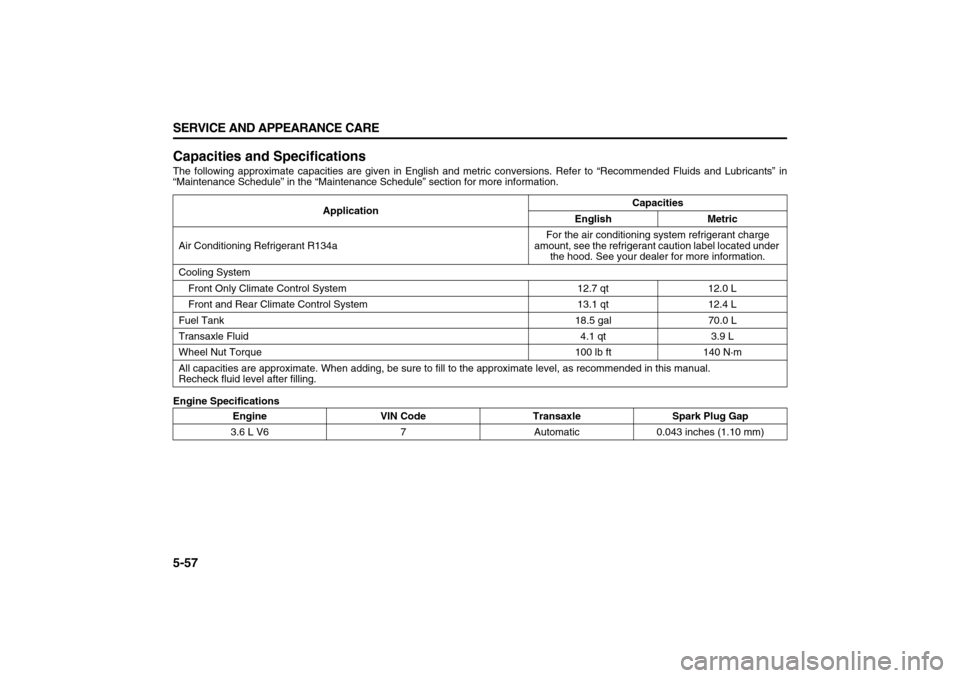
Capacities and SpecificationsThe following approximate capacities are given in English and metric conversions. Refer to “Recommended Fluids and Lubricants” in
“Maintenance Schedule” in the “Maintenance Schedule” section for more information.
Engine SpecificationsApplicationCapacities
English Metric
Air Conditioning Refrigerant R134aFor the air conditioning system refrigerant charge
amount, see the refrigerant caution label located under
the hood. See your dealer for more information.
Cooling System
Front Only Climate Control System 12.7 qt 12.0 L
Front and Rear Climate Control System 13.1 qt 12.4 L
Fuel Tank18.5 gal 70.0 L
Transaxle Fluid4.1 qt 3.9 L
Wheel Nut Torque 100 lb ft 140 N·m
All capacities are approximate. When adding, be sure to fill to the approximate level, as recommended in this manual.
Recheck fluid level after filling.
Engine VIN Code Transaxle Spark Plug Gap
3.6 L V6 7 Automatic 0.043 inches (1.10 mm)
Page 268 of 274
8-1 INDEX
88
78J00-03E
INDEXAAccessories and Modifications
..........................................5-1
Accessory Power Outlet(s)
.................................................3-10
Adding Equipment to the Outside of Your Vehicle
..........5-1
Adding Equipment to Your Airbag-Equipped Vehicle .....1-42
Additional Required Services
.............................................6-11
Additional Required Services except CANADA
................6-6
Additives
..............................................................................5-2
Add-On Electrical Equipment
.............................................5-53
Airbag Readiness Light
......................................................3-16
Airbag System
.....................................................................1-33
All-Wheel Drive ....................................................................5-22
All-Wheel Drive (AWD) System
..........................................4-6
All-Wheel Drive Disabled Light ..........................................3-25
Aluminum Wheels
...............................................................5-50
Anti-Lock Brake System (ABS)
..........................................4-4
Anti-Lock Brake System Warning Light
............................3-20
Appearance Care
.................................................................5-48
Assist Handles
.....................................................................2-22
At Each Fuel Fill ...................................................................6-14
At Least Once a Month
........................................................6-14
At Least Once a Year
...........................................................6-14
Audio Steering Wheel Controls
..........................................3-73
Audio System(s)
..................................................................3-39
Automatic Climate Control System
...................................3-10
Automatic Dimming Rearview Mirror ................................2-20
Automatic Dimming Rearview Mirror with Compass
.......2-20
Automatic Transaxle Fluid
..................................................5-10Automatic Transaxle Operation
......................................... 2-14
BBattery
.................................................................................. 5-18
Battery Run-Down Protection
............................................ 3-9
Battery Warning Light
........................................................ 3-19
Before Driving
..................................................................... 2-11
Before Leaving on a Long Trip
.......................................... 4-12
Brake System Warning Light
............................................. 3-19
Brakes
.................................................................................. 5-17
Braking ................................................................................. 4-3
Bulb Replacement
............................................................... 5-23
Buying New Tires ................................................................ 5-34
CCalifornia Fuel
..................................................................... 5-2
California Proposition 65 Warning
.................................... 5-1
Capacities and Specifications
........................................... 5-57
Care of Safety Belts
............................................................ 5-49
Care of the CD and DVD Player
......................................... 3-74
Care of Your CDs and DVDs
.............................................. 3-74
Cargo Lamp
......................................................................... 3-9
Carrier Assembly-Differential (Rear Drive Module)
......... 5-22
Center Console Storage Area
............................................ 2-22
Change Engine Oil Light
.................................................... 3-24
Changing a Flat Tire
........................................................... 5-38
Checking the Restraint Systems
....................................... 1-42
Checking Things Under the Hood ..................................... 5-5
Chemical Paint Spotting
..................................................... 5-51
Child Restraint Systems ..................................................... 1-21