seat adjustment TATA SAFARI 2015 Owners Manual
[x] Cancel search | Manufacturer: TATA, Model Year: 2015, Model line: SAFARI, Model: TATA SAFARI 2015Pages: 161, PDF Size: 2.55 MB
Page 15 of 161
15
Y O U R S A F E T Y
• •• •
•Seat belt system Seat belt systemSeat belt system Seat belt system
Seat belt system
• •• •
•W WW W
W
ear earear ear
ear
ing sea ing seaing sea ing sea
ing sea
t b t bt b t b
t b
elt eltelt elt
elt
• •• •
•Headrestraint HeadrestraintHeadrestraint Headrestraint
Headrestraint
• •• •
•Door locks Door locksDoor locks Door locks
Door locks
• •• •
•Child lock Child lockChild lock Child lock
Child lock
• •• •
•Audio warning Audio warningAudio warning Audio warning
Audio warning
• •• •
•Collapsible steering column Collapsible steering columnCollapsible steering column Collapsible steering column
Collapsible steering column
• •• •
•Air Bag (if fitted) Air Bag (if fitted)Air Bag (if fitted) Air Bag (if fitted)
Air Bag (if fitted)
• •• •
•Anti-Lock Brake System (if fitted) Anti-Lock Brake System (if fitted)Anti-Lock Brake System (if fitted) Anti-Lock Brake System (if fitted)
Anti-Lock Brake System (if fitted)
This section gives you important information about
safety features of the vehicle meant for occupant
protection. It provides information on the use of seat,
seat belts, headrest and seat adjustments.
In addition to seat and seat belts, there are number
of other features as listed alongside which are built
in the design of the vehicle so as to take care of your
safety.
ProCarManuals.com
Page 17 of 161
17
S SS S
S
y yy y
y
st stst st
st
em C em Cem C em C
em C
omp ompomp omp
omp
onen onenonen onen
onen
ts and ts and ts and ts and
ts and
W WW W
W
ear earear ear
ear
ing S ing Sing S ing S
ing S
ea eaea ea
ea
t B t Bt B t B
t B
elt eltelt elt
elt
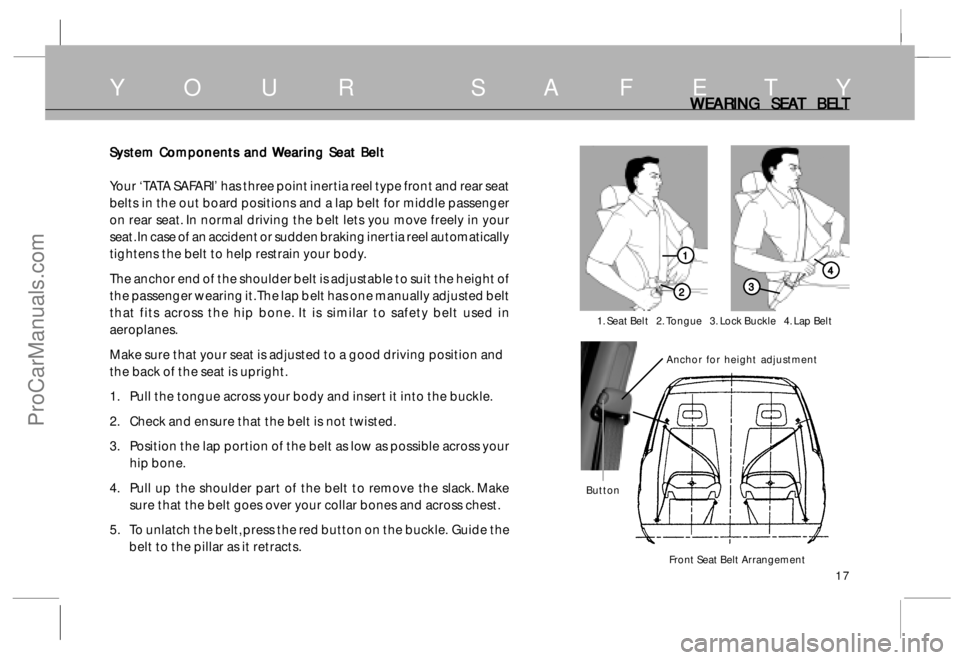
Your ‘TATA SAFARI’ has three point inertia reel type front and rear seat
belts in the out board positions and a lap belt for middle passenger
on rear seat. In normal driving the belt lets you move freely in your
seat. In case of an accident or sudden braking inertia reel automatically
tightens the belt to help restrain your body.
The anchor end of the shoulder belt is adjustable to suit the height of
the passenger wearing it. The lap belt has one manually adjusted belt
that fits across the hip bone. It is similar to safety belt used in
aeroplanes.
Make sure that your seat is adjusted to a good driving position and
the back of the seat is upright.
1. Pull the tongue across your body and insert it into the buckle.
2. Check and ensure that the belt is not twisted.
3. Position the lap portion of the belt as low as possible across your
hip bone.
4. Pull up the shoulder part of the belt to remove the slack. Make
sure that the belt goes over your collar bones and across chest.
5. To unlatch the belt, press the red button on the buckle. Guide the
belt to the pillar as it retracts.
Y O U R S A F E T YWEARING SEA WEARING SEAWEARING SEA WEARING SEA
WEARING SEA
T BEL T BELT BEL T BEL
T BEL
T TT T
T
1. Seat Belt 2. Tongue 3. Lock Buckle 4. Lap Belt
Front Seat Belt Arrangement
2 22 2
2
1 11 1
1
3 33 3
3
4 44 4
4
Anchor for height adjustment
Button
ProCarManuals.com
Page 18 of 161
18
6. Each belt should be used by one occupant only . The belt must not
be put round a child, seated on passengers lap.
7. When the belt has been in use in a serious accident or shows signs
of severe fraying or of having been cut, replace with an approved
belt kit.
8. The belt must not be altered or modified during use.
9. The belts are meant (intended) for adult occupants only.
10. The belts if required should be replaced, by Authorised personnel
only.
11. The belt should not be disassembled. If required, authorised
personnel only should carry out disassembly and assembly.
Adjustable Headrestraint Adjustable HeadrestraintAdjustable Headrestraint Adjustable Headrestraint
Adjustable Headrestraint
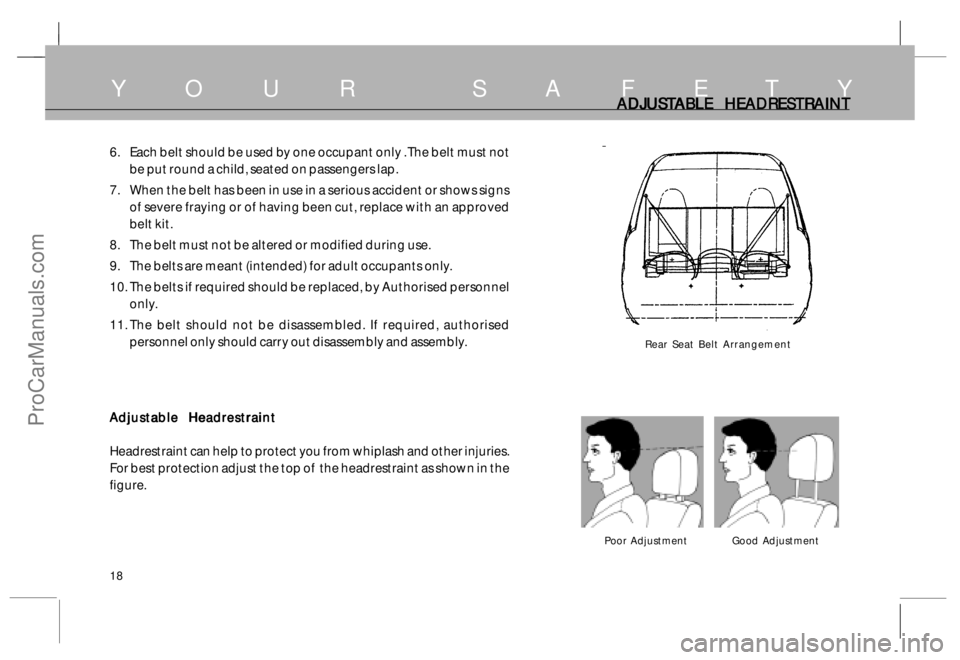
Headrestraint can help to protect you from whiplash and other injuries.
For best protection adjust the top of the headrestraint as shown in the
figure.
Y O U R S A F E T YADJUST ADJUSTADJUST ADJUST
ADJUST
ABLE HEADRESTR ABLE HEADRESTRABLE HEADRESTR ABLE HEADRESTR
ABLE HEADRESTR
AINT AINTAINT AINT
AINT
Rear Seat Belt Arrangement
Poor Adjustment Good Adjustment
ProCarManuals.com
Page 37 of 161
37
D R I V I N G C O N T R O L SSTEERING STEERING STEERING STEERING
STEERING
WHEEL POSITION ADJUST WHEEL POSITION ADJUSTWHEEL POSITION ADJUST WHEEL POSITION ADJUST
WHEEL POSITION ADJUST
MENT MENTMENT MENT
MENT
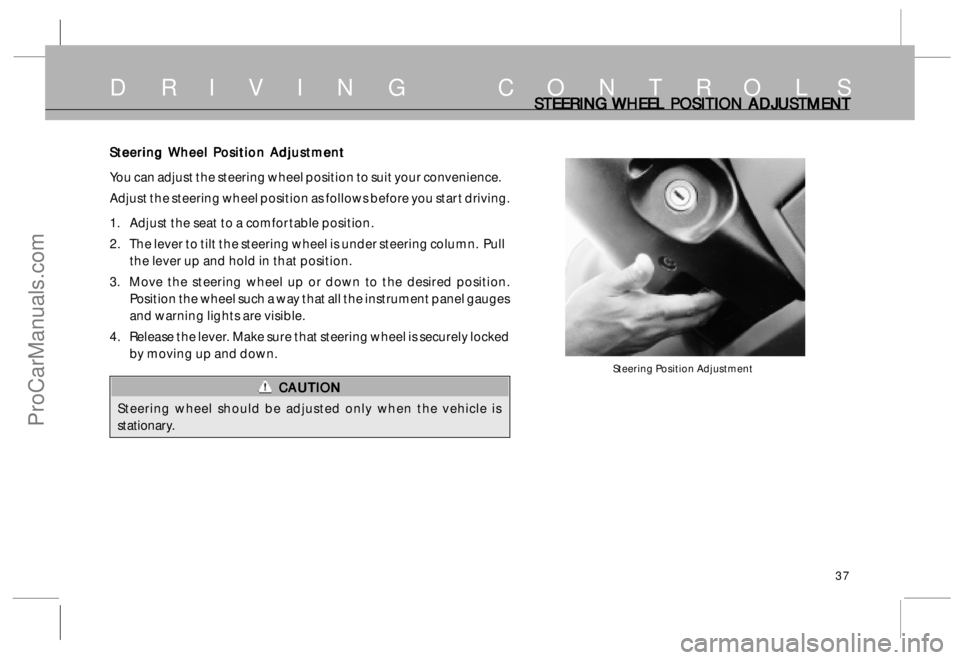
Steering Position Adjustment
Steering Wheel Position Adjustment Steering Wheel Position AdjustmentSteering Wheel Position Adjustment Steering Wheel Position Adjustment
Steering Wheel Position Adjustment
You can adjust the steering wheel position to suit your convenience.
Adjust the steering wheel position as follows before you start driving.
1. Adjust the seat to a comfortable position.
2. The lever to tilt the steering wheel is under steering column. Pull
the lever up and hold in that position.
3. Move the steering wheel up or down to the desired position.
Position the wheel such a way that all the instrument panel gauges
and warning lights are visible.
4. Release the lever. Make sure that steering wheel is securely locked
by moving up and down.
CAUTION CAUTIONCAUTION CAUTION
CAUTION
Steering wheel should be adjusted only when the vehicle is
stationary.
ProCarManuals.com
Page 56 of 161
56
FR FRFR FR
FR
ONT SEA ONT SEAONT SEA ONT SEA
ONT SEA
T AND SEA T AND SEAT AND SEA T AND SEA
T AND SEA
T ADJUST T ADJUSTT ADJUST T ADJUST
T ADJUST
MENT MENTMENT MENT
MENT
S SS S
SCOMFORT AND CONVENIENCE
Front Seats Front SeatsFront Seats Front Seats
Front Seats
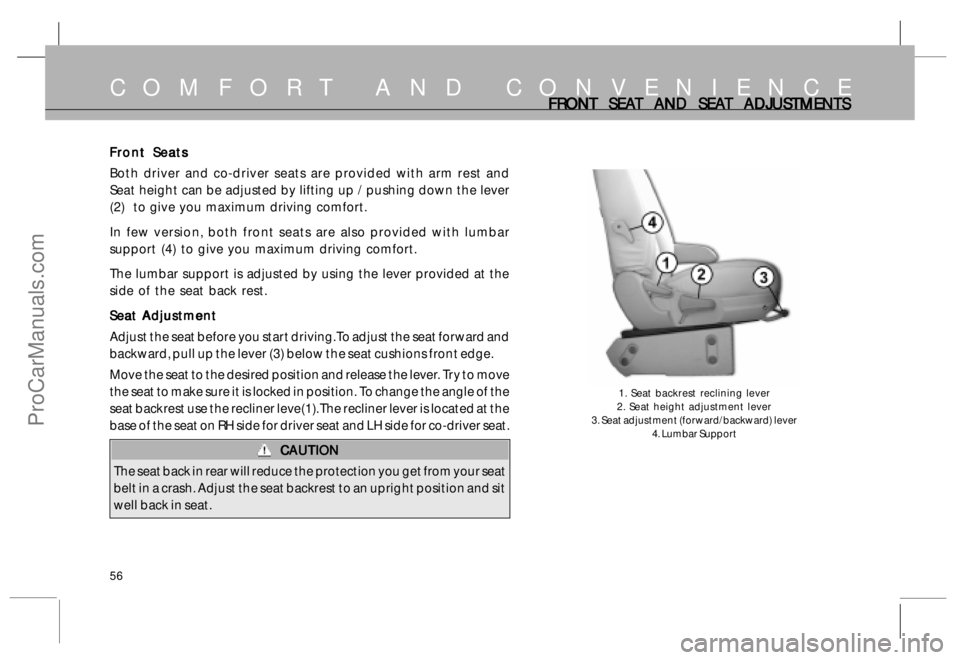
Both driver and co-driver seats are provided with arm rest and
Seat height can be adjusted by lifting up / pushing down the lever
(2) to give you maximum driving comfort.
In few version, both front seats are also provided with lumbar
support (4) to give you maximum driving comfort.
The lumbar support is adjusted by using the lever provided at the
side of the seat back rest.
Seat Adjustment Seat AdjustmentSeat Adjustment Seat Adjustment
Seat Adjustment
Adjust the seat before you start driving. To adjust the seat forward and
backward, pull up the lever (3) below the seat cushions front edge.
Move the seat to the desired position and release the lever. Try to move
the seat to make sure it is locked in position. To change the angle of the
seat backrest use the recliner leve(1). The recliner lever is located at the
base of the seat on RH side for driver seat and LH side for co-driver seat.
CAUTION CAUTIONCAUTION CAUTION
CAUTION
The seat back in rear will reduce the protection you get from your seat
belt in a crash. Adjust the seat backrest to an upright position and sit
well back in seat.
1. Seat backrest reclining lever
2. Seat height adjustment lever
3. Seat adjustment (forward/backward) lever
4. Lumbar Support
ProCarManuals.com
Page 57 of 161
57
Headrestraint HeadrestraintHeadrestraint Headrestraint
Headrestraint
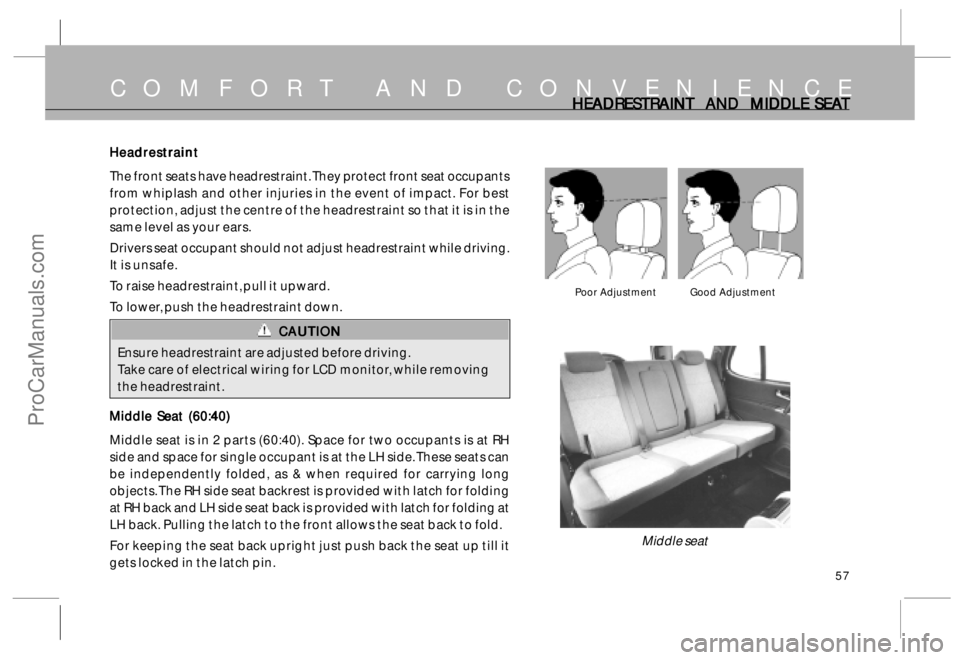
The front seats have headrestraint. They protect front seat occupants
from whiplash and other injuries in the event of impact. For best
protection, adjust the centre of the headrestraint so that it is in the
same level as your ears.
Drivers seat occupant should not adjust headrestraint while driving.
It is unsafe.
To raise headrestraint, pull it upward.
To lower, push the headrestraint down.
CAUTION CAUTIONCAUTION CAUTION
CAUTION
Ensure headrestraint are adjusted before driving.
Take care of electrical wiring for LCD monitor, while removing
the headrestraint.
Middle Seat (60:40) Middle Seat (60:40)Middle Seat (60:40) Middle Seat (60:40)
Middle Seat (60:40)
Middle seat is in 2 parts (60:40). Space for two occupants is at RH
side and space for single occupant is at the LH side. These seats can
be independently folded, as & when required for carrying long
objects. The RH side seat backrest is provided with latch for folding
at RH back and LH side seat back is provided with latch for folding at
LH back. Pulling the latch to the front allows the seat back to fold.
For keeping the seat back upright just push back the seat up till it
gets locked in the latch pin.
COMFORT AND CONVENIENCE
Middle seat
HEADRESTR HEADRESTRHEADRESTR HEADRESTR
HEADRESTR
AINT AND MIDDLE SEA AINT AND MIDDLE SEAAINT AND MIDDLE SEA AINT AND MIDDLE SEA
AINT AND MIDDLE SEA
T TT T
T
Poor Adjustment Good Adjustment
ProCarManuals.com
Page 77 of 161
77
D R I V I N GPREP PREPPREP PREP
PREP
ARING ARING ARING ARING
ARING
T TT T
T
O DRIVE & R O DRIVE & RO DRIVE & R O DRIVE & R
O DRIVE & R
UNNING IN PERIOD UNNING IN PERIODUNNING IN PERIOD UNNING IN PERIOD
UNNING IN PERIOD
Preparing to Drive Preparing to DrivePreparing to Drive Preparing to Drive
Preparing to Drive
The following checks and adjustments should be done
before you start driving the vehicle.
1 . Ensure all mirrors, windows and outside lights are clean
and unobstructed. Remove dust, frost, snow or ice if
any, on these.
2 . Ensure bonnet is fully closed.
3 . Check that any items you may be carrying inside with
you are stored properly or fastened down securely.
4 . Check adjustment of seat. If required adjust to your
convenience.
5 . Check adjustment of all rear view mirrors.
6 . Check adjustment of steering wheel.
7 . If the doors are not properly closed you will get a audio
warning/indicator light as soon as you insert the ignition
key in the switch. Make sure all doors are properly closed
and locked.
8 . If the seat belts of driver & co-driver are not fastened you
will get an audio warning as soon as you turn the key to
ignition position. Fasten your seat belt, ensure co-driver
seat passenger has also fastened the seat belt (see
Your Safety).9 . Check and ensure that all the gauges and indicator lights
in the instrument panel are working.
Running-in Period Running-in PeriodRunning-in Period Running-in Period
Running-in Period
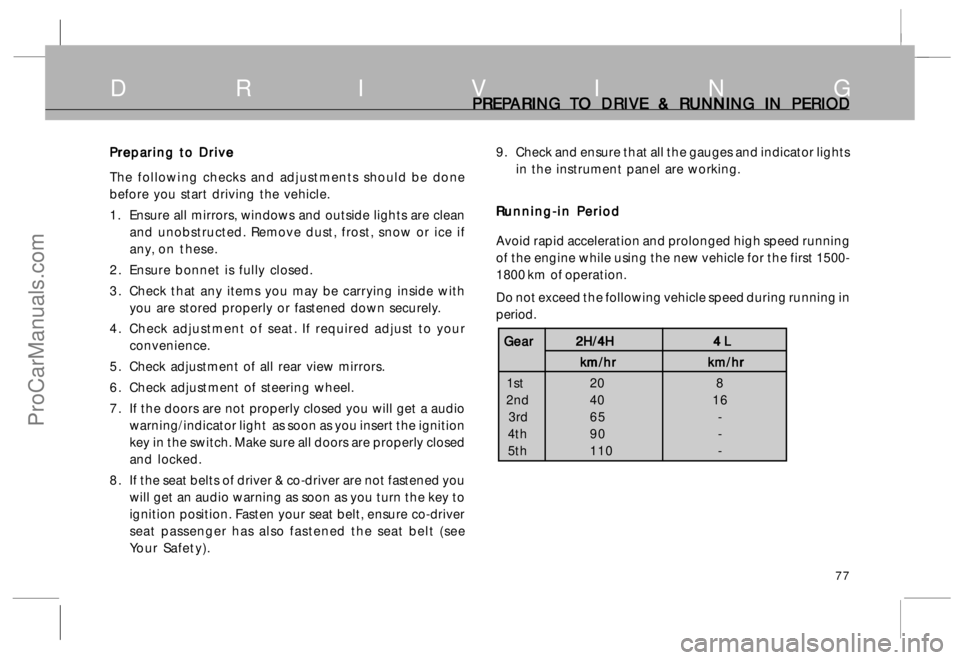
Avoid rapid acceleration and prolonged high speed running
of the engine while using the new vehicle for the first 1500-
1800 km of operation.
Do not exceed the following vehicle speed during running in
period.
Gear GearGear Gear
Gear
2H/4H 2H/4H 2H/4H 2H/4H
2H/4H
4 L 4 L 4 L 4 L
4 L
km/hr km/hr km/hr km/hr
km/hr
km/hr km/hr km/hr km/hr
km/hr
1st 20 8
2nd 40 16
3rd 65 -
4th 90 -
5th 110 -
ProCarManuals.com
Page 155 of 161

155
A L P H A B E T I C A L I N D E X ALPHABETIC INDEX ALPHABETIC INDEX ALPHABETIC INDEX ALPHABETIC INDEX
ALPHABETIC INDEX
A AA A
A
Air Bags 2 2
Aggregate Numbers-Location 1 2
Air Conditioning52, 134
Air Filter & Filter Element 105
Analog Clock 66
Anti Lock Brake System 7 9
Ashtray 6 1
Audio Warning 2 1
Automatic Hub Lock 8 2
B BB B
B
Battery 118
Belt Tension 135
Bonnet Opening / Closing 7 0
Brake Fluid 115
Brakes 7 9
Branded Lubricants 9 5
C CC C
C
Catalytic Converter 132
Central Locking System 13
Child Lock 20
Cigarette Lighter 60
Clutch Fluid 115
Collapsible Steering column 2 1
Combi-Switch 33
Coolants 9 4
D DD D
D
Door Locks 20
Driving Controls 28
Driving in adverse conditions 85
Driving Safety 89
E
ECU 1 1 7
EGR System 132
Engine Compartment 104
Engine Coolant 73
Engine Cooling System 106
Engine oil 72
Engine Oil & Oil Filter 108
Environment Protection 8
F FF F
F
Flat tyre replacement 120
Follow Me Home Headlamp 64
Front & Rear Fog Lights 38
Front / Rear Axle Oil 112
Front Seat 56
Front Windshield / Door Glass Demister 5 4
Fuel 92
Fuel Economy 84
Fuel Gauge 50
Fuel level 72
Fuel Tank Flap Switch 38
Fuel Tank Flap 61
Fuses 130
G GG G
G
Gauges 4 7
Gear Box 78
Gear Box Oil 1 1 0
Gear Shift Lever 32
Glove Box 62
H HH H
H
Hazard Warning 39
Head Lamps & Headlamp Adjustment 113
Headlamp Leveling Switch 40
Headrest 57
Headrest adjustment 1 8
High mounted stop lamp 67
I II I
I
Ignition Switch 29
Immobiliser- Anti Theft Security System 31
Important Information 6,7
Indicators 43
Instrument Cluster 42
J JJ J
J
Jack & Tools 59
Jump Seats 59
ProCarManuals.com
Page 156 of 161

156
A L P H A B E T I C A L I N D E X ALPHABETIC INDEX ALPHABETIC INDEX ALPHABETIC INDEX ALPHABETIC INDEX
ALPHABETIC INDEX
L LL L
L
Limited Slip Differential 82
Lubricants 9 3
Load consciouse pressure
reducing valve 117
M MM M
M
Middle Seat 57
Mirror (Inside) 63
Mirror (Motorised) 60
Mirror Demister 39
MP3/DVD player 67
Music System 66
O OO O
O
Odometer 47
Operating Switch 38
P PP P
P
Panel Lights 47
Parking Brake 32
Power Steering Fluid 115
Power Windows 55
Preparing to drive 77
Prior to driving – Check List 71
R RR R
R
Rear Seat 5 7
Rear Windshield Demister 39
Rear Windshield Wash & Wipe 39
Remote bypass valve 1 1 8
Relays 131
Reverse Guiding System 65
Roof Lights 63
Roof Mounted A.C. 54
Roof Rail 88
RPM Meter 49
Running in Period 77
S SS S
S
Seat Adjustment 58
Seat belt 1 6
Seat belt precautions 1 9
Service Schedule 144
Spare Wheel 1 2 5
Speedometer 4 8
Starting / Stopping the engine 7 6
Steering Lock 29
Steering Wheel Position Adjustment 38
Sunvisors 6 5
T TT T
T
Tail lamp 67
Technical Specifications 97
Temperature Gauge 50
Towing the vehicle 88
Transfer case 4X4 operation 82
Transfer case Electric Shift Switch 36
Transfer case oil 1 1 1
Trouble Shooting 136
Turbo Charger 133
Tyre 120,123
Tyre Rotation 124
V VV V
V
Vehicle Care 126
Vehicle Record Sheet 1 4 9
Vehicle Specifications 9 7
W WW W
W
Warranty-Terms & Condition 10
Wheels & Tyres 120
Wheel Alignment 123
Wheel Balancing 123
Wiper Care 127
ProCarManuals.com