wheel torque TATA SAFARI 2015 Owners Manual
[x] Cancel search | Manufacturer: TATA, Model Year: 2015, Model line: SAFARI, Model: TATA SAFARI 2015Pages: 161, PDF Size: 2.55 MB
Page 82 of 161

82
Automatic Hub Locks Automatic Hub LocksAutomatic Hub Locks Automatic Hub Locks
Automatic Hub Locks
While driving in 2H mode this mechanism on the front axle
hub allows the hub to free wheel. This avoids the unnecessary
spinning of front drive components and results in fuel saving,
reduced noise and longer component life.
As soon as 4H or 4L mode is selected the hub gets
automatically connected to front drive line to increase the
traction.
Limited Slip Differential Limited Slip DifferentialLimited Slip Differential Limited Slip Differential
Limited Slip Differential
(Standard on 4x4 and optional on others)
A standard differential delivers torque equally to each wheel.
In case one wheel loses traction and begins to spin, the
differential distributes the rotary speed unequally but with
same torque. This can cause the wheel with good traction to
slow down or stop while the wheel which lost traction rotates
with increased speed. Such a situation can prevent the vehicle
from moving.
The limited slip differential provided in the rear axle takes
care of such situations. The clutch lock arrangement provided
internally, ensures that in case one wheel loses traction and
begins to slip, a locking action takes place which prevents
differential action and both wheels turn at the same speed.
D R I V I N GTR TRTR TR
TR
ANSFER C ANSFER CANSFER C ANSFER C
ANSFER C
ASE ASEASE ASE
ASE
,, ,,
,
AUT AUT AUT AUT
AUT
OMA OMAOMA OMA
OMA
TIC HUB L TIC HUB LTIC HUB L TIC HUB L
TIC HUB L
OCK & LIMITED SLIP DIFFERENTIAL OCK & LIMITED SLIP DIFFERENTIALOCK & LIMITED SLIP DIFFERENTIAL OCK & LIMITED SLIP DIFFERENTIAL
OCK & LIMITED SLIP DIFFERENTIAL
T TT T
T
r rr r
r
ansf ansfansf ansf
ansf
er C er Cer C er C
er C
ase and ase and ase and ase and
ase and
T TT T
T
r rr r
r
ansf ansfansf ansf
ansf
er C er Cer C er C
er C
ase S ase Sase S ase S
ase S
elec elecelec elec
elec
t tt t
t
or E or Eor E or E
or E
lec leclec lec
lec
tr trtr tr
tr
ic S ic Sic S ic S
ic S
wit witwit wit
wit
ch chch ch
ch
(If fitted) (If fitted)(If fitted) (If fitted)
(If fitted)
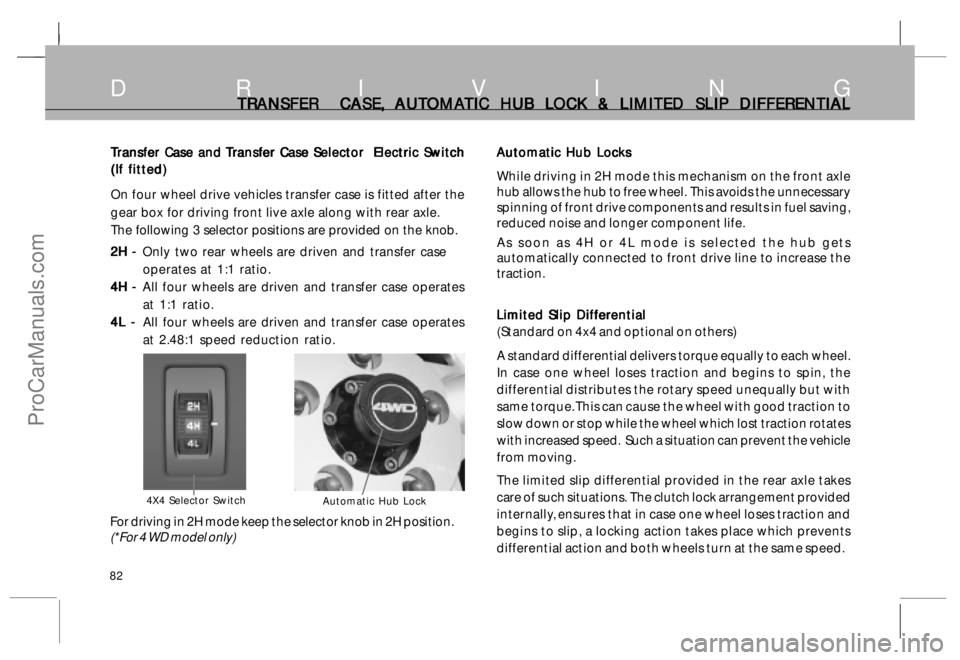
On four wheel drive vehicles transfer case is fitted after the
gear box for driving front live axle along with rear axle.
The following 3 selector positions are provided on the knob.
2H - 2H -2H -
2H -
2H - Only two rear wheels are driven and transfer case
operates at 1:1 ratio.
4H - 4H -4H - 4H -
4H - All four wheels are driven and transfer case operates
at 1:1 ratio.
4L - 4L -4L - 4L -
4L - All four wheels are driven and transfer case operates
at 2.48:1 speed reduction ratio.
Automatic Hub Lock4X4 Selector Switch
For driving in 2H mode keep the selector knob in 2H position.
(*For 4 WD model only)
ProCarManuals.com
Page 83 of 161

83
D R I V I N GLIMITED SLIP DIFFERENTIAL AND FOUR LIMITED SLIP DIFFERENTIAL AND FOUR LIMITED SLIP DIFFERENTIAL AND FOUR LIMITED SLIP DIFFERENTIAL AND FOUR
LIMITED SLIP DIFFERENTIAL AND FOUR
WHEEL DRIVING WHEEL DRIVINGWHEEL DRIVING WHEEL DRIVING
WHEEL DRIVING
Thus unnecessary spinning of one wheel is avoided and torque
is transmitted to both wheels, thus assisting the vehicle to traverse
loose terrain. However during normal driving, the differential
action takes place in the same manner as in a standard differential.
1. 1.1. 1.
1.
Four Wheel Drive Operation Four Wheel Drive OperationFour Wheel Drive Operation Four Wheel Drive Operation
Four Wheel Drive Operation
In 2-H mode, only the rear two wheels of the vehicle are
powered by the engine and the front wheels are merely
pushed. By shifting to four wheel drive mode (4H or 4L)
the rear as well as the front axles get geared to the engine
through transfer case and transmit the engine power to all
four wheels. This gives the vehicle increased traction.
In 4H mode, the transmitted engine torque and vehicle
speed remain the same as in 2H. However, when you shift
to 4L mode engine torque is multiplied and vehicle moves
at low speed in the same gears with increased traction. 4L
mode is provided for negotiating sharp gradients or driving
through loose soil/sand.
2. 2.2. 2.
2.
Shifting from 2H to 4H Shifting from 2H to 4HShifting from 2H to 4H Shifting from 2H to 4H
Shifting from 2H to 4H
Turn the selector knob from 2H to 4H position. 4H indicator
on instrument panel will light up. Changing from 2H to 4H
can be done at any speed upto 65 km/h (40 mph). No
pressing of clutch pedal is required.3. 3.3. 3.
3.
Shifting from 4H to 2H Shifting from 4H to 2HShifting from 4H to 2H Shifting from 4H to 2H
Shifting from 4H to 2H
Turn the selector knob from 4H to 2H position. 4H indicator
on instrument panel will go off. Changing from 4H to 2H
can be done at any speed upto 65 km/h (40 mph). No
pressing of clutch pedal is required.
Free Wheeling of Front Hub Free Wheeling of Front HubFree Wheeling of Front Hub Free Wheeling of Front Hub
Free Wheeling of Front Hub
After shifting from 4H to 2H, for effecting free wheeling of front
wheels, direction of vehicle motion needs to be changed. If
the vehicle was moving forward in 4H then bring it to halt and
engage reverse gear of main gear box. (If it was moving reverse
in 4H mode then stop it, and then engage forward gear of
main gear box.) After stopping and changing the gear the
vehicle must travel in opposite direction for a minimum of three
meters, before free wheeling takes place.
4. 4.4. 4.
4.
Shifting from 4H to 4L Shifting from 4H to 4LShifting from 4H to 4L Shifting from 4H to 4L
Shifting from 4H to 4L
Stop the vehicle. Press clutch pedal. Turn the selector knob
from 4H to 4L position. 4L indicator light on instrument panel
will blink few times and remain on.
5. 5.5. 5.
5.
Shifting from 4L to 4H Shifting from 4L to 4HShifting from 4L to 4H Shifting from 4L to 4H
Shifting from 4L to 4H
Stop the vehicle. Press clutch pedal. Turn the selector knob
from 4L to 4H position. 4H indicator light on instrument panel
will blink few times and will remain on.
ProCarManuals.com
Page 125 of 161

125
R RR R
R
epair epairepair epair
epair
ing a ing a ing a ing a
ing a
T TT T
T
yr yryr yr
yr
e ee e
e
•Mark suitability the tyre position (if original colour dot mark is
not visible) with reference to valve stem hole to ensure that the
tyre is refitted in original location.
•Ensure that balancing weights are not disturbed during removal
of tyres.
•Check the balance weight prior to removal of tyre if found loose,
mark its location on rim & refit properly. Balance the wheel after
every dismantling and assembly of tyre on wheel rim.
•Tightening torque of wheel nut is 12-15 mkg.
•While fitting wheels on vehicle ensure that wheel bolts are free
from dust, scratches, dirt, dents, etc.
•Do not apply any oil on the wheel nut or bolt. Wipe off if present.
T TT T
T
YRES YRESYRES YRES
YRESM A I N T E N A N C E
ProCarManuals.com