speed TESLA MODEL 3 2018 Owner's Guide
[x] Cancel search | Manufacturer: TESLA, Model Year: 2018, Model line: MODEL 3, Model: TESLA MODEL 3 2018Pages: 165, PDF Size: 8.63 MB
Page 88 of 165
Controlling Climate
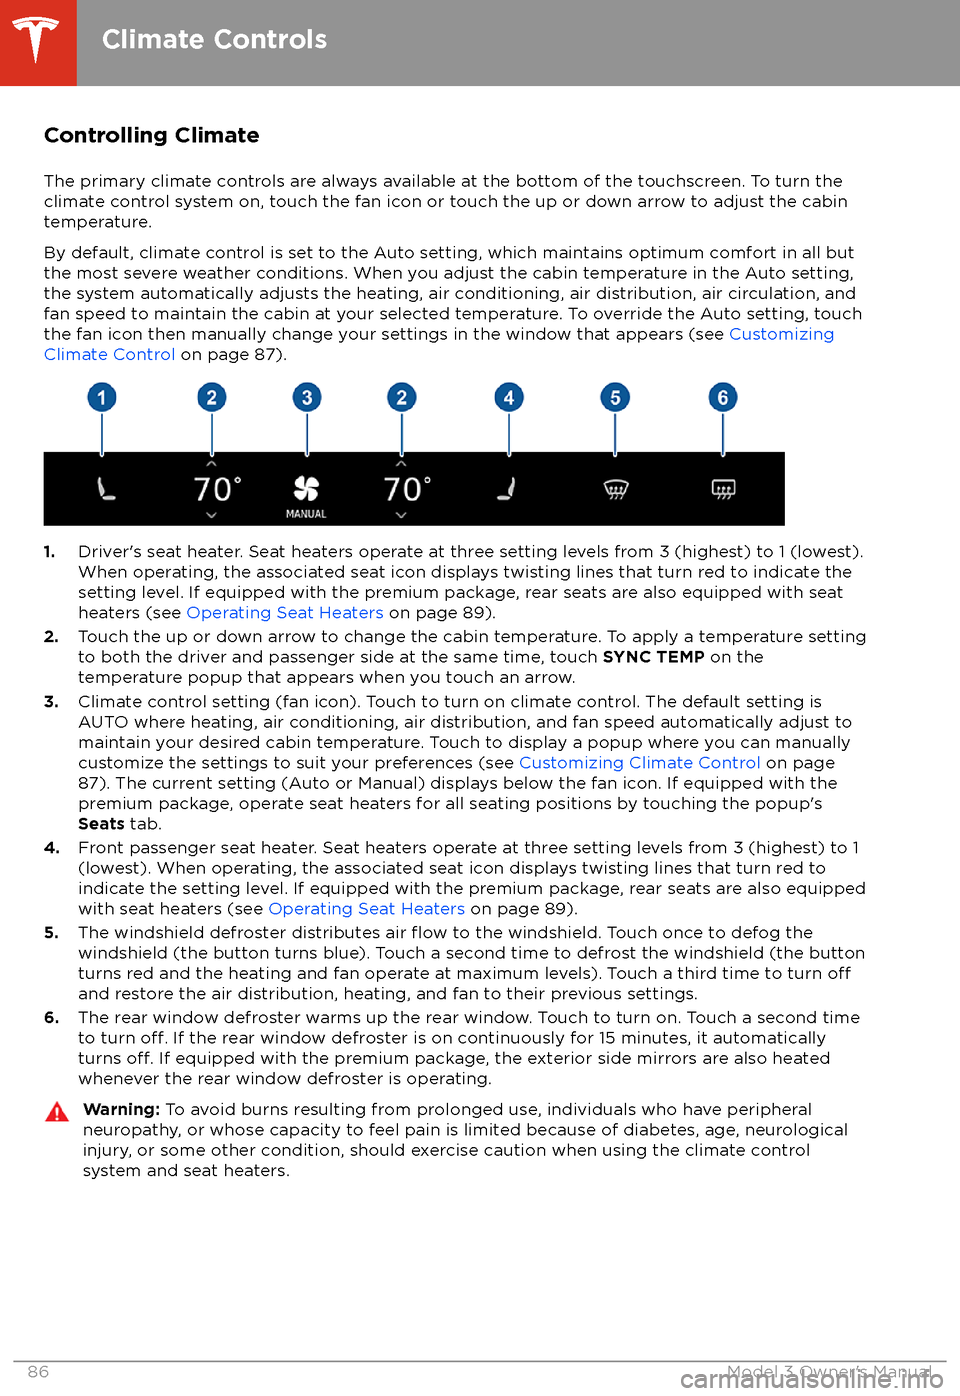
The primary climate controls are always available at the bottom of the touchscreen. To turn the
climate control system on, touch the fan icon or touch the up or down arrow to adjust the cabin
temperature.
By default, climate control is set to the Auto setting, which maintains optimum comfort in all but
the most severe weather conditions. When you adjust the cabin temperature in the Auto setting,
the system automatically adjusts the heating, air conditioning, air distribution, air circulation, and fan speed to maintain the cabin at your selected temperature. To override the Auto setting, touch
the fan icon then manually change your settings in the window that appears (see Customizing
Climate Control on page 87).
1.Driver
Page 89 of 165
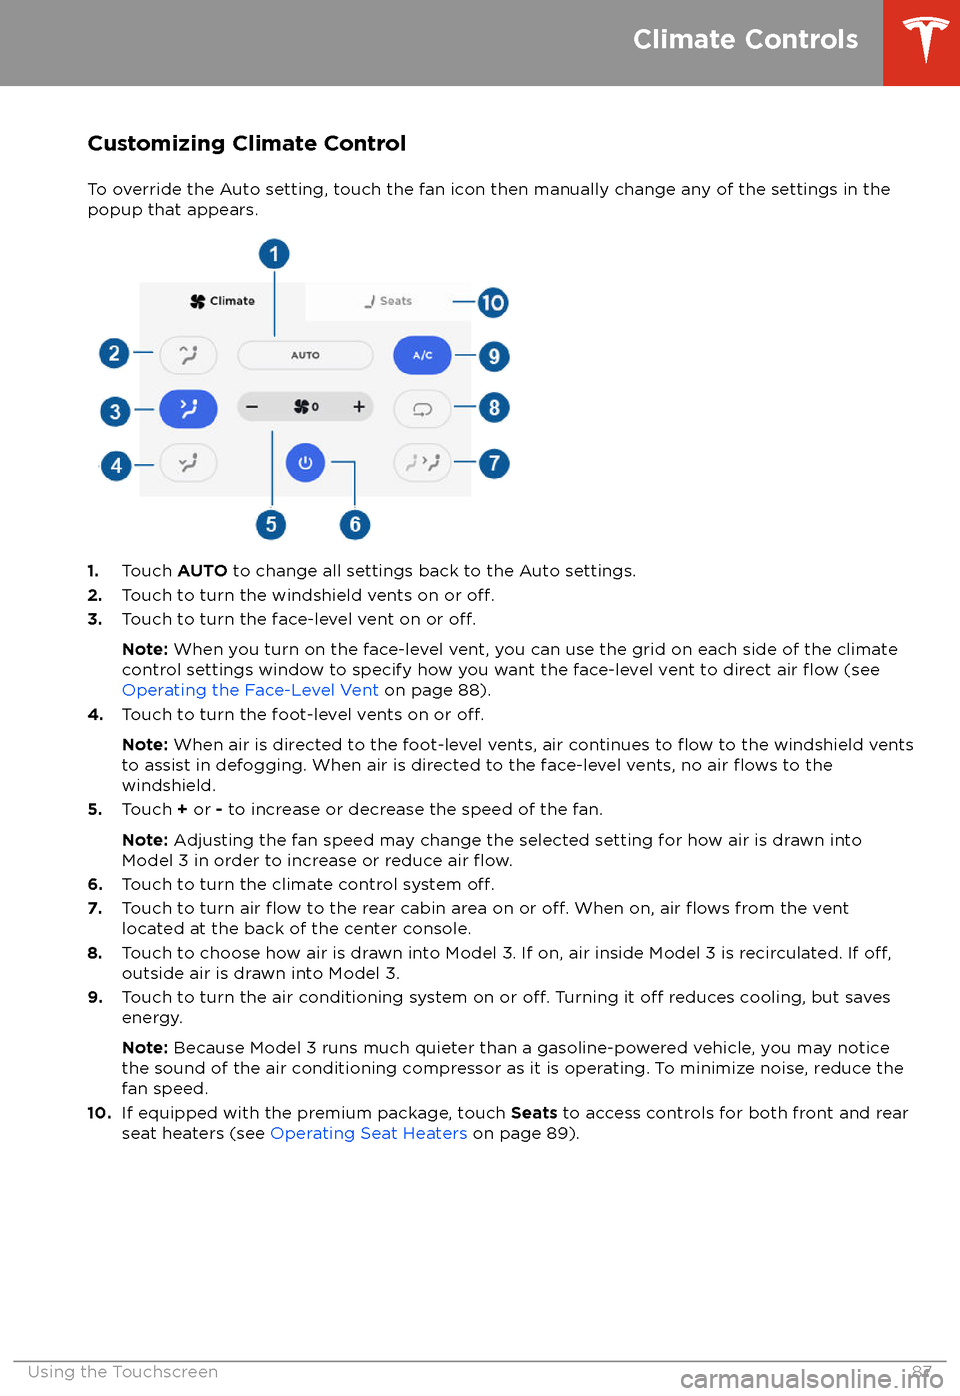
Customizing Climate ControlTo override the Auto setting, touch the fan icon then manually change any of the settings in thepopup that appears.
1. Touch AUTO to change all settings back to the Auto settings.
2. Touch to turn the windshield vents on or off.3.Touch to turn the face-level vent on or off.
Note: When you turn on the face-level vent, you can use the grid on each side of the climate
control settings window to specify how you want the face-level vent to direct air flow (see
Operating the Face-Level Vent on page 88).
4. Touch to turn the foot-level vents on or
off.
Note: When air is directed to the foot-level vents, air continues to flow to the windshield vents
to assist in defogging. When air is directed to the face-level vents, no air flows to the
windshield.
5. Touch + or - to increase or decrease the speed of the fan.
Note: Adjusting the fan speed may change the selected setting for how air is drawn into
Model 3 in order to increase or reduce air
flow.6. Touch to turn the climate control system off.7. Touch to turn air flow to the rear cabin area on or off. When on, air flows from the vent
located at the back of the center console.
8. Touch to choose how air is drawn into Model 3. If on, air inside Model 3 is recirculated. If
off,outside air is drawn into Model 3.
9. Touch to turn the air conditioning system on or off. Turning it off reduces cooling, but saves
energy.
Note: Because Model 3 runs much quieter than a gasoline-powered vehicle, you may notice
the sound of the air conditioning compressor as it is operating. To minimize noise, reduce the fan speed.
10. If equipped with the premium package, touch Seats to access controls for both front and rear
seat heaters (see Operating Seat Heaters on page 89).
Climate Controls
Using the Touchscreen87
Page 99 of 165
Predicting Energy Usage
When navigating to a destination, Model 3
helps you anticipate your charging needs by
calculating the amount of energy that remains
when you reach your destination. The
calculation is an estimate based on driving
style (predicted speed, etc.) and
environmental factors (elevation changes,
weather, etc.). When you initiate a navigation
route, the touchscreen displays this calculation
at the bottom of the turn-by-turn direction list.
Thereafter, you can display it by touching the
area at the bottom of the turn-by-turn
direction list.
Throughout your route, Model 3 monitors energy usage and updates the calculation. A
popup warning displays at the bottom of the
turn-by-turn direction list in these situations:
Page 116 of 165
Inspecting and Maintaining TiresRegularly inspect the tread and side walls for
any sign of distortion (bulges), foreign objects,
cuts or wear.Warning: Do not drive Model 3 if a tire is
damaged, excessively worn, or inflated to
an incorrect pressure. Check tires
regularly for wear, and ensure there are
no cuts, bulges or exposure of the ply/
cord structure.
Tire Wear
Adequate tread depth is important for proper
tire performance. Tires with a tread depth less
than 4/32” (3 mm) are more likely to
hydroplane in wet conditions and should not be used. Tires with a tread depth less than5/32” (4 mm) do not perform well in snow andslush and should not be used when driving inwinter conditions.
Model 3 is originally
fitted with tires that have
wear indicators molded into the tread pattern.
When the tread has been worn down to 4/32”
(3 mm), the indicators start to appear at the surface of the tread pattern, producing the
effect of a continuous band of rubber across
the width of the tire. For optimal performance
and safety, Tesla recommends replacing tires
before the wear indicators are visible.
Tire Rotation, Balance, and Wheel Alignment
Tesla recommends rotating the tires every
6,250 miles (10,000 km).
Unbalanced wheels (sometimes noticeable as
vibration through the steering wheel)
affectvehicle handling and tire life. Even with regular
use, wheels can get out of balance. Therefore,
they should be balanced as required.
If tire wear is uneven (on one side of the tire
only) or becomes abnormally excessive, check
the alignment of wheels.
Note: When replacing only two tires, always
install the new tires on the rear.
Punctured Tires
A puncture eventually causes the tire to lose
pressure, which is why it is important to check
tire pressures frequently. Permanently repair
or replace punctured or damaged tires as
soon as possible.
Your tubeless tires may not leak when
penetrated, provided the object remains in the tire. If, however, you feel a sudden vibration or
ride disturbance while driving, or you suspect a tire is damaged, immediately reduce your
speed. Drive slowly, while avoiding heavy
braking or sharp steering and, when safe to do so, stop the vehicle. Arrange to have Model 3
transported to a Tesla Service Center, or to a nearby tire repair center.
Note: In some cases, you can temporarily
repair small tire punctures (under 1/4” (6
mm)) using an optional tire repair kit available
from Tesla. This allows you to slowly drive
Model 3 to Tesla or to a nearby tire repair
facility.Warning: Do not drive with a punctured
tire, even if the puncture has not caused the tire to
deflate. A punctured tire candeflate suddenly at any time.
Flat Spots
If Model 3 is stationary for a long period in
high temperatures, tires can form
flat spots.
When Model 3 is driven, these flat spots cause
a vibration which gradually disappears as the
tires warm up and regain their original shape.
To minimize
flat spots during storage, inflatetires to the maximum pressure indicated on the tire wall. Then, before driving, release airto adjust tire pressure to the recommendedlevels.
Improving Tire Mileage
To improve the mileage you get from your
tires, maintain tires at the recommended tire
pressures, observe speed limits and advisory
speeds, and avoid:
Page 117 of 165
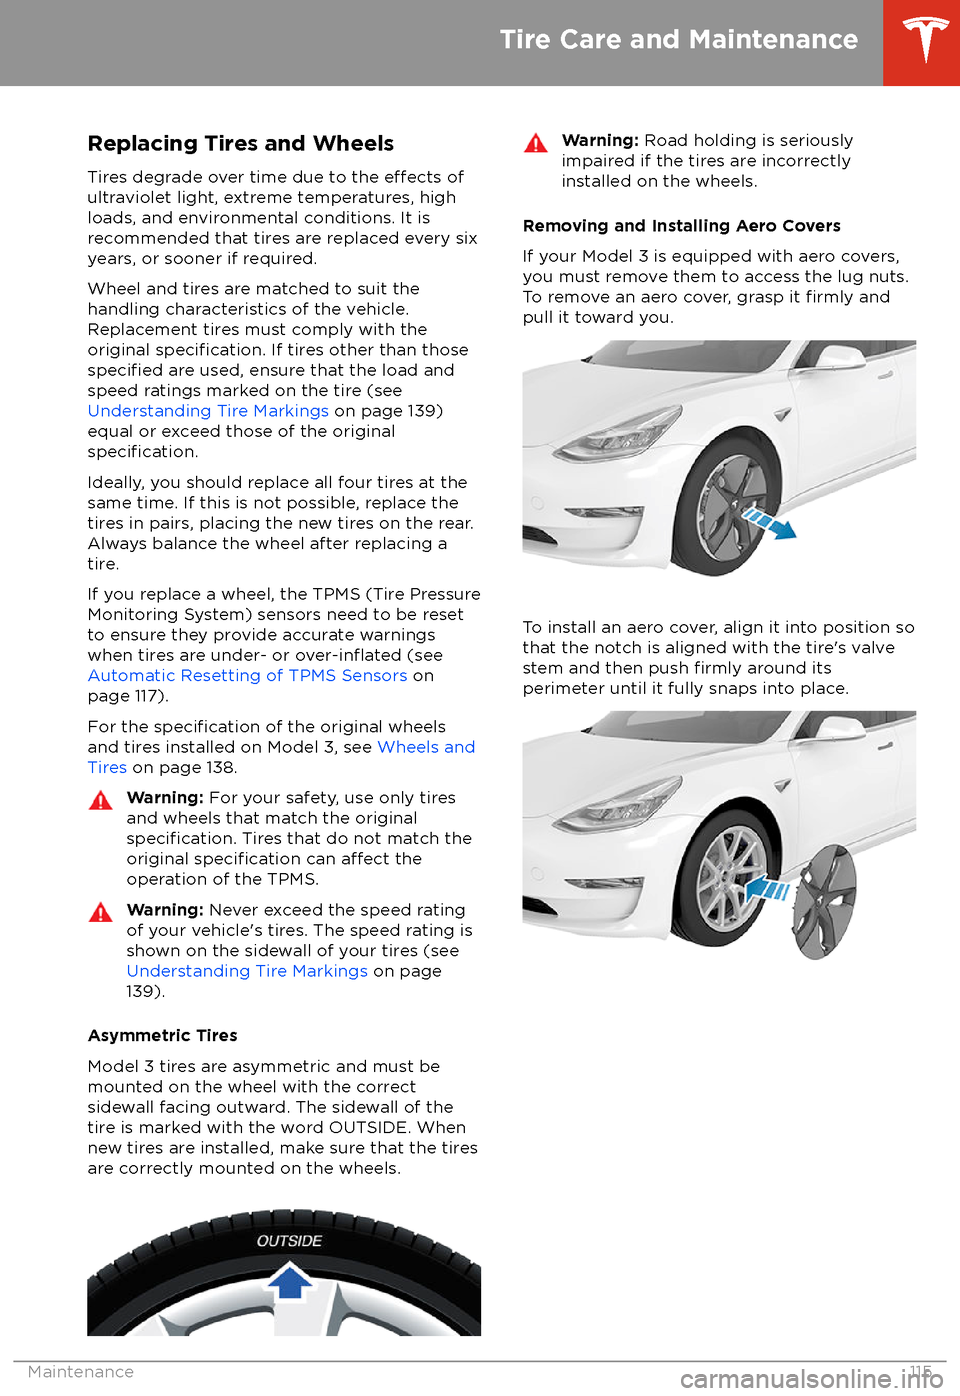
Replacing Tires and Wheels
Tires degrade over time due to the
effects of
ultraviolet light, extreme temperatures, high
loads, and environmental conditions. It is
recommended that tires are replaced every six
years, or sooner if required.
Wheel and tires are matched to suit thehandling characteristics of the vehicle.
Replacement tires must comply with the
original
specification. If tires other than thosespecified are used, ensure that the load and
speed ratings marked on the tire (see Understanding Tire Markings on page 139)
equal or exceed those of the original
specification.
Ideally, you should replace all four tires at the same time. If this is not possible, replace the
tires in pairs, placing the new tires on the rear.
Always balance the wheel after replacing a
tire.
If you replace a wheel, the TPMS (Tire Pressure
Monitoring System) sensors need to be reset to ensure they provide accurate warnings
when tires are under- or
over-inflated (see
Automatic Resetting of TPMS Sensors on
page 117).
For the
specification of the original wheels
and tires installed on Model 3, see Wheels and
Tires on page 138.
Warning:
For your safety, use only tires
and wheels that match the original
specification. Tires that do not match the
original specification can affect the
operation of the TPMS.
Warning: Never exceed the speed rating
of your vehicle
Page 138 of 165
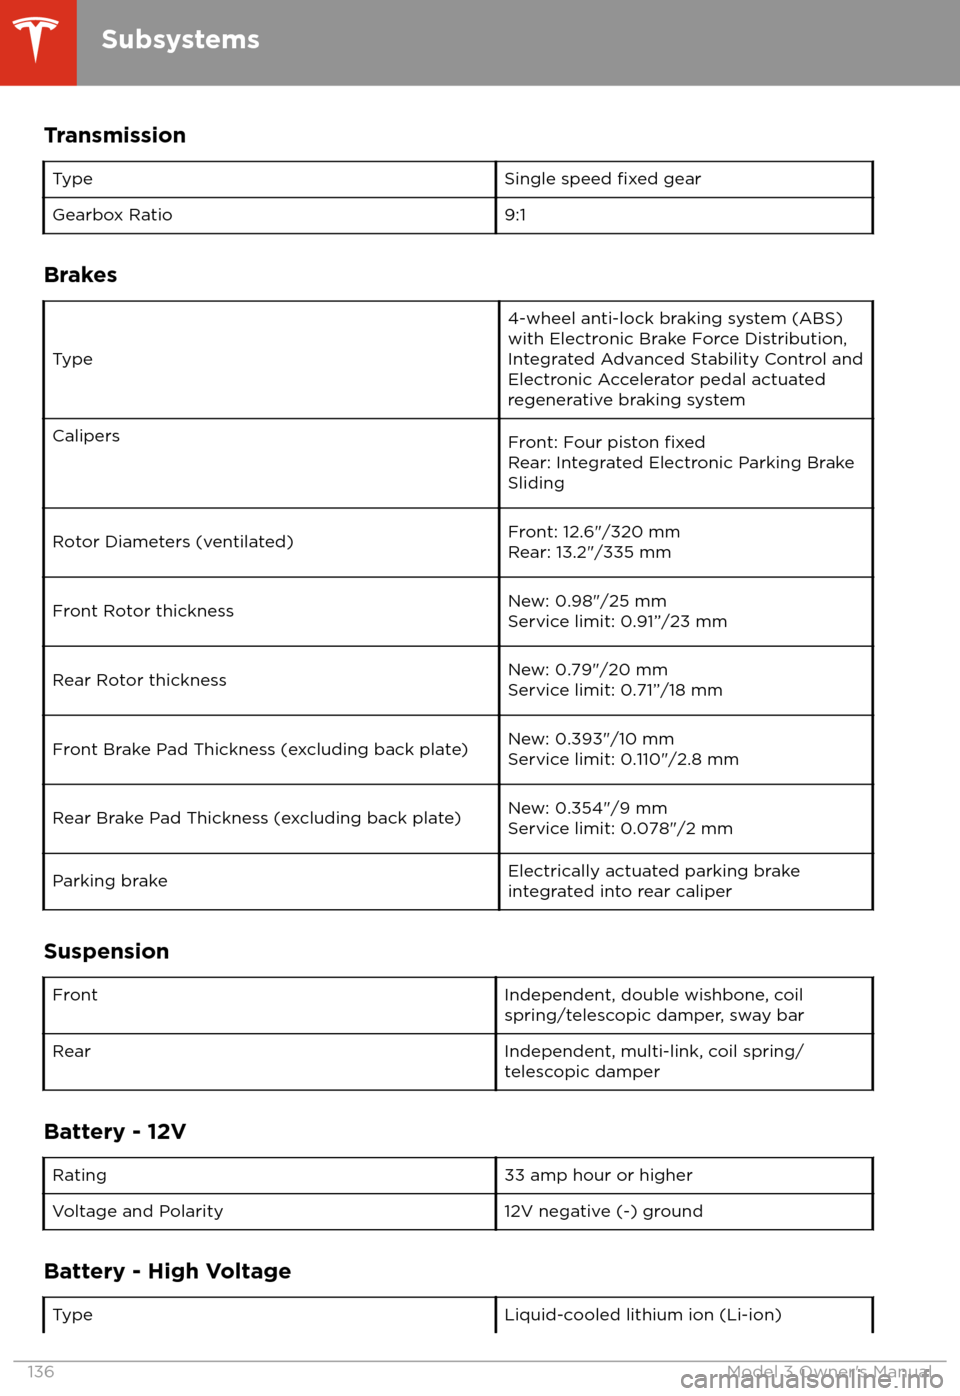
TransmissionTypeSingle speed fixed gearGearbox Ratio9:1
Brakes
Type
4-wheel anti-lock braking system (ABS)
with Electronic Brake Force Distribution,
Integrated Advanced Stability Control and
Electronic Accelerator pedal actuated
regenerative braking systemCalipersFront: Four piston fixedRear: Integrated Electronic Parking Brake
SlidingRotor Diameters (ventilated)Front: 12.6"/320 mm
Rear: 13.2"/335 mmFront Rotor thicknessNew: 0.98"/25 mm
Service limit: 0.91”/23 mmRear Rotor thicknessNew: 0.79"/20 mm
Service limit: 0.71”/18 mmFront Brake Pad Thickness (excluding back plate)New: 0.393"/10 mm
Service limit: 0.110"/2.8 mmRear Brake Pad Thickness (excluding back plate)New: 0.354"/9 mm
Service limit: 0.078"/2 mmParking brakeElectrically actuated parking brake
integrated into rear caliper
Suspension
FrontIndependent, double wishbone, coil
spring/telescopic damper, sway barRearIndependent, multi-link, coil spring/
telescopic damper
Battery - 12V
Rating33 amp hour or higherVoltage and Polarity12V negative (-) ground
Battery - High Voltage
TypeLiquid-cooled lithium ion (Li-ion)
Subsystems
136Model 3 Owner
Page 141 of 165
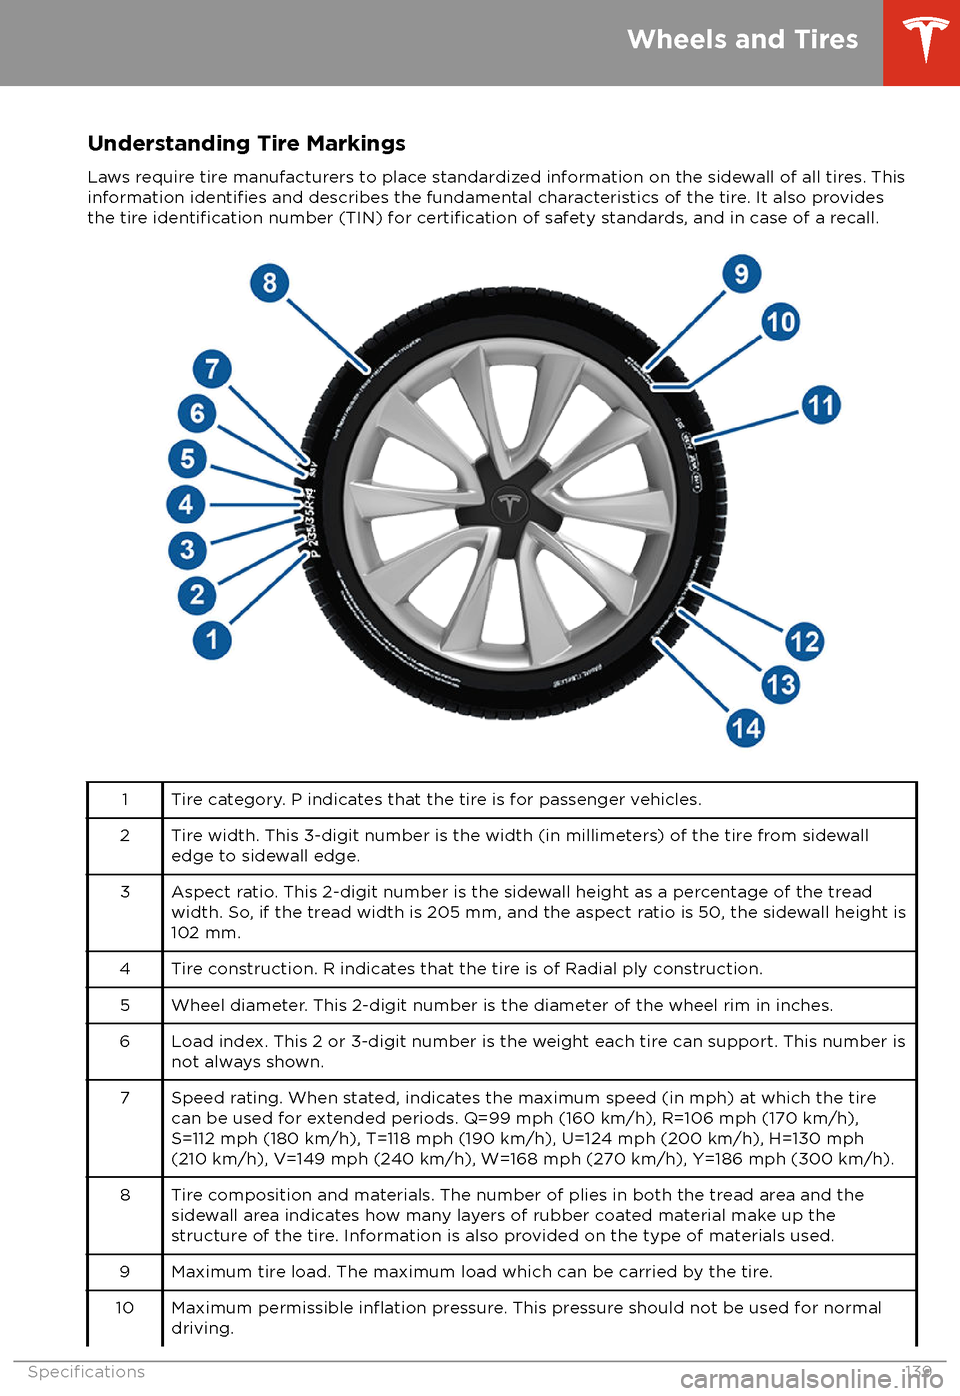
Understanding Tire MarkingsLaws require tire manufacturers to place standardized information on the sidewall of all tires. Thisinformation
identifies and describes the fundamental characteristics of the tire. It also provides
the tire identification number (TIN) for certification of safety standards, and in case of a recall.
1Tire category. P indicates that the tire is for passenger vehicles.2Tire width. This 3-digit number is the width (in millimeters) of the tire from sidewall
edge to sidewall edge.3Aspect ratio. This 2-digit number is the sidewall height as a percentage of the tread
width. So, if the tread width is 205 mm, and the aspect ratio is 50, the sidewall height is 102 mm.4Tire construction. R indicates that the tire is of Radial ply construction.5Wheel diameter. This 2-digit number is the diameter of the wheel rim in inches.6Load index. This 2 or 3-digit number is the weight each tire can support. This number is
not always shown.7Speed rating. When stated, indicates the maximum speed (in mph) at which the tire can be used for extended periods. Q=99 mph (160 km/h), R=106 mph (170 km/h), S=112 mph (180 km/h), T=118 mph (190 km/h), U=124 mph (200 km/h), H=130 mph(210 km/h), V=149 mph (240 km/h), W=168 mph (270 km/h), Y=186 mph (300 km/h).8Tire composition and materials. The number of plies in both the tread area and thesidewall area indicates how many layers of rubber coated material make up the structure of the tire. Information is also provided on the type of materials used.9Maximum tire load. The maximum load which can be carried by the tire.10Maximum permissible inflation pressure. This pressure should not be used for normal
driving.
Wheels and Tires
Specifications139
Page 148 of 165
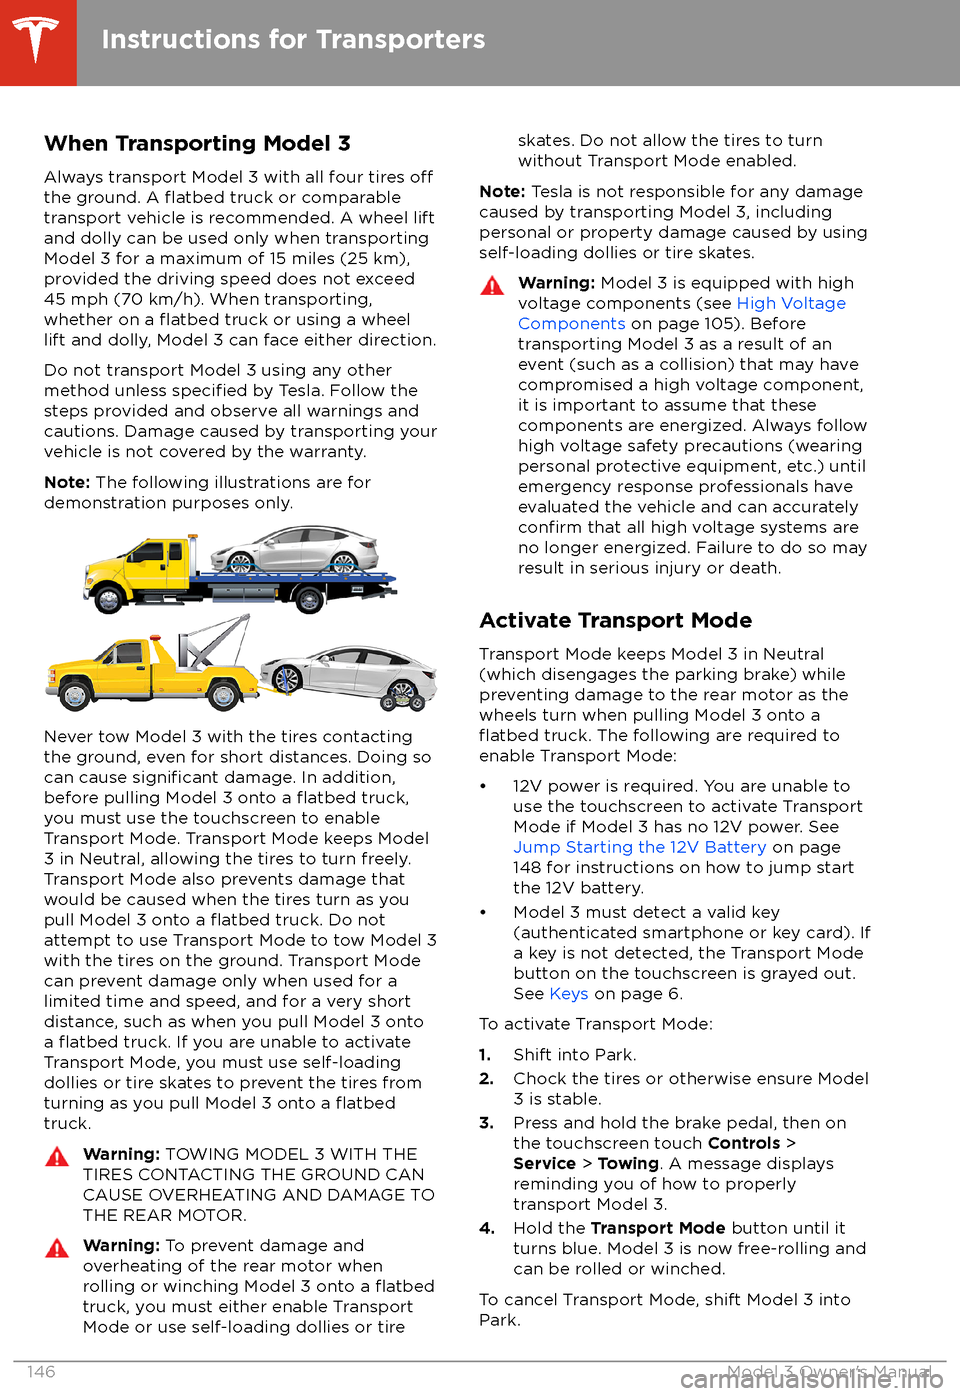
When Transporting Model 3Always transport Model 3 with all four tires
offthe ground. A flatbed truck or comparable
transport vehicle is recommended. A wheel lift
and dolly can be used only when transporting
Model 3 for a maximum of 15 miles (25 km),
provided the driving speed does not exceed
45 mph (70 km/h). When transporting,
whether on a
flatbed truck or using a wheel
lift and dolly, Model 3 can face either direction.
Do not transport Model 3 using any other
method unless
specified by Tesla. Follow the
steps provided and observe all warnings and
cautions. Damage caused by transporting your
vehicle is not covered by the warranty.
Note: The following illustrations are for
demonstration purposes only.
Never tow Model 3 with the tires contacting
the ground, even for short distances. Doing so
can cause
significant damage. In addition,
before pulling Model 3 onto a flatbed truck,
you must use the touchscreen to enable
Transport Mode. Transport Mode keeps Model
3 in Neutral, allowing the tires to turn freely.
Transport Mode also prevents damage that
would be caused when the tires turn as you
pull Model 3 onto a
flatbed truck. Do not
attempt to use Transport Mode to tow Model 3
with the tires on the ground. Transport Mode can prevent damage only when used for a
limited time and speed, and for a very short
distance, such as when you pull Model 3 onto a
flatbed truck. If you are unable to activate
Transport Mode, you must use self-loading dollies or tire skates to prevent the tires from
turning as you pull Model 3 onto a
flatbedtruck.
Warning: TOWING MODEL 3 WITH THE
TIRES CONTACTING THE GROUND CAN
CAUSE OVERHEATING AND DAMAGE TO THE REAR MOTOR.Warning: To prevent damage and
overheating of the rear motor when
rolling or winching Model 3 onto a
flatbedtruck, you must either enable Transport
Mode or use self-loading dollies or tire
skates. Do not allow the tires to turn
without Transport Mode enabled.
Note: Tesla is not responsible for any damage
caused by transporting Model 3, including personal or property damage caused by using
self-loading dollies or tire skates.
Warning: Model 3 is equipped with high
voltage components (see High Voltage
Components on page 105). Before
transporting Model 3 as a result of an
event (such as a collision) that may have
compromised a high voltage component, it is important to assume that these
components are energized. Always follow
high voltage safety precautions (wearing
personal protective equipment, etc.) until
emergency response professionals have
evaluated the vehicle and can accurately
confirm that all high voltage systems are
no longer energized. Failure to do so may
result in serious injury or death.
Activate Transport Mode
Transport Mode keeps Model 3 in Neutral
(which disengages the parking brake) while
preventing damage to the rear motor as the wheels turn when pulling Model 3 onto a
flatbed truck. The following are required to
enable Transport Mode:
Page 160 of 165
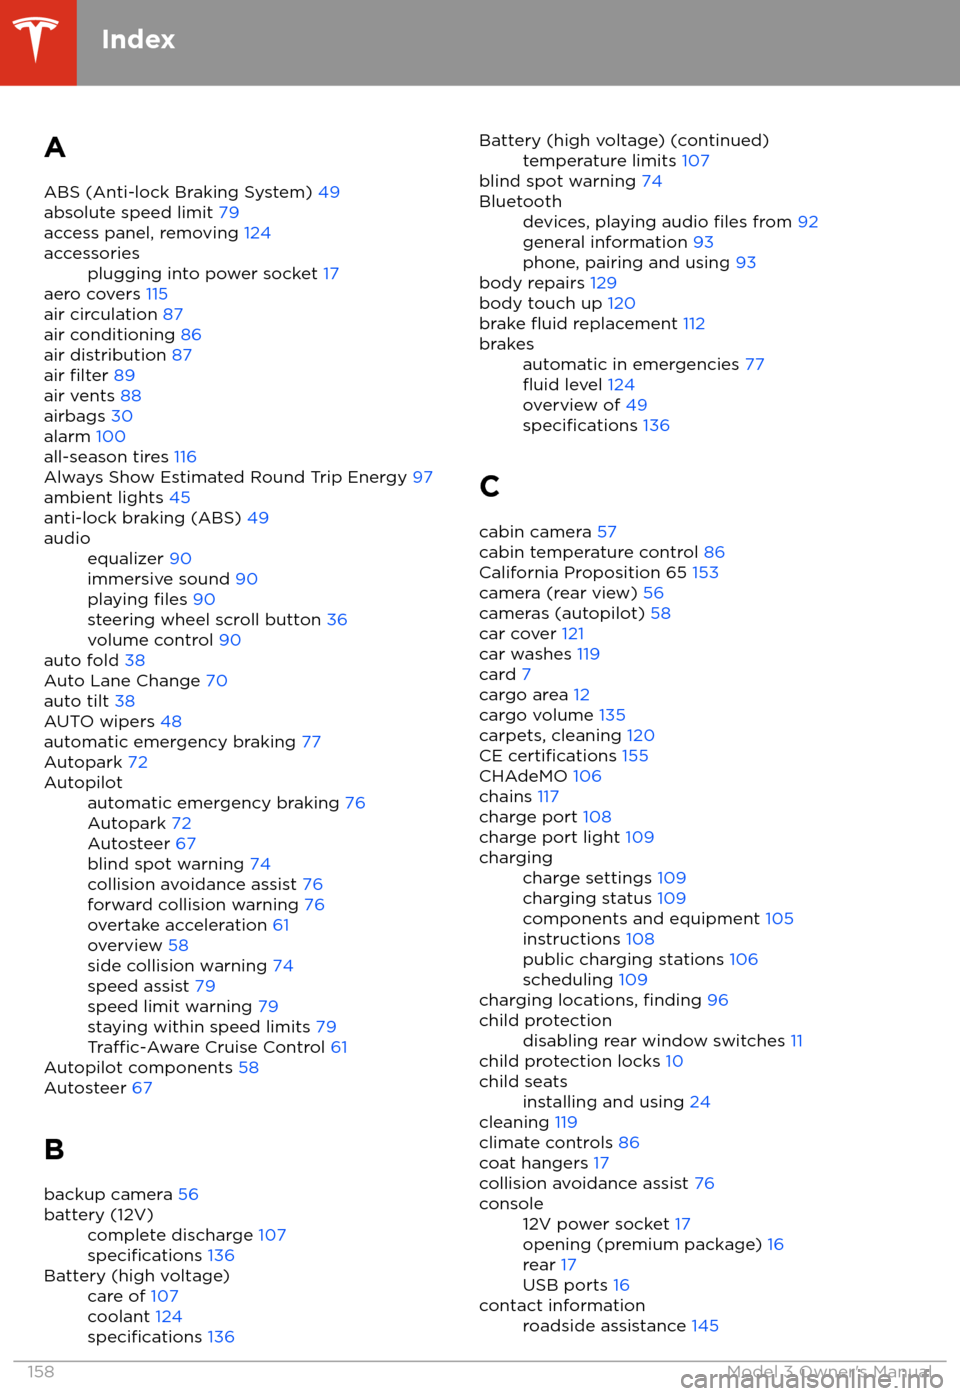
AABS (Anti-lock Braking System) 49
absolute speed limit 79
access panel, removing 124accessoriesplugging into power socket 17
aero covers 115
air circulation 87
air conditioning 86
air distribution 87
air
filter 89
air vents 88
airbags 30
alarm 100
all-season tires 116
Always Show Estimated Round Trip Energy 97
ambient lights 45
anti-lock braking (ABS) 49
audioequalizer 90
immersive sound 90
playing
files 90
steering wheel scroll button 36
volume control 90
auto fold
38
Auto Lane Change 70
auto tilt 38
AUTO wipers 48
automatic emergency braking 77
Autopark 72
Autopilotautomatic emergency braking 76
Autopark 72
Autosteer 67
blind spot warning 74
collision avoidance assist 76
forward collision warning 76
overtake acceleration 61
overview 58
side collision warning 74
speed assist 79
speed limit warning 79
staying within speed limits 79
Traffic-Aware Cruise Control 61
Autopilot components 58
Autosteer 67
B backup camera 56
battery (12V)complete discharge 107specifications 136Battery (high voltage)care of 107
coolant 124
specifications 136
Battery (high voltage) (continued)temperature limits 107
blind spot warning 74
Bluetoothdevices, playing audio files from 92
general information 93
phone, pairing and using 93
body repairs 129
body touch up 120
brake
fluid replacement 112
brakesautomatic in emergencies 77fluid level 124
overview of 49
specifications 136
C
cabin camera 57
cabin temperature control 86
California Proposition 65 153
camera (rear view) 56
cameras (autopilot) 58
car cover 121
car washes 119
card 7
cargo area 12
cargo volume 135
carpets, cleaning 120
CE
certifications 155
CHAdeMO 106
chains 117
charge port 108
charge port light 109
chargingcharge settings 109
charging status 109
components and equipment 105
instructions 108
public charging stations 106
scheduling 109
charging locations, finding 96
child protectiondisabling rear window switches 11
child protection locks 10
child seatsinstalling and using 24
cleaning 119
climate controls 86
coat hangers 17
collision avoidance assist 76
console12V power socket 17
opening (premium package) 16
rear 17
USB ports 16contact informationroadside assistance 145
Index
158Model 3 Owner
Page 161 of 165
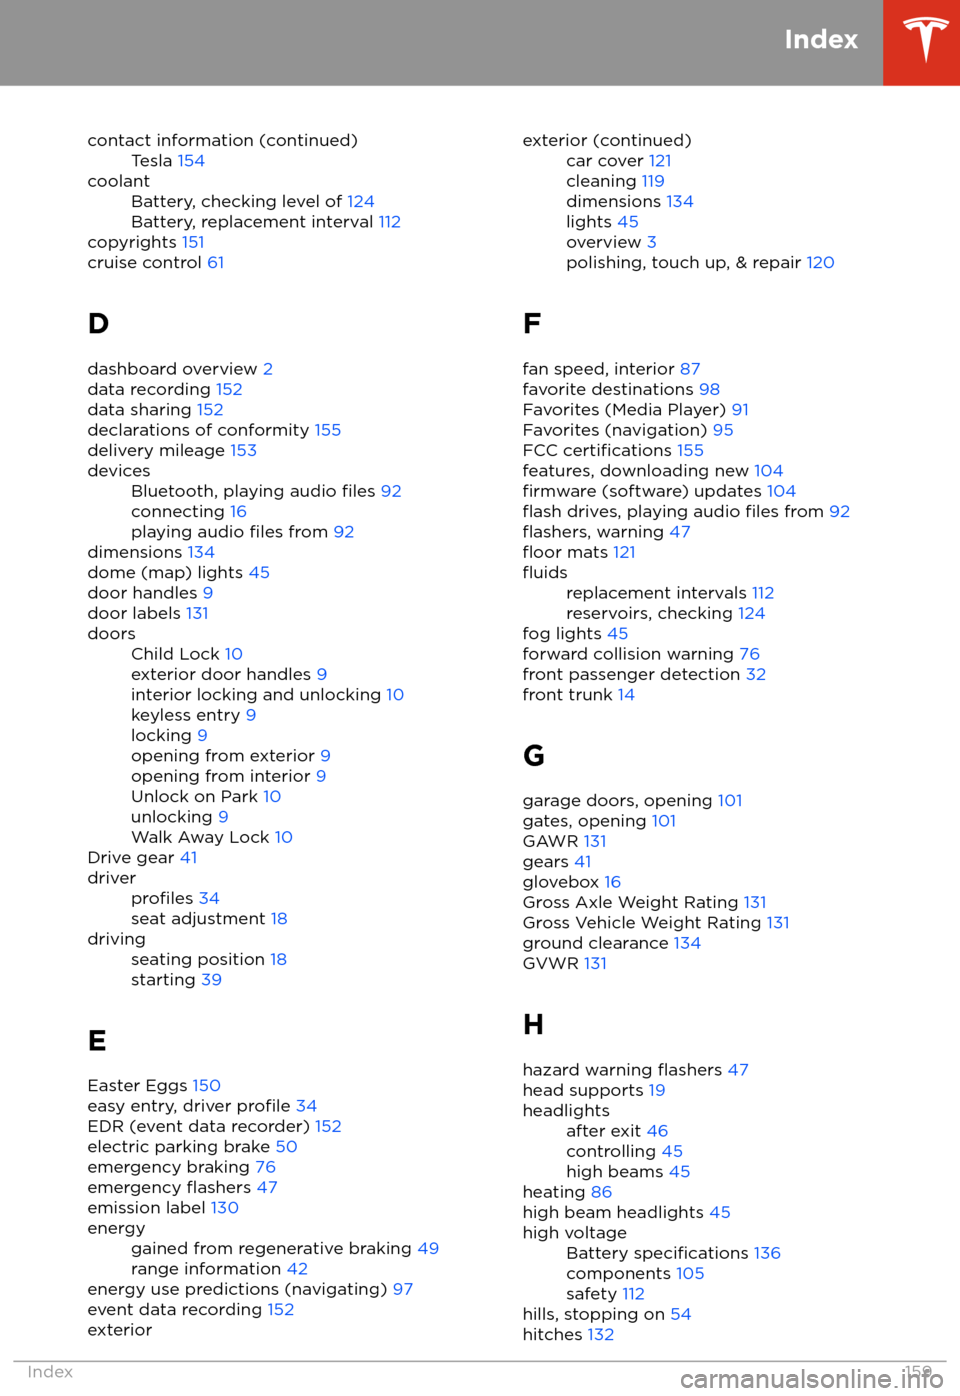
contact information (continued)Tesla 154coolantBattery, checking level of 124
Battery, replacement interval 112
copyrights 151
cruise control 61
D
dashboard overview 2
data recording 152
data sharing 152
declarations of conformity 155
delivery mileage 153
devicesBluetooth, playing audio files 92
connecting 16
playing audio
files from 92
dimensions 134
dome (map) lights 45
door handles 9
door labels 131
doorsChild Lock 10
exterior door handles 9
interior locking and unlocking 10
keyless entry 9
locking 9
opening from exterior 9
opening from interior 9
Unlock on Park 10
unlocking 9
Walk Away Lock 10
Drive gear 41
driverprofiles 34
seat adjustment 18drivingseating position 18
starting 39
E
Easter Eggs 150
easy entry, driver
profile 34
EDR (event data recorder) 152
electric parking brake 50
emergency braking 76
emergency
flashers 47
emission label 130
energygained from regenerative braking 49
range information 42
energy use predictions (navigating) 97
event data recording 152
exteriorexterior (continued)car cover 121
cleaning 119
dimensions 134
lights 45
overview 3
polishing, touch up, & repair 120
F
fan speed, interior 87
favorite destinations 98
Favorites (Media Player) 91
Favorites (navigation) 95
FCC
certifications 155
features, downloading new 104
firmware (software) updates 104flash drives, playing audio files from 92flashers, warning 47floor mats 121
fluidsreplacement intervals 112
reservoirs, checking 124
fog lights 45
forward collision warning 76
front passenger detection 32
front trunk 14
G
garage doors, opening 101
gates, opening 101
GAWR 131
gears 41
glovebox 16
Gross Axle Weight Rating 131
Gross Vehicle Weight Rating 131
ground clearance 134
GVWR 131
H hazard warning
flashers 47
head supports 19
headlightsafter exit 46
controlling 45
high beams 45
heating 86
high beam headlights 45
high voltageBattery specifications 136
components 105
safety 112
hills, stopping on 54
hitches 132
Index
Index159