center console TESLA MODEL 3 2018 Owner's Manual
[x] Cancel search | Manufacturer: TESLA, Model Year: 2018, Model line: MODEL 3, Model: TESLA MODEL 3 2018Pages: 165, PDF Size: 8.63 MB
Page 4 of 165
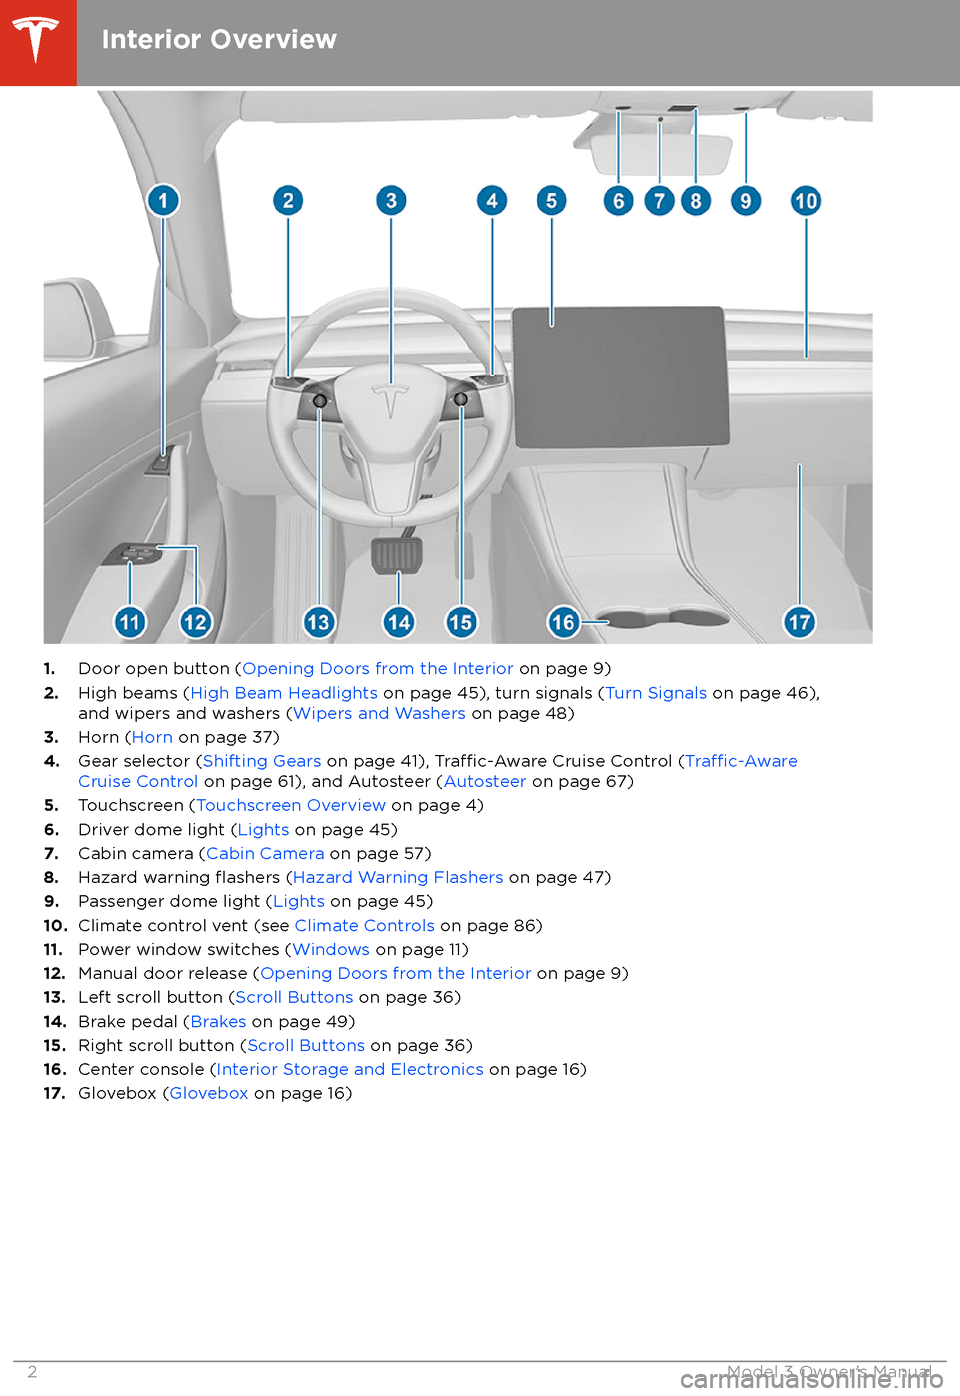
1.Door open button ( Opening Doors from the Interior on page 9)
2. High beams ( High Beam Headlights on page 45), turn signals ( Turn Signals on page 46),
and wipers and washers ( Wipers and Washers on page 48)
3. Horn ( Horn on page 37)
4. Gear selector ( Shifting Gears on page 41),
Traffic-Aware Cruise Control (Traffic-AwareCruise Control on page 61), and Autosteer ( Autosteer on page 67)
5. Touchscreen ( Touchscreen Overview on page 4)
6. Driver dome light ( Lights on page 45)
7. Cabin camera ( Cabin Camera on page 57)
8. Hazard warning
flashers (Hazard Warning Flashers on page 47)
9. Passenger dome light ( Lights on page 45)
10. Climate control vent (see Climate Controls on page 86)
11. Power window switches ( Windows on page 11)
12. Manual door release ( Opening Doors from the Interior on page 9)
13. Left scroll button ( Scroll Buttons on page 36)
14. Brake pedal ( Brakes on page 49)
15. Right scroll button ( Scroll Buttons on page 36)
16. Center console ( Interior Storage and Electronics on page 16)
17. Glovebox ( Glovebox on page 16)
Interior Overview
2Model 3 Owner
Page 18 of 165
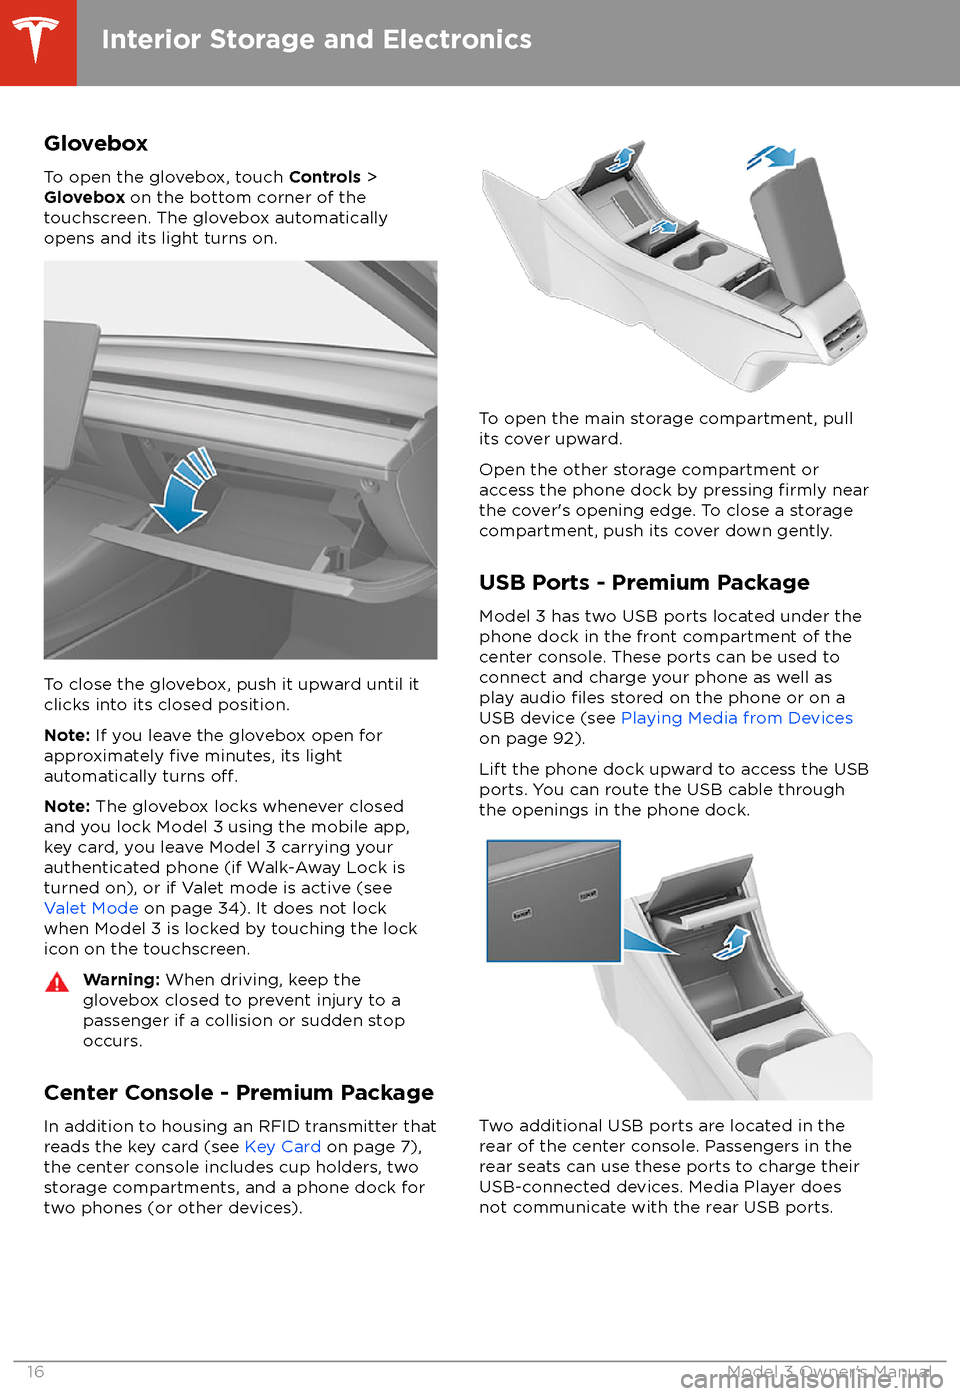
Glovebox
To open the glovebox, touch Controls >
Glovebox on the bottom corner of the
touchscreen. The glovebox automatically
opens and its light turns on.
To close the glovebox, push it upward until it
clicks into its closed position.
Note: If you leave the glovebox open for
approximately
five minutes, its light
automatically turns off.
Note: The glovebox locks whenever closed
and you lock Model 3 using the mobile app,
key card, you leave Model 3 carrying your authenticated phone (if Walk-Away Lock is
turned on), or if Valet mode is active (see
Valet Mode on page 34). It does not lock
when Model 3 is locked by touching the lock
icon on the touchscreen.
Warning: When driving, keep the
glovebox closed to prevent injury to a
passenger if a collision or sudden stop occurs.
Center Console - Premium Package
In addition to housing an RFID transmitter that reads the key card (see Key Card on page 7),
the center console includes cup holders, two
storage compartments, and a phone dock for
two phones (or other devices).
To open the main storage compartment, pull its cover upward.
Open the other storage compartment or
access the phone dock by pressing
firmly near
the cover
Page 19 of 165
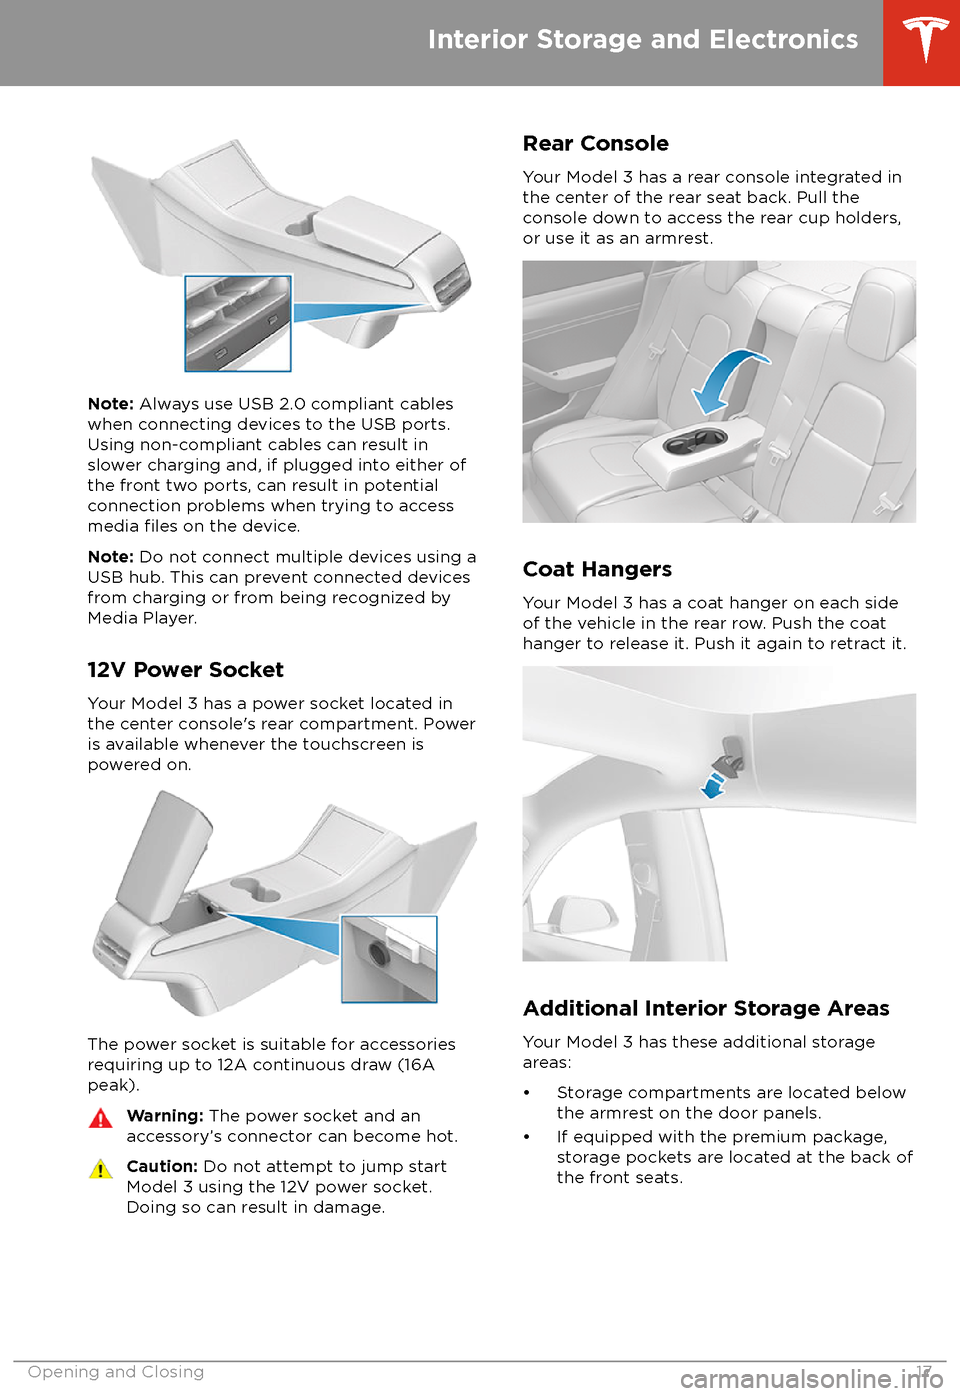
Note: Always use USB 2.0 compliant cables
when connecting devices to the USB ports.
Using non-compliant cables can result in
slower charging and, if plugged into either of the front two ports, can result in potentialconnection problems when trying to access
media
files on the device.
Note: Do not connect multiple devices using a
USB hub. This can prevent connected devices from charging or from being recognized by
Media Player.
12V Power Socket
Your Model 3 has a power socket located in the center console
Page 41 of 165
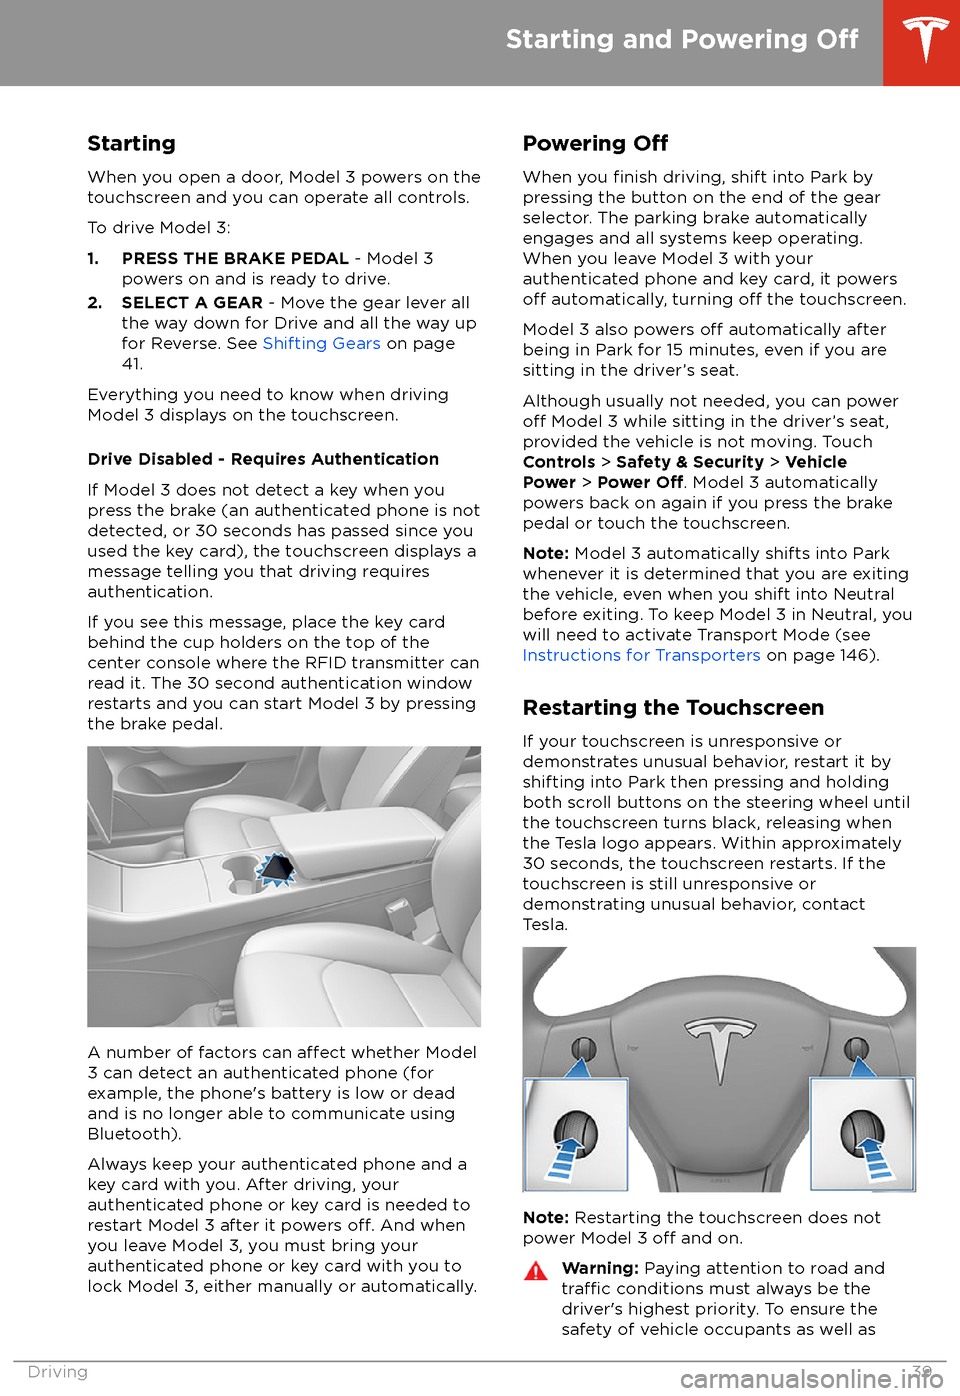
StartingWhen you open a door, Model 3 powers on the
touchscreen and you can operate all controls.
To drive Model 3:
1. PRESS THE BRAKE PEDAL - Model 3
powers on and is ready to drive.
2. SELECT A GEAR - Move the gear lever all
the way down for Drive and all the way up
for Reverse. See Shifting Gears on page
41.
Everything you need to know when driving
Model 3 displays on the touchscreen.
Drive Disabled - Requires Authentication
If Model 3 does not detect a key when you
press the brake (an authenticated phone is not
detected, or 30 seconds has passed since you
used the key card), the touchscreen displays a
message telling you that driving requires
authentication.
If you see this message, place the key card
behind the cup holders on the top of the
center console where the RFID transmitter can
read it. The 30 second authentication window
restarts and you can start Model 3 by pressing
the brake pedal.
A number of factors can affect whether Model
3 can detect an authenticated phone (for
example, the phone
Page 89 of 165
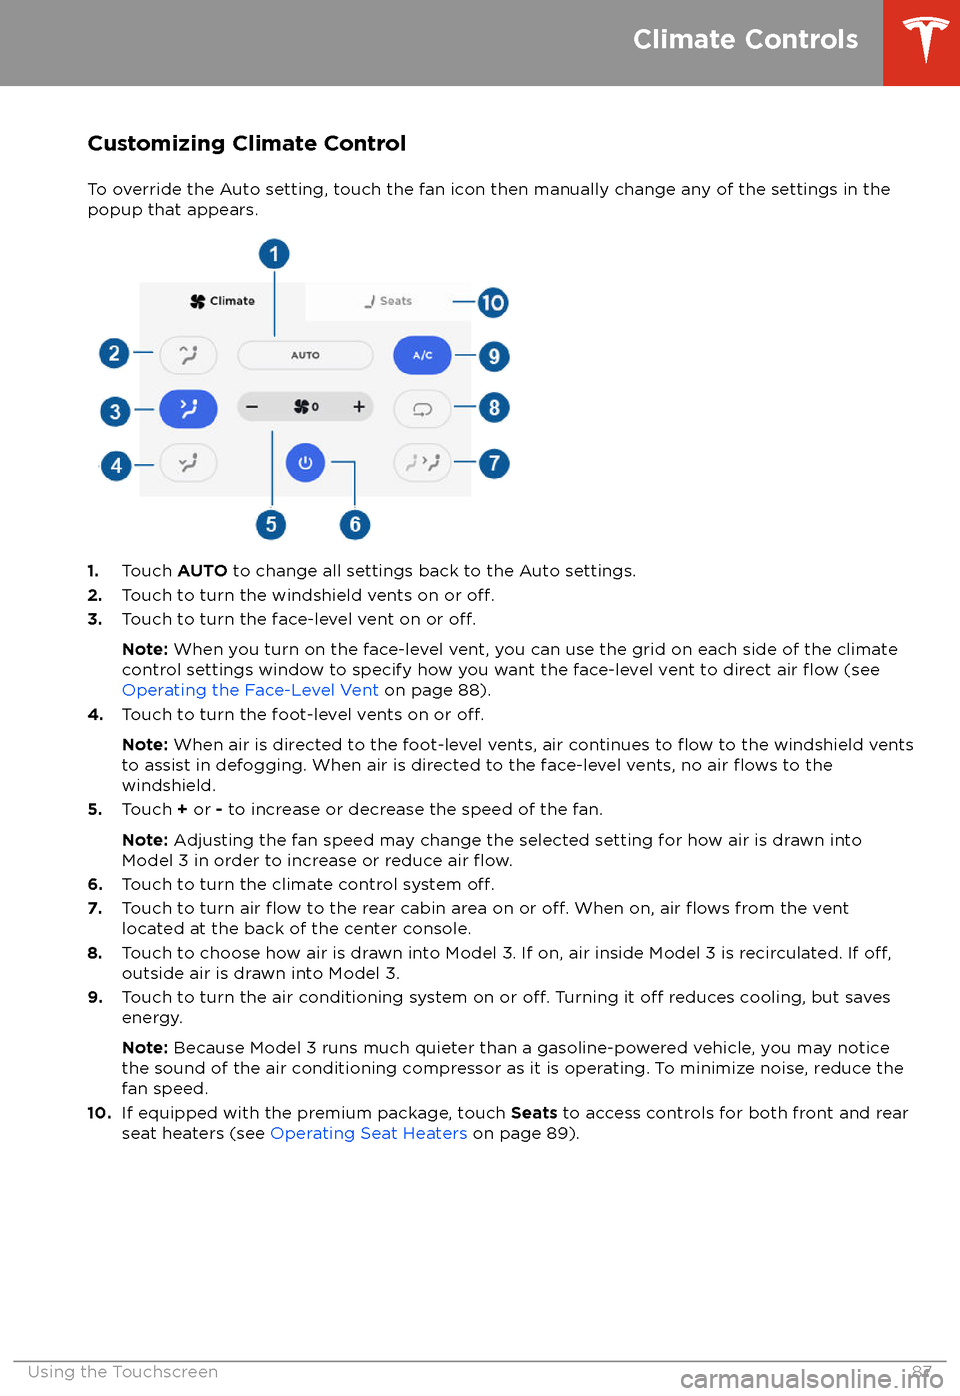
Customizing Climate ControlTo override the Auto setting, touch the fan icon then manually change any of the settings in thepopup that appears.
1. Touch AUTO to change all settings back to the Auto settings.
2. Touch to turn the windshield vents on or off.3.Touch to turn the face-level vent on or off.
Note: When you turn on the face-level vent, you can use the grid on each side of the climate
control settings window to specify how you want the face-level vent to direct air flow (see
Operating the Face-Level Vent on page 88).
4. Touch to turn the foot-level vents on or
off.
Note: When air is directed to the foot-level vents, air continues to flow to the windshield vents
to assist in defogging. When air is directed to the face-level vents, no air flows to the
windshield.
5. Touch + or - to increase or decrease the speed of the fan.
Note: Adjusting the fan speed may change the selected setting for how air is drawn into
Model 3 in order to increase or reduce air
flow.6. Touch to turn the climate control system off.7. Touch to turn air flow to the rear cabin area on or off. When on, air flows from the vent
located at the back of the center console.
8. Touch to choose how air is drawn into Model 3. If on, air inside Model 3 is recirculated. If
off,outside air is drawn into Model 3.
9. Touch to turn the air conditioning system on or off. Turning it off reduces cooling, but saves
energy.
Note: Because Model 3 runs much quieter than a gasoline-powered vehicle, you may notice
the sound of the air conditioning compressor as it is operating. To minimize noise, reduce the fan speed.
10. If equipped with the premium package, touch Seats to access controls for both front and rear
seat heaters (see Operating Seat Heaters on page 89).
Climate Controls
Using the Touchscreen87
Page 157 of 165

Passive Entry System
Certification Labels
Pillar Endpoint:
Center Console:
Fascia Endpoint:
FCC Certification
ComponentMfrOperating
Freq (MHz)Tested ForFCC IDPillar Endpoint
1089773Tesla13.56 and 2400US
Canada2AEIM-1089773Center Console
1089774Tesla13.56 and 2400US
Canada2AEIM-1089774Fascia Endpoint
1089775Tesla2400US
Canada2AEIM-1089775
Per FCC IDs 2AEIM-1089773, 2AEIM-1089774, and 2AEIM-1089775 the Model 3 passive entry
devices listed above comply with Part 15 of the FCC rules. Operation is subject to the followingtwo conditions:
1. This device may not cause harmful interference, and
Declarations of Conformity
Consumer Information155