glove box TESLA MODEL 3 2018 Owner's Manual
[x] Cancel search | Manufacturer: TESLA, Model Year: 2018, Model line: MODEL 3, Model: TESLA MODEL 3 2018Pages: 165, PDF Size: 8.63 MB
Page 4 of 165

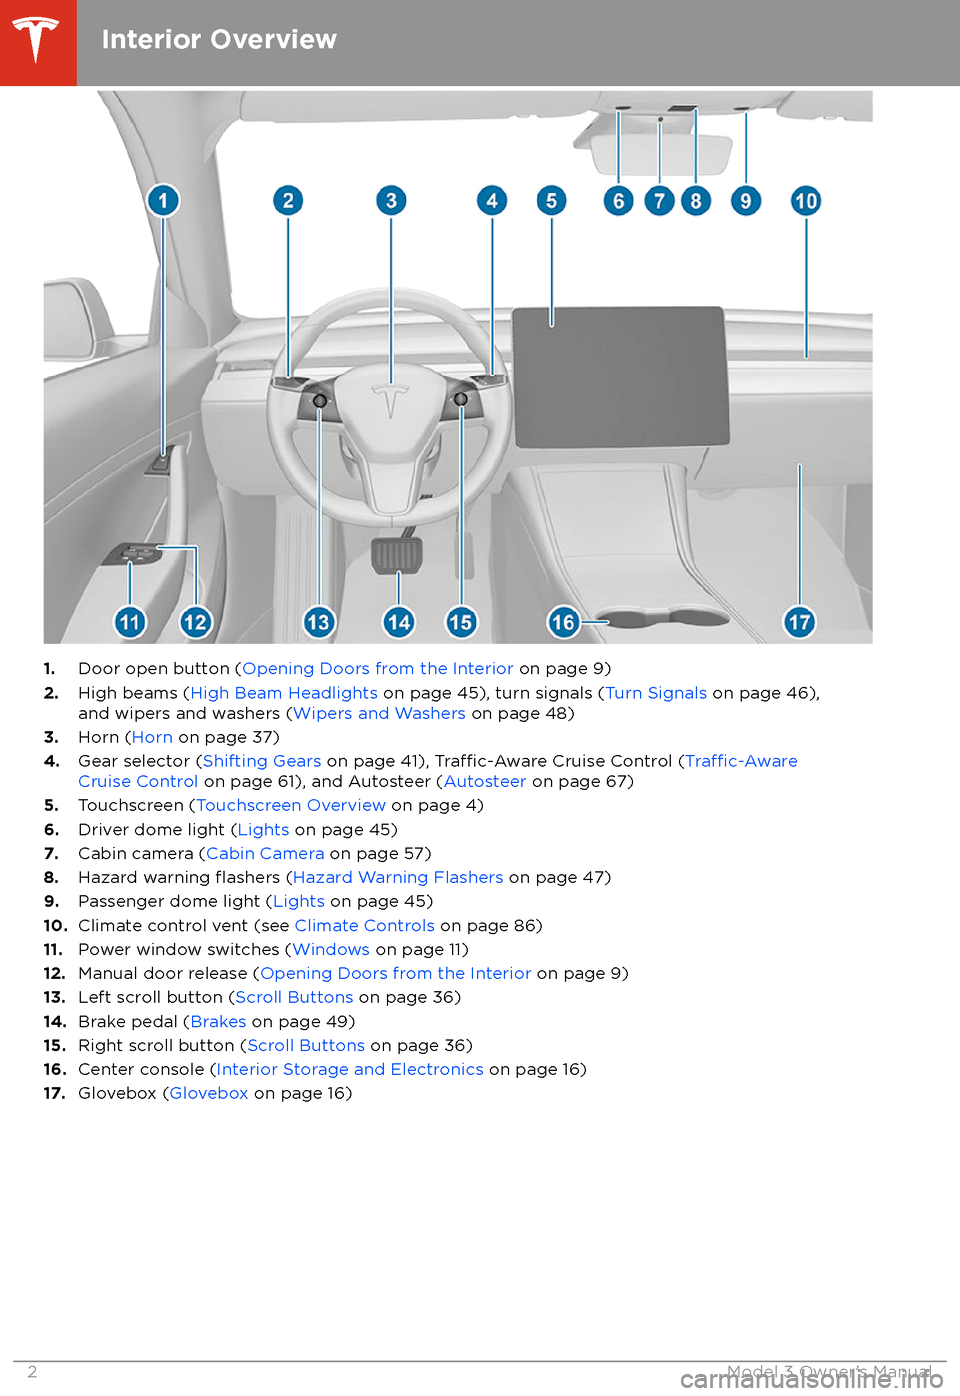
1.Door open button ( Opening Doors from the Interior on page 9)
2. High beams ( High Beam Headlights on page 45), turn signals ( Turn Signals on page 46),
and wipers and washers ( Wipers and Washers on page 48)
3. Horn ( Horn on page 37)
4. Gear selector ( Shifting Gears on page 41),
Traffic-Aware Cruise Control (Traffic-AwareCruise Control on page 61), and Autosteer ( Autosteer on page 67)
5. Touchscreen ( Touchscreen Overview on page 4)
6. Driver dome light ( Lights on page 45)
7. Cabin camera ( Cabin Camera on page 57)
8. Hazard warning
flashers (Hazard Warning Flashers on page 47)
9. Passenger dome light ( Lights on page 45)
10. Climate control vent (see Climate Controls on page 86)
11. Power window switches ( Windows on page 11)
12. Manual door release ( Opening Doors from the Interior on page 9)
13. Left scroll button ( Scroll Buttons on page 36)
14. Brake pedal ( Brakes on page 49)
15. Right scroll button ( Scroll Buttons on page 36)
16. Center console ( Interior Storage and Electronics on page 16)
17. Glovebox ( Glovebox on page 16)
Interior Overview
2Model 3 Owner
Page 18 of 165

Glovebox
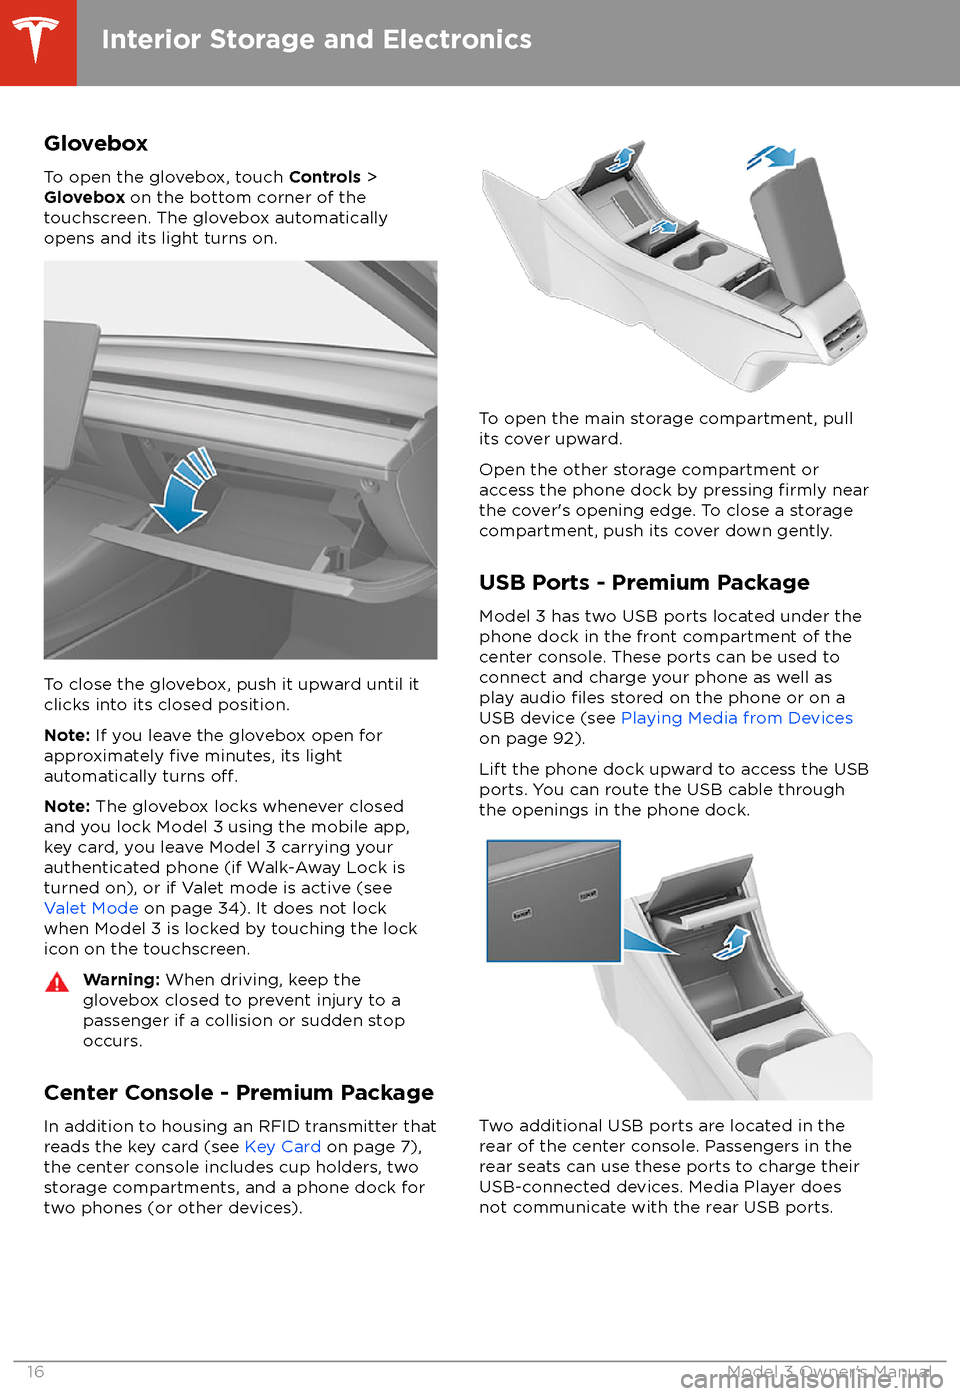
To open the glovebox, touch Controls >
Glovebox on the bottom corner of the
touchscreen. The glovebox automatically
opens and its light turns on.
To close the glovebox, push it upward until it
clicks into its closed position.
Note: If you leave the glovebox open for
approximately
five minutes, its light
automatically turns off.
Note: The glovebox locks whenever closed
and you lock Model 3 using the mobile app,
key card, you leave Model 3 carrying your authenticated phone (if Walk-Away Lock is
turned on), or if Valet mode is active (see
Valet Mode on page 34). It does not lock
when Model 3 is locked by touching the lock
icon on the touchscreen.
Warning: When driving, keep the
glovebox closed to prevent injury to a
passenger if a collision or sudden stop occurs.
Center Console - Premium Package
In addition to housing an RFID transmitter that reads the key card (see Key Card on page 7),
the center console includes cup holders, two
storage compartments, and a phone dock for
two phones (or other devices).
To open the main storage compartment, pull its cover upward.
Open the other storage compartment or
access the phone dock by pressing
firmly near
the cover
Page 118 of 165

Removing and Installing Lug Nut Covers
If your Model 3 is equipped with lug nut covers, you must remove them to access the
lug nuts.
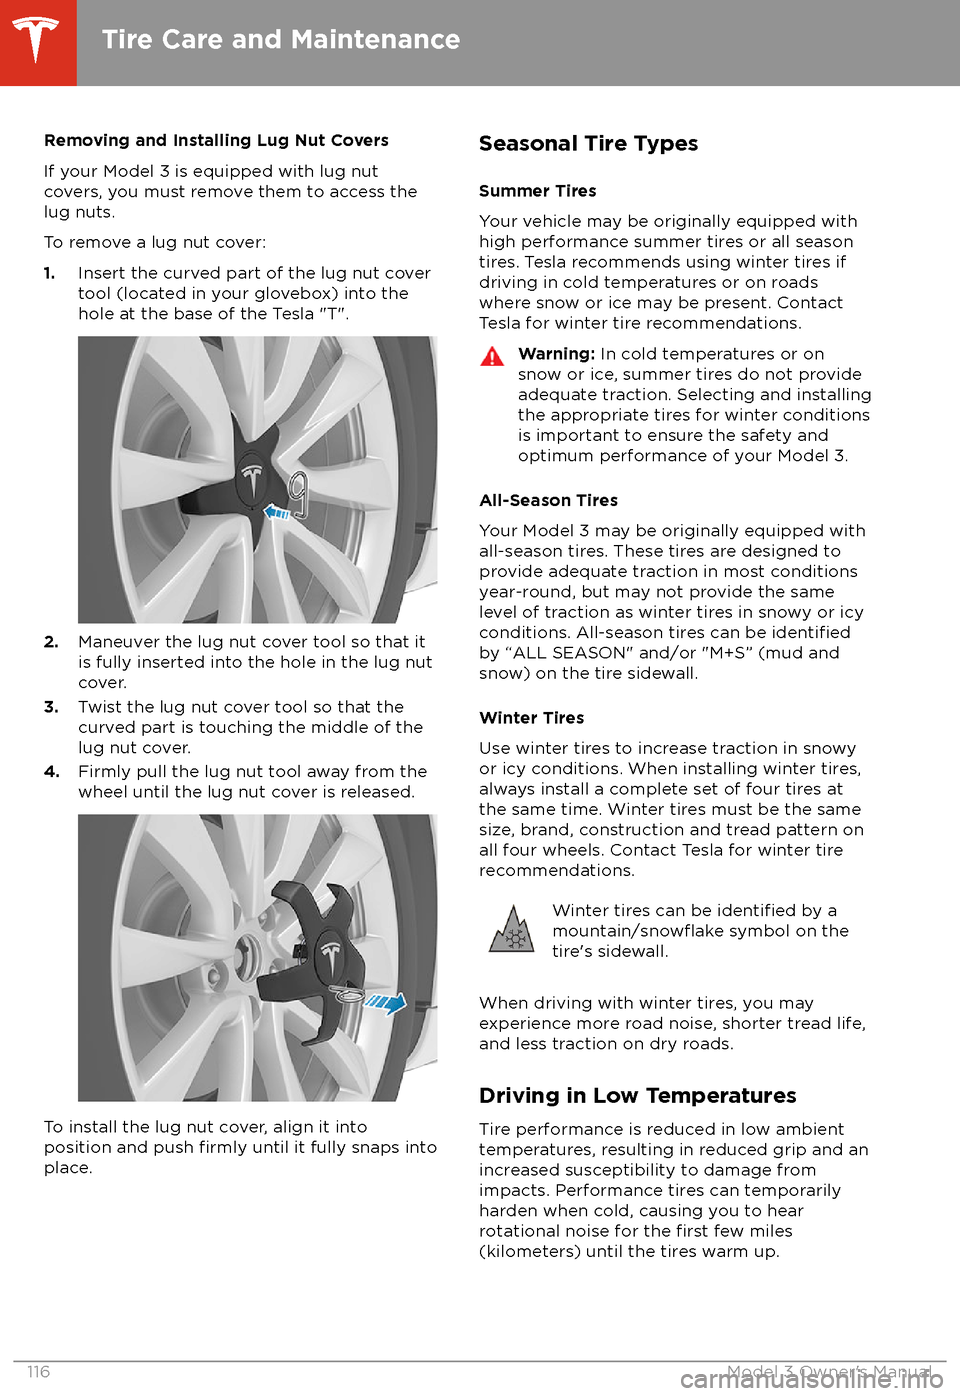
To remove a lug nut cover:
1. Insert the curved part of the lug nut cover
tool (located in your glovebox) into the hole at the base of the Tesla "T".
2. Maneuver the lug nut cover tool so that it
is fully inserted into the hole in the lug nut
cover.
3. Twist the lug nut cover tool so that the
curved part is touching the middle of the
lug nut cover.
4. Firmly pull the lug nut tool away from the
wheel until the lug nut cover is released.
To install the lug nut cover, align it into
position and push firmly until it fully snaps into
place.
Seasonal Tire Types
Summer Tires
Your vehicle may be originally equipped with high performance summer tires or all season
tires. Tesla recommends using winter tires if
driving in cold temperatures or on roads
where snow or ice may be present. Contact Tesla for winter tire recommendations.Warning: In cold temperatures or on
snow or ice, summer tires do not provide adequate traction. Selecting and installingthe appropriate tires for winter conditions
is important to ensure the safety and
optimum performance of your Model 3.
All-Season Tires
Your Model 3 may be originally equipped with
all-season tires. These tires are designed to provide adequate traction in most conditions
year-round, but may not provide the same level of traction as winter tires in snowy or icy
conditions. All-season tires can be
identifiedby “ALL SEASON" and/or "M+S” (mud and
snow) on the tire sidewall.
Winter Tires
Use winter tires to increase traction in snowy
or icy conditions. When installing winter tires,
always install a complete set of four tires at
the same time. Winter tires must be the same
size, brand, construction and tread pattern on all four wheels. Contact Tesla for winter tire
recommendations.
Winter tires can be identified by amountain/snowflake symbol on the
tire
Page 161 of 165

contact information (continued)Tesla 154coolantBattery, checking level of 124
Battery, replacement interval 112
copyrights 151
cruise control 61
D
dashboard overview 2
data recording 152
data sharing 152
declarations of conformity 155
delivery mileage 153
devicesBluetooth, playing audio files 92
connecting 16
playing audio
files from 92
dimensions 134
dome (map) lights 45
door handles 9
door labels 131
doorsChild Lock 10
exterior door handles 9
interior locking and unlocking 10
keyless entry 9
locking 9
opening from exterior 9
opening from interior 9
Unlock on Park 10
unlocking 9
Walk Away Lock 10
Drive gear 41
driverprofiles 34
seat adjustment 18drivingseating position 18
starting 39
E
Easter Eggs 150
easy entry, driver
profile 34
EDR (event data recorder) 152
electric parking brake 50
emergency braking 76
emergency
flashers 47
emission label 130
energygained from regenerative braking 49
range information 42
energy use predictions (navigating) 97
event data recording 152
exteriorexterior (continued)car cover 121
cleaning 119
dimensions 134
lights 45
overview 3
polishing, touch up, & repair 120
F
fan speed, interior 87
favorite destinations 98
Favorites (Media Player) 91
Favorites (navigation) 95
FCC
certifications 155
features, downloading new 104
firmware (software) updates 104flash drives, playing audio files from 92flashers, warning 47floor mats 121
fluidsreplacement intervals 112
reservoirs, checking 124
fog lights 45
forward collision warning 76
front passenger detection 32
front trunk 14
G
garage doors, opening 101
gates, opening 101
GAWR 131
gears 41
glovebox 16
Gross Axle Weight Rating 131
Gross Vehicle Weight Rating 131
ground clearance 134
GVWR 131
H hazard warning
flashers 47
head supports 19
headlightsafter exit 46
controlling 45
high beams 45
heating 86
high beam headlights 45
high voltageBattery specifications 136
components 105
safety 112
hills, stopping on 54
hitches 132
Index
Index159