tow TESLA MODEL 3 2018 Owner's Manual
[x] Cancel search | Manufacturer: TESLA, Model Year: 2018, Model line: MODEL 3, Model: TESLA MODEL 3 2018Pages: 165, PDF Size: 8.63 MB
Page 5 of 165
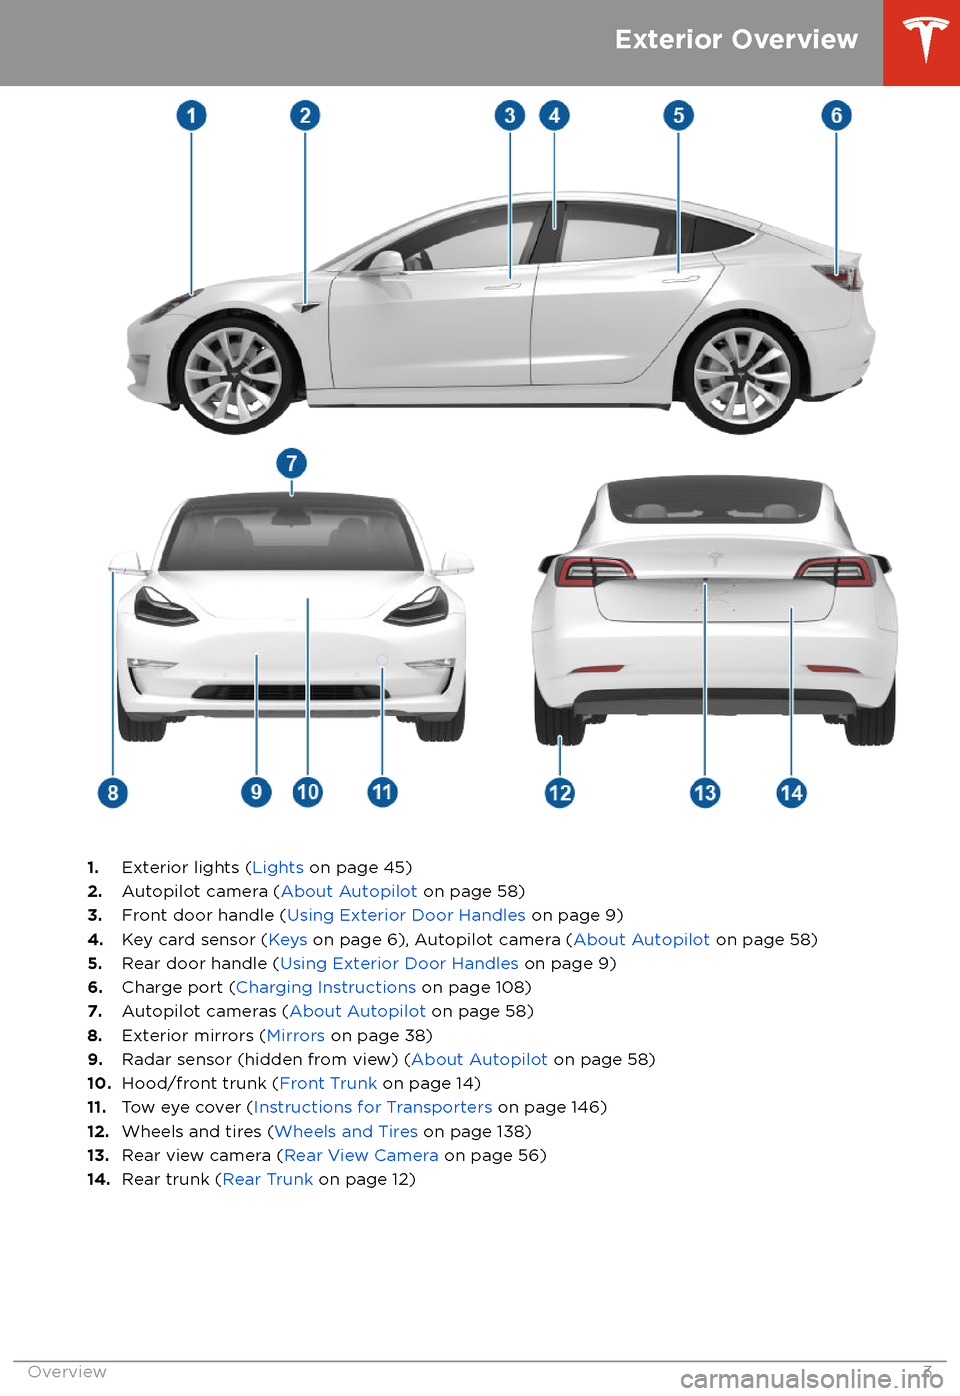
1.Exterior lights ( Lights on page 45)
2. Autopilot camera ( About Autopilot on page 58)
3. Front door handle ( Using Exterior Door Handles on page 9)
4. Key card sensor ( Keys on page 6), Autopilot camera ( About Autopilot on page 58)
5. Rear door handle ( Using Exterior Door Handles on page 9)
6. Charge port ( Charging Instructions on page 108)
7. Autopilot cameras ( About Autopilot on page 58)
8. Exterior mirrors ( Mirrors on page 38)
9. Radar sensor (hidden from view) ( About Autopilot on page 58)
10. Hood/front trunk ( Front Trunk on page 14)
11. Tow eye cover ( Instructions for Transporters on page 146)
12. Wheels and tires ( Wheels and Tires on page 138)
13. Rear view camera ( Rear View Camera on page 56)
14. Rear trunk ( Rear Trunk on page 12)
Exterior Overview
Overview3
Page 17 of 165
Note: The interior release button glows
following a brief exposure to ambient light.Warning: People should never climb
inside the front trunk. Never shut the
front trunk when a person is inside.Warning: Care should be taken to ensure
that objects inside the front trunk do not
bump against the release button, causing the trunk to accidentally open.
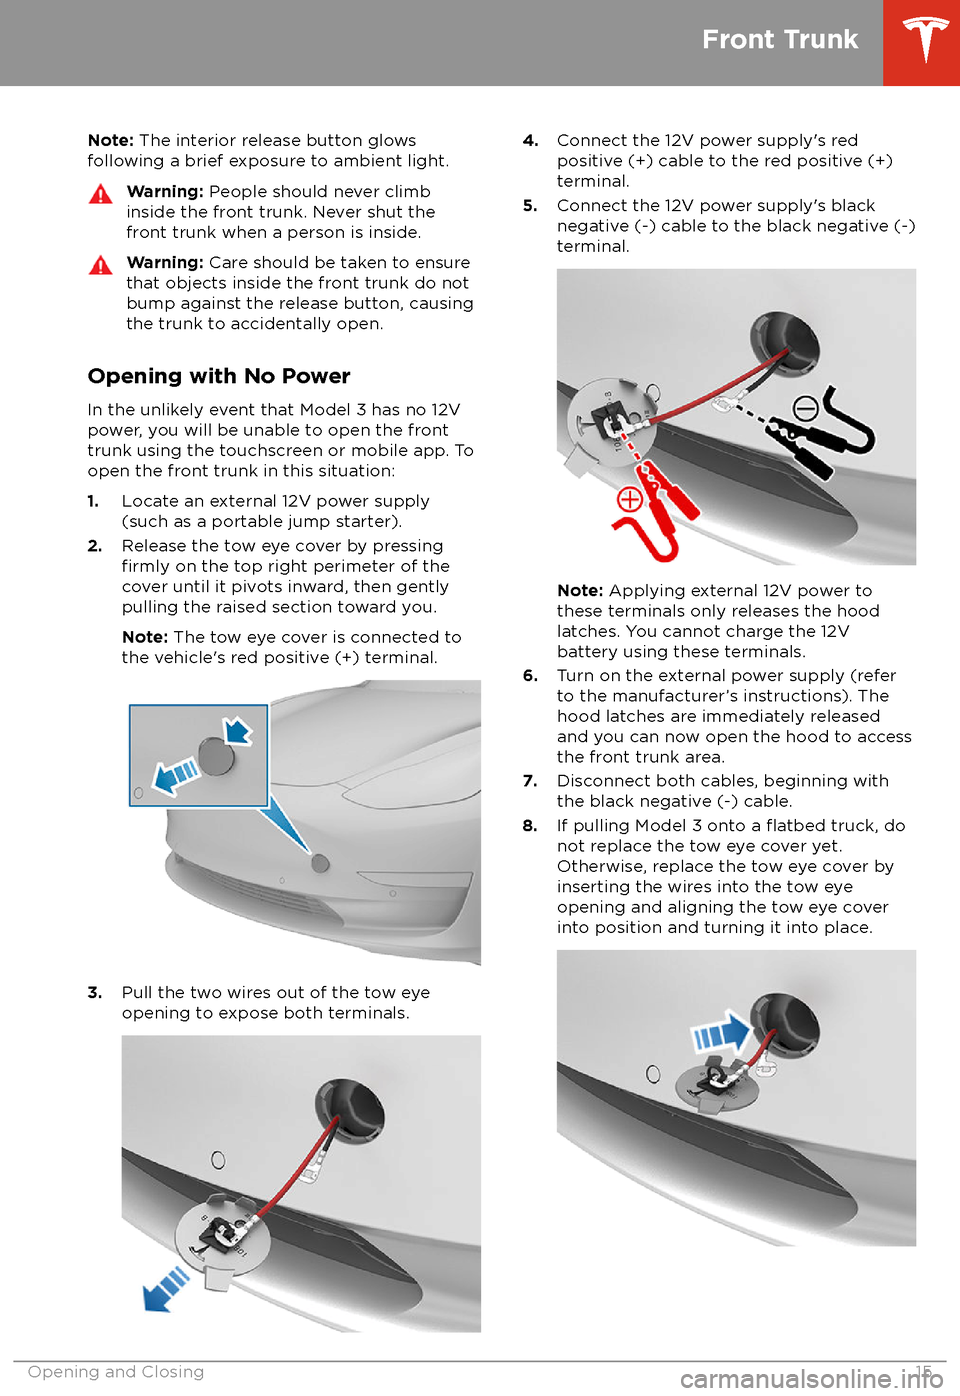
Opening with No Power
In the unlikely event that Model 3 has no 12V power, you will be unable to open the front
trunk using the touchscreen or mobile app. To
open the front trunk in this situation:
1. Locate an external 12V power supply
(such as a portable jump starter).
2. Release the tow eye cover by pressing
firmly on the top right perimeter of the
cover until it pivots inward, then gently pulling the raised section toward you.
Note: The tow eye cover is connected to
the vehicle
Page 23 of 165
Wearing Seat BeltsUsing seat belts and child safety seats is the
most
effective way to protect occupants if a
collision occurs. Therefore, wearing a seat belt is required by law in most jurisdictions.
Both the driver and passenger seats are
equipped with three-point inertia reel seat
belts. Inertia reel belts are automatically
tensioned to allow occupants to move
comfortably during normal driving conditions.
To securely hold child safety seats, all
passenger seating positions are equipped with
an automatic locking retractor (ALR) that, by
pulling the seat belt beyond the length
needed for a typical adult occupant, locks the
belt into place until the seat belt is unbuckled
(see Installing Seat Belt Retained Child Seats
on page 26).
The seat belt reel automatically locks to prevent movement of occupants if Model 3
experiences a force associated with hard acceleration, braking, cornering, or an impact
in a collision.
The seat belt reminder on the
touchscreen alerts you if a seat belt
for an occupied seat is not fastened. If the belt remains unfastened, the
reminder
flashes and an intermittent
chime sounds. If all occupants are
buckled up and the reminder stays
on, re-fasten seat belts to ensure
they are correctly latched. Also
remove any heavy objects (such as a
briefcase) from an unoccupied seat.
If the reminder light continues to
stay on, contact Tesla.
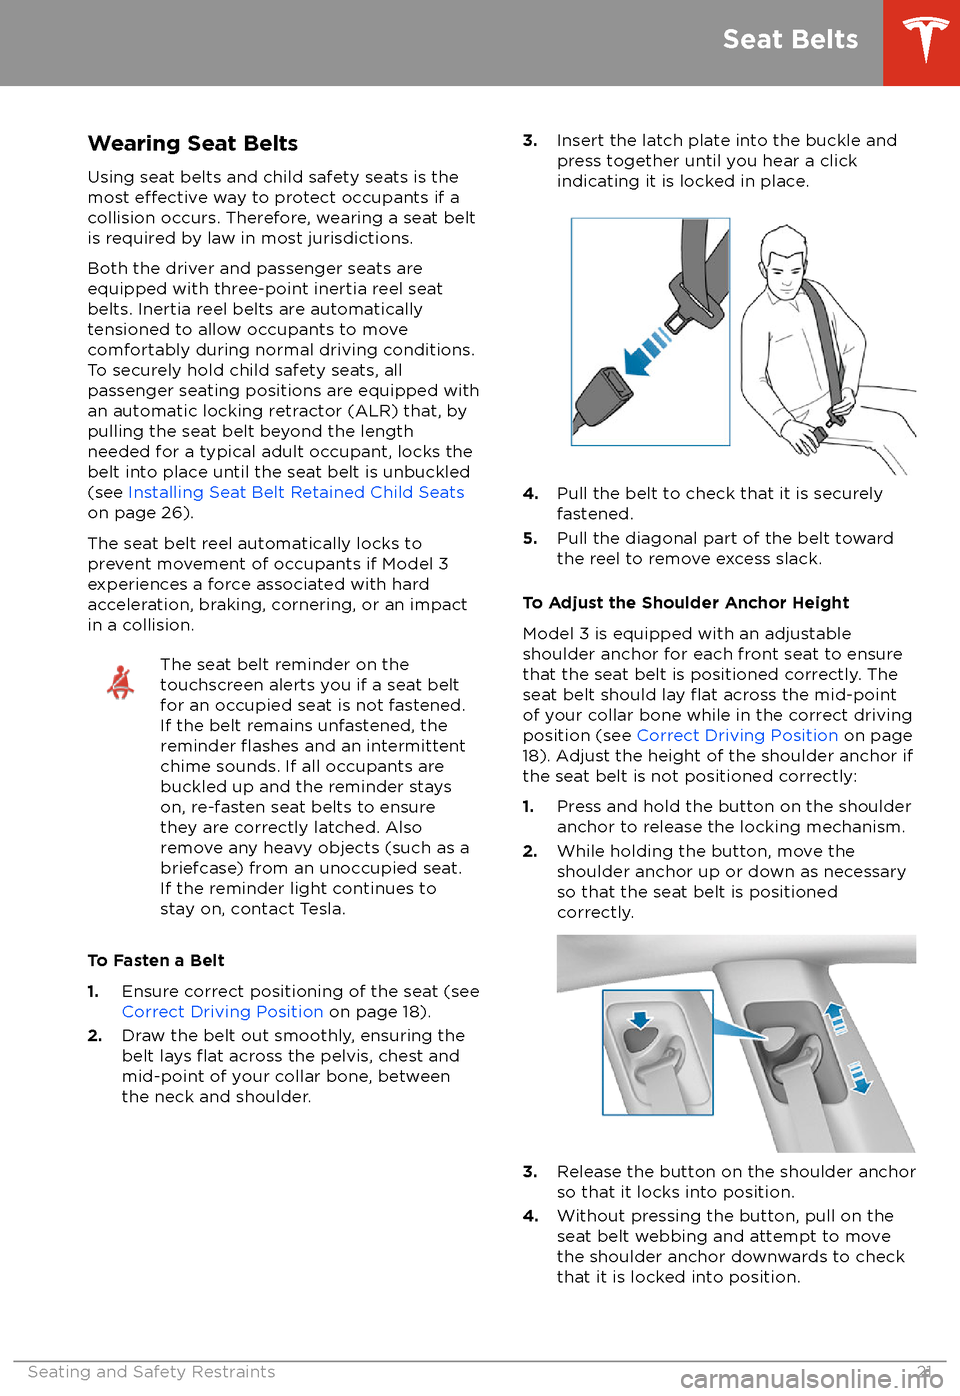
To Fasten a Belt
1. Ensure correct positioning of the seat (see
Correct Driving Position on page 18).
2. Draw the belt out smoothly, ensuring the
belt lays
flat across the pelvis, chest and
mid-point of your collar bone, between
the neck and shoulder.
3. Insert the latch plate into the buckle and
press together until you hear a click
indicating it is locked in place.
4. Pull the belt to check that it is securely
fastened.
5. Pull the diagonal part of the belt toward
the reel to remove excess slack.
To Adjust the Shoulder Anchor Height
Model 3 is equipped with an adjustable shoulder anchor for each front seat to ensure
that the seat belt is positioned correctly. The
seat belt should lay
flat across the mid-point
of your collar bone while in the correct driving
position (see Correct Driving Position on page
18). Adjust the height of the shoulder anchor if
the seat belt is not positioned correctly:
1. Press and hold the button on the shoulder
anchor to release the locking mechanism.
2. While holding the button, move the
shoulder anchor up or down as necessary
so that the seat belt is positioned correctly.
3. Release the button on the shoulder anchor
so that it locks into position.
4. Without pressing the button, pull on the
seat belt webbing and attempt to move
the shoulder anchor downwards to check that it is locked into position.
Seat Belts
Seating and Safety Restraints21
Page 48 of 165
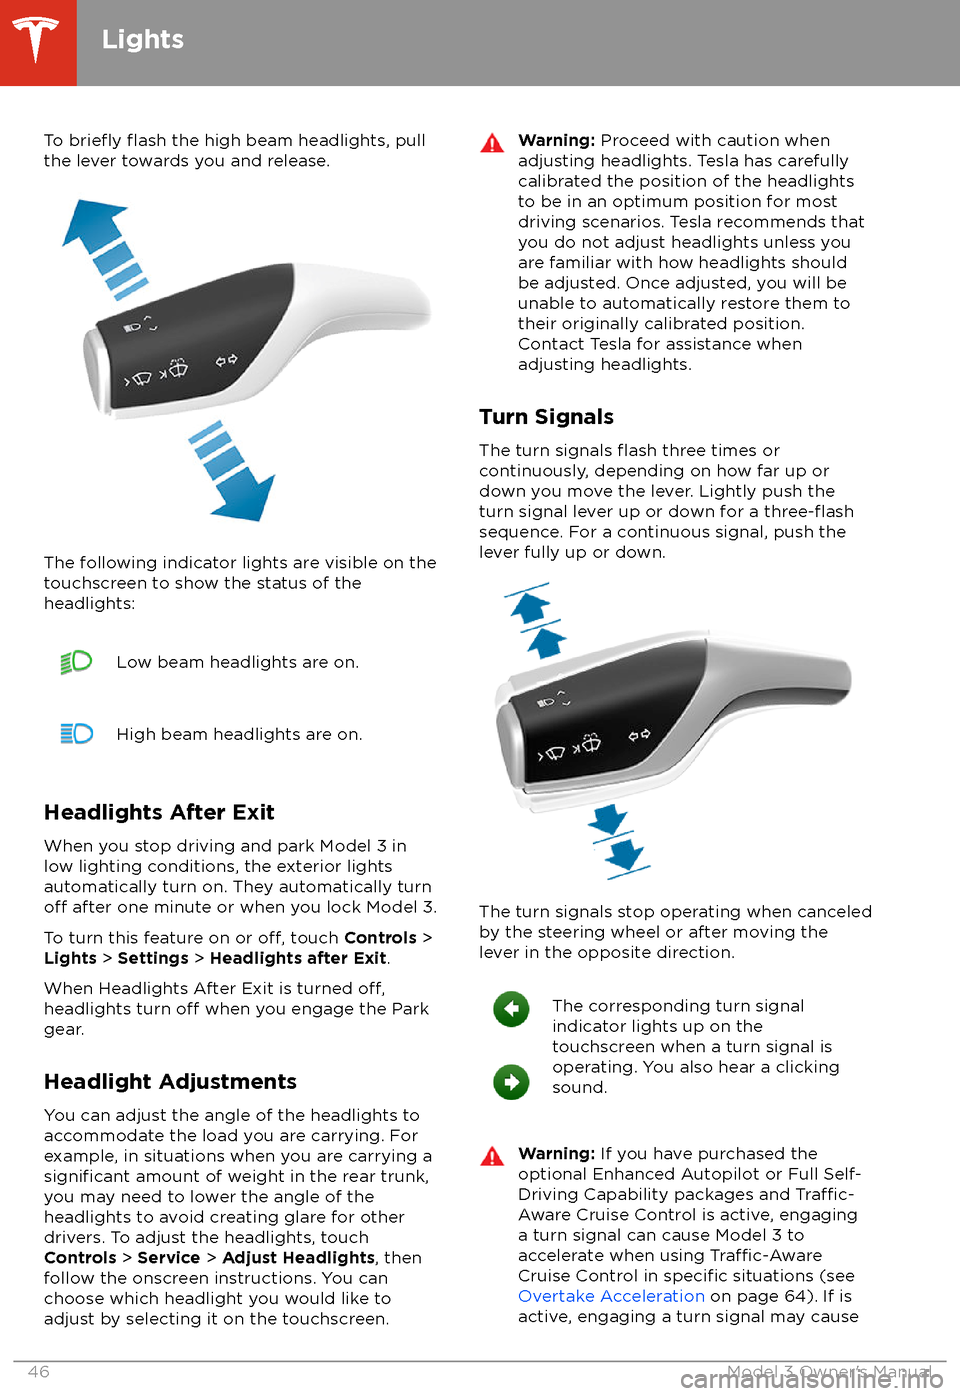
To briefly flash the high beam headlights, pull
the lever towards you and release.
The following indicator lights are visible on the
touchscreen to show the status of the
headlights:
Low beam headlights are on.High beam headlights are on.
Headlights After Exit
When you stop driving and park Model 3 in
low lighting conditions, the exterior lights
automatically turn on. They automatically turn
off after one minute or when you lock Model 3.
To turn this feature on or
off, touch Controls >
Lights > Settings > Headlights after Exit .
When Headlights After Exit is turned
off,headlights turn off when you engage the Park
gear.
Headlight Adjustments You can adjust the angle of the headlights toaccommodate the load you are carrying. For
example, in situations when you are carrying a
significant amount of weight in the rear trunk,
you may need to lower the angle of the
headlights to avoid creating glare for other
drivers. To adjust the headlights, touch
Controls > Service > Adjust Headlights , then
follow the onscreen instructions. You can
choose which headlight you would like to adjust by selecting it on the touchscreen.
Warning: Proceed with caution when
adjusting headlights. Tesla has carefully
calibrated the position of the headlights
to be in an optimum position for most
driving scenarios. Tesla recommends that
you do not adjust headlights unless you
are familiar with how headlights should
be adjusted. Once adjusted, you will be
unable to automatically restore them to their originally calibrated position.
Contact Tesla for assistance when
adjusting headlights.
Turn Signals
The turn signals
flash three times or
continuously, depending on how far up or
down you move the lever. Lightly push the
turn signal lever up or down for a
three-flashsequence. For a continuous signal, push the lever fully up or down.
The turn signals stop operating when canceled
by the steering wheel or after moving the
lever in the opposite direction.
The corresponding turn signal
indicator lights up on the
touchscreen when a turn signal is
operating. You also hear a clicking
sound.Warning: If you have purchased the
optional Enhanced Autopilot or Full Self-
Driving Capability packages and
Traffic-
Aware Cruise Control is active, engaging
a turn signal can cause Model 3 to accelerate when using
Traffic-AwareCruise Control in specific situations (see
Overtake Acceleration on page 64). If is
active, engaging a turn signal may cause
Lights
46Model 3 Owner
Page 66 of 165
(whichever is greater) when you move the
gear lever fully down once then release.
Note: If Speed Assist is unable to determine a
speed limit, your set speed does not change
when you move the gear lever fully down once
then release.Warning: Do not rely on Speed Assist orTraffic-Aware Cruise Control to determine
an accurate or appropriate cruising
speed. Always cruise at a safe speed
based on road conditions and applicable
speed limits.
Changing the Set Speed
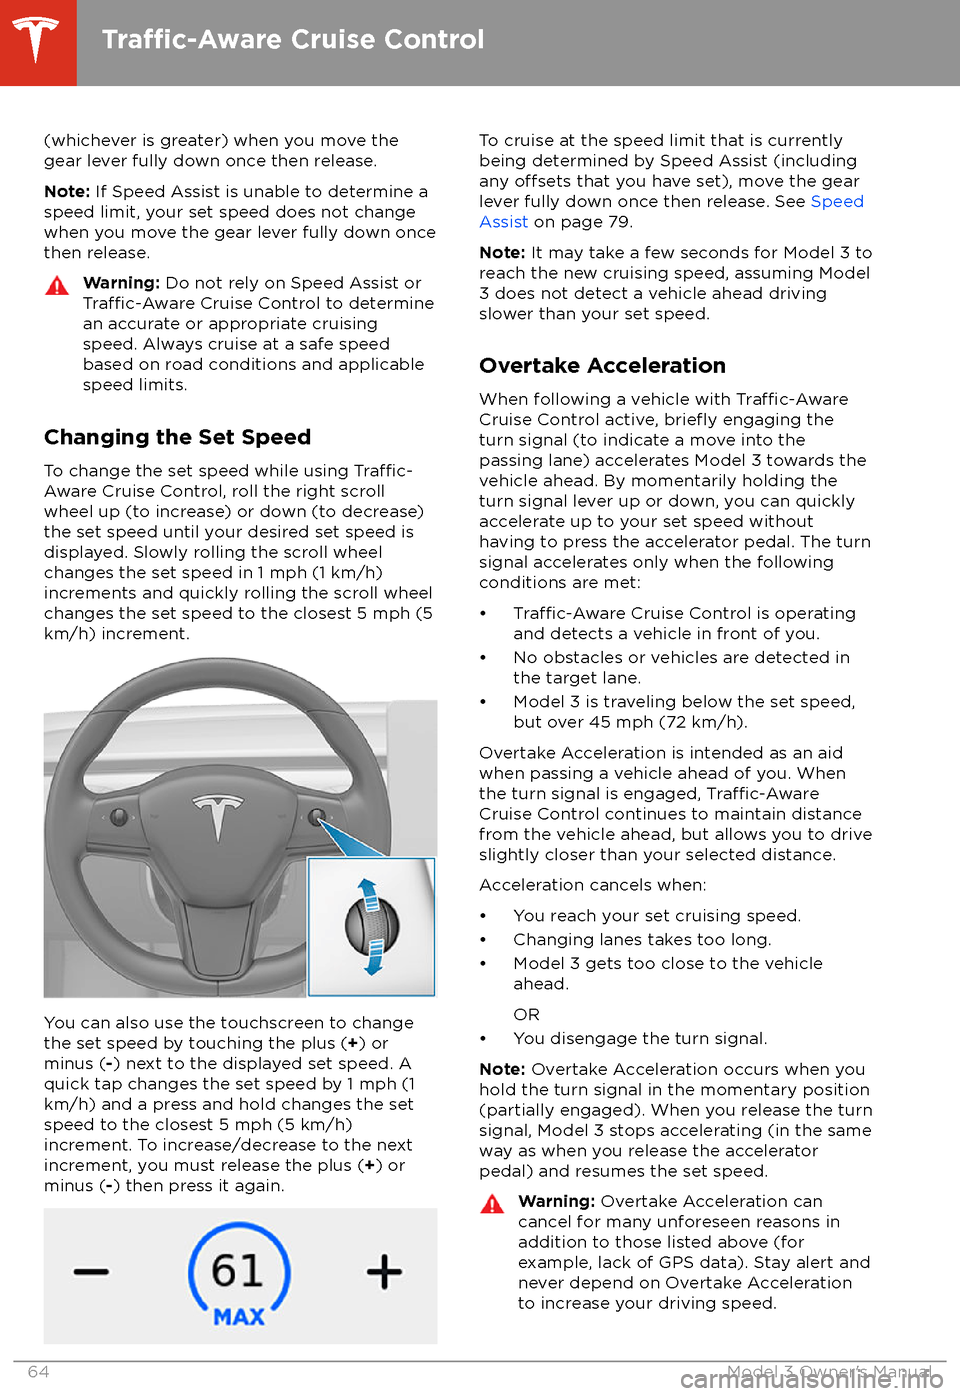
To change the set speed while using
Traffic-
Aware Cruise Control, roll the right scroll
wheel up (to increase) or down (to decrease)
the set speed until your desired set speed is
displayed. Slowly rolling the scroll wheel changes the set speed in 1 mph (1 km/h)
increments and quickly rolling the scroll wheel
changes the set speed to the closest 5 mph (5
km/h) increment.
You can also use the touchscreen to change
the set speed by touching the plus ( +) or
minus ( -) next to the displayed set speed. A
quick tap changes the set speed by 1 mph (1
km/h) and a press and hold changes the set
speed to the closest 5 mph (5 km/h)
increment. To increase/decrease to the next
increment, you must release the plus ( +) or
minus ( -) then press it again.
To cruise at the speed limit that is currently
being determined by Speed Assist (including
any
offsets that you have set), move the gear
lever fully down once then release. See Speed
Assist on page 79.
Note: It may take a few seconds for Model 3 to
reach the new cruising speed, assuming Model
3 does not detect a vehicle ahead driving
slower than your set speed.
Overtake Acceleration
When following a vehicle with
Traffic-AwareCruise Control active, briefly engaging the
turn signal (to indicate a move into the
passing lane) accelerates Model 3 towards the vehicle ahead. By momentarily holding theturn signal lever up or down, you can quickly
accelerate up to your set speed without having to press the accelerator pedal. The turn
signal accelerates only when the following
conditions are met:
Page 87 of 165
ServiceWiper Service Mode: Make wiper blades easy to access (see Wiper Blades
and Washer Jets on page 122).
Adjust Headlights : Make adjustments to the level of the headlights to
accommodate a load you are carrying (see Headlight Adjustments on page
46).Caution: Headlights should only be adjusted by Tesla Service.
Towing: Prepare Model 3 for towing by keeping it in Neutral (which
disengages the parking brake and prevents damage to the rear motor that is
caused by wheels turning as Model 3 is pulled onto a
flatbed truck). See
Instructions for Transporters on page 146.
Owner
Page 111 of 165
If the charge port light turns red while
charging, a fault is detected. Check the touchscreen for a message describing the
fault. A fault can occur due to something as
common as a power outage. If a power outage
occurs, charging resumes automatically when power is restored.
Note: When charging, particularly at high
currents, the refrigerant compressor and fan
operate as needed to keep the Battery cool.
Therefore, it is normal to hear sounds during charging.
Note: Air conditioning performance is
generally not
affected by charging. However,
under certain circumstances (for example, you
are charging at high currents during a
particularly warm day), the air coming from
the vents may not be as cool as expected and
a message displays on the touchscreen. This is
normal behavior and ensures that the Battery stays within an optimum temperature range
while charging to support longevity and optimum performance.
Warning: Never spray liquid at a high
velocity (for example, if using a pressure
washer) towards the charge port while
charging. Failure to follow these
instructions can result in serious injury or
damage to the vehicle, charging
equipment, or property.
Stopping Charging
Stop charging at any time by disconnecting
the charge cable or touching Stop Charging
on the touchscreen.
Note: To prevent unauthorized unplugging of
the charge cable, Model 3 must be unlocked
or able to recognize your authenticated phone before you can disconnect the charge cable.
To disconnect the charge cable:
1. Press and hold the button on a Tesla
connector to release the latch. You can
also touch Stop Charging on the charging
screen (see Charging Status and Settings
on page 109).
2. Pull the connector from the charge port.
Note: The charge port automatically closes
within approximately 10 seconds of removing
the connector from the charge port.
Caution: Tesla strongly recommends
leaving Model 3 plugged in when not in use. This maintains the Battery at the
optimum level of charge.Charge Port Light
Page 114 of 165
Service Intervals
Regular maintenance is the key to ensuring
the continued reliability and
efficiency of your
Model 3.
Rotate the tires every 6,250 miles
(10,000 km). Maintain the correct tire
pressures. It is also important to perform the
daily and monthly checks described below.
Note: View tire pressures in the "Cards" area,
located toward the bottom on the left side of the touchscreen, as described in Touchscreen
Overview on page 4.
Model 3 should be serviced by
Tesla-certifiedtechnicians. Damages or failures caused by
maintenance or repairs performed by non-
Tesla
certified technicians are not covered by
the warranty.
Daily Checks
Page 121 of 165
Cleaning the ExteriorTo prevent damage to the paint, immediately
remove corrosive substances (bird droppings, tree resin, dead insects, tar spots, road salt,
industrial fallout, etc.). Do not wait until Model
3 is due for a complete wash. If necessary, use
denatured alcohol to remove tar spots and
stubborn grease stains, then immediately wash the area with water and a mild, non-detergent soap to remove the alcohol.
Follow these steps when washing the exterior
of Model 3:
1. Rinse Thoroughly
Before washing,
flush grime and grit from
the bodywork using a hose. Flush away
accumulations of mud in areas where
debris easily collects (such as wheel
arches and panel seams). If salt has been
used on the highways (such as during
winter months), thoroughly rinse all traces
of road salt from the underside of the vehicle.
2. Hand Wash
Hand wash Model 3 using a clean soft
cloth and cold or lukewarm water
containing a mild, high-quality car
shampoo.
3. Rinse with Clean Water
After washing, rinse with clean water to
prevent soap from drying on the surfaces.
4. Dry Thoroughly and Clean Exterior Glass
After washing and rinsing, dry thoroughly
with a chamois.
Clean windows and mirrors using an automotive glass cleaner. Do not scrape,
or use any abrasive cleaning
fluid on glass
or mirrored surfaces.
Cautions for Exterior CleaningCaution: Do not use windshield treatmentfluids. Doing so can interfere with wiper
friction and cause a chattering sound.Caution: Do not use hot water or
detergents.Caution: Do not wash in direct sunlight.Caution: If using a pressure washer,
maintain a distance of at least 12" (30 cm)
between the nozzle and the surface of
Model 3. Keep the nozzle moving and do not concentrate the water jet on any one
area.Caution: Do not aim water hoses directly
at window, door or hood seals, or through
wheel apertures onto brake components.Caution: Avoid using tight-napped or
rough cloths, such as washing mitts.Caution: If washing in an automatic car
wash, use Touchless car washes only. These car washes have no parts (brushes,
etc.) that touch the surfaces of Model 3.
Using any other type of car wash could
cause damage that is not covered by the
warranty.Caution: Ensure the wipers are off before
washing Model 3 to avoid the risk of damaging the wipers.Caution: Do not use chemical based
wheel cleaners. These can damage the
finish on the wheels.
Caution: Avoid using a high pressure
power washer on the camera(s) or
parking sensors (if equipped) and do not
clean a sensor or camera lens with a
sharp or abrasive object that can scratch
or damage its surface.Warning: Never spray liquid at a high
velocity (for example, if using a pressure
washer) towards the charge port while
Model 3 is charging. Failure to follow
these instructions can result in serious
injury or damage to the vehicle, charging
equipment, or property.
Cleaning
Maintenance119
Page 137 of 165
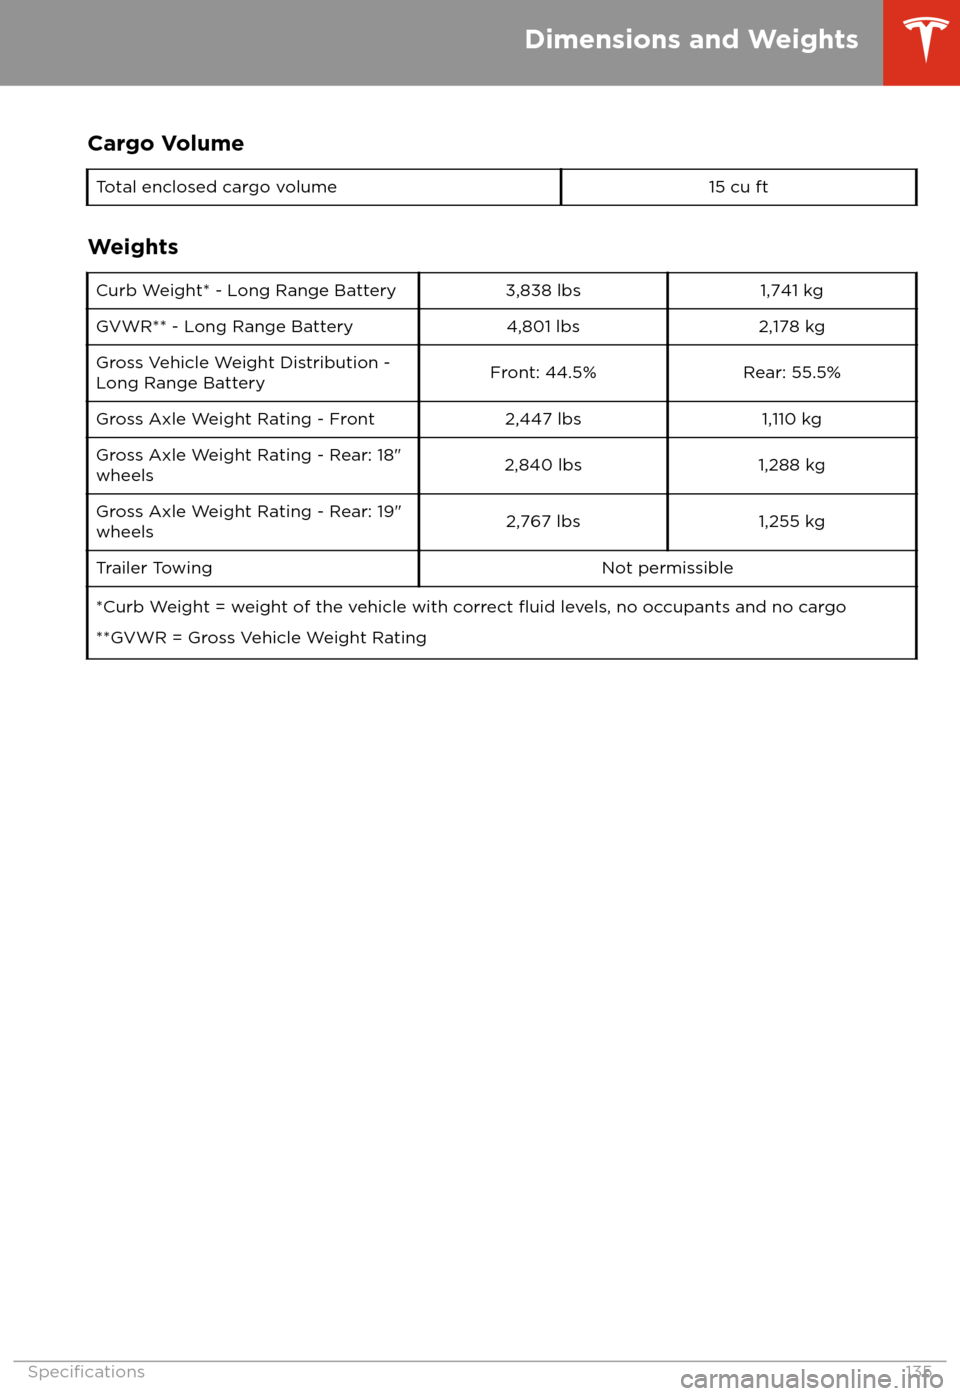
Cargo VolumeTotal enclosed cargo volume15 cu ft
Weights
Curb Weight* - Long Range Battery3,838 lbs1,741 kgGVWR** - Long Range Battery4,801 lbs2,178 kgGross Vehicle Weight Distribution -Long Range BatteryFront: 44.5%Rear: 55.5%Gross Axle Weight Rating - Front2,447 lbs1,110 kgGross Axle Weight Rating - Rear: 18"
wheels2,840 lbs1,288 kgGross Axle Weight Rating - Rear: 19"
wheels2,767 lbs1,255 kgTrailer TowingNot permissible*Curb Weight = weight of the vehicle with correct fluid levels, no occupants and no cargo
**GVWR = Gross Vehicle Weight Rating
Dimensions and Weights
Specifications135