12v TESLA MODEL 3 2020 Owner's Manuals
[x] Cancel search | Manufacturer: TESLA, Model Year: 2020, Model line: MODEL 3, Model: TESLA MODEL 3 2020Pages: 220, PDF Size: 9.65 MB
Page 23 of 220
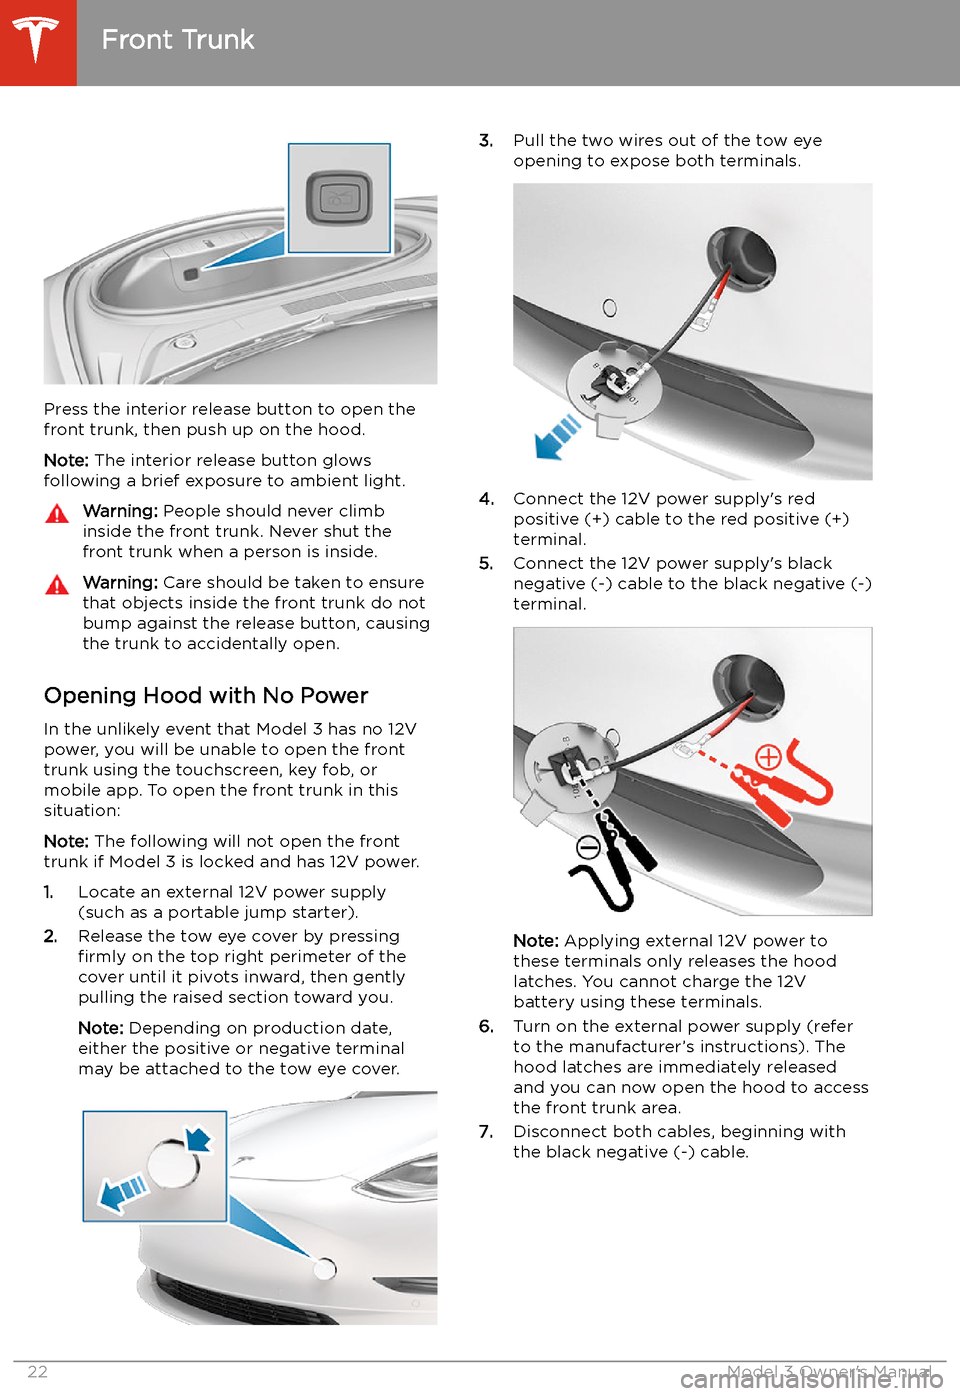
Press the interior release button to open the
front trunk, then push up on the hood.
Note: The interior release button glows
following a brief exposure to ambient light.
Warning: People should never climb
inside the front trunk. Never shut the
front trunk when a person is inside.Warning: Care should be taken to ensure
that objects inside the front trunk do not
bump against the release button, causing the trunk to accidentally open.
Opening Hood with No Power
In the unlikely event that Model 3 has no 12V power, you will be unable to open the front
trunk using the touchscreen, key fob, or
mobile app. To open the front trunk in this situation:
Note: The following will not open the front
trunk if Model 3 is locked and has 12V power.
1. Locate an external 12V power supply
(such as a portable jump starter).
2. Release the tow eye cover by pressing
firmly on the top right perimeter of the
cover until it pivots inward, then gently pulling the raised section toward you.
Note: Depending on production date,
either the positive or negative terminal
may be attached to the tow eye cover.
3. Pull the two wires out of the tow eye
opening to expose both terminals.
4. Connect the 12V power supply
Page 26 of 220
Note: Power is available whenever the vehicle
is considered "awake". The vehicle may be
awake for many reasons. For example, when
using features such as Summon, or when features such as Cabin Overheat Protection,Keep Climate On, Dog Mode, Sentry Mode,
etc. are enabled. The vehicle is also awake
whenever the 12V battery is being charged or
is in use, during HV charging, when the vehicle
is communicating with the mobile app, etc. Leaving an accessory plugged in does notdeplete the 12V battery.
Note: Always use USB 2.0 compliant cables
when connecting devices to the USB ports.
Using non-compliant cables can result in
slower charging and, if plugged into either of the front two ports, can result in potential connection problems or degraded
performance when trying to access media files
on the device.
Note: Do not connect multiple devices using a
USB hub. This can prevent connected devices from charging or from being recognized by
Media Player, Sentry Mode, Dashcam, etc.
Installing Phone Charging Cable To make it easy to connect your phone while
keeping the console free of clutter, you can install a phone charging cable in Model 3.
Note: The phone dock supports two phones
side-by-side.
To install a phone charging cable:
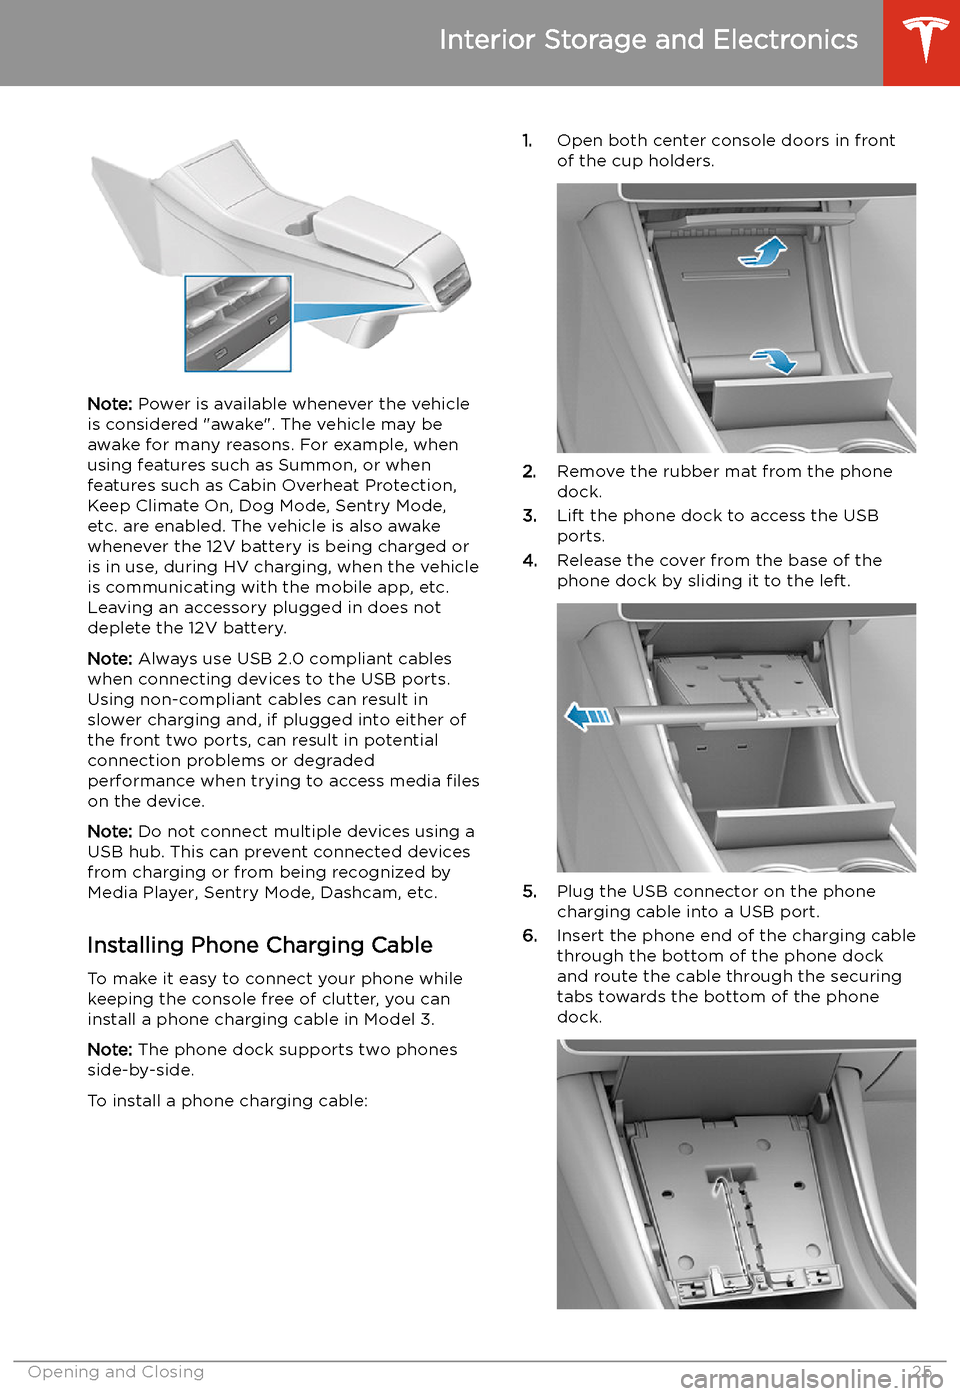
1. Open both center console doors in front
of the cup holders.
2. Remove the rubber mat from the phone
dock.
3. Lift the phone dock to access the USB
ports.
4. Release the cover from the base of the
phone dock by sliding it to the left.
5. Plug the USB connector on the phone
charging cable into a USB port.
6. Insert the phone end of the charging cable
through the bottom of the phone dock
and route the cable through the securing
tabs towards the bottom of the phone dock.
Interior Storage and Electronics
Opening and Closing25
Page 27 of 220
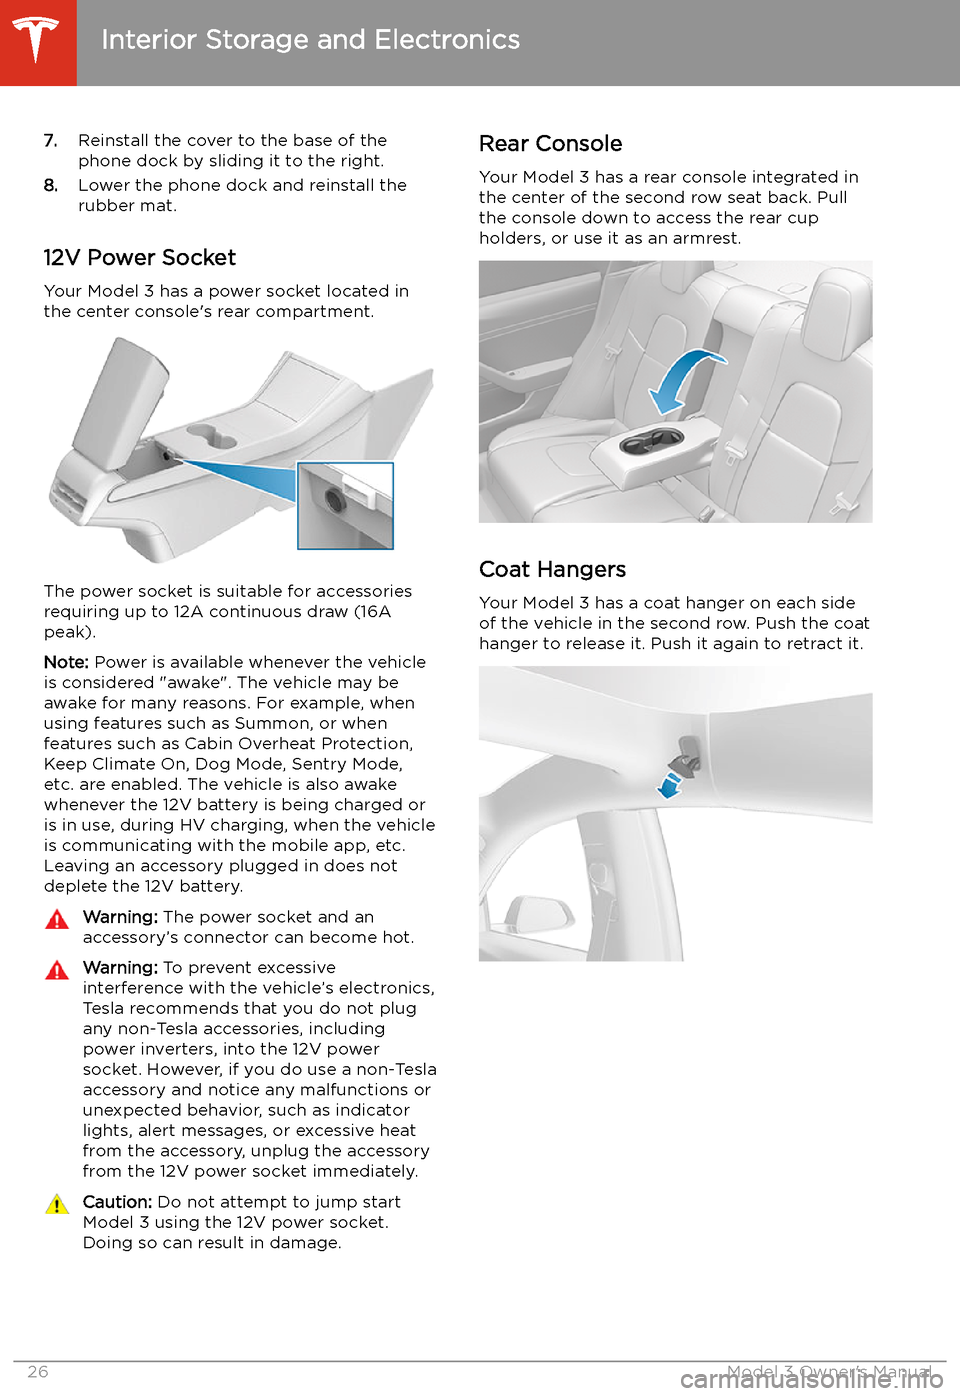
7.Reinstall the cover to the base of the
phone dock by sliding it to the right.
8. Lower the phone dock and reinstall the
rubber mat.
12V Power Socket Your Model 3 has a power socket located in
the center console
Page 156 of 220
Battery Information
About the Battery
Model 3 has one of the most sophisticated
battery systems in the world. The most
important way to preserve the Battery is to LEAVE YOUR VEHICLE PLUGGED IN when
you are not using it. This is particularly important if you are not planning to drive
Model 3 for several weeks. When plugged in,
Model 3 wakes up when needed to
automatically maintain a charge level that
maximizes the lifetime of the Battery.
Note: When left idle and unplugged, your
vehicle periodically uses energy from the Battery for system tests and recharging the
12V battery when necessary.
There is no advantage to waiting until the
Battery’s level is low before charging. In fact, the Battery performs best when charged
regularly.
Note: If you allow the Battery to discharge to
0%, other components may become damaged
or require replacement (for example, the 12V
battery). In these cases, you are responsible for repair and/or transporting expenses.
Discharge-related expenses are not covered
by the warranty or under the Roadside
Assistance policy.
The peak charging rate of the Battery may
decrease slightly after a large number of DC
Fast Charging sessions, such as those at
Superchargers. To ensure maximum driving
range and Battery safety, the Battery charge
rate is decreased when the Battery is too cold,
when the Battery’s charge is nearly full, and when the Battery conditions change with
usage and age. These changes in the condition of the Battery are driven by battery physics
and may increase the total Supercharging
duration by a few minutes over time.
Battery Care
Never allow the Battery to fully discharge.
Even when Model 3 is not being driven, its
Battery discharges very slowly to power the
onboard electronics. The Battery can
discharge at a rate of approximately 1% per day, though the discharge rate may vary
depending on environmental factors (such as
cold weather), vehicle configuration, and your
selected settings on the touchscreen.
Situations can arise in which you must leave
Model 3 unplugged for an extended period of time (for example, at an airport when
traveling). In these situations, keep the 1% in
mind to ensure that you leave the Battery with a sufficient charge level. For example, over a
two week period (14 days), the Battery may
discharge by approximately 14%.
Discharging the Battery to 0% may result in
damage to vehicle components. To protect
against a complete discharge, Model 3 enters
a low-power consumption mode when the
displayed charge level drops to approximately
0%. In this mode, the Battery stops supporting
the onboard electronics and auxiliary 12V
battery. Once this low-power consumption
mode is active, immediately plug in Model 3 to
prevent a jump-start and 12V battery
replacement.
Note: If the vehicle is unresponsive and will
not unlock, open, or charge, then the 12V
battery may have become discharged. In this
situation, contact Tesla.
Temperature Limits
For better long-term performance, avoid
exposing Model 3 to ambient temperatures
above 140
Page 190 of 220
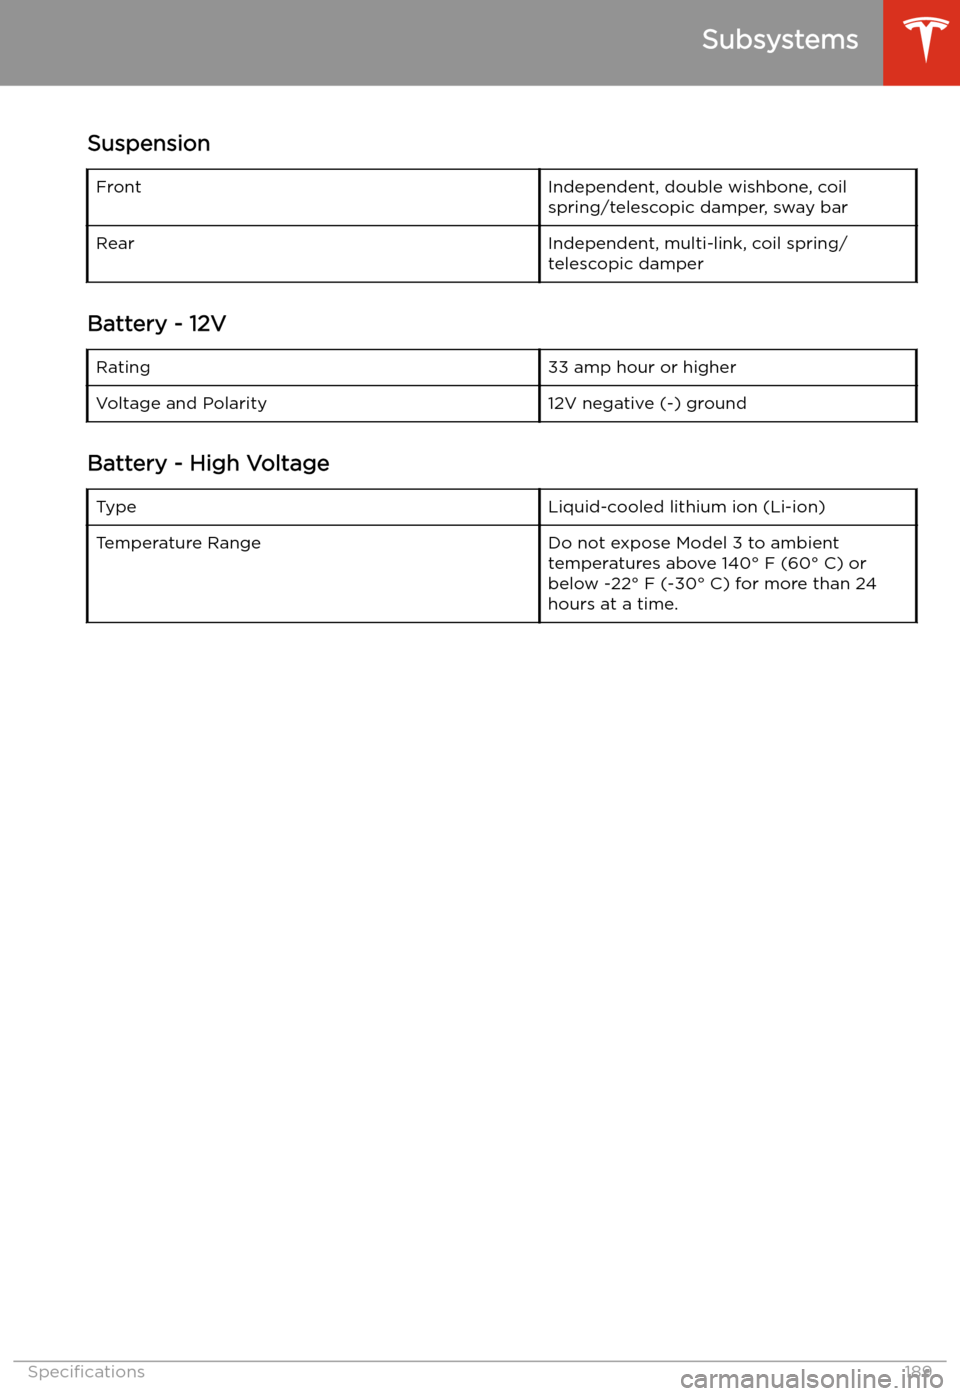
SuspensionFrontIndependent, double wishbone, coil
spring/telescopic damper, sway barRearIndependent, multi-link, coil spring/
telescopic damper
Battery - 12V
Rating33 amp hour or higherVoltage and Polarity12V negative (-) ground
Battery - High Voltage
TypeLiquid-cooled lithium ion (Li-ion)Temperature RangeDo not expose Model 3 to ambient
temperatures above 140
Page 203 of 220

7.When external 12V power is no longer
required, disconnect both cables from the
terminals on the 12V battery, beginning
with the black negative (-) cable.
8. Replace the cabin intake trim panel by
placing it back in its original location and
pressing down until it is secure.
9. Replace the maintenance panel by placing
it back in its original location and pressing
down until it is secure.
10. Close the hood.
Instructions for Transporters
202Model 3 Owner
Page 214 of 220
Index
A ABS (Anti-lock Braking System) 65
absolute speed limit 114
access panel, removing 176
accessoriesplugging into power socket 26
adjacent lane speed 108
aero covers 167
air circulation 126
air conditioning 125
air distribution 126
air filter 128
air vents 127
airbags 41
alarm 143
all-season tires 170
Always Show Estimated Round Trip Energy
133
ambient lights 58
anti-lock braking (ABS) 65
application launcher 4
audioequalizer 138
immersive sound 138
playing files 136
steering wheel scroll button 50
volume control 136
auto fold
52
Auto High Beam 59
Auto Lane Change 95
auto tilt 52
AUTO wipers 64
automatic emergency braking 112
automatic navigation 130
Autopark 100
autopilotblind spot collision warning 108
side collision warning 108
staying inside lane markings 108AutopilotAuto Lane Change 95
automatic emergency braking 111
Autopark 100
Autosteer 93
collision avoidance assist 111
forward collision warning 111
Navigate on Autopilot 96
overtake acceleration 87
overview 84
speed assist 114
speed limit warning 114
staying within speed limits 114
Summon 102
Traffic-Aware Cruise Control 87
Autopilot components 84
Autosteer 93
average range 74
B
backup camera 75battery (12V)complete discharge 155
specifications 189Battery (high voltage)care of 155
coolant 176
specifications 189
temperature limits 155
battery (key), replacing 12
blind spot collision warning 108
blind spot collision warning chime 108
Bluetoothdevices, playing audio files from 138
general information 139
phone, pairing and using 139
body repairs 181
body touch up 173
brakesautomatic in emergencies 112
Page 215 of 220
charging (continued)public charging stations 154
scheduling 159
charging locations, finding 132
child protectiondisabling rear window switches 18child seatsinstalling and using 35
child-protection locks 17
cleaning 172
climate controls 125
coat hangers 26
cold weather driving 80
collision avoidance assist 111
connecting to Wi-Fi 150
console12V power socket 26
opening 24
rear 26
USB ports 24
consumption chart 74
contact informationroadside assistance 198
Tesla 208
copyrights 204
cruise control 87
D dashboard overview 2
Dashcam 76
data recording 206
data sharing 206
declarations of conformity 209
delivery mileage 207
devicesBluetooth, playing audio files 138
connecting 24
playing audio files from 138
dimensions 186
Dog Mode 128
dome (map) lights 58
door handles 15
door labels 184
doorsChild Lock 17
exterior door handles 15
interior locking and unlocking 16
keyless entry 15
locking 15
opening from exterior 15
opening from interior 15
Unlock on Park 17
unlocking 15doorsfunctionWalk-Away Door Lock 16
drive away locking 16
Drive gear 56
driverprofiles 48drivingseating position 28
starting 54
tips to maximize range 74
E
Easter Eggs 203
easy entry, driver profile 48
EDR (event data recorder) 206
electric parking brake 67
emergency braking 111
emergency
Page 218 of 220
slip start 69
Smart Summon 105smartphoneauthenticating as a key 9
removing as a key 12
software reset 124
software update preferences 151
software updates 151
software version 8
specifications12V battery 189
brakes 188
cargo volume 187
dimensions 186
exterior 186
High Voltage Battery 189
interior 186
motor 188
steering 188
subsystems 188
suspension 189
tires 191
transmission 188
weights 187
wheels 190
speed assist 114
Speed Limit Mode 124
speed limit warning 114
stability control 69
starting 54
steering specifications 188
steering wheeladjusting position 50
adjusting sensitivity 50
buttons 50
lights, controlling 58
scroll buttons 50
steering, automatic 93
streaming radio 136
streaming services 136
summer tires 170
Summon 102
Summon Distance 102
superchargingdescribed 161
idle fees 161
pay-per-use fees 161
suspension specifications 189
T telematics 206
temperatureBattery (high voltage), limits 155
cabin, controls for 125
outside 61
tires 194
Teslacam 76
tie-down straps
200
tilt/intrusion detection 143
Tire and Loading Information label 184
tire noise 171Tire Pressure Monitoring Systemoverview of 168
tire pressures, checking 164
tiresall-season 170
balancing 165
chains 171
inspecting and maintaining 165
pressures, how to check 164
quality grading 194
replacing 166
replacing a tire sensor 169
rotation 165
specification 191
summer 170
temperature grades 194
tire markings 192
traction grade 194
treadwear grade 194
wheel configuration 164
winter 170
toll system transponders, attaching 179
torque specifications 188
touch up body 173
touchscreencleaning 173
overview 4
restarting 50
software updates 151
towing a trailer 185
towing instructions 199
TPMSoverview of 168
Track Mode 73
Tracking Disabled 130
traction control 69
trademarks 204
Traffic-Aware Cruise Control 87
trailer hitches 185
transmission specifications 188
transponders, attaching 179
Transport Canada, contacting 208
Transport Mode 200
transporting 199
trip chart 74
Trip Planner 134
trunk, front 21
trunk, rear 19
turn signals 60
U
ultrasonic sensors 84
uniform tire quality grading 194
Index
Index217