ECU TESLA MODEL 3 2021 Owner´s Manual
[x] Cancel search | Manufacturer: TESLA, Model Year: 2021, Model line: MODEL 3, Model: TESLA MODEL 3 2021Pages: 248, PDF Size: 7.76 MB
Page 65 of 248
Controlling Audible Feedback
You can use Park Assist with or without audible feedback. To turn chimes on or
off, touch Controls >
Safety & Security > Park Assist Chimes.
Limitations and False Warnings
The parking sensors may not function correctly in these
situations:
Page 80 of 248
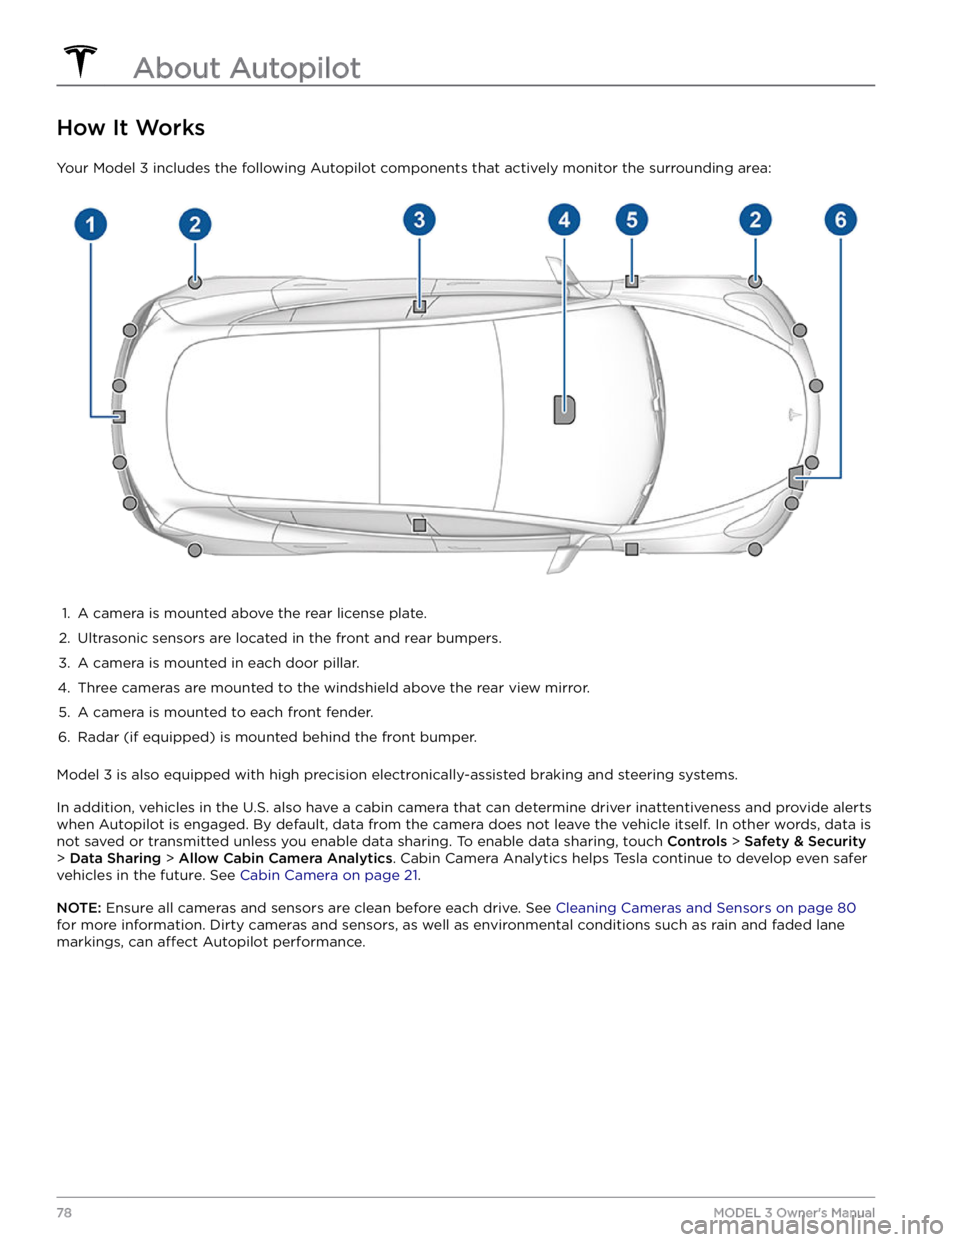
How It Works
Your Model 3 includes the following Autopilot components that actively monitor the surrounding area:
1.
A camera is mounted above the rear license plate.
2.
Ultrasonic sensors are located in the front and rear bumpers.
3.
A camera is mounted in each door pillar.
4.
Three cameras are mounted to the windshield above the rear view mirror.
5.
A camera is mounted to each front fender.
6.
Radar (if equipped) is mounted behind the front bumper.
Model 3 is also equipped with high precision electronically-assisted braking and steering systems.
In addition, vehicles in the U.S. also have a cabin camera that can determine driver inattentiveness and provide alerts
when Autopilot is engaged. By default, data from the camera does not leave the vehicle itself. In other words, data is
not saved or transmitted unless you enable data sharing. To enable data sharing, touch
Controls > Safety & Security
> Data Sharing > Allow Cabin Camera Analytics. Cabin Camera Analytics helps Tesla continue to develop even safer
vehicles in the future. See
Cabin Camera on page 21.
NOTE: Ensure all cameras and sensors are clean before each drive. See Cleaning Cameras and Sensors on page 80
for more information. Dirty cameras and sensors, as well as environmental conditions such as rain and faded lane markings, can
affect Autopilot performance.
About Autopilot
78MODEL 3 Owner
Page 119 of 248
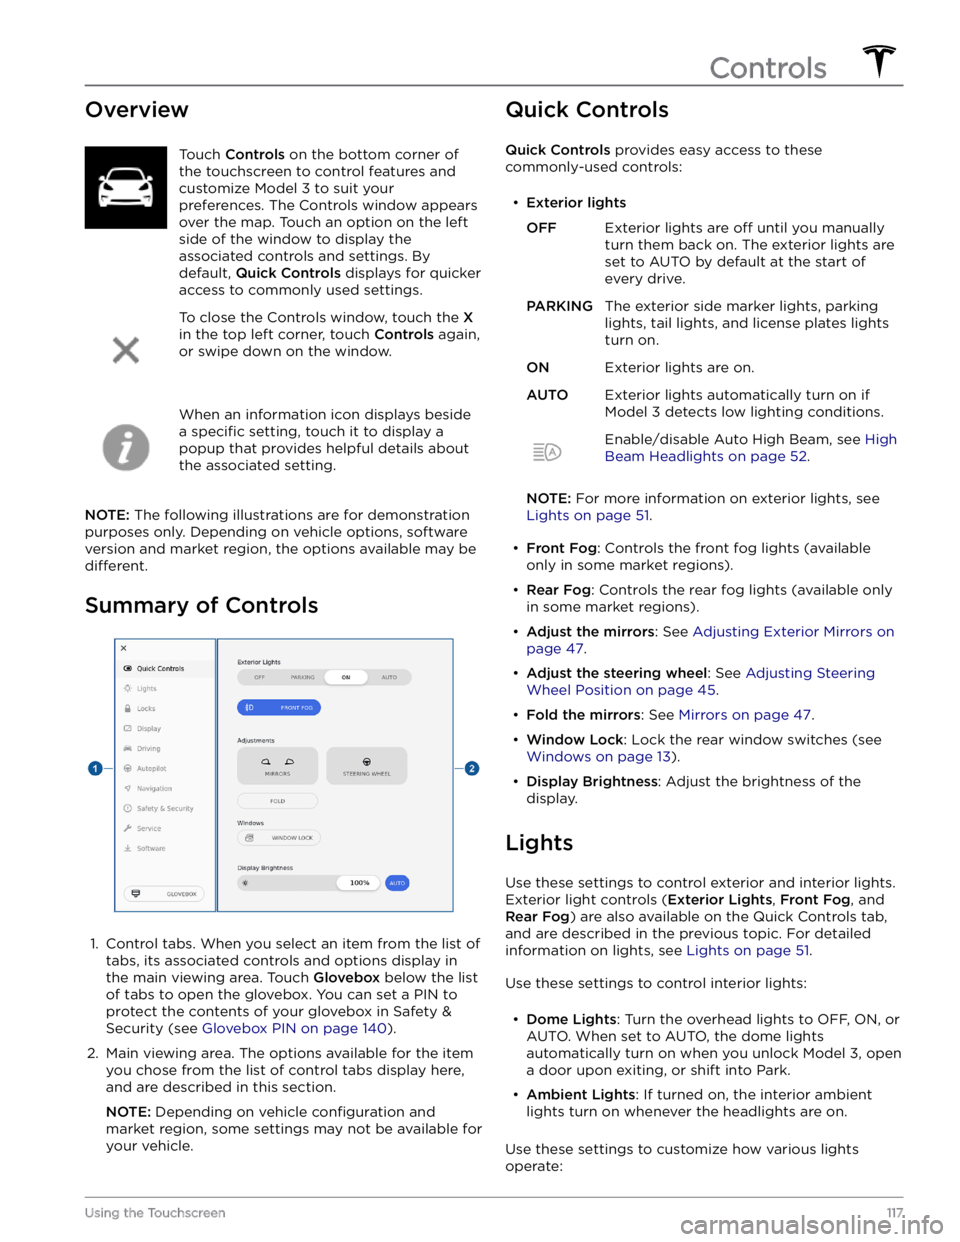
OverviewTouch Controls on the bottom corner of
the touchscreen to control features and
customize
Model 3 to suit your
preferences. The Controls window appears
over the map. Touch an option on the left
side of the window to display the
associated controls and settings. By default,
Quick Controls displays for quicker
access to commonly used settings.
To close the Controls window, touch the X
in the top left corner, touch Controls again,
or swipe down on the window.
When an information icon displays beside a
specific setting, touch it to display a
popup that provides helpful details about
the associated setting.
NOTE: The following illustrations are for demonstration
purposes only. Depending on vehicle options, software version and market region, the options available may be
different.
Summary of Controls
1.
Control tabs. When you select an item from the list of tabs, its associated controls and options display in the main viewing area. Touch
Glovebox below the list
of tabs to open the glovebox. You can set a PIN to
protect the contents of your glovebox in Safety & Security (see
Glovebox PIN on page 140).
2.
Main viewing area. The options available for the item you chose from the list of control tabs display here, and are described in this section.
NOTE: Depending on vehicle configuration and
market region, some settings may not be available for
your vehicle.
Quick Controls
Quick Controls provides easy access to these
commonly-used controls:
Page 142 of 248
About the Security System
If Model 3 does not detect an authenticated phone, key
fob, or key card and a locked door or trunk is opened, an
alarm sounds and the headlights and turn signals
flash.
To deactivate the alarm, press any button on the mobile
app or tap your key card or key fob against the card reader located
just below the Autopilot camera on the
driver
Page 143 of 248
CAUTION: Do not rely on Sentry Mode to protect
Model 3 from all possible security threats. While it
may help deter some threats, no security system
can prevent all attacks.
CAUTION: Sentry Mode may not trigger the
security alarm in all situations involving damage to
the vehicle. The security alarm depends upon
multiple factors to be triggered and may not
detect all impacts to the vehicle or may not trigger
the alarm in all cases.
Standby, Alert, and Alarm States
When in Sentry Mode, Model 3 may go through three
states depending on its surroundings
Page 166 of 248
NOTE: The lug nut cover tool can also be purchased
at an auto parts store or through online retailers.2.
Maneuver the lug nut cover tool so that it is fully inserted into the hole in the lug nut cover.
3.
Twist the lug nut cover tool so that the curved part is
touching the middle of the lug nut cover.
4.
Firmly pull the lug nut tool away from the wheel until the lug nut cover is released.
To install the lug nut cover:
1.
Align the lug nut cover into position.
2.
Push firmly on the lug nut cover until it fully snaps
into place.
CAUTION: Make sure the lug nut cover is fully
secure before driving to prevent it from falling
off.
Wheel Configuration
If you are installing new wheels or swapping them for
different ones, update your vehicle
Page 173 of 248
Removing the Maintenance Panel
To check fluid levels, remove the maintenance panel:
1.
Open the hood.
2.
Pull the maintenance panel upward to release the clips that hold it in place.
3.
If checking the Battery coolant, remove the cabin
intake trim panel by pulling it upwards to release the clips that hold it in place.
CAUTION: The maintenance panel protects the
front trunk from water. When re-attaching, make
sure it is fully seated.
Checking Battery Coolant
Your Battery coolant should not need to be replaced for
the life of your vehicle under most circumstances. However, if the quantity of
fluid in the cooling system
drops below the recommended level, the
touchscreen
displays a warning message. Stop driving Model 3 as
soon as safety permits and contact Tesla.
Fluid Level Check
DO NOT REMOVE THE FILLER CAP AND DO NOT ADD
FLUID. Doing so can result in damage not covered by
the warranty.
Do Not Top Up Battery Coolant
WARNING: Battery coolant can be hazardous and
can irritate eyes and skin. Under no circumstances
should you remove the filler cap and/or add
coolant. If the touchscreen warns you that the fluid
level is low, contact Tesla immediately.
To maximize the performance and life of the Battery, the
cooling system uses a
specific mixture of G-48 ethylene-
glycol coolant (HOAT). Contact Tesla for more
specific
information about the coolant.
Checking Brake FluidWARNING: Contact Tesla immediately if you notice
increased movement of the brake pedal or a
significant loss of brake fluid. Driving under these
conditions can result in extended stopping
distances or complete brake failure.
A red brake indicator on the touchscreen
alerts you if the quantity of fluid in the
brake reservoir drops below the
recommended level. If it displays while driving, stop as soon as safety permits by
gently applying the brakes. Do not
continue driving. Contact Tesla
immediately.
Topping Up the Brake Fluid
Do not top up your brake fluid. The following
instructions are provided for information purposes and future reference only:
1.
Clean the filler cap before removing it to prevent dirt
from entering the reservoir.
2.
Unscrew the cap and remove it.
3.
Top up the reservoir to the MAX mark using the
appropriate brake
fluid.
4.
Replace the filler cap, ensuring it is fully secured.
WARNING: Only use new fluid from a sealed air-
tight container. Never use previously used fluid or
fluid from a previously opened container
Page 180 of 248
6. Remove the remaining tape from the sides of the
bracket then press the entire bracket
firmly against
the bumper, ensuring the bracket is held in place by
all adhesive areas.
7.
Once the bracket is securely mounted, use the four supplied screws to attach your license plate to the bracket (tighten to 3 Nm/2.2 ft-lbs).Parts and Accessories
178MODEL 3 Owner
Page 197 of 248
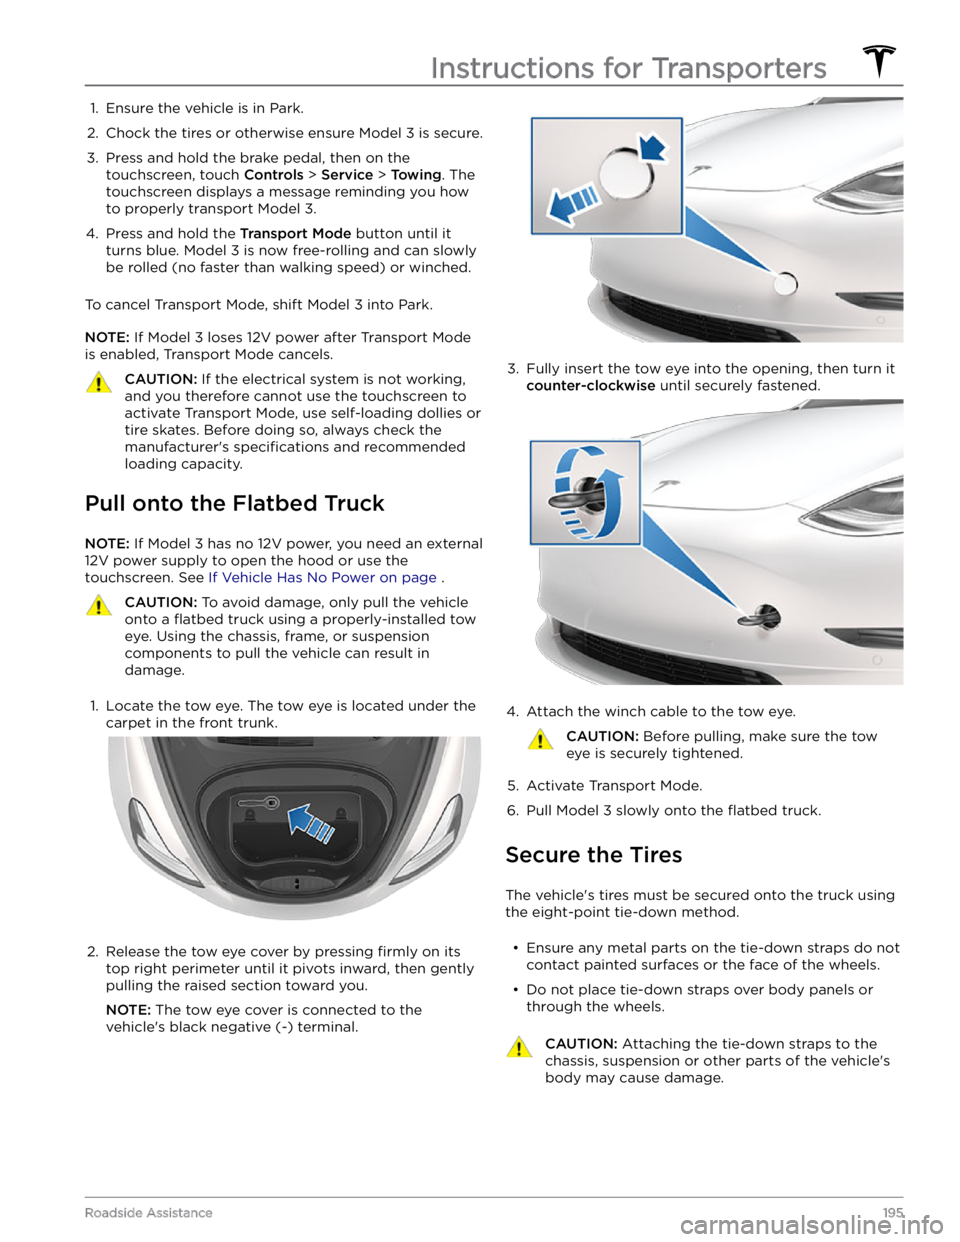
1. Ensure the vehicle is in Park.2.
Chock the tires or otherwise ensure Model 3 is secure.
3.
Press and hold the brake pedal, then on the touchscreen, touch
Controls > Service > Towing. The
touchscreen displays a message reminding you how
to properly transport
Model 3.
4.
Press and hold the Transport Mode button until it
turns blue.
Model 3 is now free-rolling and can slowly
be rolled (no faster than walking speed) or winched.
To cancel Transport Mode, shift Model 3 into Park.
NOTE: If Model 3 loses 12V power after Transport Mode
is enabled, Transport Mode cancels.
CAUTION: If the electrical system is not working,
and you therefore cannot use the touchscreen to
activate Transport Mode, use self-loading dollies or
tire skates. Before doing so, always check the
manufacturer
Page 211 of 248

(CC_a003)
Unable to charge - Wall Connector GFCI tripped
Disconnect and retry or use different equipment
What this alert means:
Ground fault. Current is leaking through an unsafe path. Possible Line to ground or Neutral to ground fault.
What to do:
Try again by disconnecting the Wall Connector from the vehicle and reconnecting. If the problem persists, turn OFF
the circuit breaker servicing the Wall Connector, wait 10 seconds, turn the circuit breaker ON again, then try
reconnecting the Wall Connector to the vehicle. If the problem persists, contact Tesla.
(CC_a004)
Unable to charge - Wall Connector issue
Wall Connector needs service
What this alert means:
Wall Connector hardware issue. Possible issues include:
1.
Contactor not working
2.
Self-test of internal ground fault monitoring circuit failed
3.
Thermal sensor disconnected
4.
Other hardware component issues
What to do:
An internal issue was detected by the Wall Connector.
1.
Try charging again by disconnecting the Wall Connector from the vehicle and reconnecting.
2.
If the issue persists, turn OFF the circuit breaker for the Wall Connector, wait 10 seconds, and turn the circuit
breaker ON again. Then try reconnecting the Wall Connector to the vehicle.
3.
If the issue persists, check for loose connections.
a.
Make sure there is no power to the Wall Connector.
b.
Remove the face plate and inspect the wiring terminals for any loose connections.
c.
Contact an electrician if necessary to make sure all wires are properly connected and torqued according to the
instructions in the Wall Connector Installation Manual.
4.
Once all connections have been checked and made secure, restore power to the Wall Connector and try charging
again by reconnecting to the vehicle.
5.
If the issue persists, the Wall Connector needs service. Schedule a service appointment through your Mobile App.
(CC_a005)
Unable to charge - Wall Connector GFCI tripped
Disconnect and retry or use different equipment
What this alert means:
Ground fault. Current is leaking through an unsafe path. Possible Line to ground or Neutral to ground fault.
What to do:
Troubleshooting Alerts
209Consumer Information