display TESLA MODEL 3 2021 Owner´s Manual
[x] Cancel search | Manufacturer: TESLA, Model Year: 2021, Model line: MODEL 3, Model: TESLA MODEL 3 2021Pages: 248, PDF Size: 7.76 MB
Page 6 of 248
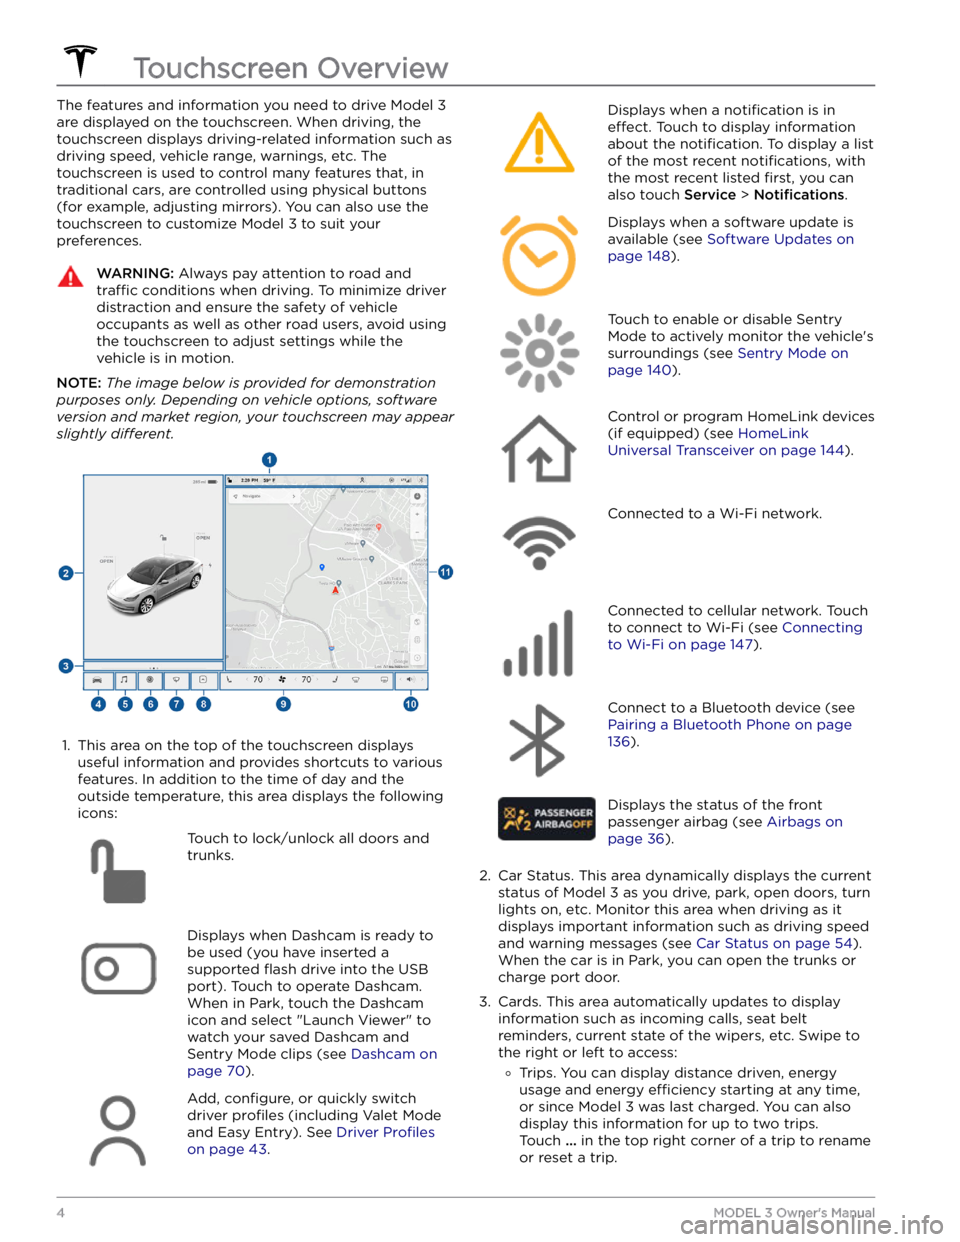
The features and information you need to drive Model 3
are displayed on the touchscreen. When driving, the
touchscreen displays driving-related information such as driving speed, vehicle range, warnings, etc. The touchscreen is used to control many features that, in traditional cars, are controlled using physical buttons (for example, adjusting mirrors). You can also use the touchscreen to customize
Model 3 to suit your
preferences.
WARNING: Always pay attention to road and
traffic conditions when driving. To minimize driver
distraction and ensure the safety of vehicle
occupants as well as other road users, avoid using
the touchscreen to adjust settings while the
vehicle is in motion.
NOTE: The image below is provided for demonstration
purposes only. Depending on vehicle options, software
version and market region, your touchscreen may appear
slightly different.
1.
This area on the top of the touchscreen displays useful information and provides shortcuts to various
features. In addition to the time of day
and the
outside temperature, this area displays the following
icons:
Touch to lock/unlock all doors and
trunks.Displays when Dashcam is ready to be used (you have inserted a supported
flash drive into the USB
port). Touch to operate Dashcam
.
When in Park, touch the Dashcam
icon and select "Launch Viewer" to
watch your saved Dashcam and
Sentry Mode clips (see Dashcam on
page 70).
Add, configure, or quickly switch
driver
profiles (including Valet Mode
and Easy Entry). See
Driver Profiles
on page 43.
Displays when a notification is in
effect. Touch to display information
about the
notification. To display a list
of the most recent
notifications, with
the most recent listed
first, you can
also touch
Service > Notifications.
Displays when a software update is
available (see
Software Updates on
page 148).
Touch to enable or disable Sentry
Mode to actively monitor the vehicle
Page 13 of 248
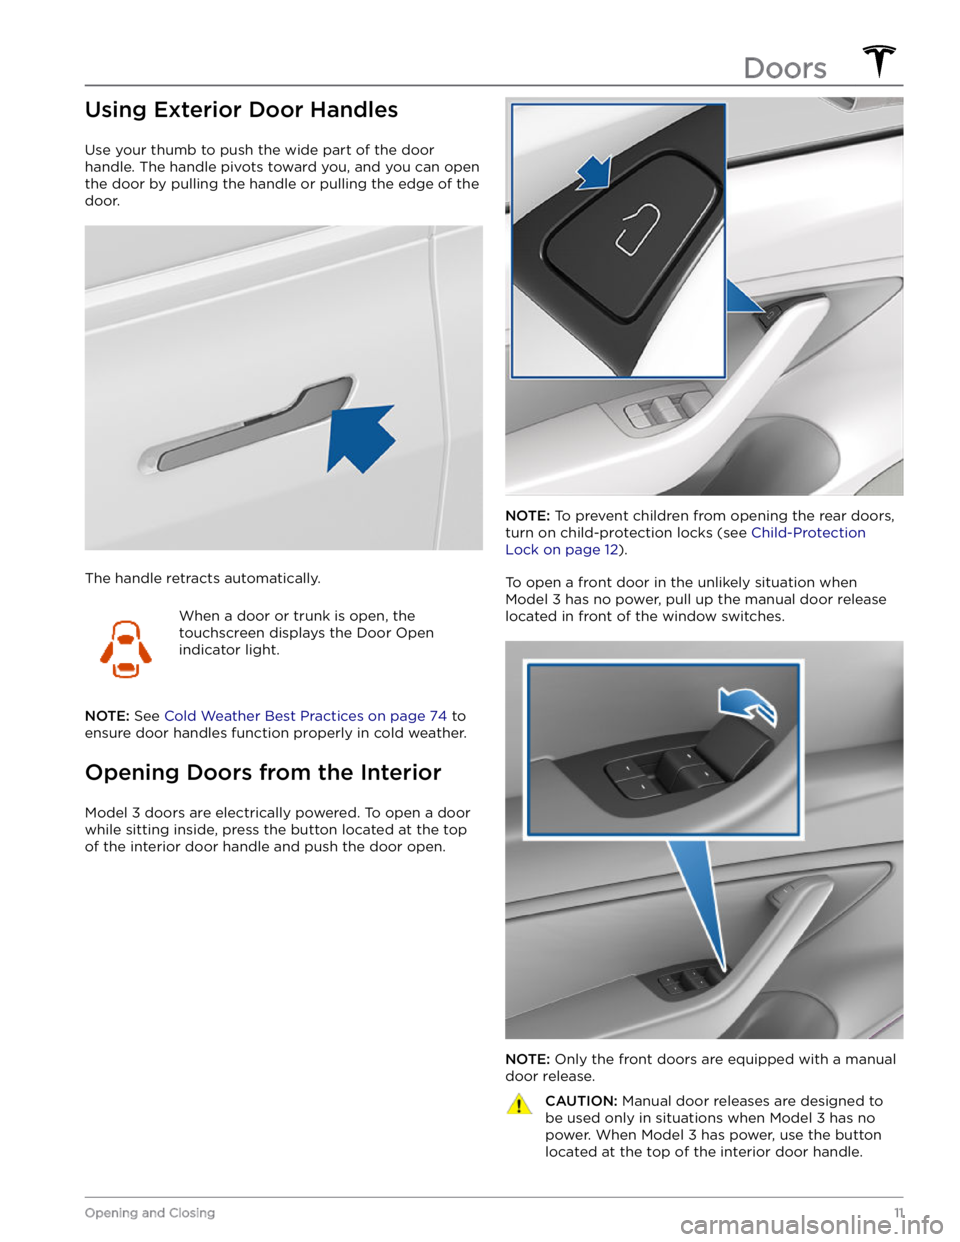
Using Exterior Door Handles
Use your thumb to push the wide part of the door
handle. The handle pivots toward you, and you can open
the door by pulling the handle or pulling the edge of the door.
The handle retracts automatically.
When a door or trunk is open, the
touchscreen displays the Door Open
indicator light.
NOTE: See Cold Weather Best Practices on page 74 to
ensure door handles function properly in cold weather.
Opening Doors from the Interior
Model 3 doors are electrically powered. To open a door
while sitting inside, press the button located at the top of the interior door handle and push the door open.
NOTE: To prevent children from opening the rear doors,
turn on child-protection locks (see
Child-Protection
Lock on page 12).
To open a front door in the unlikely situation when
Model 3 has no power, pull up the manual door release
located in front of the window switches.
NOTE: Only the front doors are equipped with a manual
door release.
CAUTION: Manual door releases are designed to
be used only in situations when Model 3 has no
power. When Model 3 has power, use the button
located at the top of the interior door handle.Doors
11Opening and Closing
Page 29 of 248
Wearing Seat Belts
Using seat belts and child safety seats is the most
effective way to protect occupants if a collision occurs.
Therefore, wearing a seat belt is required by law in most jurisdictions.
Both the driver and passenger seats are equipped with three-point inertia reel seat belts. Inertia reel belts are automatically tensioned to allow occupants to move
comfortably during normal driving conditions.
To
securely hold child safety seats, all passenger seating
positions are equipped with an automatic locking
retractor (ALR) feature that, by fully extracting the seat
belt (beyond the length needed for a typical adult
occupant), locks the belt into place until the seat belt is
unbuckled.
The seat belt reel automatically locks to prevent
movement of occupants if
Model 3 experiences a force
associated with hard acceleration, braking, cornering, or
an impact in a collision.
Seat Belt Reminders
The seat belt reminder on the touchscreen
alerts you if a seat belt for an occupied driver or passenger seat is unbuckled. If
the belt remains unbuckled, the reminder
flashes and an intermittent chime sounds.
If all occupants are buckled up and the
reminder stays on, re-buckle seat belts to
ensure they are correctly latched. Also
remove any heavy objects (such as a
briefcase) from an unoccupied seat. If the
reminder light continues to stay on,
contact Tesla.
You can temporarily mute a seat belt reminder
associated with a rear seating position. This is useful in situations when you are carrying an object in a rear seat
that triggers the seat belt reminder alert. To mute the reminder, touch the associated seat on the seat belt reminder card that displays on the touchscreen when a seat belt reminder alert is active. When a reminder is muted, the seat belt reminder icon is replaced by a seat icon. Touch the seat again to unmute the reminder. The reminder is disabled for the current drive only.
WARNING: Seat belts must be worn by passengers
in all seating positions. Do not disable a seat belt
reminder when the seating position is occupied by
a passenger.
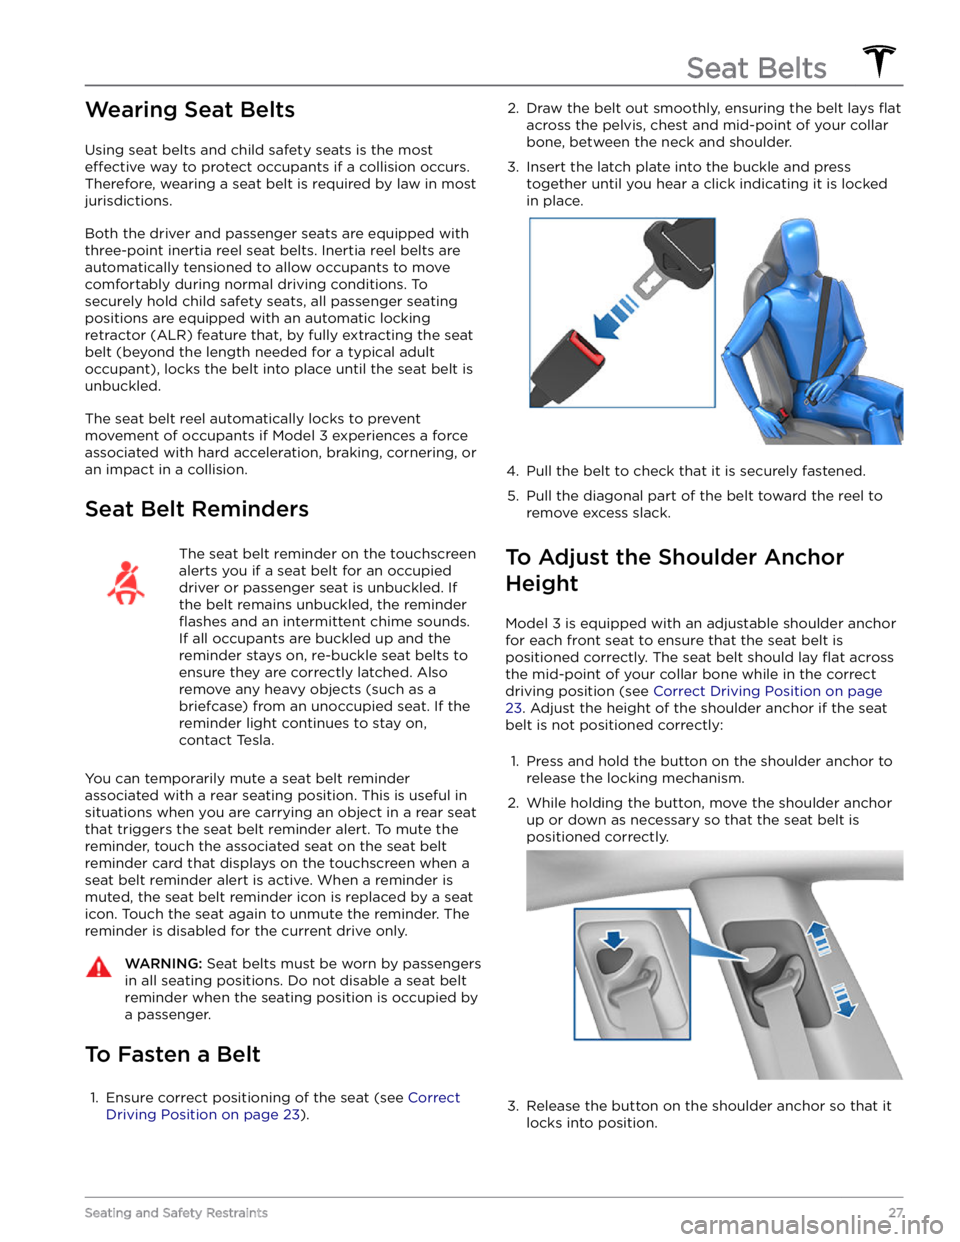
To Fasten a Belt
1.
Ensure correct positioning of the seat (see Correct
Driving Position on page 23).
2. Draw the belt out smoothly, ensuring the belt lays flat
across the pelvis, chest and mid-point of your collar
bone, between the neck and shoulder.
3.
Insert the latch plate into the buckle and press together until you hear a click indicating it is locked
in place.
4.
Pull the belt to check that it is securely fastened.
5.
Pull the diagonal part of the belt toward the reel to
remove excess slack.
To Adjust the Shoulder Anchor
Height
Model 3 is equipped with an adjustable shoulder anchor
for each front seat to ensure that the seat belt is positioned correctly. The seat belt should lay
flat across
the mid-point of your collar bone while in the correct driving position
(see Correct Driving Position on page
23. Adjust the height of the shoulder anchor if the seat
belt is not positioned correctly:
1.
Press and hold the button on the shoulder anchor to release the locking mechanism.
2.
While holding the button, move the shoulder anchor up or down as necessary so that the seat belt is
positioned correctly.
3.
Release the button on the shoulder anchor so that it
locks into position.
Seat Belts
27Seating and Safety Restraints
Page 40 of 248
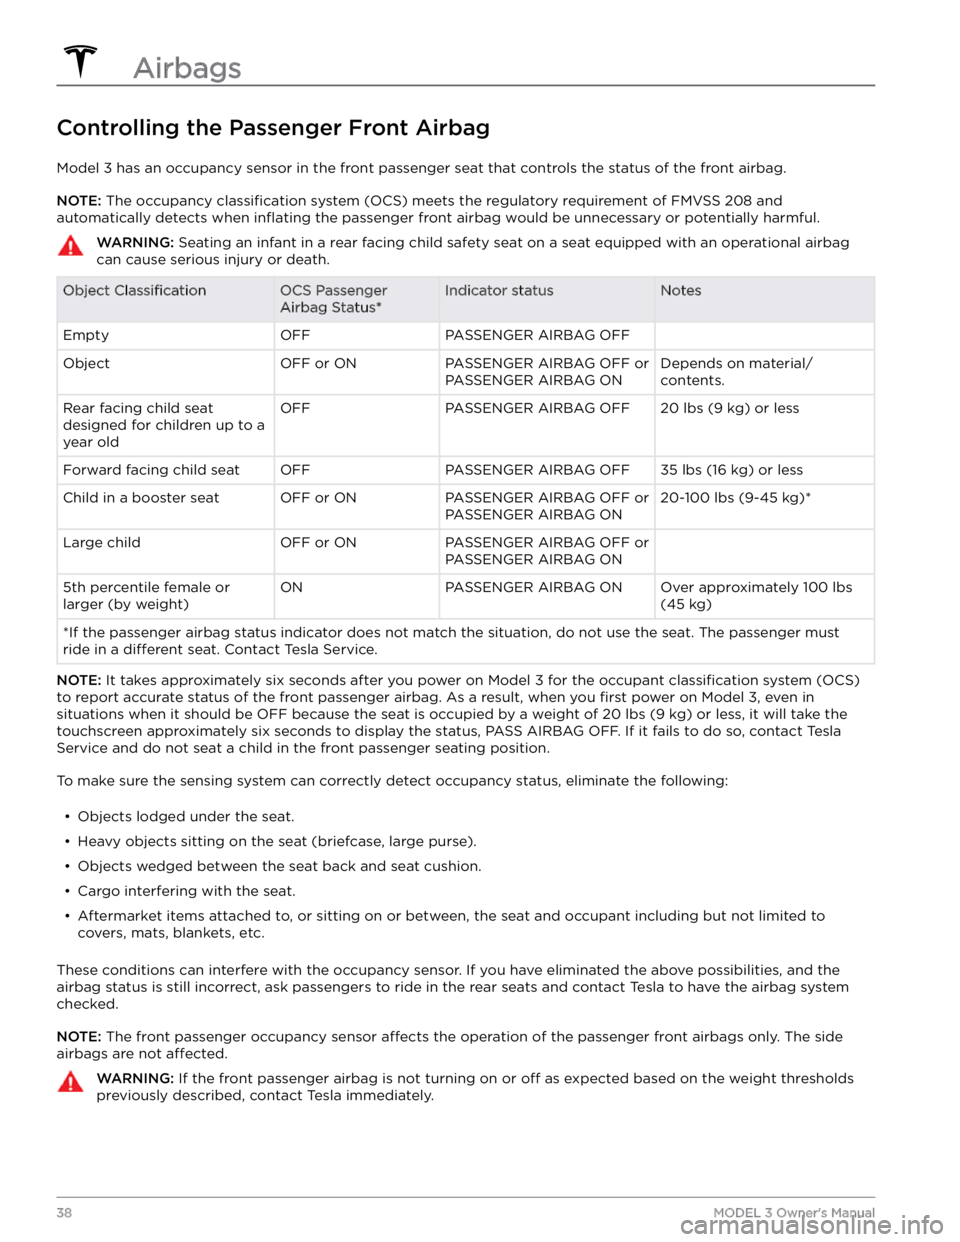
Controlling the Passenger Front Airbag
Model 3 has an occupancy sensor in the front passenger seat that controls the status of the front airbag.
NOTE: The occupancy classification system (OCS) meets the regulatory requirement of FMVSS 208 and
automatically detects when
inflating the passenger front airbag would be unnecessary or potentially harmful.
WARNING: Seating an infant in a rear facing child safety seat on a seat equipped with an operational airbag
can cause serious injury or death.
Object ClassificationOCS Passenger
Airbag Status*Indicator statusNotesEmptyOFFPASSENGER AIRBAG OFF ObjectOFF or ONPASSENGER AIRBAG OFF or
PASSENGER AIRBAG ONDepends on material/
contents.Rear facing child seat
designed for children up to a
year oldOFFPASSENGER AIRBAG OFF20 lbs (9 kg) or lessForward facing child seatOFFPASSENGER AIRBAG OFF35 lbs (16 kg) or lessChild in a booster seatOFF or ONPASSENGER AIRBAG OFF or
PASSENGER AIRBAG ON20-100 lbs (9-45 kg)*Large childOFF or ONPASSENGER AIRBAG OFF or
PASSENGER AIRBAG ON 5th percentile female or
larger (by weight)ONPASSENGER AIRBAG ONOver approximately 100 lbs
(45 kg)
*If the passenger airbag status indicator does not match the situation, do not use the seat. The passenger must
ride in a
different seat. Contact Tesla Service.
NOTE: It takes approximately six seconds after you power on Model 3 for the occupant classification system (OCS)
to report accurate status of the front passenger airbag. As a result, when you
first power on Model 3, even in
situations when it should be OFF because the seat is occupied by a weight of
20 lbs (9 kg) or less, it will take the
touchscreen approximately six seconds to display the status, PASS AIRBAG OFF. If it fails to do so, contact Tesla
Service and do not seat a child in the front passenger seating position.
To make sure the sensing system can correctly detect occupancy status, eliminate the following:
Page 50 of 248
Starting
When you open a door to enter Model 3, the
touchscreen powers on and you can operate all controls.
To drive
Model 3:
1.
PRESS THE BRAKE PEDAL - Model 3 powers on and
is ready to drive.
2.
SELECT A GEAR - move the gear stalk down for
Drive or up for Reverse (see
Gears on page 50).
NOTE: If the PIN to Drive feature is enabled (see PIN to
Drive on page 140), you must also enter a valid PIN on
the touchscreen before you can drive
Model 3.
Everything you need to know when driving Model 3
displays on the touchscreen.
Drive Disabled - Requires Authentication
If Model 3 does not detect a key when you press the
brake (a key fob or phone key is not detected or two
minutes have passed since you used the key card), the touchscreen displays a message telling you that driving requires authentication.
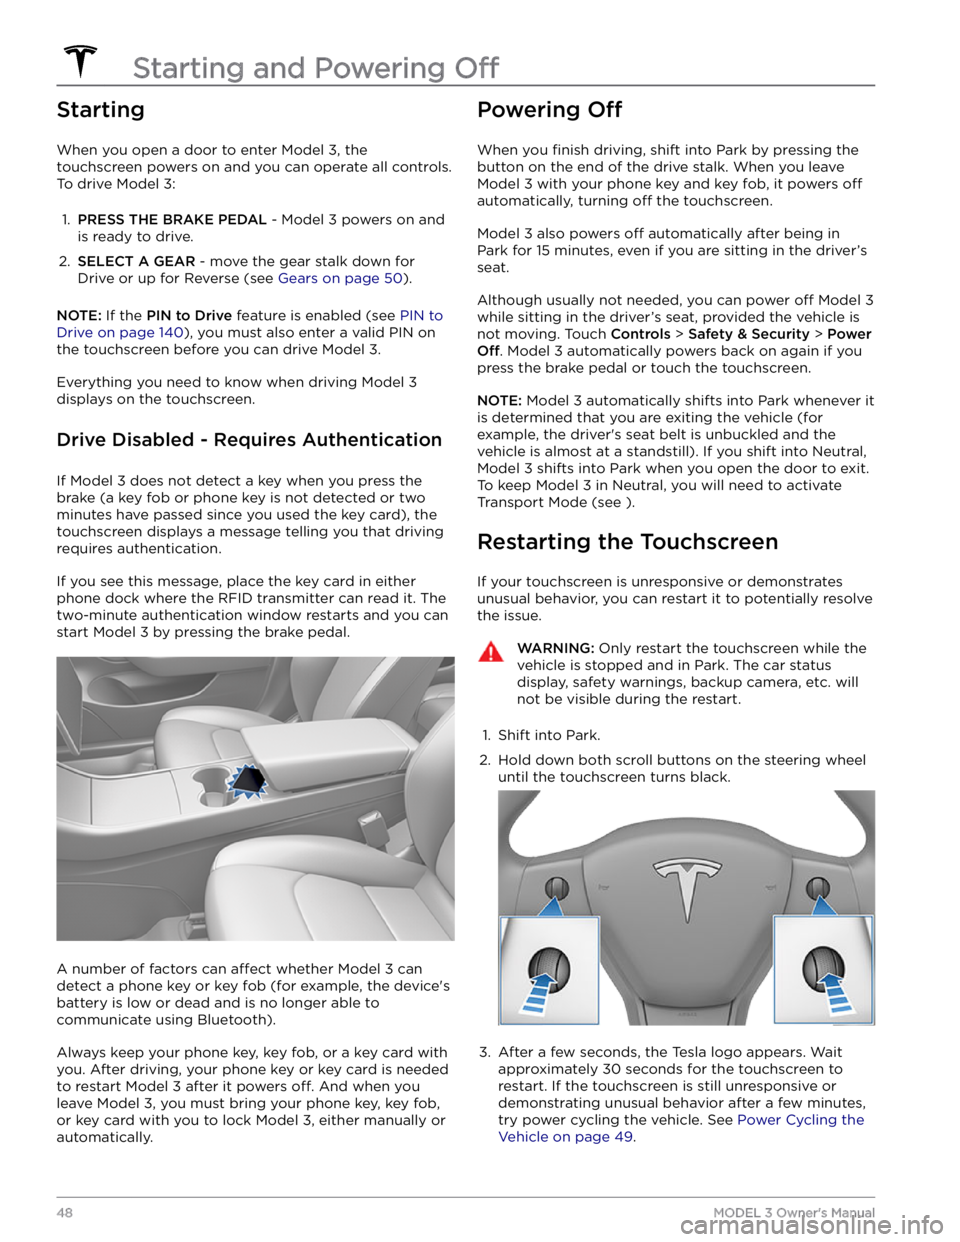
If you see this message, place the key card in either
phone dock where the RFID transmitter can read it. The
two-minute authentication window restarts and you can
start
Model 3 by pressing the brake pedal.
A number of factors can affect whether Model 3 can
detect a phone key or key fob (for example, the device
Page 56 of 248
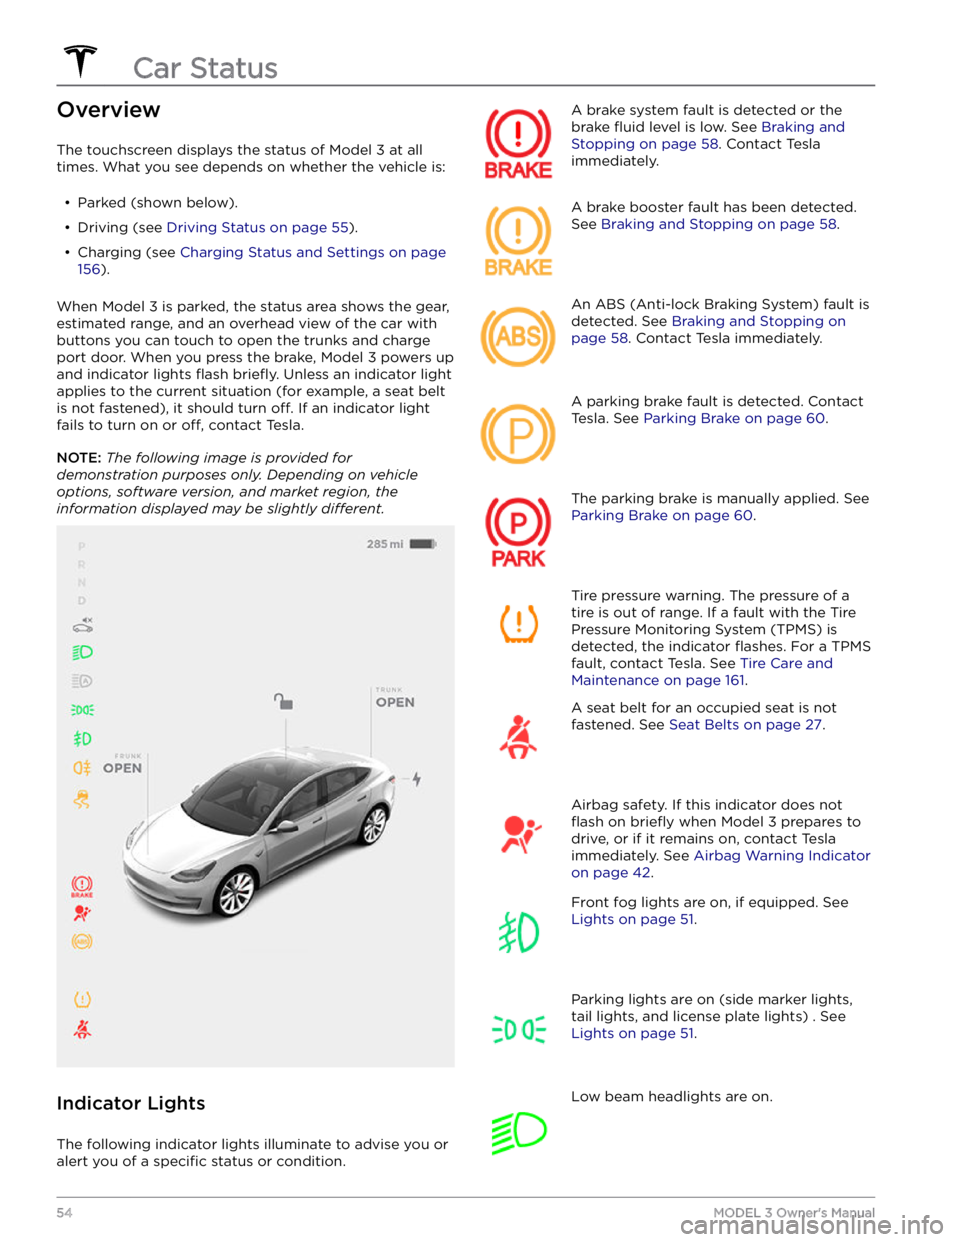
Overview
The touchscreen displays the status of Model 3 at all
times. What you see depends on whether the vehicle is:
Page 60 of 248
Braking SystemsWARNING: Properly functioning braking systems
are critical to ensure safety. If you experience a
problem with the brake pedal, brake calipers, or
any component of a Model 3 braking system,
contact Tesla immediately.
Model 3 has an anti-lock braking system (ABS) that
prevents the wheels from locking when you apply
maximum brake pressure. This improves steering control
during heavy braking in most road conditions.
During emergency braking conditions, the ABS
constantly monitors the speed of each wheel and varies
the brake pressure according to the grip available.
The alteration of brake pressure can be felt as a pulsing sensation through the brake pedal. This demonstrates that the ABS is operating and is not a cause for concern. Keep
firm and steady pressure on the brake pedal while
experiencing the pulsing.
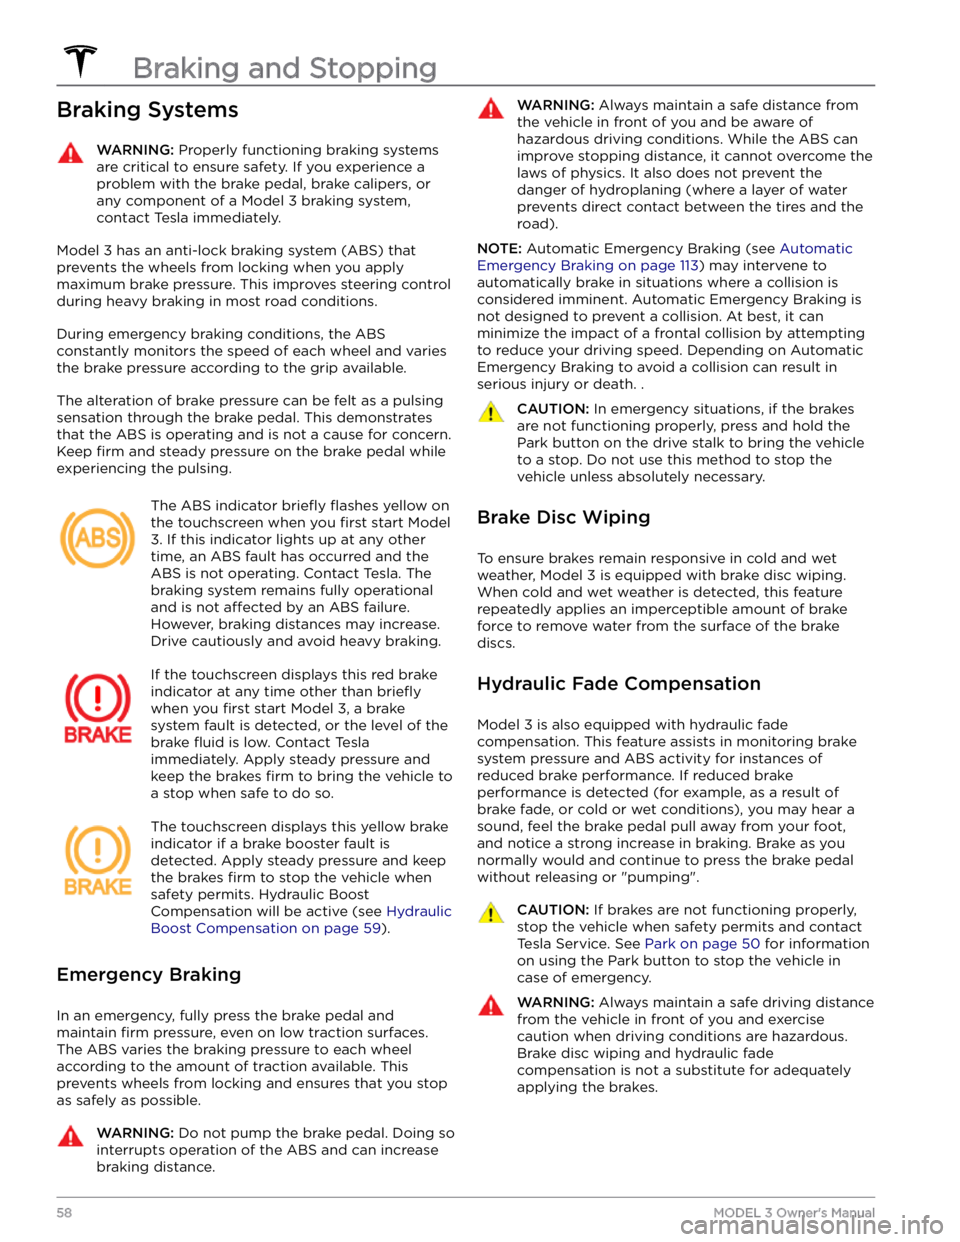
The ABS indicator briefly flashes yellow on
the
touchscreen when you first start Model
3. If this indicator lights up at any other
time, an ABS fault has occurred and the ABS is not operating. Contact Tesla. The
braking system remains fully operational
and is not
affected by an ABS failure.
However, braking distances may increase. Drive cautiously and avoid heavy braking.
If the touchscreen displays this red brake
indicator at any time other than
briefly
when you first start Model 3, a brake
system fault is detected, or the level of the
brake
fluid is low. Contact Tesla
immediately. Apply steady pressure and
keep the brakes
firm to bring the vehicle to
a stop when safe to do so.
The touchscreen displays this yellow brake
indicator if a brake booster fault is detected. Apply steady pressure and keep
the brakes
firm to stop the vehicle when
safety permits. Hydraulic Boost
Compensation will be active (see
Hydraulic
Boost Compensation on page 59).
Emergency Braking
In an emergency, fully press the brake pedal and
maintain
firm pressure, even on low traction surfaces.
The ABS varies the braking pressure to each wheel according to the amount of traction available. This prevents wheels from locking and ensures that you stop as safely as possible.
WARNING: Do not pump the brake pedal. Doing so
interrupts operation of the ABS and can increase
braking distance.
WARNING: Always maintain a safe distance from
the vehicle in front of you and be aware of
hazardous driving conditions. While the ABS can
improve stopping distance, it cannot overcome the
laws of physics. It also does not prevent the
danger of hydroplaning (where a layer of water
prevents direct contact between the tires and the
road).
NOTE: Automatic Emergency Braking (see Automatic
Emergency Braking on page 113) may intervene to
automatically brake in situations where a collision is considered imminent. Automatic Emergency Braking is
not designed to prevent a collision. At best, it can
minimize the impact of a frontal collision by attempting to reduce your driving speed. Depending on Automatic
Emergency Braking to avoid a collision can result in serious injury or death. .
CAUTION: In emergency situations, if the brakes
are not functioning properly, press and hold the
Park button on the drive stalk to bring the vehicle
to a stop. Do not use this method to stop the
vehicle unless absolutely necessary.
Brake Disc Wiping
To ensure brakes remain responsive in cold and wet
weather,
Model 3 is equipped with brake disc wiping.
When cold and wet weather is detected, this feature repeatedly applies an imperceptible amount of brake force to remove water from the surface of the brake discs.
Hydraulic Fade Compensation
Model 3 is also equipped with hydraulic fade
compensation. This feature assists in monitoring brake system pressure and ABS activity for instances of reduced brake performance. If reduced brake
performance is detected (for example, as a result of
brake fade, or cold or wet conditions), you may hear a sound, feel the brake pedal pull away from your foot, and notice a strong increase in braking. Brake as you
normally would and continue to press the brake pedal
without releasing or "pumping".
CAUTION: If brakes are not functioning properly,
stop the vehicle when safety permits and contact
Tesla Service. See Park on page 50 for information
on using the Park button to stop the vehicle in
case of emergency.
WARNING: Always maintain a safe driving distance
from the vehicle in front of you and exercise
caution when driving conditions are hazardous.
Brake disc wiping and hydraulic fade
compensation is not a substitute for adequately
applying the brakes.
Braking and Stopping
58MODEL 3 Owner
Page 62 of 248
WARNING: Do not rely on regenerative braking
and your chosen Stopping Mode to keep you and
your vehicle safe. Various factors such as driving
with a heavy vehicle load, on a steep hill, or on wet
or icy roads affect deceleration rate and the
distance at which Model 3 will come to a stop.
Drive attentively and always stay prepared to use
the brake pedal to stop as appropriate based on
traffic and road conditions.
WARNING: Forward Collision Warning and
Automatic Emergency Braking (if equipped) do
not operate when driving at very low speeds (see
Collision Avoidance Assist on page 112). Do not
rely on these features to warn you, or to prevent or
reduce the impact of a collision.
NOTE: Your chosen setting is retained in your Driver
Profile until you manually change it.
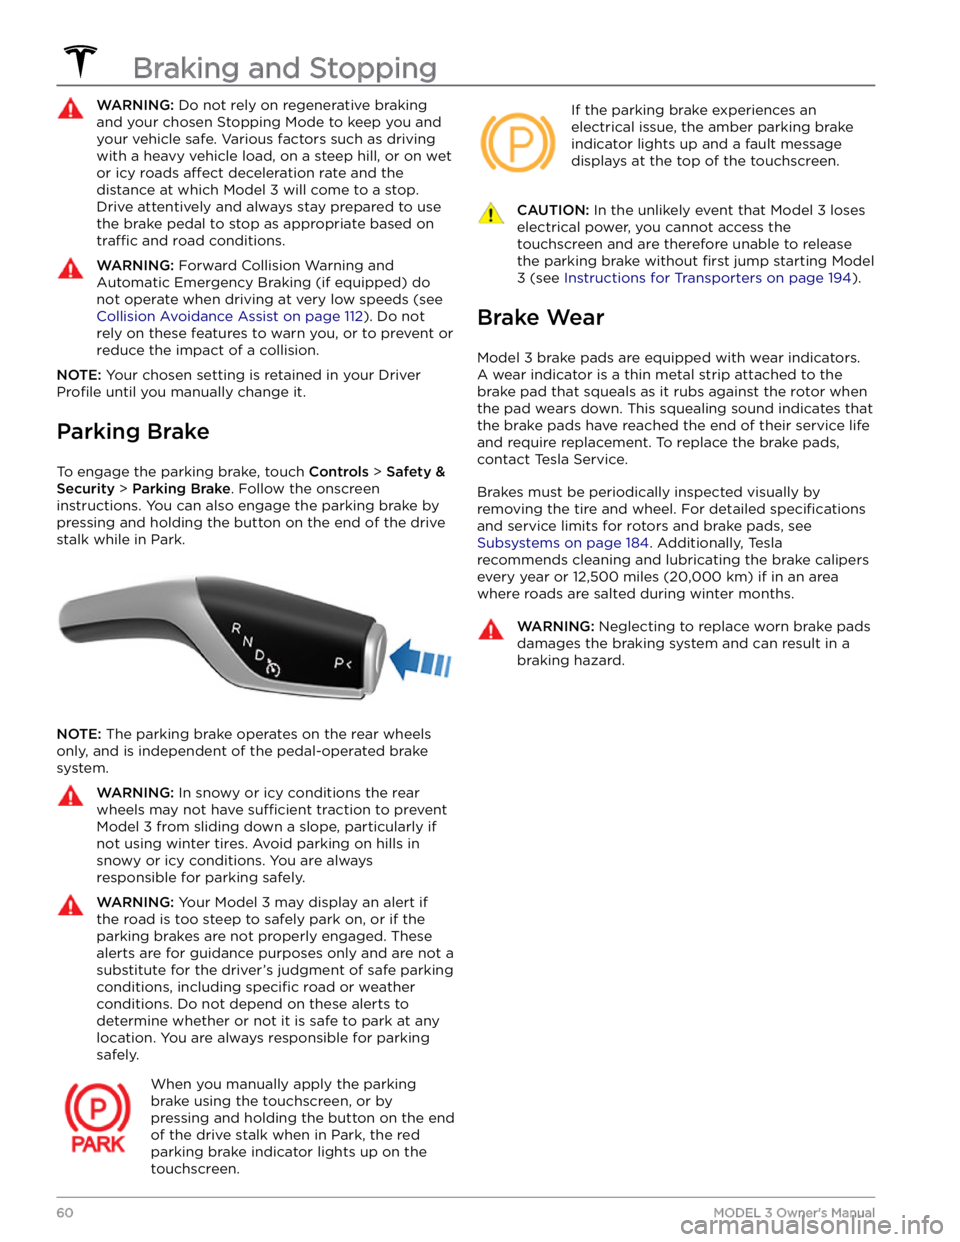
Parking Brake
To engage the parking brake, touch Controls > Safety &
Security > Parking Brake. Follow the onscreen
instructions.
You can also engage the parking brake by
pressing and holding the button on the end of the drive
stalk while in Park.
NOTE: The parking brake operates on the rear wheels
only, and is independent of the pedal-operated brake
system.
WARNING: In snowy or icy conditions the rear
wheels may not have sufficient traction to prevent
Model 3 from sliding down a slope, particularly if
not using winter tires. Avoid parking on hills in
snowy or icy conditions. You are always
responsible for parking safely.
WARNING: Your Model 3 may display an alert if
the road is too steep to safely park on, or if the
parking brakes are not properly engaged. These
alerts are for guidance purposes only and are not a
substitute for the driver
Page 64 of 248
How Park Assist Works
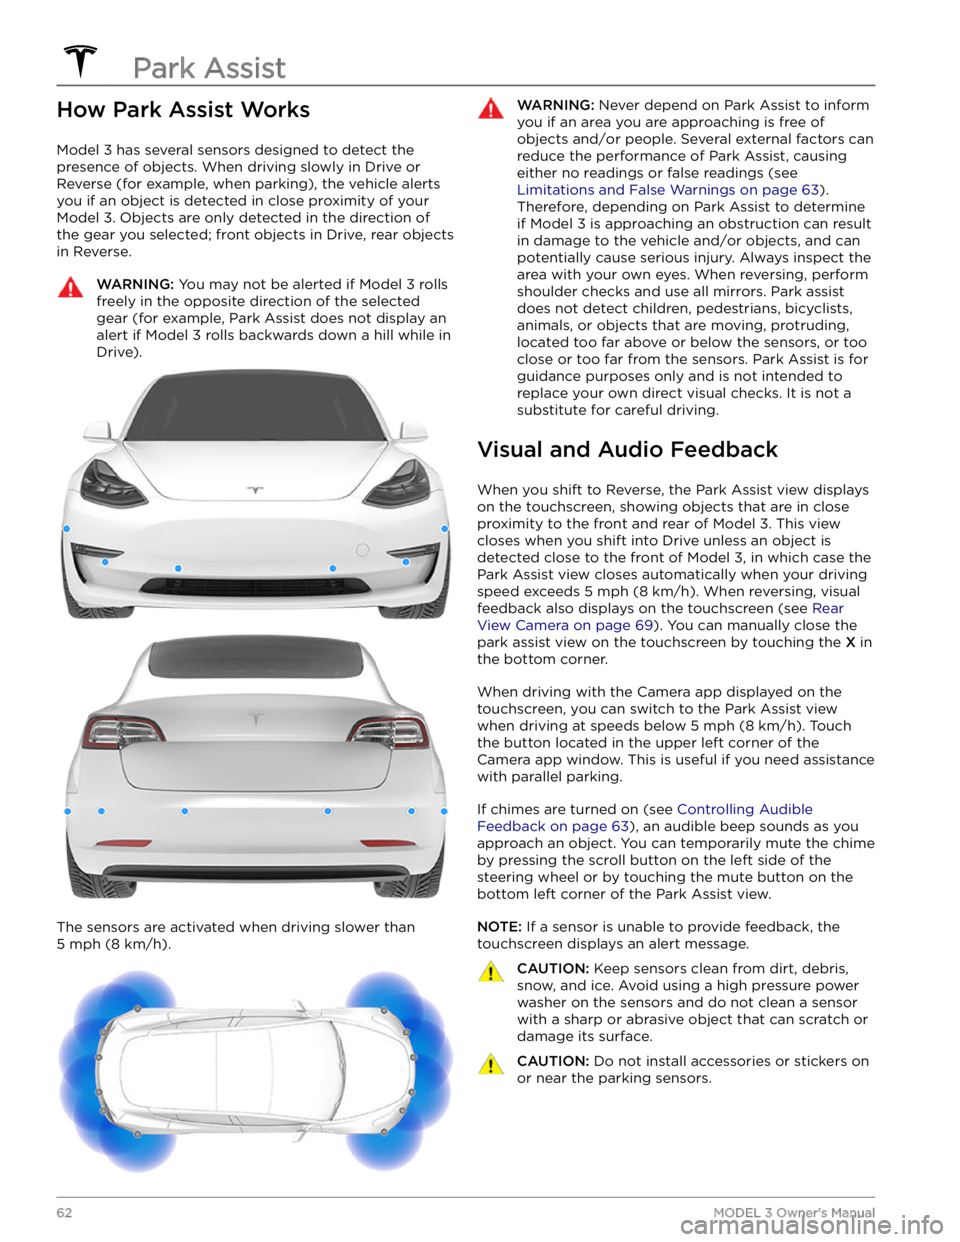
Model 3 has several sensors designed to detect the
presence of objects. When driving slowly in Drive or
Reverse (for example, when parking), the vehicle alerts
you if an object is detected in close proximity of your
Model 3. Objects are only detected in the direction of
the gear you selected; front objects in Drive, rear objects
in Reverse.
WARNING: You may not be alerted if Model 3 rolls
freely in the opposite direction of the selected
gear (for example, Park Assist does not display an
alert if Model 3 rolls backwards down a hill while in
Drive).
The sensors are activated when driving slower than
5 mph (8 km/h).
WARNING: Never depend on Park Assist to inform
you if an area you are approaching is free of
objects and/or people. Several external factors can
reduce the performance of Park Assist, causing
either no readings or false readings (see
Limitations and False Warnings on page 63).
Therefore, depending on Park Assist to determine
if Model 3 is approaching an obstruction can result
in damage to the vehicle and/or objects, and can
potentially cause serious injury. Always inspect the
area with your own eyes. When reversing, perform
shoulder checks and use all mirrors. Park assist
does not detect children, pedestrians, bicyclists,
animals, or objects that are moving, protruding,
located too far above or below the sensors, or too
close or too far from the sensors. Park Assist is for
guidance purposes only and is not intended to
replace your own direct visual checks. It is not a
substitute for careful driving.
Visual and Audio Feedback
When you shift to Reverse, the Park Assist view displays on the
touchscreen, showing objects that are in close
proximity to the front and rear of
Model 3. This view
closes when you shift into Drive unless an object is
detected close to the front of
Model 3, in which case the
Park Assist view closes automatically when your driving speed exceeds
5 mph (8 km/h). When reversing, visual
feedback also displays on the touchscreen (see
Rear
View Camera on page 69). You can manually close the
park assist view on the touchscreen by touching the
X in
the bottom corner.
When driving with the Camera app displayed on the
touchscreen, you can switch to the Park Assist view
when driving at speeds below
5 mph (8 km/h). Touch
the button located in the upper left corner of the Camera app window. This is useful if you need assistance
with parallel parking.
If chimes are turned on (see Controlling Audible
Feedback on page 63), an audible beep sounds as you
approach an object. You can temporarily mute the chime by pressing the scroll button on the left side of the
steering wheel or by touching the mute button on the
bottom left corner of the Park Assist view.
NOTE: If a sensor is unable to provide feedback, the
touchscreen displays an alert message.
CAUTION: Keep sensors clean from dirt, debris,
snow, and ice. Avoid using a high pressure power
washer on the sensors and do not clean a sensor
with a sharp or abrasive object that can scratch or
damage its surface.
CAUTION: Do not install accessories or stickers on
or near the parking sensors.
Park Assist
62MODEL 3 Owner
Page 66 of 248
When Model 3 is stopped, Vehicle Hold can continue to
apply the brakes even after you remove your foot from
the brake pedal. When driving on a hill or on a
flat
surface, brake as you normally would. After coming to a
complete stop, simply press the brake pedal again (until
the
touchscreen displays the Vehicle Hold indicator
light) to enable Vehicle Hold. You can then release the
brake pedal and remain stopped, even on a hill.
This indicator displays on the touchscreen
whenever Vehicle Hold is actively braking
Model 3.
To disengage Vehicle Hold, press the accelerator pedal or press and release the brake pedal.
NOTE: Shifting into Neutral also disengages Vehicle
Hold.
NOTE: After actively braking Model 3 for approximately
ten minutes,
Model 3 shifts into Park and Vehicle Hold
cancels.
Model 3 also shifts into Park if it detects that
the driver has left the vehicle.
NOTE: When Stopping Mode is set to Hold (see
Stopping Mode on page 59), Vehicle Hold engages
automatically whenever
Model 3 stops while in a driving
gear. There is no need to press the brake to engage it.
Vehicle Hold
64MODEL 3 Owner