display TESLA MODEL 3 2022 Owner´s Manual
[x] Cancel search | Manufacturer: TESLA, Model Year: 2022, Model line: MODEL 3, Model: TESLA MODEL 3 2022Pages: 248, PDF Size: 7.76 MB
Page 117 of 248
How Speed Assist Works
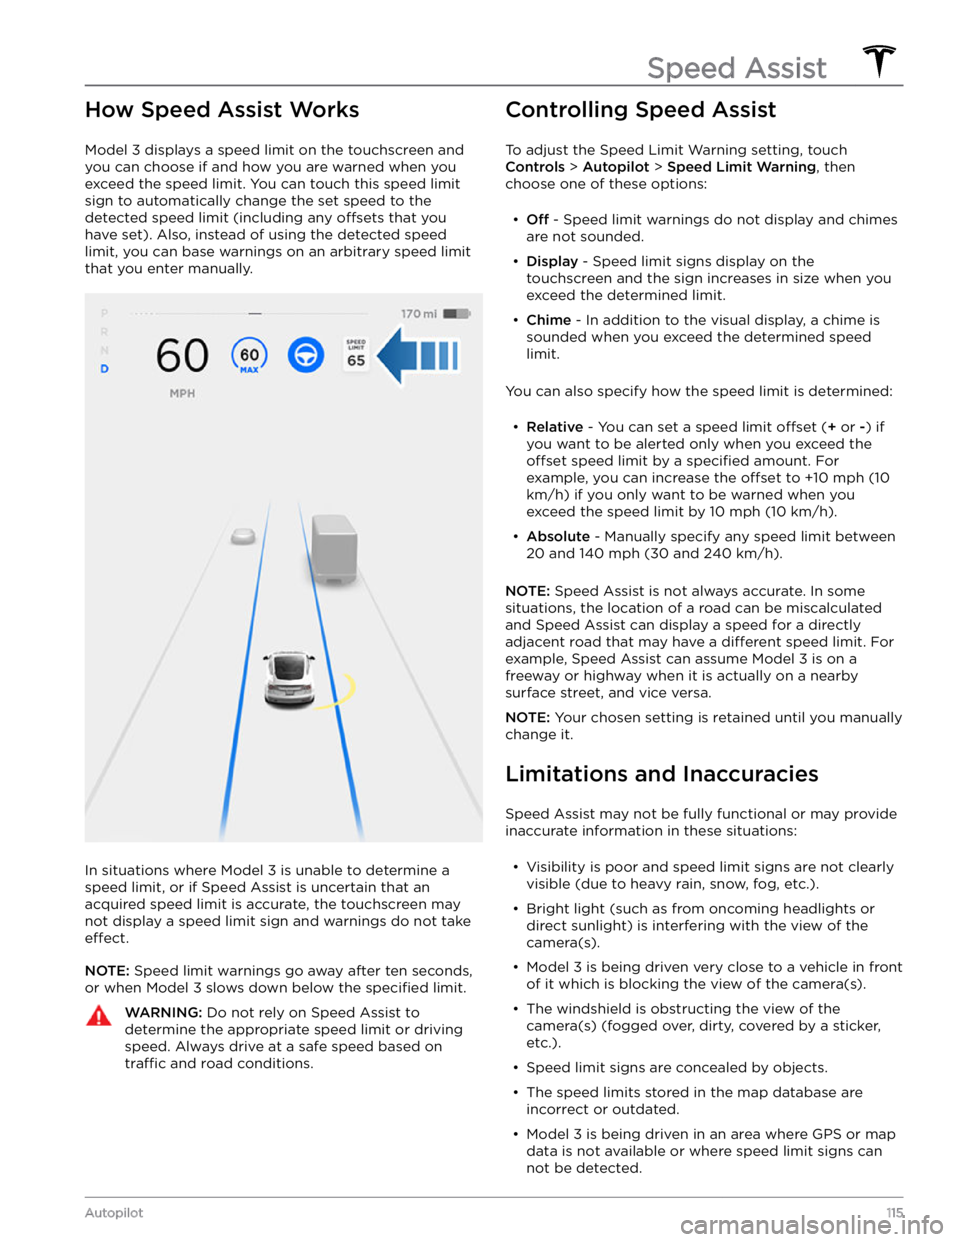
Model 3 displays a speed limit on the touchscreen and
you can choose if and how you are warned when you exceed the speed limit.
You can touch this speed limit
sign to automatically change the set speed to the
detected speed limit (including any offsets that you
have set). Also, instead of using the detected speed
limit, you can base warnings on an arbitrary speed limit that you enter manually.
In situations where Model 3 is unable to determine a
speed limit, or if Speed Assist is uncertain that an acquired speed limit is accurate, the
touchscreen may
not display a speed limit sign and warnings do not take
effect.
NOTE: Speed limit warnings go away after ten seconds,
or when
Model 3 slows down below the specified limit.
WARNING: Do not rely on Speed Assist to
determine the appropriate speed limit or driving
speed. Always drive at a safe speed based on
traffic and road conditions.
Controlling Speed Assist
To adjust the Speed Limit Warning setting, touch
Controls > Autopilot > Speed Limit Warning, then
choose one of these options:
Page 119 of 248
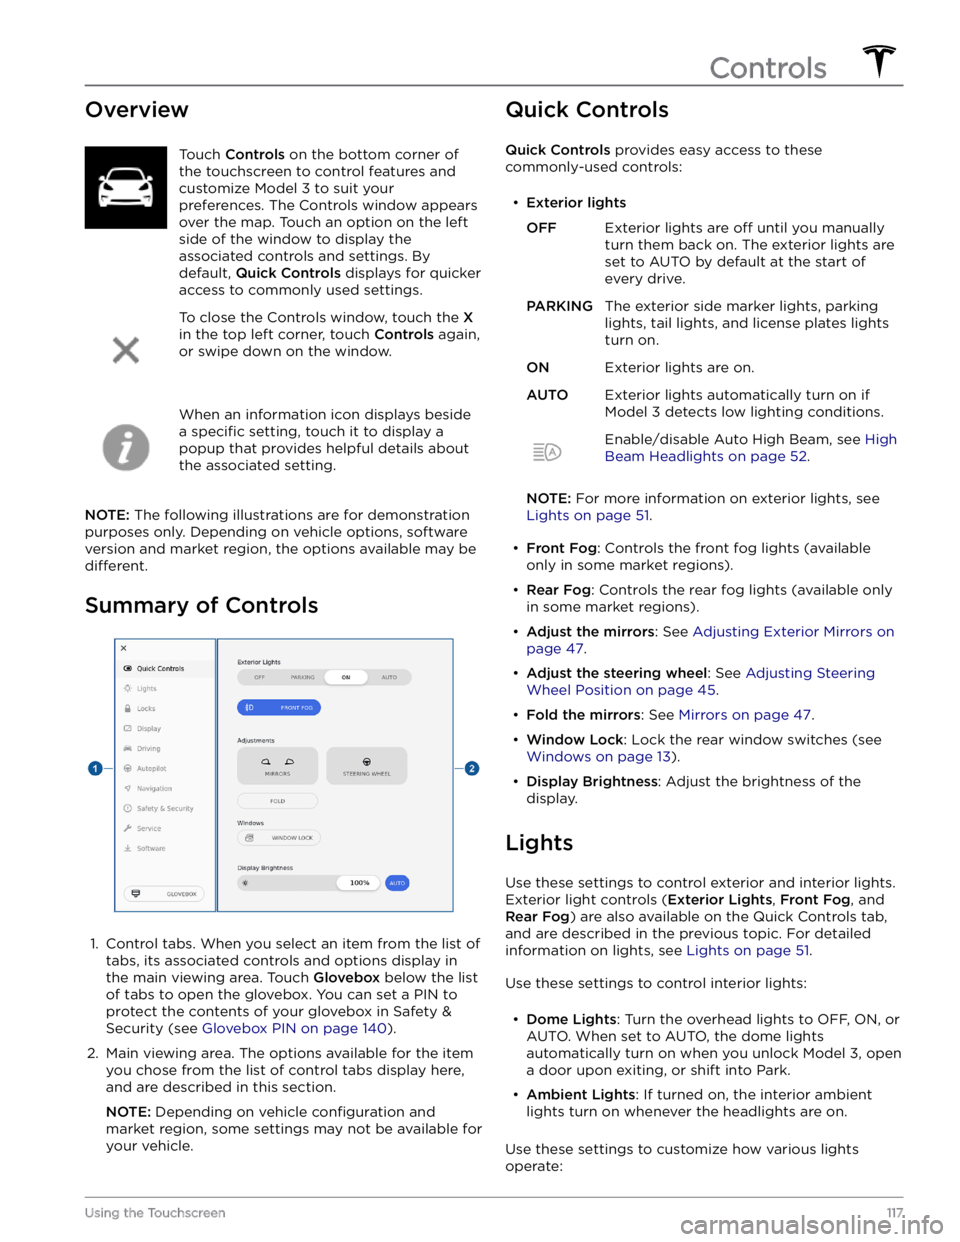
OverviewTouch Controls on the bottom corner of
the touchscreen to control features and
customize
Model 3 to suit your
preferences. The Controls window appears
over the map. Touch an option on the left
side of the window to display the
associated controls and settings. By default,
Quick Controls displays for quicker
access to commonly used settings.
To close the Controls window, touch the X
in the top left corner, touch Controls again,
or swipe down on the window.
When an information icon displays beside a
specific setting, touch it to display a
popup that provides helpful details about
the associated setting.
NOTE: The following illustrations are for demonstration
purposes only. Depending on vehicle options, software version and market region, the options available may be
different.
Summary of Controls
1.
Control tabs. When you select an item from the list of tabs, its associated controls and options display in the main viewing area. Touch
Glovebox below the list
of tabs to open the glovebox. You can set a PIN to
protect the contents of your glovebox in Safety & Security (see
Glovebox PIN on page 140).
2.
Main viewing area. The options available for the item you chose from the list of control tabs display here, and are described in this section.
NOTE: Depending on vehicle configuration and
market region, some settings may not be available for
your vehicle.
Quick Controls
Quick Controls provides easy access to these
commonly-used controls:
Page 121 of 248
NOTE: When Chill is selected, Chill displays on the
touchscreen above the driving speed.
NOTE: If equipped with the Acceleration Upgrade
package, the modes of acceleration are
Chill and Sport.
Steering Mode: Adjust the amount of effort required to
turn the steering wheel.
Sport feels more responsive
whereas
Comfort feels easier to drive and park (see
Adjusting Steering Effort on page 45).
Stopping Mode: Choose how you want Model 3 to
behave once regenerative braking has reduced the driving speed to a very low speed, a driving gear is still
engaged, and both the accelerator and brake pedals are
released. See
Stopping Mode on page 59. You can adjust
this setting only when
Model 3 is in Park.
Track Mode: (available on Performance vehicles only)
when enabled, this mode
modifies the vehicle
Page 126 of 248
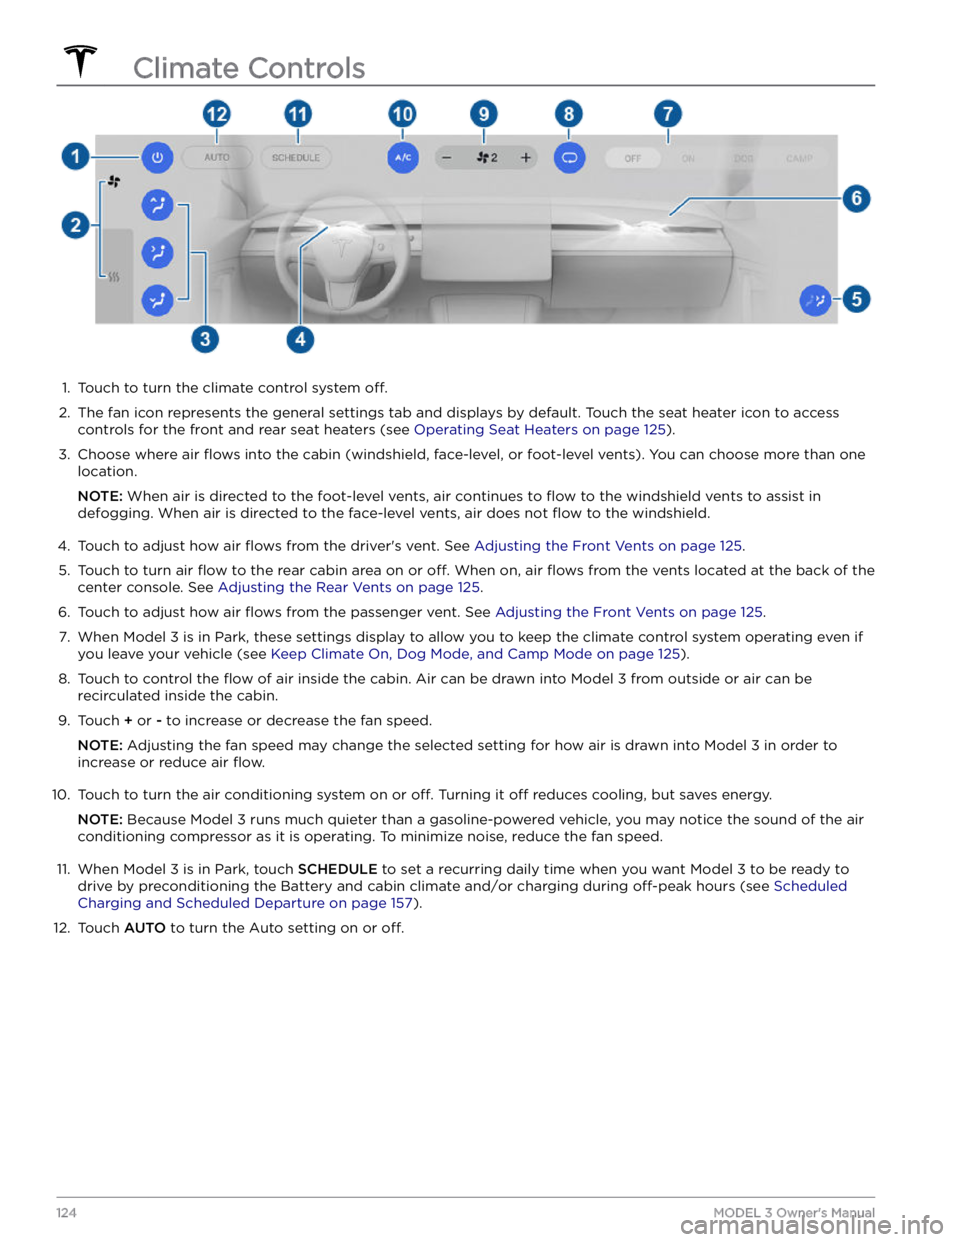
1.
Touch to turn the climate control system off.
2.
The fan icon represents the general settings tab and displays by default. Touch the seat heater icon to access
controls for the front
and rear seat heaters (see Operating Seat Heaters on page 125).
3.
Choose where air flows into the cabin (windshield, face-level, or foot-level vents). You can choose more than one
location.
NOTE: When air is directed to the foot-level vents, air continues to flow to the windshield vents to assist in
defogging. When air is directed to the face-level vents, air does not
flow to the windshield.
4.
Touch to adjust how air flows from the driver
Page 127 of 248
Operating Seat Heaters
To control the front seat heaters for the driver and passenger, touch the corresponding control on the main climate
control area at the bottom of the touchscreen.
To control the rear seat heaters (if equipped) or access duplicate
controls for the front seat heaters, touch the fan icon, then touch the seat heater icon followed by the seat for which
you want to adjust heating. Seat heaters operate at three setting levels from 3 (highest) to 1 (lowest). When
operating, the associated seat icon displays twisting lines that turn red to indicate the setting level. You can touch
All
Off to turn off all seat heaters simultaneously.
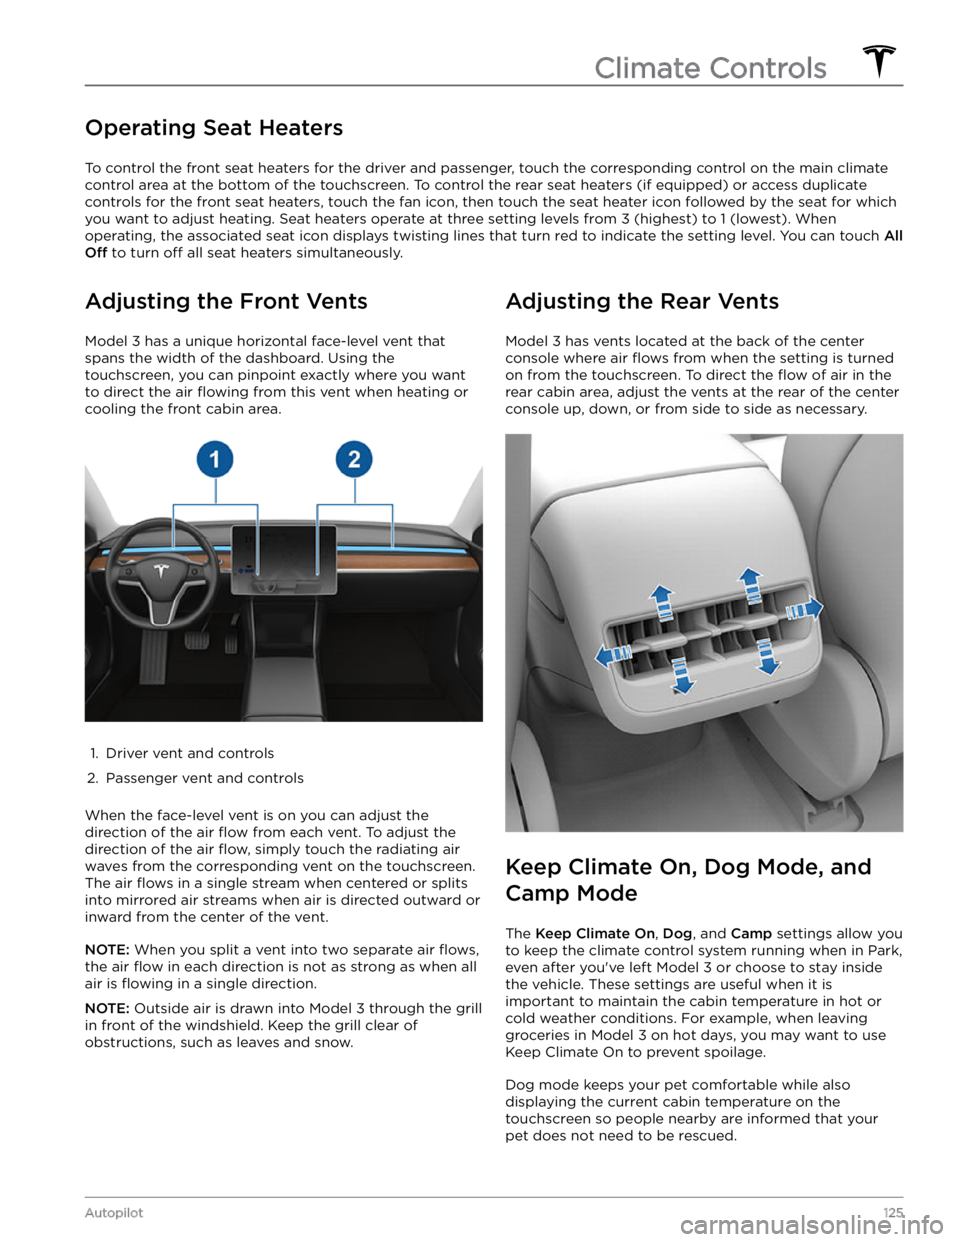
Adjusting the Front Vents
Model 3 has a unique horizontal face-level vent that
spans the width of the dashboard. Using the
touchscreen, you can pinpoint exactly where you want to direct the air
flowing from this vent when heating or
cooling the front cabin area.
1.
Driver vent and controls
2.
Passenger vent and controls
When the face-level vent is on you can adjust the direction of the air
flow from each vent. To adjust the
direction of the air
flow, simply touch the radiating air
waves from the corresponding vent on the touchscreen.
The air
flows in a single stream when centered or splits
into mirrored air streams when air is directed outward or inward from the center of the vent.
NOTE: When you split a vent into two separate air flows,
the air flow in each direction is not as strong as when all
air is
flowing in a single direction.
NOTE: Outside air is drawn into Model 3 through the grill
in front of the windshield. Keep the grill clear of
obstructions, such as leaves and snow.
Adjusting the Rear Vents
Model 3 has vents located at the back of the center
console where air
flows from when the setting is turned
on from the touchscreen. To direct the
flow of air in the
rear cabin area, adjust the vents at the rear of the center console up, down, or from side to side as necessary.
Keep Climate On, Dog Mode, and
Camp Mode
The Keep Climate On, Dog, and Camp settings allow you
to keep the climate control system running when in Park,
even after you
Page 130 of 248
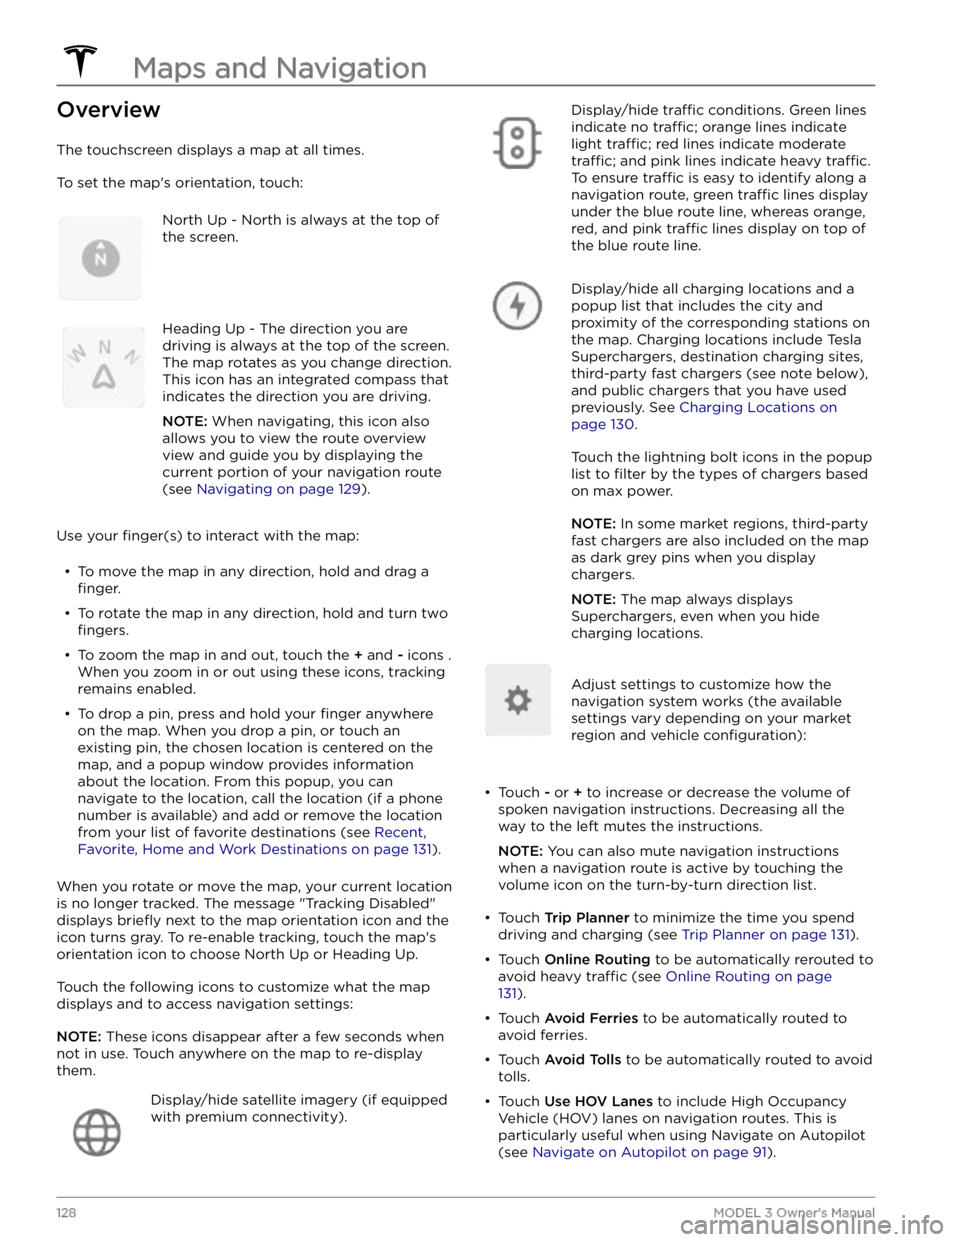
Overview
The touchscreen displays a map at all times.
To set the map
Page 133 of 248
The location is either a destination charging site, third-party fast charger, or any public charging station that you have
previously used. Touch to display more information such as usage restrictions and available charge current.
NOTE: When the map is zoomed out and more than one
destination charging site is available in an area, the pin is
round and displays the number of stations. Touch the pin to zoom in. Then you can touch an individual pins for details about a
specific charging location.
Predicting Energy Usage
When navigating to a destination, Model 3 helps you
anticipate your charging needs by calculating the
amount of energy that remains when you reach your
destination. The calculation is an estimate based on
driving style (predicted speed, etc.) and environmental factors (elevation changes, temperature, etc.). When
navigating, the map displays this calculation at the bottom of the expanded turn-by-turn direction list (see
Navigating on page 129). When the turn-by-turn
direction list is compressed, touch the top of the list to expand it.
Throughout your route, Model 3 monitors energy usage
and updates the calculation. A popup warning displays at the bottom of the turn-by-turn direction list in these situations:
Page 137 of 248

Your Bluetooth device begins playing the audio file that
is currently active on your device, and Media Player displays the Miniplayer view. If no audio
file is playing on
your device, use your device to choose the audio
file you
want to listen to. When the chosen
file begins to play,
you can then use Miniplayer
Page 139 of 248
NOTE: Unpairing the phone has no effect on using the
phone as a key. To forget an authenticated phone, see
Keys on page 6.
Connecting to a Paired Phone
Model 3 automatically connects to a phone that you
designated as
Priority Device on the Bluetooth settings
screen. If you have not set a phone as a priority,
Model 3
connects to the last phone to which is was connected, provided it is within operating range and has Bluetooth
turned on. If the last phone is not within range, it attempts to connect with the next phone that it has
been paired with.
To connect to a different phone, touch the Bluetooth
icon on the top of the touchscreen. The Bluetooth window displays a list of paired phones. Choose the phone you want to connect to, then touch
Connect. If
the phone you want to connect to is not listed, you must
pair the phone. See
Pairing a Bluetooth Phone on page
136.
When connected, the Model 3 touchscreen displays the
Bluetooth symbol next to the phone name to show that the connection is active.
Using the Phone App
When your phone is connected to Model 3 using
Bluetooth, and you have allowed access to your phone
Page 147 of 248

Auto Opening and Closing
To operate a HomeLink device without using the
touchscreen, you can automate the device to open as you approach, and close as you drive away:
1.
Touch the HomeLink icon at the top of the
touchscreen , then choose the device you want to
automate.
2.
Select the Auto-open when arriving checkbox if you
want the device to open as you approach.
3.
Touch the arrows to specify the distance you want
Model 3 to be from the device before it opens.
4.
Select the Auto-close when leaving checkbox if you
want the device to close as you drive away.
As you approach (or drive away from) a device that is set to operate automatically, the HomeLink status icon displays a count-down message to let you know when
the device automatically opens or closes. In situations where you don