torque TESLA MODEL 3 2022 Owner´s Manual
[x] Cancel search | Manufacturer: TESLA, Model Year: 2022, Model line: MODEL 3, Model: TESLA MODEL 3 2022Pages: 248, PDF Size: 7.76 MB
Page 116 of 248

WARNING: Obstacle-Aware Acceleration is
designed to reduce the severity of an impact. It is
not designed to avoid a collision.
WARNING: Obstacle-Aware Acceleration may not
limit torque in all situations. Several factors,
including environmental conditions, distance from
an obstacle, and a driver
Page 165 of 248

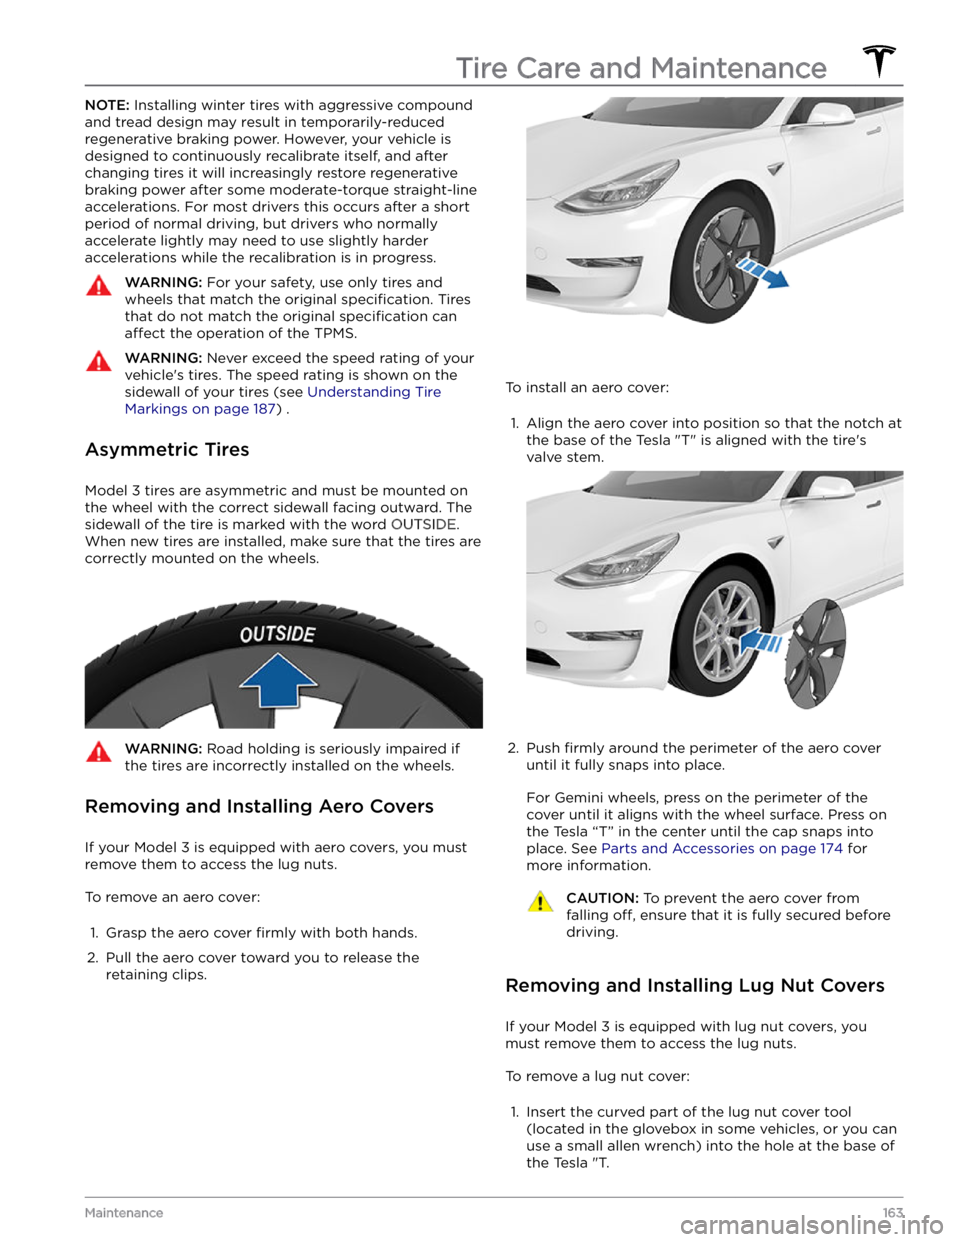
NOTE: Installing winter tires with aggressive compound
and tread design may result in temporarily-reduced regenerative braking power. However, your vehicle is
designed to continuously recalibrate itself, and after changing tires it will increasingly restore regenerative
braking power after some moderate-torque straight-line accelerations. For most drivers this occurs after a short period of normal driving, but drivers who normally
accelerate lightly may need to use slightly harder accelerations while the recalibration is in progress.WARNING: For your safety, use only tires and
wheels that match the original specification. Tires
that do not match the original specification can
affect the operation of the TPMS.
WARNING: Never exceed the speed rating of your
vehicle
Page 188 of 248

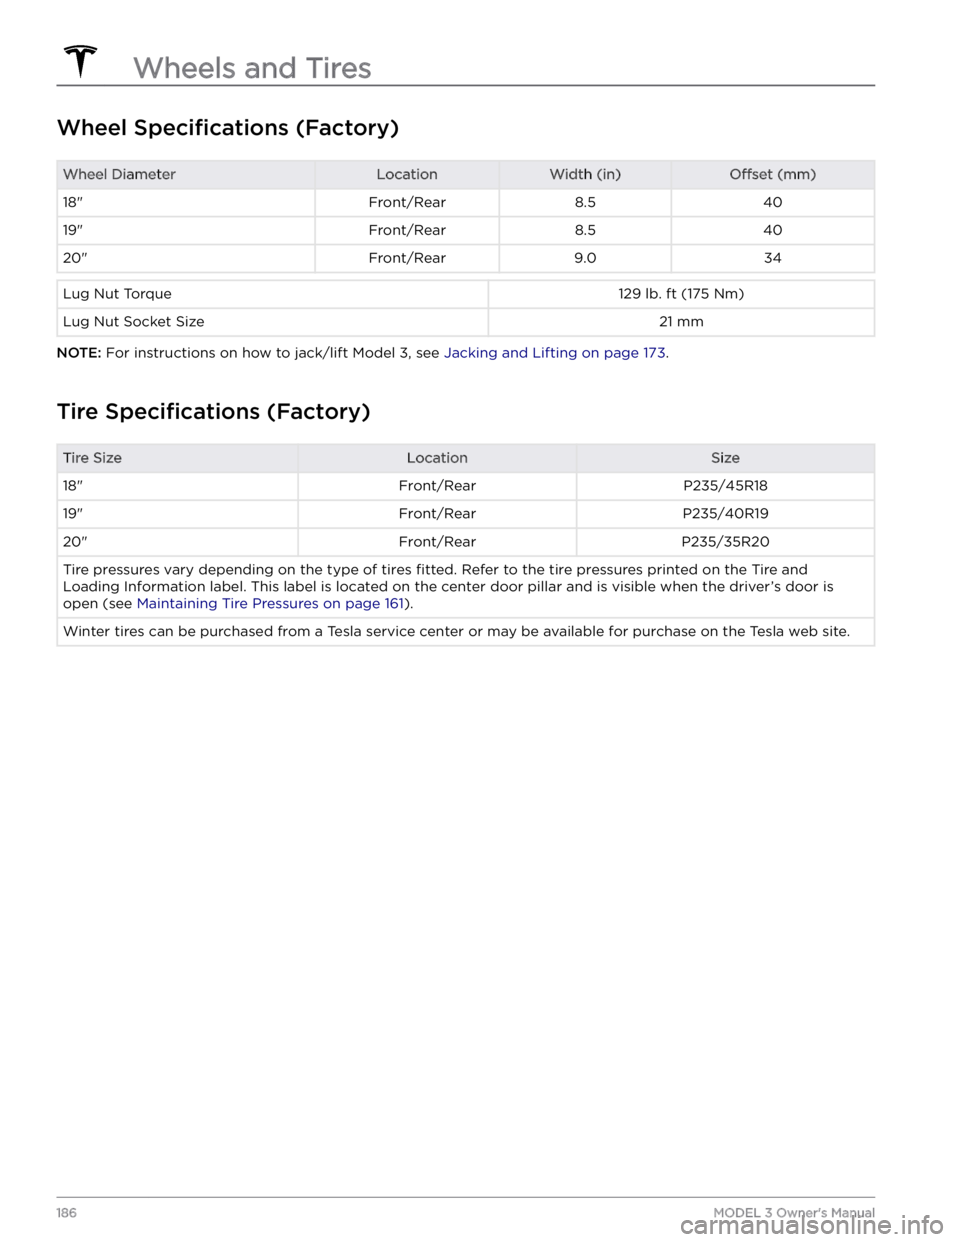
Wheel Specifications (Factory)
Wheel DiameterLocationWidth (in)Offset (mm)18"Front/Rear8.54019"Front/Rear8.54020"Front/Rear9.034Lug Nut Torque129 lb. ft (175 Nm)Lug Nut Socket Size21 mm
NOTE: For instructions on how to jack/lift Model 3, see Jacking and Lifting on page 173.
Tire Specifications (Factory)
Tire SizeLocationSize18"Front/RearP235/45R1819"Front/RearP235/40R1920"Front/RearP235/35R20Tire pressures vary depending on the type of tires fitted. Refer to the tire pressures printed on the Tire and
Loading Information label. This label is located on the center door pillar and is visible when the
driver
Page 211 of 248

(CC_a003)
Unable to charge - Wall Connector GFCI tripped
Disconnect and retry or use different equipment
What this alert means:
Ground fault. Current is leaking through an unsafe path. Possible Line to ground or Neutral to ground fault.
What to do:
Try again by disconnecting the Wall Connector from the vehicle and reconnecting. If the problem persists, turn OFF
the circuit breaker servicing the Wall Connector, wait 10 seconds, turn the circuit breaker ON again, then try
reconnecting the Wall Connector to the vehicle. If the problem persists, contact Tesla.
(CC_a004)
Unable to charge - Wall Connector issue
Wall Connector needs service
What this alert means:
Wall Connector hardware issue. Possible issues include:
1.
Contactor not working
2.
Self-test of internal ground fault monitoring circuit failed
3.
Thermal sensor disconnected
4.
Other hardware component issues
What to do:
An internal issue was detected by the Wall Connector.
1.
Try charging again by disconnecting the Wall Connector from the vehicle and reconnecting.
2.
If the issue persists, turn OFF the circuit breaker for the Wall Connector, wait 10 seconds, and turn the circuit
breaker ON again. Then try reconnecting the Wall Connector to the vehicle.
3.
If the issue persists, check for loose connections.
a.
Make sure there is no power to the Wall Connector.
b.
Remove the face plate and inspect the wiring terminals for any loose connections.
c.
Contact an electrician if necessary to make sure all wires are properly connected and torqued according to the
instructions in the Wall Connector Installation Manual.
4.
Once all connections have been checked and made secure, restore power to the Wall Connector and try charging
again by reconnecting to the vehicle.
5.
If the issue persists, the Wall Connector needs service. Schedule a service appointment through your Mobile App.
(CC_a005)
Unable to charge - Wall Connector GFCI tripped
Disconnect and retry or use different equipment
What this alert means:
Ground fault. Current is leaking through an unsafe path. Possible Line to ground or Neutral to ground fault.
What to do:
Troubleshooting Alerts
209Consumer Information
Page 213 of 248

(CC_a010)
Unable to charge - Wall Connector issue
Wall Connector needs service
What this alert means:
Wall Connector hardware issue. Possible issues include:
1.
Contactor not working
2.
Self-test of internal ground fault monitoring circuit failed
3.
Thermal sensor disconnected
4.
Other hardware component issues
What to do:
An internal issue was detected by the Wall Connector.
1.
Try charging again by disconnecting the Wall Connector from the vehicle and reconnecting.
2.
If the issue persists, turn OFF the circuit breaker for the Wall Connector, wait 10 seconds, and turn the circuit
breaker ON again. Then try reconnecting the Wall Connector to the vehicle.
3.
If the issue persists, check for loose connections.
a.
Make sure there is no power to the Wall Connector.
b.
Remove the face plate and inspect the wiring terminals for any loose connections.
c.
Contact an electrician if necessary to make sure all wires are properly connected and torqued according to the
instructions in the Wall Connector Installation Manual.
4.
Once all connections have been checked and made secure, restore power to the Wall Connector and try charging
again by reconnecting to the vehicle.
5.
If the issue persists, the Wall Connector needs service. Schedule a service appointment through your Mobile App.
(CC_a011)
Unable to charge - Wall Connector too hot
Let Wall Connector cool and try again
What this alert means:
Over temperature protection (latchoff).
What to do:
Make sure the Wall Connector is not covered by anything and that there is no heat source nearby. If the problem
persists in normal ambient temperatures (under 100
Page 216 of 248

(CC_a019)
Unable to charge - Vehicle connection issue
Insert charge handle fully into charge port
What this alert means:
A communication error occurred between the Wall Connector and the vehicle.
What to do:
Try again by disconnecting the Wall Connector from the vehicle and reconnecting. If possible, plug the vehicle into
another Wall Connector or a Mobile Connector to determine if the vehicle is able to communicate with other
charging equipment. If the problem persists, contact Tesla.
(CC_a020)
Unable to charge - Wall Connector issue
Wall Connector needs service
What this alert means:
Wall Connector hardware issue. Possible issues include:
1.
Contactor not working
2.
Self-test of internal ground fault monitoring circuit failed
3.
Thermal sensor disconnected
4.
Other hardware component issues
What to do:
An internal issue was detected by the Wall Connector.
1.
Try charging again by disconnecting the Wall Connector from the vehicle and reconnecting.
2.
If the issue persists, turn OFF the circuit breaker for the Wall Connector, wait 10 seconds, and turn the circuit
breaker ON again. Then try reconnecting the Wall Connector to the vehicle.
3.
If the issue persists, check for loose connections.
a.
Make sure there is no power to the Wall Connector.
b.
Remove the face plate and inspect the wiring terminals for any loose connections.
c.
Contact an electrician if necessary to make sure all wires are properly connected and torqued according to the
instructions in the Wall Connector Installation Manual.
4.
Once all connections have been checked and made secure, restore power to the Wall Connector and try charging
again by reconnecting to the vehicle.
5.
If the issue persists, the Wall Connector needs service. Schedule a service appointment through your Mobile App.
(CC_a021)
Unable to charge - No primary Wall Connector
Check that primary unit is powered and available
What this alert means:
Circuit Breaker Sharing Network: Need one (and only one) Wall Connector set to Master.
What to do:
Troubleshooting Alerts
214MODEL 3 Owner
Page 218 of 248

3. Thermal sensor disconnected4.
Other hardware component issues
What to do:
An internal issue was detected by the Wall Connector.
1.
Try charging again by disconnecting the Wall Connector from the vehicle and reconnecting.
2.
If the issue persists, turn OFF the circuit breaker for the Wall Connector, wait 10 seconds, and turn the circuit
breaker ON again. Then try reconnecting the Wall Connector to the vehicle.
3.
If the issue persists, check for loose connections.
a.
Make sure there is no power to the Wall Connector.
b.
Remove the face plate and inspect the wiring terminals for any loose connections.
c.
Contact an electrician if necessary to make sure all wires are properly connected and torqued according to the
instructions in the Wall Connector Installation Manual.
4.
Once all connections have been checked and made secure, restore power to the Wall Connector and try charging
again by reconnecting to the vehicle.
5.
If the issue persists, the Wall Connector needs service. Schedule a service appointment through your Mobile App.
(CC_a026)
Unable to charge - Wall Connector issue
Wall Connector needs service
What this alert means:
Wall Connector hardware issue. Possible issues include:
1.
Contactor not working
2.
Self-test of internal ground fault monitoring circuit failed
3.
Thermal sensor disconnected
4.
Other hardware component issues
What to do:
An internal issue was detected by the Wall Connector.
1.
Try charging again by disconnecting the Wall Connector from the vehicle and reconnecting.
2.
If the issue persists, turn OFF the circuit breaker for the Wall Connector, wait 10 seconds, and turn the circuit
breaker ON again. Then try reconnecting the Wall Connector to the vehicle.
3.
If the issue persists, check for loose connections.
a.
Make sure there is no power to the Wall Connector.
b.
Remove the face plate and inspect the wiring terminals for any loose connections.
c.
Contact an electrician if necessary to make sure all wires are properly connected and torqued according to the
instructions in the Wall Connector Installation Manual.
4.
Once all connections have been checked and made secure, restore power to the Wall Connector and try charging
again by reconnecting to the vehicle.
5.
If the issue persists, the Wall Connector needs service. Schedule a service appointment through your Mobile App.
Troubleshooting Alerts
216MODEL 3 Owner
Page 219 of 248

(CC_a027)
Unable to charge - Wall Connector issue
Wall Connector needs service
What this alert means:
Wall Connector hardware issue. Possible issues include:
1.
Contactor not working
2.
Self-test of internal ground fault monitoring circuit failed
3.
Thermal sensor disconnected
4.
Other hardware component issues
What to do:
An internal issue was detected by the Wall Connector.
1.
Try charging again by disconnecting the Wall Connector from the vehicle and reconnecting.
2.
If the issue persists, turn OFF the circuit breaker for the Wall Connector, wait 10 seconds, and turn the circuit
breaker ON again. Then try reconnecting the Wall Connector to the vehicle.
3.
If the issue persists, check for loose connections.
a.
Make sure there is no power to the Wall Connector.
b.
Remove the face plate and inspect the wiring terminals for any loose connections.
c.
Contact an electrician if necessary to make sure all wires are properly connected and torqued according to the instructions in the Wall Connector Installation Manual.
4.
Once all connections have been checked and made secure, restore power to the Wall Connector and try charging
again by reconnecting to the vehicle.
5.
If the issue persists, the Wall Connector needs service. Schedule a service appointment through your Mobile App.
(CC_a028)
Unable to charge - Incorrect switch setting
Wall Connector rotary switch must be adjusted
What this alert means:
Incorrect rotary switch setting.
What to do:
Make sure there is no power to the Wall Connector. Remove the face plate and adjust the rotary switch to a valid
operating current setting. The correlation between switch setting and current is printed on the inside of the Wall
Connector. You can also refer to the Set the Operating Current section in the Wall Connector Installation Manual. If
the Wall Connector is set up for load sharing (paired with other Wall Connectors), the rotary switch of the master
unit must be set to an operating current setting that allows each paired Wall Connector to receive at least 6A of
charge current. Example: Three Wall Connectors are paired for load sharing. The master unit needs to be set to a
current of at least 3 * 6A = 18A or greater.
(CC_a029)
Unable to charge - Vehicle connection issue
Insert charge handle fully into charge port
What this alert means:
A communication error occurred between the Wall Connector and the vehicle.
Troubleshooting Alerts
217Consumer Information
Page 220 of 248

What to do:
Try again by disconnecting the Wall Connector from the vehicle and reconnecting. If possible, plug the vehicle into
another Wall Connector or a Mobile Connector to determine if the vehicle is able to communicate with other
charging equipment. If the problem persists, contact Tesla.
(CC_a030)
Unable to charge - Primary / paired unit mismatch
Wall Connector current ratings must match
What this alert means:
Circuit Breaker Sharing Network: The paired Wall Connectors have different maximum current capabilities.
What to do:
Only Wall Connectors with the same maximum current capabilities can be paired in a load-sharing (circuit breaker
sharing) network. Inspect the type labels on the Wall Connectors to make sure the current capabilities match. It is
further recommended to only pair Wall Connectors with the same part number, as an easy way to make sure paired
units are compatible.
(CC_a041)
Charge rate reduced - Wall connection hot
Outlet or Wall Connector wiring must be checked
High temperature detected by Wall Connector alerts indicate the building connection to the Wall Connector is
getting too warm, so charging has been slowed to protect the wiring and Wall Connector.
This is not typically an issue with your vehicle or your Wall Connector, but rather an issue with the building wiring.
This may be caused by a loose building wiring connection to the Wall Connector and can be
fixed quickly by an
electrician.
To regain normal charge speed, contact an electrician to inspect the building wiring connection to the Wall
Connector. They should make sure that all wires are properly connected and torqued according to the installation
guide for the Wall Connector.
Wall Connector installation guides can be found here.
(CP_a004)
Charging equipment not recognized
Try again or try different equipment
The charge port is unable to detect whether a charge cable is inserted or the type of charge cable connected.
If this alert appears while a charge cable is connected, it should be determined whether the issue is caused by the
charging equipment or the vehicle. Try charging the vehicle using
different external charging equipment (charge
cable, charging station, charging stall, etc.).
Page 246 of 248

tires: 189
Teslacam: 70
tie-down straps: 195
tilt/intrusion detection: 140
Tire and Loading Information label: 180
tire noise: 166
Tire Pressure Monitoring System: 164
overview of: 164
tire pressures, checking: 161
tires: 161, 162, 165, 166, 186, 187, 189
all-season: 165
balancing: 162
chains: 166
inspecting and maintaining: 161
pressures, how to check: 161
quality grading: 189
replacing: 162
replacing a tire sensor: 165
rotation: 162
specification: 186
summer: 165
temperature grades: 189
tire markings: 187
traction grade: 189
treadwear grade: 189
wheel configuration: 161
winter: 165
toll system transponders, attaching: 174
torque specifications: 184
touch up body: 169
touchscreen: 4, 45, 148, 168
cleaning: 168
overview: 4
restarting: 45
software updates: 148
towing a trailer: 181
towing instructions: 194
Toybox: 197
TPMS: 164
overview of: 164
Track Mode: 65
Tracking Disabled: 128
traction control: 61
trademarks: 199
Traffic Light and Stop Sign Control: 94
Traffic-Aware Cruise Control: 81
trailer hitches: 181
transmission specifications: 184
transponders, attaching: 174
Transport Canada, contacting: 203
Transport Mode: 194
transporting: 194
trip chart: 68
Trip Planner: 131
trunk, adjust opening height: 14
trunk, front: 16
trunk, rear: 14
turn signals: 53
U
ultrasonic sensors: 78
uniform tire quality grading: 189
Unlock On Park: 12
unlocking: 11
USB devices: 19, 134
connecting: 19
playing audio files from: 134
USB flash drive: 140
USB ports: 19
V
Valet mode: 43
vehicle certification label: 180
Vehicle Hold: 64
Vehicle Identification Number (VIN): 179
vehicle loading: 180
ventilation: 125
videos and recording: 70, 142
videos and recording (Track Mode): 65
VIN (Vehicle Identification Number): 179
volume control: 4
volume control (media): 133
W
Walk-Away Door Lock: 12
Wall Connector: 152
warning flashers: 53
washer fluid, topping up: 171
washer jets, cleaning: 170
washers, using: 57
weight specifications: 184
wheel chocks: 195
wheels: 162, 163, 186
aero covers, removing and installing: 163
alignment: 162
lug nut covers, removing and installing: 163
replacing: 162
specifications: 186
torque: 186
Wi-Fi, connecting to: 147
Index