power off TESLA MODEL 3 2023 User Guide
[x] Cancel search | Manufacturer: TESLA, Model Year: 2023, Model line: MODEL 3, Model: TESLA MODEL 3 2023Pages: 296, PDF Size: 9.84 MB
Page 201 of 296

3.
In the front trunk, remove the cabin intake duct and
set it aside.
4.
Power off the vehicle by navigating to Controls >
Safety > Power Off on the touchscreen.
5.
In the front trunk, disconnect the first responder loop
by sliding the red locking tab toward you, pressing
the black tab, and releasing it. Set the
first responder
loop aside.
6.
With a 10mm socket, loosen the nut that secures the
negative (-) terminal clamp to the negative (-) post on the low voltage lead-acid battery. Release the terminal clamp from the negative (-) post.
7.
With a 10mm socket, release the terminal cover and
loosen the nut that secures the positive (+) terminal
clamp to the positive (+) post on the low voltage
lead-acid battery. Release the terminal clamp from the positive (+) post and cover the terminal clamp with a dry rag.
CAUTION: Do not allow the positive (+)
terminal clamp to contact nearby components
like the low voltage lead-acid battery hold
down bracket or A/C cooling lines.
8.
Unplug the vent tube hose from the negative (-)
terminal side of the low voltage battery.
Parts and Accessories
199Maintenance
Page 223 of 296
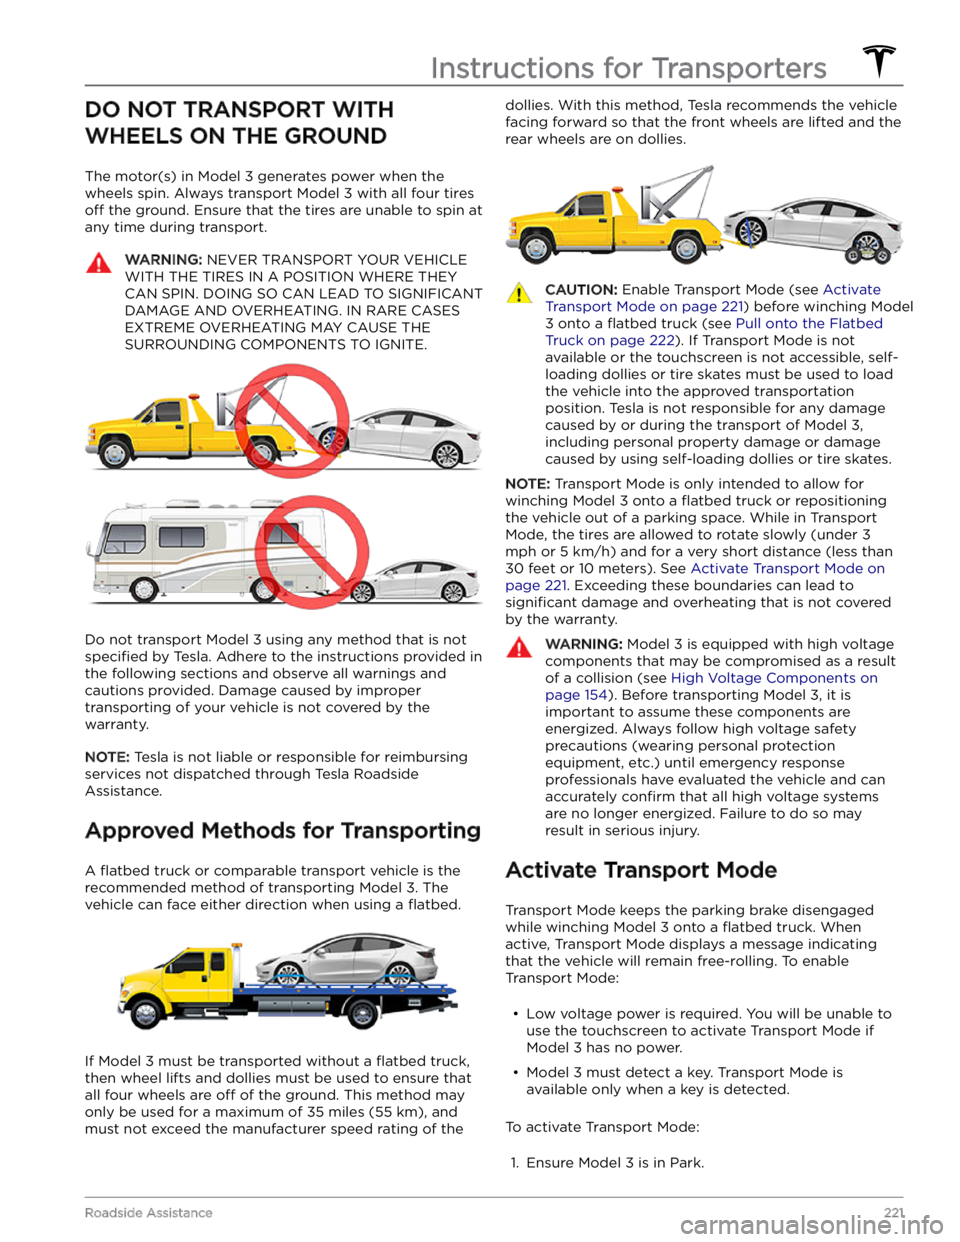
DO NOT TRANSPORT WITH
WHEELS ON THE GROUND
The motor(s) in Model 3 generates power when the
wheels spin. Always transport
Model 3 with all four tires
off the ground. Ensure that the tires are unable to spin at
any time during transport.
WARNING: NEVER TRANSPORT YOUR VEHICLE
WITH THE TIRES IN A POSITION WHERE THEY
CAN SPIN. DOING SO CAN LEAD TO SIGNIFICANT
DAMAGE AND OVERHEATING. IN RARE CASES
EXTREME OVERHEATING MAY CAUSE THE
SURROUNDING COMPONENTS TO IGNITE.
Do not transport Model 3 using any method that is not
specified by Tesla. Adhere to the instructions provided in
the following sections and observe all warnings and
cautions provided. Damage caused by improper
transporting of your vehicle is not covered by the
warranty.
NOTE: Tesla is not liable or responsible for reimbursing
services not dispatched through Tesla Roadside Assistance.
Approved Methods for Transporting
A flatbed truck or comparable transport vehicle is the
recommended method of transporting
Model 3. The
vehicle can face either direction when using a
flatbed.
If Model 3 must be transported without a flatbed truck,
then wheel lifts and dollies must be used to ensure that
all four wheels are
off of the ground. This method may
only be used for a maximum of
35 miles (55 km), and
must not exceed the manufacturer speed rating of the
dollies. With this method, Tesla recommends the vehicle
facing forward so that the front wheels are lifted and the rear wheels are on dollies.CAUTION: Enable Transport Mode (see Activate
Transport Mode on page 221) before winching Model
3 onto a flatbed truck (see Pull onto the Flatbed
Truck on page 222). If Transport Mode is not
available or the touchscreen is not accessible, self-
loading dollies or tire skates must be used to load
the vehicle into the approved transportation
position. Tesla is not responsible for any damage
caused by or during the transport of Model 3,
including personal property damage or damage
caused by using self-loading dollies or tire skates.
NOTE: Transport Mode is only intended to allow for
winching
Model 3 onto a flatbed truck or repositioning
the vehicle out of a parking space. While in Transport Mode, the tires are allowed to rotate slowly (under
3
mph or 5 km/h) and for a very short distance (less than
30 feet or 10 meters). See Activate Transport Mode on
page 221. Exceeding these boundaries can lead to
significant damage and overheating that is not covered
by the warranty.
WARNING: Model 3 is equipped with high voltage
components that may be compromised as a result
of a collision (see High Voltage Components on
page 154). Before transporting Model 3, it is
important to assume these components are
energized. Always follow high voltage safety
precautions (wearing personal protection
equipment, etc.) until emergency response
professionals have evaluated the vehicle and can
accurately confirm that all high voltage systems
are no longer energized. Failure to do so may
result in serious injury.
Activate Transport Mode
Transport Mode keeps the parking brake disengaged
while winching
Model 3 onto a flatbed truck. When
active, Transport Mode displays a message indicating that the vehicle will remain free-rolling. To enable
Transport Mode:
Page 235 of 296

CC_a003
Unable to charge - Wall Connector GFCI tripped
Disconnect and retry or use different equipment
What this alert means:
Ground fault. Current is leaking through an unsafe path. Possible Line to ground or Neutral to ground fault.
What to do:
Try charging again by disconnecting the Wall Connector from the vehicle and reconnecting. If the issue persists, turn
OFF the circuit breaker servicing the Wall Connector, wait 10 seconds, turn the circuit breaker ON again, then try reconnecting the Wall Connector to the vehicle. If the issue persists, consult your electrician or contact Tesla.
For more information, see the installation guide for your Wall Connector.
CC_a004
Unable to charge - Wall Connector issue
Wall Connector needs service
What this alert means:
Wall Connector hardware issue. Possible issues include:
1.
Contactor not working
2.
Self-test of internal ground fault monitoring circuit failed
3.
Thermal sensor disconnected
4.
Other hardware component issues
What to do:
An internal issue was detected by the Wall Connector.
1.
Try charging again by disconnecting the Wall Connector from the vehicle and reconnecting.
2.
If the issue persists, turn OFF the circuit breaker for the Wall Connector, wait 10 seconds, and turn the circuit
breaker ON again. Then try reconnecting the Wall Connector to the vehicle.
3.
If the issue persists, have an electrician make sure all wires are properly connected and torqued according to the
instructions in the Wall Connector Installation Manual.
4.
Once your electrician has completed all work and restored power to the Wall Connector, try charging again by reconnecting the Wall Connector to the vehicle.
5.
If the issue persists, the Wall Connector requires service.
For more information, see the installation guide for your Wall Connector.
CC_a005
Unable to charge - Wall Connector GFCI tripped
Disconnect and retry or use different equipment
What this alert means:
Ground fault. Current is leaking through an unsafe path. Possible Line to ground or Neutral to ground fault.
What to do:
Troubleshooting Alerts
233Troubleshooting
Page 237 of 296

The wiring between the wall power and the Wall Connector has been incorrectly installed. Consult your electrician.
For more information, see the installation guide for your Wall Connector.
CC_a010
Unable to charge - Wall Connector issue
Wall Connector needs service
What this alert means:
Wall Connector hardware issue. Possible issues include:
1.
Contactor not working
2.
Self-test of internal ground fault monitoring circuit failed
3.
Thermal sensor disconnected
4.
Other hardware component issues
What to do:
An internal issue was detected by the Wall Connector.
1.
Try charging again by disconnecting the Wall Connector from the vehicle and reconnecting.
2.
If the issue persists, turn OFF the circuit breaker for the Wall Connector, wait 10 seconds, and turn the circuit
breaker ON again. Then try reconnecting the Wall Connector to the vehicle.
3.
If the issue persists, have an electrician make sure all wires are properly connected and torqued according to the
instructions in the Wall Connector Installation Manual.
4.
Once your electrician has completed all work and restored power to the Wall Connector, try charging again by reconnecting the Wall Connector to the vehicle.
5.
If the issue persists, the Wall Connector requires service.
For more information, see the installation guide for your Wall Connector.
CC_a011
Unable to charge - Wall Connector too hot
Let Wall Connector cool and try again
What this alert means:
Over temperature protection (latchoff).
What to do:
Make sure the Wall Connector is not covered by anything and that there is no heat source nearby. If the problem
persists in normal ambient temperatures
(under 100
Page 239 of 296

4. Once your electrician has completed all work and restored power to the Wall Connector, try charging again by
reconnecting the Wall Connector to the vehicle.5.
If the issue persists, the Wall Connector requires service.
For more information, see the installation guide for your Wall Connector.
CC_a015
Unable to charge - Vehicle connection issue
Insert charge handle fully into charge port
What this alert means:
A communication error occurred between the Wall Connector and the vehicle.
What to do:
Try charging again by disconnecting the Wall Connector from the vehicle and reconnecting.
1.
If the issue persists, turn OFF the circuit breaker servicing the Wall Connector, wait 10 seconds, turn the circuit breaker ON again, then try reconnecting the Wall Connector to the vehicle.
2.
If the issue persists and other charging equipment is available, plug the vehicle into another Wall Connector or a
Mobile Connector to determine if the vehicle is able to communicate with other charging equipment.
3.
If the issue persists, service is required.
For more information, see the installation guide for your Wall Connector.
CC_a016
Unable to charge - Vehicle connection issue
Insert charge handle fully into charge port
What this alert means:
A communication error occurred between the Wall Connector and the vehicle.
What to do:
Try charging again by disconnecting the Wall Connector from the vehicle and reconnecting.
1.
If the issue persists, turn OFF the circuit breaker servicing the Wall Connector, wait 10 seconds, turn the circuit
breaker ON again, then try reconnecting the Wall Connector to the vehicle.
2.
If the issue persists and other charging equipment is available, plug the vehicle into another Wall Connector or a
Mobile Connector to determine if the vehicle is able to communicate with other charging equipment.
3.
If the issue persists, service is required.
For more information, see the installation guide for your Wall Connector.
CC_a017
Unable to charge - Vehicle connection issue
Insert charge handle fully into charge port
What this alert means:
A communication error occurred between the Wall Connector and the vehicle.
What to do:
Troubleshooting Alerts
237Troubleshooting
Page 241 of 296

Wall Connector hardware issue. Possible issues include:1.
Contactor not working
2.
Self-test of internal ground fault monitoring circuit failed
3.
Thermal sensor disconnected
4.
Other hardware component issues
What to do:
An internal issue was detected by the Wall Connector.
1.
Try charging again by disconnecting the Wall Connector from the vehicle and reconnecting.
2.
If the issue persists, turn OFF the circuit breaker for the Wall Connector, wait 10 seconds, and turn the circuit
breaker ON again. Then try reconnecting the Wall Connector to the vehicle.
3.
If the issue persists, have an electrician make sure all wires are properly connected and torqued according to the
instructions in the Wall Connector Installation Manual.
4.
Once your electrician has completed all work and restored power to the Wall Connector, try charging again by
reconnecting the Wall Connector to the vehicle.
5.
If the issue persists, the Wall Connector requires service.
For more information, see the installation guide for your Wall Connector.
CC_a021
Unable to charge - No primary Wall Connector
Check that primary unit is powered and available
What this alert means:
Load sharing (circuit breaker sharing) network: Need one (and only one) Wall Connector set as primary.
What to do:
Only one Wall Connector can be set to a primary configuration. Have your electrician confirm:
1.
Only one of the Wall Connectors is set as primary.
2.
All other Wall Connectors linked to the primary unit are set to paired position (position F).
For more information, see the installation guide for your Wall Connector.
CC_a022
Unable to charge - More than 1 primary unit
Ensure only 1 Wall Connector is set as primary
What this alert means:
Load sharing (circuit breaker sharing) network: Need one (and only one) Wall Connector set as primary.
What to do:
Only one Wall Connector can be set to a primary configuration. Have your electrician confirm:
1.
Only one of the Wall Connectors is set as primary.
2.
All other Wall Connectors linked to the primary unit are set to paired position (position F).
For more information, see the installation guide for your Wall Connector.
Troubleshooting Alerts
239Troubleshooting
Page 243 of 296

2. If the issue persists, turn OFF the circuit breaker for the Wall Connector, wait 10 seconds, and turn the circuit
breaker ON again. Then try reconnecting the Wall Connector to the vehicle.3.
If the issue persists, have an electrician make sure all wires are properly connected and torqued according to the
instructions in the Wall Connector Installation Manual.
4.
Once your electrician has completed all work and restored power to the Wall Connector, try charging again by reconnecting the Wall Connector to the vehicle.
5.
If the issue persists, the Wall Connector requires service.
For more information, see the installation guide for your Wall Connector.
CC_a026
Unable to charge - Wall Connector issue
Wall Connector needs service
What this alert means:
Wall Connector hardware issue. Possible issues include:
1.
Contactor not working
2.
Self-test of internal ground fault monitoring circuit failed
3.
Thermal sensor disconnected
4.
Other hardware component issues
What to do:
An internal issue was detected by the Wall Connector.
1.
Try charging again by disconnecting the Wall Connector from the vehicle and reconnecting.
2.
If the issue persists, turn OFF the circuit breaker for the Wall Connector, wait 10 seconds, and turn the circuit
breaker ON again. Then try reconnecting the Wall Connector to the vehicle.
3.
If the issue persists, have an electrician make sure all wires are properly connected and torqued according to the
instructions in the Wall Connector Installation Manual.
4.
Once your electrician has completed all work and restored power to the Wall Connector, try charging again by reconnecting the Wall Connector to the vehicle.
5.
If the issue persists, the Wall Connector requires service.
For more information, see the installation guide for your Wall Connector.
CC_a027
Unable to charge - Wall Connector issue
Wall Connector needs service
What this alert means:
Wall Connector hardware issue. Possible issues include:
1.
Contactor not working
2.
Self-test of internal ground fault monitoring circuit failed
3.
Thermal sensor disconnected
4.
Other hardware component issues
What to do:
Troubleshooting Alerts
241Troubleshooting
Page 244 of 296

An internal issue was detected by the Wall Connector.1.
Try charging again by disconnecting the Wall Connector from the vehicle and reconnecting.
2.
If the issue persists, turn OFF the circuit breaker for the Wall Connector, wait 10 seconds, and turn the circuit
breaker ON again. Then try reconnecting the Wall Connector to the vehicle.
3.
If the issue persists, have an electrician make sure all wires are properly connected and torqued according to the
instructions in the Wall Connector Installation Manual.
4.
Once your electrician has completed all work and restored power to the Wall Connector, try charging again by
reconnecting the Wall Connector to the vehicle.
5.
If the issue persists, the Wall Connector requires service.
For more information, see the installation guide for your Wall Connector.
CC_a028
Unable to charge - Incorrect switch setting
Wall Connector rotary switch must be adjusted
What this alert means:
Incorrect rotary switch setting.
What to do:
Have your electrician adjust the Wall Connector
Page 262 of 296

This can sometimes be caused by a hardware issue specific to the external charging equipment, which prevents the
charging equipment from switching power to the vehicle on or
off when requested. It could also occur due to
another condition
affecting the external charging equipment, the power source it is connected to, or your vehicle
itself.
What to do:
This alert is usually specific to external charging equipment and power sources and does not typically indicate an
issue with your vehicle that can be resolved by scheduling service.
Try charging with multiple, different types of charging equipment.
You can also try charging your vehicle using a Tesla Supercharger or Destination Charging location, all of which can
be located through the map on your vehicle
Page 275 of 296

The electrical system cannot maintain the voltage required to support all vehicle features.
If this alert is present while you are driving, it is possible your vehicle will shut down unexpectedly.
If this alert is present when your vehicle is in Park or when it first wakes, it is possible your vehicle may not have
adequate electrical power to start driving. A separate vehicle alert may be present to indicate that condition.
What to do:
It is recommended that you eliminate or reduce your use of any non-essential features. This can help your vehicle
maintain adequate electrical power for essential functions.
If this alert remains active, schedule service immediately. Without service, your vehicle may shut down unexpectedly
or may not restart.
VCFRONT_a182
Schedule service to replace low voltage battery
Software will not update until battery is replaced
What this alert means:
The low voltage battery is showing degraded performance and needs to be replaced. Until the low voltage battery is
replaced, vehicle software updates will not complete.
What to do:
It is recommended that you have the low voltage battery replaced at your earliest convenient opportunity.
You can schedule service via your Tesla Mobile App, or with an independent service provider that offers low voltage
battery replacement for your vehicle. Please note that independent service provider options may vary, based on your
vehicle configuration and your location.
If the low voltage battery does not have enough electrical power to turn on your vehicle or open the doors, follow the instructions in
Jump Starting on page 225.
For more information on the battery system, see High Voltage Battery Information on page 156.
VCFRONT_a191
Electrical system power reduced
Vehicle shutting down
What this alert means:
The low voltage battery cannot provide the electrical support necessary to drive or continue driving. Your vehicle is shutting down to preserve energy for essential functions other than driving.
Your vehicle cannot be driven or continue driving while this condition continues.
What to do:
If this alert is present while you are driving, your vehicle needs to come to a stop immediately. It is recommended
that you: