glove box TESLA MODEL 3 2023 Owners Manual
[x] Cancel search | Manufacturer: TESLA, Model Year: 2023, Model line: MODEL 3, Model: TESLA MODEL 3 2023Pages: 296, PDF Size: 9.84 MB
Page 6 of 296

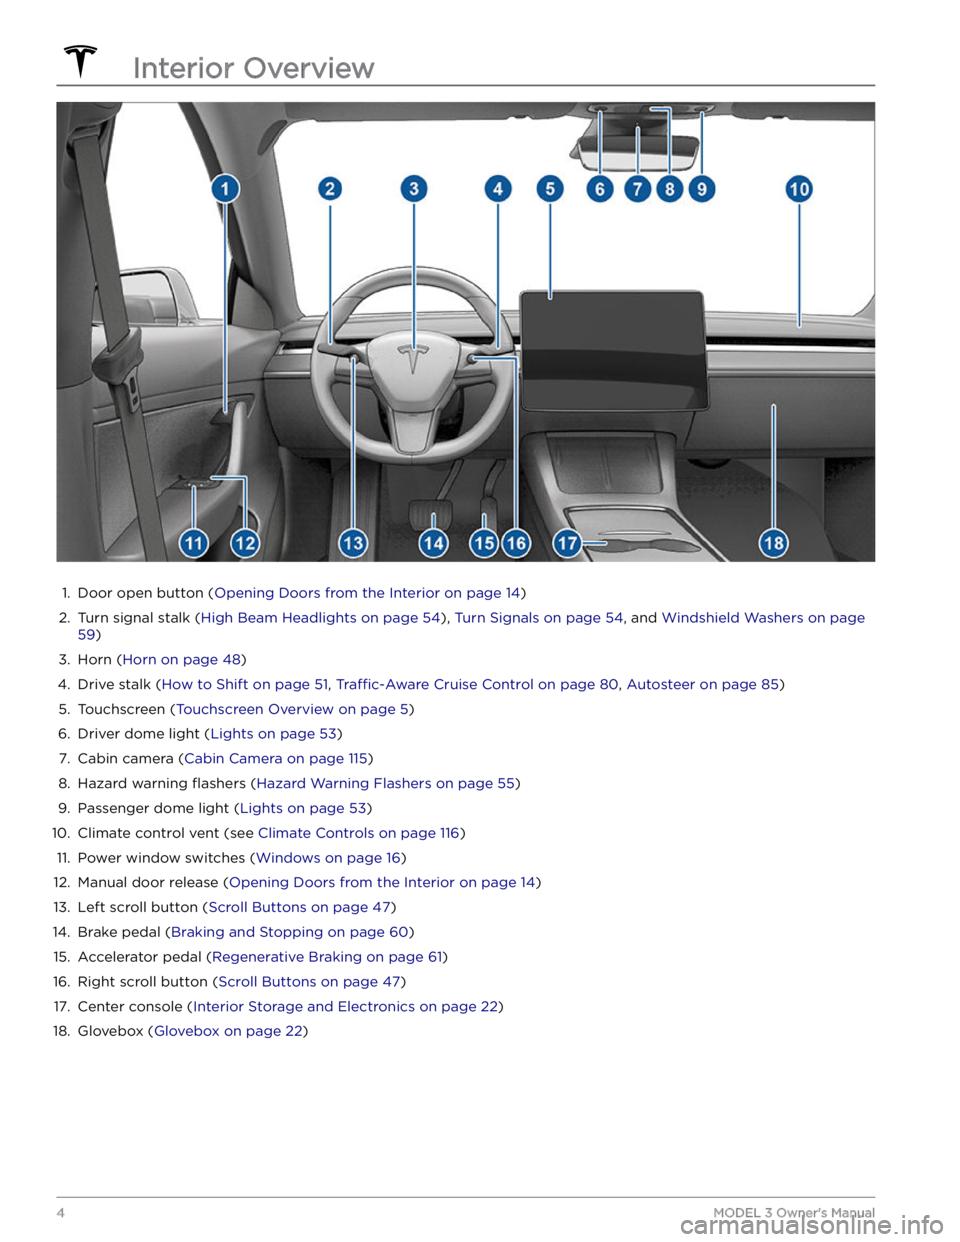
1.
Door open button (Opening Doors from the Interior on page 14)
2.
Turn signal stalk (High Beam Headlights on page 54), Turn Signals on page 54, and Windshield Washers on page
59)
3.
Horn (Horn on page 48)
4.
Drive stalk (How to Shift on page 51, Traffic-Aware Cruise Control on page 80, Autosteer on page 85)
5.
Touchscreen (Touchscreen Overview on page 5)
6.
Driver dome light (Lights on page 53)
7.
Cabin camera (Cabin Camera on page 115)
8.
Hazard warning flashers (Hazard Warning Flashers on page 55)
9.
Passenger dome light (Lights on page 53)
10.
Climate control vent (see Climate Controls on page 116)
11.
Power window switches (Windows on page 16)
12.
Manual door release (Opening Doors from the Interior on page 14)
13.
Left scroll button (Scroll Buttons on page 47)
14.
Brake pedal (Braking and Stopping on page 60)
15.
Accelerator pedal (Regenerative Braking on page 61)
16.
Right scroll button (Scroll Buttons on page 47)
17.
Center console (Interior Storage and Electronics on page 22)
18.
Glovebox (Glovebox on page 22)
Interior Overview
4MODEL 3 Owner
Page 24 of 296

Center Console
In addition to housing an RFID transmitter that reads key fobs and key cards (see
Key Card on page 10), the
center console includes cup holders, two storage
compartments, and
a wireless phone charger.
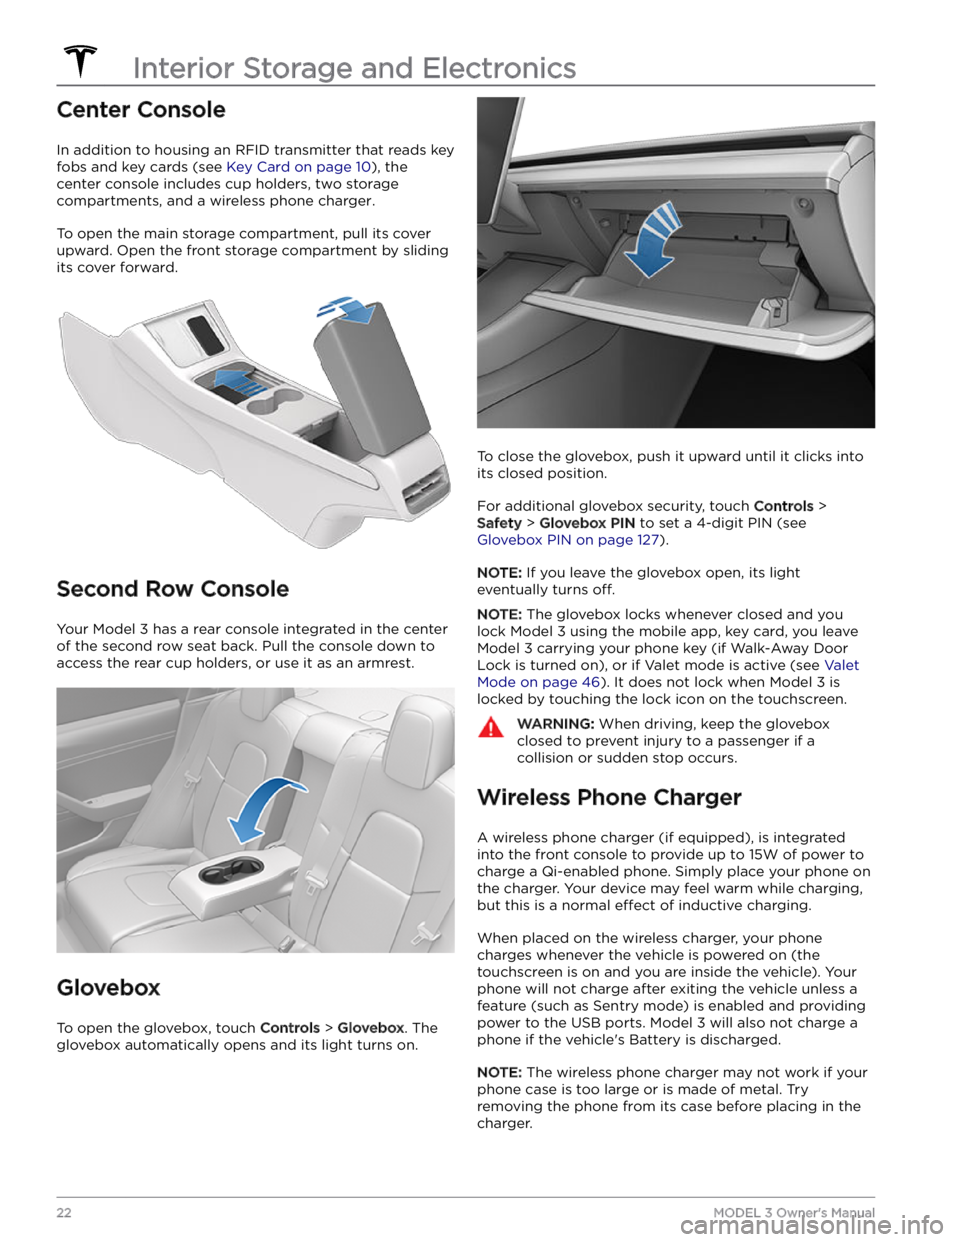
To open the main storage compartment, pull its cover upward. Open the front storage compartment by sliding its cover forward.
Second Row Console
Your Model 3 has a rear console integrated in the center
of the second row seat back. Pull the console down to
access the rear cup holders, or use it as an armrest.
Glovebox
To open the glovebox, touch Controls > Glovebox. The
glovebox automatically opens and its light turns on.
To close the glovebox, push it upward until it clicks into its closed position.
For additional glovebox security, touch Controls >
Safety > Glovebox PIN to set a 4-digit PIN (see
Glovebox PIN on page 127).
NOTE: If you leave the glovebox open, its light
eventually turns
off.
NOTE: The glovebox locks whenever closed and you
lock
Model 3 using the mobile app, key card, you leave
Model 3 carrying your phone key (if Walk-Away Door
Lock is turned on), or if Valet mode is active (see
Valet
Mode on page 46). It does not lock when Model 3 is
locked by touching the lock icon on the touchscreen.
WARNING: When driving, keep the glovebox
closed to prevent injury to a passenger if a
collision or sudden stop occurs.
Wireless Phone Charger
A wireless phone charger (if equipped), is integrated
into the front console to provide up to 15W of power to charge a Qi-enabled phone. Simply place your phone on
the charger. Your device may feel warm while charging, but this is a normal
effect of inductive charging.
When placed on the wireless charger, your phone
charges whenever the vehicle is powered on (the
touchscreen is on and you are inside the vehicle). Your
phone will not charge after exiting the vehicle
unless a
feature (such as Sentry mode) is enabled and providing
power to the USB ports. Model 3 will also not charge a
phone if the vehicle
Page 135 of 296

NOTE: For some vehicles manufactured after
approximately November 1, 2021, the center console USB
ports may only support charging devices. Tesla
recommends using the USB port inside the glove box for
all other functions.
NOTE: The ability to format, and view video footage on,
USB drives may not be available on your vehicle
depending on date of manufacture and vehicle
configuration.
Some features on your Model 3 requires the use of a
USB drive (for example, Dashcam
, Sentry Mode and
Track Mode, if equipped) that meet these requirements:
Page 152 of 296

NOTE: Use a USB port located at the front of the center
console. The USB connections at the rear of the console are for charging only.
NOTE: For some vehicles manufactured after
approximately November 1, 2021, the center console USB ports may only support charging devices. Use the USB port inside the glove box for all other functions.
Bluetooth Connected Devices
If you have a Bluetooth-capable device such as a phone that is paired and connected to
Model 3 (see Pairing a
Bluetooth Phone on page 122), you can play audio files
stored on it. Choose Media Player
Page 153 of 296

Overview
NOTE: Entertainment options vary by market region.
The touchscreen displays the Entertainment screen when you choose any of the following apps:
Theater: Play various video streaming services (such as Netflix, YouTube, Hulu, etc.) while parked.
Available only if
Model 3 is connected to WiFi, or is equipped with premium connectivity and a cellular
signal is available.
Arcade: Want to game? Depending on the game, you may need to use the steering wheel buttons or a
Bluetooth or USB controller to play. See
Gaming Controllers on page 153.
NOTE: For some vehicles manufactured after approximately November 1, 2021, the center console USB
ports can only be used to charge devices. On these vehicles, you must use the USB port inside the glove box.
Toybox: Play in the Toybox while parked.WARNING: Use these features only when Model 3 is parked. Always pay attention to road and traffic
conditions when driving. Using these features while driving is illegal and very dangerous.
NOTE: You can also use voice commands to access these features (see Voice Commands on page 125).
Toybox
Your vehicle
Page 181 of 296

For Gemini wheels, press on the perimeter of the cover until it aligns with the wheel surface. Press on the Tesla “T” in the center until the cap snaps into place. See
Parts and Accessories on page 190 for
more information.
CAUTION: To prevent the aero cover from
falling off, ensure that it is fully secured before
driving.
Removing and Installing Lug Nut Covers
If your Model 3 is equipped with lug nut covers, you
must remove them to access the lug nuts.
To remove a lug nut cover:
1.
Insert the curved part of the lug nut cover tool, if equipped (located in the glovebox in some vehicles, or you can use a small allen wrench) into the hole at the base of the Tesla "T".
NOTE: The lug nut cover tool can also be purchased
at an auto parts store or through online retailers.
2.
Maneuver the lug nut cover tool so that it is fully inserted into the hole in the lug nut cover.
3.
Twist the lug nut cover tool so that the curved part is
touching the middle of the lug nut cover.
4.
Firmly pull the lug nut tool away from the wheel until the lug nut cover is released.
To install the lug nut cover:
1.
Align the lug nut cover into position.
2.
Push firmly on the lug nut cover until it fully snaps
into place.
CAUTION: Make sure the lug nut cover is fully
secure before driving to prevent it from falling
off.
Wheel Configuration
If you are installing new wheels or swapping them for
different ones, update your vehicle
Page 291 of 296

dimensions: 208
lights: 53
overview: 3
polishing, touch up, & repair: 185
F
factory defaults, restoring: 9
factory reset: 9
favorites (Media Player): 149
Favorites (navigation): 142
FCC & ISED certifications: 285
feature availability: 281
features, downloading new: 138
firmware (software) updates: 138
flash drive: 129, 131
flashers, warning: 55
floor mats: 186
fluids: 167
replacement intervals: 167
fog lights: 53
forward collision warning: 111
front airbag, passenger: 40
front and rear seats: 25
front license plate: 202
front trunk: 19
G
G-meter: 69
gaming controllers: 151
garage doors, opening: 134
gates, opening: 134
GAWR: 206
glovebox: 22
Glovebox PIN: 127
Gross Axle Weight Rating: 206
Gross Vehicle Weight Rating: 206
ground clearance: 208
GVWR: 206
H
Handling Balance (Track Mode): 69
hazard lights: 55
hazard warning flashers: 55
hazards: 55
head supports: 26
headlights: 53, 54
after exit: 54
controlling: 53
high beams: 54
heating: 116
high beam headlights: 54
high voltage: 154, 167, 211
Battery specifications: 211
components: 154
safety: 167
hills, stopping on: 67
hitches: 207
Home: 5
button: 5
screen: 5
Home location: 144
HomeLink: 102, 134
programming and using: 134
when using Summon: 102
hood: 19
horn: 48
hub caps: 178
I
I