port TESLA MODEL S 2016 User Guide
[x] Cancel search | Manufacturer: TESLA, Model Year: 2016, Model line: MODEL S, Model: TESLA MODEL S 2016Pages: 190, PDF Size: 4.85 MB
Page 78 of 190
midway through the lane change, both
Auto Lane Change and Autosteer will cancel. The instrument panel displays a
message instructing you to take over the
steering wheel immediately.
When Auto Lane Change is active, it is
important to monitor its performance by
watching the driving path in front of you. Stay
prepared to take over steering at any time. On the instrument panel, the lane you are crossing
over displays as a dashed blue line and once in your new lane, the lane markings display as
solid blue lines.
In situations where Auto Lane Change is
unable to operate at optimal performance, or
can not operate due to inadequate data, the
instrument panel displays a series of warnings.
Therefore, when using Auto Lane Change,
always pay attention to the instrument panel
and be prepared to manually steer Model S.
Warning: When Auto Lane Change is
actively steering Model S, the steering
wheel moves accordingly. Any
significantrestriction of the steering wheel
Page 96 of 190

1. CloseTouch the circled X in the top left corner of a window to close it (or you can touch anywhere
outside the window).
2. Sunroof
If Model S is equipped with a sunroof, touch to adjust its position (see Sunroof on page 15).
3. Suspension
If Model S is equipped with Smart Air Suspension, touch to manually raise or lower Model S, orto remove a previously saved auto-raising location (see Smart Air Suspension on page 108).
Model S must be powered on and you must press the brake pedal before you can change
suspension settings. Smart Air Suspension causes Model S to self-level, even when powered
off. Therefore, when towing or lifting, you must disable self-leveling (see Instructions for
Transporters on page 175 and Jacking and Lifting on page 158).
Controls
96Model S Owner
Page 103 of 190

When you save, Name Your Vehicle is replaced by the name you provided. You can touch the
name at any time to rename your Model S.
Erasing Personal Data
You can erase all personal data (saved addresses, music favorites, imported contacts, HomeLink
programming, etc.) and restore all customized settings to their factory defaults. This is useful
when transferring ownership of Model S. Touch Controls > Settings > Service & Reset > Factory
Reset > Erase & Reset. Before erasing, Model S
verifies your credentials by prompting you to enter
the user name and password associated with your MY TESLA account.
Settings
Using the Touchscreen103
Page 113 of 190

USB Hub Connections
Your Model S has two USB connections
located on the front of the center console that
you can use to connect USB devices. To play
audio
files stored on a USB drive connected to
these ports, see My Music & Devices on page
112. You can also use these connections to charge USB devices.
Note: Do not connect multiple devices using a
USB hub. This can prevent connected devices
from charging or from being recognized by
the Media Player.
12V Power Socket
Your Model S has a power socket located on
the front of the center console. Power is
available whenever the instrument panel and
touchscreen are on.
The 12V power socket is suitable for
accessories requiring up to 11A continuous
draw (15A peak) or a maximum of 150
continuous watts (180 watts peak).
Note: In situations where Model S is unable to detect the key (low battery, interference, etc.),
place it immediately below the 12V power
socket where Model S can best detect it.
Warning: The power socket and an
accessory
Page 127 of 190
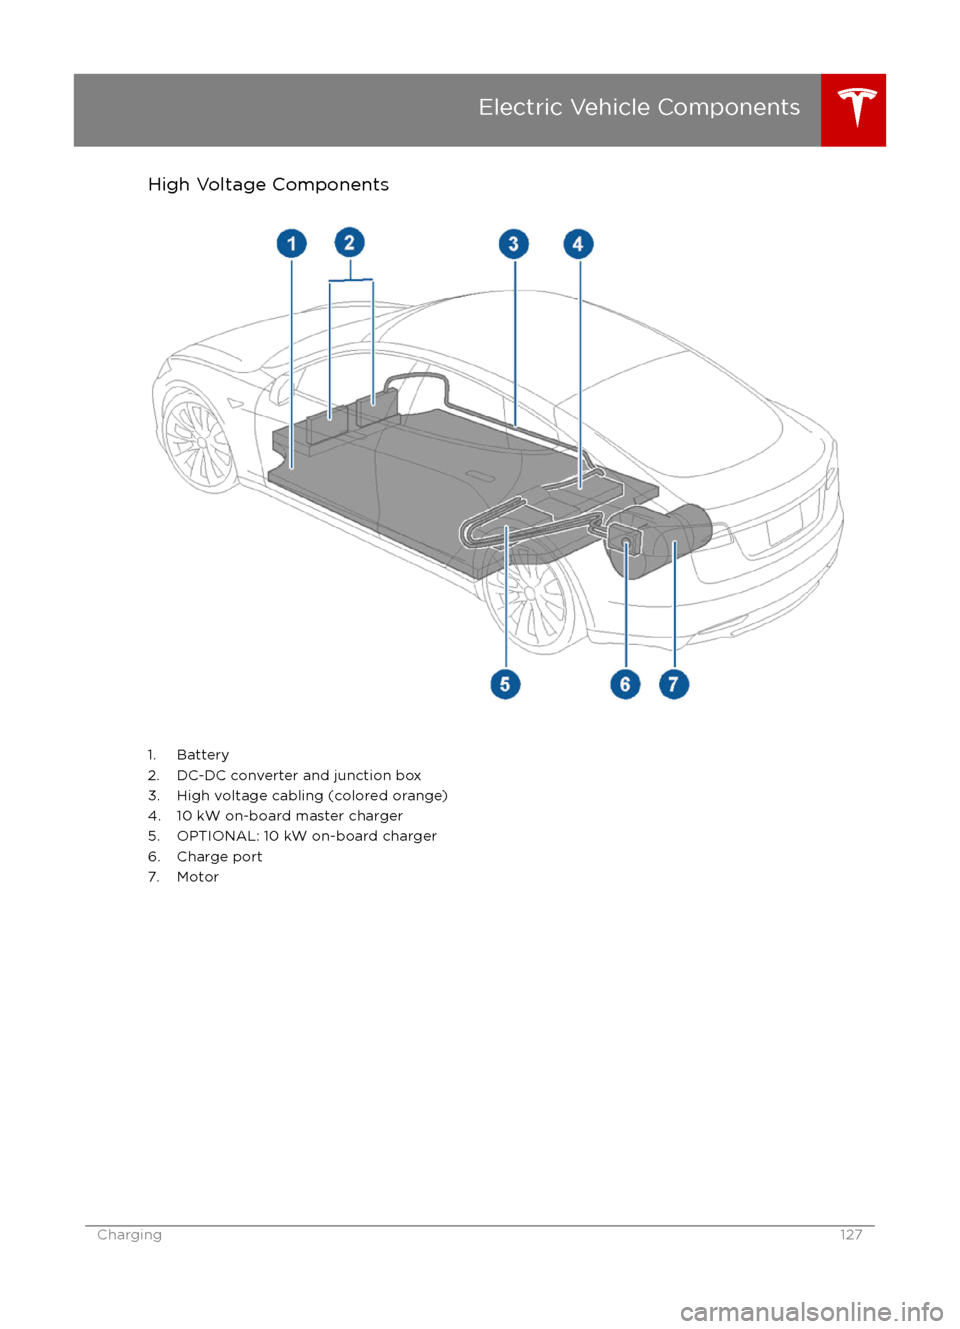
High Voltage Components
1. Battery
2. DC-DC converter and junction box 3. High voltage cabling (colored orange)
4. 10 kW on-board master charger
5. OPTIONAL: 10 kW on-board charger
6. Charge port
7. Motor
Electric Vehicle Components
Charging127
Page 129 of 190
About the Battery
Model S has one of the most sophisticated
battery systems in the world. The most
important way to preserve the Battery is to LEAVE YOUR Model S PLUGGED IN when you
are not using it. This is particularly important if you are not planning to drive Model S for
several weeks. When plugged in, Model S wakes up when needed to automatically
maintain a charge level that maximizes the
lifetime of the Battery.
There is no advantage to waiting until the
Battery
Page 130 of 190
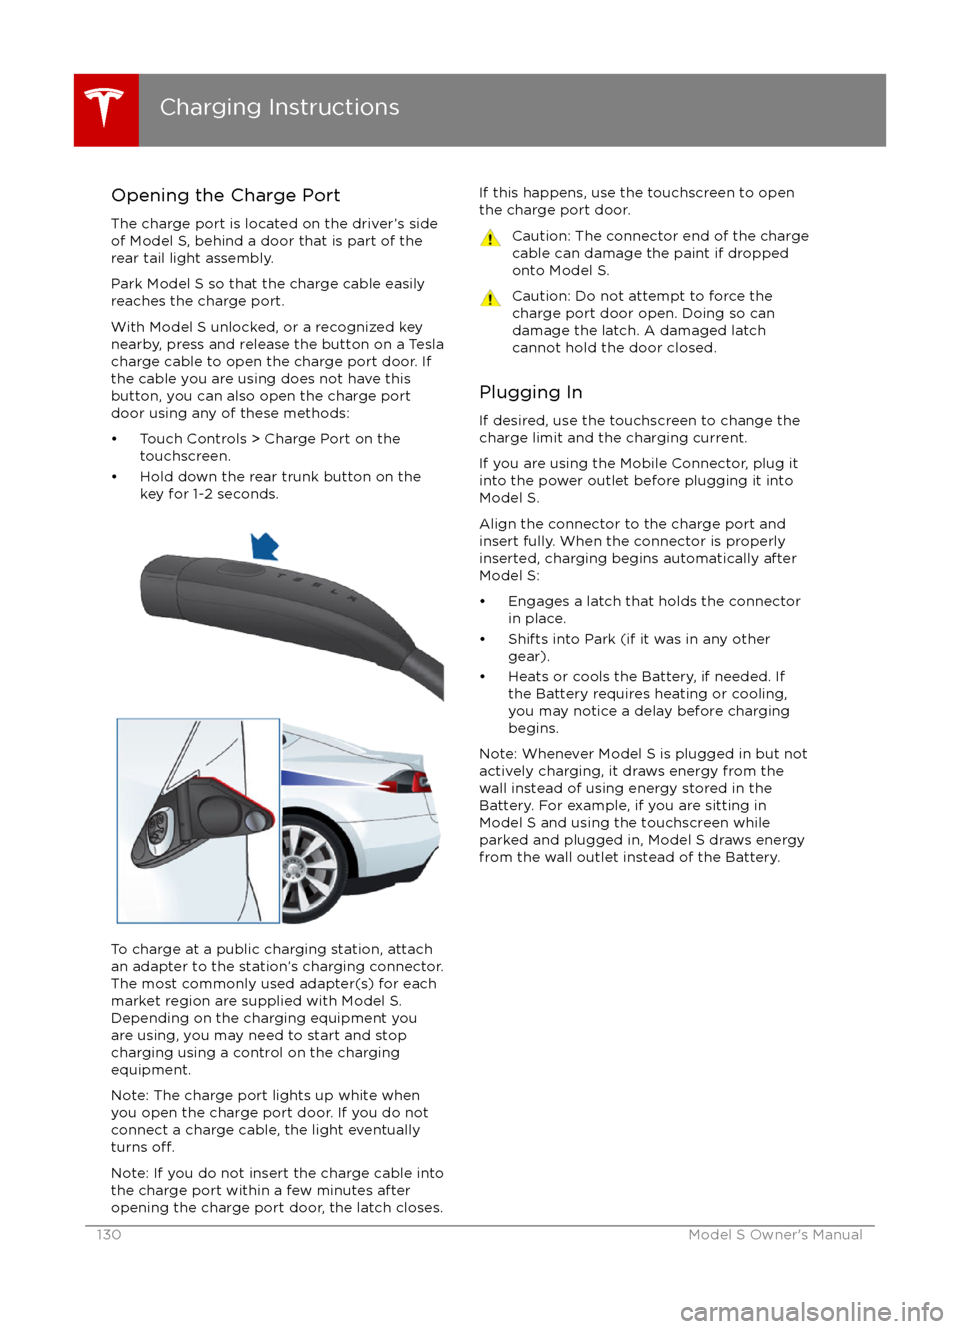
Opening the Charge PortThe charge port is located on the driver
Page 131 of 190

During ChargingDuring charging, the charge port pulses green
and charging status displays on the instrument
panel. The frequency at which the charge
port
Page 132 of 190
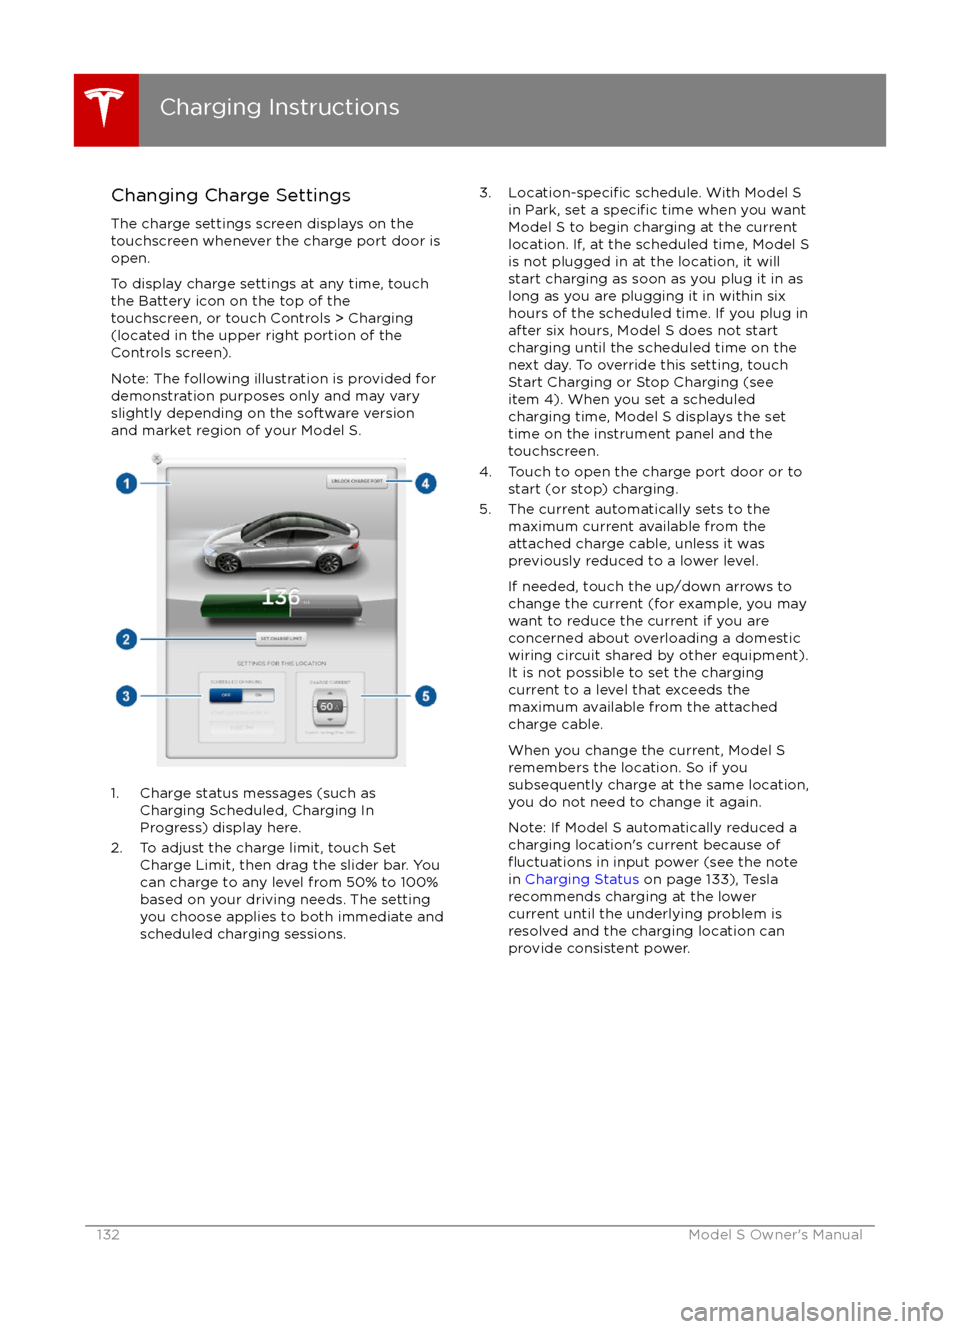
Changing Charge SettingsThe charge settings screen displays on the
touchscreen whenever the charge port door is
open.
To display charge settings at any time, touch the Battery icon on the top of the
touchscreen, or touch Controls > Charging
(located in the upper right portion of the
Controls screen).
Note: The following illustration is provided for
demonstration purposes only and may vary
slightly depending on the software version
and market region of your Model S.
1. Charge status messages (such as
Charging Scheduled, Charging In
Progress) display here.
2. To adjust the charge limit, touch Set Charge Limit, then drag the slider bar. You
can charge to any level from 50% to 100%
based on your driving needs. The setting
you choose applies to both immediate and scheduled charging sessions.
3.Location-specific schedule. With Model S
in Park, set a specific time when you want
Model S to begin charging at the current
location. If, at the scheduled time, Model S
is not plugged in at the location, it will
start charging as soon as you plug it in as
long as you are plugging it in within six
hours of the scheduled time. If you plug in
after six hours, Model S does not start charging until the scheduled time on the
next day. To override this setting, touch Start Charging or Stop Charging (see
item 4). When you set a scheduled
charging time, Model S displays the set
time on the instrument panel and the
touchscreen.
4. Touch to open the charge port door or to start (or stop) charging.
5. The current automatically sets to the maximum current available from the
attached charge cable, unless it was
previously reduced to a lower level.
If needed, touch the up/down arrows to change the current (for example, you may
want to reduce the current if you are
concerned about overloading a domestic
wiring circuit shared by other equipment).
It is not possible to set the charging
current to a level that exceeds the
maximum available from the attached
charge cable.
When you change the current, Model S
remembers the location. So if you
subsequently charge at the same location,
you do not need to change it again.
Note: If Model S automatically reduced a charging location
Page 133 of 190
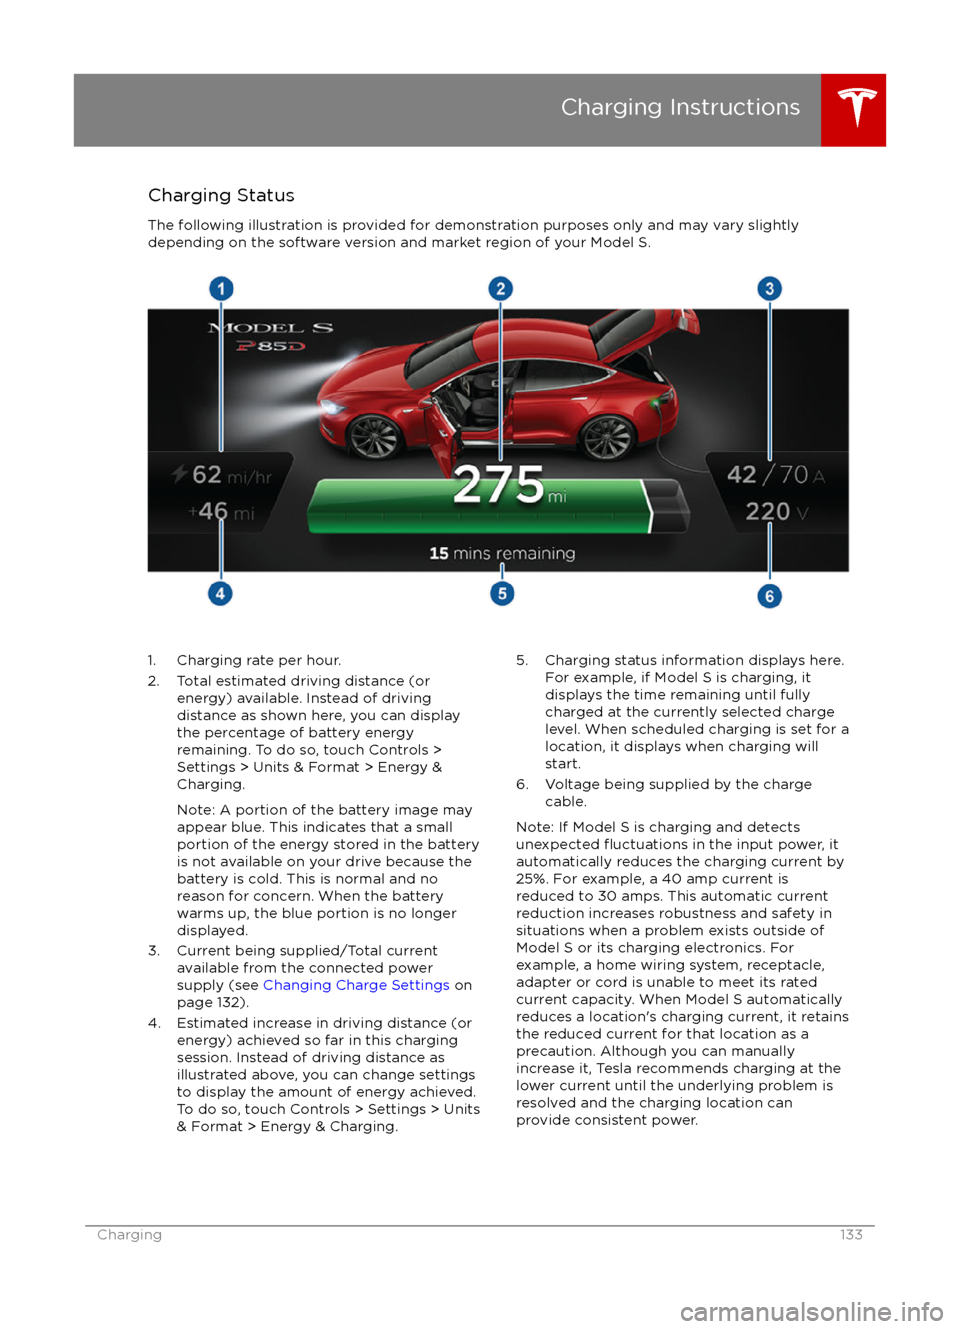
Charging StatusThe following illustration is provided for demonstration purposes only and may vary slightly
depending on the software version and market region of your Model S.1. Charging rate per hour.
2. Total estimated driving distance (or energy) available. Instead of drivingdistance as shown here, you can display
the percentage of battery energy
remaining. To do so, touch Controls > Settings > Units & Format > Energy &
Charging.
Note: A portion of the battery image may
appear blue. This indicates that a small
portion of the energy stored in the battery
is not available on your drive because the
battery is cold. This is normal and no
reason for concern. When the battery warms up, the blue portion is no longer
displayed.
3. Current being supplied/Total current available from the connected power
supply (see Changing Charge Settings on
page 132).
4. Estimated increase in driving distance (or energy) achieved so far in this chargingsession. Instead of driving distance as
illustrated above, you can change settings
to display the amount of energy achieved.
To do so, touch Controls > Settings > Units
& Format > Energy & Charging.5. Charging status information displays here.
For example, if Model S is charging, it
displays the time remaining until fully
charged at the currently selected charge
level. When scheduled charging is set for a
location, it displays when charging will
start.
6. Voltage being supplied by the charge cable.
Note: If Model S is charging and detects
unexpected