release TESLA MODEL S 2016 Owner's Guide
[x] Cancel search | Manufacturer: TESLA, Model Year: 2016, Model line: MODEL S, Model: TESLA MODEL S 2016Pages: 190, PDF Size: 4.85 MB
Page 142 of 190
Inflating with Air Only
If you have a Tesla tire repair kit, follow these
steps to
inflate a tire with air:
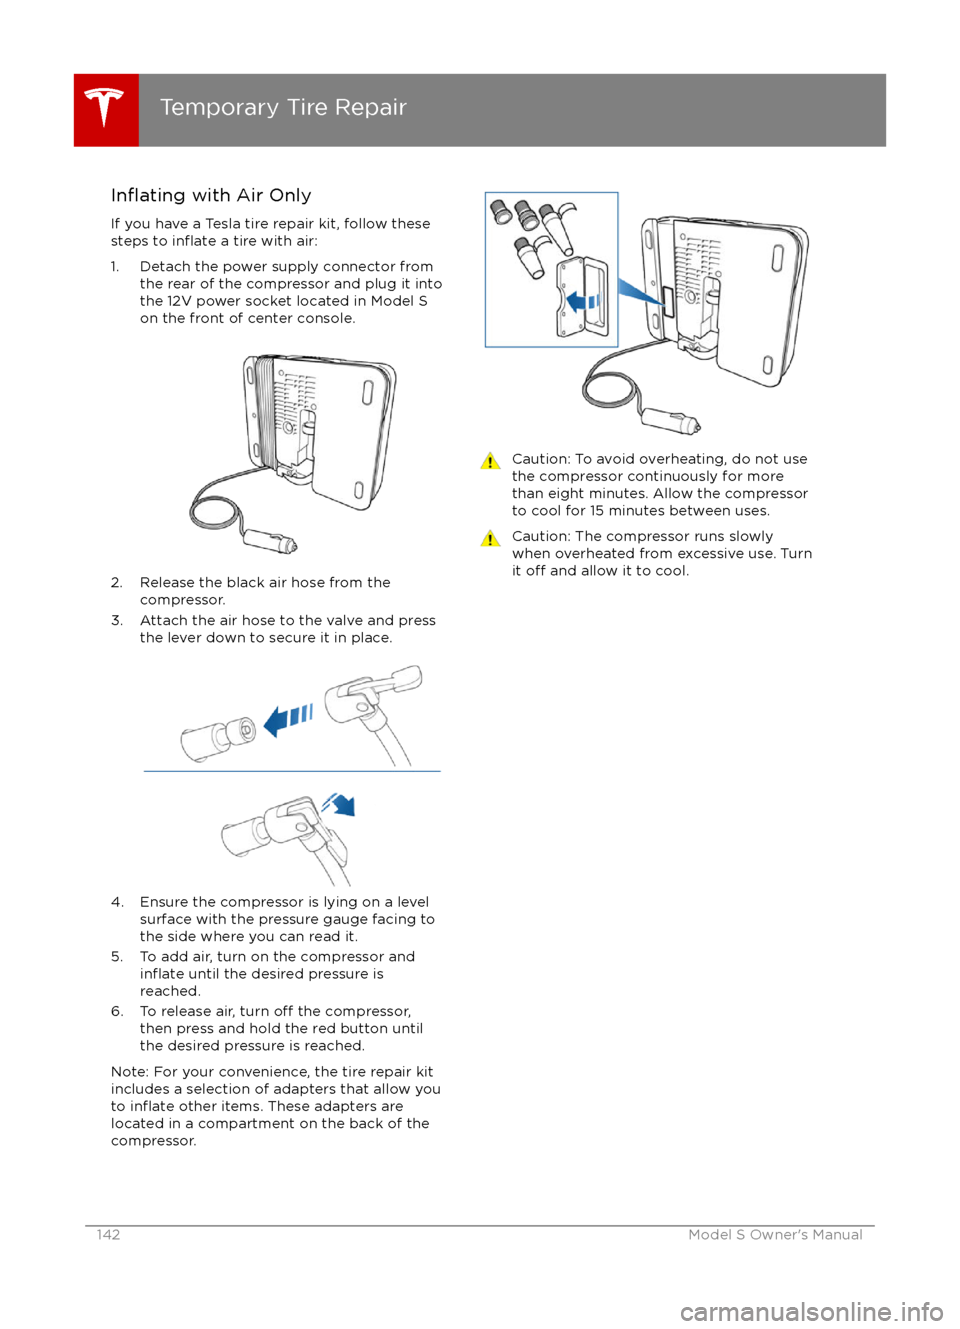
1. Detach the power supply connector from the rear of the compressor and plug it into
the 12V power socket located in Model S
on the front of center console.
2. Release the black air hose from the compressor.
3. Attach the air hose to the valve and press the lever down to secure it in place.
4. Ensure the compressor is lying on a level
surface with the pressure gauge facing tothe side where you can read it.
5. To add air, turn on the compressor and
inflate until the desired pressure is
reached.
6. To release air, turn
off the compressor,
then press and hold the red button until
the desired pressure is reached.
Note: For your convenience, the tire repair kit
includes a selection of adapters that allow you to
inflate other items. These adapters are
located in a compartment on the back of the
compressor.
Caution: To avoid overheating, do not use
the compressor continuously for more
than eight minutes. Allow the compressor
to cool for 15 minutes between uses.Caution: The compressor runs slowly
when overheated from excessive use. Turn
it
off and allow it to cool.Temporary Tire Repair
142Model S Owner
Page 143 of 190
Replacing the Sealant CanisterIf you have a Tesla tire repair kit, you can
purchase additional or replacement canisters
of tire sealant from Tesla.
Follow these steps to replace the canister in
your Tesla tire repair kit:
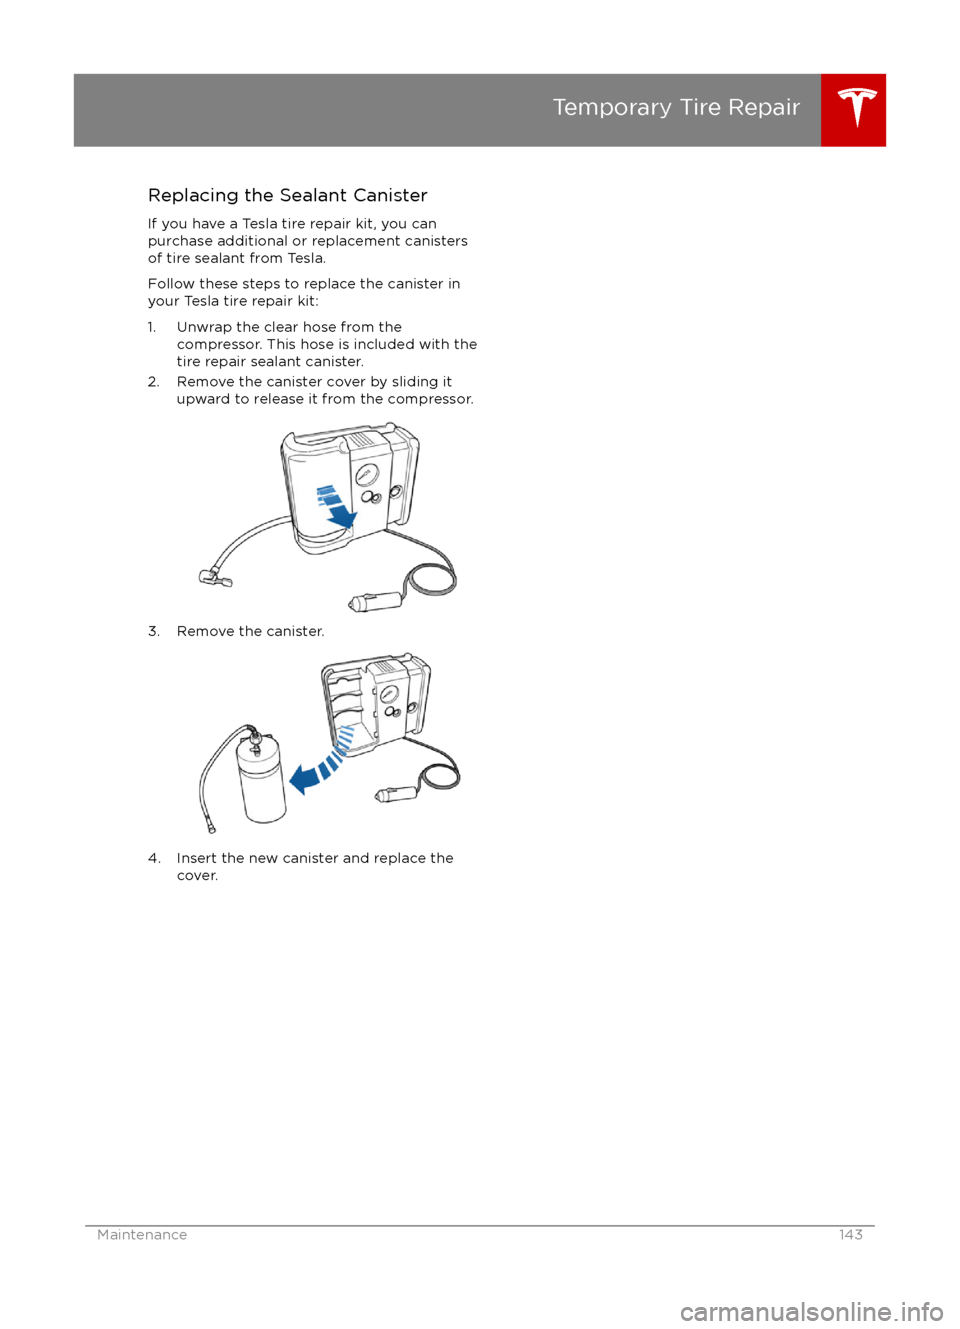
1. Unwrap the clear hose from the compressor. This hose is included with the
tire repair sealant canister.
2. Remove the canister cover by sliding it upward to release it from the compressor.
3. Remove the canister.
4. Insert the new canister and replace the
cover.
Temporary Tire Repair
Maintenance143
Page 149 of 190
Removing the Maintenance Panel
To access fuses and check
fluid levels, remove
the maintenance panel:
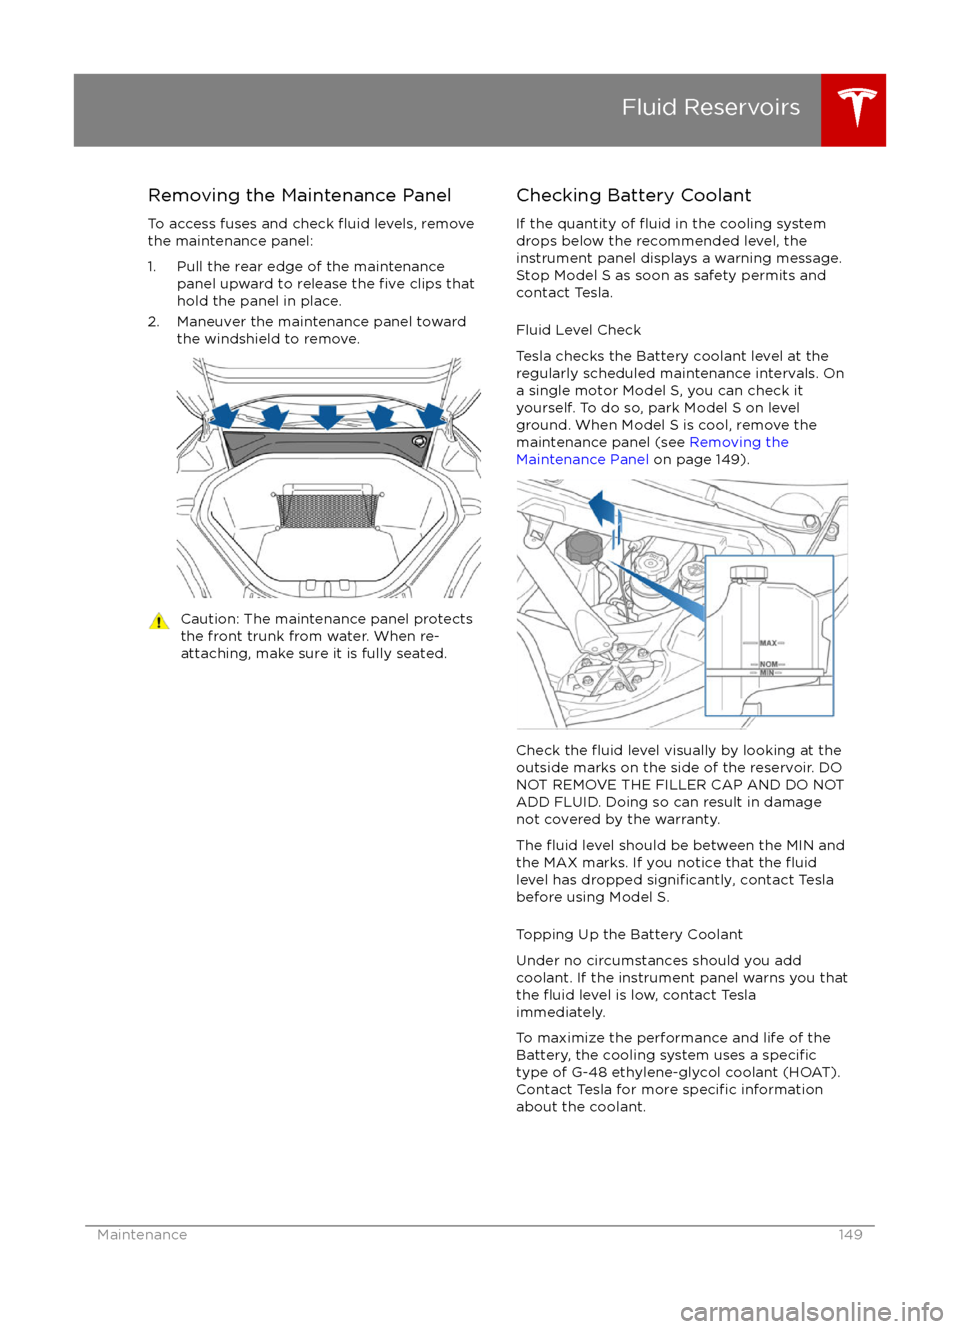
1. Pull the rear edge of the maintenance panel upward to release the
five clips that
hold the panel in place.
2. Maneuver the maintenance panel toward the windshield to remove.
Caution: The maintenance panel protects
the front trunk from water. When re-
attaching, make sure it is fully seated.Checking Battery Coolant
If the quantity of
fluid in the cooling system
drops below the recommended level, the
instrument panel displays a warning message.
Stop Model S as soon as safety permits and
contact Tesla.
Fluid Level Check
Tesla checks the Battery coolant level at the
regularly scheduled maintenance intervals. On a single motor Model S, you can check it
yourself. To do so, park Model S on level
ground. When Model S is cool, remove the
maintenance panel (see Removing the
Maintenance Panel on page 149).
Check the fluid level visually by looking at the
outside marks on the side of the reservoir. DO
NOT REMOVE THE FILLER CAP AND DO NOT
ADD FLUID. Doing so can result in damage
not covered by the warranty.
The
fluid level should be between the MIN and
the MAX marks. If you notice that the fluidlevel has dropped significantly, contact Tesla
before using Model S.
Topping Up the Battery Coolant
Under no circumstances should you add
coolant. If the instrument panel warns you that
the
fluid level is low, contact Tesla
immediately.
To maximize the performance and life of the Battery, the cooling system uses a
specifictype of G-48 ethylene-glycol coolant (HOAT).
Contact Tesla for more specific information
about the coolant.
Fluid Reservoirs
Maintenance149
Page 175 of 190
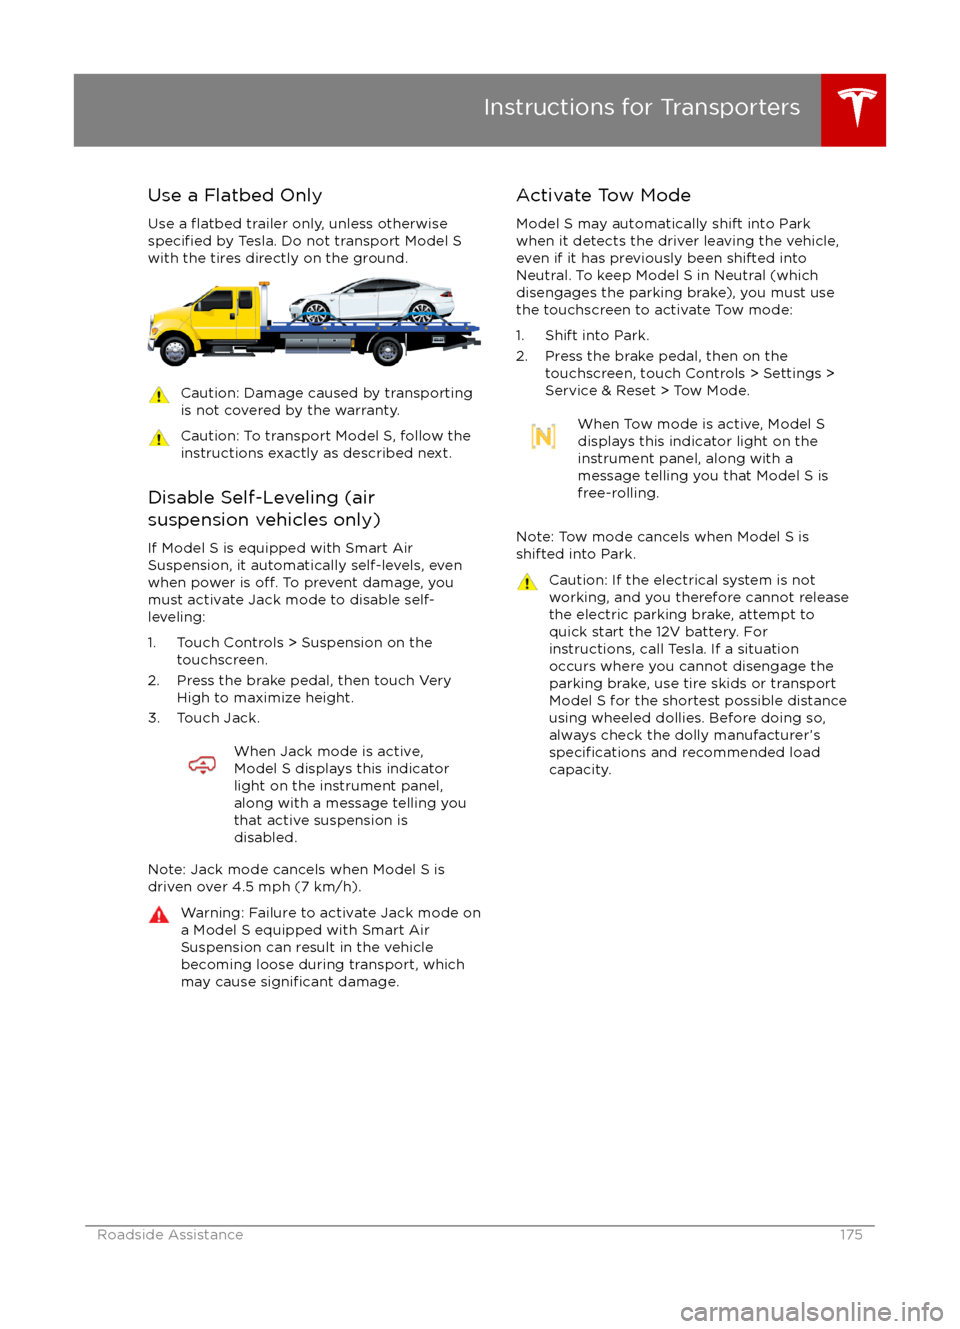
Use a Flatbed OnlyUse a
flatbed trailer only, unless otherwisespecified by Tesla. Do not transport Model S
with the tires directly on the ground.
Caution: Damage caused by transporting is not covered by the warranty.Caution: To transport Model S, follow theinstructions exactly as described next.
Disable Self-Leveling (air
suspension vehicles only)
If Model S is equipped with Smart AirSuspension, it automatically self-levels, even
when power is
off. To prevent damage, you
must activate Jack mode to disable self- leveling:
1. Touch Controls > Suspension on the touchscreen.
2. Press the brake pedal, then touch Very High to maximize height.
3. Touch Jack.
When Jack mode is active,
Model S displays this indicator
light on the instrument panel,
along with a message telling you
that active suspension is
disabled.
Note: Jack mode cancels when Model S is
driven over 4.5 mph (7 km/h).
Warning: Failure to activate Jack mode on
a Model S equipped with Smart Air Suspension can result in the vehicle
becoming loose during transport, which
may cause
significant damage.
Activate Tow Mode
Model S may automatically shift into Park
when it detects the driver leaving the vehicle,
even if it has previously been shifted into Neutral. To keep Model S in Neutral (which
disengages the parking brake), you must use
the touchscreen to activate Tow mode:
1. Shift into Park.
2. Press the brake pedal, then on the touchscreen, touch Controls > Settings >
Service & Reset > Tow Mode.When Tow mode is active, Model S
displays this indicator light on the
instrument panel, along with a
message telling you that Model S is
free-rolling.
Note: Tow mode cancels when Model S is
shifted into Park.
Caution: If the electrical system is not
working, and you therefore cannot release
the electric parking brake, attempt to
quick start the 12V battery. For
instructions, call Tesla. If a situation
occurs where you cannot disengage the
parking brake, use tire skids or transport Model S for the shortest possible distance
using wheeled dollies. Before doing so,
always check the dolly manufacturer
Page 176 of 190
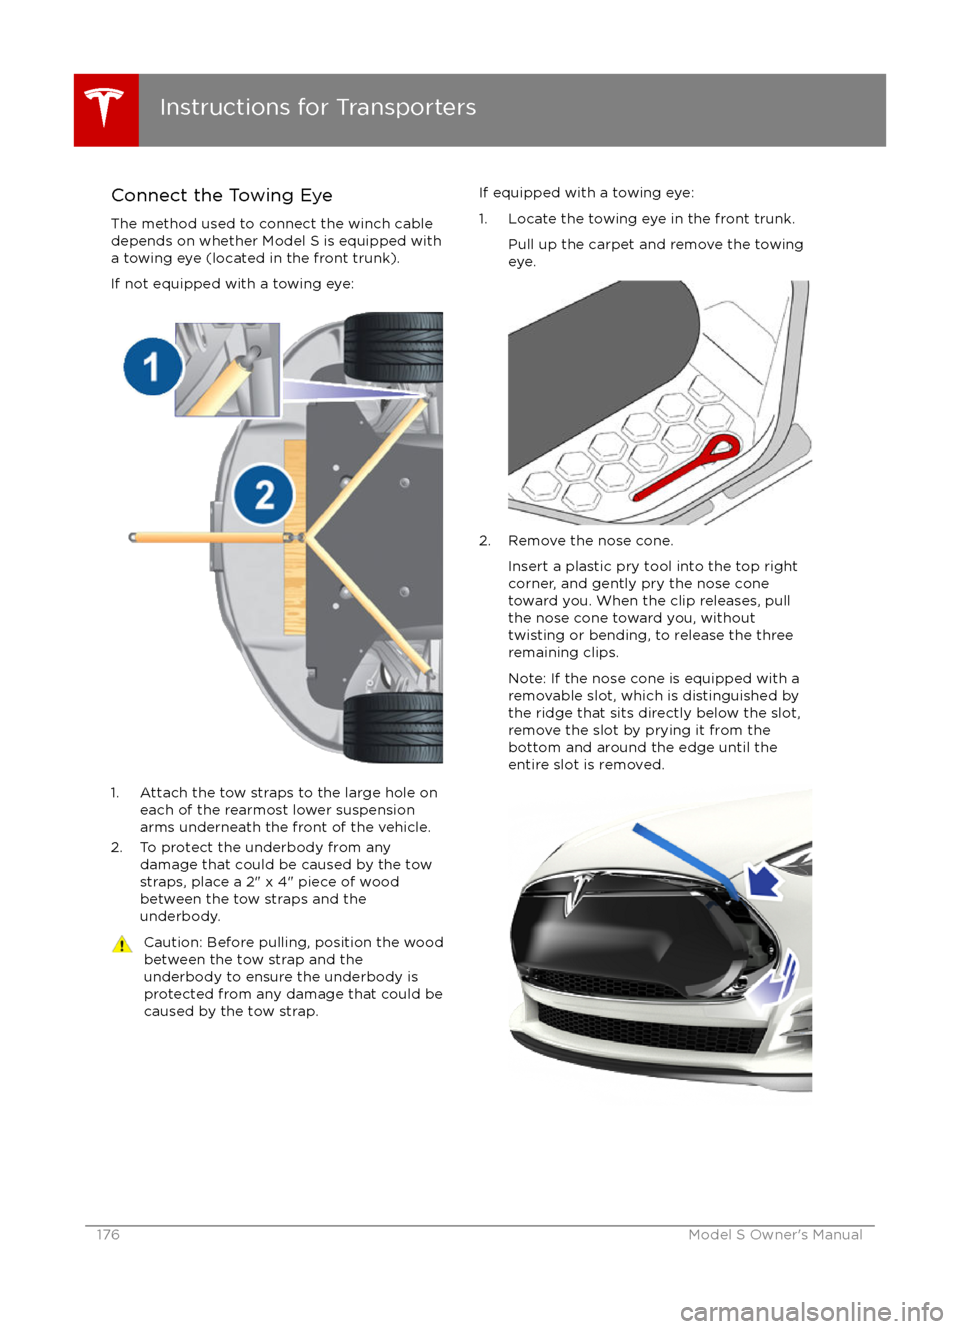
Connect the Towing EyeThe method used to connect the winch cabledepends on whether Model S is equipped with
a towing eye (located in the front trunk).
If not equipped with a towing eye:
1. Attach the tow straps to the large hole on each of the rearmost lower suspension
arms underneath the front of the vehicle.
2. To protect the underbody from any damage that could be caused by the tow
straps, place a 2" x 4" piece of wood
between the tow straps and the
underbody.
Caution: Before pulling, position the wood
between the tow strap and the
underbody to ensure the underbody is
protected from any damage that could be caused by the tow strap.If equipped with a towing eye:
1. Locate the towing eye in the front trunk. Pull up the carpet and remove the towing
eye.
2. Remove the nose cone.
Insert a plastic pry tool into the top right
corner, and gently pry the nose cone
toward you. When the clip releases, pull
the nose cone toward you, without
twisting or bending, to release the three
remaining clips.
Note: If the nose cone is equipped with a removable slot, which is distinguished by
the ridge that sits directly below the slot,
remove the slot by prying it from the
bottom and around the edge until the
entire slot is removed.
Instructions for Transporters
176Model S Owner
Page 177 of 190

3. If applicable, disconnect the bumpersensors.
If Model S is equipped with Autopilot
components (see About Driver Assistance
on page 65), you also need to disconnect
the cords for the ultrasonic sensors. To do
so, press down on the tab and pull to release.
4. Insert the towing eye.
Fully insert the towing eye into the
opening on the right side, then turn it
counter-clockwise until securely fastened.
5. Attach the winch cable to the towing eye.
Caution: Before pulling, make sure the
towing eye is securely tightened.Pull Onto the Trailer and Secure the
Wheels
Secure wheels using the eight-point tie-downmethod with basket straps or tie-down straps:
Page 178 of 190

IllustrationsIllustrations are provided for demonstration
purposes only. Depending on vehicle options, software version, region of purchase, and
specific vehicle settings, your Model S may
appear slightly different.
Although the owner information is applicable
to both right-hand drive and left-hand drive
vehicles, many illustrations show only left-
hand drive vehicles. However, the essential
information that the illustrations are providing
is correct.
Errors or Inaccuracies All
specifications and descriptions are known
to be accurate at time of publishing. However,
because continuous improvement is a goal at
Tesla, we reserve the right to make product
modifications at any time. To communicate
any inaccuracies or omissions, or to provide
general feedback or suggestions regarding the quality of this owner information, send anemail to:
[email protected]
Location of ComponentsThe owner information may specify thelocation of a component as being on the left
or right side of the vehicle. As shown here, left
(1) and right (2) represent the side of the
vehicle when sitting inside Model S in a front-
facing seat.
Document Applicability
Owner information is updated on a regular
basis to
reflect updates to your Model S.
However, in some cases, recently released
features may not be described. To display information about recently released features,
view the Release Notes on the Model S
touchscreen. Release Notes are displayed on
the touchscreen after a software update, and can be displayed at any time by touching the
Tesla "T" at the top center of the touchscreen,
then touching the Release Notes link. If
information related to how to use the Model S
touchscreen
conflicts with information in the
Release Notes, the Release Notes take
precedence.
About this Owner Information
178Model S Owner
Page 188 of 190
odometerresetting trip odometer 61
outside temperature 37
overhang dimensions 163
overtake acceleration 68
Owner Information, about 178, 179
P Park Assist 57
Park gear 42
parking brake 55
parking, automatic 79
parts replacement 159
passenger detection 33
passenger front airbag 33
personal data, erasing 103
phonesteering wheel controls for 38
using 114
PIN 35
power management 62
power socket 113
power windows 9
powering on and
off 41
Preconditioning 99
preferences, setting 99
Proposition 65 180
public charging stations 128
R
radar 65
radio 110
Radio Frequency information 182
radio frequency, FCC information 184
rain sensor 53
rangedisplayed on instrument panel 43, 46
driving tips to maximize 62
regenerative braking 55
range assurance 62
range mode 62
Range Mode 94
Rated range 99
rear seats, folding and raising 18
rear view camera 64
rear window switches, disabling 9
regenerative braking 55
region format 99
release notes 125
Reverse gear 42
roadside assistance 174
roof racks 162
rotating tires 136
route overview 116
Ssafety defectsreporting (Canada) 181
reporting (U.S.) 181
safety defects, reporting 181
safety informationairbags 34
child seats 26
rear facing child seats 30
seat belts 20seat beltscleaning 145
in a collision 20
overview of 19
pre-tensioners 20
wearing when pregnant 19
seat covers 18
seat heaters 104
seating capacity 161
seatsadjusting 17
heaters 104
Tesla built-in rear facing 27
security settings 121
self parking and unparking 79
sensors 65
service data recording 180
service intervals 134
Settings 99
Settings, erasing 103
shifting gears 42
side collision avoidance 83
side collision warning 83
Slacker 111
slip start 56
Smart Preconditioning 99
software reset 103
software updates 125
specificationscargo volume 164
dimensions 163
exterior 163
interior 163
motor 166
subsystems 166
tires 169
weights 165
wheels 169
stability control 56
starting 41
steering
specifications 166
steering wheel 37
steering, automatic 74
summer tires 137
Summon 79
sunroof 15
suspension 109
suspension
specifications 167
Index
188Model S Owner