TESLA MODEL S 2021 Owner´s Manual
Manufacturer: TESLA, Model Year: 2021, Model line: MODEL S, Model: TESLA MODEL S 2021Pages: 281, PDF Size: 7.63 MB
Page 21 of 281
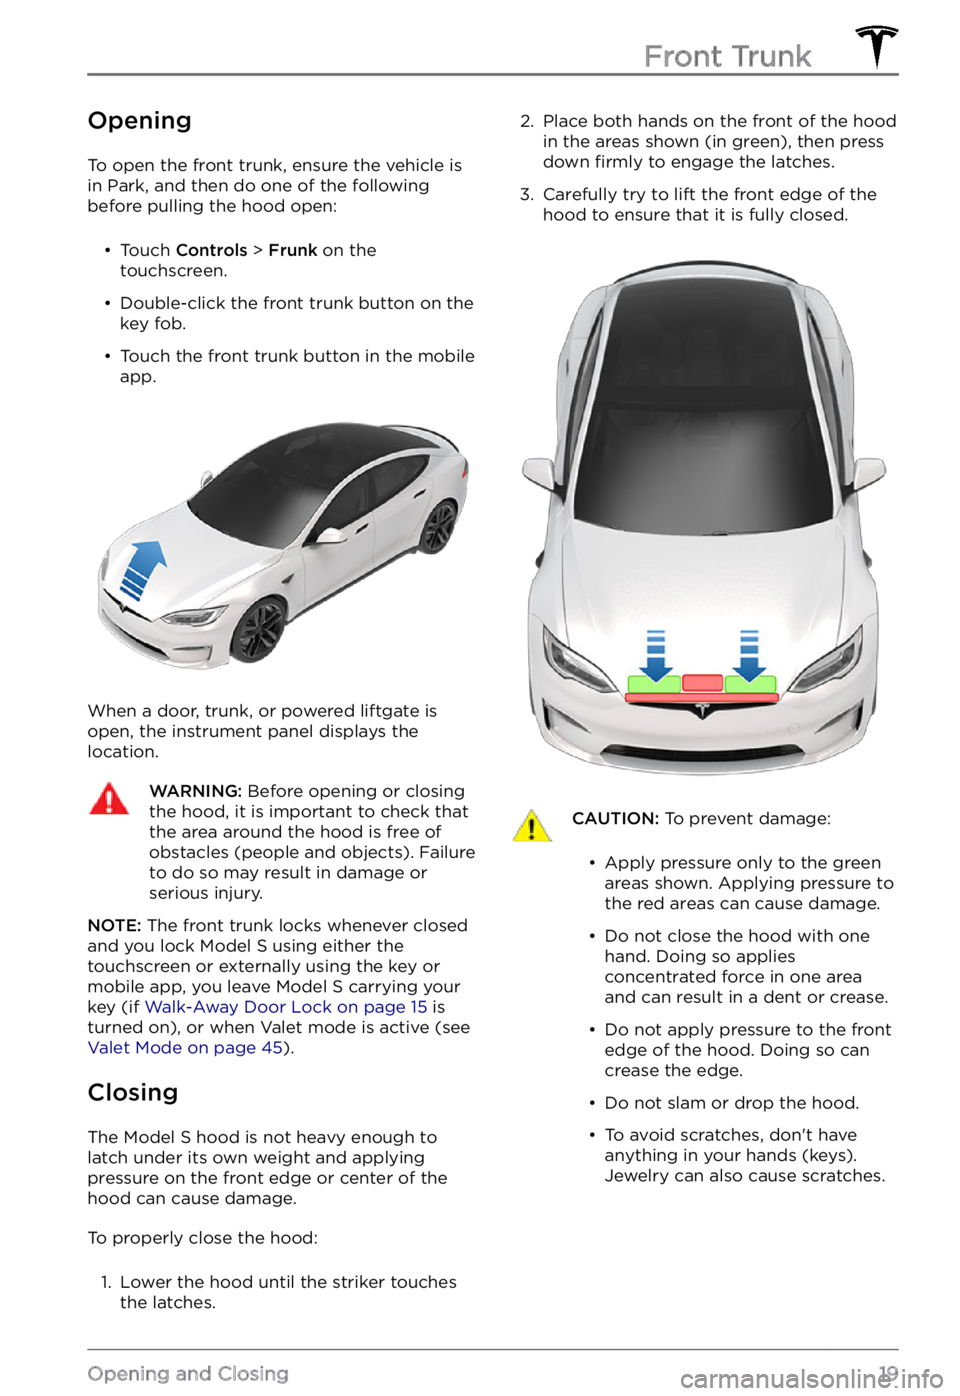
Opening
To open the front trunk, ensure the vehicle is
in Park, and then do one of the following
before pulling the hood open:
Page 22 of 281
WARNING: Before driving, you must ensure that the hood is securely latched in the fully closed position by carefully trying to lift the front edge of the hood upward and confirming there is no movement.
Interior Emergency Release
An illuminated interior release button inside
the front trunk allows a person locked inside to get out.
Press the interior release button to open the
front trunk, then push up on the hood.
NOTE: The interior release button glows
following a brief exposure to ambient light.
WARNING: People should never climb inside the front trunk. Never shut the front trunk when a person is inside.
WARNING: Care should be taken to ensure that objects inside the front trunk do not bump against the release button, causing the hood to accidentally open.
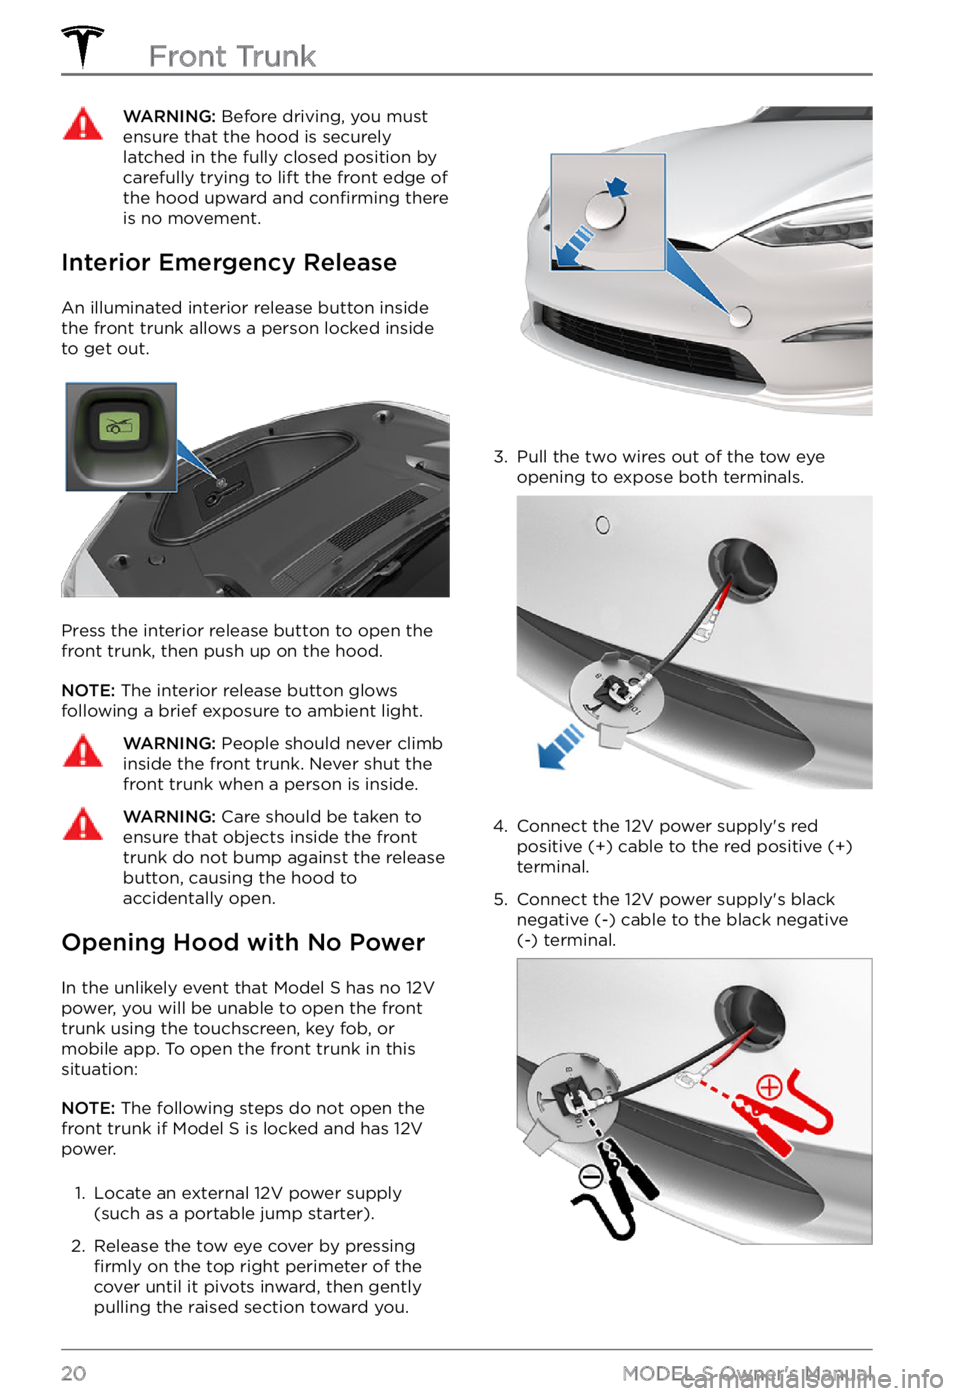
Opening Hood with No Power
In the unlikely event that Model S has no 12V
power, you will be unable to open the front
trunk using the touchscreen, key fob, or
mobile app. To open the front trunk in this situation:
NOTE: The following steps do not open the
front trunk if Model S is locked and has 12V
power.
1.
Locate an external 12V power supply
(such as a portable jump starter).
2.
Release the tow eye cover by pressing firmly on the top right perimeter of the
cover until it pivots inward, then gently pulling the raised section toward you.
3.
Pull the two wires out of the tow eye
opening to expose both terminals.
4.
Connect the 12V power supply
Page 23 of 281
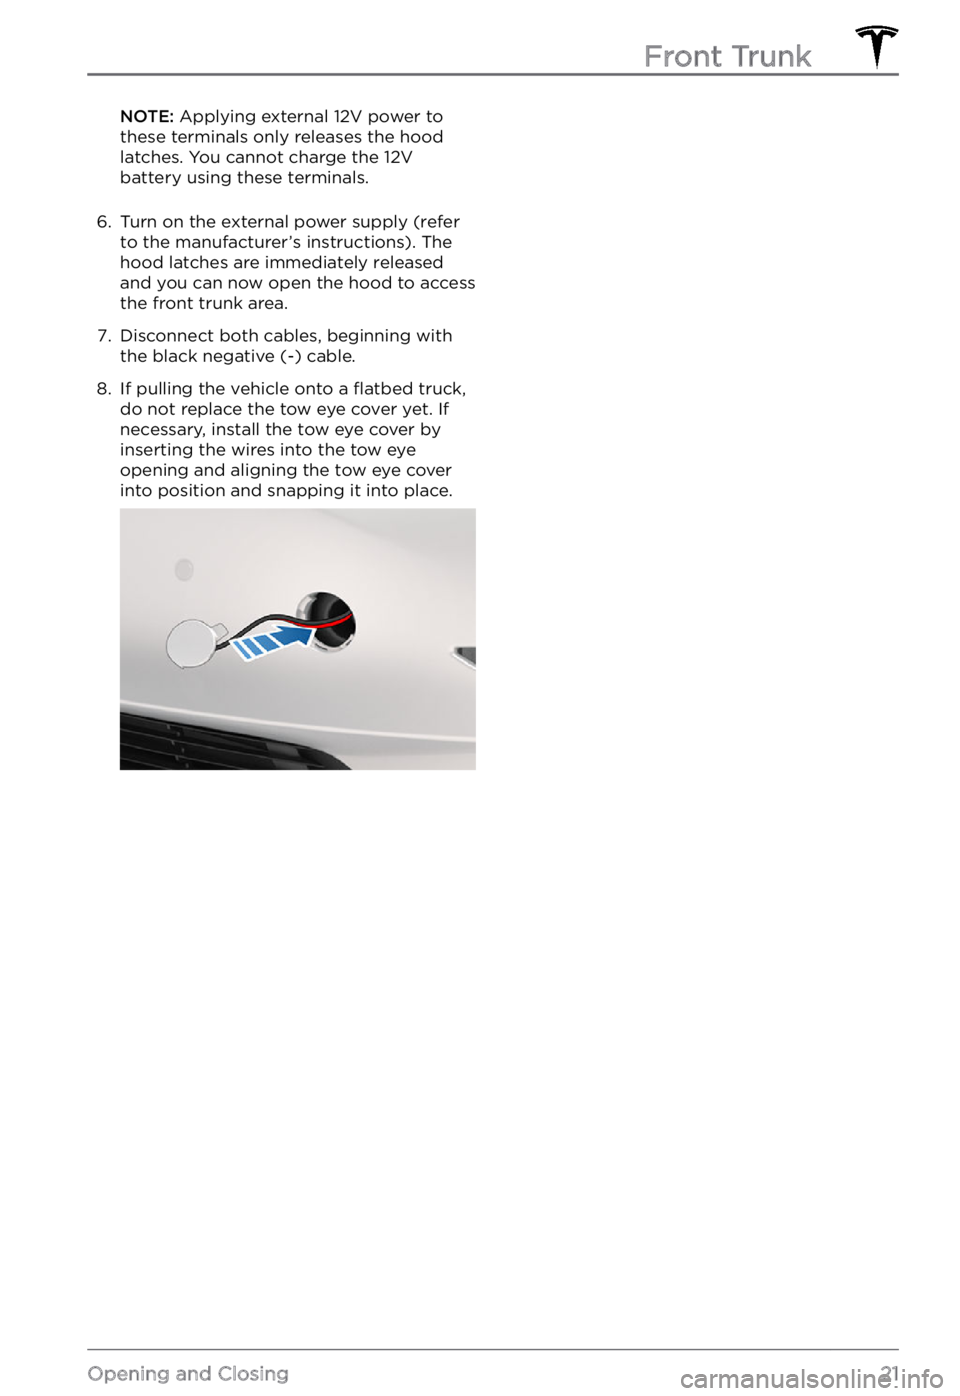
NOTE: Applying external 12V power to
these terminals only releases the hood
latches. You cannot charge the 12V
battery using these terminals.6.
Turn on the external power supply (refer
to the manufacturer
Page 24 of 281
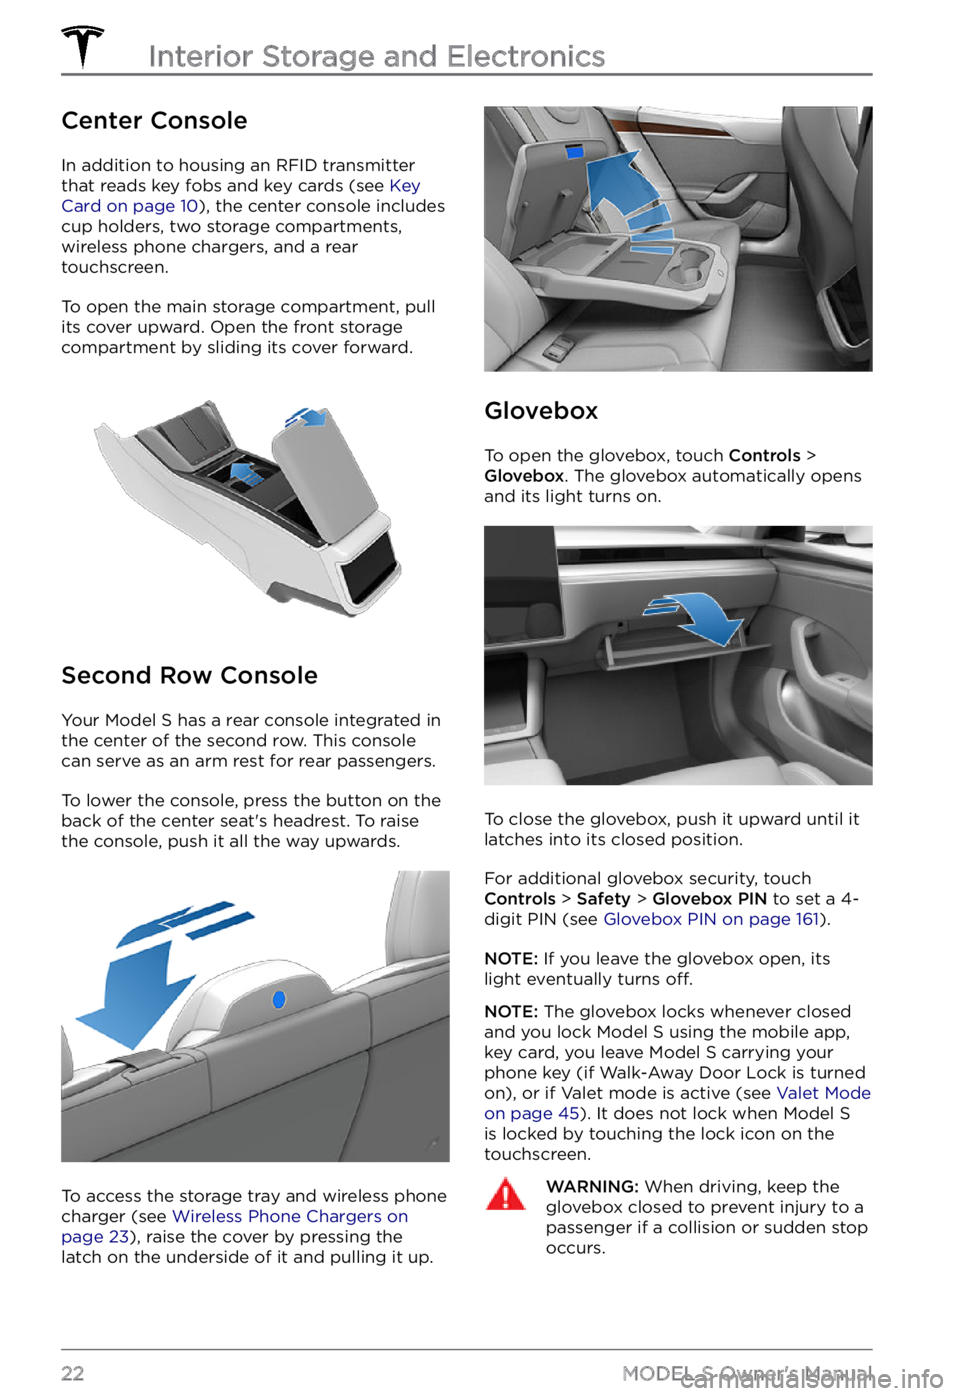
Center Console
In addition to housing an RFID transmitter
that reads key fobs and key cards (see Key Card on page 10), the center console includes
cup holders, two storage compartments, wireless phone chargers, and a rear
touchscreen.
To open the main storage compartment, pull its cover upward. Open the front storage
compartment by sliding its cover forward.
Second Row Console
Your Model S has a rear console integrated in
the center of the second row. This console
can serve as an arm rest for rear passengers.
To lower the console, press the button on the
back of the center seat
Page 25 of 281
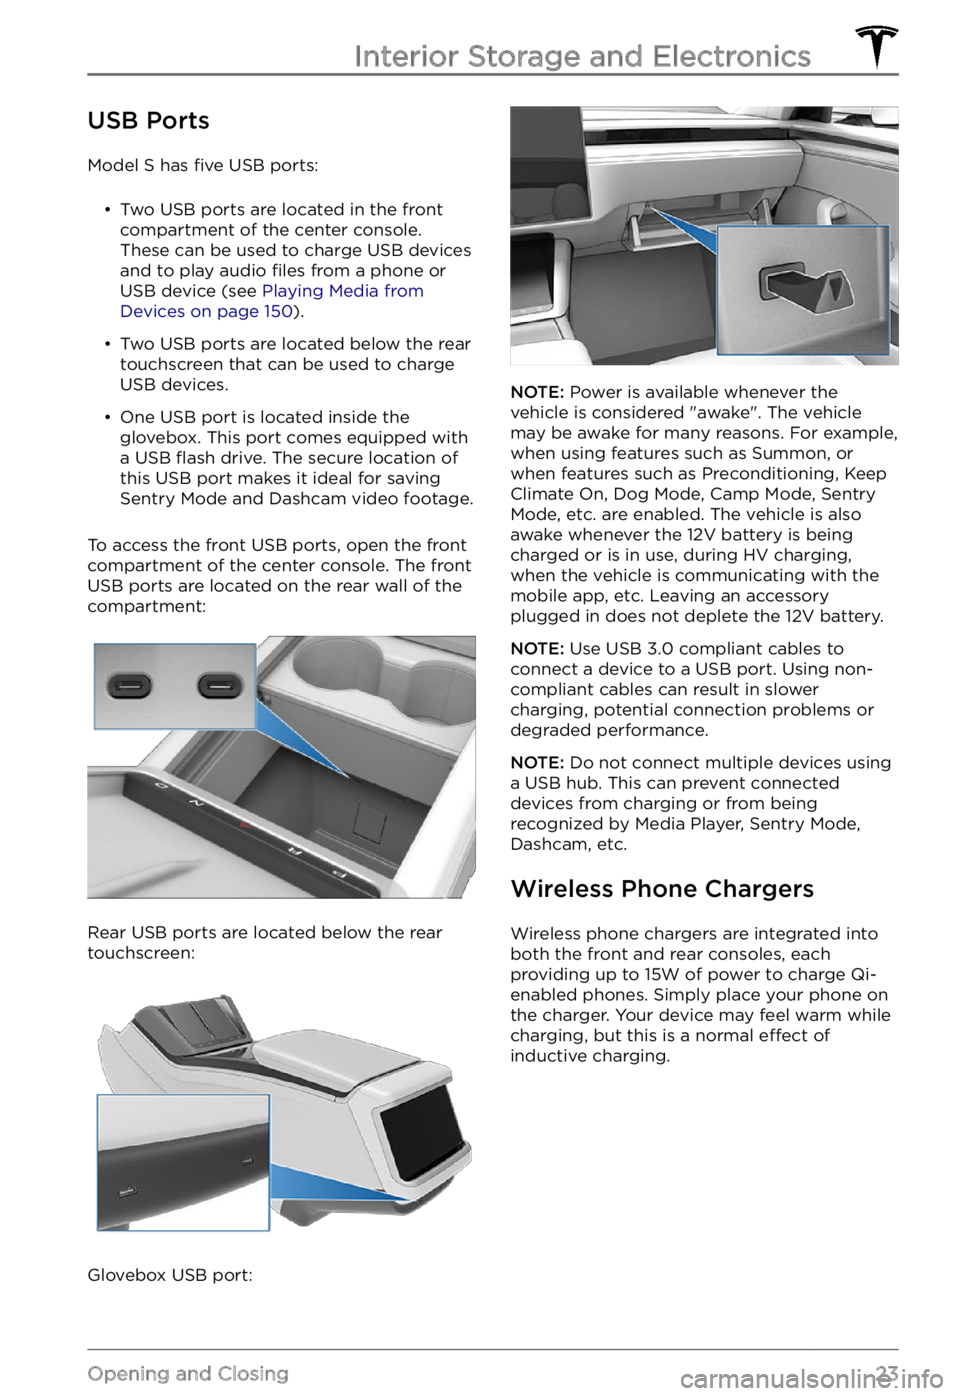
USB Ports
Model S has five USB ports:
Page 26 of 281
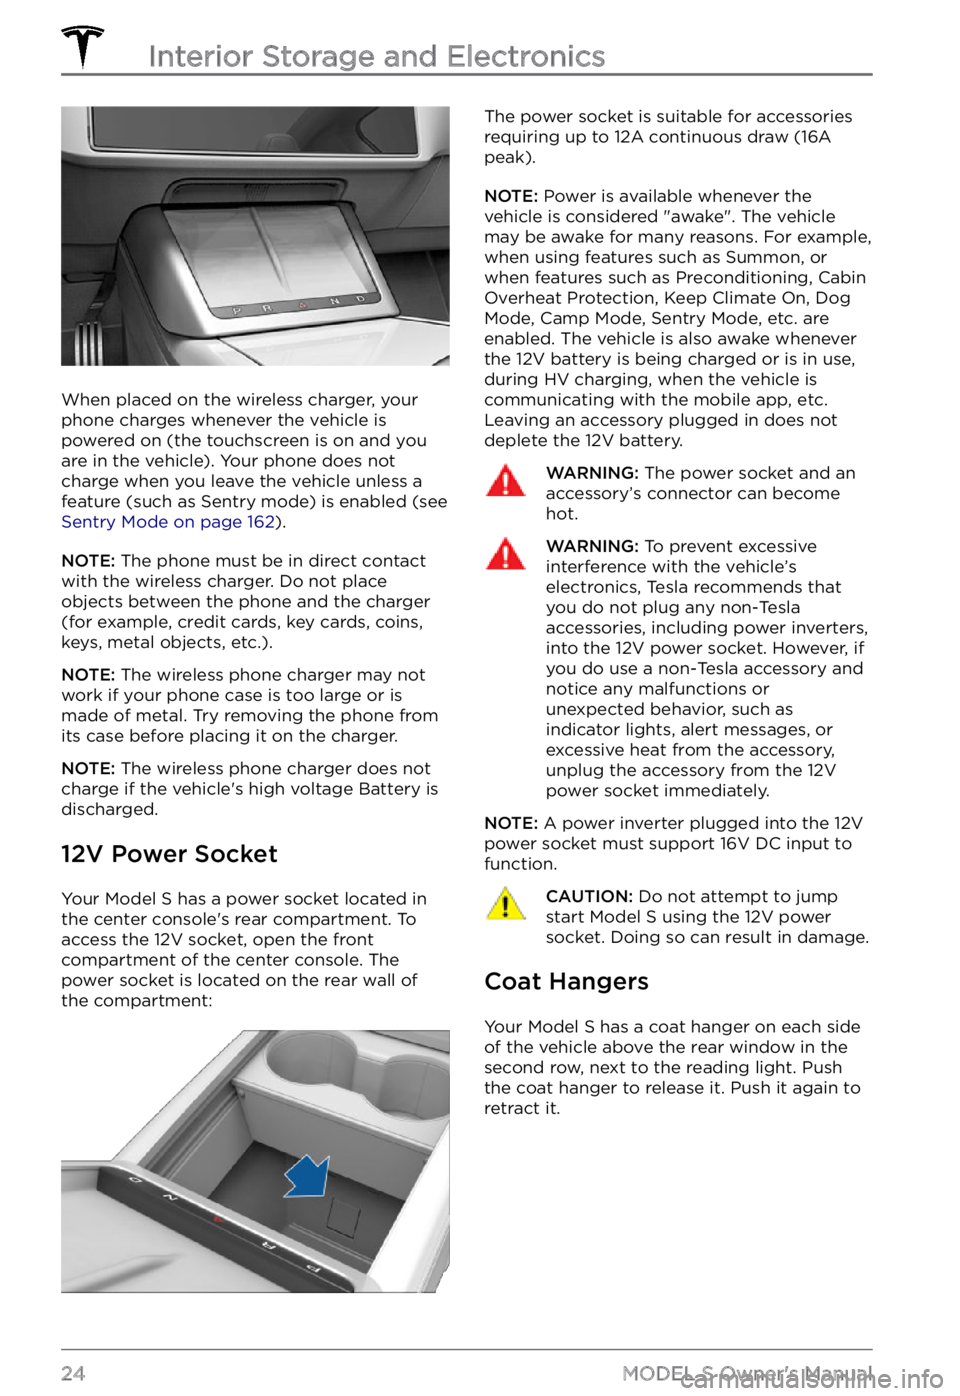
When placed on the wireless charger, your
phone charges whenever the vehicle is
powered on (the touchscreen is on and you
are in the vehicle). Your phone does not
charge when you leave the vehicle
unless a feature (such as Sentry mode) is enabled (see Sentry Mode on page 162).
NOTE: The phone must be in direct contact
with the wireless charger. Do not place
objects between the phone and the charger
(for example, credit cards, key cards, coins,
keys, metal objects, etc.).
NOTE: The wireless phone charger may not
work if your phone case is too large or is
made of metal. Try removing the phone from
its case before placing it on the charger.
NOTE: The wireless phone charger does not
charge if the vehicle
Page 27 of 281
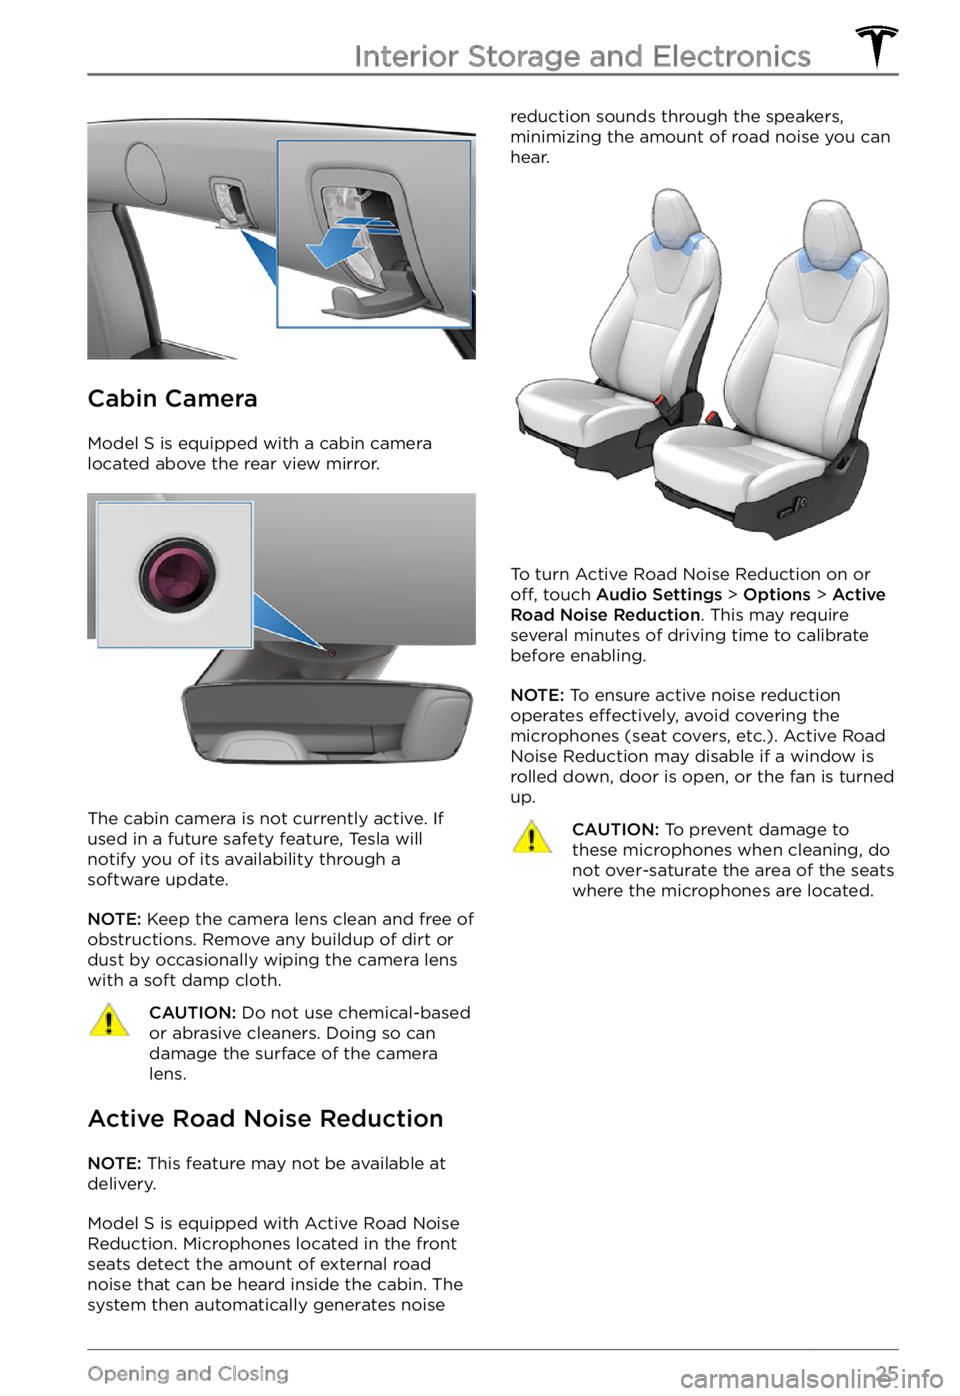
Cabin Camera
Model S is equipped with a cabin camera
located above the rear view mirror.
The cabin camera is not currently active. If
used in a future safety feature, Tesla will
notify you of its availability through a
software update.
NOTE: Keep the camera lens clean and free of
obstructions. Remove any buildup of dirt or
dust by occasionally wiping the camera lens
with a soft damp cloth.
CAUTION: Do not use chemical-based or abrasive cleaners. Doing so can damage the surface of the camera lens.
Active Road Noise Reduction
NOTE: This feature may not be available at
delivery.
Model S is equipped with Active Road Noise
Reduction. Microphones located in the front
seats detect the amount of external road
noise that can be heard inside the cabin. The system then automatically generates noise
reduction sounds through the speakers,
minimizing the amount of road noise you can
hear.
To turn Active Road Noise Reduction on or off, touch Audio Settings > Options > Active Road Noise Reduction. This may require
several minutes of driving time to calibrate
before enabling.
NOTE: To ensure active noise reduction
operates effectively, avoid covering the
microphones (seat covers, etc.). Active Road
Noise Reduction may disable if a window is
rolled down, door is open, or the fan is turned
up.
CAUTION: To prevent damage to these microphones when cleaning, do not over-saturate the area of the seats where the microphones are located.Interior Storage and Electronics
25Opening and Closing
Page 28 of 281
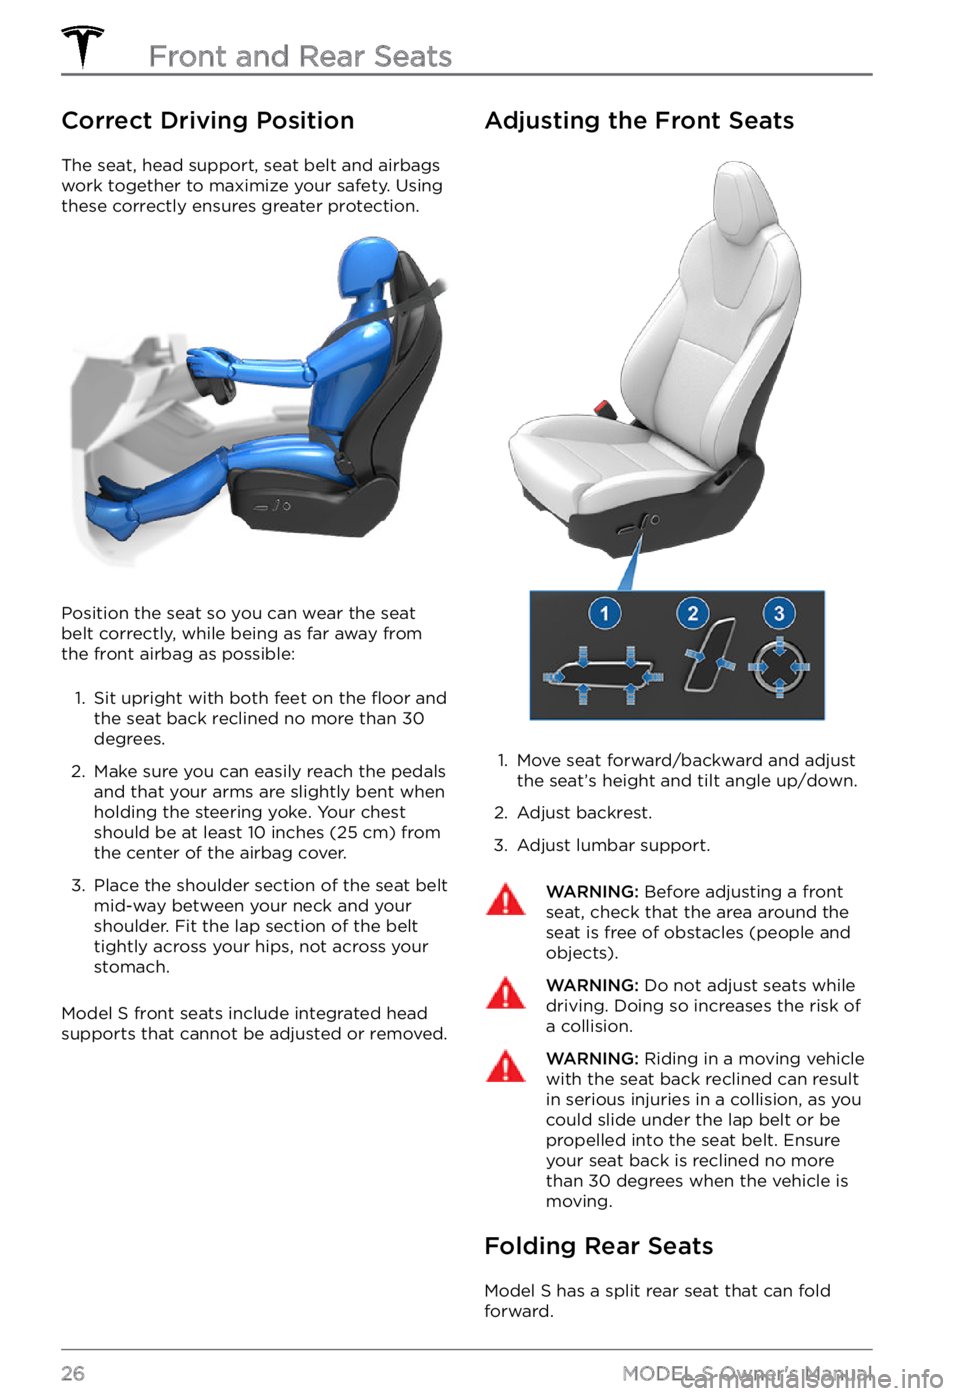
Correct Driving Position
The seat, head support, seat belt and airbags
work together to maximize your safety. Using
these correctly ensures greater protection.
Position the seat so you can wear the seat
belt correctly, while being as far away from the front airbag as possible:
1.
Sit upright with both feet on the floor and
the seat back reclined no more than 30
degrees.
2.
Make sure you can easily reach the pedals
and that your arms are slightly bent when
holding the
steering yoke. Your chest
should be at least 10 inches (25 cm) from
the center of the airbag cover.
3.
Place the shoulder section of the seat belt
mid-way between your neck and your
shoulder. Fit the lap section of the belt
tightly across your hips, not across your
stomach.
Model S front seats include integrated head
supports that cannot be adjusted or removed.
Adjusting the Front Seats1.
Move seat forward/backward and adjust
the seat
Page 29 of 281
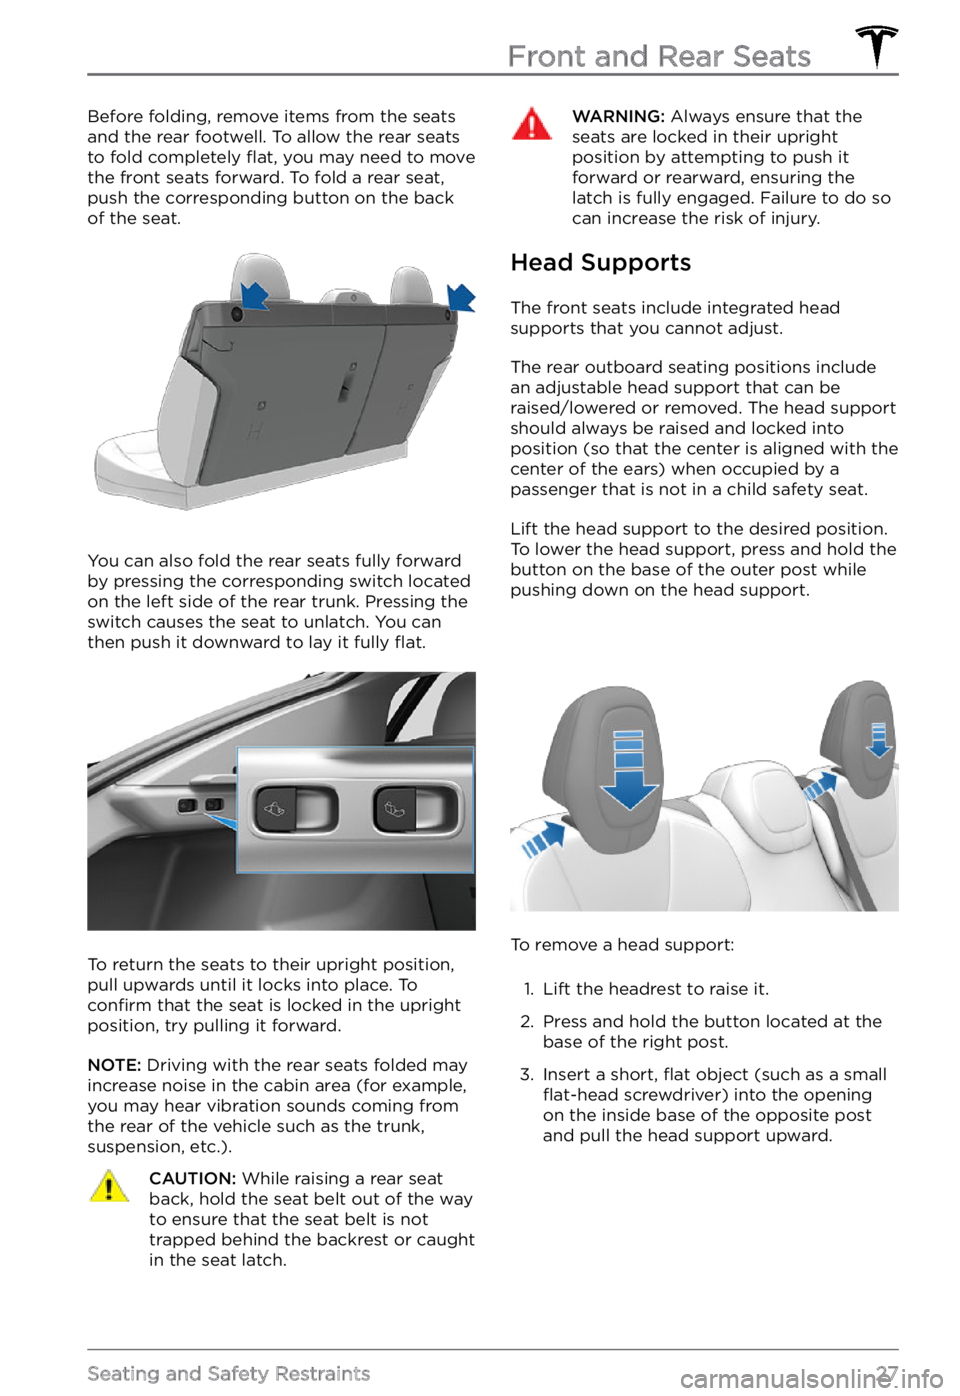
Before folding, remove items from the seats
and the rear footwell. To allow the rear seats
to fold completely
flat, you may need to move
the front seats forward. To fold a rear seat,
push the corresponding button on the back
of the seat.
You can also fold the rear seats fully forward
by pressing the corresponding switch located on the left side of the rear trunk. Pressing the
switch causes the seat to unlatch. You can
then push it downward to lay it fully
flat.
To return the seats to their upright position,
pull upwards until it locks into place. To
confirm that the seat is locked in the upright
position, try pulling it forward.
NOTE: Driving with the rear seats folded may
increase noise in the cabin area (for example,
you may hear vibration sounds coming from
the rear of the vehicle such as the trunk, suspension, etc.).
CAUTION: While raising a rear seat back, hold the seat belt out of the way to ensure that the seat belt is not trapped behind the backrest or caught in the seat latch.
WARNING: Always ensure that the seats are locked in their upright position by attempting to push it forward or rearward, ensuring the latch is fully engaged. Failure to do so can increase the risk of injury.
Head Supports
The front seats include integrated head
supports that you cannot adjust.
The rear outboard seating positions include
an adjustable head support that can be raised/lowered or removed. The head support
should always be raised and locked into
position (so that the center is aligned with the
center of the ears) when occupied by a
passenger that is not in a child safety seat.
Lift the head support to the desired position. To lower the head support, press and hold the
button on the base of the outer post while
pushing down on the head support.
To remove a head support:
1.
Lift the headrest to raise it.
2.
Press and hold the button located at the
base of the right post.
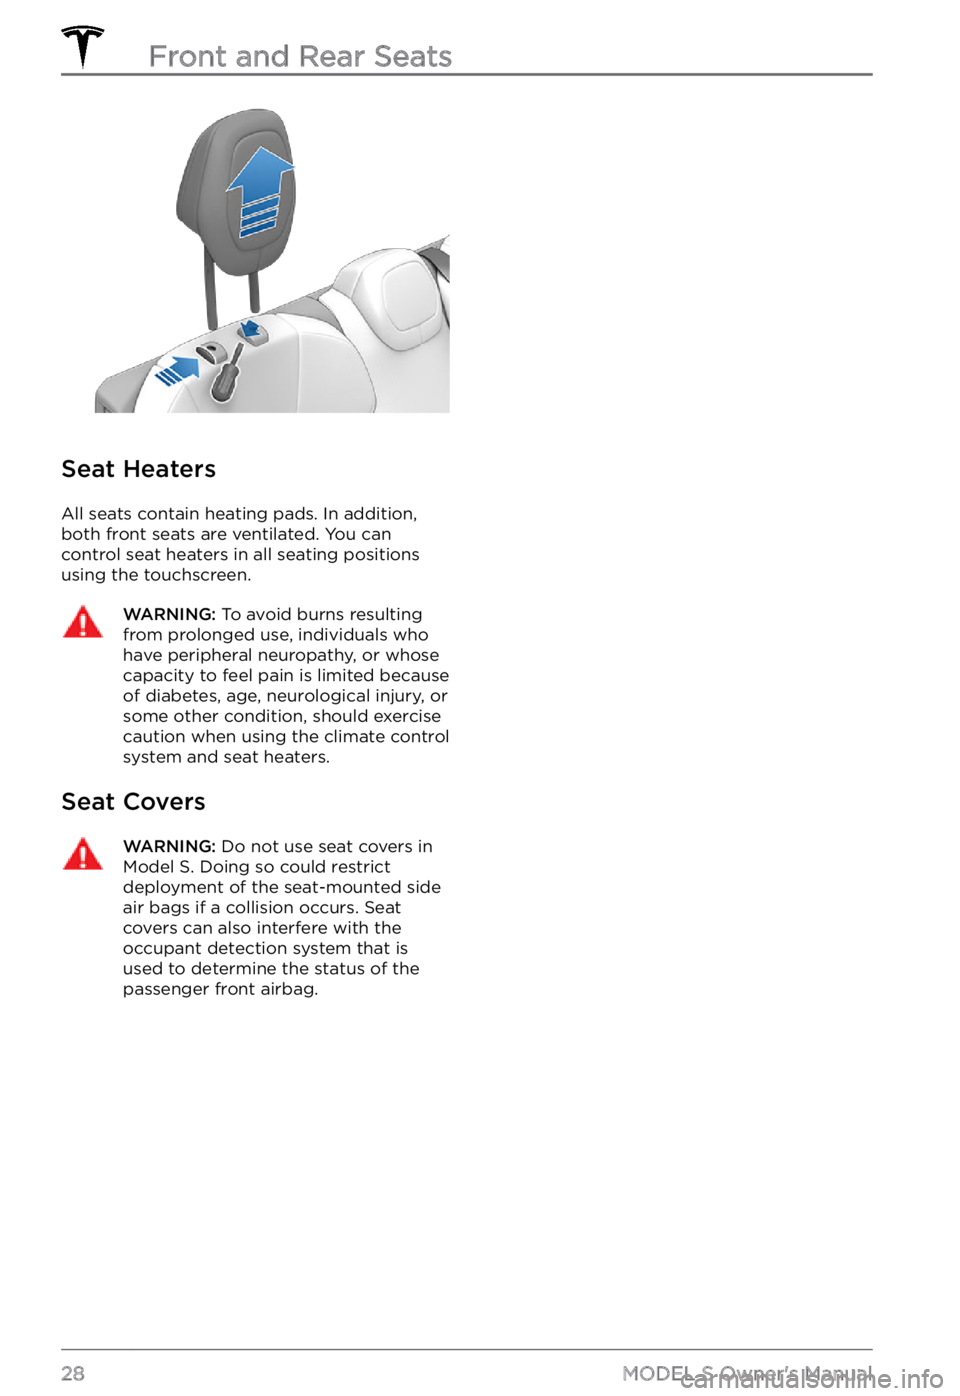
3.
Insert a short, flat object (such as a small flat-head screwdriver) into the opening
on the inside base of the opposite post
and pull the head support upward.
Front and Rear Seats
27Seating and Safety Restraints
Page 30 of 281
Seat Heaters
All seats contain heating pads. In addition,
both front seats are ventilated. You can control seat heaters in all seating positions using the touchscreen.
WARNING: To avoid burns resulting from prolonged use, individuals who have peripheral neuropathy, or whose capacity to feel pain is limited because of diabetes, age, neurological injury, or some other condition, should exercise caution when using the climate control system and seat heaters.
Seat Covers
WARNING: Do not use seat covers in Model S. Doing so could restrict deployment of the seat-mounted side air bags if a collision occurs. Seat covers can also interfere with the occupant detection system that is used to determine the status of the passenger front airbag.
Front and Rear Seats
28MODEL S Owner