window TESLA MODEL S 2022 Owner´s Manual
[x] Cancel search | Manufacturer: TESLA, Model Year: 2022, Model line: MODEL S, Model: TESLA MODEL S 2022Pages: 281, PDF Size: 7.63 MB
Page 3 of 281

Overview............................................................3
Exterior Overview......................................................3
Interior Overview.......................................................4
Touchscreen Overview.............................................6
Opening and Closing....................................9
Keys.................................................................................9
Doors.............................................................................14
Windows......................................................................16
Rear Trunk...................................................................17
Front Trunk.................................................................19
Interior Storage and Electronics........................22
Seating and Safety Restraints.................26
Front and Rear Seats.............................................26
Seat Belts....................................................................29
Child Safety Seats...................................................32
Airbags........................................................................38
Driving.............................................................44
Driver Profiles...........................................................44
Steering Yoke............................................................47
Mirrors.........................................................................50
Starting and Powering Off....................................51
Gears............................................................................53
Lights...........................................................................56
Instrument Panel.....................................................60
Wipers and Washers..............................................65
Braking and Stopping............................................66
Traction Control.......................................................69
Park Assist.................................................................70
Acceleration Modes................................................72
Trip Information........................................................73
Getting Maximum Range......................................74
Rear View Camera...................................................76
Dashcam.....................................................................77
Pedestrian Warning System................................80
Cold Weather Best Practices...............................81
Autopilot.........................................................84
About Autopilot.......................................................84
Traffic-Aware Cruise Control...............................87
Autosteer....................................................................93
Navigate on Autopilot...........................................98
Traffic Light and Stop Sign Control.................101
Autopark...................................................................109
Summon.......................................................................111
Smart Summon........................................................115
Lane Assist................................................................119
Collision Avoidance Assist..................................122
Speed Assist............................................................126
Using the Touchscreen.............................128
Controls.....................................................................128
Climate Controls.....................................................135
Maps and Navigation............................................142
Media..........................................................................149
Entertainment..........................................................152
Phone and Calendar.............................................154
Air Suspension........................................................158
Using Voice Commands......................................160
Security Settings.....................................................161
HomeLink Universal Transceiver......................166
Connecting to Wi-Fi.............................................169
Software Updates..................................................170
Mobile App...............................................................172
Charging........................................................175
Electric Vehicle Components............................175
Battery Information...............................................177
Charging Instructions...........................................179
Maintenance.................................................186
Maintenance Schedule.........................................186
Tire Care and Maintenance.................................188
Cleaning.....................................................................194
Wiper Blades and Washer Jets........................198
Fluid Reservoirs......................................................199
Jacking and Lifting................................................201
Parts and Accessories.........................................202
Specifications.............................................203
Identification Labels............................................203
Vehicle Loading.....................................................204
Dimensions and Weights...................................206
Subsystems.............................................................208
Wheels and Tires....................................................210
Roadside Assistance.................................217
Contacting Tesla Roadside Assistance..........217
Instructions for Transporters.............................218
Consumer Information............................224
About this Owner Information.........................224
Disclaimers..............................................................226
Reporting Safety Defects..................................228
Contents
Page 18 of 281
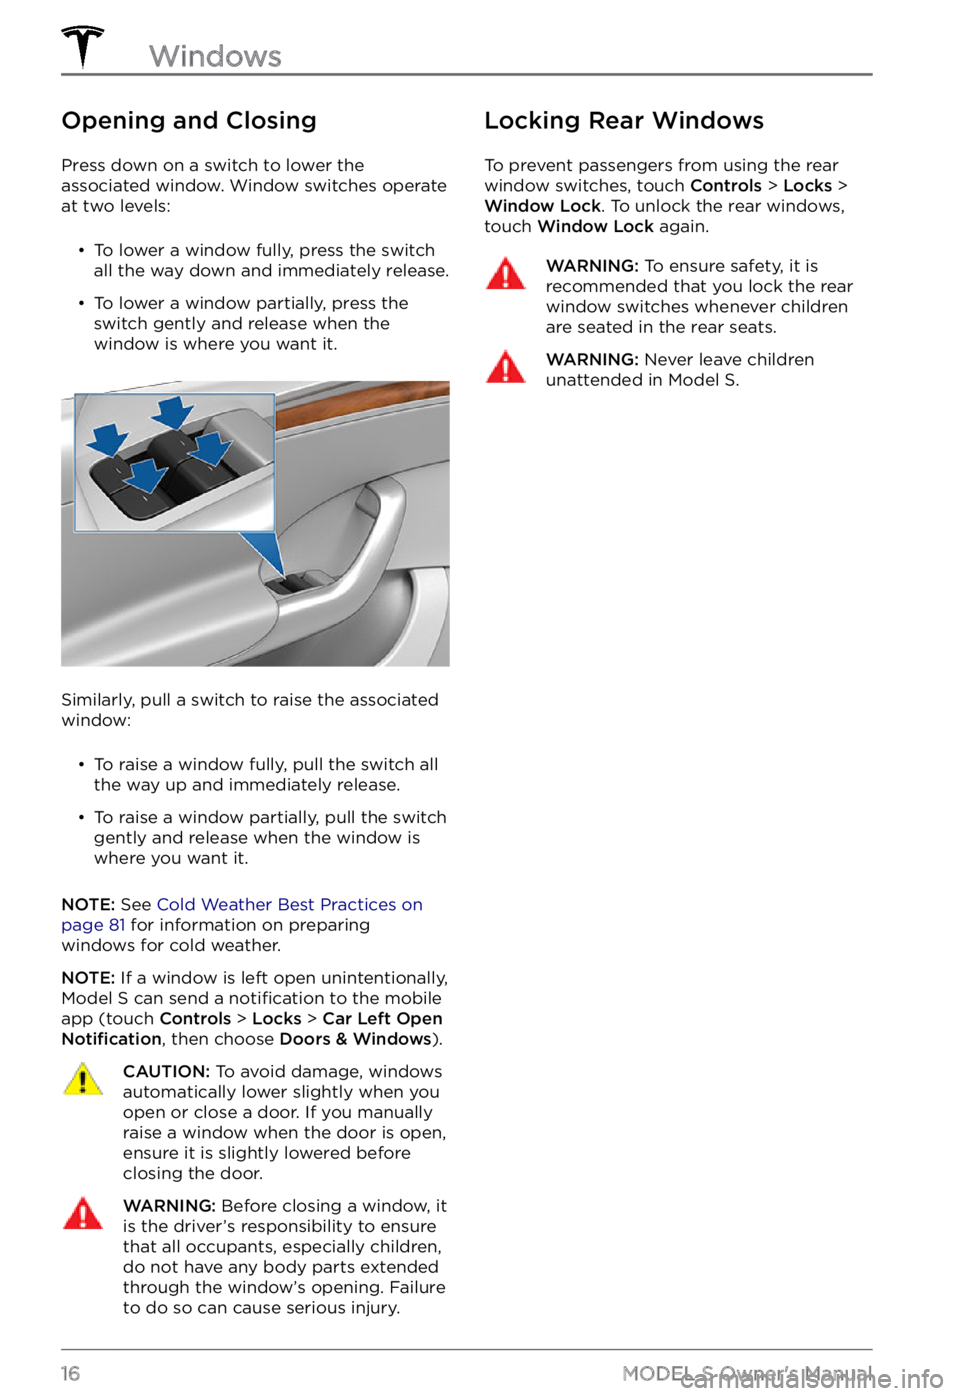
Opening and Closing
Press down on a switch to lower the
associated window. Window switches operate
at two levels:
Page 27 of 281
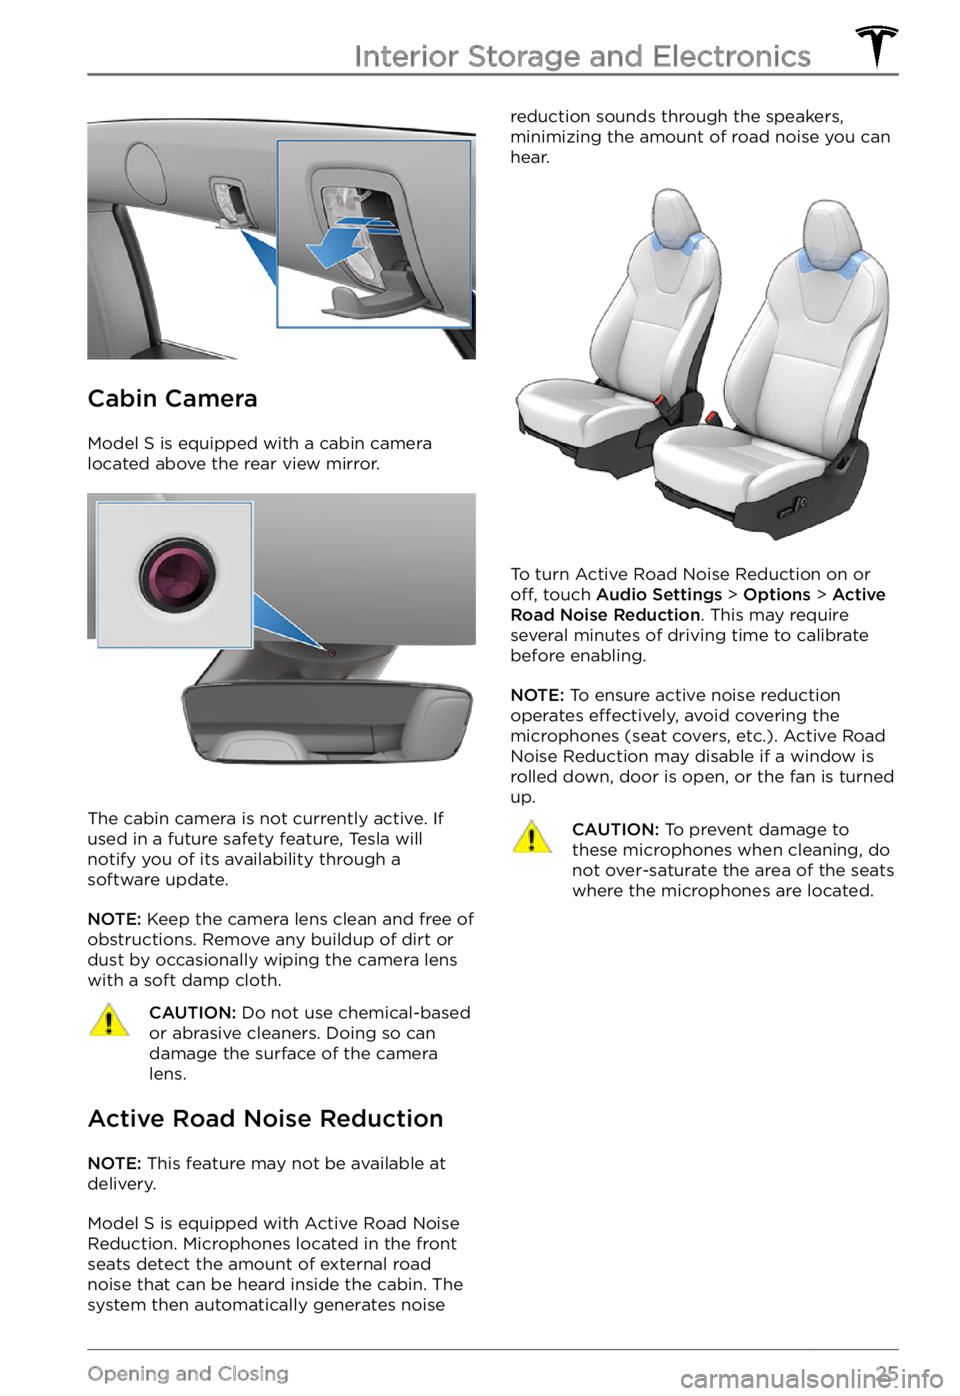
Cabin Camera
Model S is equipped with a cabin camera
located above the rear view mirror.
The cabin camera is not currently active. If
used in a future safety feature, Tesla will
notify you of its availability through a
software update.
NOTE: Keep the camera lens clean and free of
obstructions. Remove any buildup of dirt or
dust by occasionally wiping the camera lens
with a soft damp cloth.
CAUTION: Do not use chemical-based or abrasive cleaners. Doing so can damage the surface of the camera lens.
Active Road Noise Reduction
NOTE: This feature may not be available at
delivery.
Model S is equipped with Active Road Noise
Reduction. Microphones located in the front
seats detect the amount of external road
noise that can be heard inside the cabin. The system then automatically generates noise
reduction sounds through the speakers,
minimizing the amount of road noise you can
hear.
To turn Active Road Noise Reduction on or off, touch Audio Settings > Options > Active Road Noise Reduction. This may require
several minutes of driving time to calibrate
before enabling.
NOTE: To ensure active noise reduction
operates effectively, avoid covering the
microphones (seat covers, etc.). Active Road
Noise Reduction may disable if a window is
rolled down, door is open, or the fan is turned
up.
CAUTION: To prevent damage to these microphones when cleaning, do not over-saturate the area of the seats where the microphones are located.Interior Storage and Electronics
25Opening and Closing
Page 72 of 281
How Park Assist Works
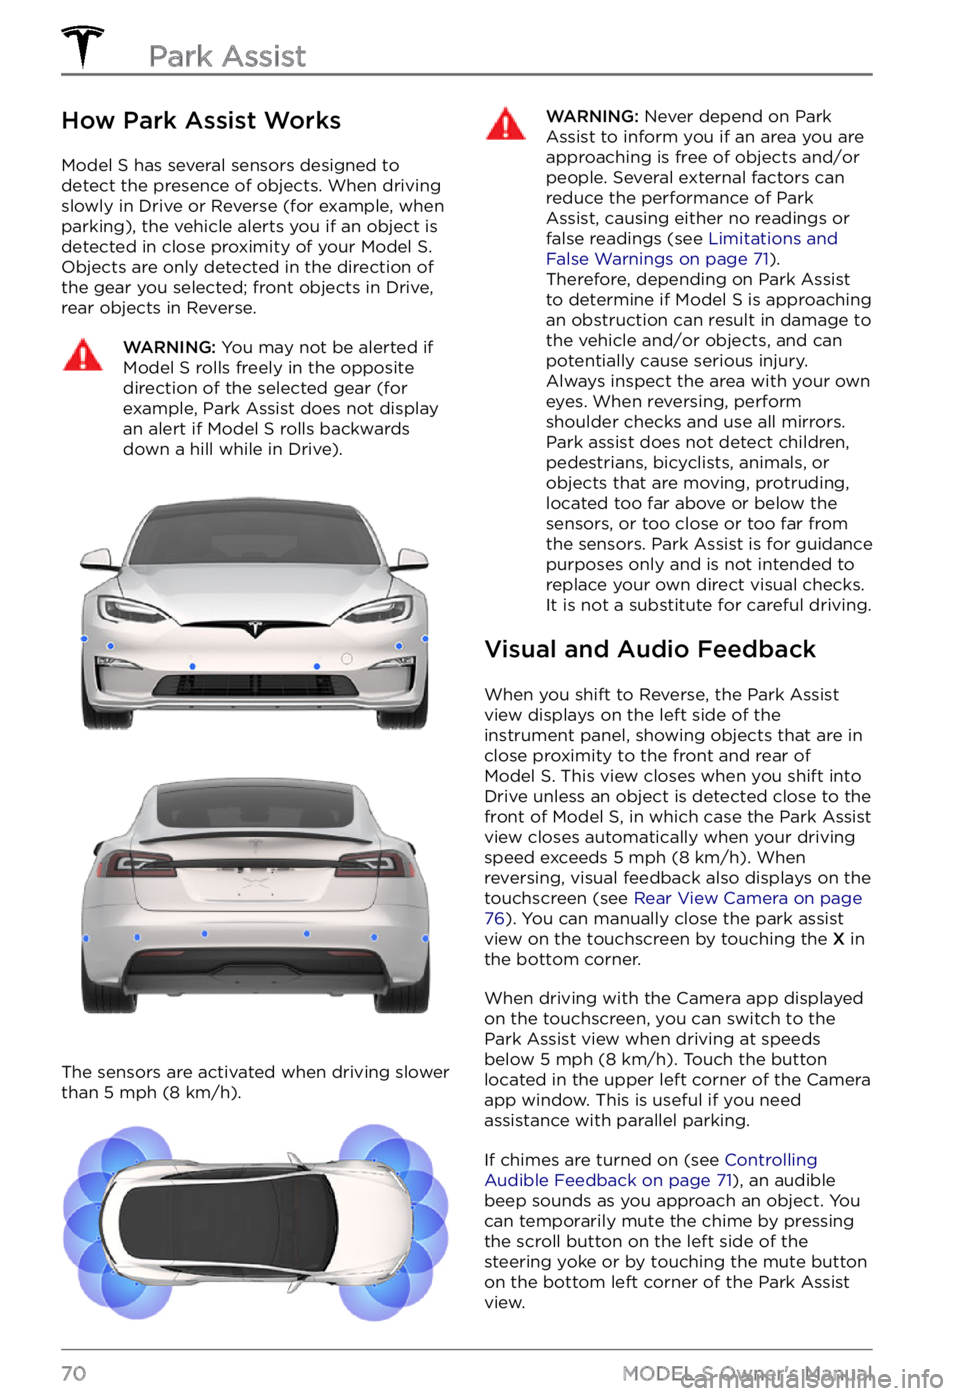
Model S has several sensors designed to
detect the presence of objects. When driving slowly in Drive or Reverse (for example, when
parking), the vehicle alerts you if an object is
detected in close proximity of your
Model S.
Objects are only detected in the direction of
the gear you selected; front objects in Drive,
rear objects in Reverse.
WARNING: You may not be alerted if Model S rolls freely in the opposite direction of the selected gear (for example, Park Assist does not display an alert if Model S rolls backwards down a hill while in Drive).
The sensors are activated when driving slower
than 5 mph (8 km/h).
WARNING: Never depend on Park Assist to inform you if an area you are approaching is free of objects and/or people. Several external factors can reduce the performance of Park Assist, causing either no readings or false readings (see Limitations and False Warnings on page 71). Therefore, depending on Park Assist to determine if Model S is approaching an obstruction can result in damage to the vehicle and/or objects, and can potentially cause serious injury. Always inspect the area with your own eyes. When reversing, perform shoulder checks and use all mirrors. Park assist does not detect children, pedestrians, bicyclists, animals, or objects that are moving, protruding, located too far above or below the sensors, or too close or too far from the sensors. Park Assist is for guidance purposes only and is not intended to replace your own direct visual checks. It is not a substitute for careful driving.
Visual and Audio Feedback
When you shift to Reverse, the Park Assist
view displays on the left side of the instrument panel, showing objects that are in
close proximity to the front and rear of
Model S. This view closes when you shift into
Drive unless an object is detected close to the
front of
Model S, in which case the Park Assist
view closes automatically when your driving
speed exceeds
5 mph (8 km/h). When
reversing, visual feedback also displays on the
touchscreen (see
Rear View Camera on page 76). You can manually close the park assist
view on the touchscreen by touching the X in
the bottom corner.
When driving with the Camera app displayed
on the touchscreen, you can switch to the
Park Assist view when driving at speeds
below
5 mph (8 km/h). Touch the button
located in the upper left corner of the Camera
app window. This is useful if you need
assistance with parallel parking.
If chimes are turned on (see Controlling Audible Feedback on page 71), an audible
beep sounds as you approach an object. You
can temporarily mute the chime by pressing
the scroll button on the left side of the
steering yoke or by touching the mute button
on the bottom left corner of the Park Assist
view.
Park Assist
70MODEL S Owner
Page 78 of 281
Camera Location
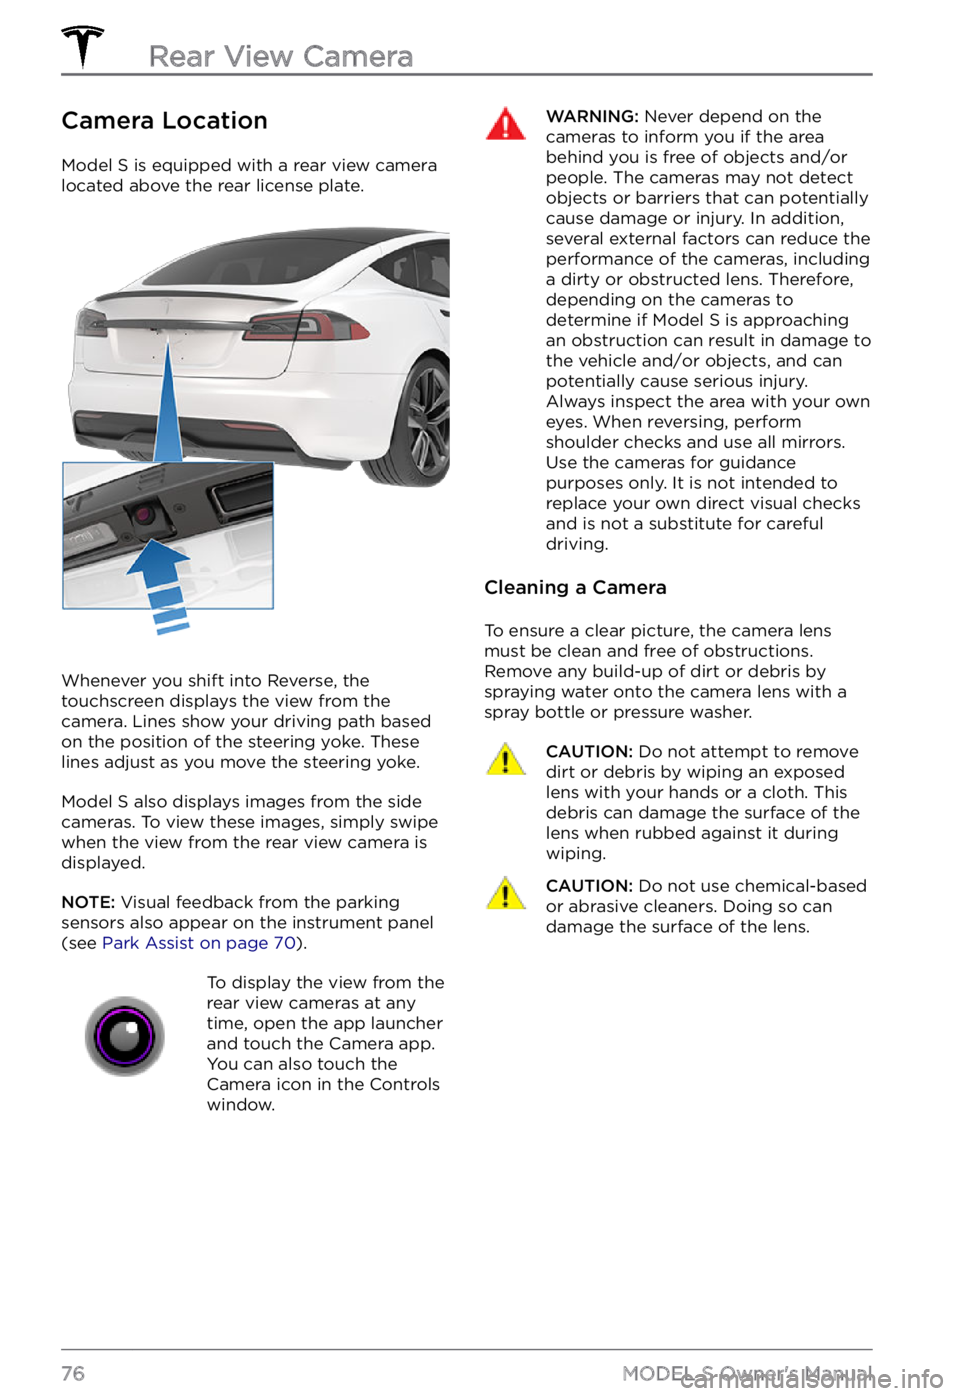
Model S is equipped with a rear view camera
located above the rear license plate.
Whenever you shift into Reverse, the
touchscreen displays the view from the
camera. Lines show your driving path based
on the position of the
steering yoke. These
lines adjust as you move the steering yoke.
Model S also displays images from the side
cameras. To view these images, simply swipe
when the view from the rear view camera is displayed.
NOTE: Visual feedback from the parking
sensors also appear on the instrument panel (see Park Assist on page 70).
To display the view from the
rear view cameras at any
time, open the app launcher
and touch the Camera app.
You can also touch the
Camera icon in the Controls
window.WARNING: Never depend on the cameras to inform you if the area behind you is free of objects and/or people. The cameras may not detect objects or barriers that can potentially cause damage or injury. In addition, several external factors can reduce the performance of the cameras, including a dirty or obstructed lens. Therefore, depending on the cameras to determine if Model S is approaching an obstruction can result in damage to the vehicle and/or objects, and can potentially cause serious injury. Always inspect the area with your own eyes. When reversing, perform shoulder checks and use all mirrors. Use the cameras for guidance purposes only. It is not intended to replace your own direct visual checks and is not a substitute for careful driving.
Cleaning a Camera
To ensure a clear picture, the camera lens
must be clean and free of obstructions.
Remove any build-up of dirt or debris by
spraying water onto the camera lens with a
spray bottle or pressure washer.
CAUTION: Do not attempt to remove dirt or debris by wiping an exposed lens with your hands or a cloth. This debris can damage the surface of the lens when rubbed against it during wiping.
CAUTION: Do not use chemical-based or abrasive cleaners. Doing so can damage the surface of the lens.Rear View Camera
76MODEL S Owner
Page 81 of 281

9. Properly eject the USB flash drive.
For Windows:
1.
Insert the USB flash drive into your
personal computer.
2.
Navigate to File Explorer.
3.
Right-click on your USB flash drive and
select "Format...".
4.
In the pop-up menu, under the File System section, select a support format
(such as exFAT, FAT 32, etc.).
NOTE: You can also name your USB flash
drive (under Volume Label).
5.
Check the Quick format box and click Start.
6.
Go back to File Explorer, click on your flash drive, and right-click to create a
folder, or select New Folder in the top
menu.
7.
Name the folder “TeslaCam” (without
quotation marks) and click Save. This
folder contains all recent and saved clips
from Sentry Mode and Dashcam.
8.
Properly eject the USB flash drive.
Once you have formatted the USB flash drive
and created the TeslaCam folder, insert it into
a USB port in Model S. Do not use the rear
USB ports
Page 83 of 281
To ensure that Model S provides you with the
best ownership experience possible in harsh cold weather conditions, follow these best
practices.
Before Driving
When snow and ice accumulate on your
vehicle, moving parts, such as the door
handles, windows, mirrors, and wipers can
freeze in place. For these reasons, and to
achieve maximum range and performance, it
is helpful to warm the cabin and Battery before you leave. There are several ways to do so:
Page 130 of 281
Controls - OverviewTouch Controls on the
bottom corner of the
touchscreen to control
features and customize
Model S to suit your
preferences. The Controls
window appears over the
map. Touch an option on the
Controls screen to display
the various settings and
options associated with the
chosen option. Swipe to
close.
NOTE: You can also access
Controls by touching
anywhere on the side of the
touchscreen closest to the
driver and swiping to the
right.
When an information icon
displays beside a specific
setting, touch it to display a
popup that provides helpful
details about the associated
setting.
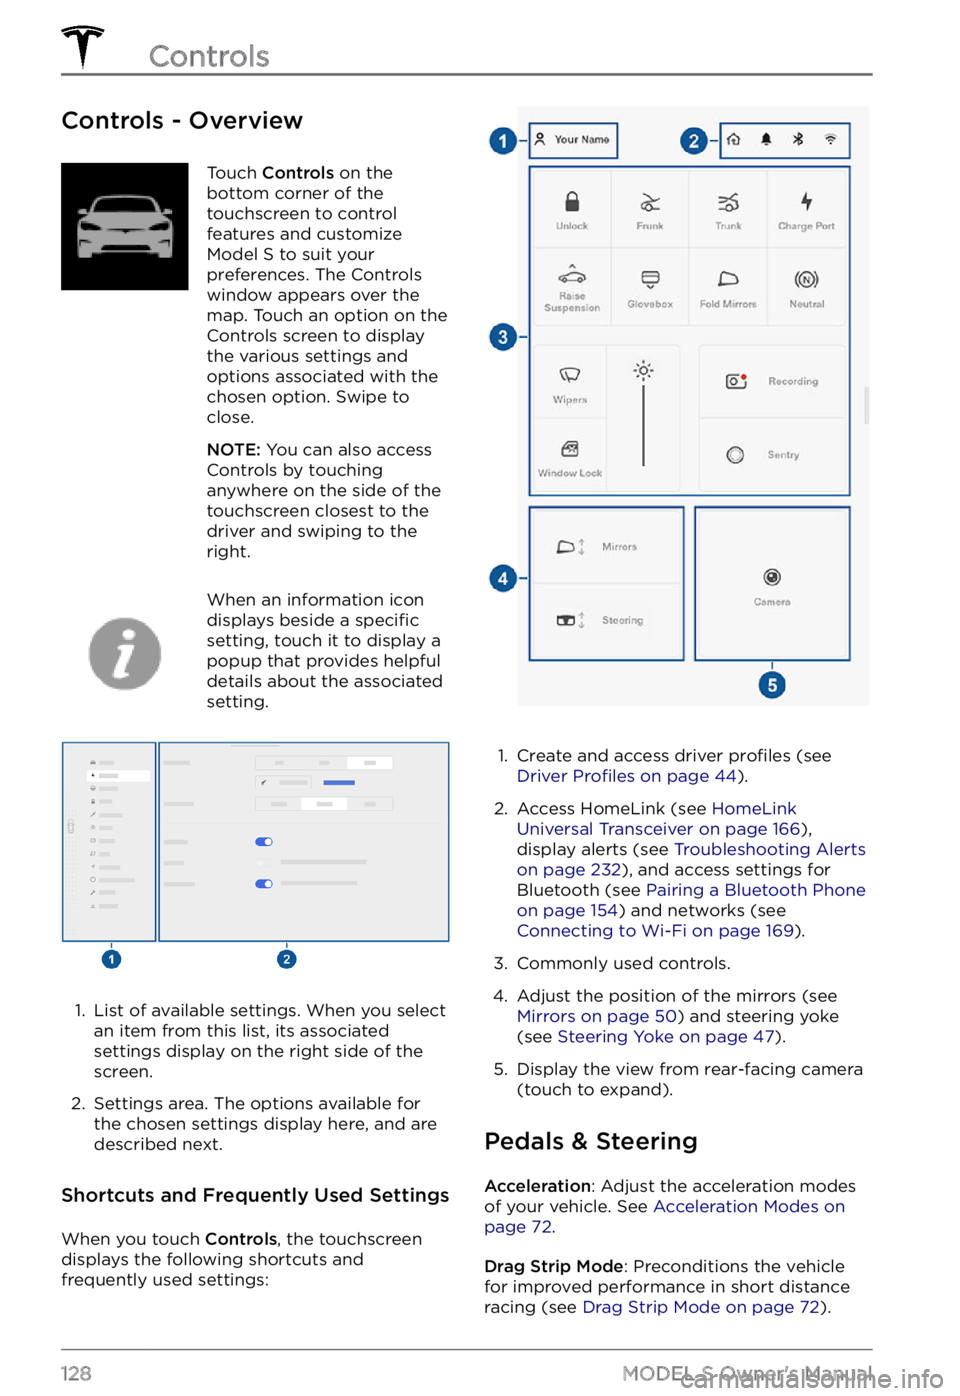
1.
List of available settings. When you select
an item from this list, its associated settings display on the right side of the
screen.
2.
Settings area. The options available for
the chosen settings display here, and are
described next.
Shortcuts and Frequently Used Settings
When you touch Controls, the touchscreen
displays the following shortcuts and
frequently used settings:
1.
Create and access driver profiles (see Driver Profiles on page 44).
2.
Access HomeLink (see HomeLink Universal Transceiver on page 166),
display alerts (see Troubleshooting Alerts on page 232), and access settings for
Bluetooth (see Pairing a Bluetooth Phone on page 154) and networks (see Connecting to Wi-Fi on page 169).
3.
Commonly used controls.
4.
Adjust the position of the mirrors (see Mirrors on page 50) and steering yoke
(see Steering Yoke on page 47).
5.
Display the view from rear-facing camera
(touch to expand).
Pedals & Steering
Acceleration: Adjust the acceleration modes
of your vehicle. See Acceleration Modes on page 72.
Drag Strip Mode: Preconditions the vehicle
for improved performance in short distance racing (see
Drag Strip Mode on page 72).
Controls
128MODEL S Owner
Page 137 of 281
Overview of Climate Controls
Climate controls are available at the bottom of the touchscreen. To turn the climate control
system on, touch the temperature icon. To turn it off, touch and hold the temperature or touch
the temperature icon to display the climate control popup, then touch the power button.
By default, climate control is set to Auto, which maintains optimum comfort in all but the most
severe weather conditions. When you adjust the cabin temperature in the Auto setting, the
system automatically adjusts the heating, air conditioning, air distribution, and fan speed to maintain the cabin at your selected temperature. Touch and hold the temperature to customize
settings in the climate control popup window. You can revert back to Auto at any time by
touching
Auto.
NOTE: The climate control system is powered by the high voltage Battery. Therefore, prolonged
use decreases driving range.
WARNING: To avoid burns resulting from prolonged use, individuals who have peripheral neuropathy, or whose capacity to feel pain is limited because of diabetes, age, neurological injury, or some other condition, should exercise caution when using the climate control system and seat heaters.
Adjusting Climate Control Settings
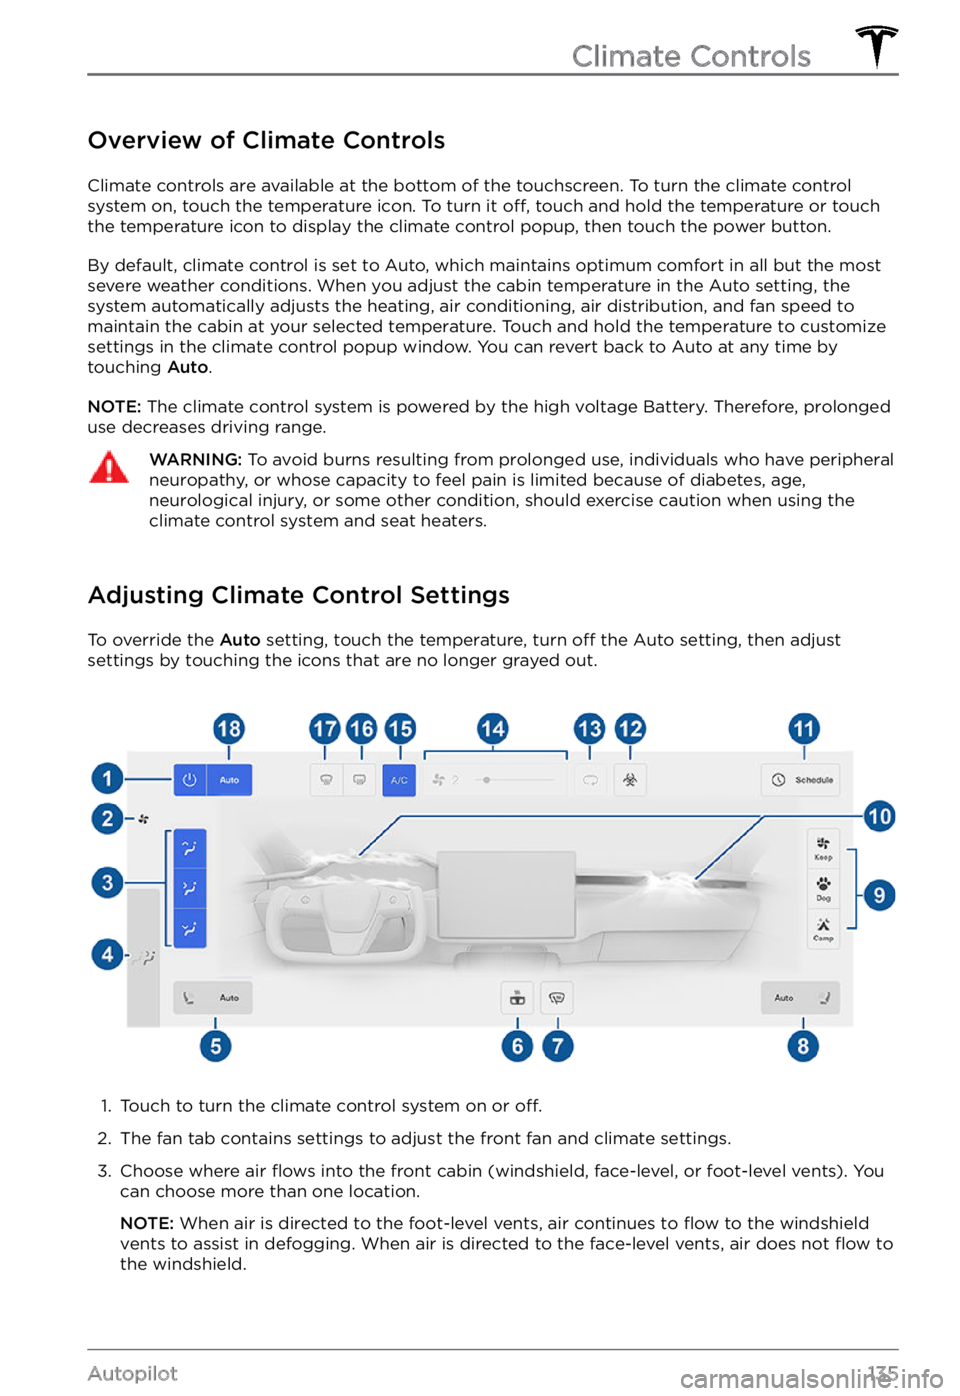
To override the Auto setting, touch the temperature, turn off the Auto setting, then adjust
settings by touching the icons that are no longer grayed out.
1.
Touch to turn the climate control system on or off.
2.
The fan tab contains settings to adjust the front fan and climate settings.
3.
Choose where air flows into the front cabin (windshield, face-level, or foot-level vents). You
can choose more than one location.
NOTE: When air is directed to the foot-level vents, air continues to flow to the windshield
vents to assist in defogging. When air is directed to the face-level vents, air does not flow to
the windshield.
Climate Controls
135Autopilot
Page 139 of 281

16. Touch to warm up the rear window. When operating, the icon turns red. After 15 minutes, the
rear window defroster automatically turns off. The exterior side mirrors are also heated
whenever the rear window defroster is operating.
17.
The windshield defroster distributes air flow to the windshield. Touch once to defog the
windshield (the icon turns blue). Touch a second time to defrost the windshield (the icon
turns red and the heating and fan operate at maximum levels). Touch a third time to turn off
and restore the air distribution, heating, and fan to their previous settings. In cold ambient temperatures, the exterior side mirrors are also heated whenever the windshield defroster is operating. See Cold Weather Best Practices on page 81 for more information on preparing
for cold weather.
18.
Touch Auto to turn the Auto setting on or off.
Climate Controls
137Using the Touchscreen