window TESLA MODEL X 2017 Owner's Manual (UK)
[x] Cancel search | Manufacturer: TESLA, Model Year: 2017, Model line: MODEL X, Model: TESLA MODEL X 2017Pages: 202, PDF Size: 4.82 MB
Page 3 of 202
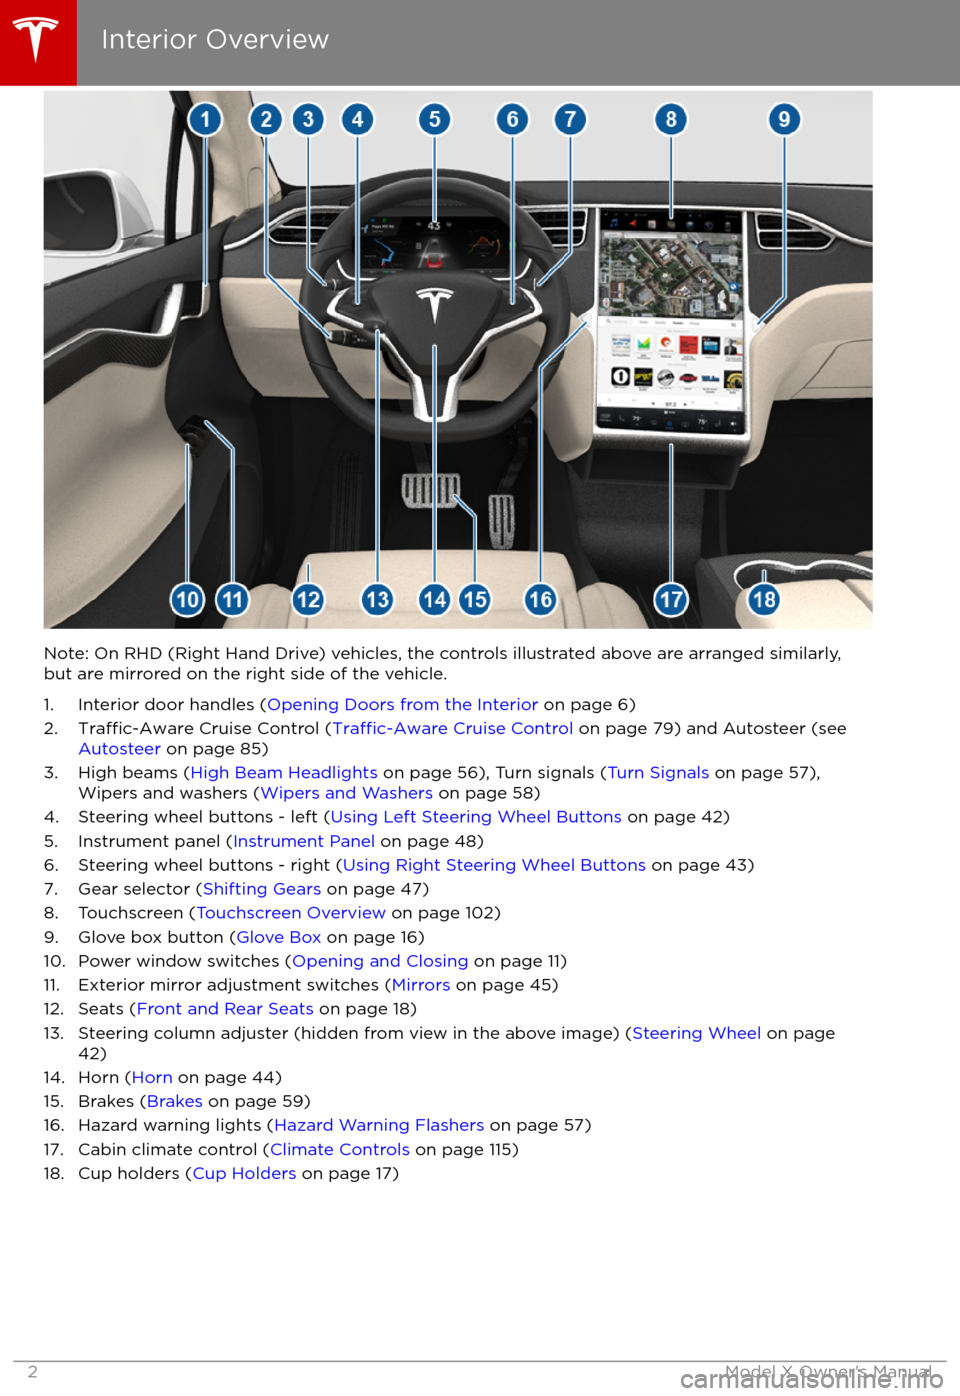
Note: On RHD (Right Hand Drive) vehicles, the controls illustrated above are arranged similarly,but are mirrored on the right side of the vehicle.
1. Interior door handles ( Opening Doors from the Interior on page 6)
2.
Traffic-Aware Cruise Control (Traffic-Aware Cruise Control on page 79) and Autosteer (see
Autosteer on page 85)
3. High beams ( High Beam Headlights on page 56), Turn signals ( Turn Signals on page 57),
Wipers and washers ( Wipers and Washers on page 58)
4. Steering wheel buttons - left ( Using Left Steering Wheel Buttons on page 42)
5. Instrument panel ( Instrument Panel on page 48)
6. Steering wheel buttons - right ( Using Right Steering Wheel Buttons on page 43)
7. Gear selector ( Shifting Gears on page 47)
8. Touchscreen ( Touchscreen Overview on page 102)
9. Glove box button ( Glove Box on page 16)
10. Power window switches ( Opening and Closing on page 11)
11. Exterior mirror adjustment switches ( Mirrors on page 45)
12. Seats ( Front and Rear Seats on page 18)
13. Steering column adjuster (hidden from view in the above image) ( Steering Wheel on page
42)
14. Horn ( Horn on page 44)
15. Brakes ( Brakes on page 59)
16. Hazard warning lights ( Hazard Warning Flashers on page 57)
17. Cabin climate control ( Climate Controls on page 115)
18. Cup holders ( Cup Holders on page 17)
Interior Overview
2Model X Owner
Page 12 of 202
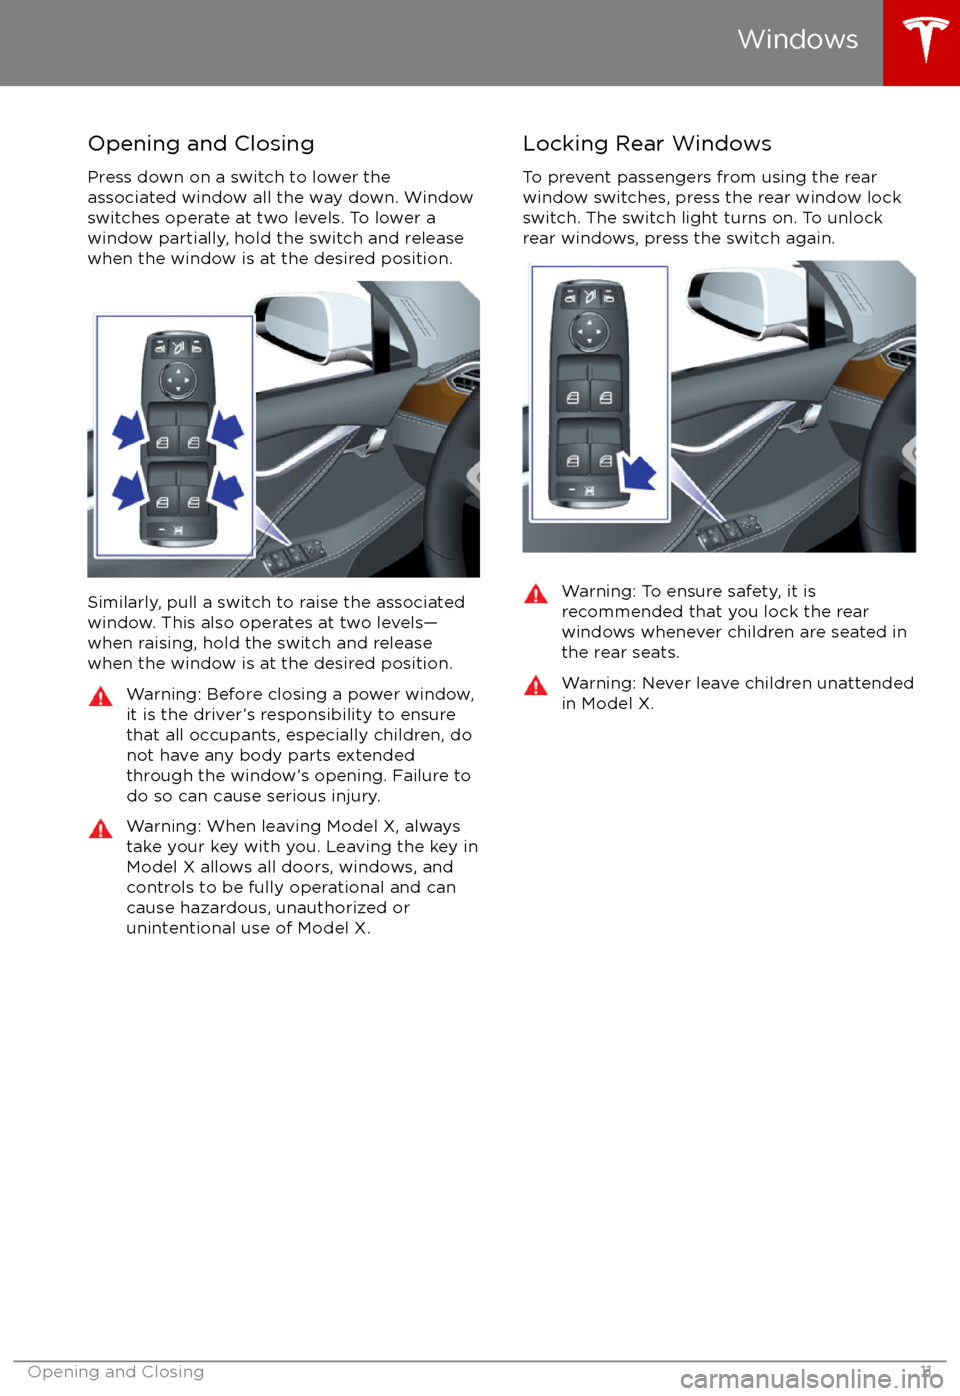
Opening and Closing
Press down on a switch to lower the
associated window all the way down. Window
switches operate at two levels. To lower a
window partially, hold the switch and release
when the window is at the desired position.
Similarly, pull a switch to raise the associated
window. This also operates at two levels
Page 15 of 202
Opening
To open the front trunk: Touch ControlsFront Trunk on the
touchscreen, or double-click the front
trunk button on the key.
Pull the hood up.The door open indicator displays on
the instrument panel when the front
trunk is open. The image of the
Model X on the touchscreen Controls window also displays the open trunk.
The front trunk locks whenever Model X is
locked using the touchscreen, externally using
the key or walk-away locking, or when Valet
mode is active (see Valet Mode).
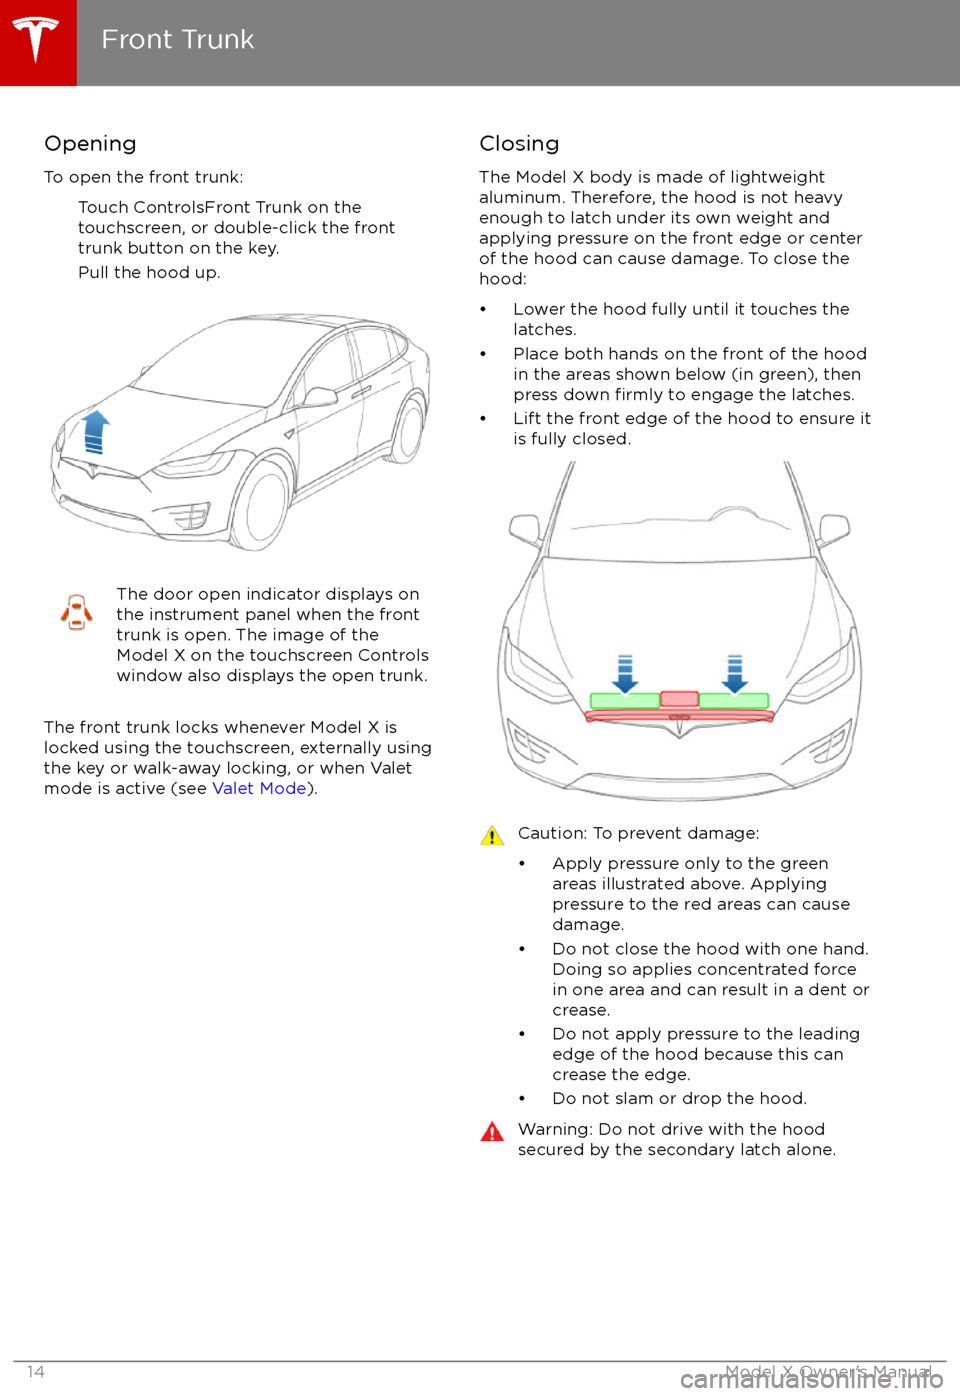
Closing
The Model X body is made of lightweight
aluminum. Therefore, the hood is not heavy
enough to latch under its own weight and
applying pressure on the front edge or center of the hood can cause damage. To close the
hood:
Page 63 of 202
How Park Assist Works
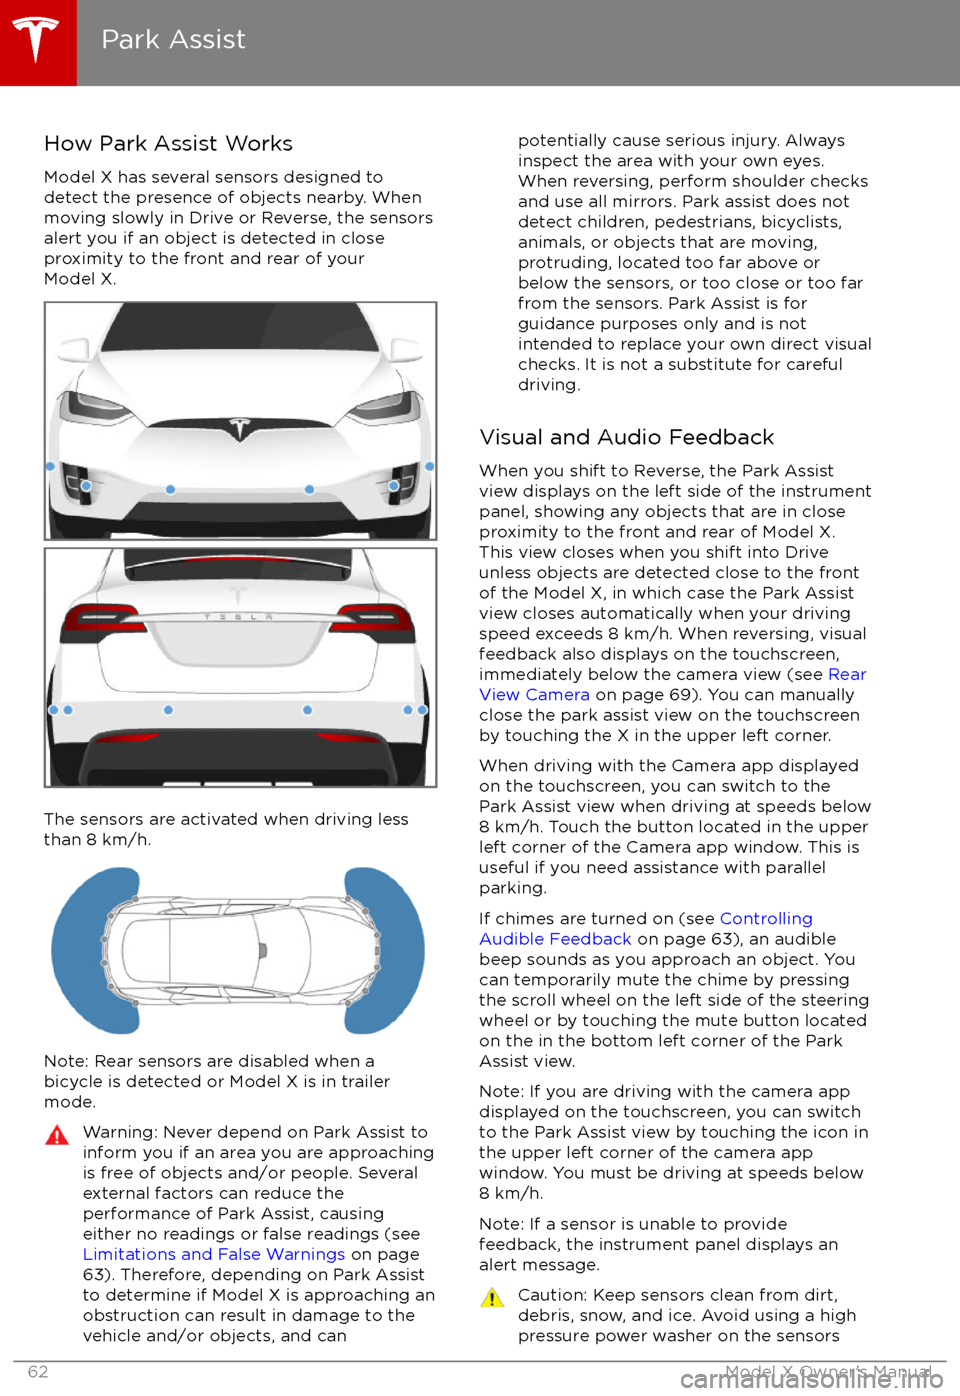
Model X has several sensors designed to
detect the presence of objects nearby. When
moving slowly in Drive or Reverse, the sensors
alert you if an object is detected in close
proximity to the front and rear of your
Model X.
The sensors are activated when driving less
than 8 km/h.
Note: Rear sensors are disabled when a
bicycle is detected or Model X is in trailer
mode.
Warning: Never depend on Park Assist to
inform you if an area you are approaching is free of objects and/or people. Several
external factors can reduce the
performance of Park Assist, causing
either no readings or false readings (see
Limitations and False Warnings on page
63). Therefore, depending on Park Assist
to determine if Model X is approaching an
obstruction can result in damage to the vehicle and/or objects, and canpotentially cause serious injury. Always
inspect the area with your own eyes.
When reversing, perform shoulder checks and use all mirrors. Park assist does not
detect children, pedestrians, bicyclists,
animals, or objects that are moving, protruding, located too far above or
below the sensors, or too close or too far
from the sensors. Park Assist is for
guidance purposes only and is not intended to replace your own direct visual
checks. It is not a substitute for careful
driving.
Visual and Audio Feedback
When you shift to Reverse, the Park Assist
view displays on the left side of the instrument
panel, showing any objects that are in close
proximity to the front and rear of Model X.
This view closes when you shift into Drive
unless objects are detected close to the front
of the Model X, in which case the Park Assist
view closes automatically when your driving
speed exceeds 8 km/h. When reversing, visual
feedback also displays on the touchscreen,
immediately below the camera view (see Rear
View Camera on page 69). You can manually
close the park assist view on the touchscreen
by touching the X in the upper left corner.
When driving with the Camera app displayed
on the touchscreen, you can switch to the
Park Assist view when driving at speeds below
8 km/h. Touch the button located in the upper
left corner of the Camera app window. This is
useful if you need assistance with parallel parking.
If chimes are turned on (see Controlling
Audible Feedback on page 63), an audible
beep sounds as you approach an object. You
can temporarily mute the chime by pressing
the scroll wheel on the left side of the steering
wheel or by touching the mute button located
on the in the bottom left corner of the Park Assist view.
Note: If you are driving with the camera app
displayed on the touchscreen, you can switch to the Park Assist view by touching the icon inthe upper left corner of the camera app
window. You must be driving at speeds below
8 km/h.
Note: If a sensor is unable to provide
feedback, the instrument panel displays an
alert message.
Caution: Keep sensors clean from dirt,
debris, snow, and ice. Avoid using a high
pressure power washer on the sensors
Park Assist
62Model X Owner
Page 109 of 202
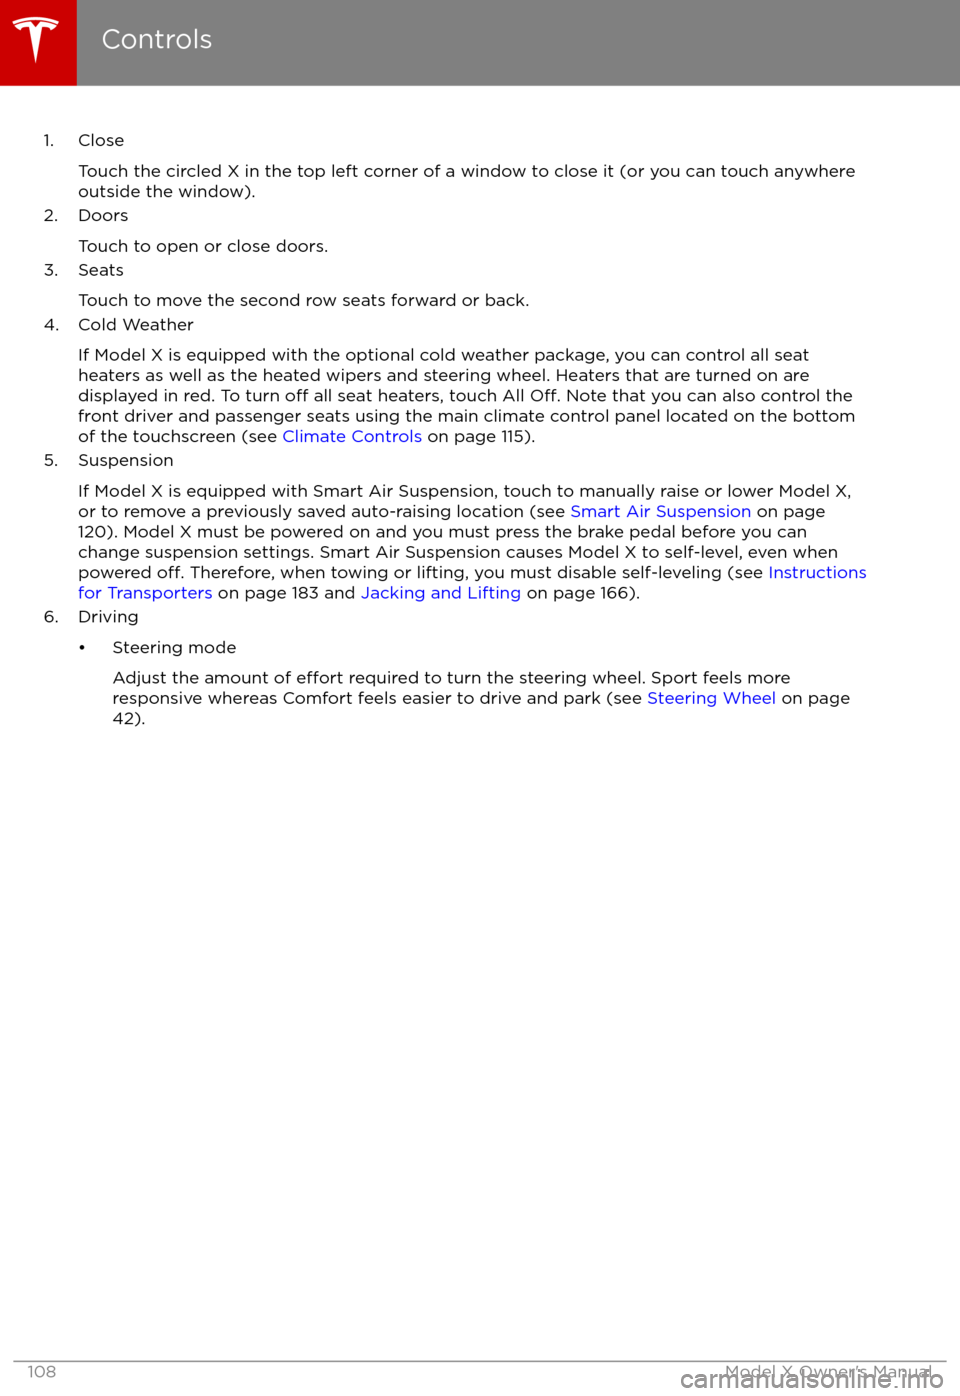
1. CloseTouch the circled X in the top left corner of a window to close it (or you can touch anywhere
outside the window).
2. Doors
Touch to open or close doors.
3. Seats
Touch to move the second row seats forward or back.
4. Cold Weather
If Model X is equipped with the optional cold weather package, you can control all seatheaters as well as the heated wipers and steering wheel. Heaters that are turned on are displayed in red. To turn
off all seat heaters, touch All Off. Note that you can also control the
front driver and passenger seats using the main climate control panel located on the bottom
of the touchscreen (see Climate Controls on page 115).
5. Suspension
If Model X is equipped with Smart Air Suspension, touch to manually raise or lower Model X,or to remove a previously saved auto-raising location (see Smart Air Suspension on page
120). Model X must be powered on and you must press the brake pedal before you can
change suspension settings. Smart Air Suspension causes Model X to self-level, even when powered
off. Therefore, when towing or lifting, you must disable self-leveling (see Instructions
for Transporters on page 183 and Jacking and Lifting on page 166).
6. Driving
Page 112 of 202
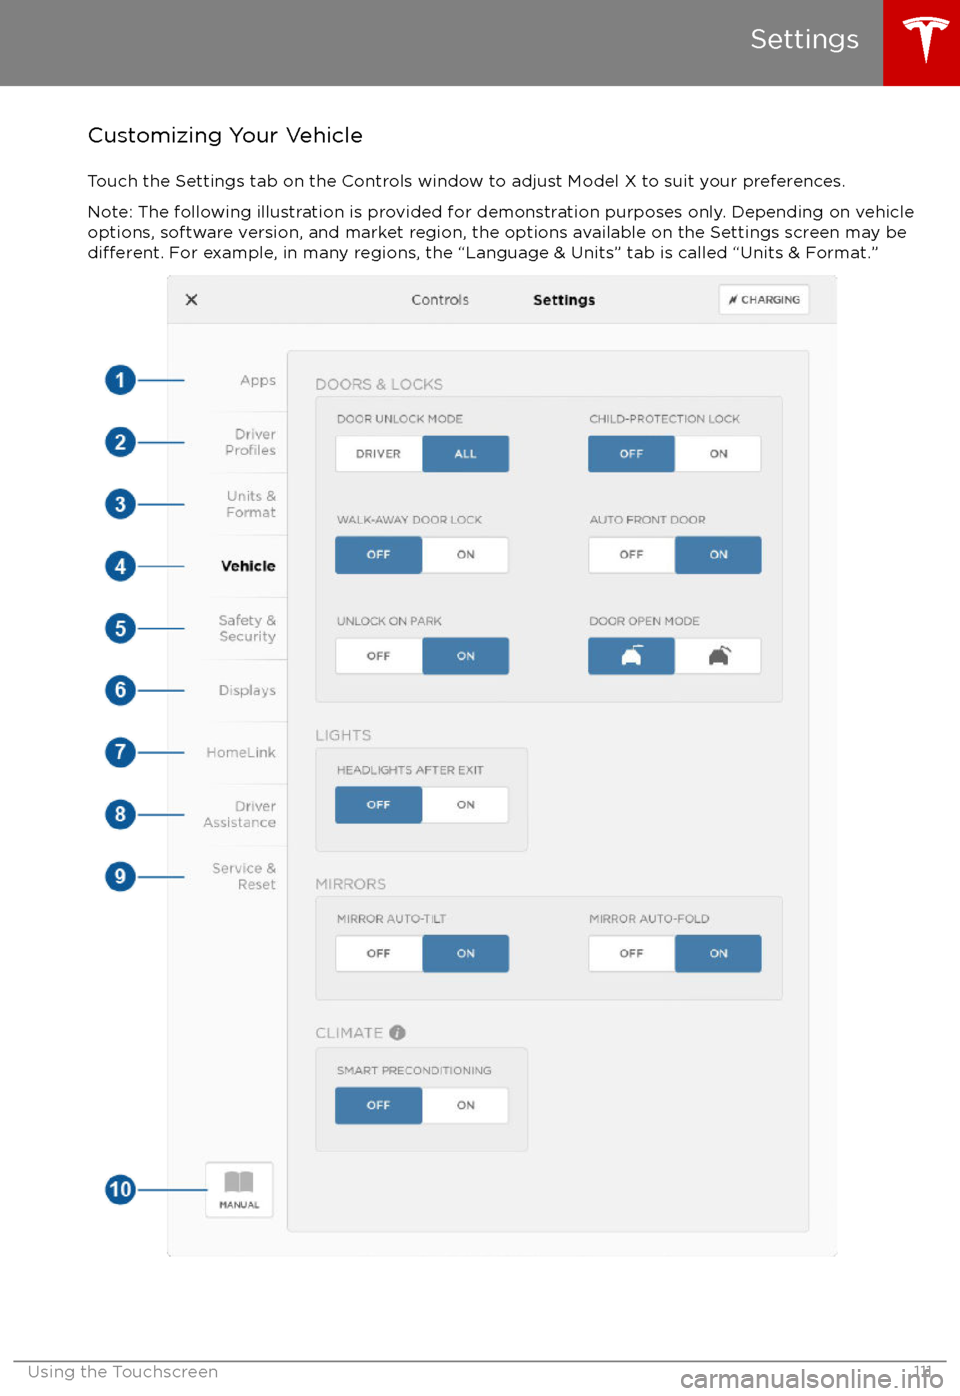
Customizing Your VehicleTouch the Settings tab on the Controls window to adjust Model X to suit your preferences.Note: The following illustration is provided for demonstration purposes only. Depending on vehicle
options, software version, and market region, the options available on the Settings screen may be
different. For example, in many regions, the “Language & Units” tab is called “Units & Format.”
Settings
Using the Touchscreen111
Page 116 of 202
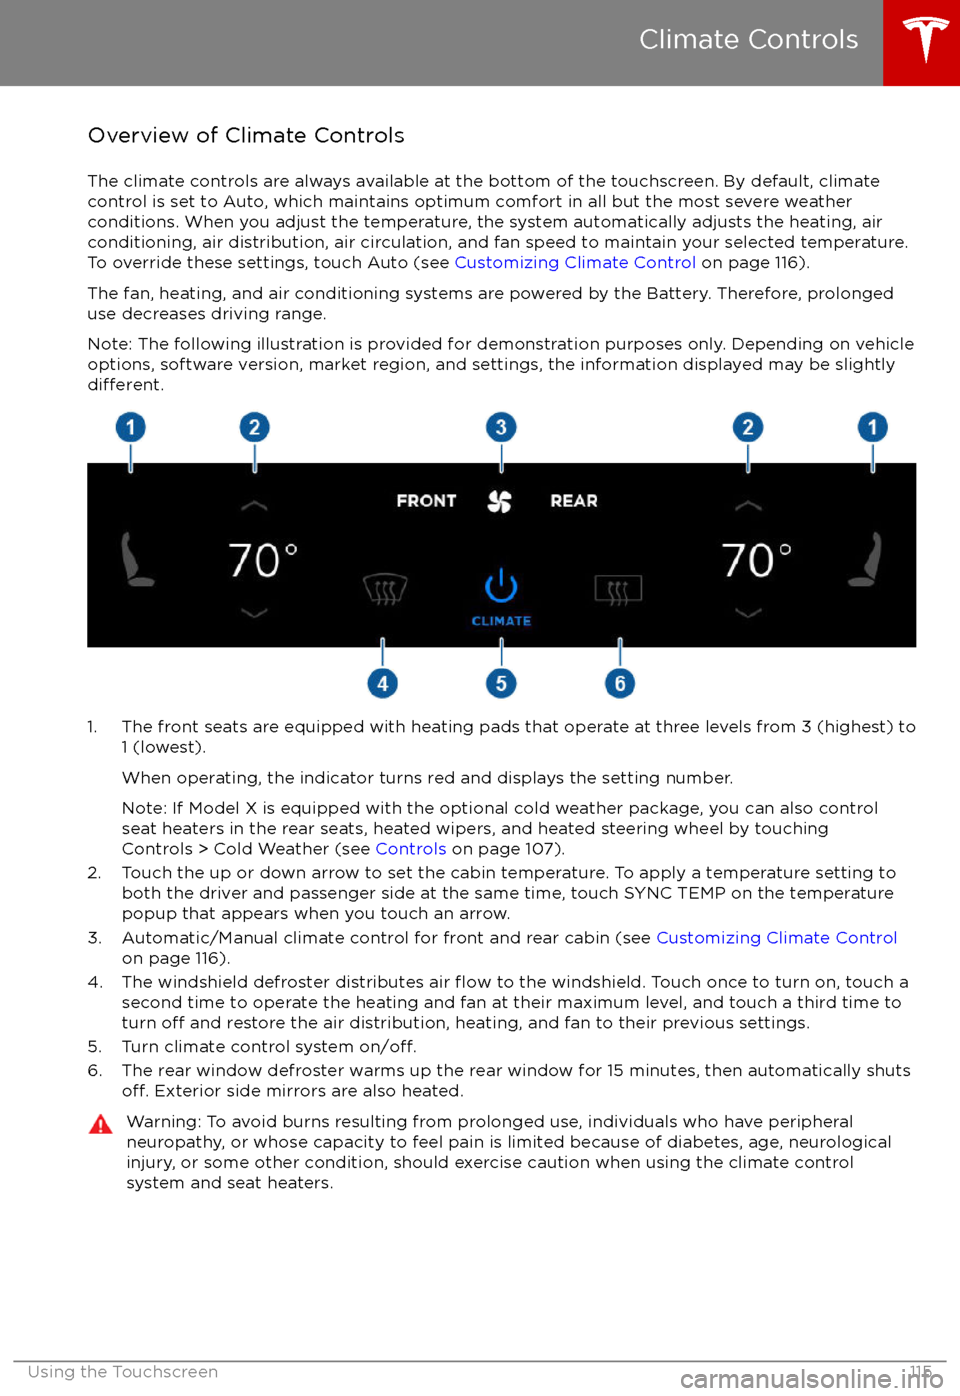
Overview of Climate Controls
The climate controls are always available at the bottom of the touchscreen. By default, climate control is set to Auto, which maintains optimum comfort in all but the most severe weather conditions. When you adjust the temperature, the system automatically adjusts the heating, air
conditioning, air distribution, air circulation, and fan speed to maintain your selected temperature. To override these settings, touch Auto (see Customizing Climate Control on page 116).
The fan, heating, and air conditioning systems are powered by the Battery. Therefore, prolonged
use decreases driving range.
Note: The following illustration is provided for demonstration purposes only. Depending on vehicle
options, software version, market region, and settings, the information displayed may be slightly
different.
1. The front seats are equipped with heating pads that operate at three levels from 3 (highest) to 1 (lowest).
When operating, the indicator turns red and displays the setting number.
Note: If Model X is equipped with the optional cold weather package, you can also control seat heaters in the rear seats, heated wipers, and heated steering wheel by touchingControls > Cold Weather (see Controls on page 107).
2. Touch the up or down arrow to set the cabin temperature. To apply a temperature setting to both the driver and passenger side at the same time, touch SYNC TEMP on the temperaturepopup that appears when you touch an arrow.
3. Automatic/Manual climate control for front and rear cabin (see Customizing Climate Control
on page 116).
4. The windshield defroster distributes air
flow to the windshield. Touch once to turn on, touch a
second time to operate the heating and fan at their maximum level, and touch a third time to
turn
off and restore the air distribution, heating, and fan to their previous settings.
5. Turn climate control system on/off.6. The rear window defroster warms up the rear window for 15 minutes, then automatically shutsoff. Exterior side mirrors are also heated.
Warning: To avoid burns resulting from prolonged use, individuals who have peripheral neuropathy, or whose capacity to feel pain is limited because of diabetes, age, neurologicalinjury, or some other condition, should exercise caution when using the climate control
system and seat heaters.
Climate Controls
Using the Touchscreen115
Page 120 of 202
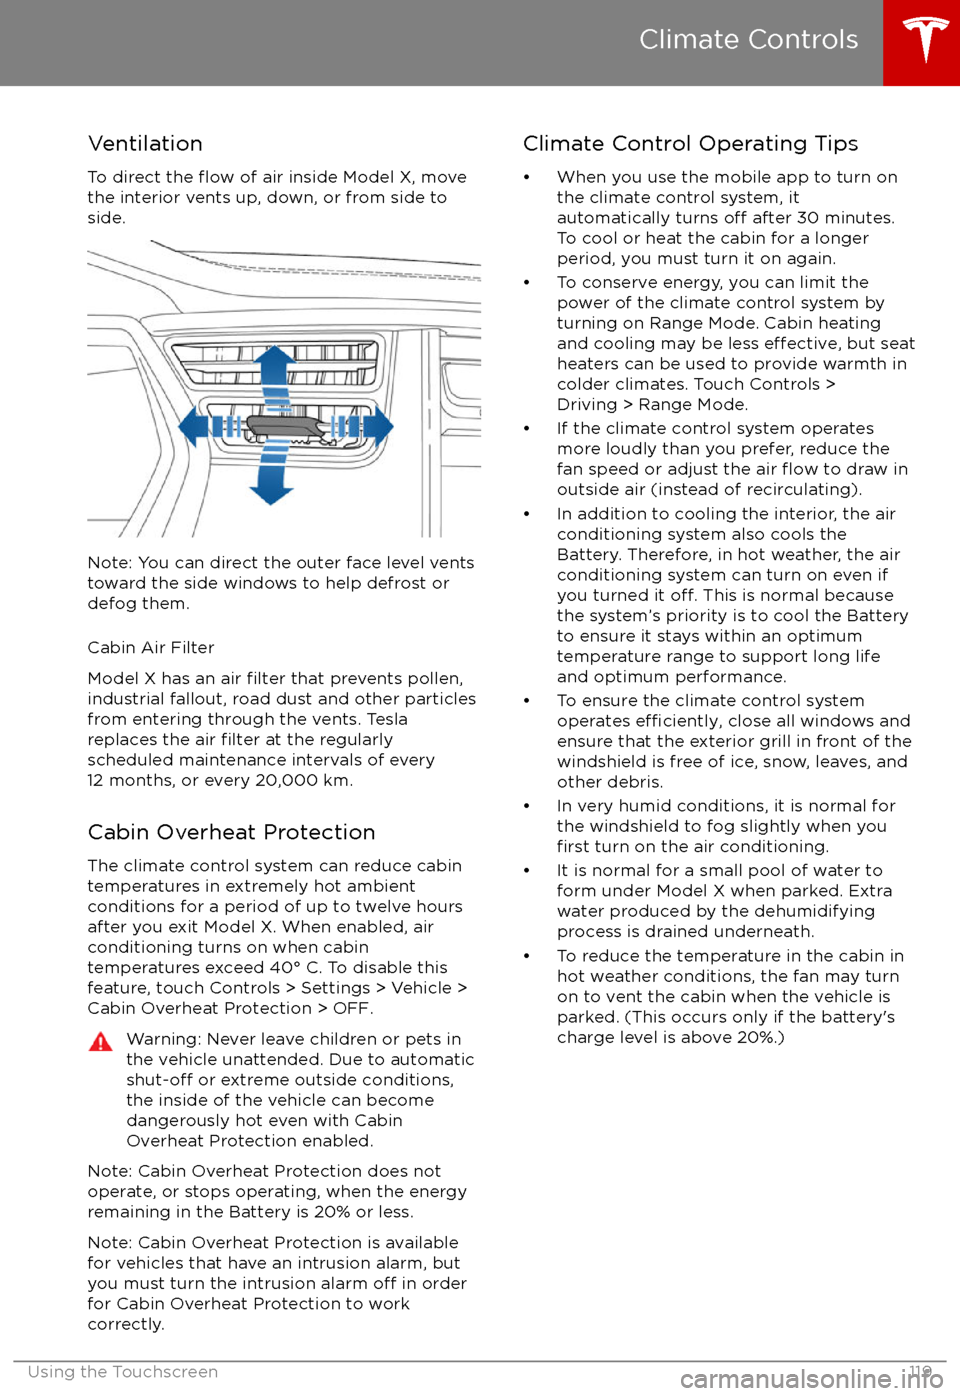
VentilationTo direct the
flow of air inside Model X, move
the interior vents up, down, or from side to
side.
Note: You can direct the outer face level vents
toward the side windows to help defrost or
defog them.
Cabin Air Filter
Model X has an air
filter that prevents pollen,
industrial fallout, road dust and other particles
from entering through the vents. Tesla
replaces the air
filter at the regularly
scheduled maintenance intervals of every
12 months, or every 20,000 km.
Cabin Overheat Protection The climate control system can reduce cabin
temperatures in extremely hot ambient conditions for a period of up to twelve hours
after you exit Model X. When enabled, air
conditioning turns on when cabin
temperatures exceed 40
Page 137 of 202

About the Security System
If Model X does not detect a key nearby and a
locked door or trunk is opened, an alarm sounds and headlights and turn signals
flash.To deactivate the alarm, press any button on the key.
To manually enable or disable the alarm system, touch Controls > Settings > Safety &
Security > Alarm. When set to on, Model X activates its alarm one minute after the doors
lock and a recognized key is no longer
detected nearby.
If Model X is equipped with the optional security package, it includes a battery-backed
siren that sounds instead of the horn in
situations where a locked door or trunk is
opened and Model X does not detect a key
nearby. If the Tilt/Intrusion setting is on, the
siren also sounds if Model X detects motion inside the cabin, a window is broken, or if it is
moved or tilted (for example, with a tow truck or jack). To turn the tilt/ intrusion detectionsystems on or
off, touch Controls > Settings >
Safety & Security > Tilt/Intrusion.
Note: If you plan to leave something that
moves, such as a dog, inside your locked
Model X, remember to turn
off the tilt/
intrusion system. Any type of motion detected inside Model X activates the siren.
Note: To turn on Tilt/Intrusion, the Alarm must
be ON.
Security Settings
136Model X Owner
Page 141 of 202
Loading New Software
Model X updates its software wirelessly,
providing new features throughout your term of ownership. Tesla recommends that you
install software update as soon as they are
available. The
first time you enter Model X
after an update is made available, a scheduling
window displays on the touchscreen. The
scheduling window displays again at the end
of your
first driving session.
Note: Some software updates can take from
two to three hours to complete. Model X must be in P (Park) when the new software is being
installed. To ensure the fastest and most
reliable delivery of software updates, leave the
Wi-Fi turned on and connected whenever
possible (see Connecting to Wi-Fi on page
139).
When a software update is available, a yellow
clock icon appears on the touchscreen