Door TESLA MODEL X 2020 User Guide
[x] Cancel search | Manufacturer: TESLA, Model Year: 2020, Model line: MODEL X, Model: TESLA MODEL X 2020Pages: 247, PDF Size: 6.48 MB
Page 22 of 247
Note: The power closing feature is also
temporarily disabled if you leave the powered
liftgate open for more than an hour.
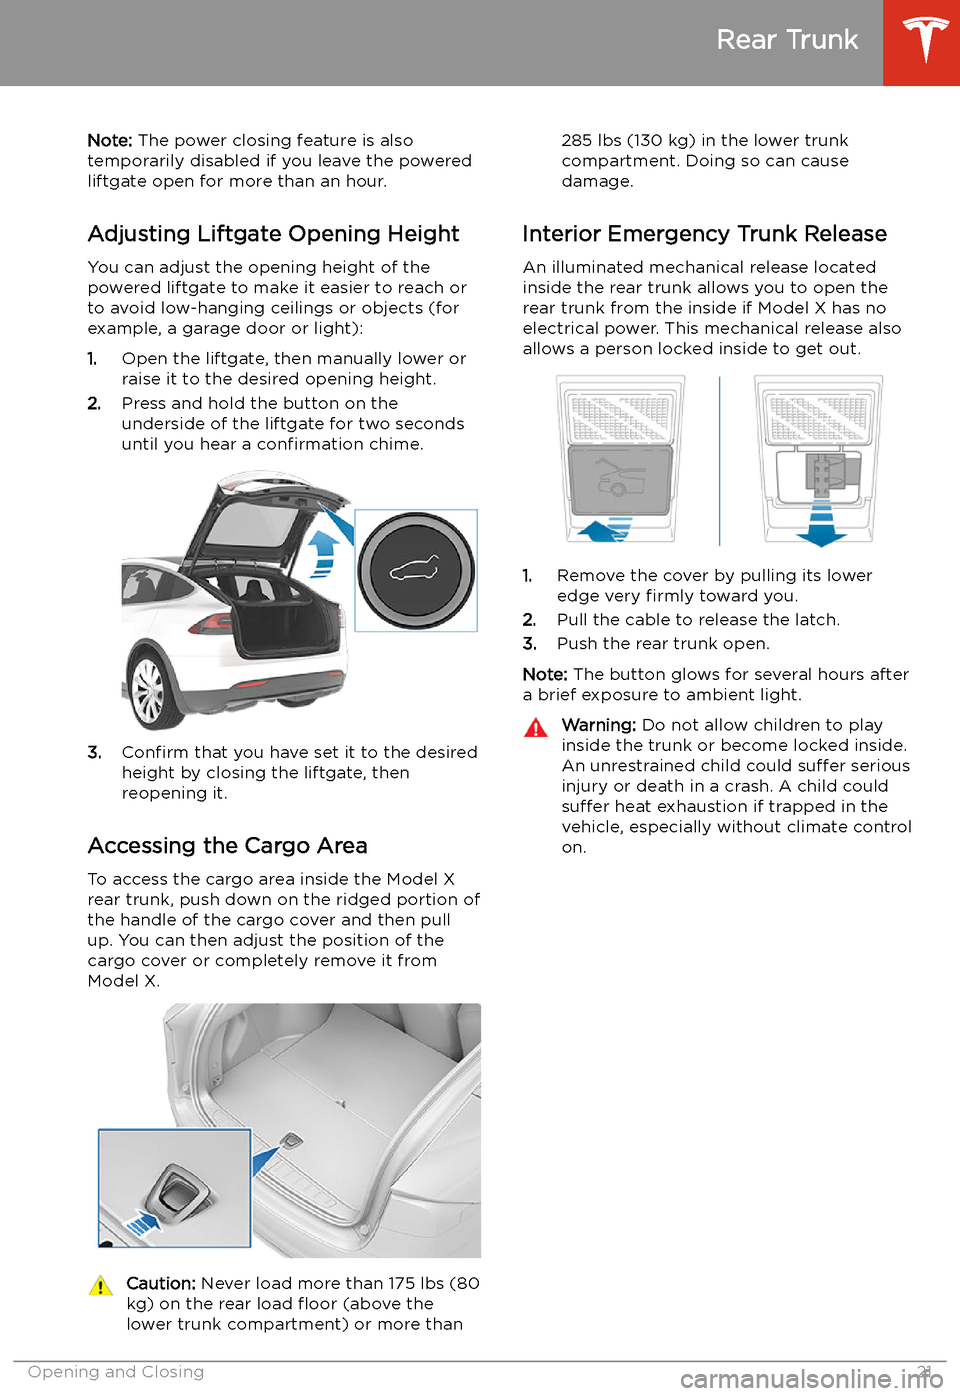
Adjusting Liftgate Opening Height
You can adjust the opening height of the
powered liftgate to make it easier to reach or
to avoid low-hanging ceilings or objects (for
example, a garage door or light):
1. Open the liftgate, then manually lower or
raise it to the desired opening height.
2. Press and hold the button on the
underside of the liftgate for two seconds
until you hear a confirmation chime.
3.Confirm that you have set it to the desired
height by closing the liftgate, then
reopening it.
Accessing the Cargo Area To access the cargo area inside the Model X
rear trunk, push down on the ridged portion of the handle of the cargo cover and then pull
up. You can then adjust the position of the
cargo cover or completely remove it from
Model X.
Caution: Never load more than 175 lbs (80
kg) on the rear load
Page 23 of 247
Front Trunk
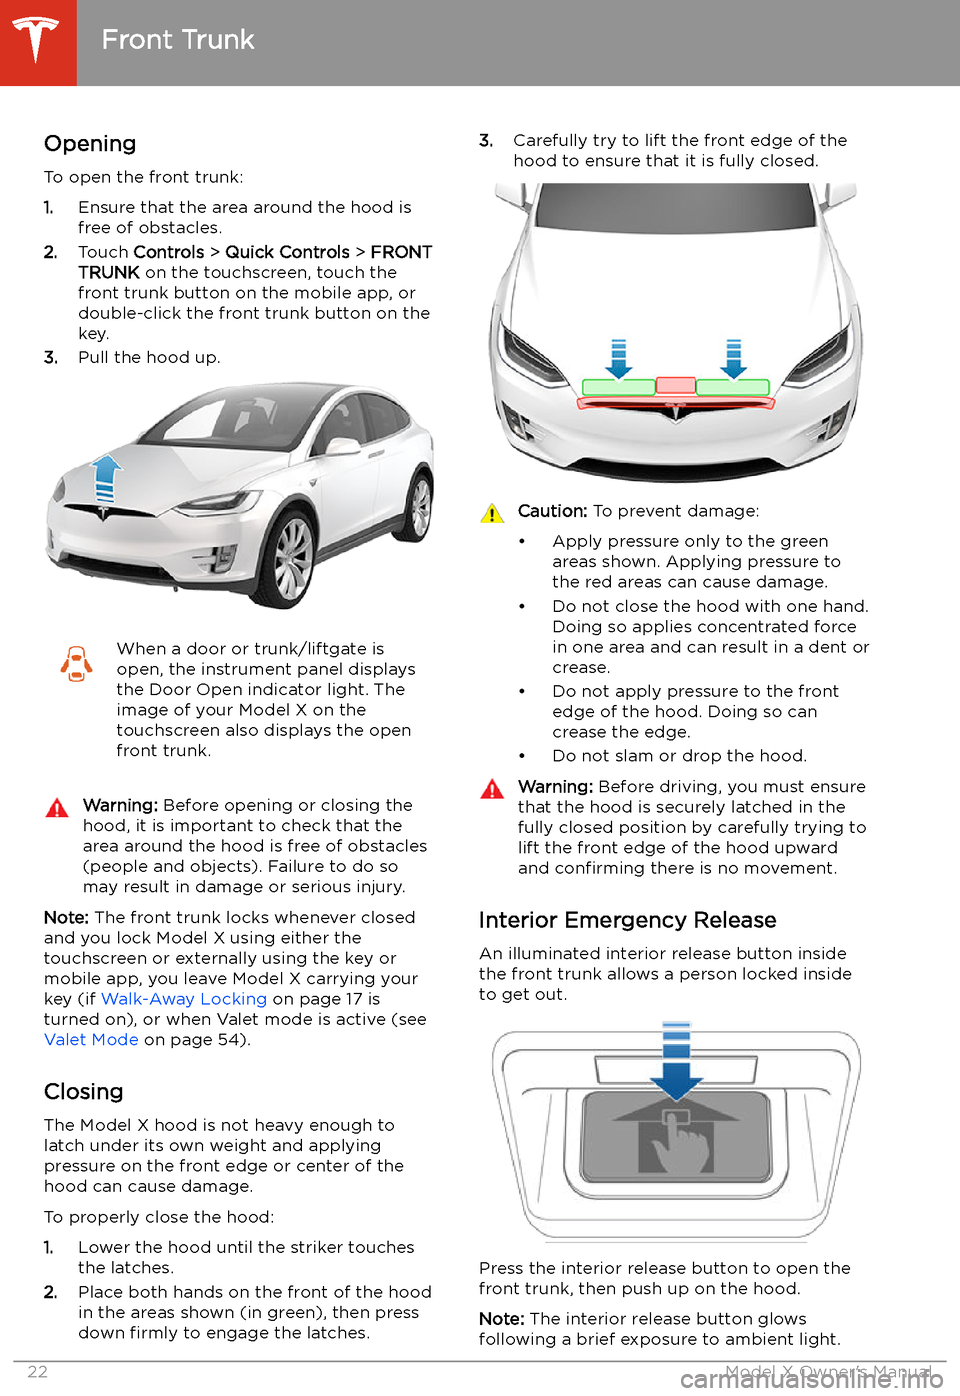
Opening
To open the front trunk:
1. Ensure that the area around the hood is
free of obstacles.
2. Touch Controls > Quick Controls > FRONT
TRUNK on the touchscreen, touch the
front trunk button on the mobile app, or
double-click the front trunk button on the key.
3. Pull the hood up.
When a door or trunk/liftgate is
open, the instrument panel displays
the Door Open indicator light. The
image of your Model X on the
touchscreen also displays the open
front trunk.Warning: Before opening or closing the
hood, it is important to check that the area around the hood is free of obstacles
(people and objects). Failure to do so
may result in damage or serious injury.
Note: The front trunk locks whenever closed
and you lock Model X using either the
touchscreen or externally using the key or
mobile app, you leave Model X carrying your key (if Walk-Away Locking on page 17 is
turned on), or when Valet mode is active (see Valet Mode on page 54).
Closing
The Model X hood is not heavy enough to
latch under its own weight and applying pressure on the front edge or center of the
hood can cause damage.
To properly close the hood:
1. Lower the hood until the striker touches
the latches.
2. Place both hands on the front of the hood
in the areas shown (in green), then press
down firmly to engage the latches.
3.
Carefully try to lift the front edge of the
hood to ensure that it is fully closed.Caution: To prevent damage:
Page 46 of 247

Airbags
Location of Airbags Airbags are located in the approximate areas shown below. Airbag warning information is printed
on the sun visors.
Model X is equipped with an airbag and lap/shoulder belt at both front seating positions. The
airbag is a supplemental restraint at those seating positions. All occupants, including the driver, should always wear their seat belts whether or not an airbag is also provided at their seating
position to minimize the risk of severe injury or death in the event of a crash.
1. Knee airbags
2. Front airbags
3. Curtain airbags
4. Seat-mounted side airbags
5. Door-mounted airbags
Airbags
Seating and Safety Restraints45
Page 62 of 247
Starting and Powering
Off
Starting When you open a door, Model X powers on
the instrument panel and touchscreen and you
can operate all controls.
To drive Model X:
1. PRESS THE BRAKE PEDAL - Model X
powers on and is ready to drive.
2. SELECT A GEAR - Move the gear lever all
the way down for Drive and all the way up
for Reverse. See Shifting Gears on page
63.
Note: If the PIN to Drive feature is enabled
(see PIN to Drive on page 171), you must also
enter a valid PIN on the touchscreen before
you can drive Model X.
Note: If Passive Entry is off and you do not
press the brake pedal to start Model X within
approximately five minutes, a message
displays on the instrument panel and you must use the key to lock then unlock Model X again
before starting the vehicle.
Everything you need to know when driving
Model X displays on the instrument panel.
Key Not Inside
If Model X does not detect a key when you
press the brake, the instrument panel displays
a message telling you that a key is not inside.
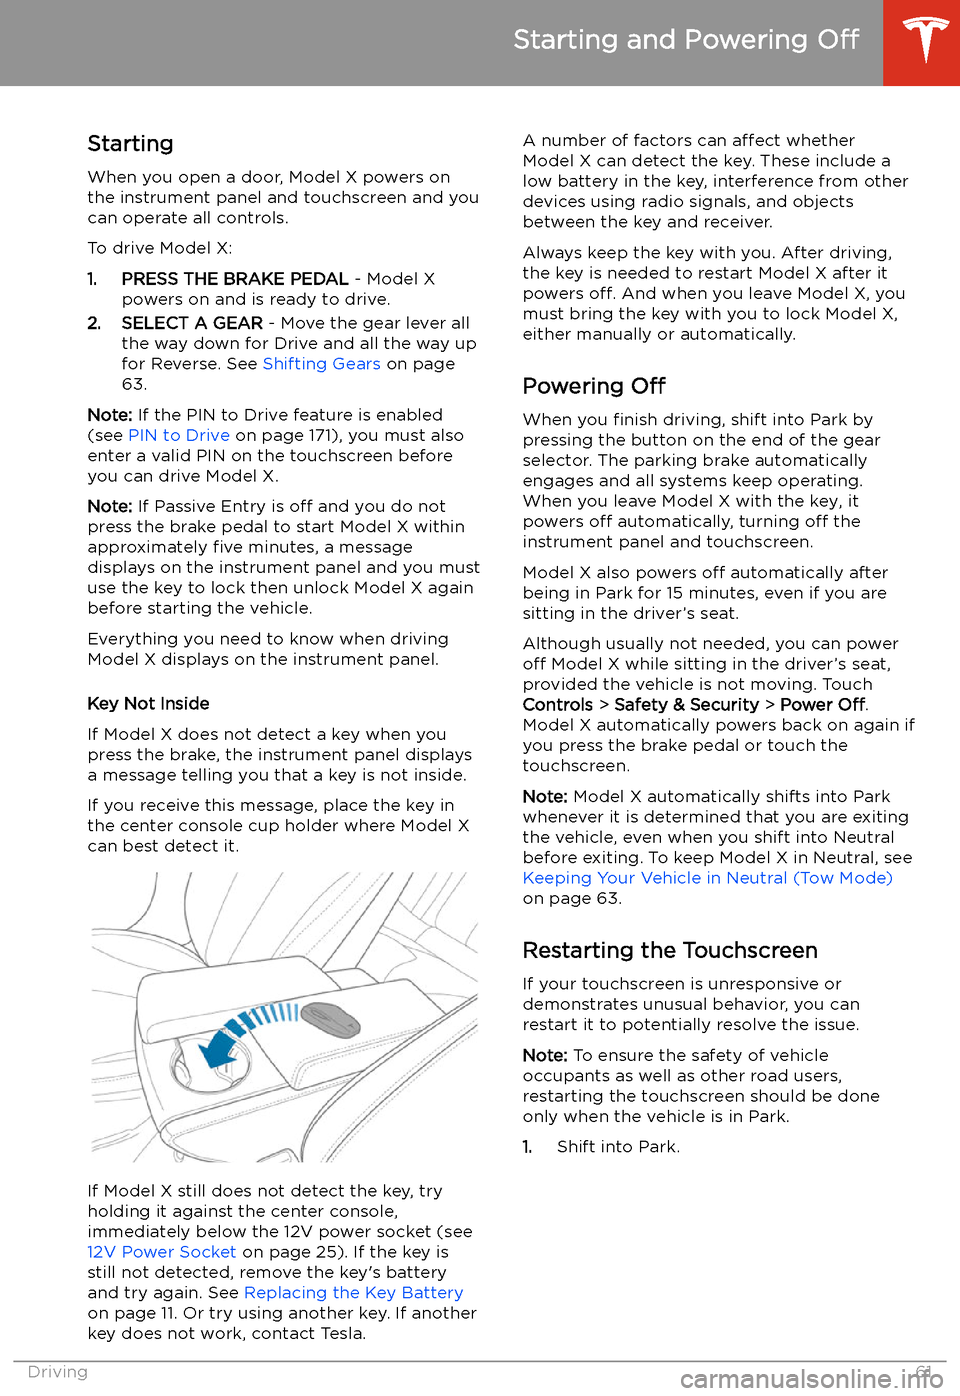
If you receive this message, place the key in
the center console cup holder where Model X
can best detect it.
If Model X still does not detect the key, try
holding it against the center console,
immediately below the 12V power socket (see
12V Power Socket on page 25). If the key is
still not detected, remove the key
Page 63 of 247
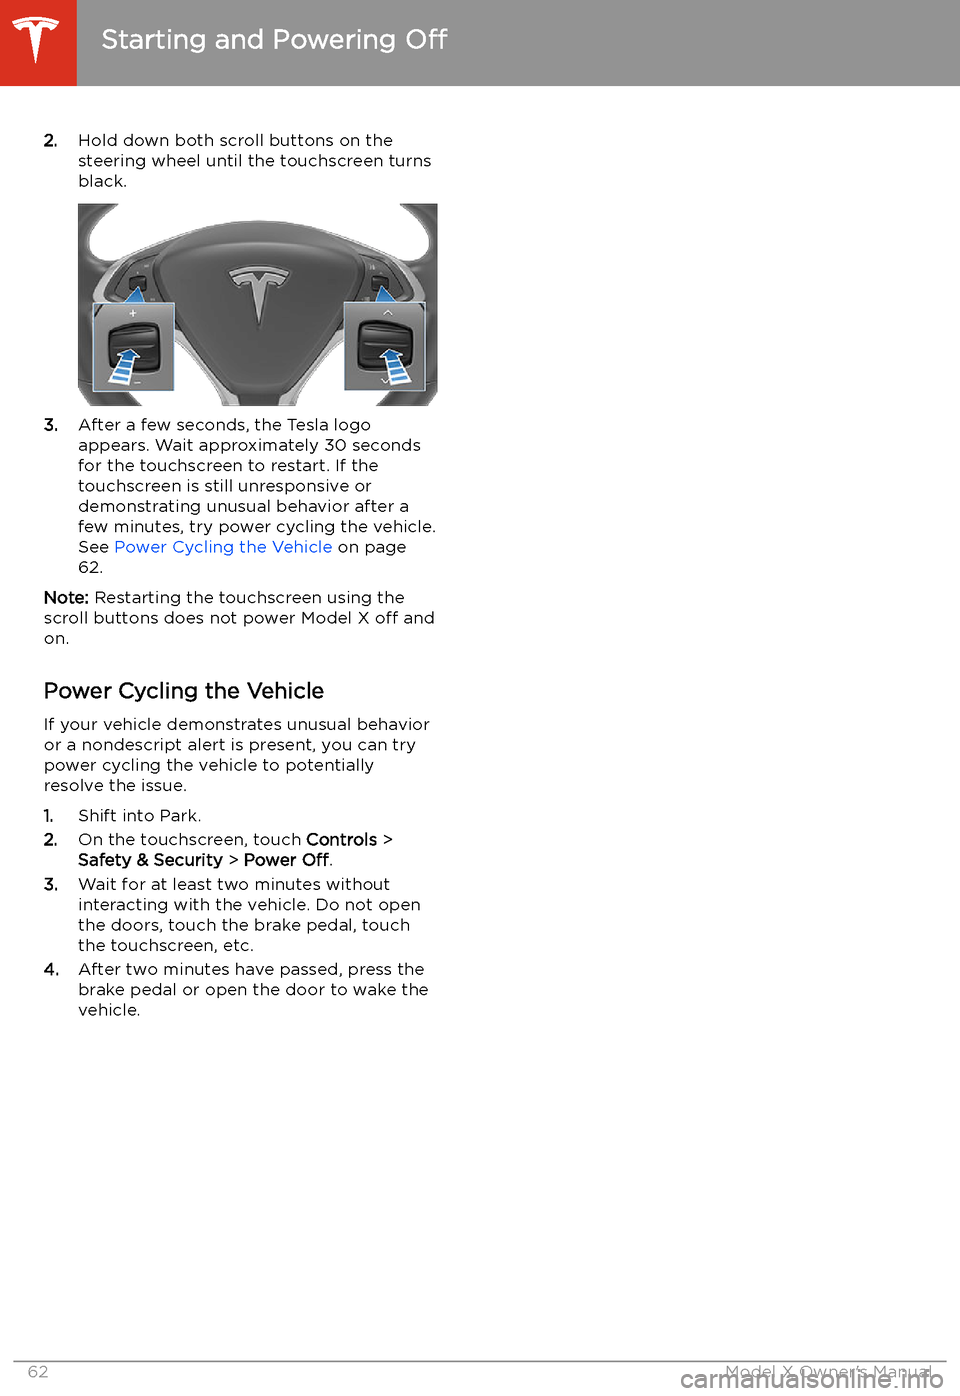
2.Hold down both scroll buttons on the
steering wheel until the touchscreen turns
black.
3. After a few seconds, the Tesla logo
appears. Wait approximately 30 seconds for the touchscreen to restart. If the
touchscreen is still unresponsive or
demonstrating unusual behavior after a
few minutes, try power cycling the vehicle.
See Power Cycling the Vehicle on page
62.
Note: Restarting the touchscreen using the
scroll buttons does not power Model X off and
on.
Power Cycling the Vehicle
If your vehicle demonstrates unusual behavior or a nondescript alert is present, you can try
power cycling the vehicle to potentially
resolve the issue.
1. Shift into Park.
2. On the touchscreen, touch Controls >
Safety & Security > Power Off.
3. Wait for at least two minutes without
interacting with the vehicle. Do not open
the doors, touch the brake pedal, touch the touchscreen, etc.
4. After two minutes have passed, press the
brake pedal or open the door to wake the
vehicle.
Starting and Powering Off
62Model X Owner
Page 66 of 247
Lights
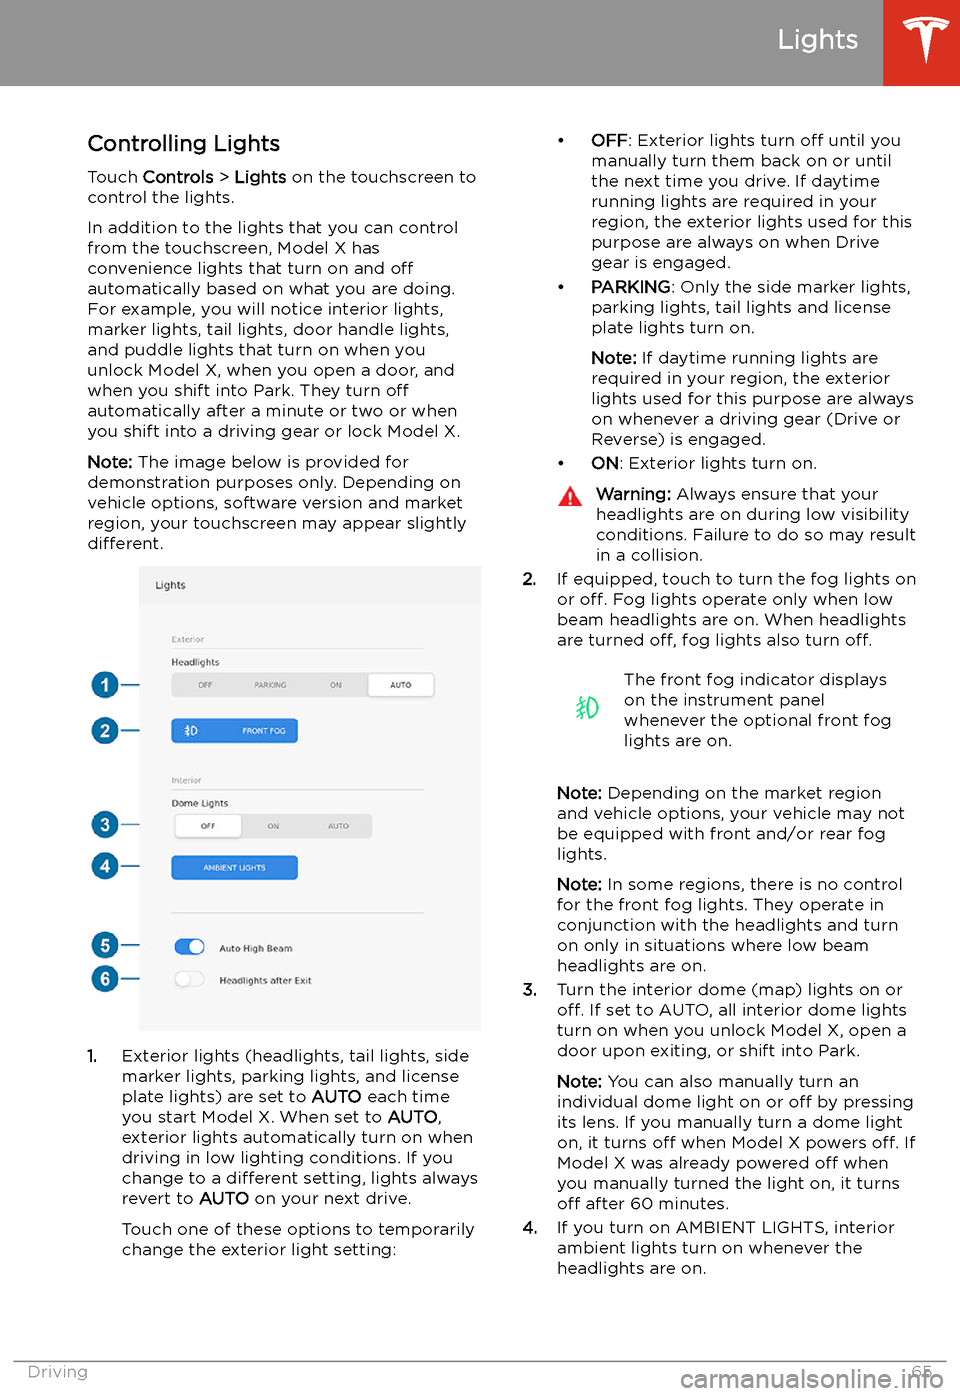
Controlling Lights Touch Controls > Lights on the touchscreen to
control the lights.
In addition to the lights that you can control
from the touchscreen, Model X has
convenience lights that turn on and off
automatically based on what you are doing. For example, you will notice interior lights,marker lights, tail lights, door handle lights,
and puddle lights that turn on when you unlock Model X, when you open a door, and
when you shift into Park. They turn off
automatically after a minute or two or when
you shift into a driving gear or lock Model X.
Note: The image below is provided for
demonstration purposes only. Depending on vehicle options, software version and market
region, your touchscreen may appear slightly
different.
1. Exterior lights (headlights, tail lights, side
marker lights, parking lights, and license
plate lights) are set to AUTO each time
you start Model X. When set to AUTO,
exterior lights automatically turn on when
driving in low lighting conditions. If you
change to a different setting, lights always
revert to AUTO on your next drive.
Touch one of these options to temporarily
change the exterior light setting:
Page 107 of 247
Autopilot
About Autopilot
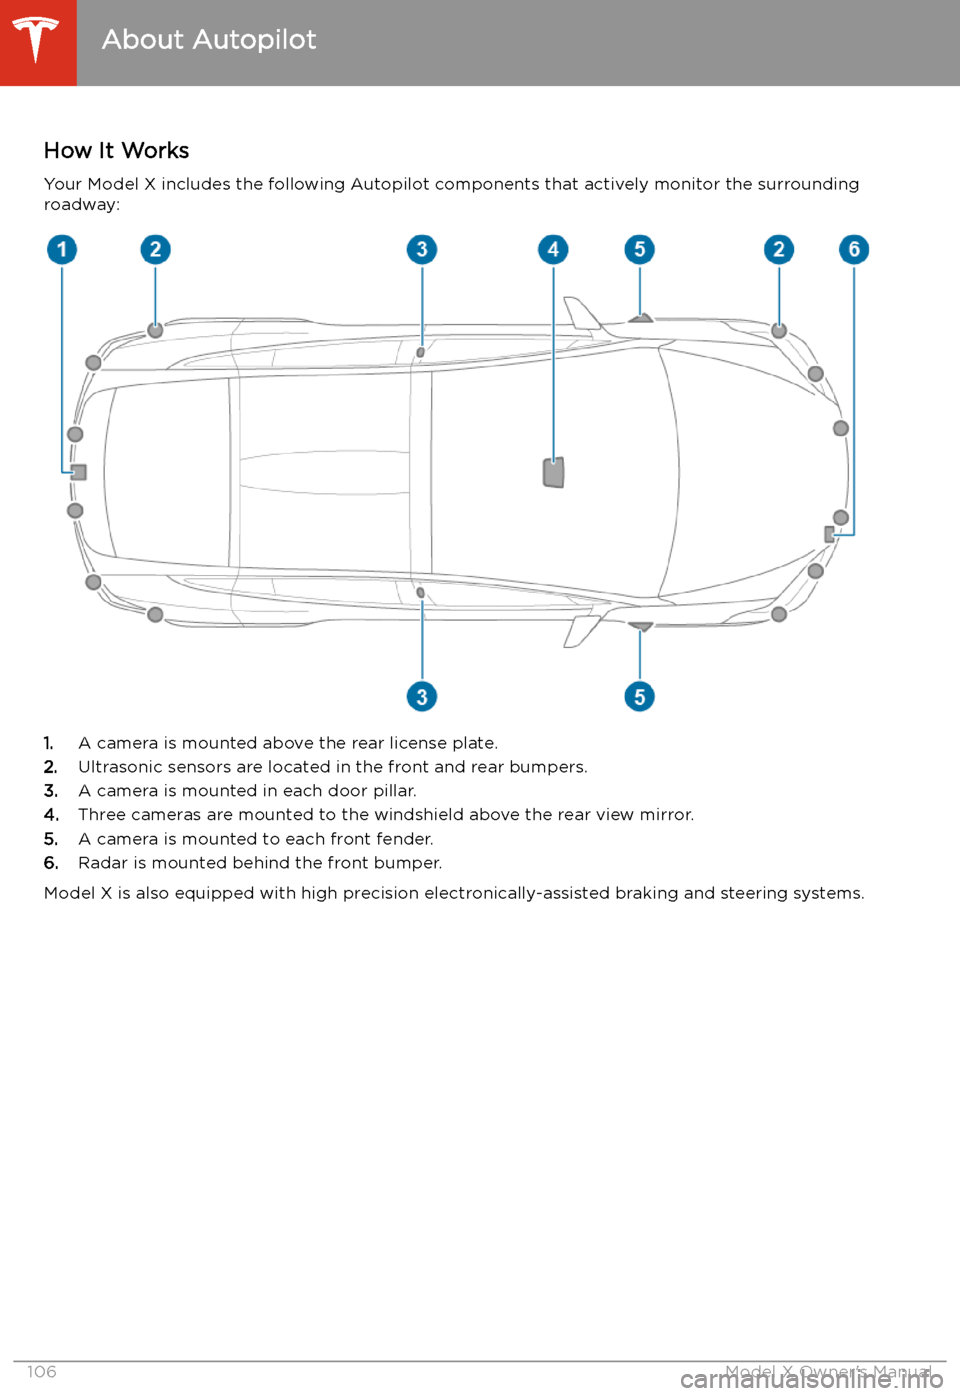
How It Works Your Model X includes the following Autopilot components that actively monitor the surrounding
roadway:
1. A camera is mounted above the rear license plate.
2. Ultrasonic sensors are located in the front and rear bumpers.
3. A camera is mounted in each door pillar.
4. Three cameras are mounted to the windshield above the rear view mirror.
5. A camera is mounted to each front fender.
6. Radar is mounted behind the front bumper.
Model X is also equipped with high precision electronically-assisted braking and steering systems.
About Autopilot
106Model X Owner
Page 137 of 247

Obstacle-Aware AccelerationObstacle-Aware Acceleration is designed toreduce the impact of a collision by reducing
motor torque and in some cases applying the
brakes, if Model X detects an object in its driving path. For example, Model X, while
parked in front of a closed garage door with
the Drive gear engaged, detects that you have
pressed hard on the accelerator pedal.
Although Model X still accelerates and hits the
garage door, the reduced torque may result in
less damage.
Obstacle-Aware Acceleration is designed to
operate only when all of these conditions are
simultaneously met:
Page 172 of 247
Security Settings
About the Security System
If Model X does not detect a key nearby and a
locked door or trunk is opened, an alarm sounds and the headlights and turn signals
Page 187 of 247

Charging Instructions
Opening the Charge Port The charge port is located on the left side of
Model X, behind a door that is part of the rear
tail light assembly. Before charging, park
Model X to ensure that the charge cable easily reaches the charge port.
With Model X unlocked (or a recognized key is
within range) and in Park, press and release
the button on the Tesla charge cable to open the charge port door.
You can also open the charge port door using
any of these methods: