ECU TESLA MODEL X 2020 User Guide
[x] Cancel search | Manufacturer: TESLA, Model Year: 2020, Model line: MODEL X, Model: TESLA MODEL X 2020Pages: 247, PDF Size: 6.48 MB
Page 80 of 247
Use the touchscreen to manually release the
parking brake (which also shifts Model X into Neutral):
1. Touch Controls > Safety & Security .
2. Press the brake pedal, then touch Parking
Brake . If Model X was previously in Park, it
shifts into Neutral.When you use the touchscreen to
manually apply the parking brake,
the red parking brake indicator lights
up on the instrument panel.If the parking brake experiences an
electrical issue, the amber parking brake indicator lights up and a fault
message displays at the top of the
instrument panel.Caution: In the unlikely event that
Model X loses electrical power, you
cannot access the touchscreen and are
therefore unable to release the parking
brake. Contact Tesla.
Brake Wear
Model X brake pads are equipped with wear indicators. A wear indicator is a thin metal
strip attached to the brake pad that squeals as
it rubs against the rotor when the pad wears
down. This squealing sound indicates that the
brake pads have reached the end of their service life and require replacement. To
replace the brake pads, contact Tesla Service.
Brakes must be periodically inspected visually by removing the tire and wheel. For detailed
specifications and service limits for rotors and
brake pads, see Subsystems on page 215.
Additionally, Tesla recommends cleaning and
lubricating the brake calipers every year or
12,500 miles (20,000 km) if in an area where
roads are salted during winter months.
Warning: Neglecting to replace worn
brake pads damages the braking system
and can result in a braking hazard.
Braking and Stopping
Driving79
Page 83 of 247
Caution: Keep sensors clean from dirt,
debris, snow, and ice. Avoid using a high
pressure power washer on the sensors
and do not clean a sensor with a sharp or abrasive object that can scratch or
damage its surface.Caution: Do not install accessories or
stickers on or near the parking sensors.
Controlling Audible Feedback
You can use Park Assist with or without
audible feedback. To turn chimes on or off,
touch Controls > Safety & Security > Park
Assist Chimes .
To mute the chimes temporarily, press the
scroll button on the left side of the steering
wheel or touch the mute button in the corner
of the Park Assist view. The chimes are muted
until you shift into a different gear or drive
over 5 mph (8 km/h).
Limitations and False Warnings The parking sensors may not function
correctly in these situations:
Page 98 of 247
Warning: The trailer tongue weight must
be approximately 10% of the total trailer weight without exceeding the maximumtongue weights provided in Carrying
Capacity. Loads that are balanced over
the wheels or heavier in the rear can
cause trailer sway, resulting in loss of
vehicle control.Warning: Always ensure that cargo is
secured in the trailer and will not shift.
Dynamic load shifts can cause loss of
vehicle control, resulting in serious injury
or death.
Trailer Mode
Trailer Mode must always be active when
towing a trailer. When you connect a trailer
Page 101 of 247
Note: Always remove the ball mount before
installing or removing the hitch receiver from
the vehicle (see Attaching and Removing the
Ball Mount on page 102).Warning: You must use the Model X trailer
hitch when towing a trailer. Never attempt
to attach a different type of trailer hitch.
Note: Always attach safety chains when
towing. Cross the chains under the trailer
tongue and attach to the trailer eyelets to
ensure the security of the trailer load.
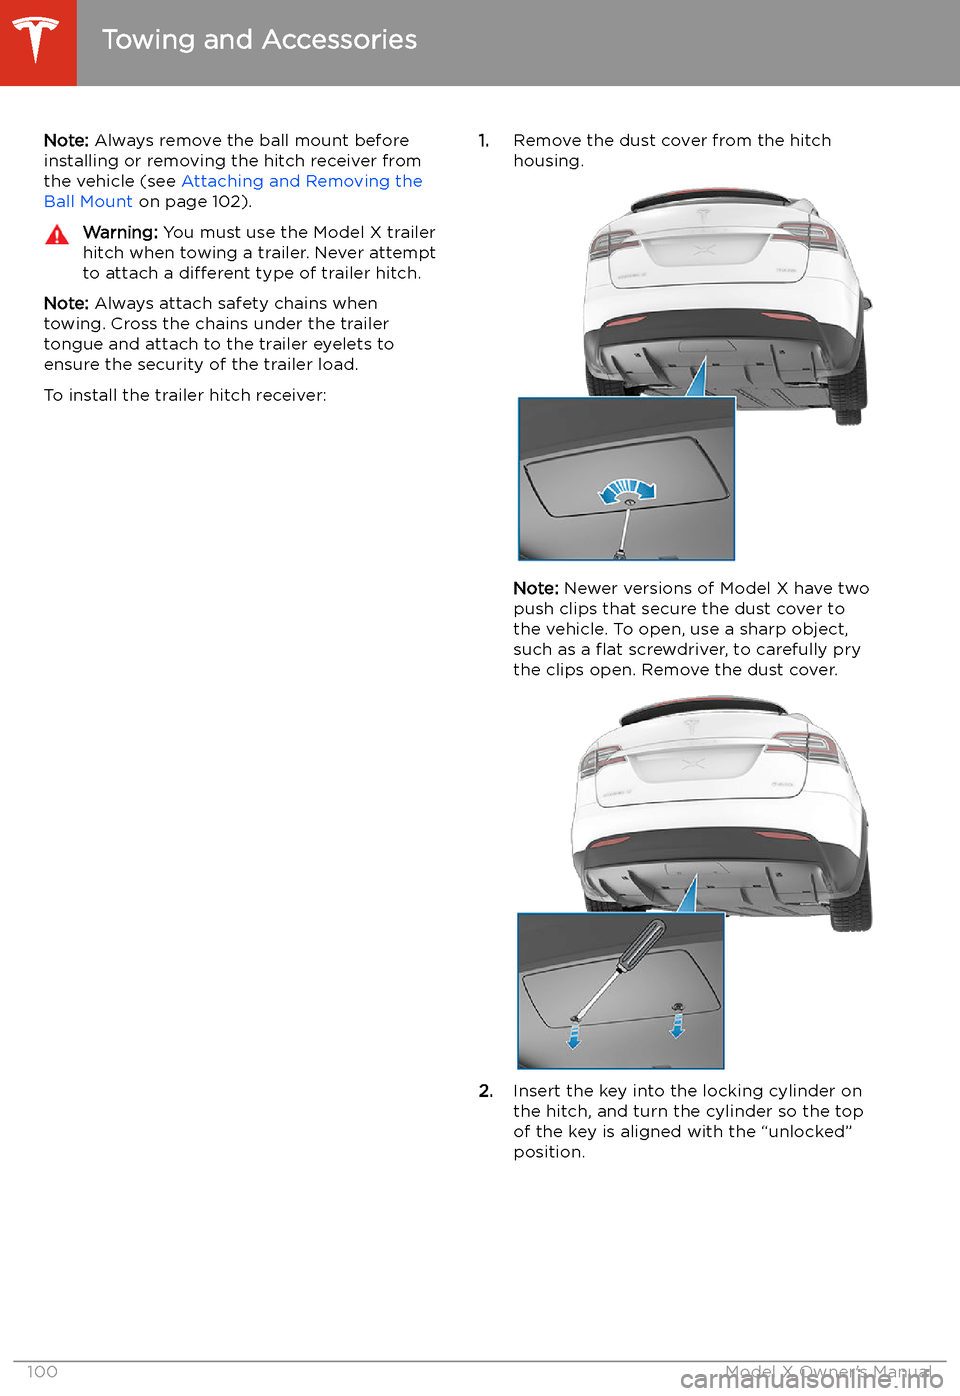
To install the trailer hitch receiver:
1. Remove the dust cover from the hitch
housing.
Note: Newer versions of Model X have two
push clips that secure the dust cover to
the vehicle. To open, use a sharp object,
such as a
Page 148 of 247

Safety & Security
Page 156 of 247
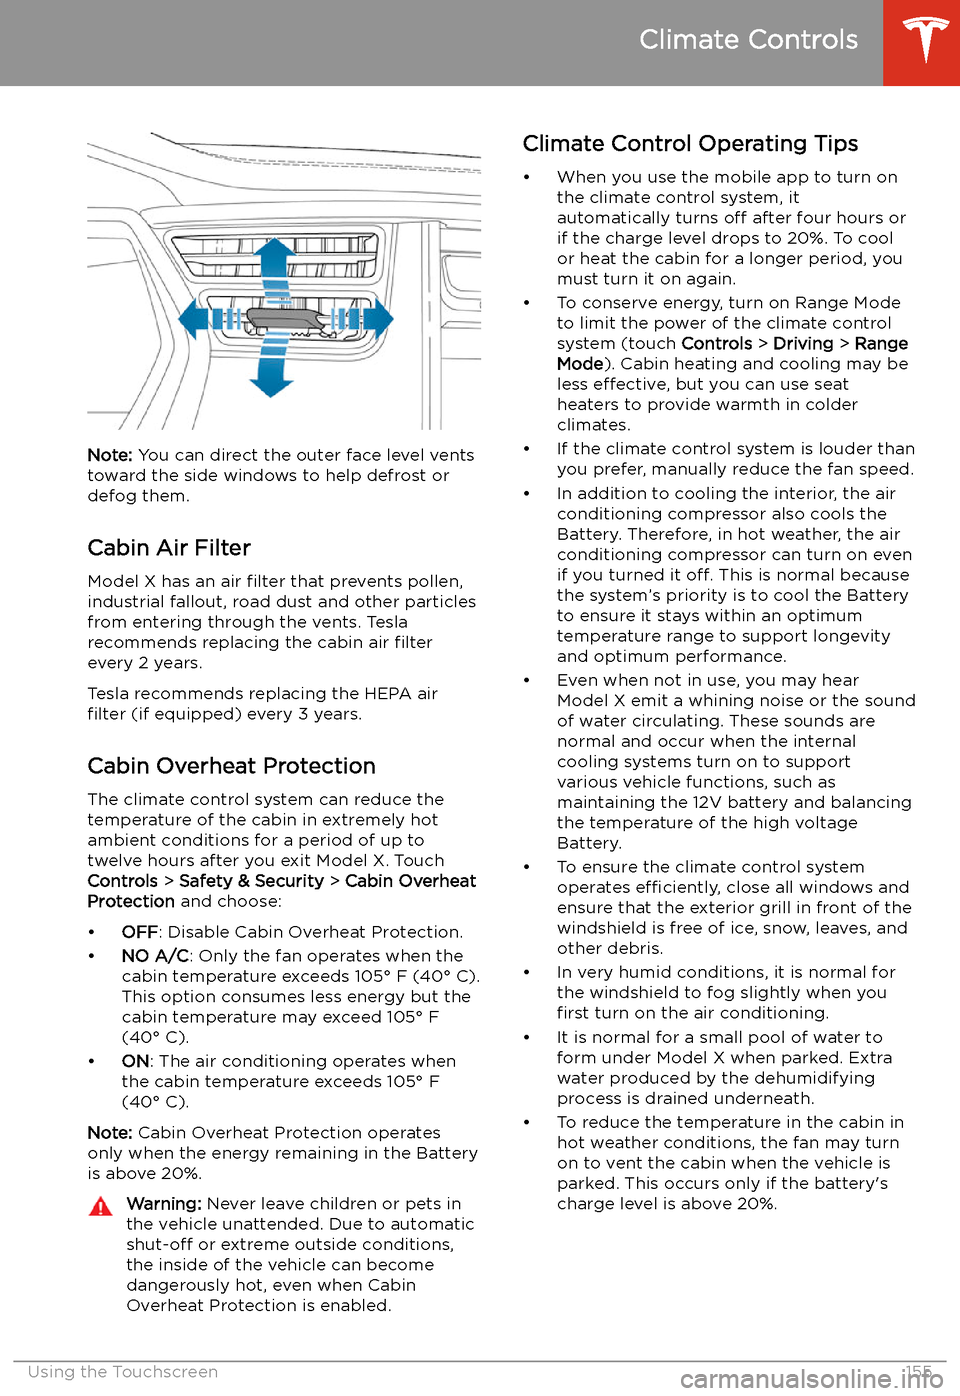
Note: You can direct the outer face level vents
toward the side windows to help defrost or
defog them.
Cabin Air Filter
Model X has an air filter that prevents pollen,
industrial fallout, road dust and other particles
from entering through the vents. Tesla
recommends replacing the cabin air filter
every 2 years.
Tesla recommends replacing the HEPA air
filter (if equipped) every 3 years.
Cabin Overheat Protection
The climate control system can reduce the
temperature of the cabin in extremely hot
ambient conditions for a period of up to twelve hours after you exit Model X. TouchControls > Safety & Security > Cabin Overheat
Protection and choose:
Page 162 of 247

For security reasons, if you sell Model X, it isrecommended that you delete your Home and
Work Locations. You can delete these
individually or you can perform a factory reset to erase all personal data (see Erasing
Personal Data on page 149).
Map Updates
As updated maps become available, they are
automatically sent to Model X over Wi-Fi. To ensure you receive them, periodically connectModel X to a Wi-Fi network (see Connecting
to Wi-Fi on page 178). The touchscreen
displays a message informing you when new
maps are installed.
Maps and Navigation
Using the Touchscreen161
Page 172 of 247
Security Settings
About the Security System
If Model X does not detect a key nearby and a
locked door or trunk is opened, an alarm sounds and the headlights and turn signals
Page 173 of 247

threats, no security system can prevent all
attacks.
Standby, Alert, and Alarm States
When in Sentry Mode, Model X may go
through three states depending on its surroundings
Page 198 of 247

Warning: Road holding is seriously
impaired if the tires are incorrectly
installed on the wheels.Removing and Installing Lug Nut Covers
If your Model X is equipped with lug nut
covers, you must remove them to access the
lug nuts.
To remove a lug nut cover:
1. Insert the curved part of the lug nut cover
tool (located in the glovebox for some
vehicles) into the hole at the base of the
Tesla "T".
Note: The lug nut cover tool can also be
purchased at an auto parts store or
through online retailers.
2. Maneuver the lug nut cover tool so that it
is fully inserted into the hole in the lug nut
cover.
3. Twist the lug nut cover tool so that the
curved part is touching the middle of the
lug nut cover.
4. Firmly pull the lug nut tool away from the
wheel until the lug nut cover is released.
To install the lug nut cover:
1. Align the lug nut cover into position.
2. Push firmly on the lug nut cover until it
fully snaps into place.
Caution: Make sure the lug nut cover
is fully secure before driving to
prevent it from falling off.
Tire Care and Maintenance
Maintenance197