tow TESLA MODEL X 2020 User Guide
[x] Cancel search | Manufacturer: TESLA, Model Year: 2020, Model line: MODEL X, Model: TESLA MODEL X 2020Pages: 247, PDF Size: 6.48 MB
Page 100 of 247

Towing Guidelines
Model X is designed primarily as a passenger-
carrying vehicle. Towing a trailer puts additional load on the motor(s), drive train,
brakes, tires, and suspension and significantly
decreases range. If you decide to tow a trailer,
proceed with caution and follow these general
guidelines:
Page 101 of 247
Note: Always remove the ball mount before
installing or removing the hitch receiver from
the vehicle (see Attaching and Removing the
Ball Mount on page 102).Warning: You must use the Model X trailer
hitch when towing a trailer. Never attempt
to attach a different type of trailer hitch.
Note: Always attach safety chains when
towing. Cross the chains under the trailer
tongue and attach to the trailer eyelets to
ensure the security of the trailer load.
To install the trailer hitch receiver:
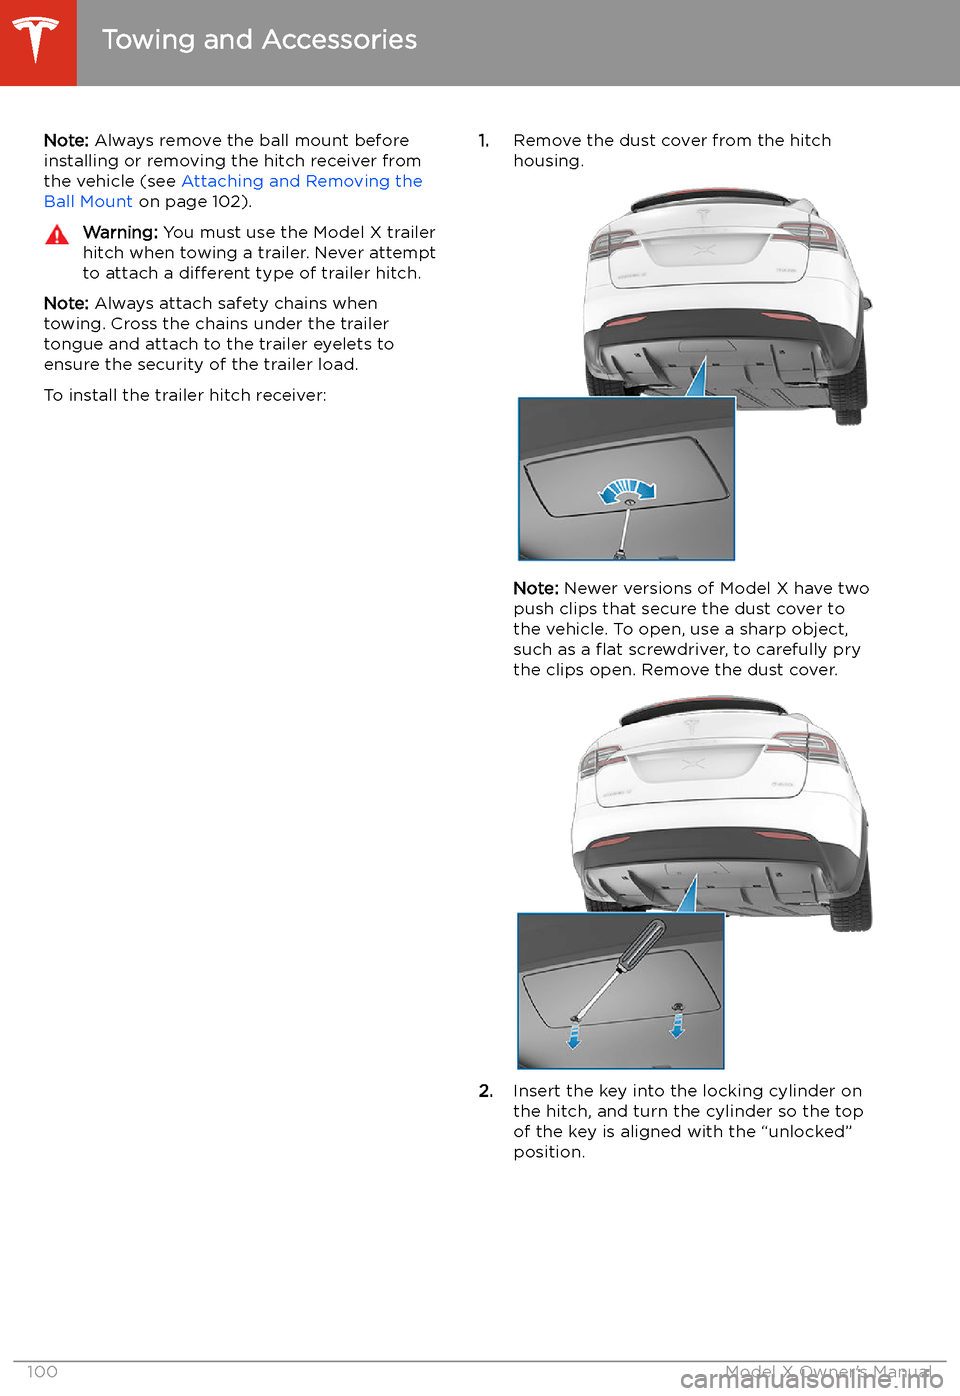
1. Remove the dust cover from the hitch
housing.
Note: Newer versions of Model X have two
push clips that secure the dust cover to
the vehicle. To open, use a sharp object,
such as a
Page 103 of 247
Attaching and Removing the Ball
Mount
The Model X towing package does not include
a ball mount. You must purchase a ball mount
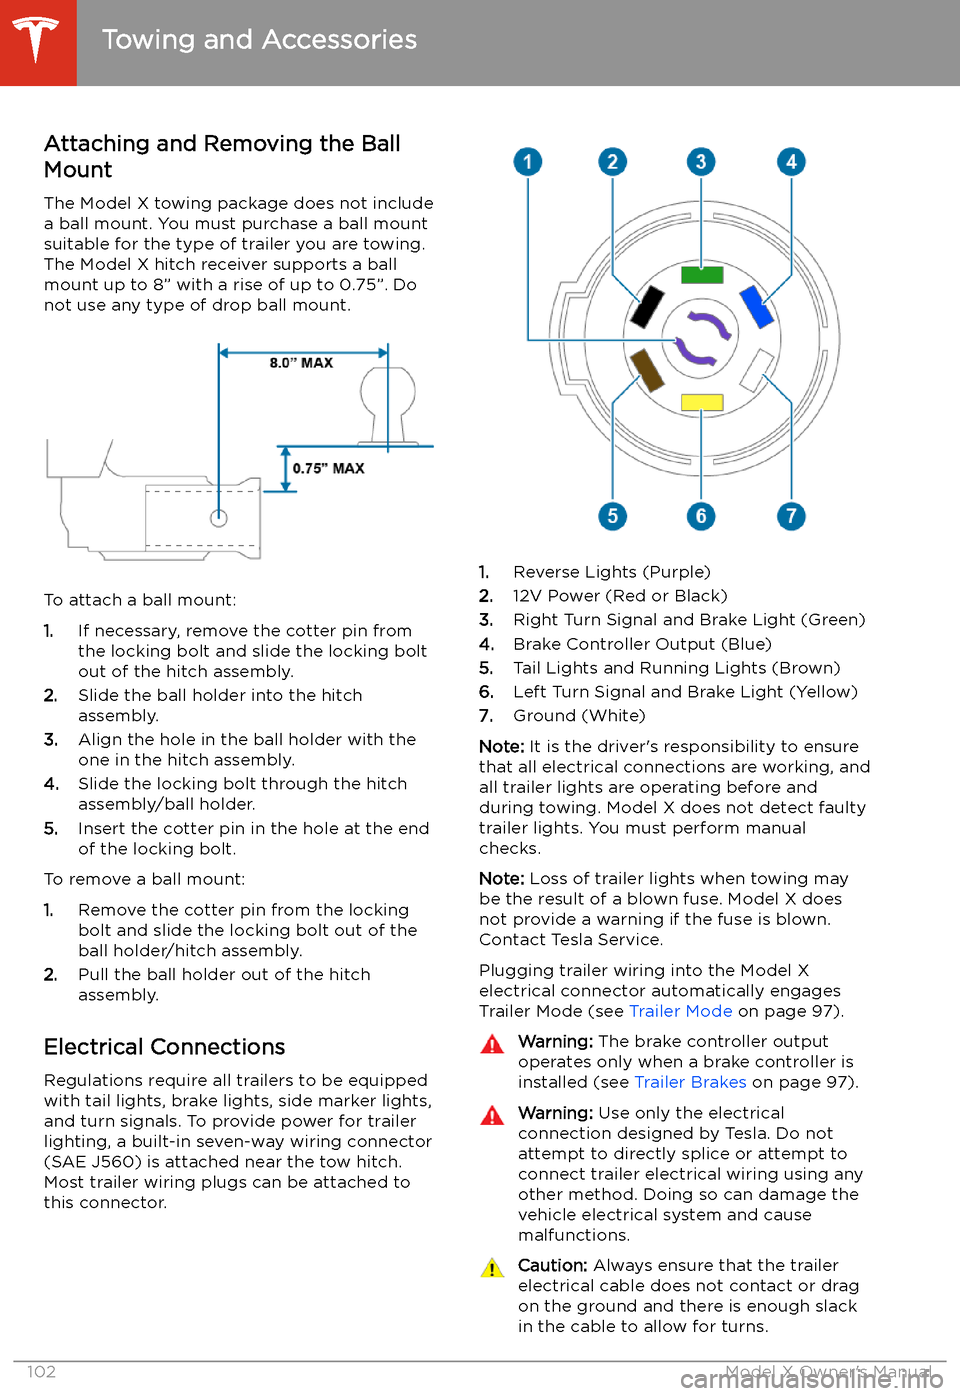
suitable for the type of trailer you are towing. The Model X hitch receiver supports a ballmount up to 8” with a rise of up to 0.75”. Do
not use any type of drop ball mount.
To attach a ball mount:
1. If necessary, remove the cotter pin from
the locking bolt and slide the locking bolt out of the hitch assembly.
2. Slide the ball holder into the hitch
assembly.
3. Align the hole in the ball holder with the
one in the hitch assembly.
4. Slide the locking bolt through the hitch
assembly/ball holder.
5. Insert the cotter pin in the hole at the end
of the locking bolt.
To remove a ball mount:
1. Remove the cotter pin from the locking
bolt and slide the locking bolt out of the
ball holder/hitch assembly.
2. Pull the ball holder out of the hitch
assembly.
Electrical Connections
Regulations require all trailers to be equipped
with tail lights, brake lights, side marker lights,
and turn signals. To provide power for trailer
lighting, a built-in seven-way wiring connector (SAE J560) is attached near the tow hitch.Most trailer wiring plugs can be attached tothis connector.
1. Reverse Lights (Purple)
2. 12V Power (Red or Black)
3. Right Turn Signal and Brake Light (Green)
4. Brake Controller Output (Blue)
5. Tail Lights and Running Lights (Brown)
6. Left Turn Signal and Brake Light (Yellow)
7. Ground (White)
Note: It is the driver
Page 104 of 247

Impact on RangeTowing a trailer and carrying accessories
increases vehicle weight and drag. As a result,
driving range can decrease significantly.
Although Trip Planner attempts to adjust
estimates based on Trailer Mode, actual
energy consumption may vary. Plan trip length
and charging destinations accordingly.
Towing and Accessories
Driving103
Page 123 of 247
When the instrument panel displays a
message asking you to confirm the lane
change, pull the Autopilot stalk toward you or
engage the appropriate turn signal. If you do
not confirm the lane change within three
seconds, a chime sounds to remind you that
Navigate on Autopilot requires your
confirmation to change lanes.
If Require Lane Change Confirmation is turned
off, Navigate on Autopilot engages the
appropriate turn signal, checks for vehicles
and objects, and when appropriate,
maneuvers Model X into the adjacent lane.
If Require Lane Change Confirmation is turned
on, you must pull the Autopilot stalk toward
you or engage the appropriate turn signal to confirm that you want Navigate on Autopilot
to make the lane change. If you do not confirm
the lane change within three seconds, a chime
sounds to remind you that Navigate on Autopilot requires your confirmation to
change lanes.
Note: If you ignore a route-based lane change
suggestion (for example, you are driving in the
left lane while approaching an off-ramp on the
right side of the highway), Navigate on
Autopilot will be unable to maneuver onto the off-ramp and as a result, the navigation
system will re-route you to your destination.Warning: Navigate on Autopilot may not
always attempt to exit at an off-ramp or
change lanes, even when an exit or lane
change is determined by the navigation
route. Always remain alert and be prepared to manually steer onto an off-
ramp, or make a lane change to prepare
for, or to exit at, an off-ramp or
interchange.
Be Ready to Assist
When attempting to change lanes or
maneuver Model X, or when approaching
construction zones, Navigate on Autopilot
may be unable to determine the appropriate
driving lane (for example, complex clover leafs
and multi-lane off-ramps) and the instrument
panel displays an alert indicating that
Navigate on Autopilot is trying to maneuver
and may require assistance. When you see the
message, be prepared to take immediate
action to ensure that it is safe and appropriate
to complete the lane change or maneuver.
Limitations
Autosteer and its associated functions are
particularly unlikely to operate as intended
when:
Page 156 of 247
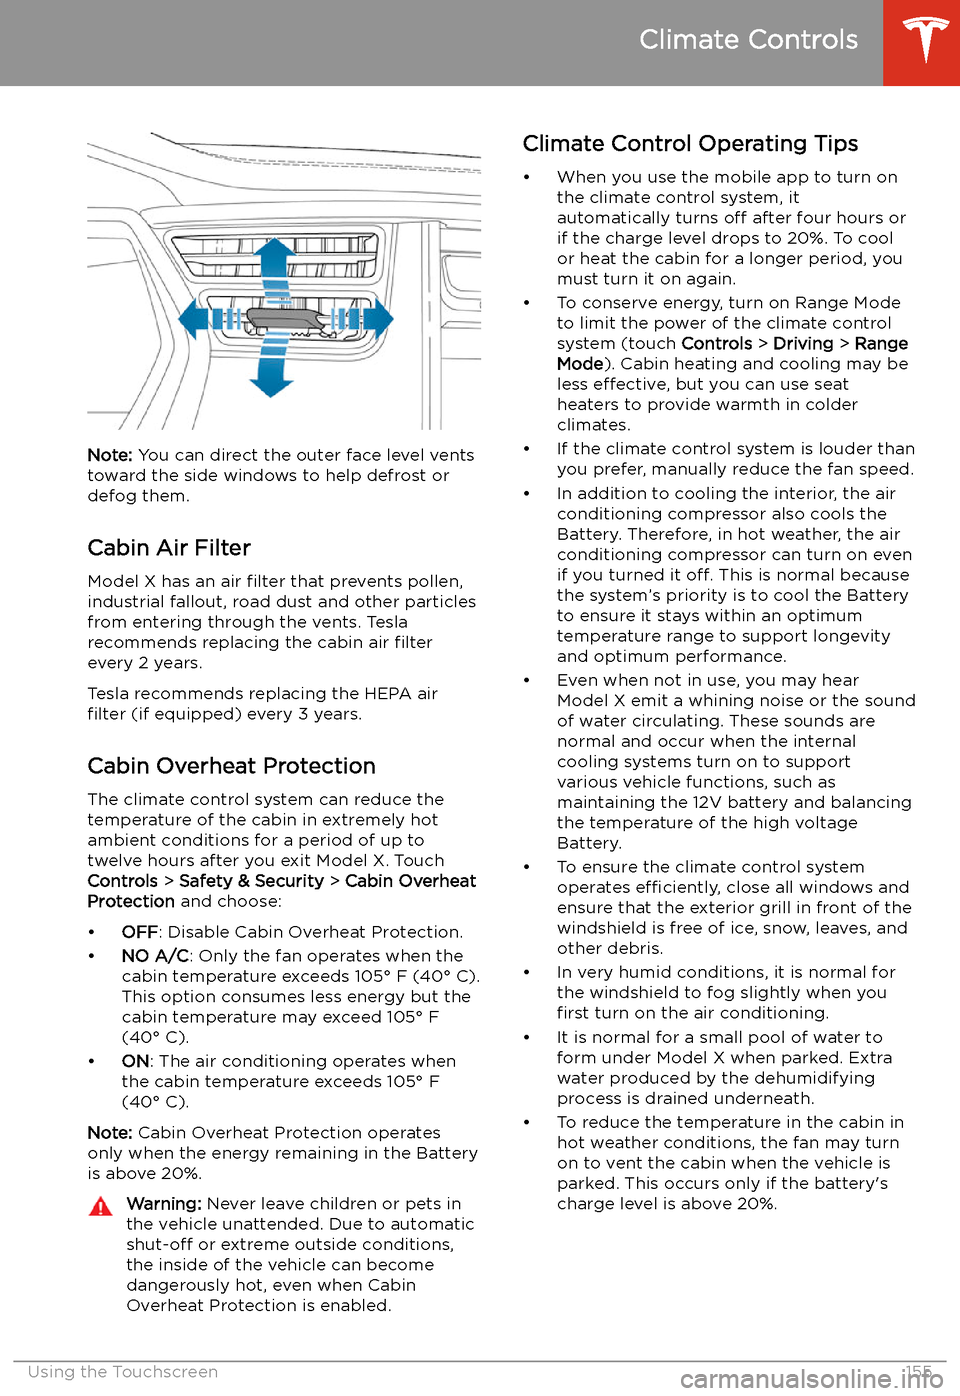
Note: You can direct the outer face level vents
toward the side windows to help defrost or
defog them.
Cabin Air Filter
Model X has an air filter that prevents pollen,
industrial fallout, road dust and other particles
from entering through the vents. Tesla
recommends replacing the cabin air filter
every 2 years.
Tesla recommends replacing the HEPA air
filter (if equipped) every 3 years.
Cabin Overheat Protection
The climate control system can reduce the
temperature of the cabin in extremely hot
ambient conditions for a period of up to twelve hours after you exit Model X. TouchControls > Safety & Security > Cabin Overheat
Protection and choose:
Page 188 of 247
Note: If Model X is locked, the charge port
light does not light up.
If the charge port light turns red while
charging, a fault is detected. Check the instrument panel or touchscreen for a
message describing the fault. A fault can
occur due to something as common as a power outage. If a power outage occurs,
charging resumes automatically when power
is restored.
Note: When charging, particularly at high
currents, the refrigerant compressor and fan
operate as needed to keep the Battery cool.
Therefore, it is normal to hear sounds during
charging.
Note: Air conditioning performance is
generally not affected by charging. However,
under certain circumstances (for example, you
are charging at high currents during a
particularly warm day), the air coming from
the vents may not be as cool as expected and
a message displays on the instrument panel.
This is normal behavior and ensures that the
Battery stays within an optimum temperature
range while charging to support longevity and
optimum performance.Warning: Never spray liquid at a high
velocity (for example, if using a pressure
washer) towards the charge port while
charging. Failure to follow these
instructions can result in serious injury or
damage to the vehicle, charging
equipment, or property.
Stopping Charging
Stop charging at any time by disconnecting
the charge cable or touching Stop Charging
on the touchscreen.
Note: To prevent unauthorized unplugging of
the charge cable, the charge cable latch remains locked and Model X must be unlockedor able to recognize your key before you can
disconnect the charge cable.
To disconnect the charge cable:
1. Press and hold the button on the
connector handle to release the latch.
Alternatively, unlock the vehicle by
opening a door, using a key fob, or
touching Stop Charging on the
touchscreen. These methods unlock the
charge port as well.
2. Pull the connector from the charge port.
3. Push the charge port door closed.
Note:
If Model X is equipped with a motorized
charge port door, it automatically closes shortly after you remove the charge cable.Caution: Tesla strongly recommends
leaving Model X plugged in when not in use. This maintains the Battery at the
optimum level of charge.
Manually Releasing Charge Cable
If the usual methods for releasing a charge
cable from the charge port (using the charge
handle release button, touchscreen, or mobile
app) do not work, carefully follow these steps:
1. Ensure that Model X is not actively
charging by displaying the charging
screen on the touchscreen. If necessary,
touch Stop Charging .
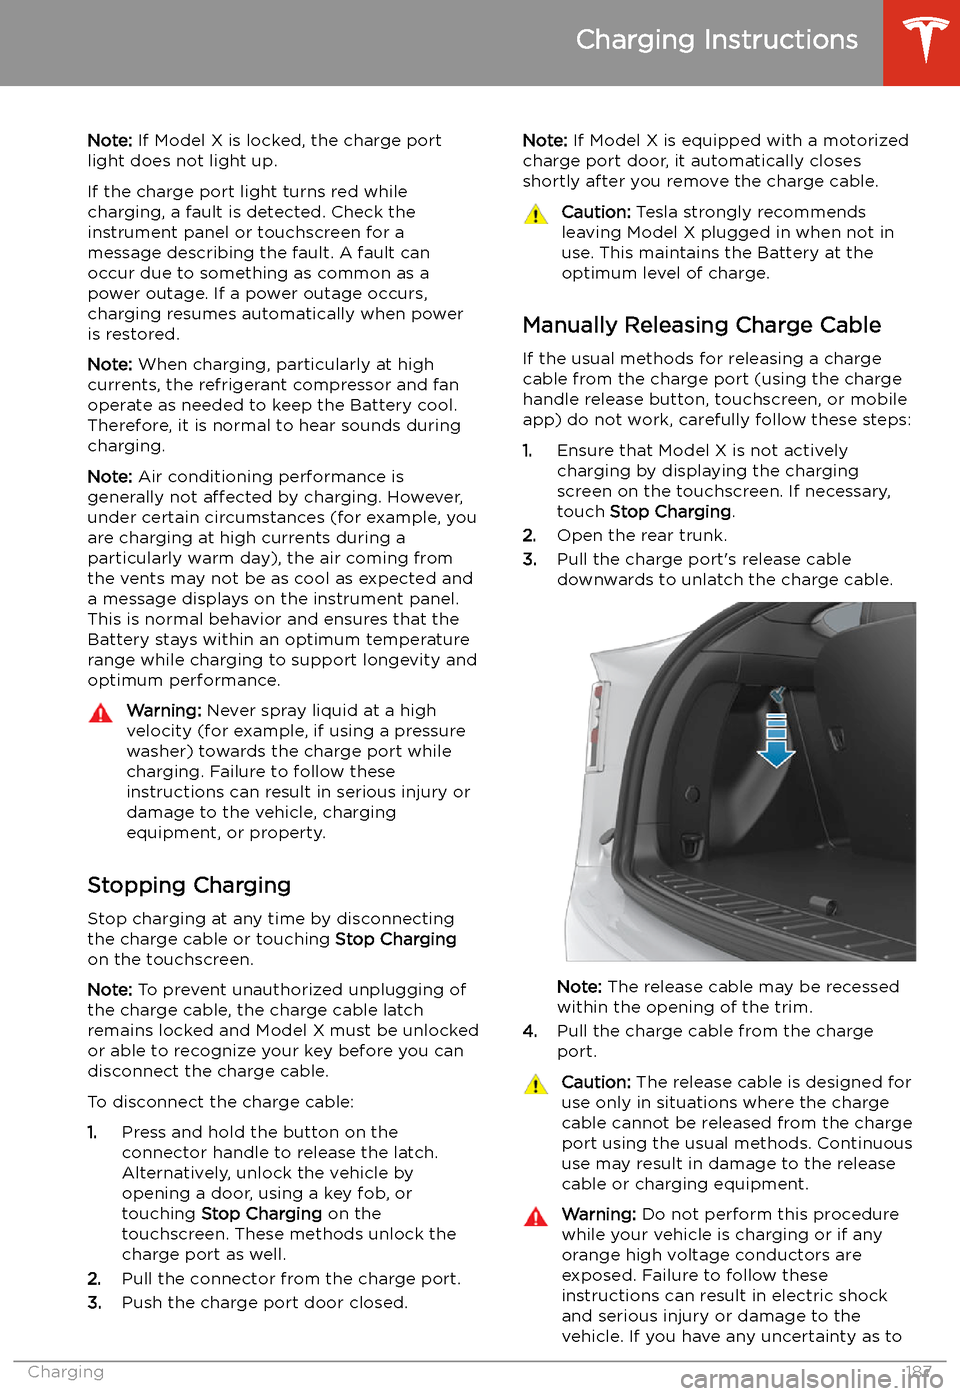
2. Open the rear trunk.
3. Pull the charge port
Page 195 of 247

Tire Care and Maintenance
Maintaining Tire Pressures
If you are not towing a trailer, keep tires
in
Page 212 of 247

Vehicle Loading
Load Capacity Labeling It is important to understand how much
weight your Model X can safely carry. This
weight is called the vehicle capacity weight
and includes the weight of all occupants, cargo and any additional equipment added toyour Model X since it was manufactured.
One or more labels attached to the center
door pillar indicate how much weight Model X
can safely carry. Labels are visible when the front door is open.
1. Towing label (if equipped)
2. Tire and Loading Information label
3. Vehicle Certification label
Note: Towing capability is available only if
Model X is equipped with the Towing Package.
Warning: Overloading Model X has an
adverse effect on braking and handling,
which can compromise your safety or cause damage.Caution: Never load more than 175 lbs (80
kg) on the rear load
Page 215 of 247

Shoulder RoomFrontRear
Third60.7 in 56.8 in 40 in1542 mm
1442 mm 1016 mmHip RoomFront Rear
Third55.6 in 59 in
38.5 in1412 mm
1498 mm 978 mm
Cargo Volume
Front TrunkRear*TotalSeven Seat Vehicles6.6 cu ft (187 L)76.5 cu ft (2166 L)**83.1 cu ft (2353 L)Six Seat Vehicles6.6 cu ft (187 L)70.7 cu ft (2002 L)**77.3 cu ft (2189 L)Five Seat Vehicles6.6 cu ft (187 L)81.2 cu ft (2299.5 L)**87.8 cu ft (2486.5 L)* Maximum cargo volume behind the front row seats. Includes the 12.6 cu ft (357 L) cargo area
in the rear trunk (area behind the third row seats, if equipped).** Second row seats fully forward and/or folded.
Weights
Curb Weight* - Model X5,631 lbs2,554 kgCurb Weight* - Model X Performance5,741 lbs2,604 kgGVWR** - Model X 6,788 lbs3,079 kgGVWR** - Model X Performance 6,878 lbs3,120 kgGross Axle Weight Rating - Front3,241 lbs1,470 kgGross Axle Weight Rating - Model X -
Rear (at nominal tire pressure of 42
psi)3,792 lbs1,720 kgGross Axle Weight Rating - Model X
Performance- Rear (at nominal tire
pressure of 42 psi)3,807 lbs1,727 kgTowing Capacity (if equipped)See Towing and Accessories on page 94.*Curb Weight = weight of the vehicle with correct