ESP TESLA MODEL X 2022 Owner´s Manual
[x] Cancel search | Manufacturer: TESLA, Model Year: 2022, Model line: MODEL X, Model: TESLA MODEL X 2022Pages: 212, PDF Size: 5.07 MB
Page 63 of 212
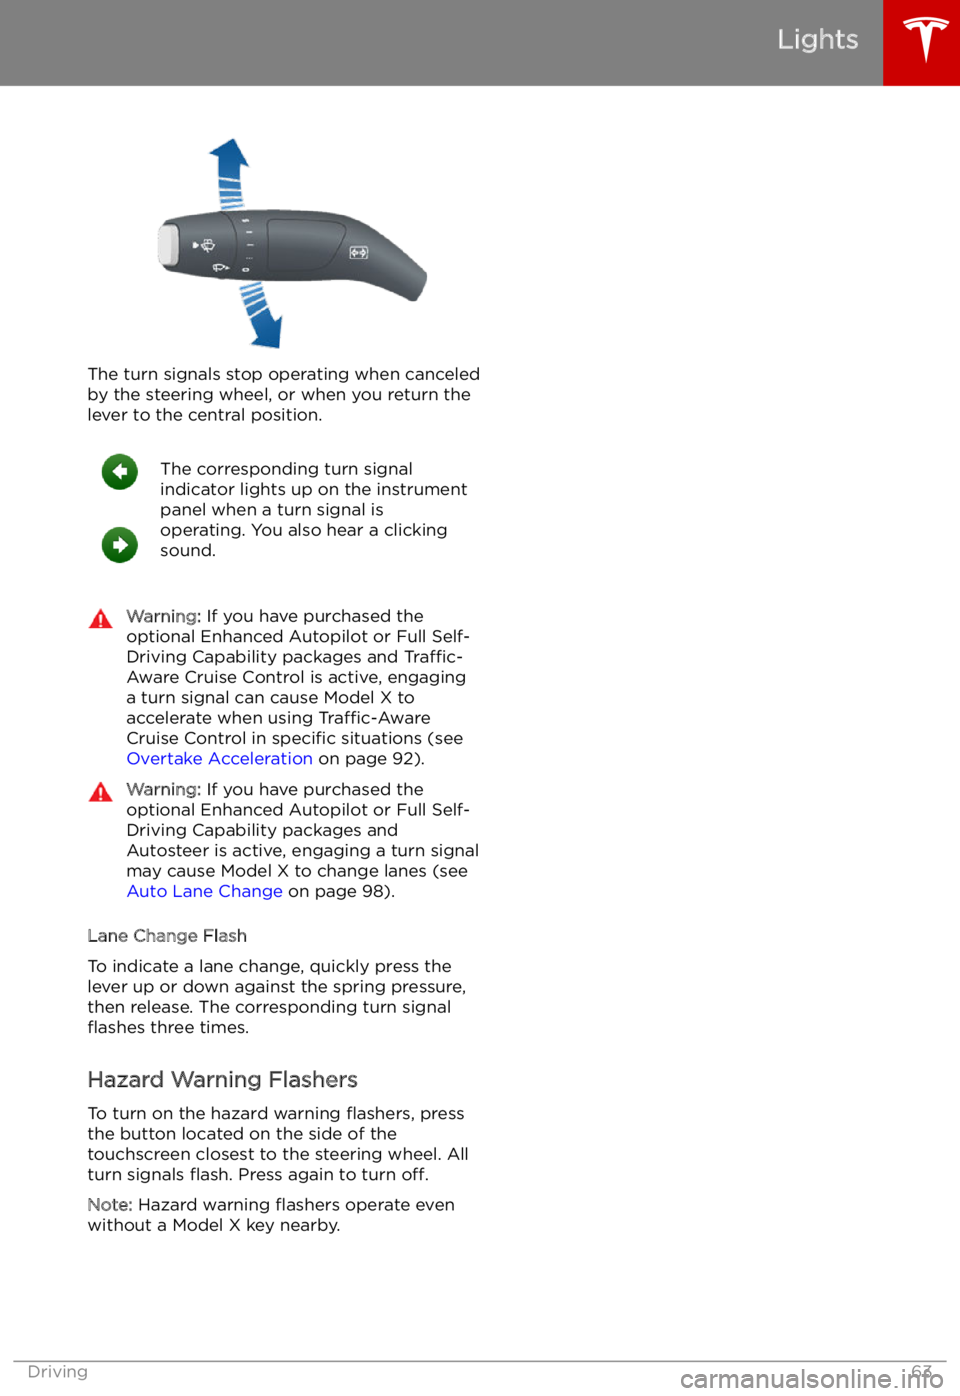
The turn signals stop operating when canceledby the steering wheel, or when you return the
lever to the central position.
The corresponding turn signal
indicator lights up on the instrument
panel when a turn signal is
operating. You also hear a clicking
sound.Warning: If you have purchased the
optional Enhanced Autopilot or Full Self-
Driving Capability packages and Traffic-
Aware Cruise Control is active, engaging
a turn signal can cause Model X to
accelerate when using Traffic-Aware
Cruise Control in specific situations (see
Overtake Acceleration on page 92).Warning: If you have purchased the
optional Enhanced Autopilot or Full Self-
Driving Capability packages and
Autosteer is active, engaging a turn signal
may cause Model X to change lanes (see Auto Lane Change on page 98).
Lane Change Flash
To indicate a lane change, quickly press the
lever up or down against the spring pressure,
then release. The corresponding turn signal
Page 77 of 212

Active Spoiler
Model X has a rear spoiler designed to improve aerodynamics. If Model X is equippedwith the active spoiler, the position of thespoiler can vary depending on the status and
speed of Model X:
Page 84 of 212
Warning: You must use the Model X trailer
hitch when towing a trailer. Never attempt
to attach a different type of trailer hitch.
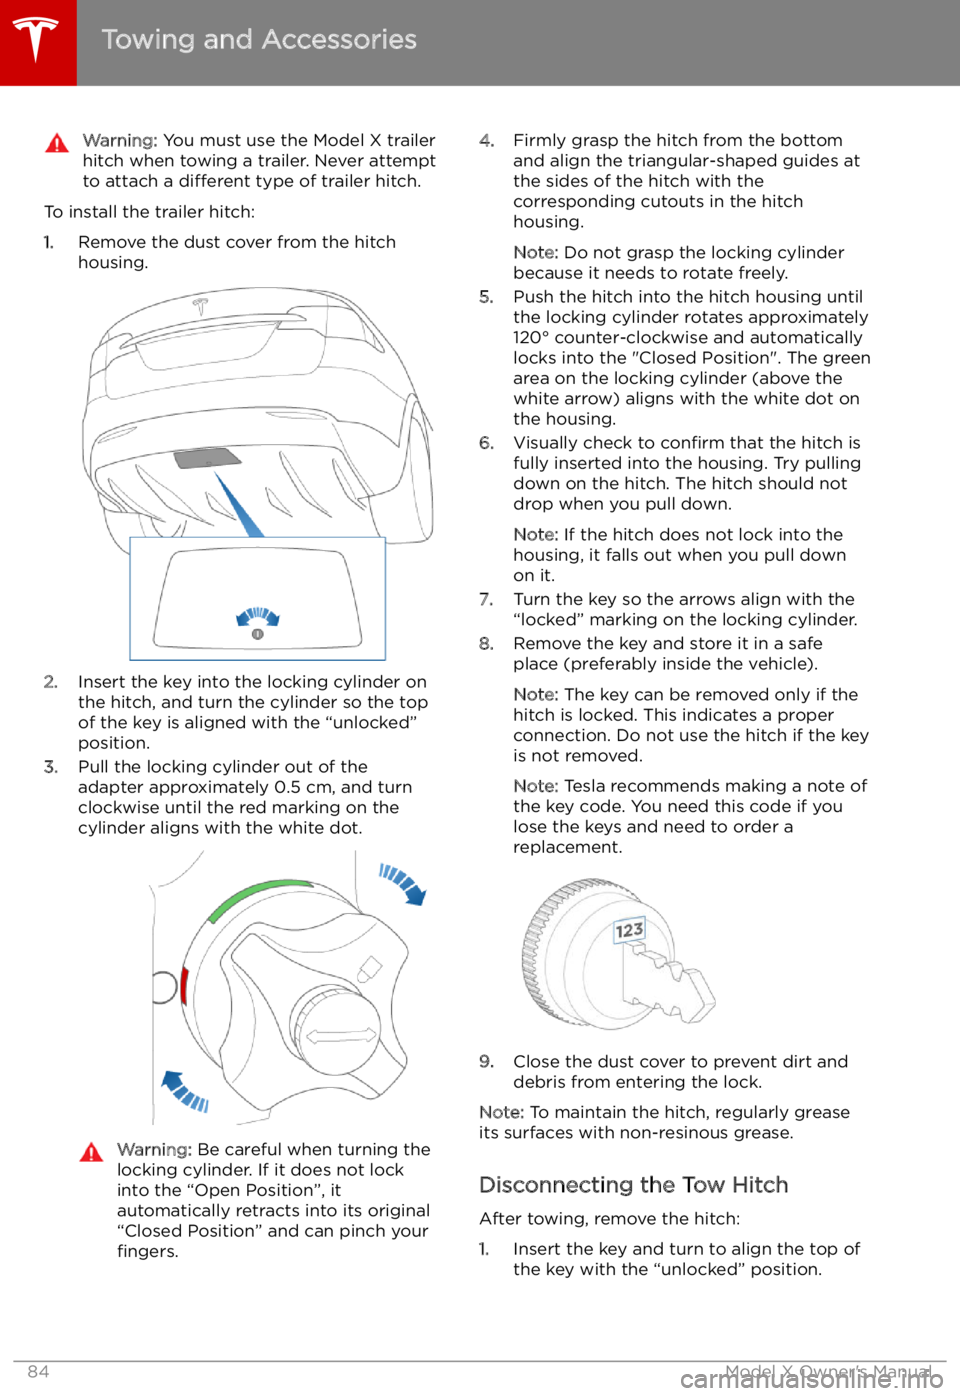
To install the trailer hitch:
1. Remove the dust cover from the hitch
housing.
2. Insert the key into the locking cylinder on
the hitch, and turn the cylinder so the top of the key is aligned with the “unlocked”
position.
3. Pull the locking cylinder out of the
adapter approximately 0.5 cm, and turn
clockwise until the red marking on the
cylinder aligns with the white dot.
Warning: Be careful when turning the
locking cylinder. If it does not lock
into the “Open Position”, it
automatically retracts into its original
“Closed Position” and can pinch your fingers.4. Firmly grasp the hitch from the bottom
and align the triangular-shaped guides at
the sides of the hitch with the
corresponding cutouts in the hitch
housing.
Note: Do not grasp the locking cylinder
because it needs to rotate freely.
5. Push the hitch into the hitch housing until
the locking cylinder rotates approximately
120
Page 91 of 212
brake/decelerate for stationary vehicles
or objects, especially in situations when
you are driving over 80 km/h and in situations where a vehicle you are
following moves out of your driving path and a stationary vehicle or object is in
front of you. Always pay attention to the
road ahead and stay prepared to take
immediate corrective action. Depending
on Traffic-Aware Cruise Control to avoid a
collision can result in serious injury or death. In addition, Traffic-Aware Cruise
Control may react to vehicles or objects
that either do not exist or are not in the
lane of travel, causing Model X to slow
down unnecessarily or inappropriately.Warning: Traffic-Aware Cruise Control
may be unable to provide adequate
speed control because of limited braking capability and hills. It can also misjudgethe distance from a vehicle ahead. Driving
downhill can increase driving speed, causing Model X to exceed your set
speed (and potentially the road
Page 104 of 212
Lane Assist
The cameras monitor the markers on the lane
you are driving in and the ultrasonic sensors
monitor the surrounding areas and the blind
spot for the presence of a vehicle or other
objects.
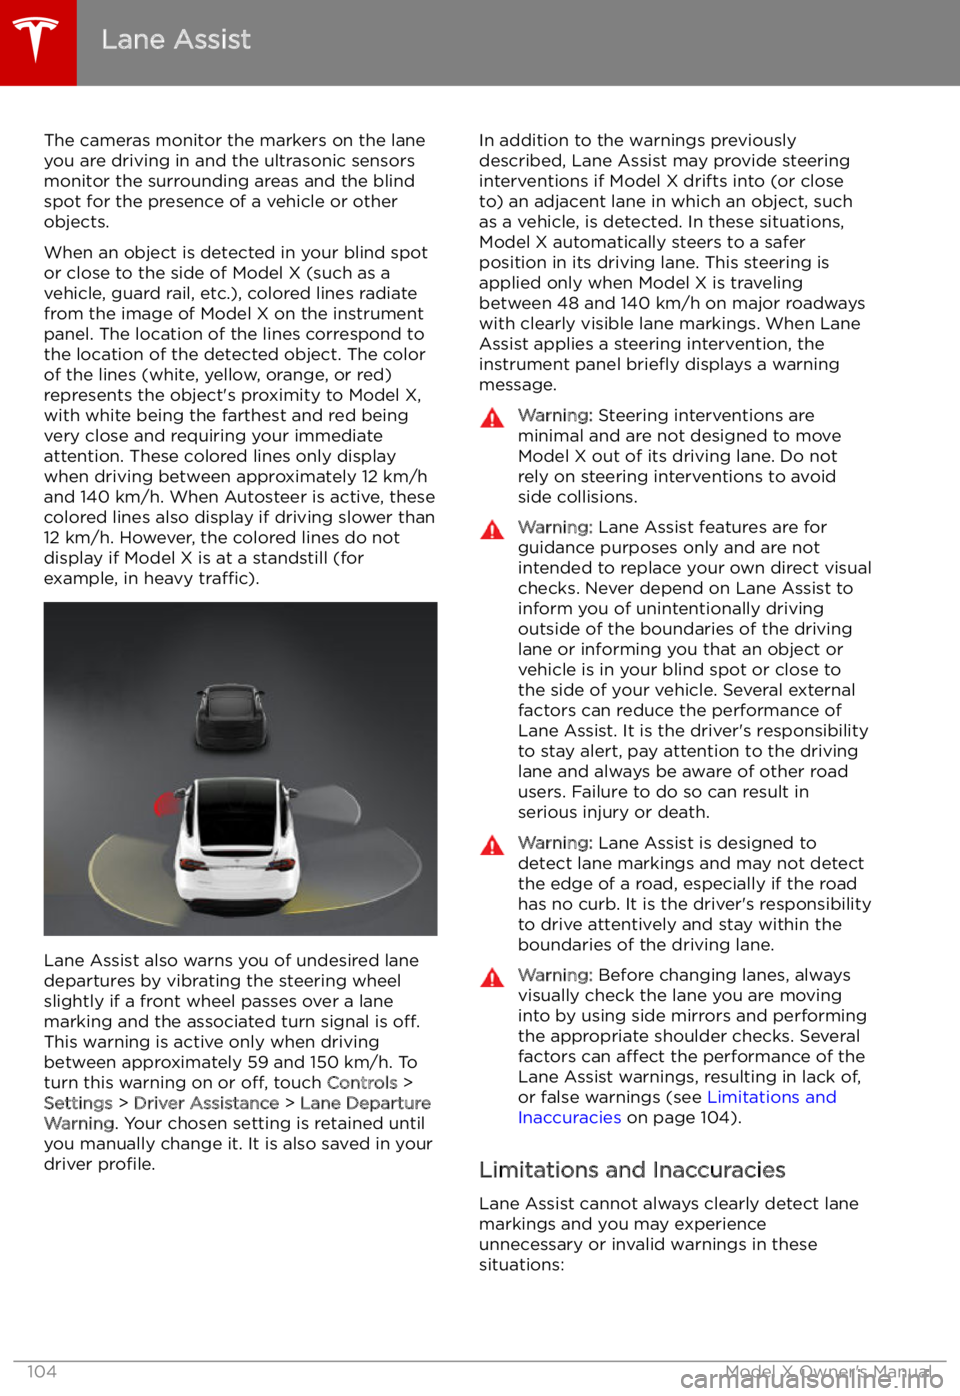
When an object is detected in your blind spot
or close to the side of Model X (such as a
vehicle, guard rail, etc.), colored lines radiate
from the image of Model X on the instrument
panel. The location of the lines correspond to
the location of the detected object. The color
of the lines (white, yellow, orange, or red)
represents the object
Page 110 of 212
Speed Assist
How Speed Assist Works
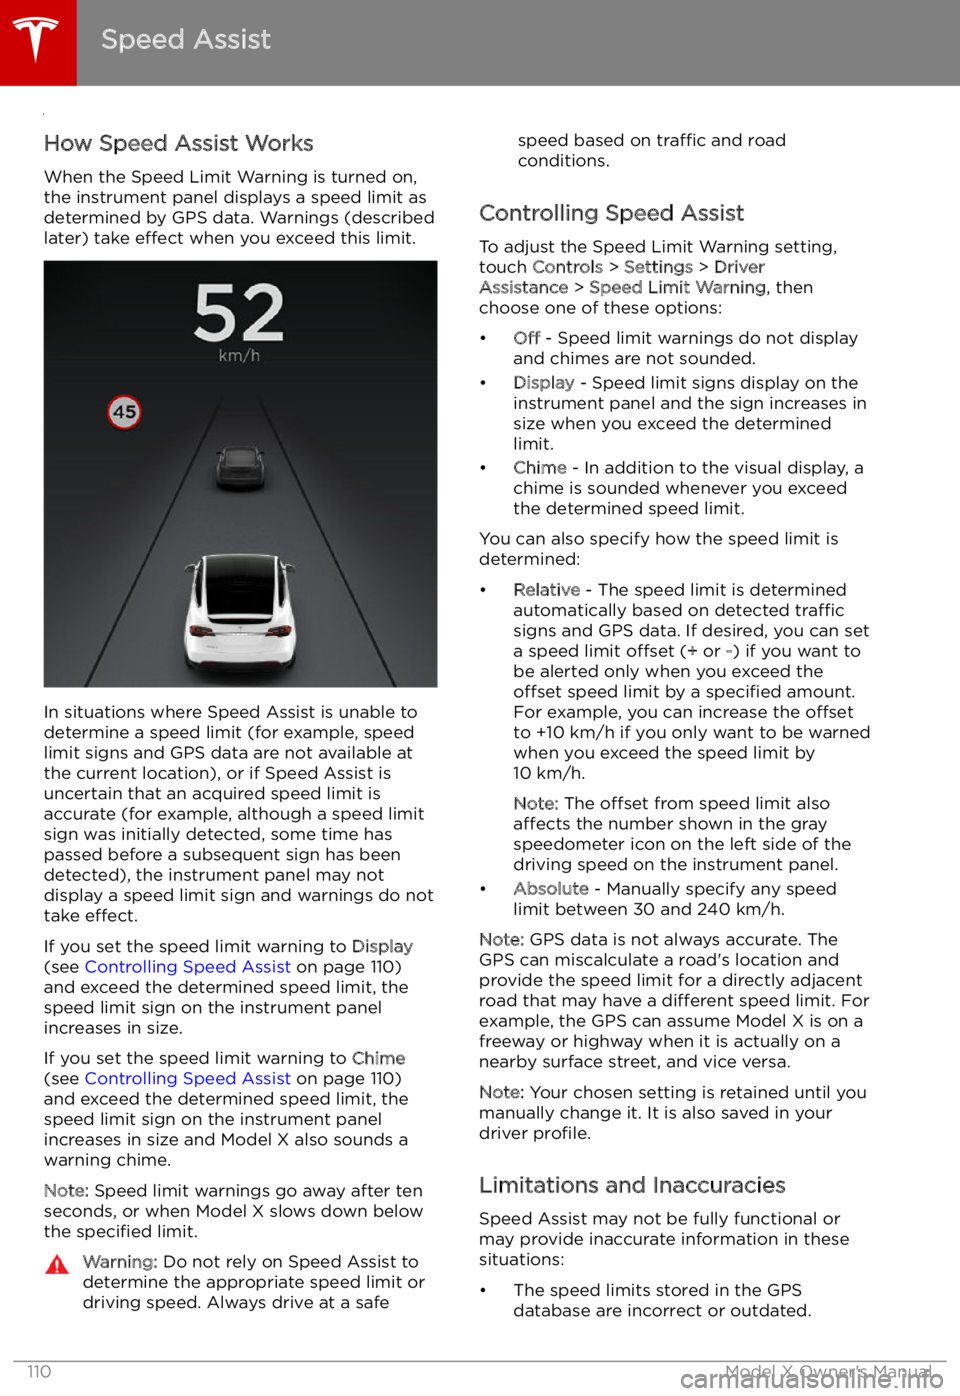
When the Speed Limit Warning is turned on,
the instrument panel displays a speed limit as
determined by GPS data. Warnings (described
later) take effect when you exceed this limit.
In situations where Speed Assist is unable to
determine a speed limit (for example, speed
limit signs and GPS data are not available at
the current location), or if Speed Assist is
uncertain that an acquired speed limit is
accurate (for example, although a speed limit sign was initially detected, some time has
passed before a subsequent sign has been
detected), the instrument panel may not
display a speed limit sign and warnings do not take effect.
If you set the speed limit warning to Display
(see Controlling Speed Assist on page 110)
and exceed the determined speed limit, the
speed limit sign on the instrument panel
increases in size.
If you set the speed limit warning to Chime
(see Controlling Speed Assist on page 110)
and exceed the determined speed limit, the speed limit sign on the instrument panelincreases in size and Model X also sounds a
warning chime.
Note: Speed limit warnings go away after ten
seconds, or when Model X slows down below
the specified limit.
Warning:
Do not rely on Speed Assist to
determine the appropriate speed limit or driving speed. Always drive at a safespeed based on traffic and road
conditions.
Controlling Speed Assist
To adjust the Speed Limit Warning setting,
touch Controls > Settings > Driver
Assistance > Speed Limit Warning , then
choose one of these options:
Page 128 of 212
Customizing Climate ControlThe climate control system is designed to automatically provide optimum comfort in most
situations. All you need to do is set the desired temperature, and the air conditioning, air
recirculation, air distribution, and fan speed automatically maintain your selected temperature. You can even keep the climate control system on while you are away from the vehicle so that the
selected temperature is maintained.
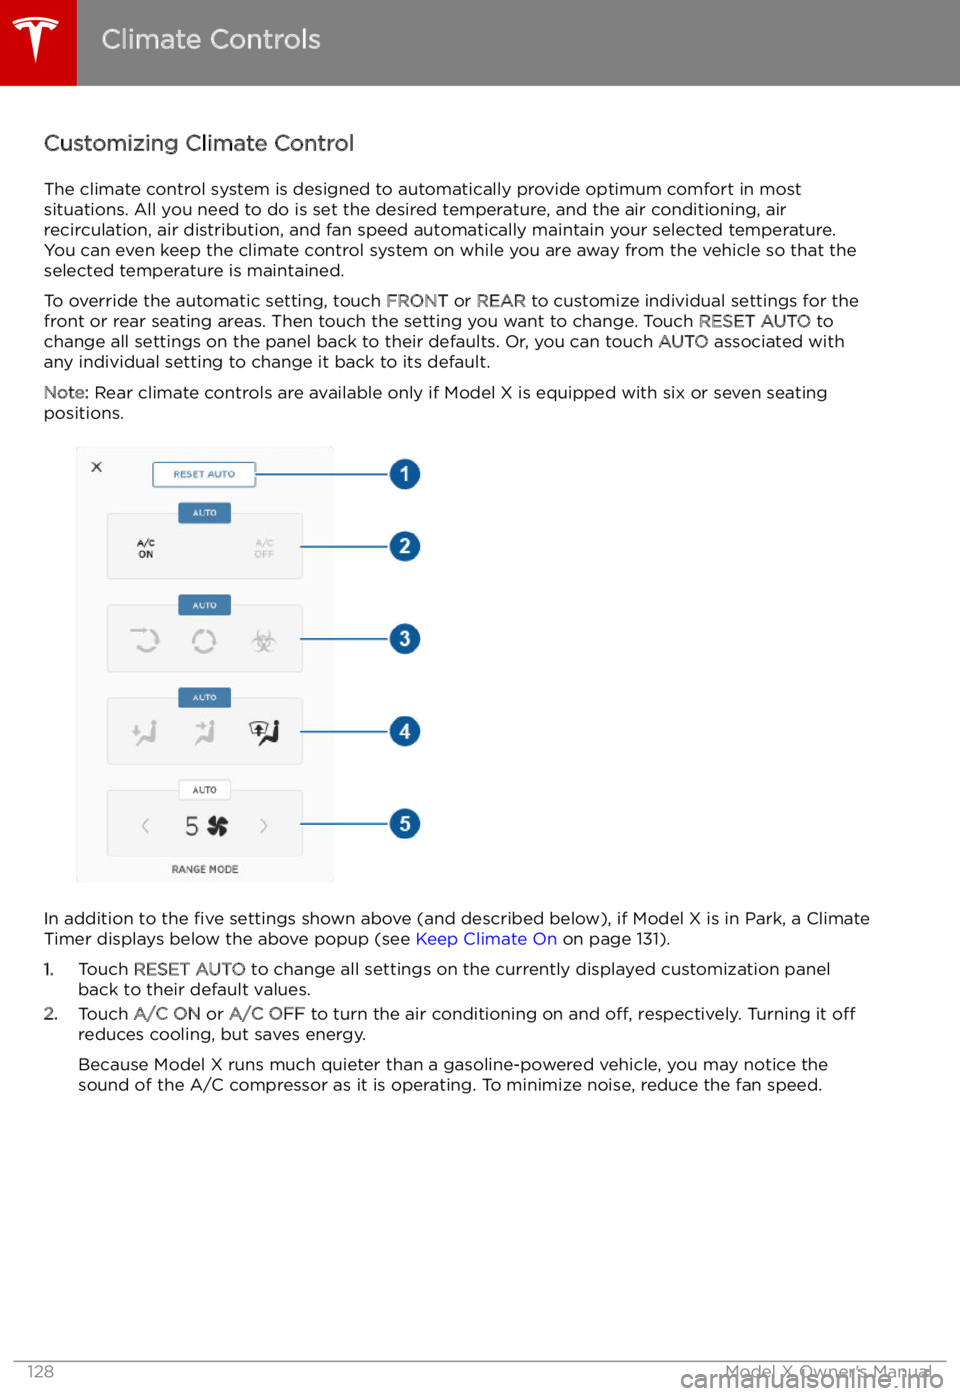
To override the automatic setting, touch FRONT or REAR to customize individual settings for the
front or rear seating areas. Then touch the setting you want to change. Touch RESET AUTO to
change all settings on the panel back to their defaults. Or, you can touch AUTO associated with
any individual setting to change it back to its default.
Note: Rear climate controls are available only if Model X is equipped with six or seven seating
positions.
In addition to the five settings shown above (and described below), if Model X is in Park, a Climate
Timer displays below the above popup (see Keep Climate On on page 131).
1. Touch RESET AUTO to change all settings on the currently displayed customization panel
back to their default values.
2. Touch A/C ON or A/C OFF to turn the air conditioning on and off, respectively. Turning it off
reduces cooling, but saves energy.
Because Model X runs much quieter than a gasoline-powered vehicle, you may notice the
sound of the A/C compressor as it is operating. To minimize noise, reduce the fan speed.
Climate Controls
128Model X Owner
Page 130 of 212
Rear Cabin Climate Controls (6 and 7 seat vehicles only)
Note: When set to AUTO, the rear heating and air conditioning turn off when Model X detects that
there are no occupants in the second or third row seats. To override this energy saving feature and
save the settings until you manually change them, touch the AUTO button located above the
Climate On/Climate Off setting. Touching AUTO a second time cancels your manual setting and
resumes the energy saving feature.
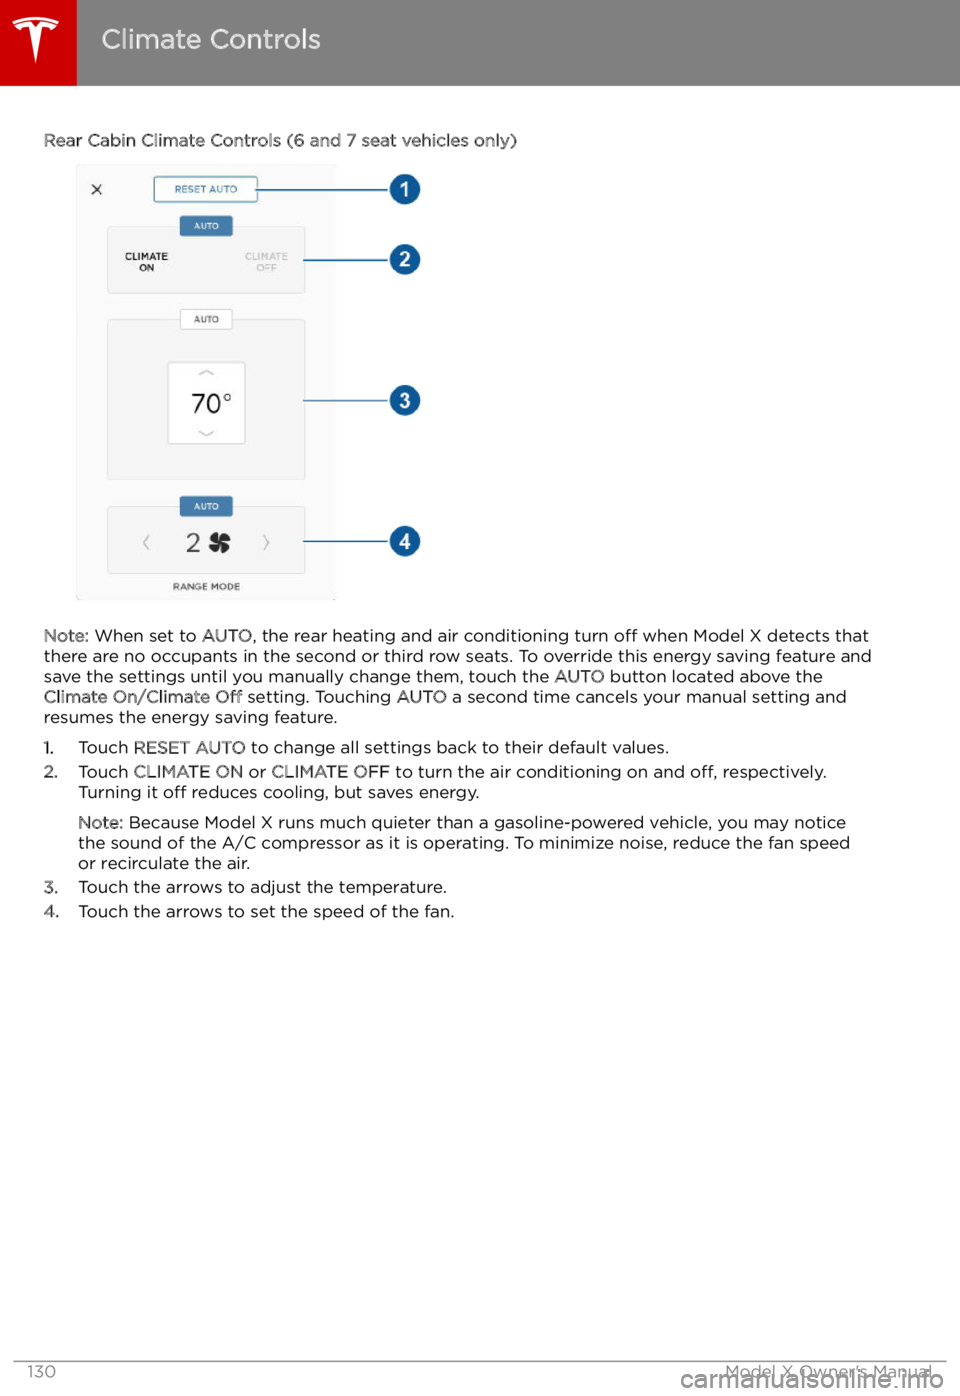
1. Touch RESET AUTO to change all settings back to their default values.
2. Touch CLIMATE ON or CLIMATE OFF to turn the air conditioning on and off, respectively.
Turning it off reduces cooling, but saves energy.
Note: Because Model X runs much quieter than a gasoline-powered vehicle, you may notice
the sound of the A/C compressor as it is operating. To minimize noise, reduce the fan speed
or recirculate the air.
3. Touch the arrows to adjust the temperature.
4. Touch the arrows to set the speed of the fan.
Climate Controls
130Model X Owner
Page 151 of 212
Connecting to Wi-Fi
Wi-Fi is available as a data connection method and is often faster than cellular data networks.
Connecting to Wi-Fi is especially useful in areas with limited or no cellular connectivity.
To ensure fast, reliable delivery of Model X
updates (see Software Updates on page 152),
Tesla recommends leaving Wi-Fi turned on and connected to a Wi-Fi network. To connectto a Wi-Fi network:
1. Touch the LTE (or 3G) icon in the
touchscreen status bar. Model X will start
scanning and display the Wi-Fi networks
that are within range.
2. Select the Wi-Fi network you want to use,
enter the password (if necessary), then
touch Connect .
You can also connect to a hidden network that
isn
Page 154 of 212
Charging
Electric Vehicle Components
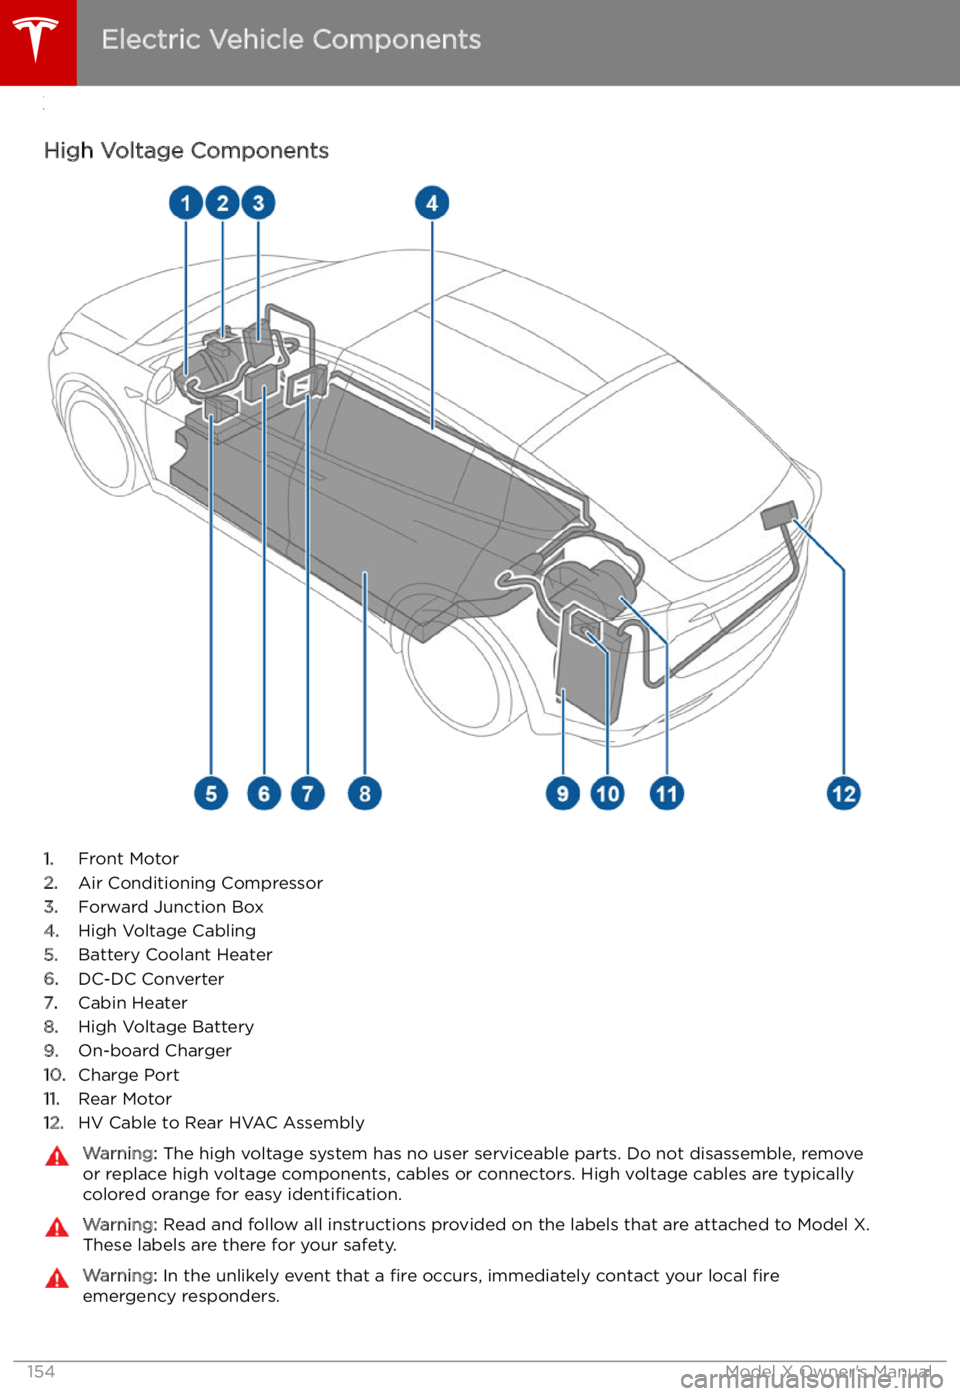
High Voltage Components
1. Front Motor
2. Air Conditioning Compressor
3. Forward Junction Box
4. High Voltage Cabling
5. Battery Coolant Heater
6. DC-DC Converter
7. Cabin Heater
8. High Voltage Battery
9. On-board Charger
10. Charge Port
11. Rear Motor
12. HV Cable to Rear HVAC Assembly
Warning:
The high voltage system has no user serviceable parts. Do not disassemble, remove
or replace high voltage components, cables or connectors. High voltage cables are typically colored orange for easy identification.Warning: Read and follow all instructions provided on the labels that are attached to Model X.
These labels are there for your safety.Warning: In the unlikely event that a fire occurs, immediately contact your local fire
emergency responders.
Electric Vehicle Components
154Model X Owner