SOC TESLA MODEL X 2023 Owners Manual
[x] Cancel search | Manufacturer: TESLA, Model Year: 2023, Model line: MODEL X, Model: TESLA MODEL X 2023Pages: 296, PDF Size: 8.56 MB
Page 20 of 296

1. On the touchscreen, touch Controls > Locks.2.
In the key list, find the key that you would like to
delete and touch its associated trash icon.
3.
When prompted, scan an authenticated key card or key fob on the card reader to
confirm the deletion.
When complete, the key list no longer includes the deleted key.
NOTE: Model X requires at least one authenticated key
card or key fob at all times. If only one key card remains on the key list, you cannot delete it.
Keys
18MODEL X Owner
Page 23 of 296
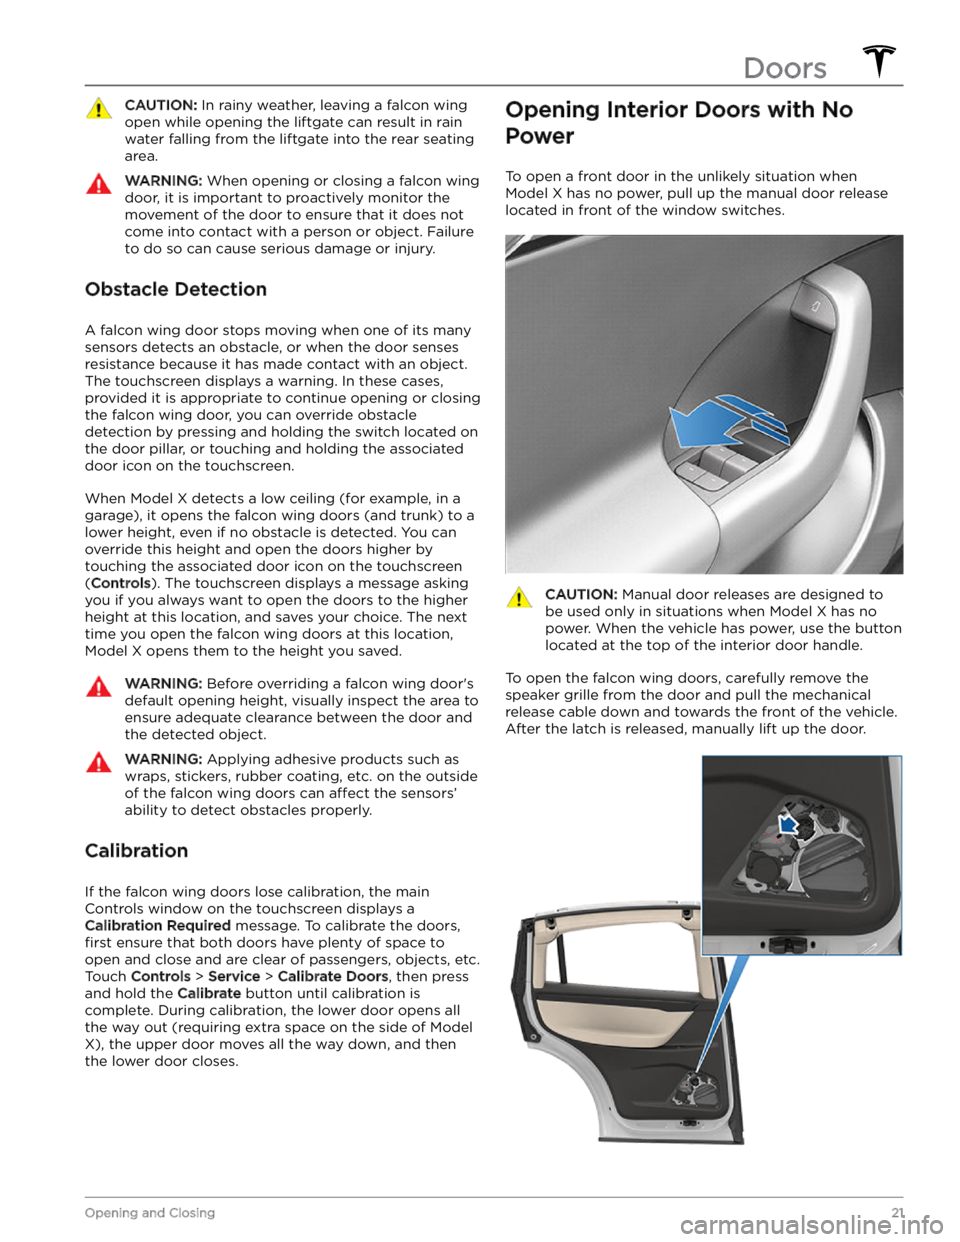
CAUTION: In rainy weather, leaving a falcon wing
open while opening the liftgate can result in rain
water falling from the liftgate into the rear seating
area.
WARNING: When opening or closing a falcon wing
door, it is important to proactively monitor the
movement of the door to ensure that it does not
come into contact with a person or object. Failure
to do so can cause serious damage or injury.
Obstacle Detection
A falcon wing door stops moving when one of its many
sensors detects an obstacle, or when the door senses resistance because it has made contact with an object. The touchscreen displays a warning. In these cases, provided it is appropriate to continue opening or closing the falcon wing door, you can override obstacle
detection by pressing and holding the switch located on the door pillar, or touching and holding the associated door icon on the touchscreen.
When Model X detects a low ceiling (for example, in a garage), it opens the falcon wing doors (and trunk) to a lower height, even if no obstacle is detected. You can override this height and open the doors higher by
touching the associated door icon on the touchscreen (
Controls). The touchscreen displays a message asking
you if you always want to open the doors to the higher height at this location, and saves your choice. The next time you open the falcon wing doors at this location, Model X opens them to the height you saved.
WARNING: Before overriding a falcon wing door
Page 26 of 296
Opening and Closing
NOTE: It is your responsibility to ensure windows are
closed after locking the vehicle.
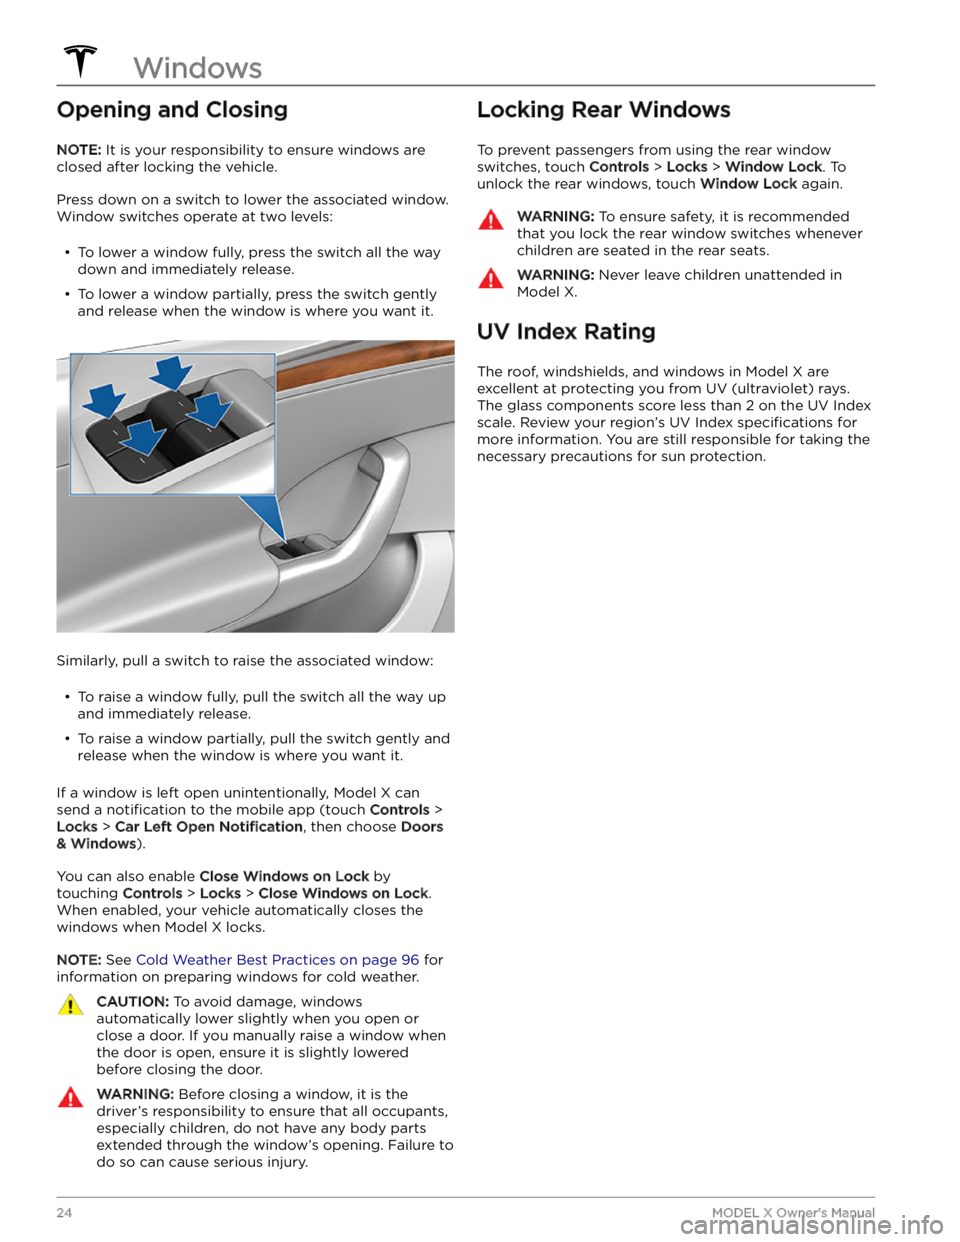
Press down on a switch to lower the associated window.
Window switches operate at two levels:
Page 34 of 296
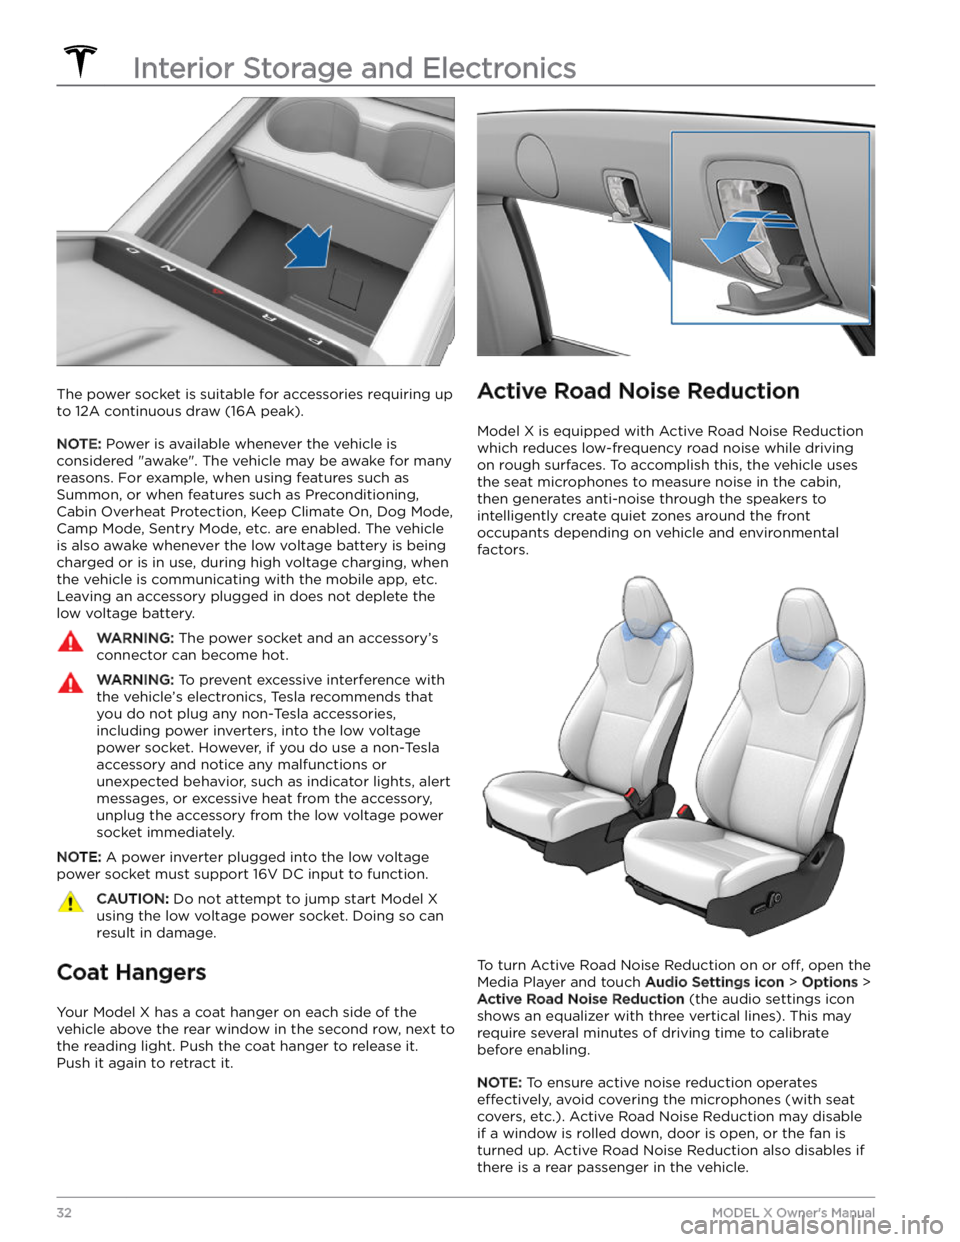
The power socket is suitable for accessories requiring up to 12A continuous draw (16A peak).
NOTE: Power is available whenever the vehicle is
considered "awake". The vehicle may be awake for many
reasons. For example, when using features such as Summon, or when features such as Preconditioning, Cabin Overheat Protection, Keep Climate On, Dog Mode,
Camp Mode, Sentry Mode, etc. are enabled. The vehicle
is also awake whenever the
low voltage battery is being
charged or is in use, during high voltage charging, when
the vehicle is communicating with the mobile app, etc. Leaving an accessory plugged in does not deplete the
low voltage battery.
WARNING: The power socket and an accessory
Page 42 of 296
Wearing Seat Belts
Using seat belts and child safety seats is the most
effective way to protect occupants if a collision occurs.
Therefore, wearing a seat belt is required by law in most jurisdictions.
Both the driver and passenger seats are equipped with three-point inertia reel seat belts. Inertia reel belts are automatically tensioned to allow occupants to move
comfortably during normal driving conditions.
To
securely hold child safety seats, all passenger seating
positions are equipped with an automatic locking
retractor (ALR) feature that, by fully extracting the seat
belt (beyond the length needed for a typical adult
occupant), locks the belt into place until the seat belt is
unbuckled.
The seat belt reel automatically locks to prevent
movement of occupants if
Model X experiences a force
associated with hard acceleration, braking, cornering, or
an impact in a collision.
Seat Belt Reminders
The seat belt reminder on the instrument
panel alerts you if a seat belt for an
occupied driver or passenger seat is unbuckled. If all occupants are buckled up and the reminder stays on, re-buckle seat
belts to ensure they are correctly latched.
Also remove any heavy objects (such as a briefcase) from an unoccupied seat. If the reminder light continues to stay on,
contact Tesla.
You can temporarily disable a seat belt reminder
associated with a rear seating position. This is useful when you are carrying an object in a rear seat that triggers the seat belt reminder alert. To disable the
reminder, touch the associated seat on the seat belt reminder popup message that displays on the touchscreen when a seat belt reminder is active. When a
reminder is disabled, the seat belt reminder icon is
replaced by a seat icon, for the current drive only. Touch the seat again to re-enable the reminder.
WARNING: Seat belts must be worn by passengers
in all seating positions. Do not disable a seat belt
reminder when the seating position is occupied by
a passenger.
To Fasten a Belt
1.
Ensure correct positioning of the seat (see Correct
Driving Position on page 35).
2.
Draw the belt out smoothly, ensuring the belt lays flat
across the pelvis, chest and mid-point of your collar
bone, between the neck and shoulder.
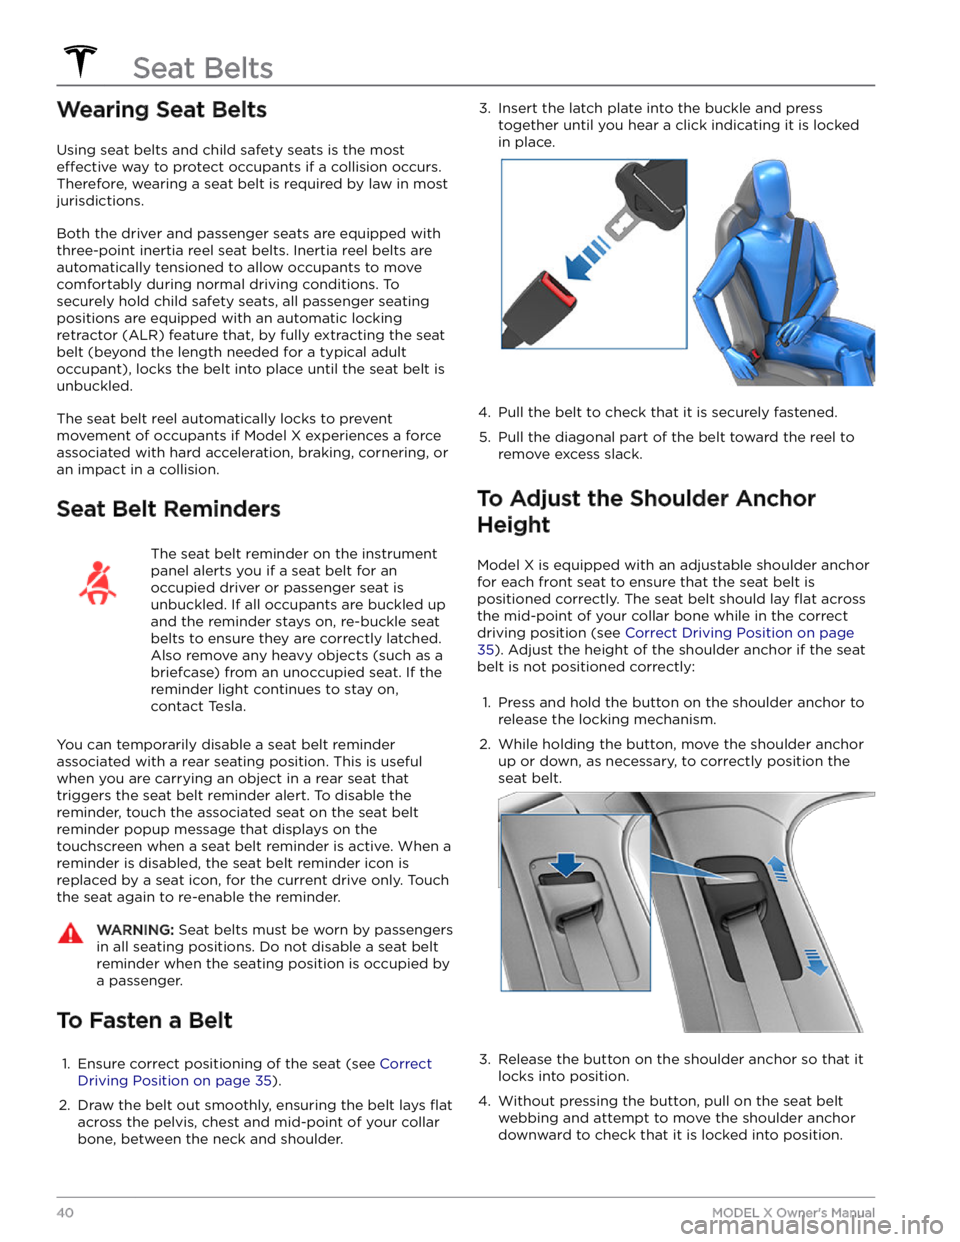
3. Insert the latch plate into the buckle and press
together until you hear a click indicating it is locked
in place.4.
Pull the belt to check that it is securely fastened.
5.
Pull the diagonal part of the belt toward the reel to
remove excess slack.
To Adjust the Shoulder Anchor
Height
Model X is equipped with an adjustable shoulder anchor
for each front seat to ensure that the seat belt is positioned correctly. The seat belt should lay
flat across
the mid-point of your collar bone while in the correct driving position
(see Correct Driving Position on page
35). Adjust the height of the shoulder anchor if the seat
belt is not positioned correctly:
1.
Press and hold the button on the shoulder anchor to release the locking mechanism.
2.
While holding the button, move the shoulder anchor up or down, as necessary, to correctly position the seat belt.
3.
Release the button on the shoulder anchor so that it
locks into position.
4.
Without pressing the button, pull on the seat belt webbing and attempt to move the shoulder anchor
downward to check that it is locked into position.
Seat Belts
40MODEL X Owner
Page 48 of 296
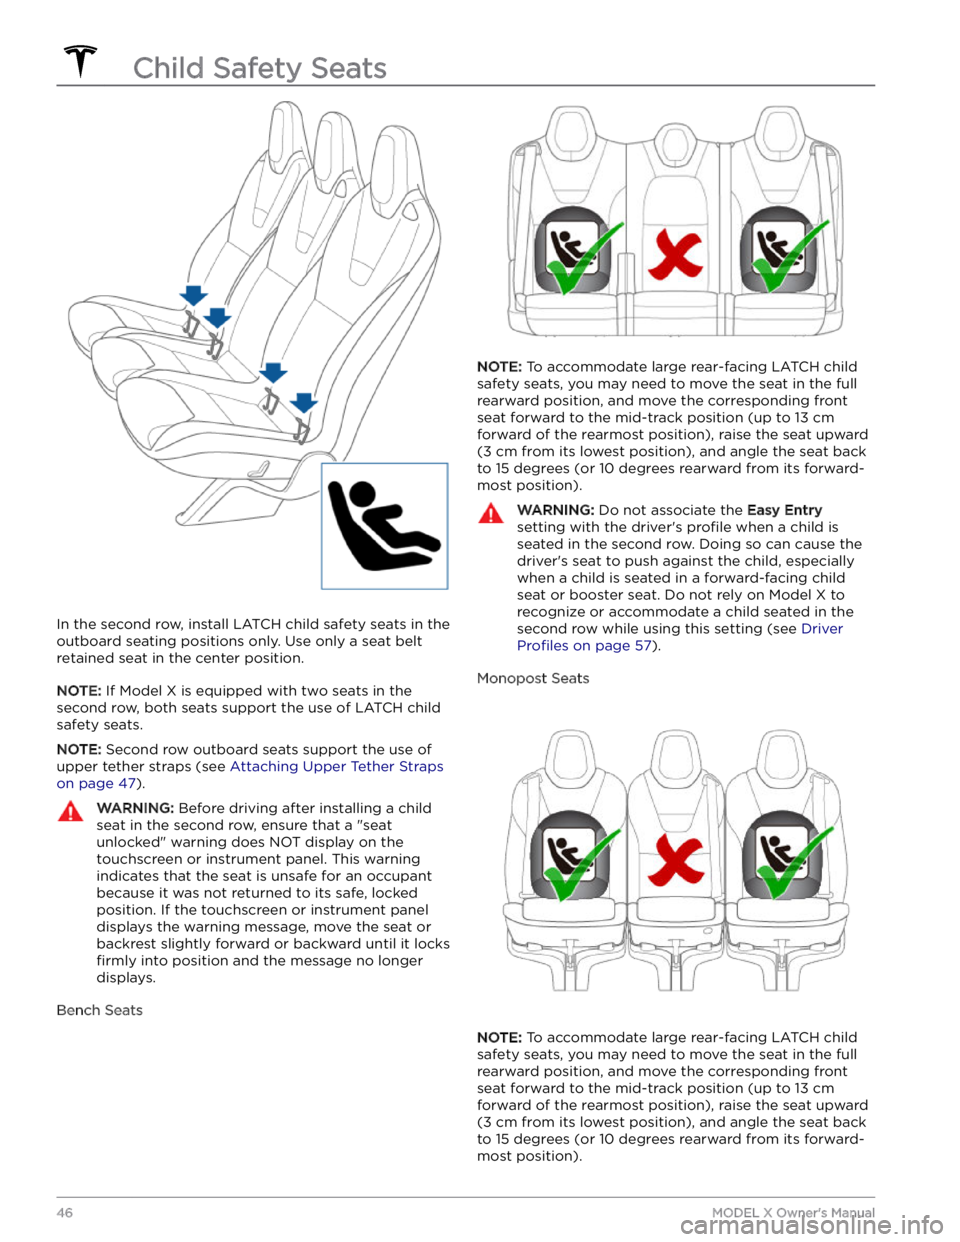
In the second row, install LATCH child safety seats in the
outboard seating positions only. Use only a seat belt
retained seat in the center position.
NOTE: If Model X is equipped with two seats in the
second row, both seats support the use of
LATCH child
safety seats.
NOTE: Second row outboard seats support the use of
upper tether straps (see
Attaching Upper Tether Straps
on page 47).
WARNING: Before driving after installing a child
seat in the second row, ensure that a "seat
unlocked" warning does NOT display on the
touchscreen or instrument panel. This warning
indicates that the seat is unsafe for an occupant
because it was not returned to its safe, locked
position. If the touchscreen or instrument panel
displays the warning message, move the seat or
backrest slightly forward or backward until it locks
firmly into position and the message no longer
displays.
Bench Seats
NOTE: To accommodate large rear-facing LATCH child
safety seats, you may need to move the seat in the full rearward position, and move the corresponding front seat forward to the mid-track position (up to 13 cm forward of the rearmost position), raise the seat upward
(3 cm from its lowest position), and angle the seat back
to 15 degrees (or 10 degrees rearward from its forward- most position).
WARNING: Do not associate the Easy Entry
setting with the driver
Page 68 of 296
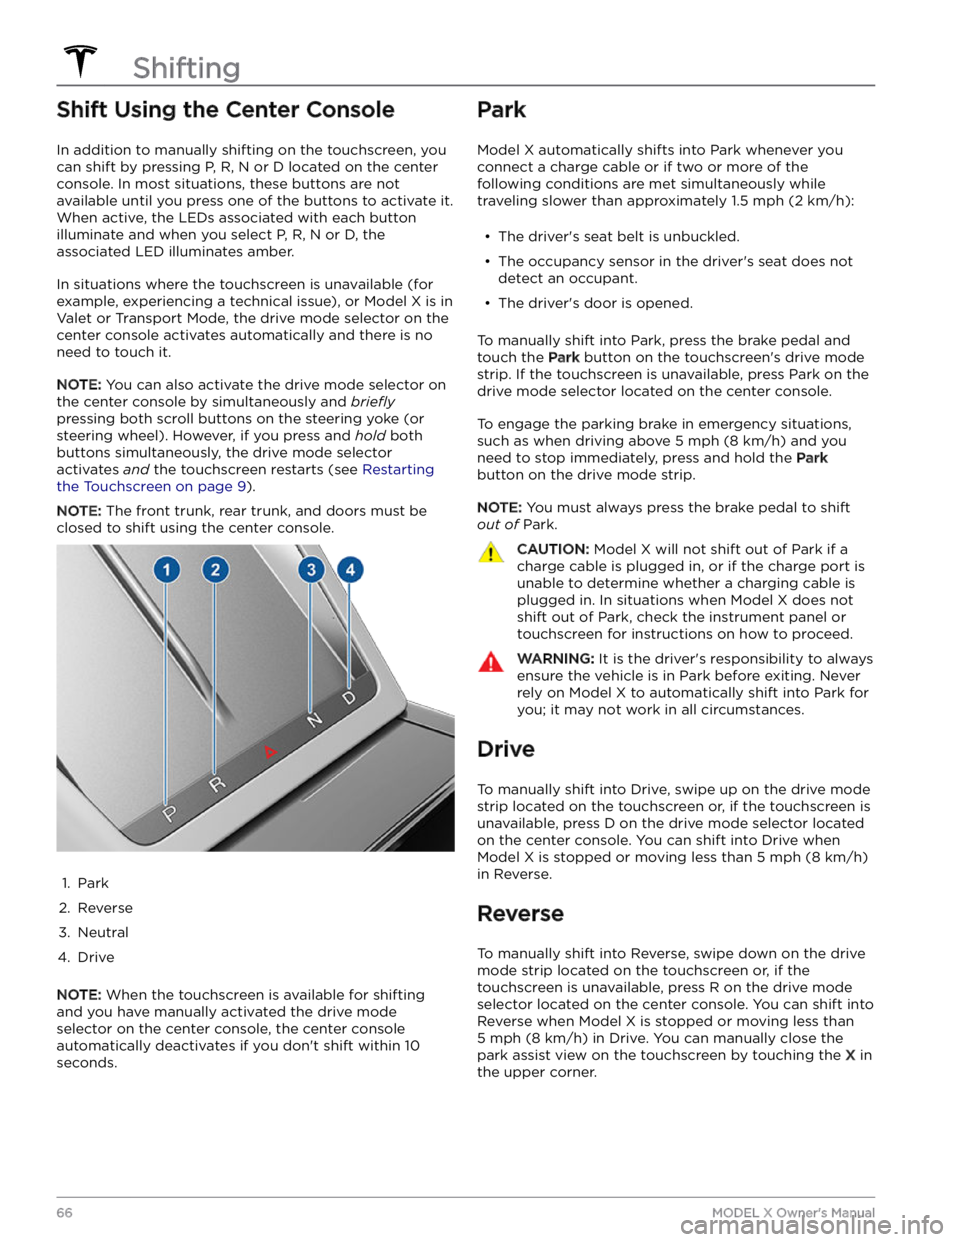
Shift Using the Center Console
In addition to manually shifting on the touchscreen, you
can shift by pressing P, R, N or D located on the center console. In most situations, these buttons are not available until you press one of the buttons to activate it. When active, the LEDs associated with each button illuminate and when you select P, R, N or D, the associated LED illuminates amber.
In situations where the touchscreen is unavailable (for
example, experiencing a technical issue), or
Model X is in
Valet or Transport Mode, the drive mode selector on the
center console activates automatically and there is no need to touch it.
NOTE: You can also activate the drive mode selector on
the center console by simultaneously and
briefly
pressing both scroll buttons on the steering yoke (or
steering wheel). However, if you press and hold both
buttons simultaneously, the drive mode selector
activates
and the touchscreen restarts (see Restarting
the Touchscreen on page 9).
NOTE: The front trunk, rear trunk, and doors must be
closed to shift using the center console.
1.
Park
2.
Reverse
3.
Neutral
4.
Drive
NOTE: When the touchscreen is available for shifting
and you have manually activated the drive mode selector on the center console, the center console automatically deactivates if you don
Page 110 of 296
In situations where Auto Lane Change is unable to operate at optimal performance, or cannot operate due to inadequate data, the
instrument panel displays a
series of warnings. Therefore, when using Auto Lane
Change, always pay attention to the
instrument panel
and be prepared to manually steer Model X.
Adjacent Lane Speed
NOTE: Depending on market region, vehicle
configuration, options purchased, and software version,
your vehicle may not be equipped with Adjacent Lane
Speed, or the feature may not operate exactly as
described.
When moving significantly faster than vehicles in
adjacent lanes,
Model X automatically reduces the
driving speed. This is especially helpful in heavy
traffic
situations or when vehicles are constantly merging into
different lanes. When Model X detects other vehicles
driving
significantly slower, the instrument panel
highlights the adjacent lanes with arrows and detected
vehicles in gray, and
Model X reduces the driving speed
as appropriate. To temporarily override this feature,
press the accelerator pedal.
WARNING: Never depend on Autopilot to
determine a safe driving speed; you are
responsible for driving safely and according to
traffic laws in your market region.
Stop Light and Stop Sign Warning
NOTE: Depending on market region, vehicle
configuration, options purchased, and software version,
your vehicle may not be equipped with Stop Light and
Stop Sign Warning, or the feature may not operate
exactly as described.
While Autosteer is in use, Model X displays a warning on
the
instrument panel and sounds a chime if it detects
that you are likely to run through a red stop light or stop sign. If this happens,
TAKE IMMEDIATE CORRECTIVE
ACTION!
The visual and audible warnings cancel after a few seconds, or when you press the brake pedal, whichever
comes
first.
Stop Light and Stop Sign Warning provides warnings
only. It does not slow down or stop
Model X at red traffic
lights, stop signs, road markings, etc. If equipped with
Traffic Light and Stop Sign Control, you can enable this
feature to automatically stop Model X at traffic lights
and stop signs (see Traffic Light and Stop Sign Control
on page 113).
CAUTION: Stop Light and Stop Sign Warning
requires on-board maps to know that a particular
stop light or stop sign exists at a location. In some
cases, map data is inaccurate or outdated and may
not include all stop lights or stop signs. Therefore,
Stop Light and Stop Sign Warning may not detect
all stop lights and stop signs.
WARNING: The Stop Light and Stop Sign Warning
feature does not apply the brakes or decelerate
Model X and may not detect all stop lights and
stop signs. Stop Light and Stop Sign Warning is
designed for guidance purposes only and is not a
substitute for attentive driving and sound
judgment. Keep your eyes on the road when
driving and never depend on Stop Light and Stop
Sign Warning to warn you of a stop light or stop
sign.
WARNING: Stop Light and Stop Sign Warning is
designed to warn you only when approaching a
visible red stop sign, solid red or later portion of a
yellow traffic light. It may not warn you of
intersections with flashing lights and it does not
warn you of yield signs or temporary stop and
yield signs (such as those used in construction
areas). Additionally, Stop Light and Stop Sign
Warning does not warn you of approaching stop
lights or stop signs when you are pressing the
accelerator pedal or brake pedal (which disables
Autosteer).
Limitations
Autosteer and its associated functions are particularly
unlikely to operate as intended when:
Page 137 of 296
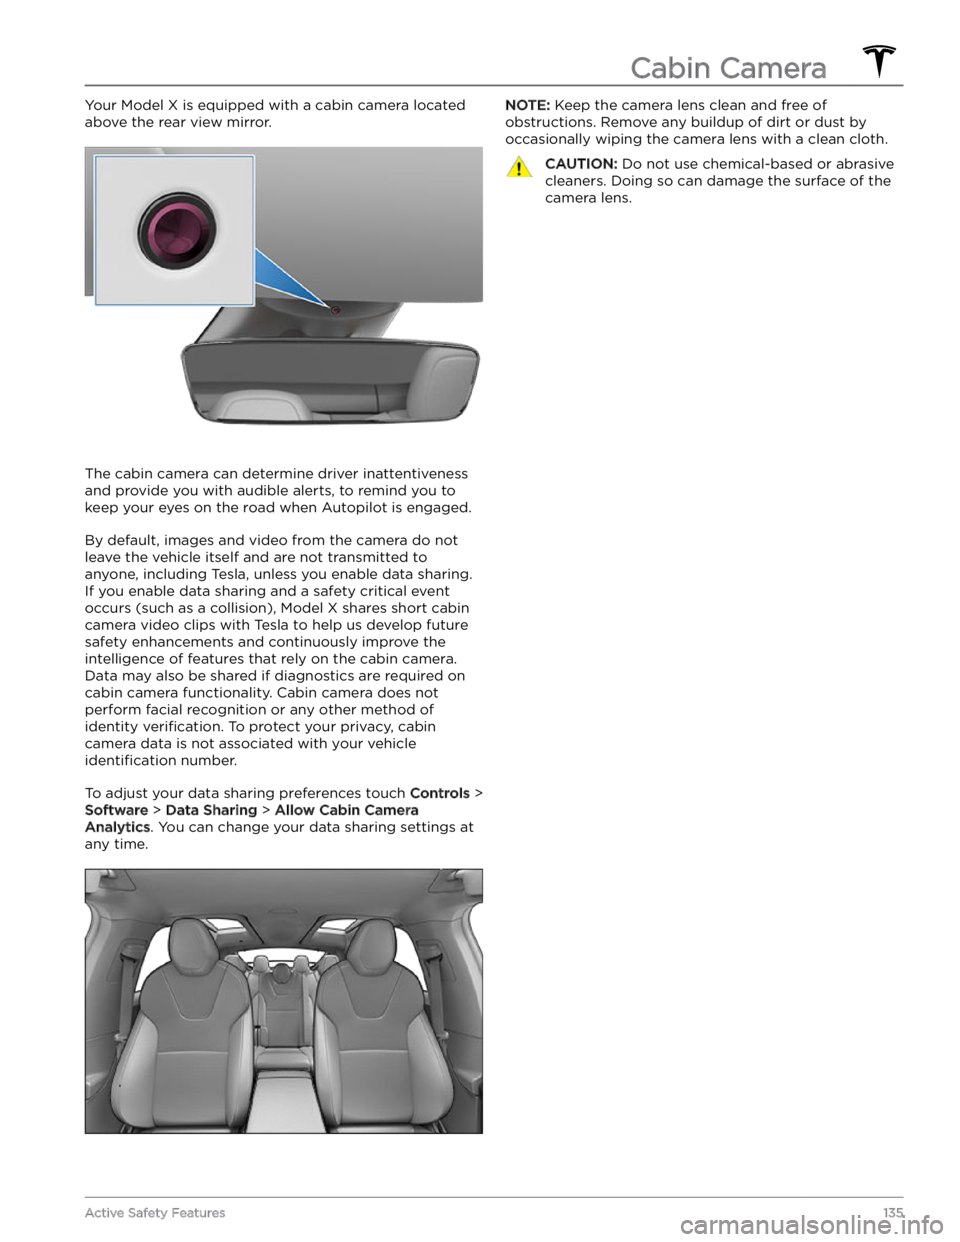
Your Model X is equipped with a cabin camera located
above the rear view mirror.
The cabin camera can determine driver inattentiveness and provide you with audible alerts, to remind you to keep your eyes on the road when Autopilot is engaged.
By default, images and video from the camera do not
leave the vehicle itself and are not transmitted to
anyone, including Tesla, unless you enable data sharing. If you enable data sharing and a safety critical event
occurs (such as a collision),
Model X shares short cabin
camera video clips with Tesla to help us develop future
safety enhancements and continuously improve the
intelligence of features that rely on the cabin camera.
Data may also be shared if diagnostics are required on cabin camera functionality. Cabin camera does not
perform facial recognition or any other method of identity
verification. To protect your privacy, cabin
camera data is not associated with your vehicle
identification number.
To adjust your data sharing preferences touch Controls >
Software > Data Sharing > Allow Cabin Camera
Analytics. You can change your data sharing settings at
any time.
NOTE: Keep the camera lens clean and free of
obstructions. Remove any buildup of dirt or dust by occasionally wiping the camera lens with a clean cloth.CAUTION: Do not use chemical-based or abrasive
cleaners. Doing so can damage the surface of the
camera lens.
Cabin Camera
135Active Safety Features
Page 169 of 296
To add a destination to your Favorites list touch its pin on the map, then touch the star icon on the popup screen that
appears. Enter a name (or leave as-is to accept the default name), then touch
Add
to Favorites. The star becomes solid and
the destination is included on your
Favorites list.
To delete a Recent or Favorite destination, touch it on the destination list and hold it down
briefly until the X
appears. Then touch the X to delete it from the list.
Home and Work locations also display under the
navigation search bar. Touch to set an address to the corresponding location. After entering the address, touch
Save as Home or Save as Work. Then simply
touch these shortcuts whenever you want to navigate home or to work.
To change or delete the corresponding address, press
and hold the
Home or Work icon. A popup allows you to
enter a new address and
Save as Home or Save as Work.
Or touch
Clear Home or Clear Work to remove
associated addresses entirely.
NOTE: Based on your usage patterns, Model X may
prompt you to save a location as Home or Work.
NOTE: Once a Home or Work location is saved, Model X
may prompt you to navigate to your Work location in
the mornings and to your Home location in the evenings
and provide an estimated driving time based on current
traffic conditions. See Automatic Navigation on page
166.
For security reasons, if you sell Model X, it is
recommended that you delete your Home and Work
locations. You can delete these individually or you can perform a factory reset to erase all personal data (touch
Controls > Service > Factory Reset).
Charging Locations
To display charging locations on the map, touch the map