service TESLA MODEL X 2023 Owners Manual
[x] Cancel search | Manufacturer: TESLA, Model Year: 2023, Model line: MODEL X, Model: TESLA MODEL X 2023Pages: 296, PDF Size: 8.56 MB
Page 3 of 296

Overview................................................................3
Exterior Overview............................................................................3
Interior Overview.............................................................................5
Touchscreen Overview...................................................................7
Opening and Closing.......................................13
Keys.....................................................................................................13
Doors..................................................................................................19
Windows...........................................................................................24
Rear Trunk........................................................................................25
Front Trunk......................................................................................27
Interior Storage and Electronics.............................................30
Sun Visors........................................................................................34
Seating and Safety Restraints.....................35
Front and Rear Seats...................................................................35
Seat Belts.........................................................................................40
Child Safety Seats.........................................................................43
Airbags...............................................................................................51
Driving..................................................................57
Driver Profiles.................................................................................57
Steering Yoke (or Steering Wheel)........................................59
Mirrors...............................................................................................62
Starting and Powering Off.........................................................63
Shifting..............................................................................................65
Lights.................................................................................................68
Instrument Panel.............................................................................71
Wipers and Washers....................................................................75
Braking and Stopping..................................................................76
Traction Control.............................................................................79
Park Assist.......................................................................................80
Vehicle Hold....................................................................................82
Acceleration Modes......................................................................83
Trip Information.............................................................................84
Rear Facing Camera(s)...............................................................85
Pedestrian Warning System......................................................86
Towing and Accessories.............................................................87
Cold Weather Best Practices....................................................96
Autopilot..............................................................98
About Autopilot............................................................................98
Traffic-Aware Cruise Control....................................................101
Autosteer........................................................................................105
Navigate on Autopilot................................................................110
Traffic Light and Stop Sign Control.......................................113
Autopark.........................................................................................120
Summon..........................................................................................122
Smart Summon.............................................................................125
Active Safety Features..................................128
Lane Assist.....................................................................................128
Collision Avoidance Assist.........................................................131
Speed Assist..................................................................................134
Cabin Camera................................................................................135
Using the Touchscreen.................................136
Climate Controls..........................................................................136
Phone, Calendar, and Web Conferencing...........................143
Air Suspension..............................................................................146
Voice Commands.........................................................................148
Safety & Security Settings.......................................................150
Dashcam..........................................................................................152
Sentry Mode..................................................................................153
USB Drive Requirements for Recording Videos..............155
Smart Garage Connectivity.....................................................156
Connecting to Wi-Fi...................................................................159
Software Updates.......................................................................160
Mobile App.....................................................................................162
Navigation and Entertainment..................164
Maps and Navigation.................................................................164
Media................................................................................................170
Theater, Arcade, and Toybox...................................................173
Charging and Energy Consumption........176
Electric Vehicle Components..................................................176
High Voltage Battery Information.........................................178
Charging Instructions................................................................180
Scheduled Charging and Scheduled Departure..............185
Getting Maximum Range..........................................................186
Maintenance......................................................188
Maintenance Service Intervals................................................188
Tire Care and Maintenance......................................................190
Cleaning..........................................................................................196
Windshield Wiper Blades, Jets and Fluid.........................200
Jacking and Lifting....................................................................202
Parts and Accessories..............................................................203
Do It Yourself Maintenance....................................................204
Specifications..................................................205
Identification Labels..................................................................205
Vehicle Loading..........................................................................206
Dimensions...................................................................................208
Subsystems.....................................................................................211
Wheels and Tires..........................................................................213
Roadside Assistance....................................220
Contacting Tesla Roadside Assistance..............................220
Instructions for Transporters...................................................221
Running Out of Range..............................................................225
Jump Starting..............................................................................226
Troubleshooting.............................................228
Contents
Page 12 of 296
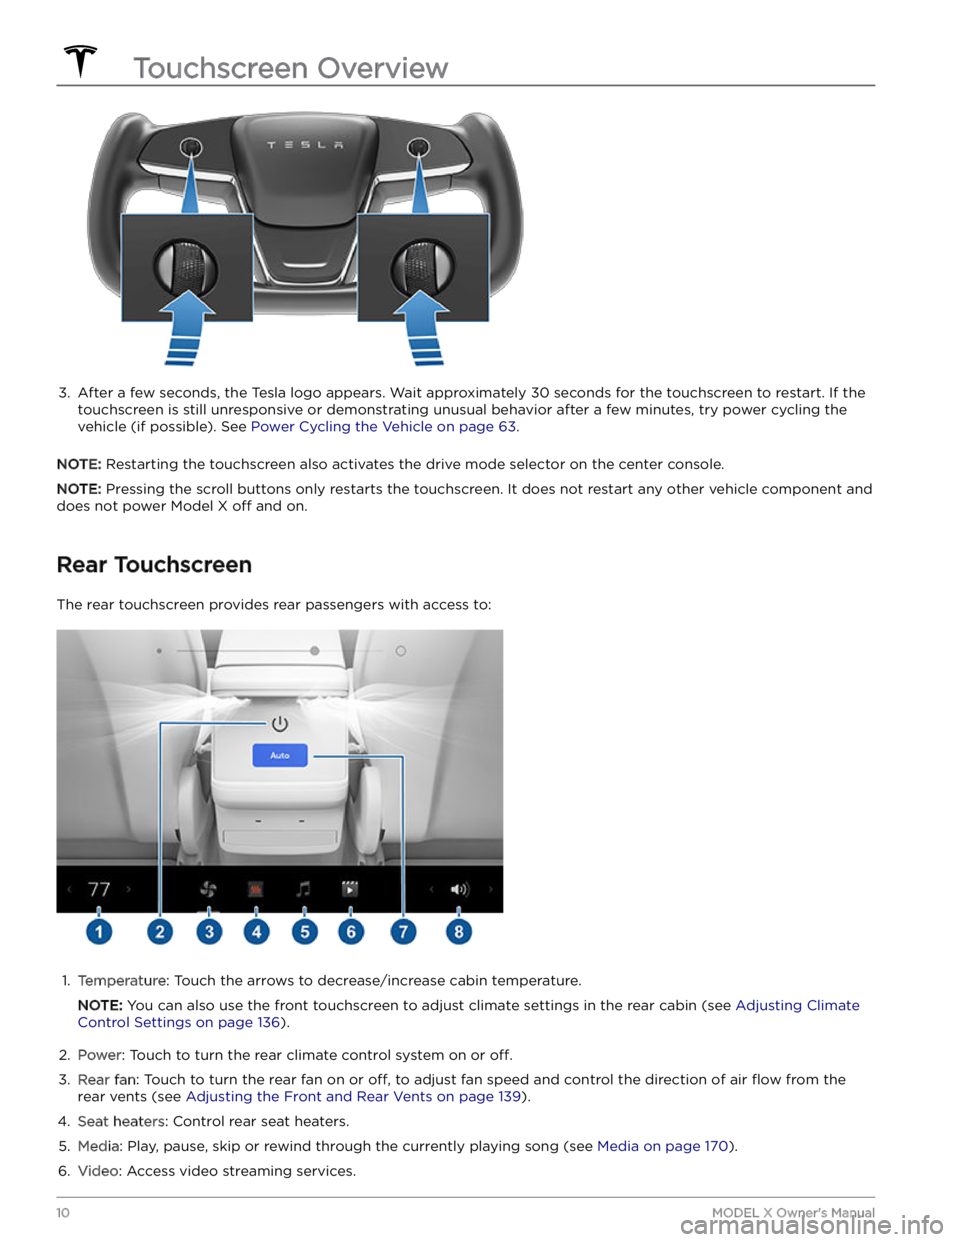
3.
After a few seconds, the Tesla logo appears. Wait approximately 30 seconds for the touchscreen to restart. If the
touchscreen is still unresponsive or demonstrating unusual behavior after a few minutes, try power cycling the
vehicle (if possible). See
Power Cycling the Vehicle on page 63.
NOTE: Restarting the touchscreen also activates the drive mode selector on the center console.
NOTE: Pressing the scroll buttons only restarts the touchscreen. It does not restart any other vehicle component and
does not power
Model X off and on.
Rear Touchscreen
The rear touchscreen provides rear passengers with access to:
1.
Temperature: Touch the arrows to decrease/increase cabin temperature.
NOTE: You can also use the front touchscreen to adjust climate settings in the rear cabin (see Adjusting Climate
Control Settings on page 136).
2.
Power: Touch to turn the rear climate control system on or off.
3.
Rear fan: Touch to turn the rear fan on or off, to adjust fan speed and control the direction of air flow from the
rear vents (see
Adjusting the Front and Rear Vents on page 139).
4.
Seat heaters: Control rear seat heaters.
5.
Media: Play, pause, skip or rewind through the currently playing song (see Media on page 170).
6.
Video: Access video streaming services.
Touchscreen Overview
10MODEL X Owner
Page 38 of 296
WARNING: Riding in a moving vehicle with the
seat back reclined can result in serious injuries in a
collision, as you could slide under the lap belt or
be propelled into the seat belt. Ensure your seat
back is reclined no more than 30 degrees when
the vehicle is moving.
Calibrating Seats
(If equipped) You can calibrate the driver seat. This is useful if you
find your seat range limited or your driver
profile does not automatically adjust the seat for you.
Navigate to
Controls > Service > Driver Seat, Steering &
Mirrors Calibration and follow the instructions on the
touchscreen.
WARNING: Ensure nothing is behind or
underneath the driver seat during calibration.
Failure to do so may cause serious injury.
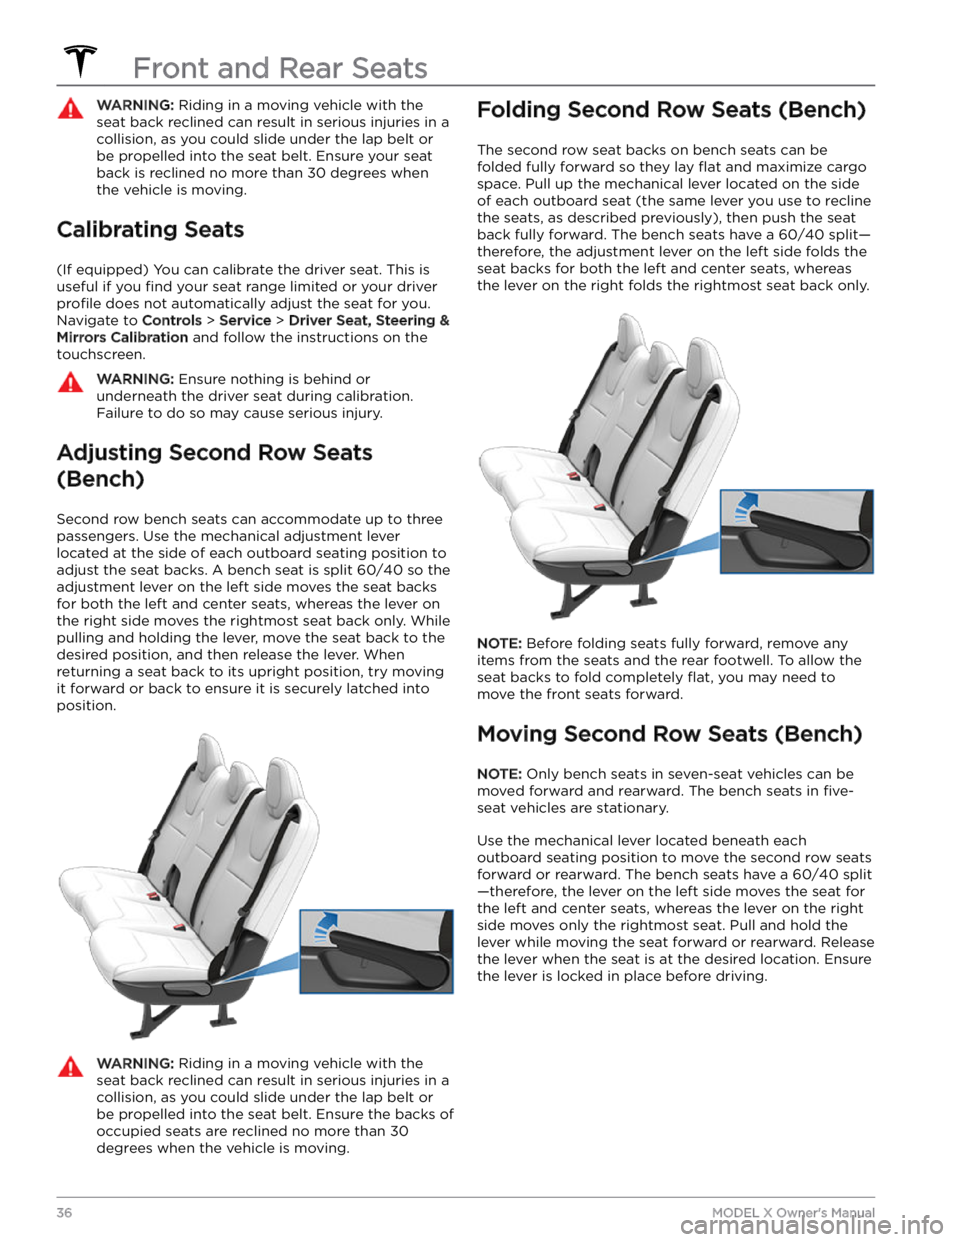
Adjusting Second Row Seats
(Bench)
Second row bench seats can accommodate up to three passengers. Use the mechanical adjustment lever
located at the side of each outboard seating position to adjust the seat backs. A bench seat is split 60/40 so the adjustment lever on the left side moves the seat backs
for both the left and center seats, whereas the lever on the right side moves the rightmost seat back only. While pulling and holding the lever, move the seat back to the desired position, and then release the lever. When
returning a seat back to its upright position, try moving
it forward or back to ensure it is securely latched into
position.
WARNING: Riding in a moving vehicle with the
seat back reclined can result in serious injuries in a
collision, as you could slide under the lap belt or
be propelled into the seat belt. Ensure the backs of
occupied seats are reclined no more than 30
degrees when the vehicle is moving.
Folding Second Row Seats (Bench)
The second row seat backs on bench seats can be
folded fully forward so they lay
flat and maximize cargo
space. Pull up the mechanical lever located on the side of each outboard seat (the same lever you use to recline
the seats, as described previously), then push the seat
back fully forward. The bench seats have a 60/40 split
Page 55 of 296

Object ClassificationOCS Passenger Airbag
Status*Indicator statusNotesForward facing child restraint
systemOFFPASSENGER AIRBAG OFF35 lbs (16 kg) or lessChild in a booster seatOFF or ONPASSENGER AIRBAG OFF or
PASSENGER AIRBAG ON20-100 lbs (9-45 kg)*Large childOFF or ONPASSENGER AIRBAG OFF or
PASSENGER AIRBAG ON 5th percentile female or larger
(by weight)ONPASSENGER AIRBAG ONOver approximately 100 lbs (45 kg)*If the passenger airbag status indicator does not match the situation, do not use the seat. The passenger must ride in a different seat. Contact Tesla Service.
NOTE: It takes approximately six seconds after you power on Model X for the occupant classification system (OCS)
to report accurate status of the front passenger airbag. As a result, when you
first power on Model X, even in
situations when it should be OFF because the seat is occupied by a weight of
20 lbs (9 kg) or less, it will take the
touchscreen approximately six seconds to display the status, PASS AIRBAG OFF. If it fails to do so, contact Tesla Service and do not seat a child in the front passenger seating position.
To make sure the sensing system can correctly detect occupancy status, eliminate the following:
Page 72 of 296
If the AFS fails, the instrument panel displays an alert. Contact Tesla Service.
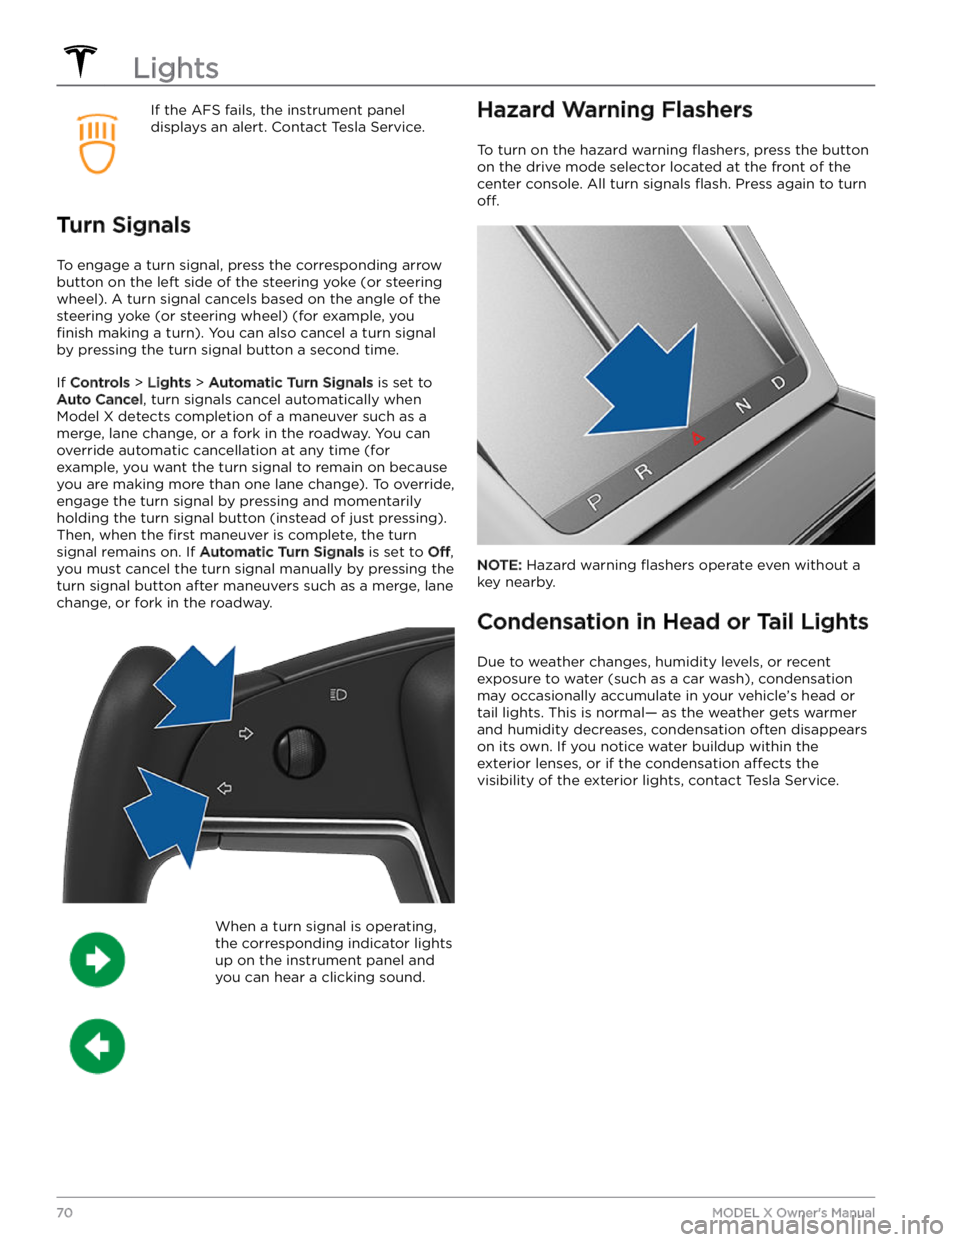
Turn Signals
To engage a turn signal, press the corresponding arrow
button on the left side of the
steering yoke (or steering
wheel). A turn signal cancels based on the angle of the
steering yoke (or steering wheel) (for example, you
finish making a turn). You can also cancel a turn signal
by pressing the turn signal button a second time.
If Controls > Lights > Automatic Turn Signals is set to
Auto Cancel, turn signals cancel automatically when
Model X detects completion of a maneuver such as a
merge, lane change, or a fork in the roadway. You can override automatic cancellation at any time (for
example, you want the turn signal to remain on because
you are making more than one lane change). To override,
engage the turn signal by pressing and momentarily
holding the turn signal button (instead of just pressing). Then, when the
first maneuver is complete, the turn
signal remains on. If
Automatic Turn Signals is set to Off,
you must cancel the turn signal manually by pressing the
turn signal button after maneuvers such as a merge, lane change, or fork in the roadway.
When a turn signal is operating,
the corresponding indicator lights
up on the instrument panel and
you can hear a clicking sound.Hazard Warning Flashers
To turn on the hazard warning flashers, press the button
on the drive mode selector located at the front of the center console. All turn signals
flash. Press again to turn
off.
NOTE: Hazard warning flashers operate even without a
key nearby.
Condensation in Head or Tail Lights
Due to weather changes, humidity levels, or recent exposure to water (such as a car wash), condensation may occasionally accumulate in your vehicle
Page 79 of 296

braking. Brake as you normally would and continue to
press the brake pedal without releasing or pumping the brakes.CAUTION: If brakes are not functioning properly,
stop the vehicle when safety permits and contact
Tesla Service.
WARNING: Always maintain a safe driving distance
from the vehicle in front of you and exercise
caution when driving conditions are hazardous.
Brake disc wiping and hydraulic fade
compensation is not a substitute for adequately
applying the brakes.
Hydraulic Boost Compensation
Model X is equipped with a brake booster that activates
the brakes when the brake pedal is pressed. Hydraulic boost compensation provides mechanical assistance if the brake booster fails. If a brake booster failure is detected, the brake pedal feels
stiffer to press and you
may hear a sound when you press the brake pedal. To
stop
Model X, apply steady force to the brake pedal
without releasing or pumping. Drive cautiously and
maintain a safe distance from other road users
Page 81 of 296

How It Works
The traction control system constantly monitors the speed of the front and rear wheels. If
Model X
experiences a loss of traction, the system minimizes wheel spin by controlling brake pressure and motor power. By default, the traction control system is on. Under normal conditions, it should remain on to ensure
maximum safety.
This yellow indicator flashes on the
instrument panel whenever the traction
control system is actively controlling brake
pressure and motor power to minimize wheel spin. If the indicator stays on, a fault is detected with the traction control system. Contact Tesla Service.
WARNING: Traction control cannot prevent
collisions caused by driving dangerously or turning
too sharply at high speeds.
Allowing Wheel Slip
To allow the wheels to spin at a limited speed, you can
enable Slip Start.
Slip Start can be enabled only when
Model X is moving 30 mph (48 km/h) or slower. Slip
Start automatically disables when the speed exceeds
50 mph (80 km/h).
Under normal conditions, Slip Start should not be enabled. Enable it only in circumstances where you
deliberately want the wheels to spin, such as:
Page 87 of 296
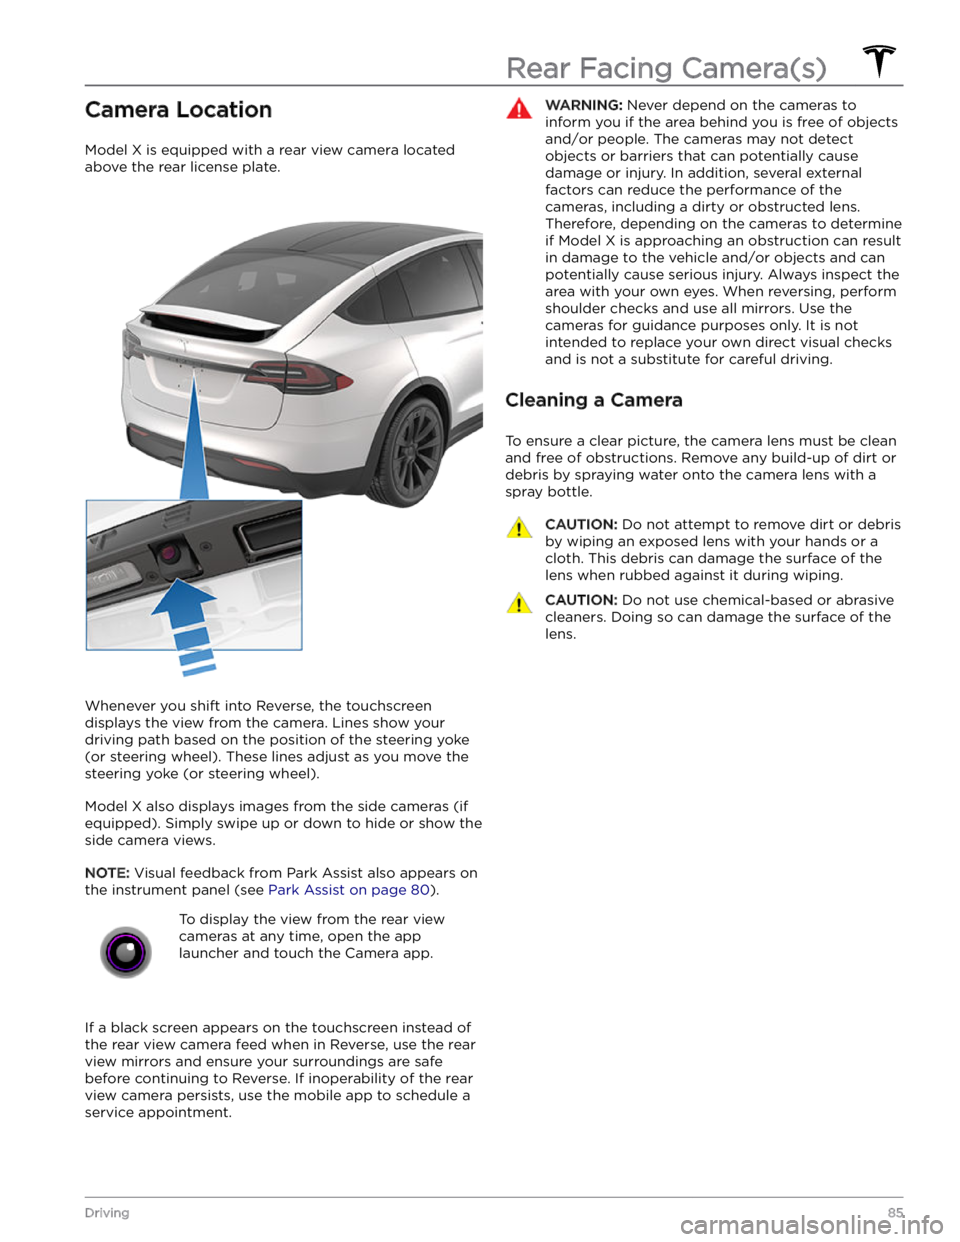
Camera Location
Model X is equipped with a rear view camera located
above the rear license plate.
Whenever you shift into Reverse, the touchscreen displays the view from the camera. Lines show your
driving path based on the position of the
steering yoke
(or steering wheel). These lines adjust as you move the
steering yoke (or steering wheel).
Model X also displays images from the side cameras (if
equipped). Simply swipe up or down to hide or show the
side camera views.
NOTE: Visual feedback from Park Assist also appears on
the
instrument panel (see Park Assist on page 80).
To display the view from the rear view
cameras at any time, open the app
launcher and touch the Camera app.
If a black screen appears on the touchscreen instead of the rear view camera feed when in Reverse, use the rear view mirrors and ensure your surroundings are safe before continuing to Reverse. If inoperability of the rear
view camera persists, use the mobile app to schedule a service appointment.
WARNING: Never depend on the cameras to
inform you if the area behind you is free of objects
and/or people. The cameras may not detect
objects or barriers that can potentially cause
damage or injury. In addition, several external
factors can reduce the performance of the
cameras, including a dirty or obstructed lens.
Therefore, depending on the cameras to determine
if Model X is approaching an obstruction can result
in damage to the vehicle and/or objects and can
potentially cause serious injury. Always inspect the
area with your own eyes. When reversing, perform
shoulder checks and use all mirrors. Use the
cameras for guidance purposes only. It is not
intended to replace your own direct visual checks
and is not a substitute for careful driving.
Cleaning a Camera
To ensure a clear picture, the camera lens must be clean
and free of obstructions. Remove any build-up of dirt or debris by spraying water onto the camera lens with a
spray bottle.
CAUTION: Do not attempt to remove dirt or debris
by wiping an exposed lens with your hands or a
cloth. This debris can damage the surface of the
lens when rubbed against it during wiping.
CAUTION: Do not use chemical-based or abrasive
cleaners. Doing so can damage the surface of the
lens.
Rear Facing Camera(s)
85Driving
Page 149 of 296

to display detailed information about the dampers for each wheel, including ride height, compression and
rebound values, and body accelerations.
Auto-Raising Locations
Whenever you raise the suspension to High or Very
High, the location is automatically saved. By saving the
location, you do not need to manually raise the
suspension every time you arrive at a frequently-used location where you have previously raised the
suspension. When you return to the saved location,
Model X raises the suspension and the instrument panel
displays a message indicating that the suspension is being raised.
When saving locations, Model X also saves the Keep
until XX mph setting (if specified).
NOTE: When returning to a saved location and driving
faster than the
High and Very High suspension settings
allow, the suspension does not raise until
Model X slows
down.
NOTE: After leaving a saved location, the suspension
automatically lowers. However, it may not lower until
Model X meets the speed and distance threshold at
which the suspension lowers.
NOTE: If Model X reaches a saved location and the
existing suspension setting is already higher than the level that has been saved for that location, the ride height is not adjusted.
To remove an auto-raising location
If you do not want the suspension to automatically raise at a location, touch to deselect
Always raise at this
location in the popup that appears when you arrive at a
saved location.
Or, when using the Raise Suspension
shortcut on the main Controls window, touch to deselect
Location Saved.
Self-Leveling
Model X equipped with air suspension automatically
self-levels, even when power is
off. To prevent damage
when jacking or lifting the vehicle, you must activate
Jack Mode to disable self-leveling (press the brake pedal
and touch
Controls > Service > Jack Mode). For more
details, see
Jack Mode on page 202.
Air Suspension
147Using the Touchscreen
Page 169 of 296
To add a destination to your Favorites list touch its pin on the map, then touch the star icon on the popup screen that
appears. Enter a name (or leave as-is to accept the default name), then touch
Add
to Favorites. The star becomes solid and
the destination is included on your
Favorites list.
To delete a Recent or Favorite destination, touch it on the destination list and hold it down
briefly until the X
appears. Then touch the X to delete it from the list.
Home and Work locations also display under the
navigation search bar. Touch to set an address to the corresponding location. After entering the address, touch
Save as Home or Save as Work. Then simply
touch these shortcuts whenever you want to navigate home or to work.
To change or delete the corresponding address, press
and hold the
Home or Work icon. A popup allows you to
enter a new address and
Save as Home or Save as Work.
Or touch
Clear Home or Clear Work to remove
associated addresses entirely.
NOTE: Based on your usage patterns, Model X may
prompt you to save a location as Home or Work.
NOTE: Once a Home or Work location is saved, Model X
may prompt you to navigate to your Work location in
the mornings and to your Home location in the evenings
and provide an estimated driving time based on current
traffic conditions. See Automatic Navigation on page
166.
For security reasons, if you sell Model X, it is
recommended that you delete your Home and Work
locations. You can delete these individually or you can perform a factory reset to erase all personal data (touch
Controls > Service > Factory Reset).
Charging Locations
To display charging locations on the map, touch the map