tow TESLA MODEL Y 2021 Owner´s Manual
[x] Cancel search | Manufacturer: TESLA, Model Year: 2021, Model line: MODEL Y, Model: TESLA MODEL Y 2021Pages: 250, PDF Size: 8.4 MB
Page 79 of 250
Trailer Brakes
When towing a loaded trailer that weighs more than
1650 lbs (750 kg), Tesla recommends that the trailer be
equipped with its own brake system adequate for the weight of the trailer. Ensure compliance with local regulations. A brake controller must be purchased separately, and the required 4-pin pigtail connector can be ordered from Tesla Service.
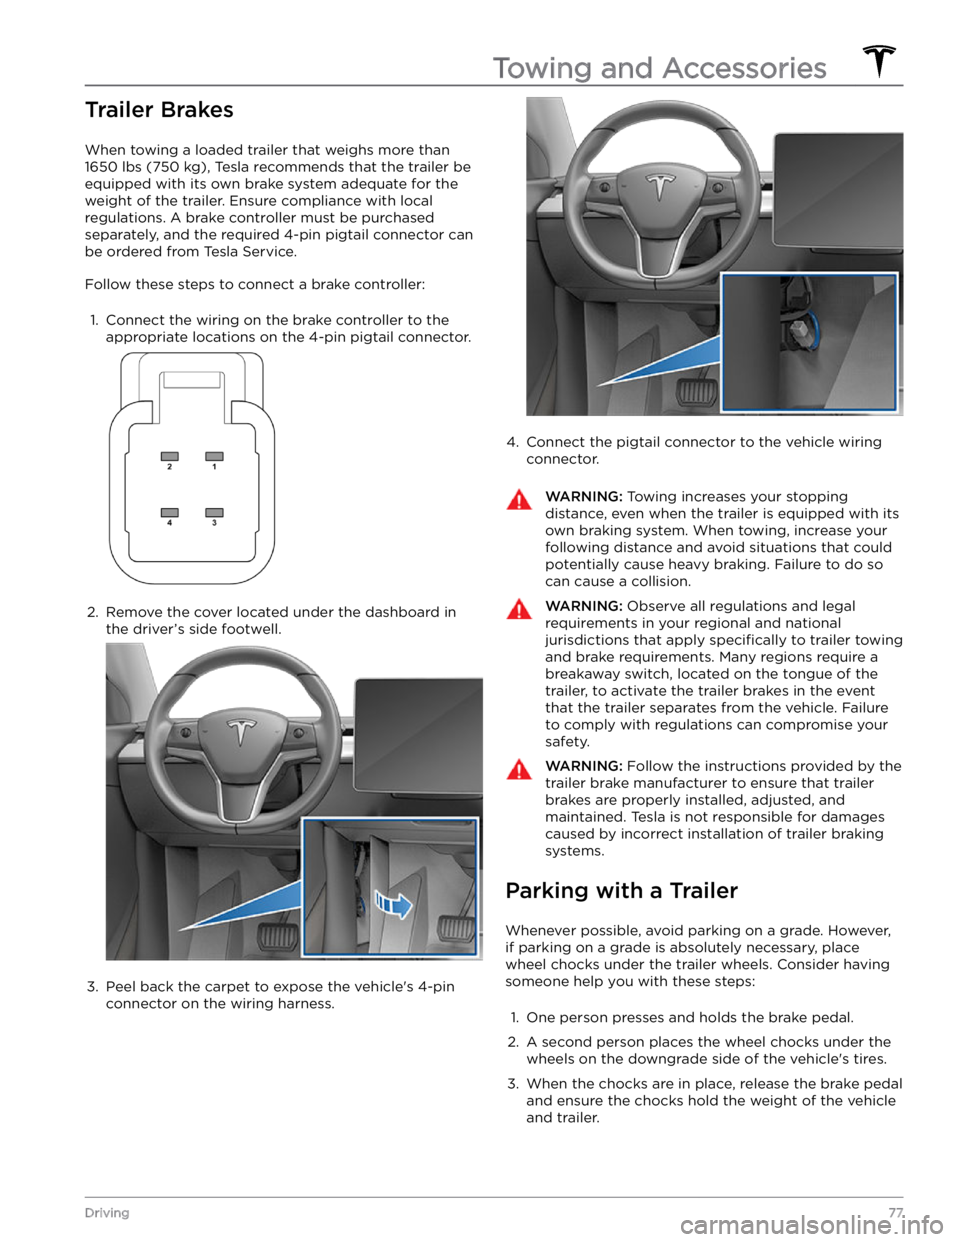
Follow these steps to connect a brake controller:
1.
Connect the wiring on the brake controller to the
appropriate locations on the 4-pin pigtail connector.
2.
Remove the cover located under the dashboard in the driver
Page 80 of 250
NOTE: When testing chocks, ensure that Vehicle Hold
(see
Vehicle Hold on page 66) is not engaged. If
Vehicle Hold is braking
Model Y, the Vehicle Hold
indicator light displays on the touchscreen. To
disengage Vehicle Hold, press and release the brake
pedal.
4.
Place the vehicle in Park.
WARNING: If parking on a grade is necessary,
always ensure that all trailer wheels have been
securely chocked. Failure to do so can result in
serious damage or injury.
Trailer Sway Mitigation
When trailer sway is detected, the electronic stability control system attempts to apply the appropriate amount of braking to minimize trailer sway. The touchscreen
briefly displays the traction control system
indicator. Pressing the brake pedal when the system is actively braking to mitigate trailer sway does not cancel this automatic braking.
Attaching and Removing the Ball
Mount
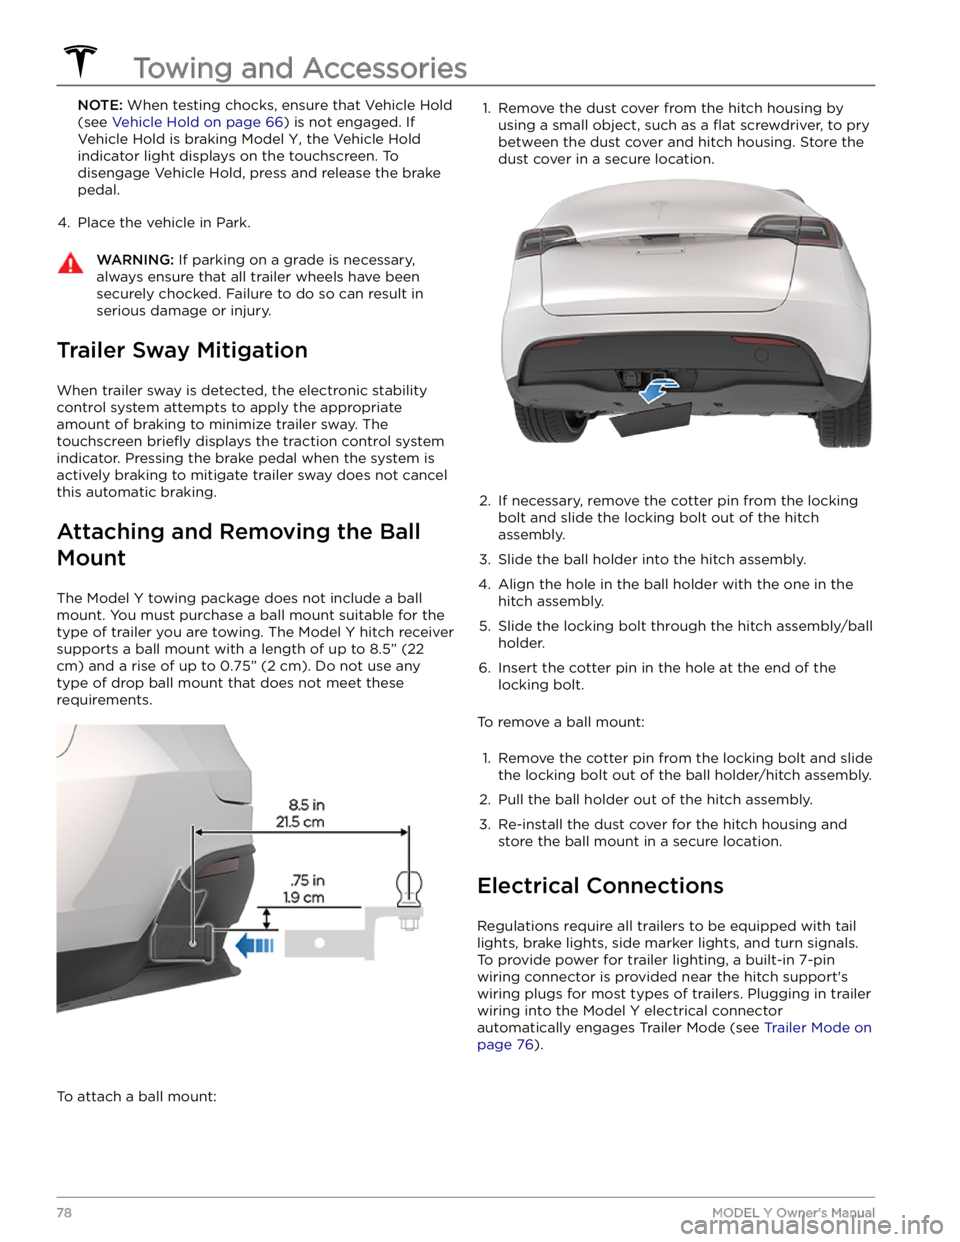
The Model Y towing package does not include a ball
mount. You must purchase a ball mount suitable for the type of trailer you are towing. The
Model Y hitch receiver
supports a ball mount with a length of up to
8.5” (22
cm) and a rise of up to 0.75” (2 cm). Do not use any
type of drop ball mount that does not meet these requirements.
To attach a ball mount:
1. Remove the dust cover from the hitch housing by
using a small object, such as a
flat screwdriver, to pry
between the dust cover and hitch housing. Store the dust cover in a secure location.
2.
If necessary, remove the cotter pin from the locking
bolt and slide the locking bolt out of the hitch assembly.
3.
Slide the ball holder into the hitch assembly.
4.
Align the hole in the ball holder with the one in the hitch assembly.
5.
Slide the locking bolt through the hitch assembly/ball holder.
6.
Insert the cotter pin in the hole at the end of the
locking bolt.
To remove a ball mount:
1.
Remove the cotter pin from the locking bolt and slide
the locking bolt out of the ball holder/hitch assembly.
2.
Pull the ball holder out of the hitch assembly.
3.
Re-install the dust cover for the hitch housing and store the ball mount in a secure location.
Electrical Connections
Regulations require all trailers to be equipped with tail lights, brake lights, side marker lights, and turn signals.
To provide power for trailer lighting, a built-in 7-pin wiring connector is provided near the hitch support
Page 87 of 250
Cleaning Cameras and Sensors
To ensure the various Autopilot components can provide
information that is as accurate as possible, keep them
clean and free of obstructions, condensation, or damage. See
Cleaning on page 172.
Condensation can form inside the camera enclosures,
especially if you park your vehicle outside in cold or wet
conditions. The
touchscreen may display an alert stating
that a camera is blocked and that some or all Autopilot
features may be temporarily restricted until the camera vision is clear. To proactively dry the condensation, precondition the cabin by setting it to a warm temperature, turning the windshield defroster on, and directing the front air vents toward the door pillars (see
Mobile App on page 154).
CAUTION: Do not wipe an exposed lens with your
hands or a cloth in an attempt to remove dirt or
debris. The debris can damage the surface of the
lens when wiped.
CAUTION: Do not use chemical-based or abrasive
cleaners. Doing so can damage surfaces.
CAUTION: Do not clean an ultrasonic sensor or
camera lens with a sharp or abrasive object that
can scratch or damage its surface.
About Autopilot
85Autopilot
Page 126 of 250
NOTE: When Chill is selected, Chill displays on the
touchscreen above the driving speed.
Steering Mode: Adjust the amount of effort required to
turn the steering wheel.
Sport feels more responsive
whereas
Comfort feels easier to drive and park (see
Adjusting Steering Effort on page 47).
Stopping Mode: Choose how you want Model Y to
behave once regenerative braking has reduced the driving speed to a very low speed, a driving gear is still
engaged, and both the accelerator and brake pedals are
released. See
Stopping Mode on page 61. You can adjust
this setting only when
Model Y is in Park.
Slip Start: Turn Slip Start ON to disable traction control
and allow wheels to spin to make it easier to dislodge the vehicle when stuck in mud, snow, ice, etc. (see
Traction Control on page 63).
Off-Road Assist: Turn Off-Road Assist ON to disable
traction control and allow wheels to spin when driving
off-road (see Traction Control on page 63).
Trailer Mode (available only if equipped with a tow
package): Must always be active when towing a trailer.
Some Autopilot features and rear sensor functionality may not be available. See
Trailer Mode on page 76).
Autopilot
Autopilot features that provide a safer and more
convenient driving experience. Some Autopilot features
are not controlled through
Controls. See About
Autopilot on page 83 for more information.
NOTE: Depending on market region, vehicle
configuration, options purchased, and software version,
your vehicle may not be equipped with all Autopilot
features, or a feature may not operate exactly as
described.
Page 167 of 250
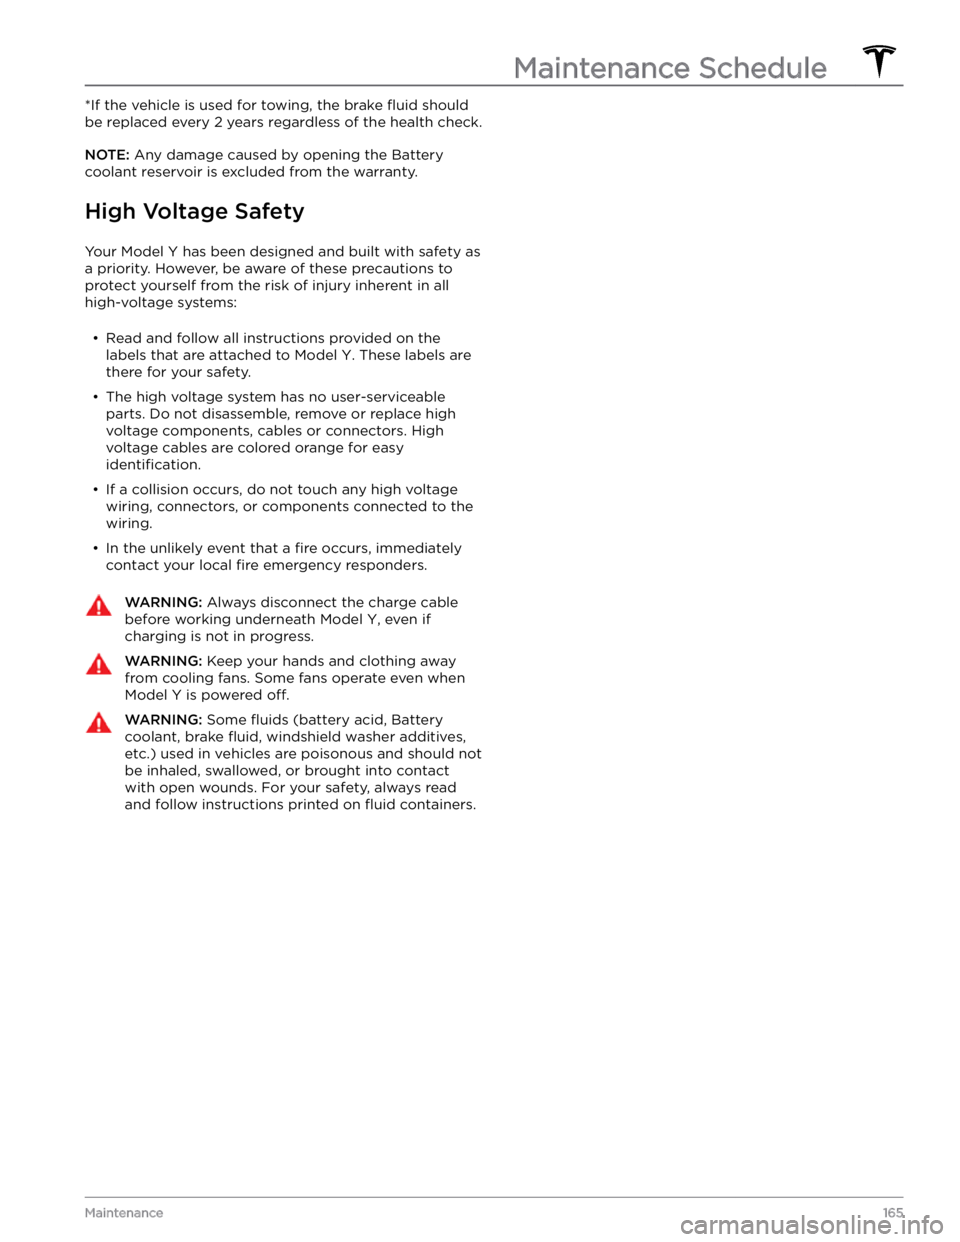
*If the vehicle is used for towing, the brake fluid should
be replaced every 2 years regardless of the health check.
NOTE: Any damage caused by opening the Battery
coolant reservoir is excluded from the warranty.
High Voltage Safety
Your Model Y has been designed and built with safety as
a priority. However, be aware of these precautions to protect yourself from the risk of injury inherent in all high-voltage systems:
Page 168 of 250
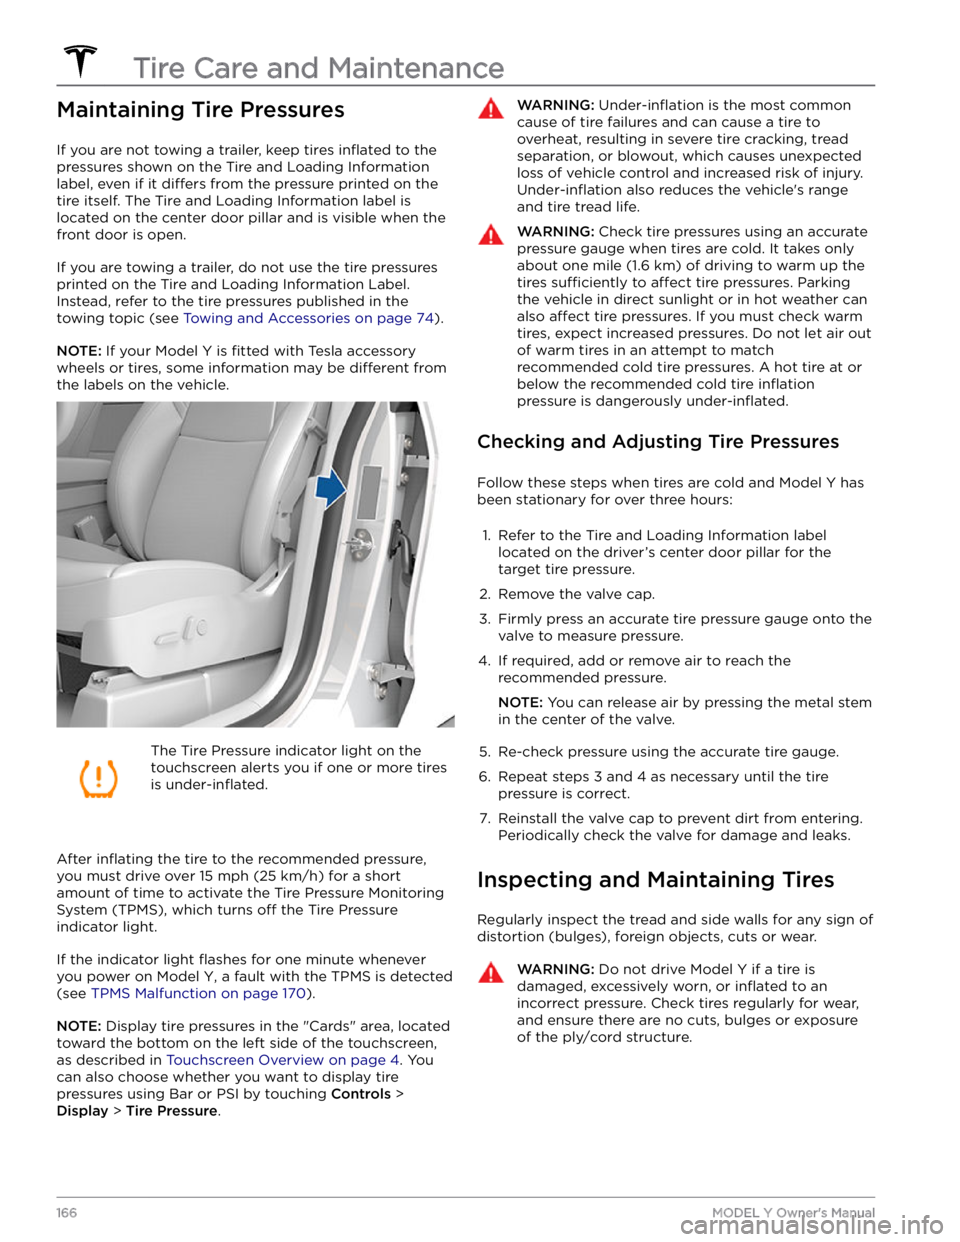
Maintaining Tire Pressures
If you are not towing a trailer, keep tires inflated to the
pressures shown on the Tire and Loading Information label, even if it
differs from the pressure printed on the
tire itself. The Tire and Loading Information label is located on the center door pillar and is visible when the
front door is open.
If you are towing a trailer, do not use the tire pressures printed on the Tire and Loading Information Label.
Instead, refer to the tire pressures published in the towing topic
(see Towing and Accessories on page 74).
NOTE: If your Model Y is fitted with Tesla accessory
wheels or tires, some information may be
different from
the labels on the vehicle.
The Tire Pressure indicator light on the
touchscreen alerts you if one or more tires
is
under-inflated.
After inflating the tire to the recommended pressure,
you must drive over
15 mph (25 km/h) for a short
amount of time to activate the Tire Pressure Monitoring
System (TPMS), which turns
off the Tire Pressure
indicator light.
If the indicator light flashes for one minute whenever
you power on
Model Y, a fault with the TPMS is detected
(see
TPMS Malfunction on page 170).
NOTE: Display tire pressures in the "Cards" area, located
toward the bottom on the left side of the touchscreen
,
as described in Touchscreen Overview on page 4. You
can also choose whether you want to display tire pressures using Bar or PSI by touching
Controls >
Display > Tire Pressure.
WARNING: Under-inflation is the most common
cause of tire failures and can cause a tire to
overheat, resulting in severe tire cracking, tread
separation, or blowout, which causes unexpected
loss of vehicle control and increased risk of injury.
Under-inflation also reduces the vehicle
Page 175 of 250
CAUTION: To avoid corrosive damage that may
not be covered by the warranty, rinse away any
road salt from the underside of the vehicle, wheel
wells, and brakes. After cleaning the vehicle, dry
the brakes by going on a short drive and applying
the brakes multiple times.
CAUTION: Avoid using tight-napped or rough
cloths, such as washing mitts. A high-quality
microfiber cleaning cloth is recommended.
CAUTION: If washing in an automatic car wash, use
touchless car washes only. These car washes have
no parts (brushes, etc.) that touch the surfaces of
Model Y. Some touchless car washes use caustic
solutions that, over time, can cause discoloration
of decorative exterior trim. Avoid exposure to
soaps and chemicals above pH 13. If unsure, check
the product label or ask the staff at the car wash.
Damage caused by improper washing is not
covered by the warranty.
CAUTION: If washing in an automatic car wash,
make sure the vehicle is locked. In addition, avoid
using controls on the touchscreen that can result
in accidentally opening doors or trunks while the
vehicle is being washed. Any damage caused is
not covered by the warranty.
CAUTION: Ensure the wipers are off before
washing Model Y to avoid the risk of damaging the
wipers.
CAUTION: Do not use chemical based wheel
cleaners or pre-wash products. These can damage
the finish on the wheels.
WARNING: Never spray liquid at a high velocity
(for example, if using a pressure washer) towards
the charge port while Model Y is charging. Failure
to follow these instructions can result in serious
injury or damage to the vehicle, charging
equipment, or property.
Cleaning the Interior
Frequently inspect and clean the interior to maintain its appearance and to prevent premature wear. If possible, immediately wipe up spills and remove marks. For
general cleaning, wipe interior surfaces using a soft cloth (such as
microfiber) dampened with a mixture of warm
water and mild non-detergent cleaner (test all cleaners on a concealed area before use). To avoid streaks, dry immediately with a soft lint-free cloth.
Interior Glass
Do not scrape, or use any abrasive cleaning fluid on
glass or mirrored surfaces. This can damage the
reflective surface of the mirror and the heating elements
in the rear window.
Airbags
Do not allow any substance to enter an airbag cover.
This could
affect correct operation.
Dashboard and Plastic Surfaces
Do not polish the upper surfaces of the dashboard. Polished surfaces are
reflective and could interfere with
your driving view.
Seats
Wipe spills as soon as possible using a soft cloth
moistened with warm water and non-detergent soap.
Wipe gently in a circular motion. Then wipe dry using a soft, lint-free cloth.
If equipped with polyurethane seats, be careful with dyes, such as from clothing or denim, that come into contact with the seats. Over time, dyes can
diffuse into
the seat material and cause staining.
Vacuum cloth seats as needed to remove any loose dirt.
CAUTION: Aftermarket, non-Tesla seat covers may
inhibit the sensitivity of a seat
Page 188 of 250
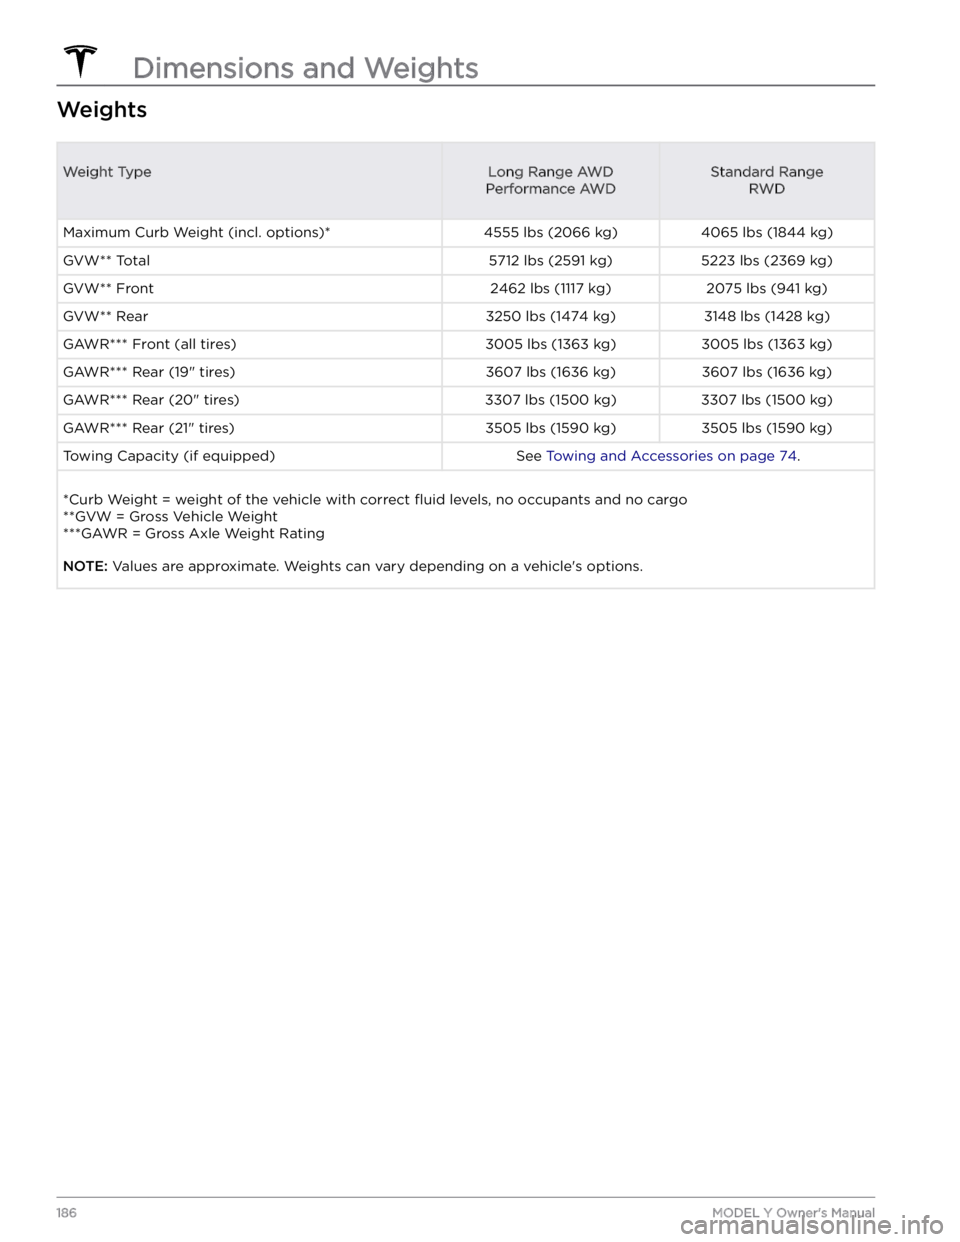
WeightsWeight TypeLong Range AWD
Performance AWDStandard Range RWD
Maximum Curb Weight (incl. options)*4555 lbs (2066 kg)4065 lbs (1844 kg)GVW** Total5712 lbs (2591 kg)5223 lbs (2369 kg)GVW** Front2462 lbs (1117 kg)2075 lbs (941 kg)GVW** Rear3250 lbs (1474 kg)3148 lbs (1428 kg)GAWR*** Front (all tires)3005 lbs (1363 kg)3005 lbs (1363 kg)GAWR*** Rear (19" tires)3607 lbs (1636 kg)3607 lbs (1636 kg)GAWR*** Rear (20" tires)3307 lbs (1500 kg)3307 lbs (1500 kg)GAWR*** Rear (21" tires)3505 lbs (1590 kg)3505 lbs (1590 kg)Towing Capacity (if equipped)See Towing and Accessories on page 74.
*Curb Weight = weight of the vehicle with correct fluid levels, no occupants and no cargo
**GVW = Gross Vehicle Weight ***GAWR = Gross Axle Weight Rating
NOTE: Values are approximate. Weights can vary depending on a vehicle
Page 193 of 250
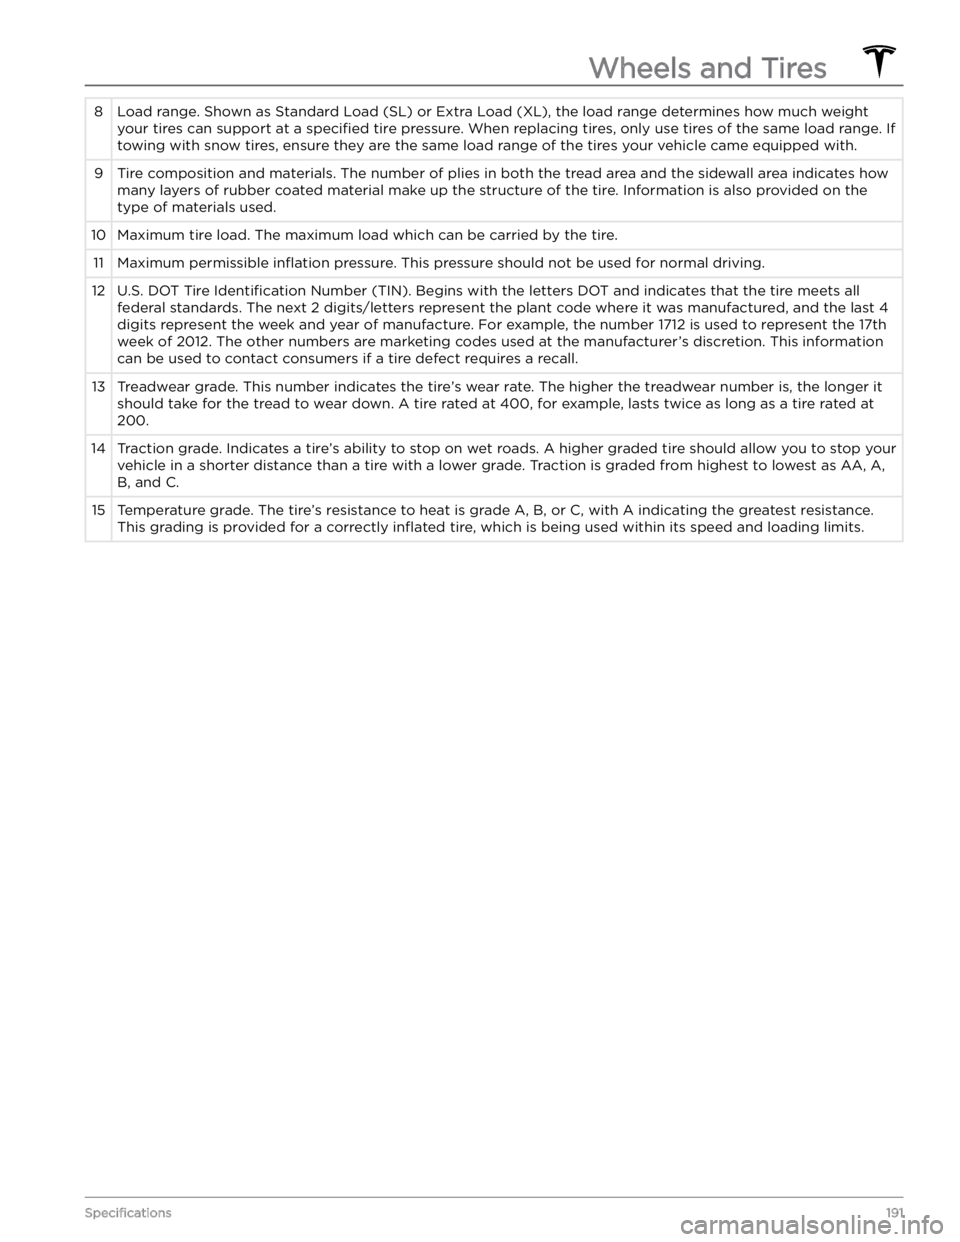
8Load range. Shown as Standard Load (SL) or Extra Load (XL), the load range determines how much weight
your tires can support at a
specified tire pressure. When replacing tires, only use tires of the same load range. If
towing with snow tires, ensure they are the same load range of the tires your vehicle came equipped with.
9Tire composition and materials. The number of plies in both the tread area and the sidewall area indicates how
many layers of rubber coated material make up the structure of the tire. Information is also provided on the type of materials used.10Maximum tire load. The maximum load which can be carried by the tire.11Maximum permissible inflation pressure. This pressure should not be used for normal driving.12U.S. DOT Tire Identification Number (TIN). Begins with the letters DOT and indicates that the tire meets all
federal standards. The next 2 digits/letters represent the plant code where it was manufactured, and the last 4 digits represent the week and year of manufacture. For example, the number 1712 is used to represent the 17th week of 2012. The other numbers are marketing codes used at the manufacturer
Page 201 of 250
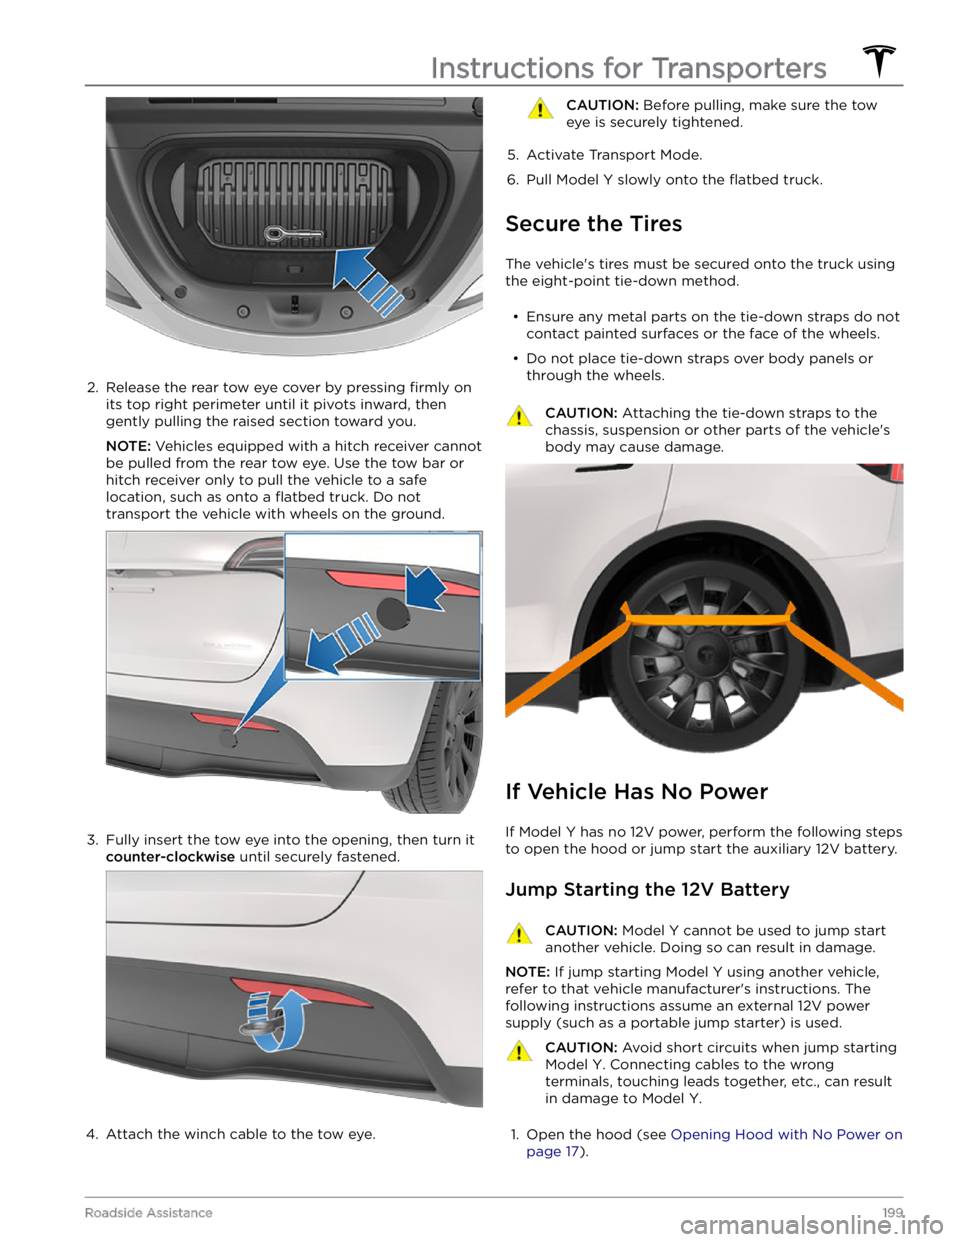
2.
Release the rear tow eye cover by pressing firmly on
its top right perimeter until it pivots inward, then
gently pulling the raised section toward you.
NOTE: Vehicles equipped with a hitch receiver cannot
be pulled from the rear tow eye. Use the tow bar or
hitch receiver only to pull the vehicle to a safe
location, such as onto a
flatbed truck. Do not
transport the vehicle with wheels on the ground.
3.
Fully insert the tow eye into the opening, then turn it
counter-clockwise until securely fastened.
4.
Attach the winch cable to the tow eye.
CAUTION: Before pulling, make sure the tow
eye is securely tightened.
5.
Activate Transport Mode.
6.
Pull Model Y slowly onto the flatbed truck.
Secure the Tires
The vehicle