TESLA MODEL Y 2022 Owner´s Manual
Manufacturer: TESLA, Model Year: 2022, Model line: MODEL Y, Model: TESLA MODEL Y 2022Pages: 250, PDF Size: 8.4 MB
Page 171 of 250
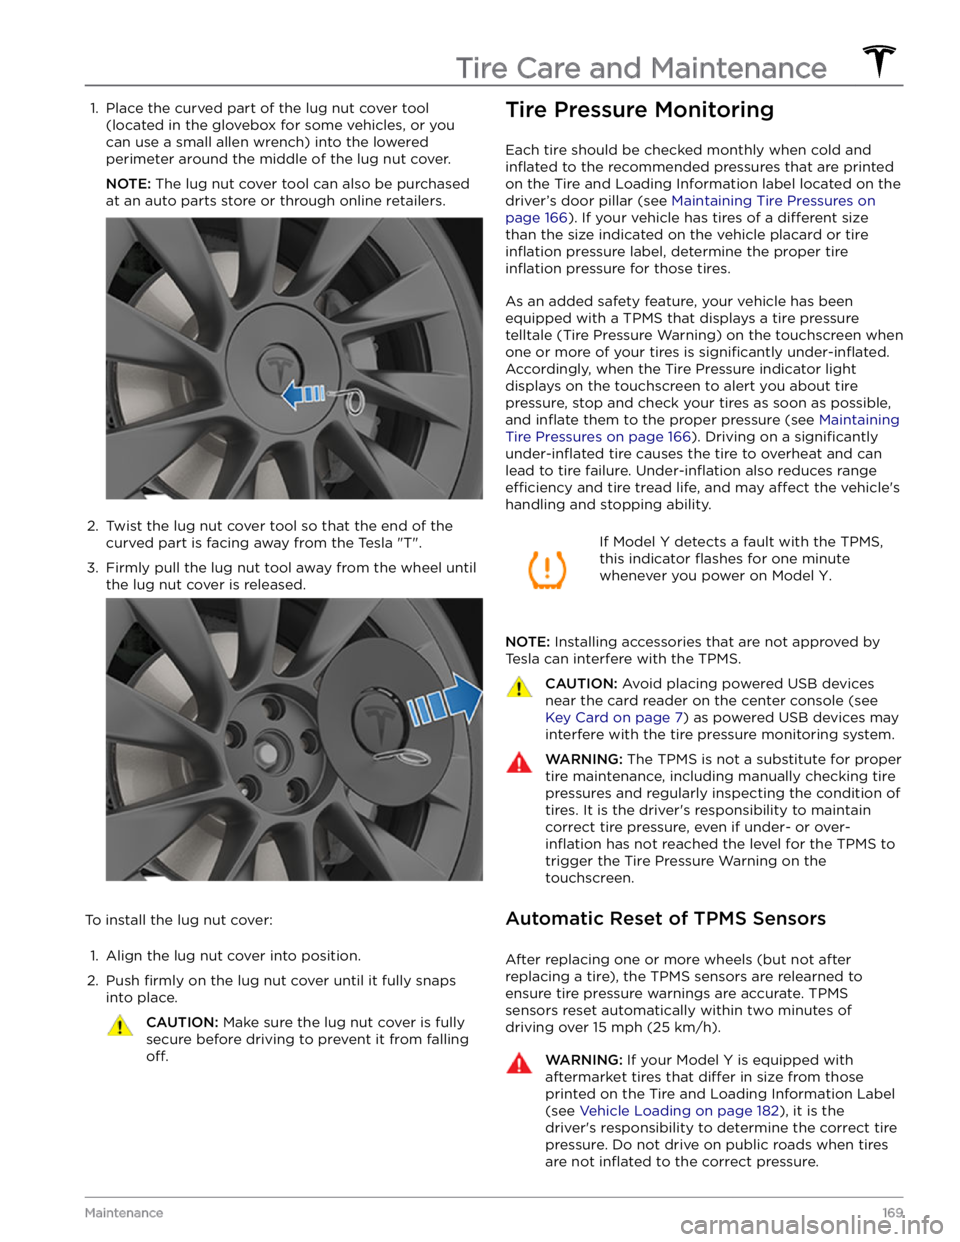
1. Place the curved part of the lug nut cover tool (located in the glovebox for some vehicles, or you can use a small allen wrench) into the lowered
perimeter around the middle of the lug nut cover.
NOTE: The lug nut cover tool can also be purchased
at an auto parts store or through online retailers.
2.
Twist the lug nut cover tool so that the end of the curved part is facing away from the Tesla "T".
3.
Firmly pull the lug nut tool away from the wheel until the lug nut cover is released.
To install the lug nut cover:
1.
Align the lug nut cover into position.
2.
Push firmly on the lug nut cover until it fully snaps
into place.
CAUTION: Make sure the lug nut cover is fully
secure before driving to prevent it from falling
off.
Tire Pressure Monitoring
Each tire should be checked monthly when cold and
inflated to the recommended pressures that are printed
on the Tire and Loading Information label located on the
driver
Page 172 of 250
WARNING: Do not depend on TPMS sensors to
accurately determine pressures and trigger alerts.
It is the driver
Page 173 of 250
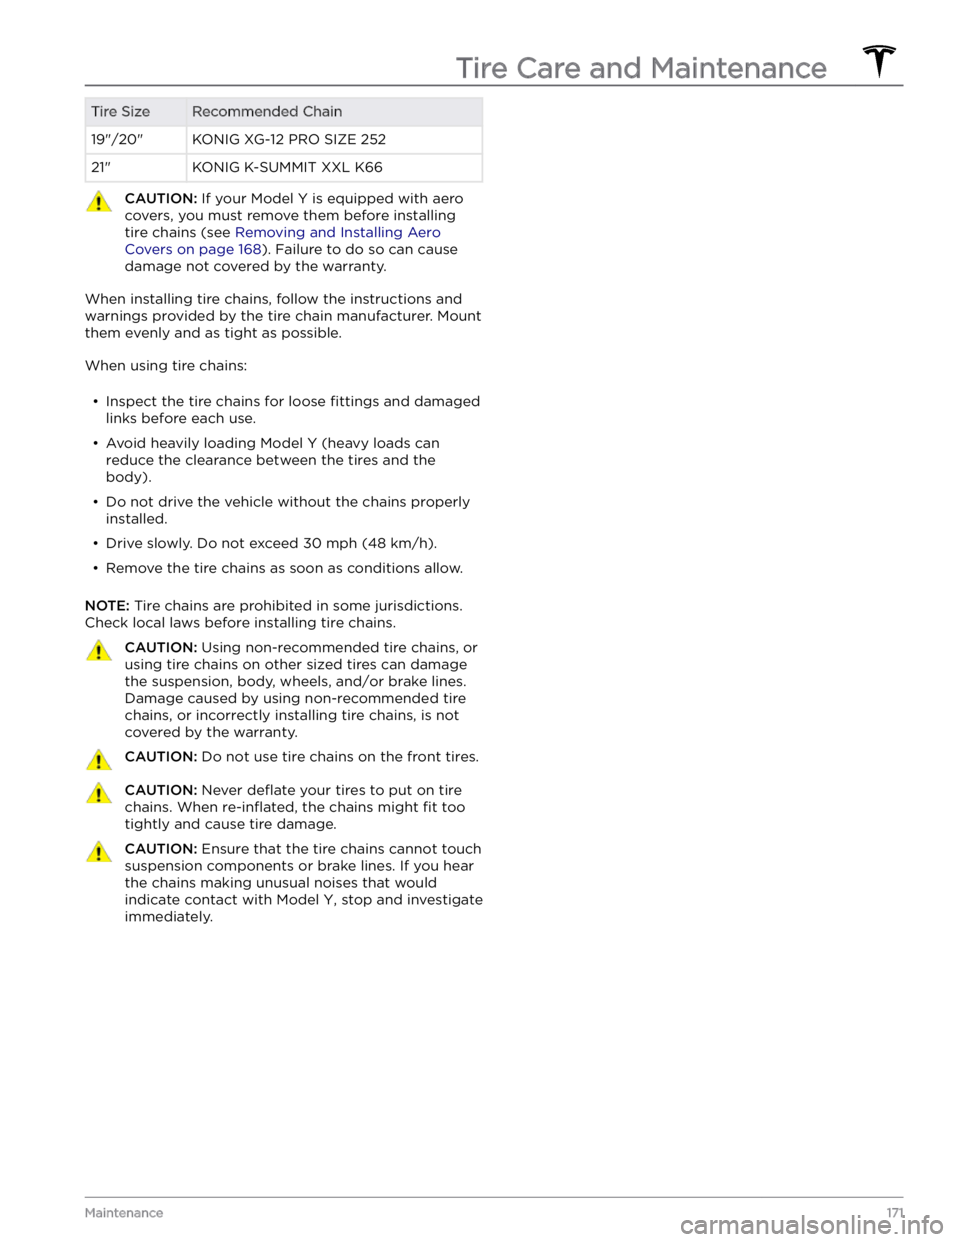
Tire SizeRecommended Chain19"/20"KONIG XG-12 PRO SIZE 25221"KONIG K-SUMMIT XXL K66CAUTION: If your Model Y is equipped with aero
covers, you must remove them before installing
tire chains (see Removing and Installing Aero
Covers on page 168). Failure to do so can cause
damage not covered by the warranty.
When installing tire chains, follow the instructions and warnings provided by the tire chain manufacturer. Mount them evenly and as tight as possible.
When using tire chains:
Page 174 of 250
Cleaning the Exterior
To prevent damage to the paint, immediately remove
corrosive substances (bird droppings, tree resin, dead insects, tar spots, road salt, industrial fallout, etc.). Do not wait until
Model Y is due for a complete wash. If
necessary, use denatured alcohol to remove tar spots
and stubborn grease stains, then immediately wash the area with water and a mild, non-detergent soap to remove the alcohol.
Keep the exterior cameras free of dirt, condensation, or obstructions. These substances can cause unclear pictures or Autopilot and safety features to stop working (see
Cleaning a Camera on page 172).
Follow these steps when washing the exterior of Model
Y:
1.
Rinse Thoroughly
Before washing, flush grime and grit from the vehicle
using a hose. Flush away accumulations of mud in
areas where debris easily collects (such as wheel wells and panel seams). If salt has been used on the highways (such as during winter months), thoroughly
rinse all traces of road salt from the underside of the
vehicle, wheel wells, and brakes.
2.
Hand Wash
Hand wash Model Y using a clean soft cloth and cold
or lukewarm water containing a mild, high-quality car
shampoo.
CAUTION: Some cleaners and car shampoos
contain chemicals that can cause damage or
discoloration, especially to plastic trim pieces,
lamps, or camera lenses. For example, some car
cleaning formulas contain hydroxide or other
highly alkaline or caustic ingredients that can
damage exterior components. Damage or
discoloration resulting from cleaning products
is not covered by the warranty.
3.
Rinse with Clean Water
After washing, rinse with clean water to prevent soap from drying on the surfaces.
4.
Dry Thoroughly and Clean Exterior Glass
After washing and rinsing, dry thoroughly with a chamois. If necessary, dry the brakes by going on a
short drive and applying the brakes multiple times.
Clean windows and mirrors using an automotive glass cleaner. Do not scrape, or use any abrasive cleaning
fluid on glass or mirrored surfaces.
Car Wash Mode
When taking Model Y to a car wash, Car Wash Mode
closes all windows, locks the charge port door, and disables windshield wipers, Sentry Mode, walk-away door locking, and parking sensor chimes. To enable, touch
Controls > Service > Car Wash Mode. Your vehicle
must be in Park and not actively charging.
If using an automatic car wash, Enable Free Roll keeps
your vehicle in Neutral and prevents
Model Y from
applying the Parking brake if you leave the driver
Page 175 of 250
CAUTION: To avoid corrosive damage that may
not be covered by the warranty, rinse away any
road salt from the underside of the vehicle, wheel
wells, and brakes. After cleaning the vehicle, dry
the brakes by going on a short drive and applying
the brakes multiple times.
CAUTION: Avoid using tight-napped or rough
cloths, such as washing mitts. A high-quality
microfiber cleaning cloth is recommended.
CAUTION: If washing in an automatic car wash, use
touchless car washes only. These car washes have
no parts (brushes, etc.) that touch the surfaces of
Model Y. Some touchless car washes use caustic
solutions that, over time, can cause discoloration
of decorative exterior trim. Avoid exposure to
soaps and chemicals above pH 13. If unsure, check
the product label or ask the staff at the car wash.
Damage caused by improper washing is not
covered by the warranty.
CAUTION: If washing in an automatic car wash,
make sure the vehicle is locked. In addition, avoid
using controls on the touchscreen that can result
in accidentally opening doors or trunks while the
vehicle is being washed. Any damage caused is
not covered by the warranty.
CAUTION: Ensure the wipers are off before
washing Model Y to avoid the risk of damaging the
wipers.
CAUTION: Do not use chemical based wheel
cleaners or pre-wash products. These can damage
the finish on the wheels.
WARNING: Never spray liquid at a high velocity
(for example, if using a pressure washer) towards
the charge port while Model Y is charging. Failure
to follow these instructions can result in serious
injury or damage to the vehicle, charging
equipment, or property.
Cleaning the Interior
Frequently inspect and clean the interior to maintain its appearance and to prevent premature wear. If possible, immediately wipe up spills and remove marks. For
general cleaning, wipe interior surfaces using a soft cloth (such as
microfiber) dampened with a mixture of warm
water and mild non-detergent cleaner (test all cleaners on a concealed area before use). To avoid streaks, dry immediately with a soft lint-free cloth.
Interior Glass
Do not scrape, or use any abrasive cleaning fluid on
glass or mirrored surfaces. This can damage the
reflective surface of the mirror and the heating elements
in the rear window.
Airbags
Do not allow any substance to enter an airbag cover.
This could
affect correct operation.
Dashboard and Plastic Surfaces
Do not polish the upper surfaces of the dashboard. Polished surfaces are
reflective and could interfere with
your driving view.
Seats
Wipe spills as soon as possible using a soft cloth
moistened with warm water and non-detergent soap.
Wipe gently in a circular motion. Then wipe dry using a soft, lint-free cloth.
If equipped with polyurethane seats, be careful with dyes, such as from clothing or denim, that come into contact with the seats. Over time, dyes can
diffuse into
the seat material and cause staining.
Vacuum cloth seats as needed to remove any loose dirt.
CAUTION: Aftermarket, non-Tesla seat covers may
inhibit the sensitivity of a seat
Page 176 of 250
Chrome and Metal Surfaces
Polish, abrasive cleaners, alcohol-based gel products (such as hand sanitizer), and hard cloths can damage the
finish on chrome and metal surfaces.
Cautions for Interior Cleaning
CAUTION: Using solvents (including alcohol),
alcohol-based gel products (such as hand
sanitizer), bleach, citrus, naphtha, or silicone-based
products or additives on interior components can
cause damage.
CAUTION: Statically-charged materials can cause
damage to the touchscreen.
WARNING: If you notice any damage on an airbag
or seat belt, contact Tesla immediately.
WARNING: Do not allow any water, cleaners, or
fabric to enter a seat belt mechanism.
WARNING: Exposure to chemical cleaners can be
hazardous and can irritate eyes and skin. Read and
observe the instructions provided by the
manufacturer of the chemical cleaner.
Polishing, Touch Up, and Body
Repair
To preserve the cosmetic appearance of the body, you
can occasionally treat the paint surfaces with an approved polish containing:
Page 177 of 250

Checking and Cleaning Wiper
Blades
Periodically clean the edge of the wiper blades and
check the rubber for cracks, splits, and roughness. If
damaged, replace the blade immediately to prevent damage to the glass and improve visibility.
Contaminants on the windshield, or on the wiper blades,
can reduce the
effectiveness of the wipers.
Contaminants include ice, wax spray from car washes, washer
fluid with bug and/or water repellent, bird
droppings, tree sap, and other organic substances.
Follow these guidelines for cleaning:
Page 178 of 250
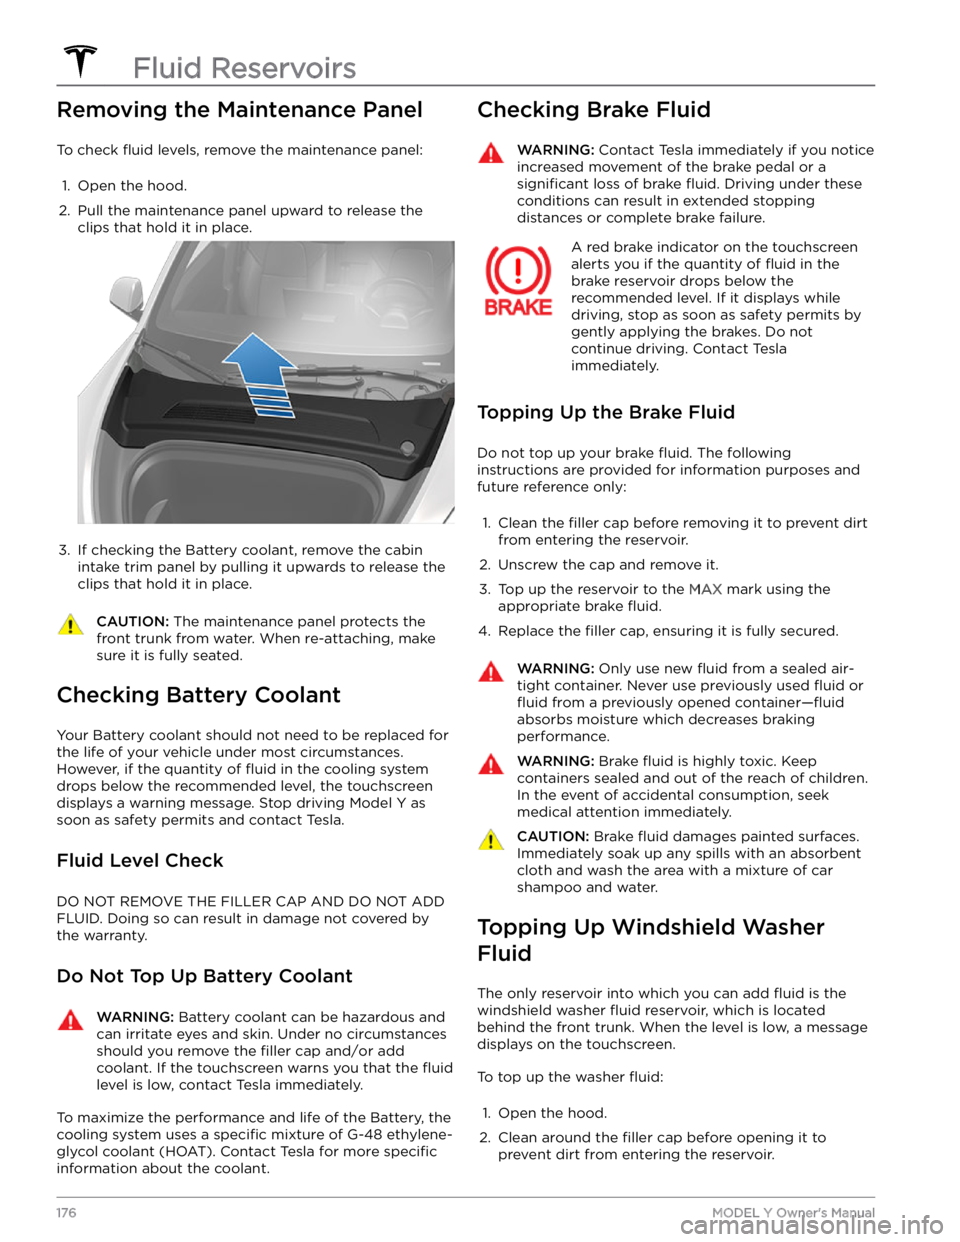
Removing the Maintenance Panel
To check fluid levels, remove the maintenance panel:
1.
Open the hood.
2.
Pull the maintenance panel upward to release the clips that hold it in place.
3.
If checking the Battery coolant, remove the cabin intake trim panel by pulling it upwards to release the clips that hold it in place.
CAUTION: The maintenance panel protects the
front trunk from water. When re-attaching, make
sure it is fully seated.
Checking Battery Coolant
Your Battery coolant should not need to be replaced for
the life of your vehicle under most circumstances. However, if the quantity of
fluid in the cooling system
drops below the recommended level, the
touchscreen
displays a warning message. Stop driving Model Y as
soon as safety permits and contact Tesla.
Fluid Level Check
DO NOT REMOVE THE FILLER CAP AND DO NOT ADD
FLUID. Doing so can result in damage not covered by
the warranty.
Do Not Top Up Battery Coolant
WARNING: Battery coolant can be hazardous and
can irritate eyes and skin. Under no circumstances
should you remove the filler cap and/or add
coolant. If the touchscreen warns you that the fluid
level is low, contact Tesla immediately.
To maximize the performance and life of the Battery, the
cooling system uses a
specific mixture of G-48 ethylene-
glycol coolant (HOAT). Contact Tesla for more
specific
information about the coolant.
Checking Brake FluidWARNING: Contact Tesla immediately if you notice
increased movement of the brake pedal or a
significant loss of brake fluid. Driving under these
conditions can result in extended stopping
distances or complete brake failure.
A red brake indicator on the touchscreen
alerts you if the quantity of fluid in the
brake reservoir drops below the
recommended level. If it displays while driving, stop as soon as safety permits by
gently applying the brakes. Do not
continue driving. Contact Tesla
immediately.
Topping Up the Brake Fluid
Do not top up your brake fluid. The following
instructions are provided for information purposes and future reference only:
1.
Clean the filler cap before removing it to prevent dirt
from entering the reservoir.
2.
Unscrew the cap and remove it.
3.
Top up the reservoir to the MAX mark using the
appropriate brake
fluid.
4.
Replace the filler cap, ensuring it is fully secured.
WARNING: Only use new fluid from a sealed air-
tight container. Never use previously used fluid or
fluid from a previously opened container
Page 179 of 250

3. Open the filler cap.4.
While avoiding spilling, fill the reservoir until the fluid
level is visible just below the filler neck. The reservoir
has a capacity of 4.5 liters.
5.
Wipe up any spills immediately and wash the
affected area with water.
6.
Replace the filler cap.
NOTE: Some national or local regulations restrict the use
of Volatile Organic Compounds (VOCs). VOCs are commonly used as antifreeze in washer
fluid. Use a
washer
fluid with limited VOC content only if it provides
adequate freeze resistance for all climates in which you drive
Model Y.
CAUTION: Do not add formulated washer fluids
that contain water repellent or bug wash. These
fluids can cause streaking, smearing, and
squeaking or other noises.
WARNING: In temperatures below 40
Page 180 of 250
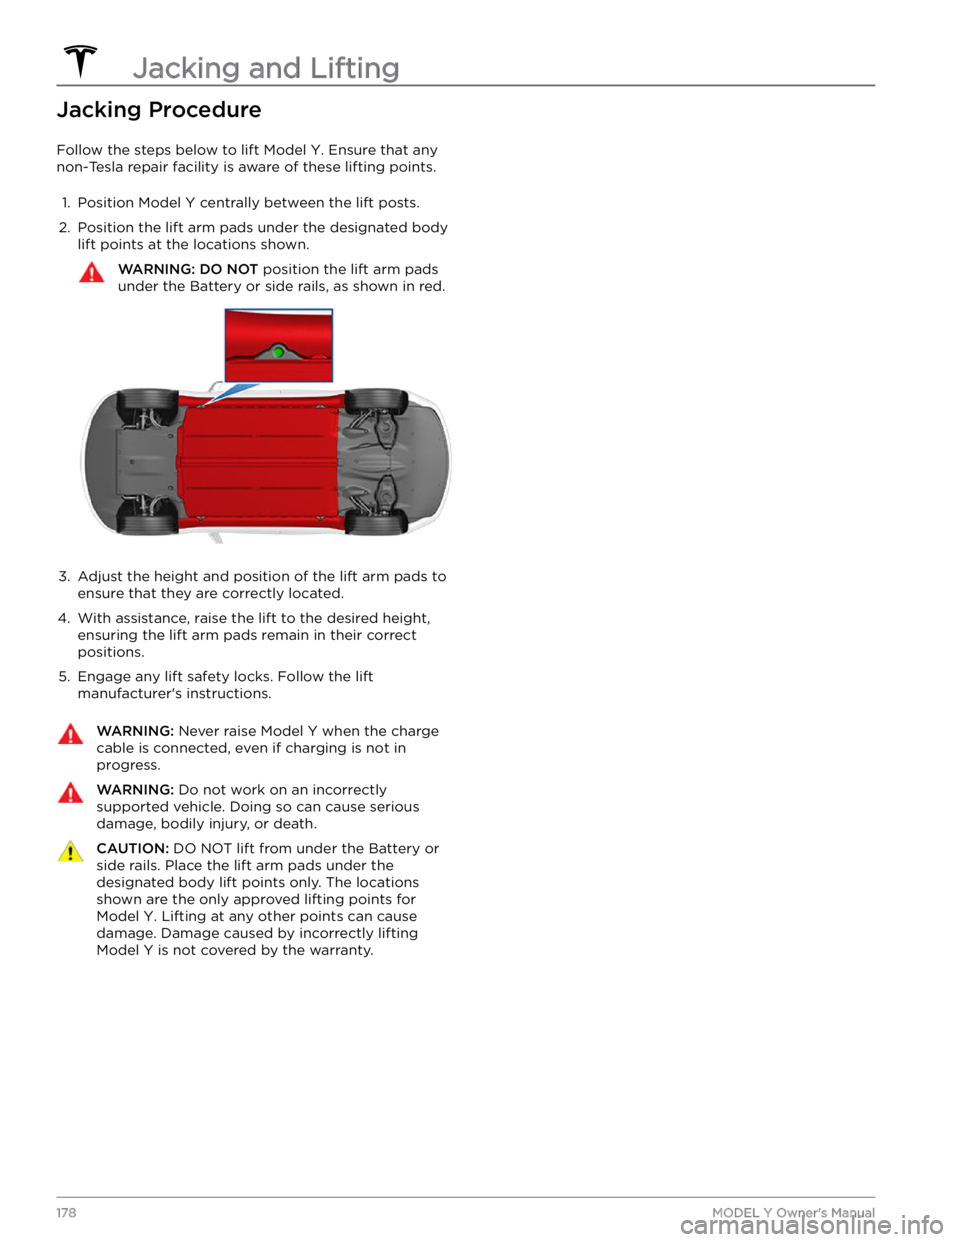
Jacking Procedure
Follow the steps below to lift Model Y. Ensure that any
non-Tesla repair facility is aware of these lifting points.
1.
Position Model Y centrally between the lift posts.
2.
Position the lift arm pads under the designated body lift points at the locations shown.
WARNING: DO NOT position the lift arm pads
under the Battery or side rails, as shown in red.
3.
Adjust the height and position of the lift arm pads to ensure that they are correctly located.
4.
With assistance, raise the lift to the desired height, ensuring the lift arm pads remain in their correct positions.
5.
Engage any lift safety locks. Follow the lift
manufacturer