ECO mode TESLA MODEL Y 2022 Owner´s Manual
[x] Cancel search | Manufacturer: TESLA, Model Year: 2022, Model line: MODEL Y, Model: TESLA MODEL Y 2022Pages: 250, PDF Size: 8.4 MB
Page 54 of 250
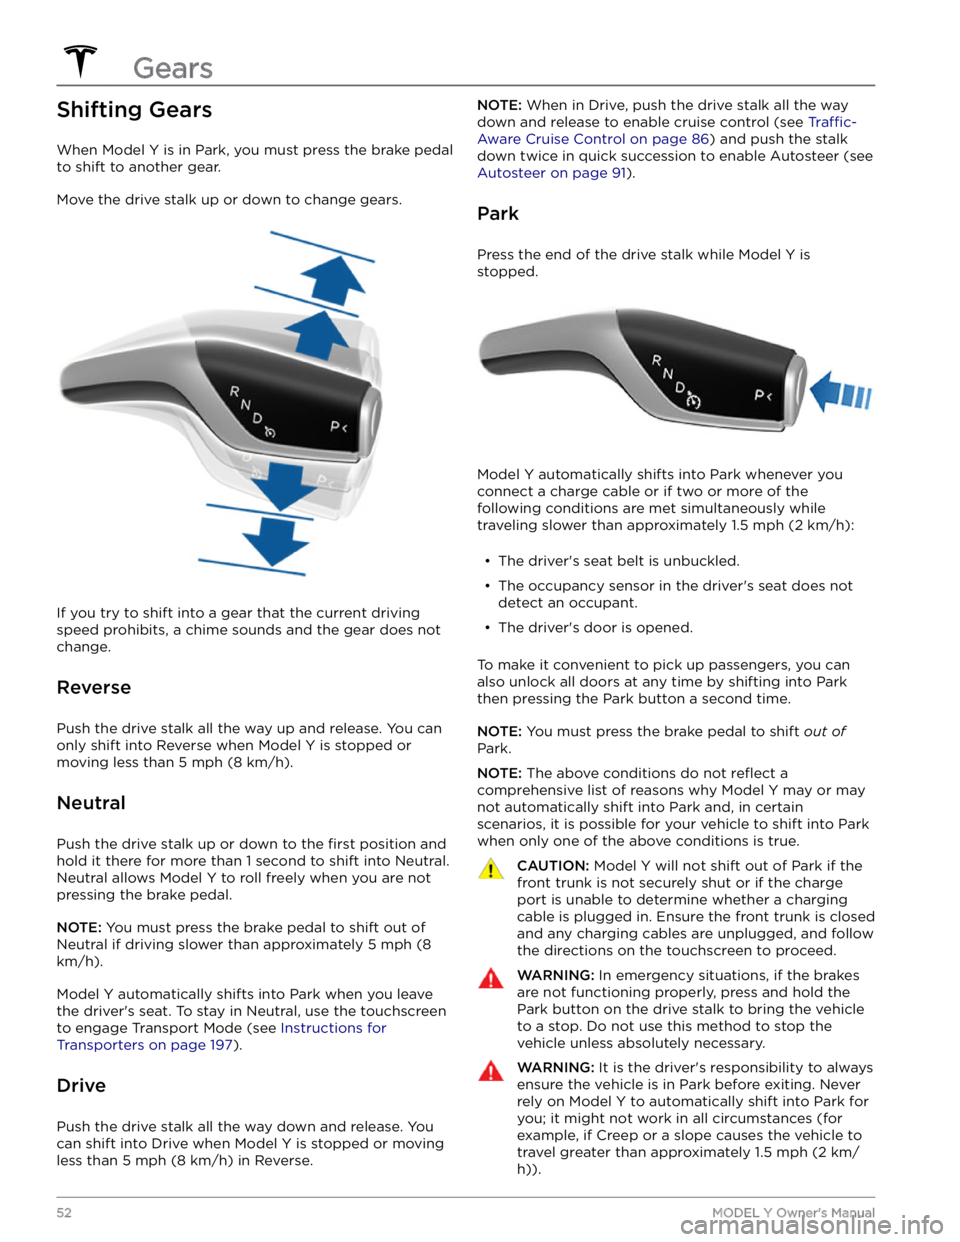
Shifting Gears
When Model Y is in Park, you must press the brake pedal
to shift to another gear.
Move the drive stalk up or down to change gears.
If you try to shift into a gear that the current driving
speed prohibits, a chime sounds and the gear does not
change.
Reverse
Push the drive stalk all the way up and release. You can only shift into Reverse when
Model Y is stopped or
moving less than
5 mph (8 km/h).
Neutral
Push the drive stalk up or down to the first position and
hold it there for more than 1 second to shift into Neutral.
Neutral allows
Model Y to roll freely when you are not
pressing the brake pedal.
NOTE: You must press the brake pedal to shift out of
Neutral if driving slower than approximately
5 mph (8
km/h).
Model Y automatically shifts into Park when you leave
the driver
Page 56 of 250
5. If you turn on Auto High Beam, your vehicle
automatically switches from high beam headlights to low beam headlights when light is detected in front of
Model Y. See High Beam Headlights on page 54.
6.
If you turn on Headlights after Exit, the exterior lights
remain on for a short period of time after you stop driving and park
Model Y in low lighting conditions.
See
Headlights After Exit on page 54.
7.
If you turn on Steering Wheel Lights, the arrows
associated with the scroll buttons are backlit in low ambient lighting conditions.
Reading Lights
There are two reading lights in the second row seating
area, both above the door and next to the coat hangers (see
Coat Hangers on page 22). Turn an individual
reading light on or
off by pressing its lens. The reading
light will automatically turn
off when Model Y powers
off.
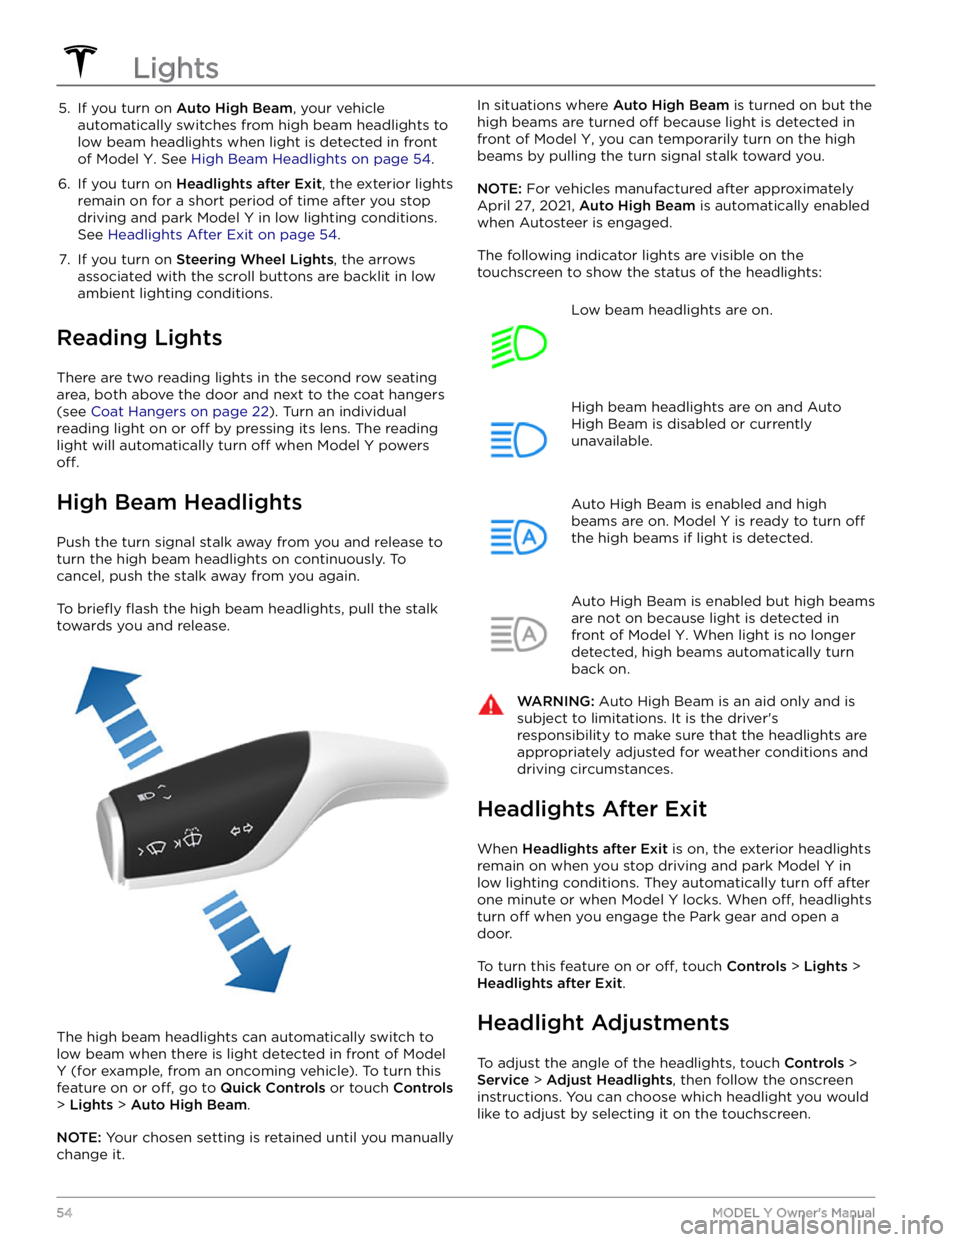
High Beam Headlights
Push the turn signal stalk away from you and release to turn the high beam headlights on continuously. To cancel, push the stalk away from you again.
To briefly flash the high beam headlights, pull the stalk
towards you and release.
The high beam headlights can automatically switch to low beam when there is light detected in front of
Model
Y (for example, from an oncoming vehicle). To turn this
feature on or
off, go to Quick Controls or touch Controls
> Lights > Auto High Beam.
NOTE: Your chosen setting is retained until you manually
change it.
In situations where Auto High Beam is turned on but the
high beams are turned
off because light is detected in
front of
Model Y, you can temporarily turn on the high
beams by pulling the turn signal stalk toward you.
NOTE: For vehicles manufactured after approximately
April 27, 2021,
Auto High Beam is automatically enabled
when Autosteer is engaged.
The following indicator lights are visible on the touchscreen to show the status of the headlights:
Low beam headlights are on.High beam headlights are on and Auto
High Beam is disabled or currently
unavailable.Auto High Beam is enabled and high
beams are on.
Model Y is ready to turn off
the high beams if light is detected.
Auto High Beam is enabled but high beams
are not on because light is detected in front of
Model Y. When light is no longer
detected, high beams automatically turn
back on.
WARNING: Auto High Beam is an aid only and is
subject to limitations. It is the driver
Page 57 of 250
NOTE: Headlights do not require adjustments when
temporarily driving into a region where the
traffic
direction is different (for example, driving in right-hand
traffic region, and then driving into a region with left-
hand
traffic).
WARNING: Proceed with caution when adjusting
headlights. Tesla has carefully calibrated the
position of the headlights to be in an optimum
position for most driving scenarios. Tesla
recommends that you do not adjust headlights
unless you are familiar with how headlights should
be adjusted. Once adjusted, you will be unable to
automatically restore them to their originally
calibrated position. Contact Tesla for assistance
when adjusting headlights.
Turn Signals
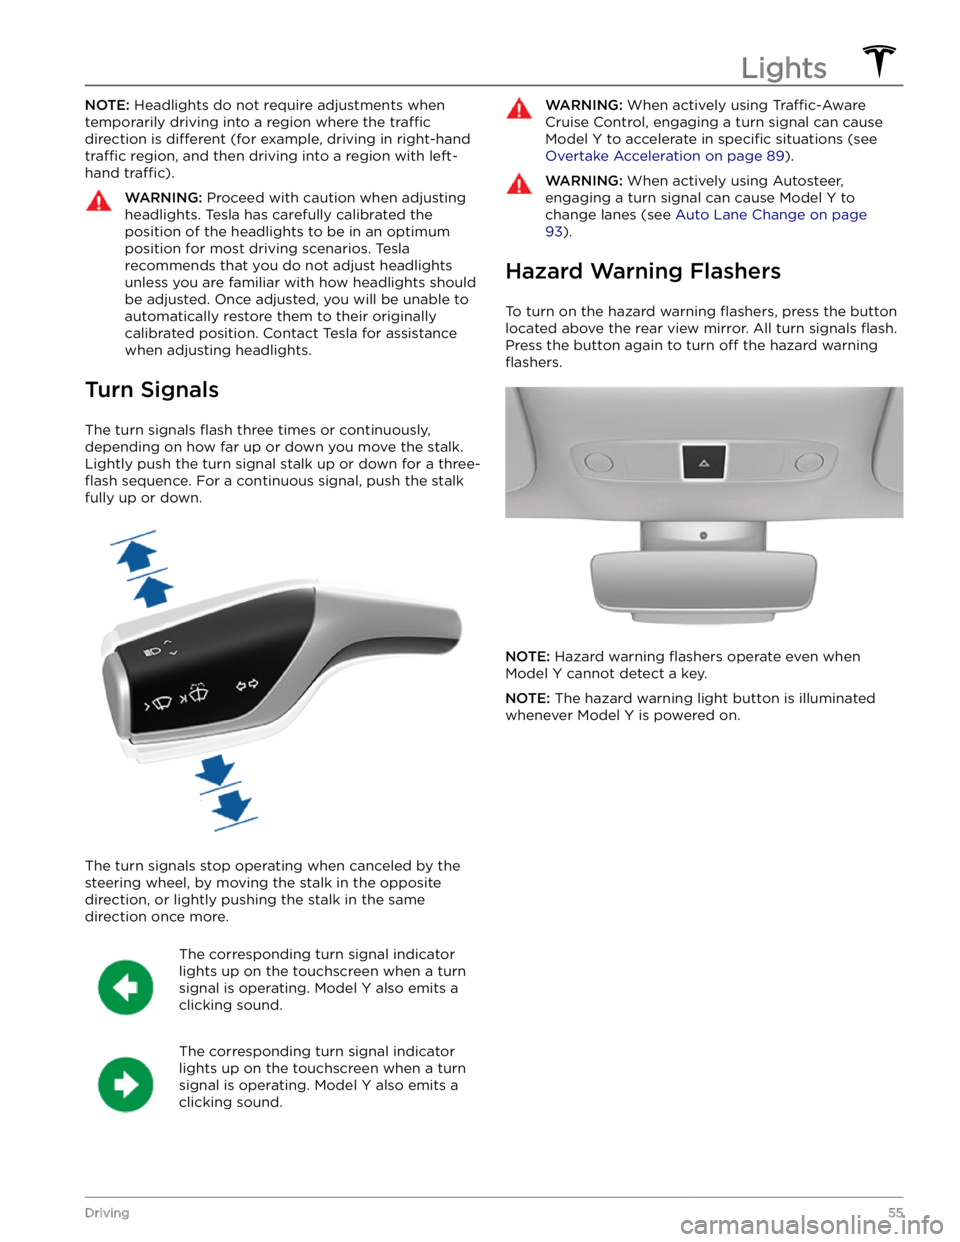
The turn signals flash three times or continuously,
depending on how far up or down you move the stalk.
Lightly push the turn signal stalk up or down for a
three-
flash sequence. For a continuous signal, push the stalk
fully up or down.
The turn signals stop operating when canceled by the steering wheel, by moving the stalk in the opposite direction, or lightly pushing the stalk in the same
direction once more.
The corresponding turn signal indicator
lights up on the touchscreen when a turn
signal is operating.
Model Y also emits a
clicking sound.
The corresponding turn signal indicator
lights up on the touchscreen when a turn
signal is operating.
Model Y also emits a
clicking sound.
WARNING: When actively using Traffic-Aware
Cruise Control, engaging a turn signal can cause
Model Y to accelerate in specific situations (see
Overtake Acceleration on page 89).
WARNING: When actively using Autosteer,
engaging a turn signal can cause Model Y to
change lanes (see Auto Lane Change on page
93).
Hazard Warning Flashers
To turn on the hazard warning flashers, press the button
located above the rear view mirror. All turn signals
flash.
Press the button again to turn off the hazard warning
flashers.
NOTE: Hazard warning flashers operate even when
Model Y cannot detect a key.
NOTE: The hazard warning light button is illuminated
whenever
Model Y is powered on.
Lights
55Driving
Page 76 of 250
The towing package includes a 2" x 2" (5 cm x 5 cm)
hitch receiver that can support an accessory carrier (for bicycles, skis, snowboards, etc.) or tow a trailer.
Installing and Using a Carrier
When using the tow package to carry accessories, the 2"
x 2" (5 cm x 5 cm) square hitch receiver is designed to
support vertical loads of up to
160 lbs (72 kg). Ball
mounts that are compatible with the square receiver
must be purchased separately.
To install and use an accessory carrier, you must first
attach the ball mount to the hitch receiver (see
Attaching and Removing the Ball Mount on page 78).
Then, follow the instructions provided by your accessory
carrier. Observe all regulations and legal requirements in your state or region that apply to carrying accessories.
The Model Y towing package includes the wiring
necessary for using an accessory carrier equipped with
lights (see
Electrical Connections on page 78). The
package also includes Trailer Mode software compatibility (see
Trailer Mode on page 76).
NOTE: Go to http://www.tesla.com to purchase
accessories for your vehicle. Although third-party products are available, Tesla recommends and supports
only Tesla-approved products (see
Parts and
Accessories on page 179). The accessory products
available for your vehicle may vary based on market
region. Before attempting to install a non Tesla-
approved carrier, review the product information to ensure compatibility.
NOTE: When not in use, the ball mount should be
removed and stored in a dry location to prevent dust and corrosion. Keep the dust cover over the hitch housing to prevent dirt and debris from entering (see
Attaching and Removing the Ball Mount on page 78).
NOTE: Tesla assumes no responsibility for damage or
injuries resulting from installing and using an accessory carrier, for any omissions in the instructions
accompanying an accessory carrier, or for your failure to follow the instructions. Damage caused by using an
accessory carrier is not covered by the warranty.
Carrying Accessories
The hitch receiver is designed to support vertical loads
up to
160 lbs (72 kg). When carrying bicycles, skis, or
other items on the
Model Y hitch, always check to
ensure that the maximum weight is not exceeded. When calculating weight, remember to include the weight of
the accessory carrier.
For example, assuming the carrier
weighs 40 lbs (18 kg), the weight threshold is sufficient
for carrying two bicycles weighing approximately 60 lbs
(27 kg) each, or four items weighing approximately 30
lbs (14 kg) each.
NOTE: Consult the product details of your accessory
carrier for more information, such as additional weight or load limits. Damage caused by non Tesla-approved
accessories is not covered by the warranty.CAUTION: Exceeding the maximum weight the
Model Y hitch is designed to support (as
previously described) can cause significant
damage.
CAUTION: Do not attempt to install an accessory
carrier on Model Y that is not equipped with the
tow package. Doing so can cause significant
damage.
Trailer Towing
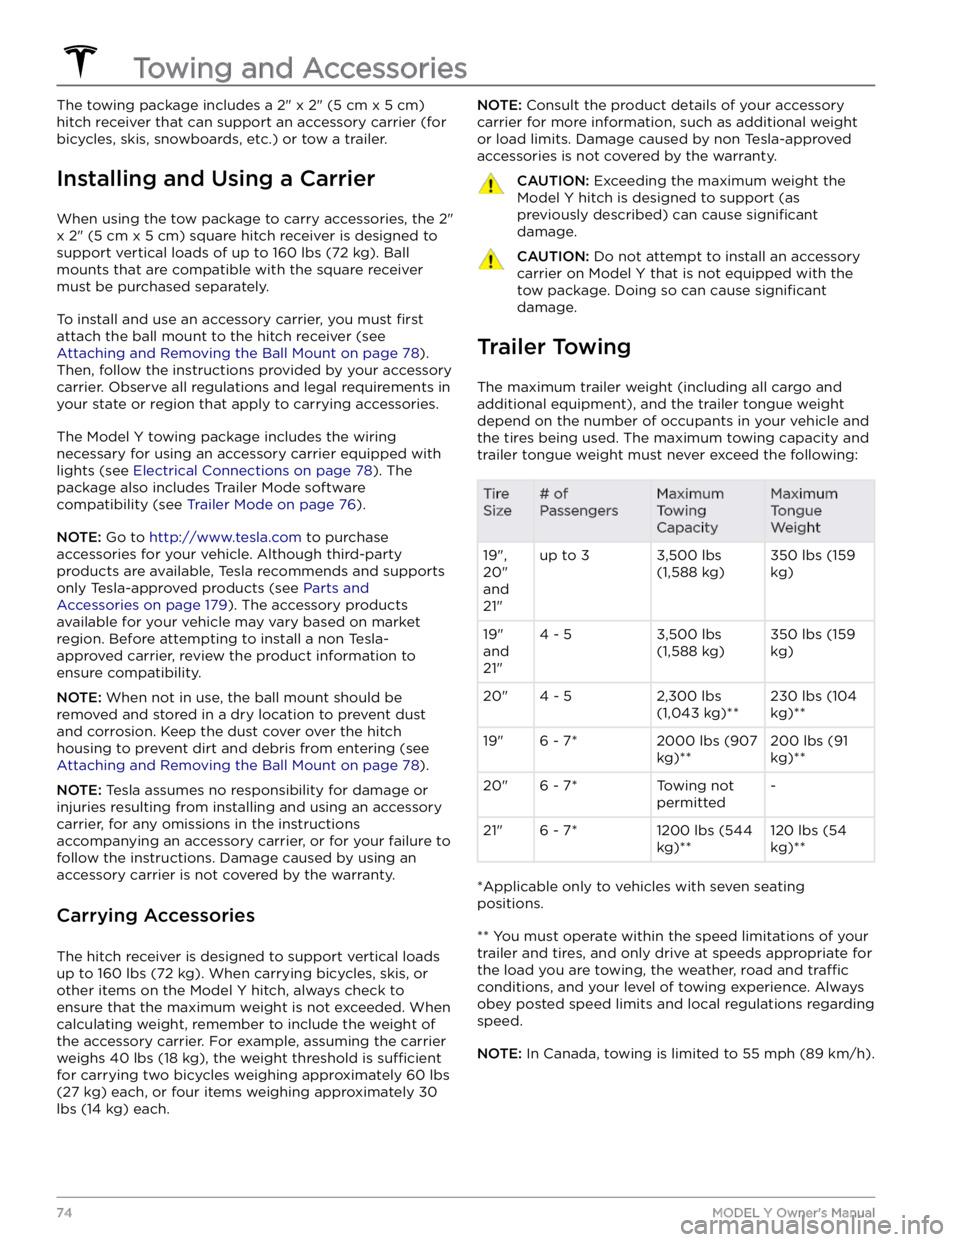
The maximum trailer weight (including all cargo and
additional equipment), and the trailer tongue weight
depend on the number of occupants in your vehicle and the tires being used. The maximum towing capacity and
trailer tongue weight must never exceed the following:
Tire
Size# of
PassengersMaximum
Towing
CapacityMaximum
Tongue
Weight19",
20"
and
21"up to 33,500 lbs
(1,588 kg)350 lbs (159
kg)19"
and
21"4 - 53,500 lbs
(1,588 kg)350 lbs (159
kg)20"4 - 52,300 lbs
(1,043 kg)**230 lbs (104
kg)**19"6 - 7*2000 lbs (907
kg)**200 lbs (91
kg)**20"6 - 7*Towing not
permitted-21"6 - 7*1200 lbs (544
kg)**120 lbs (54
kg)**
*Applicable only to vehicles with seven seating
positions.
** You must operate within the speed limitations of your trailer and tires, and only drive at speeds appropriate for
the load you are towing, the weather, road and
traffic
conditions, and your level of towing experience. Always
obey posted speed limits and local regulations regarding
speed.
NOTE: In Canada, towing is limited to 55 mph (89 km/h).
Towing and Accessories
74MODEL Y Owner
Page 96 of 250
When using Auto Lane Change, it is important to monitor its performance by watching the driving path in front of you and the surrounding area. Stay prepared to take over steering at any time. As you are crossing over into the adjacent lane, the
touchscreen displays the
location in the lane that
Model Y is moving into.
In situations where Auto Lane Change is unable to operate at optimal performance, or cannot operate due to inadequate data, the
touchscreen displays a series of
warnings. Therefore, when using Auto Lane Change,
always pay attention to the
touchscreen and be
prepared to manually steer
Model Y.
Stop Light and Stop Sign Warning
NOTE: Depending on market region, vehicle
configuration, options purchased, and software version,
your vehicle may not be equipped with Stop Light and
Stop Sign Warning, or the feature may not operate
exactly as described.
While Autosteer is in use, Model Y displays a warning on
the
touchscreen and sounds a chime if it detects that
you are likely to run through a red stop light or stop sign. If this happens,
TAKE IMMEDIATE CORRECTIVE
ACTION!
The visual and audible warnings cancel after a few seconds, or when you press the brake pedal, whichever
comes
first.
Stop Light and Stop Sign Warning provides warnings
only. It makes no attempt to slow down or stop
Model Y
at red traffic lights, stop signs, road markings, etc. If your
vehicle is equipped with Traffic Light and Stop Sign
Control, you can enable this feature to automatically
stop Model Y at traffic lights and stop signs (see Traffic
Light and Stop Sign Control on page 99).
NOTE: Touch Controls > Autopilot > Full Self-Driving
Visualization Preview (if equipped) to display more
details about the roadway and its surroundings, such as road markings, stop lights, objects (such as trash cans
and poles), etc.
CAUTION: Stop Light and Stop Sign Warning
requires the vehicle
Page 98 of 250
NOTE: Navigate on Autopilot is a BETA feature.
NOTE: Depending on market region, vehicle
configuration, options purchased, and software version,
your vehicle may not be equipped with Navigate on
Autopilot, or the feature may not operate exactly as
described.
When using Autosteer on a controlled-access road (such as a highway or freeway), Navigate on Autopilot guides
Model Y to off-ramps and interchanges based on your
navigation route. Along the highway portion of a navigation route, Navigate on Autopilot also changes
lanes to prepare for exits and to minimize the driving time to your destination.
WARNING: Navigate on Autopilot does not make
driving autonomous. You must pay attention to the
road, keep your hands on the steering wheel at all
times, and remain aware of your navigation route.
WARNING: As is the case with normal driving, be
extra careful around blind corners, highway
interchanges, and exits because obstacles can
appear quickly and at any time.
WARNING: Navigate on Autopilot may not
recognize or detect oncoming vehicles, stationary
objects, and special-use lanes such as those used
exclusively for bikes, carpools, emergency vehicles,
etc. Remain alert at all times and be prepared to
take immediate action. Failure to do so can cause
damage, injury or death.
Enabling and Customizing Navigate
on Autopilot
To enable Navigate on Autopilot, touch Controls >
Autopilot > Navigate on Autopilot (Beta). Then, to
customize how you want Navigate on Autopilot to operate, touch
CUSTOMIZE NAVIGATE ON AUTOPILOT:
Page 100 of 250
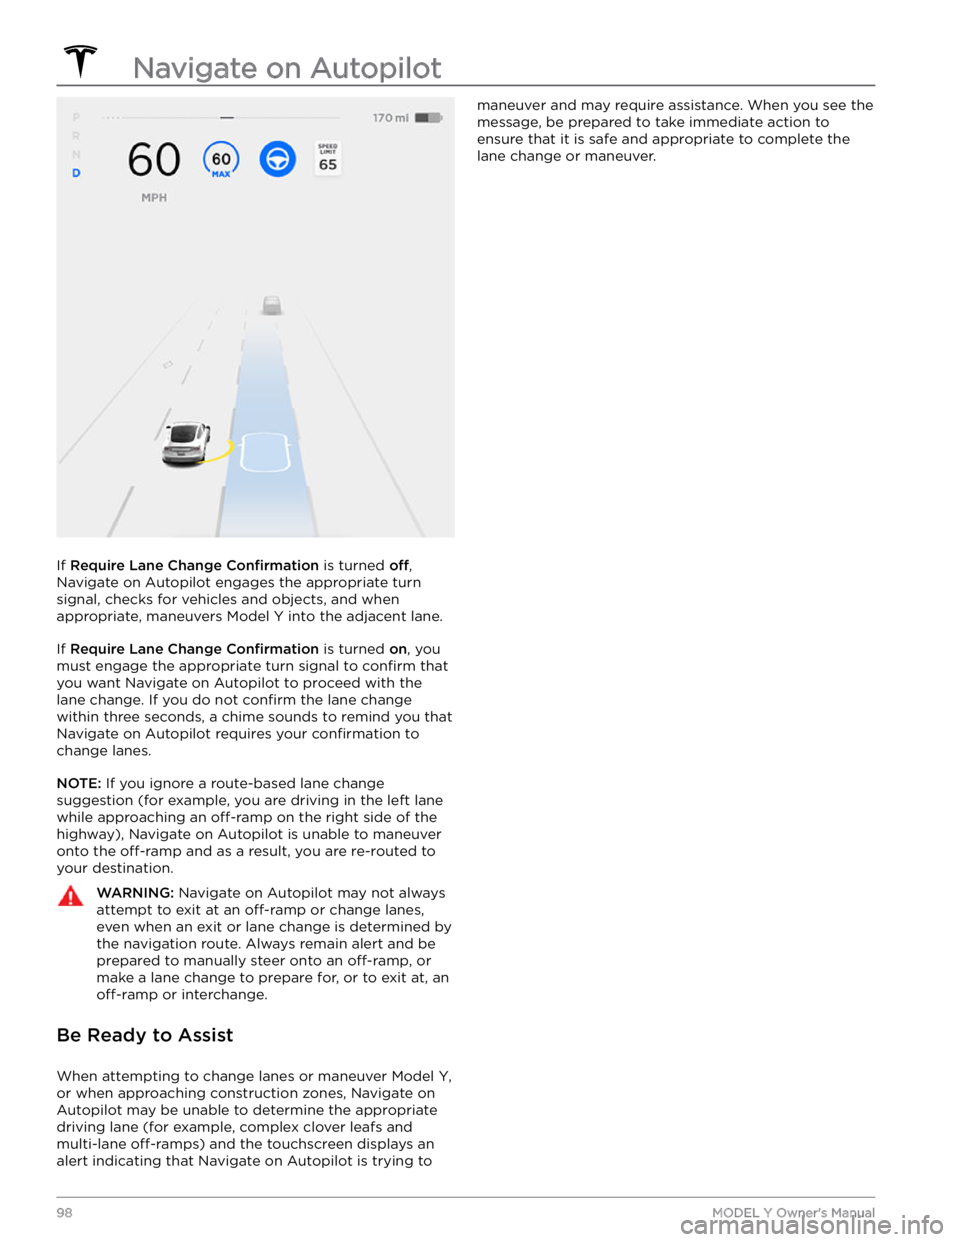
If Require Lane Change Confirmation is turned off,
Navigate on Autopilot engages the appropriate turn signal, checks for vehicles and objects, and when appropriate, maneuvers
Model Y into the adjacent lane.
If Require Lane Change Confirmation is turned on, you
must
engage the appropriate turn signal to confirm that
you want Navigate on Autopilot to proceed with the lane change. If you do not
confirm the lane change
within three seconds, a chime sounds to remind you that Navigate on Autopilot requires your
confirmation to
change lanes.
NOTE: If you ignore a route-based lane change
suggestion (for example, you are driving in the left lane while approaching an
off-ramp on the right side of the
highway), Navigate on Autopilot is unable to maneuver onto the
off-ramp and as a result, you are re-routed to
your destination.
WARNING: Navigate on Autopilot may not always
attempt to exit at an off-ramp or change lanes,
even when an exit or lane change is determined by
the navigation route. Always remain alert and be
prepared to manually steer onto an off-ramp, or
make a lane change to prepare for, or to exit at, an
off-ramp or interchange.
Be Ready to Assist
When attempting to change lanes or maneuver Model Y,
or when approaching construction zones, Navigate on Autopilot may be unable to determine the appropriate driving lane (for example, complex clover leafs and
multi-lane
off-ramps) and the touchscreen displays an
alert indicating that Navigate on Autopilot is trying to
maneuver and may require assistance. When you see the
message, be prepared to take immediate action to ensure that it is safe and appropriate to complete the lane change or maneuver.
Navigate on Autopilot
98MODEL Y Owner
Page 101 of 250
NOTE: Depending on market region, vehicle
configuration, options purchased, and software version,
your vehicle may not be equipped with Traffic Light and
Stop Sign Control, or the feature may not operate
exactly as described.
NOTE: Traffic Light and Stop Sign Control is a BETA
feature and works best on roads that are frequently
driven by Tesla vehicles. Traffic Light and Stop Sign
Control attempts to stop at all traffic lights and may also
stop at green lights.
Traffic Light and Stop Sign Control is designed to
recognize and respond to
traffic lights and stop signs,
slowing
Model Y to a stop when using Traffic-Aware
cruise control or Autosteer. This feature uses the
vehicle
Page 122 of 250
How Speed Assist Works
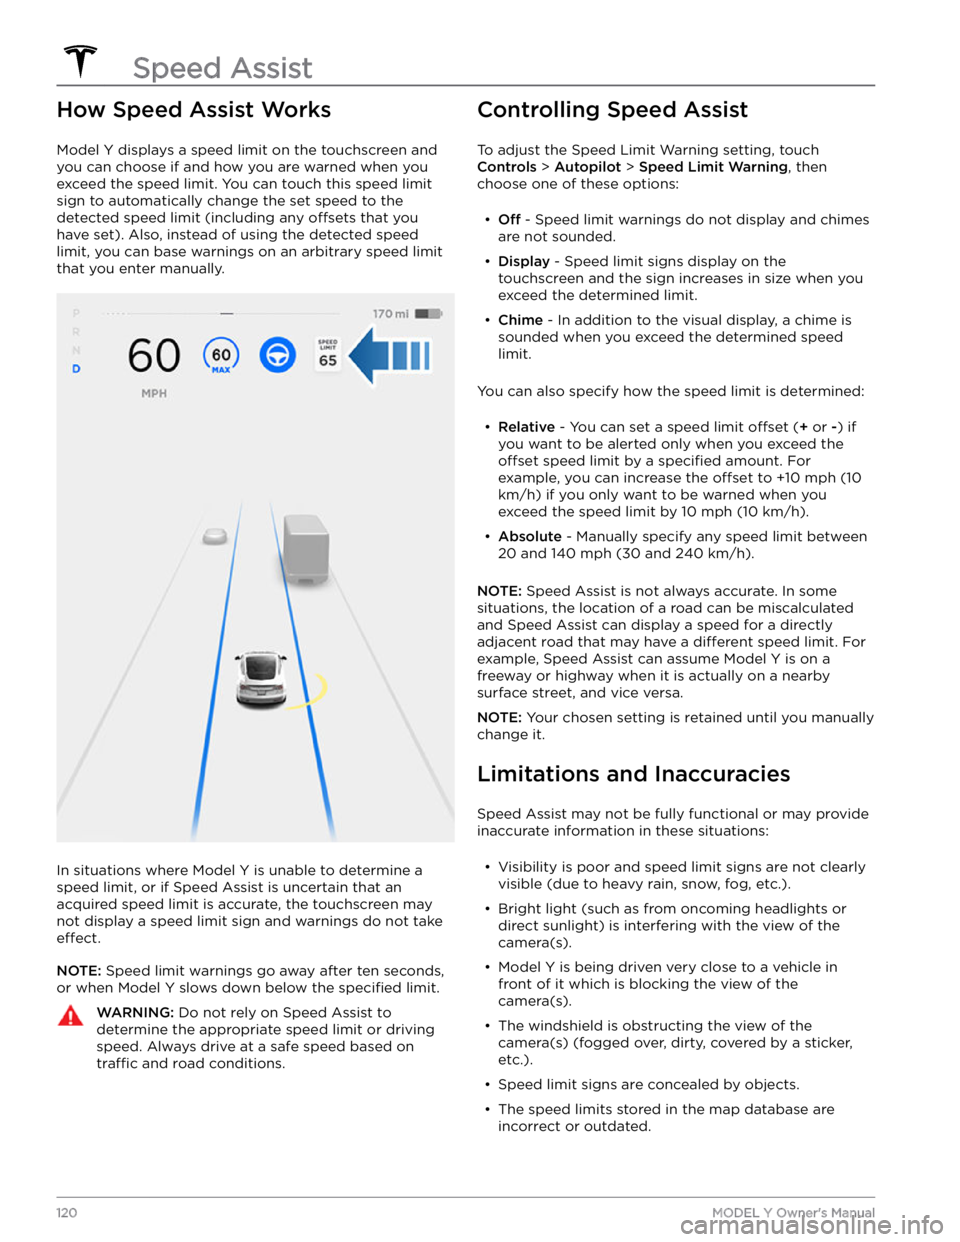
Model Y displays a speed limit on the touchscreen and
you can choose if and how you are warned when you exceed the speed limit.
You can touch this speed limit
sign to automatically change the set speed to the
detected speed limit (including any offsets that you
have set). Also, instead of using the detected speed
limit, you can base warnings on an arbitrary speed limit that you enter manually.
In situations where Model Y is unable to determine a
speed limit, or if Speed Assist is uncertain that an acquired speed limit is accurate, the
touchscreen may
not display a speed limit sign and warnings do not take
effect.
NOTE: Speed limit warnings go away after ten seconds,
or when
Model Y slows down below the specified limit.
WARNING: Do not rely on Speed Assist to
determine the appropriate speed limit or driving
speed. Always drive at a safe speed based on
traffic and road conditions.
Controlling Speed Assist
To adjust the Speed Limit Warning setting, touch
Controls > Autopilot > Speed Limit Warning, then
choose one of these options:
Page 154 of 250
Wi-Fi is available as a data connection method and is often faster than cellular data networks. Connecting to Wi-Fi is especially useful in areas with limited or no
cellular connectivity. To ensure fast, reliable delivery of software and map updates, Tesla recommends leaving your vehicle connected to a Wi-Fi network whenever
possible (for example, if parked in your garage
overnight).
To connect to a Wi-Fi network:
1.
Touch the cellular icon (usually LTE or 3G) on the top
corner of your touchscreen. Model Y begins to scan
and display detected Wi-Fi networks that are within
range.
NOTE: If a known Wi-Fi network does not appear in
the list, move your vehicle closer to the access point or consider using a range extender to reach your
vehicle.
2.
Select the Wi-Fi network you want to use, enter the password (if necessary), then touch
Confirm.
3.
Your vehicle connects to the Wi-Fi network. Whenever the network is within range,
Model Y
automatically connects to it.
You can also connect to a hidden network that isn