turn signal TESLA MODEL Y 2022 Owner´s Manual
[x] Cancel search | Manufacturer: TESLA, Model Year: 2022, Model line: MODEL Y, Model: TESLA MODEL Y 2022Pages: 250, PDF Size: 8.4 MB
Page 5 of 250
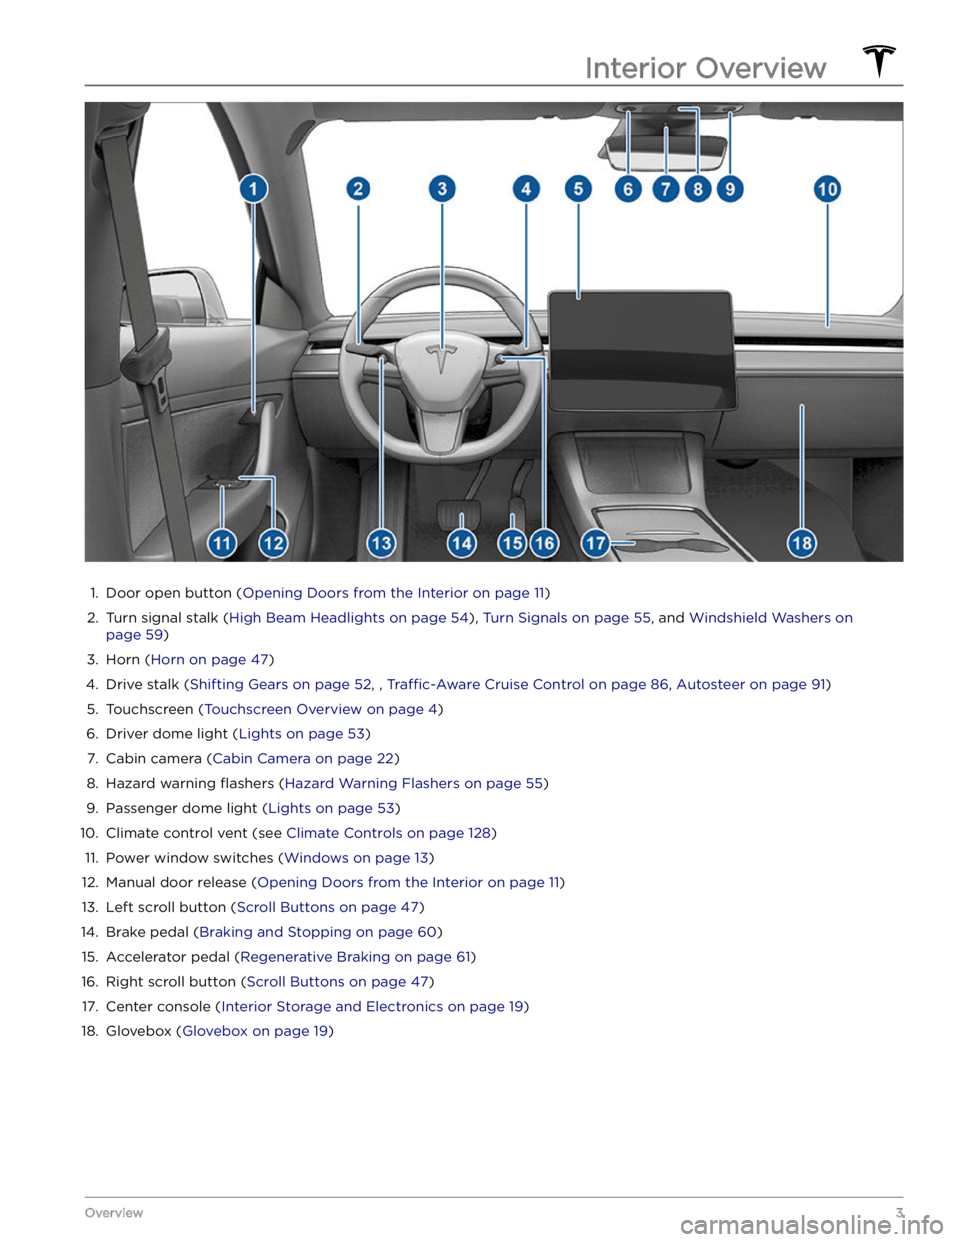
1.
Door open button (Opening Doors from the Interior on page 11)
2.
Turn signal stalk (High Beam Headlights on page 54), Turn Signals on page 55, and Windshield Washers on
page 59)
3.
Horn (Horn on page 47)
4.
Drive stalk (Shifting Gears on page 52, , Traffic-Aware Cruise Control on page 86, Autosteer on page 91)
5.
Touchscreen (Touchscreen Overview on page 4)
6.
Driver dome light (Lights on page 53)
7.
Cabin camera (Cabin Camera on page 22)
8.
Hazard warning flashers (Hazard Warning Flashers on page 55)
9.
Passenger dome light (Lights on page 53)
10.
Climate control vent (see Climate Controls on page 128)
11.
Power window switches (Windows on page 13)
12.
Manual door release (Opening Doors from the Interior on page 11)
13.
Left scroll button (Scroll Buttons on page 47)
14.
Brake pedal (Braking and Stopping on page 60)
15.
Accelerator pedal (Regenerative Braking on page 61)
16.
Right scroll button (Scroll Buttons on page 47)
17.
Center console (Interior Storage and Electronics on page 19)
18.
Glovebox (Glovebox on page 19)
Interior Overview
3Overview
Page 56 of 250
5. If you turn on Auto High Beam, your vehicle
automatically switches from high beam headlights to low beam headlights when light is detected in front of
Model Y. See High Beam Headlights on page 54.
6.
If you turn on Headlights after Exit, the exterior lights
remain on for a short period of time after you stop driving and park
Model Y in low lighting conditions.
See
Headlights After Exit on page 54.
7.
If you turn on Steering Wheel Lights, the arrows
associated with the scroll buttons are backlit in low ambient lighting conditions.
Reading Lights
There are two reading lights in the second row seating
area, both above the door and next to the coat hangers (see
Coat Hangers on page 22). Turn an individual
reading light on or
off by pressing its lens. The reading
light will automatically turn
off when Model Y powers
off.
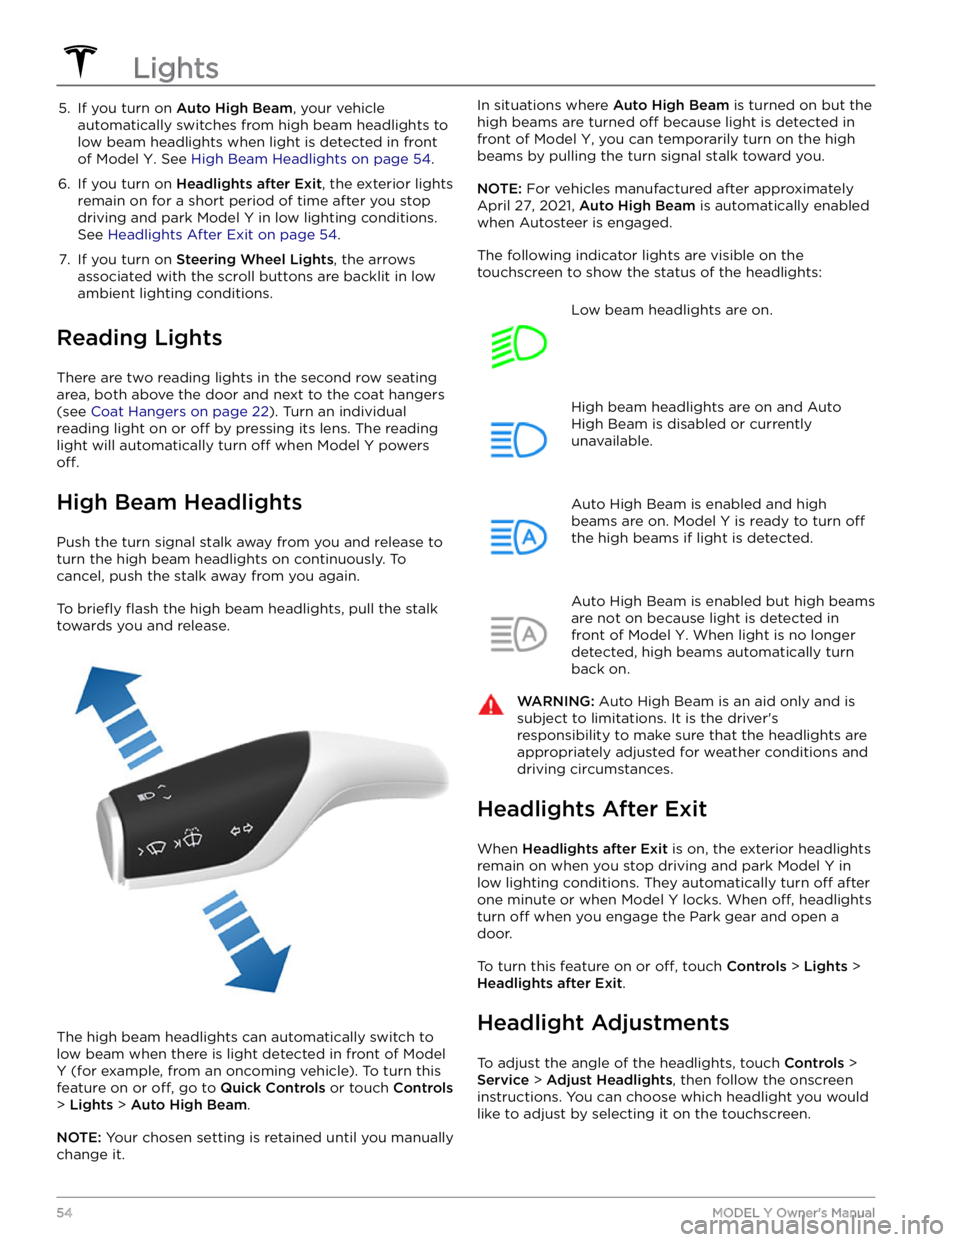
High Beam Headlights
Push the turn signal stalk away from you and release to turn the high beam headlights on continuously. To cancel, push the stalk away from you again.
To briefly flash the high beam headlights, pull the stalk
towards you and release.
The high beam headlights can automatically switch to low beam when there is light detected in front of
Model
Y (for example, from an oncoming vehicle). To turn this
feature on or
off, go to Quick Controls or touch Controls
> Lights > Auto High Beam.
NOTE: Your chosen setting is retained until you manually
change it.
In situations where Auto High Beam is turned on but the
high beams are turned
off because light is detected in
front of
Model Y, you can temporarily turn on the high
beams by pulling the turn signal stalk toward you.
NOTE: For vehicles manufactured after approximately
April 27, 2021,
Auto High Beam is automatically enabled
when Autosteer is engaged.
The following indicator lights are visible on the touchscreen to show the status of the headlights:
Low beam headlights are on.High beam headlights are on and Auto
High Beam is disabled or currently
unavailable.Auto High Beam is enabled and high
beams are on.
Model Y is ready to turn off
the high beams if light is detected.
Auto High Beam is enabled but high beams
are not on because light is detected in front of
Model Y. When light is no longer
detected, high beams automatically turn
back on.
WARNING: Auto High Beam is an aid only and is
subject to limitations. It is the driver
Page 57 of 250
NOTE: Headlights do not require adjustments when
temporarily driving into a region where the
traffic
direction is different (for example, driving in right-hand
traffic region, and then driving into a region with left-
hand
traffic).
WARNING: Proceed with caution when adjusting
headlights. Tesla has carefully calibrated the
position of the headlights to be in an optimum
position for most driving scenarios. Tesla
recommends that you do not adjust headlights
unless you are familiar with how headlights should
be adjusted. Once adjusted, you will be unable to
automatically restore them to their originally
calibrated position. Contact Tesla for assistance
when adjusting headlights.
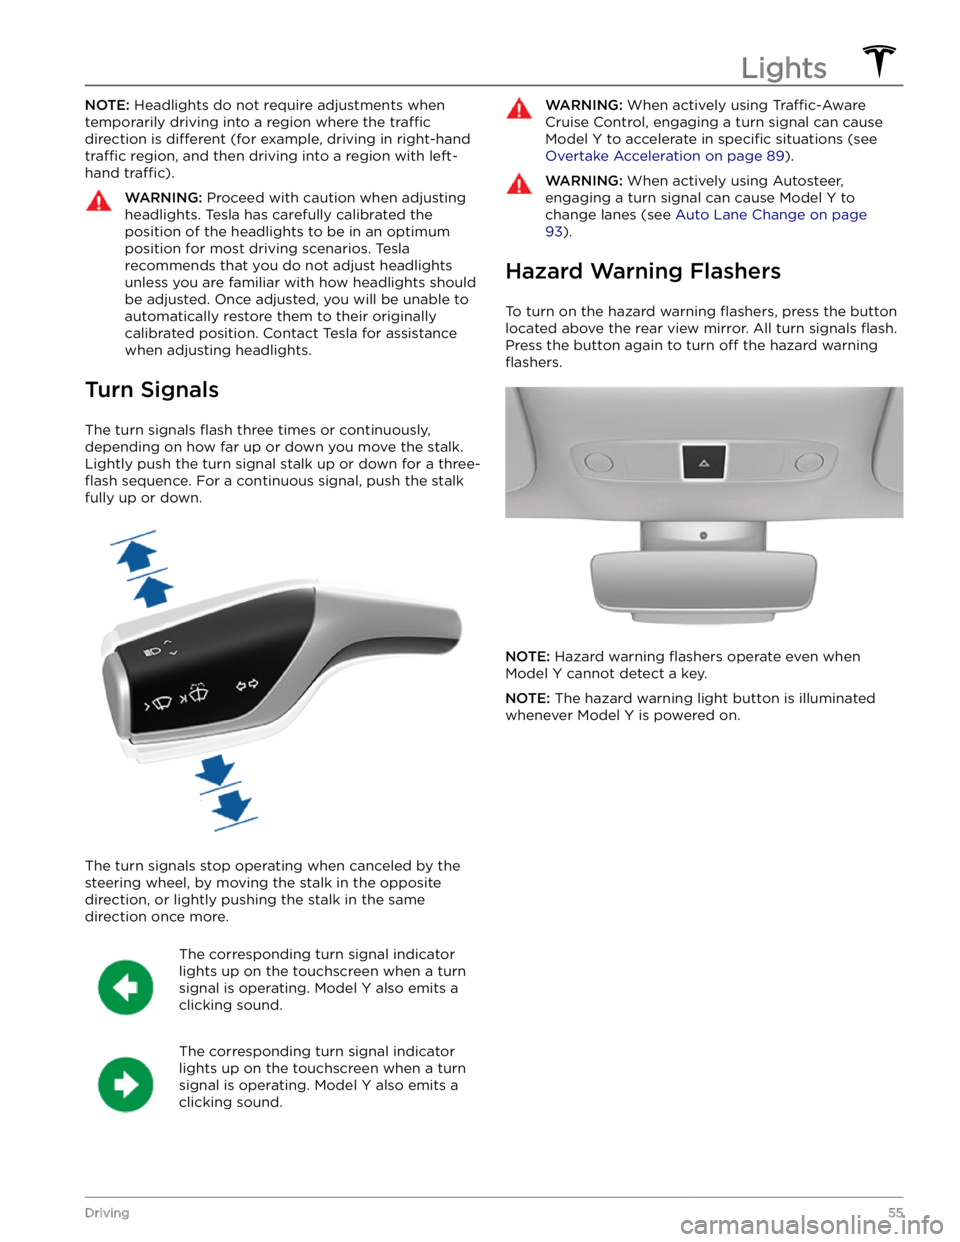
Turn Signals
The turn signals flash three times or continuously,
depending on how far up or down you move the stalk.
Lightly push the turn signal stalk up or down for a
three-
flash sequence. For a continuous signal, push the stalk
fully up or down.
The turn signals stop operating when canceled by the steering wheel, by moving the stalk in the opposite direction, or lightly pushing the stalk in the same
direction once more.
The corresponding turn signal indicator
lights up on the touchscreen when a turn
signal is operating.
Model Y also emits a
clicking sound.
The corresponding turn signal indicator
lights up on the touchscreen when a turn
signal is operating.
Model Y also emits a
clicking sound.
WARNING: When actively using Traffic-Aware
Cruise Control, engaging a turn signal can cause
Model Y to accelerate in specific situations (see
Overtake Acceleration on page 89).
WARNING: When actively using Autosteer,
engaging a turn signal can cause Model Y to
change lanes (see Auto Lane Change on page
93).
Hazard Warning Flashers
To turn on the hazard warning flashers, press the button
located above the rear view mirror. All turn signals
flash.
Press the button again to turn off the hazard warning
flashers.
NOTE: Hazard warning flashers operate even when
Model Y cannot detect a key.
NOTE: The hazard warning light button is illuminated
whenever
Model Y is powered on.
Lights
55Driving
Page 61 of 250
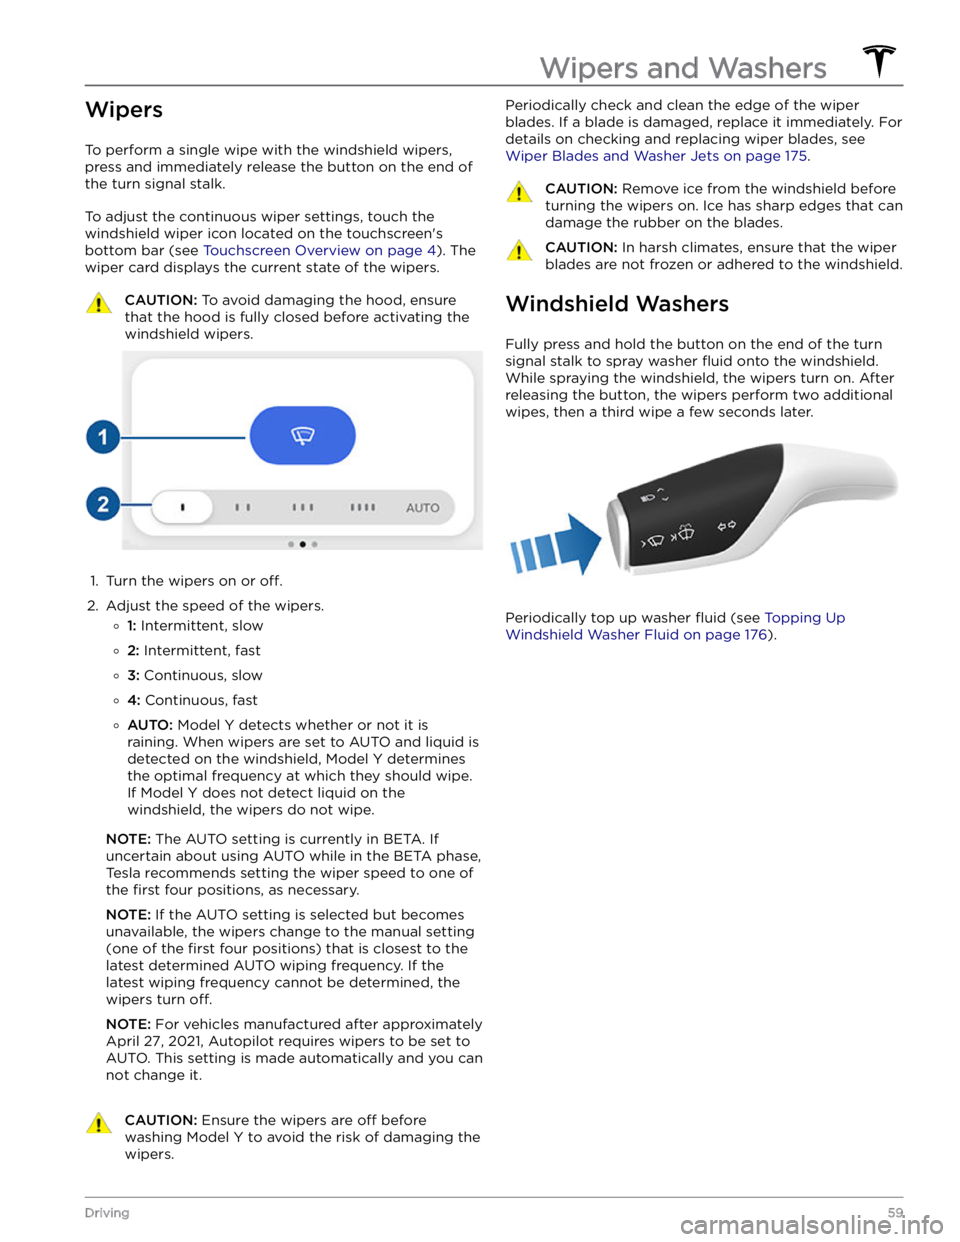
Wipers
To perform a single wipe with the windshield wipers,
press and immediately release the button on the end of the turn signal stalk.
To adjust the continuous wiper settings, touch the windshield wiper icon located on the touchscreen
Page 80 of 250
NOTE: When testing chocks, ensure that Vehicle Hold
(see
Vehicle Hold on page 66) is not engaged. If
Vehicle Hold is braking
Model Y, the Vehicle Hold
indicator light displays on the touchscreen. To
disengage Vehicle Hold, press and release the brake
pedal.
4.
Place the vehicle in Park.
WARNING: If parking on a grade is necessary,
always ensure that all trailer wheels have been
securely chocked. Failure to do so can result in
serious damage or injury.
Trailer Sway Mitigation
When trailer sway is detected, the electronic stability control system attempts to apply the appropriate amount of braking to minimize trailer sway. The touchscreen
briefly displays the traction control system
indicator. Pressing the brake pedal when the system is actively braking to mitigate trailer sway does not cancel this automatic braking.
Attaching and Removing the Ball
Mount
The Model Y towing package does not include a ball
mount. You must purchase a ball mount suitable for the type of trailer you are towing. The
Model Y hitch receiver
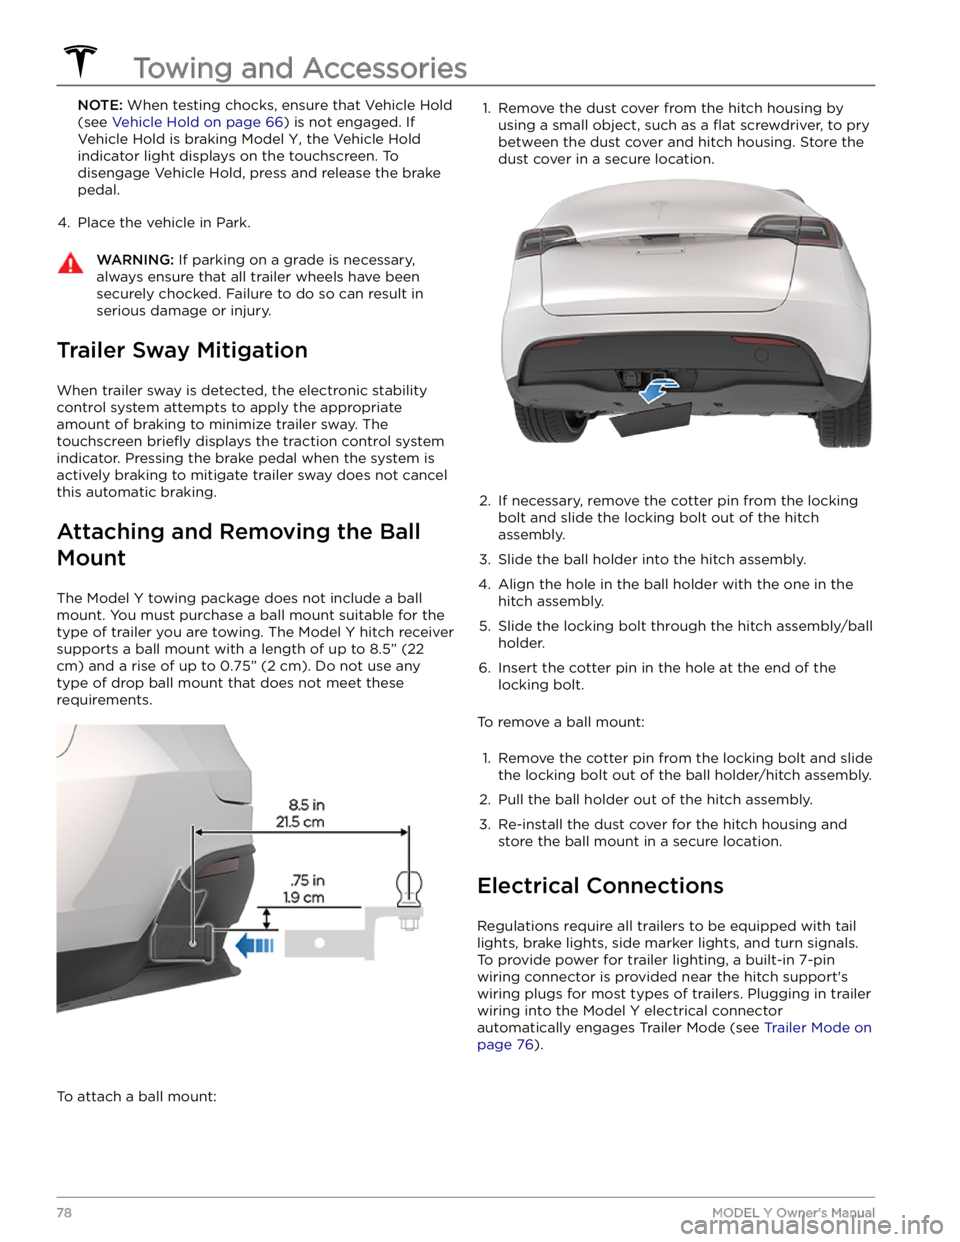
supports a ball mount with a length of up to
8.5” (22
cm) and a rise of up to 0.75” (2 cm). Do not use any
type of drop ball mount that does not meet these requirements.
To attach a ball mount:
1. Remove the dust cover from the hitch housing by
using a small object, such as a
flat screwdriver, to pry
between the dust cover and hitch housing. Store the dust cover in a secure location.
2.
If necessary, remove the cotter pin from the locking
bolt and slide the locking bolt out of the hitch assembly.
3.
Slide the ball holder into the hitch assembly.
4.
Align the hole in the ball holder with the one in the hitch assembly.
5.
Slide the locking bolt through the hitch assembly/ball holder.
6.
Insert the cotter pin in the hole at the end of the
locking bolt.
To remove a ball mount:
1.
Remove the cotter pin from the locking bolt and slide
the locking bolt out of the ball holder/hitch assembly.
2.
Pull the ball holder out of the hitch assembly.
3.
Re-install the dust cover for the hitch housing and store the ball mount in a secure location.
Electrical Connections
Regulations require all trailers to be equipped with tail lights, brake lights, side marker lights, and turn signals.
To provide power for trailer lighting, a built-in 7-pin wiring connector is provided near the hitch support
Page 81 of 250
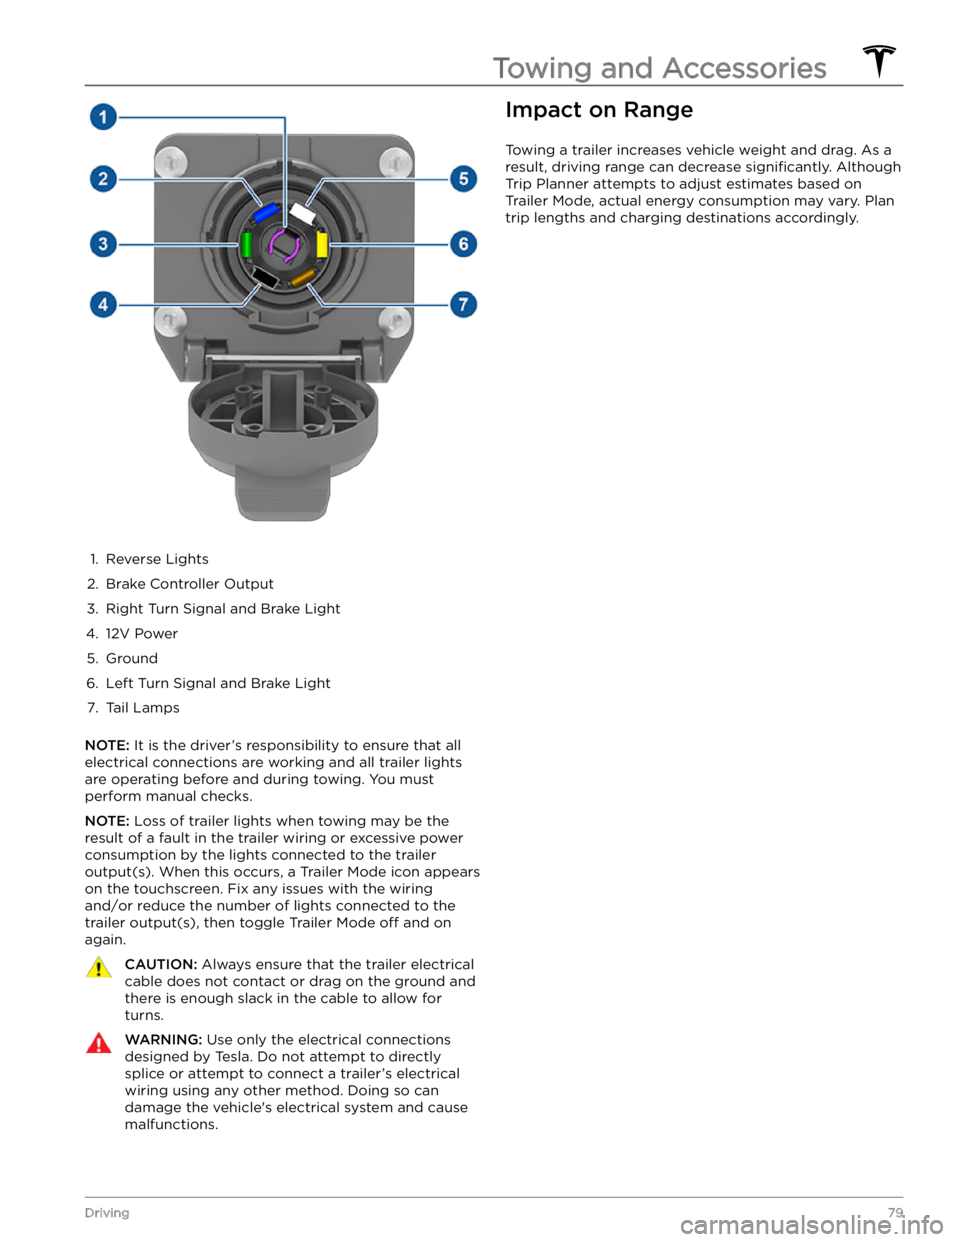
1.
Reverse Lights
2.
Brake Controller Output
3.
Right Turn Signal and Brake Light
4.
12V Power
5.
Ground
6.
Left Turn Signal and Brake Light
7.
Tail Lamps
NOTE: It is the driver
Page 93 of 250
NOTE: Depending on market region, vehicle
configuration, options purchased, and software version,
your vehicle may not be equipped with Autosteer, or the
feature may not operate exactly as described.
NOTE: Autosteer is a BETA feature.
Autosteer builds upon Traffic-Aware Cruise Control (see
Traffic-Aware Cruise Control on page 86), intelligently
keeping
Model Y in its driving lane when cruising at a set
speed.
Autosteer also allows you to use the turn signals
to move Model Y into an adjacent lane (see Auto Lane
Change on page 93). Autosteer detects lane markings
and the presence of vehicles and objects to
steer Model
Y.
NOTE: To display more details about the roadway and its
surroundings, such as road markings, stop lights, objects (such as trash cans and poles), etc., touch
Controls >
Autopilot > Full Self-Driving Visualization Preview (if
equipped).
CAUTION: Ensure all cameras and sensors are
clean. Dirty cameras and sensors, as well as
environmental conditions such as rain and faded
lane markings, affect performance.
WARNING: Autosteer is a hands-on feature. You
must keep your hands on the steering wheel at all
times.
WARNING: Autosteer is intended for use on
highways and limited-access roads with a fully
attentive driver. When using Autosteer, hold the
steering wheel and be mindful of road conditions
and surrounding traffic. Do not use Autosteer on
city streets, in construction zones, or in areas
where bicyclists or pedestrians may be present.
Never depend on Autosteer to determine an
appropriate driving path. Always be prepared to
take immediate action. Failure to follow these
instructions could cause damage, serious injury or
death.
Operating Autosteer
Before you can operate Autosteer, you must enable it by touching
Controls > Autopilot > Autosteer (Beta).
To indicate that Autosteer is available (but
not actively steering
Model Y), the
touchscreen displays a gray Autosteer
icon .
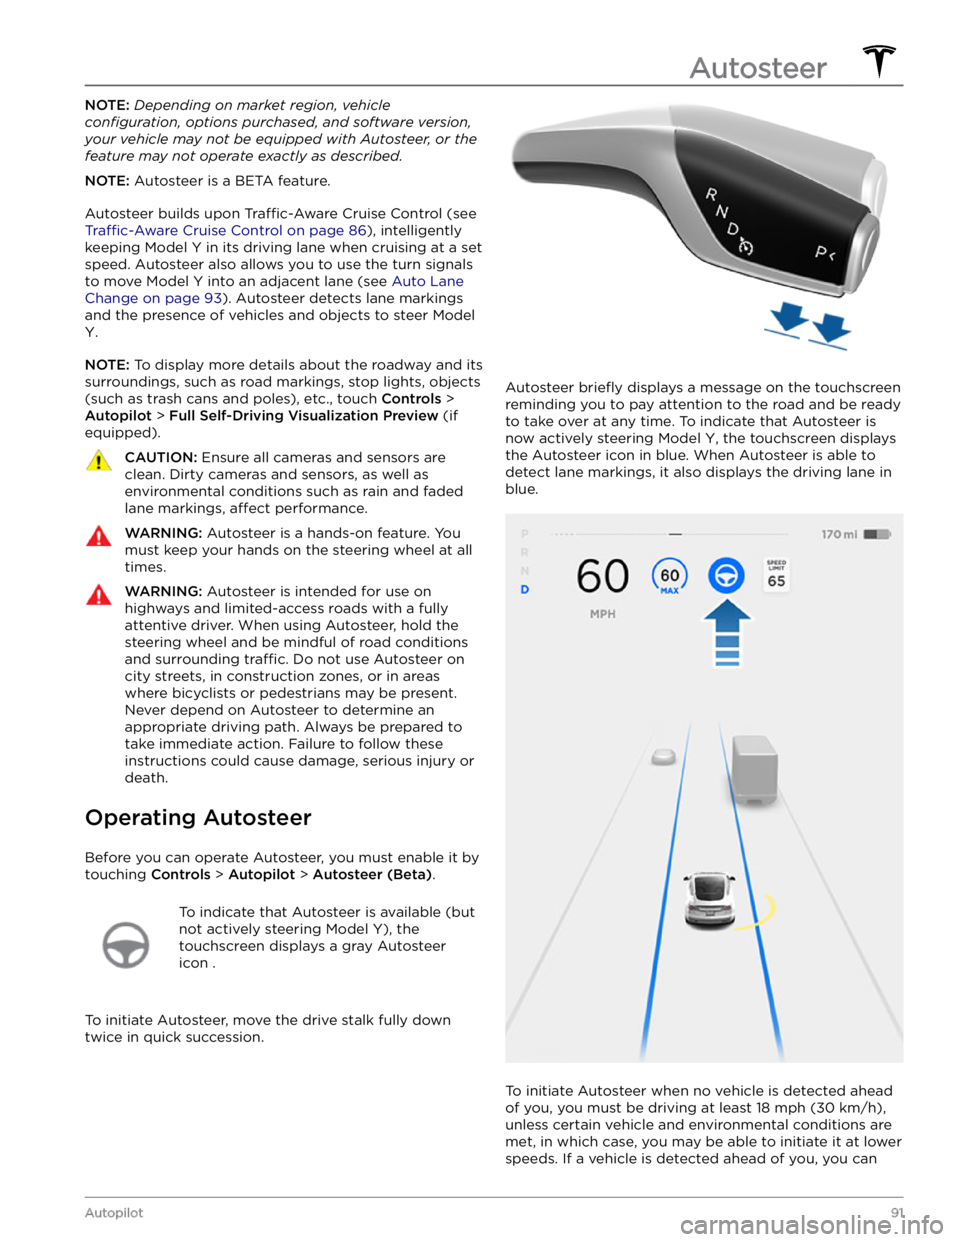
To initiate Autosteer, move the drive stalk fully down
twice in quick succession.
Autosteer briefly displays a message on the touchscreen
reminding you to pay attention to the road and be ready
to take over at any time. To indicate that Autosteer is
now actively steering
Model Y, the touchscreen displays
the Autosteer icon in blue. When Autosteer is able to detect lane markings, it also displays the driving lane in blue.
To initiate Autosteer when no vehicle is detected ahead
of you, you must be driving at least
18 mph (30 km/h),
unless certain vehicle and environmental conditions are met, in which case, you may be able to initiate it at lower speeds. If a vehicle is detected ahead of you, you can
Autosteer
91Autopilot
Page 99 of 250
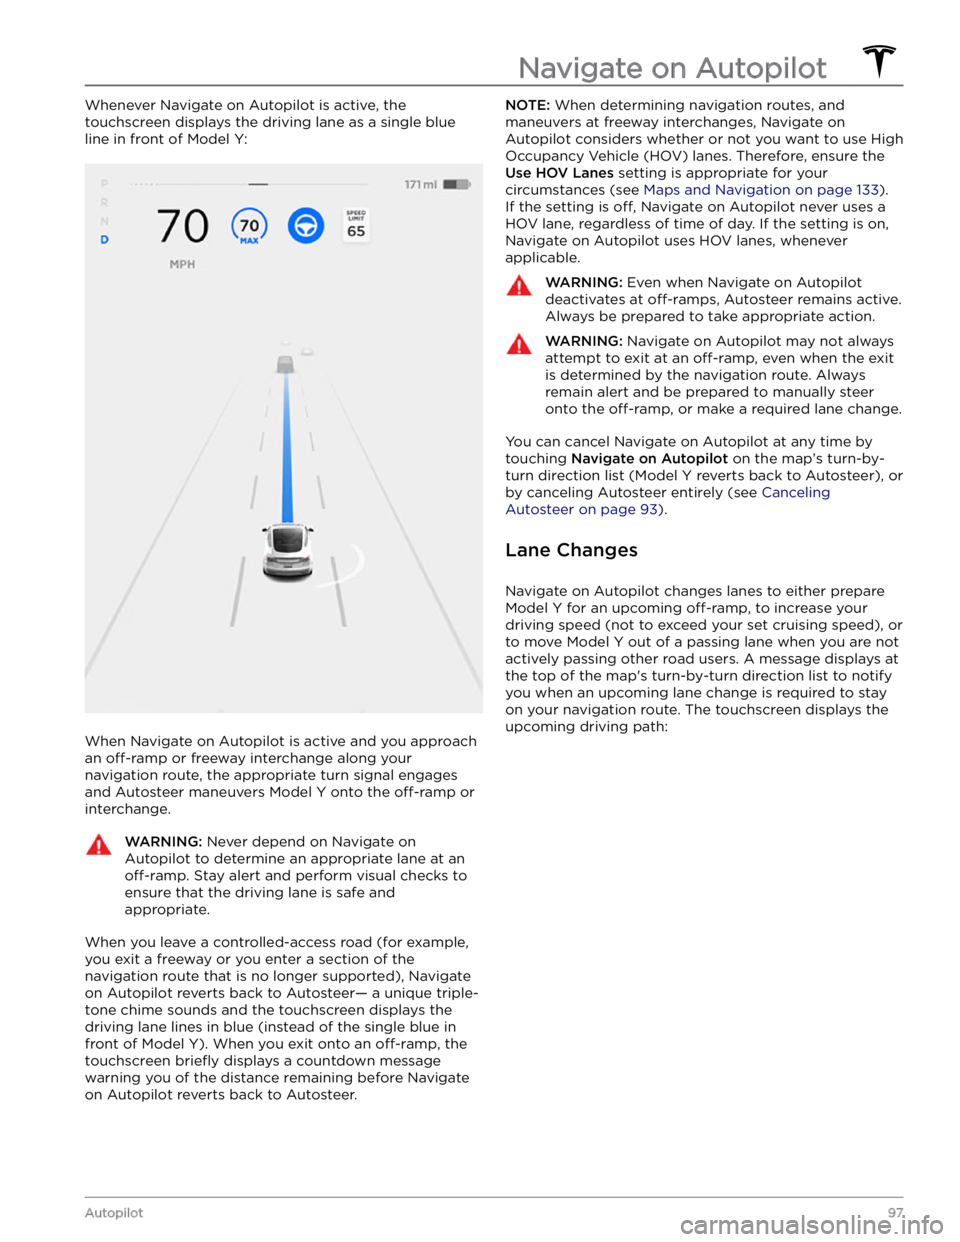
Whenever Navigate on Autopilot is active, the
touchscreen displays the driving lane as a single blue
line in front of
Model Y:
When Navigate on Autopilot is active and you approach an
off-ramp or freeway interchange along your
navigation route, the appropriate turn signal engages and Autosteer maneuvers
Model Y onto the off-ramp or
interchange.
WARNING: Never depend on Navigate on
Autopilot to determine an appropriate lane at an
off-ramp. Stay alert and perform visual checks to
ensure that the driving lane is safe and
appropriate.
When you leave a controlled-access road (for example, you exit a freeway or you enter a section of the navigation route that is no longer supported), Navigate on Autopilot reverts back to Autosteer
Page 100 of 250
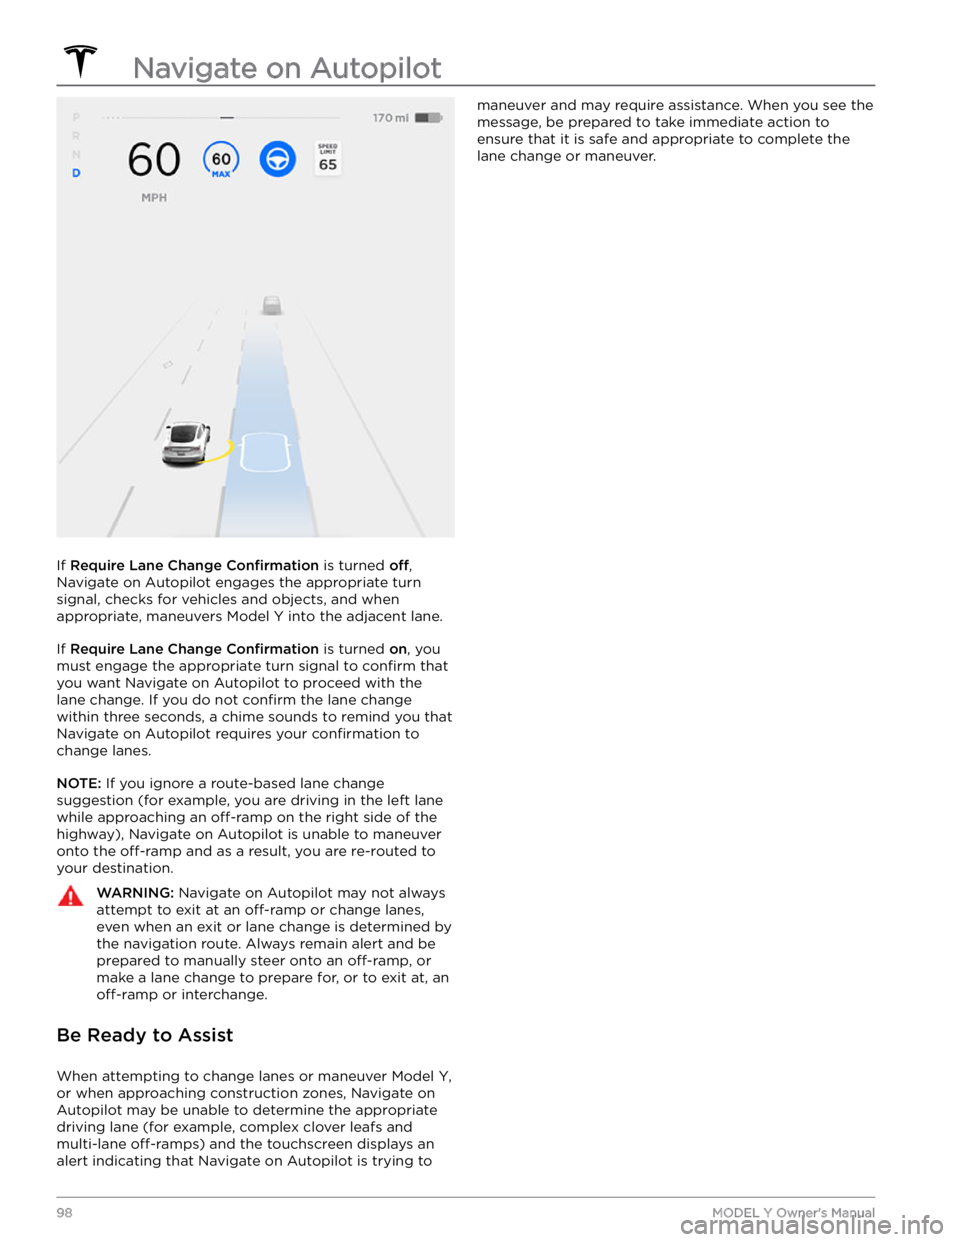
If Require Lane Change Confirmation is turned off,
Navigate on Autopilot engages the appropriate turn signal, checks for vehicles and objects, and when appropriate, maneuvers
Model Y into the adjacent lane.
If Require Lane Change Confirmation is turned on, you
must
engage the appropriate turn signal to confirm that
you want Navigate on Autopilot to proceed with the lane change. If you do not
confirm the lane change
within three seconds, a chime sounds to remind you that Navigate on Autopilot requires your
confirmation to
change lanes.
NOTE: If you ignore a route-based lane change
suggestion (for example, you are driving in the left lane while approaching an
off-ramp on the right side of the
highway), Navigate on Autopilot is unable to maneuver onto the
off-ramp and as a result, you are re-routed to
your destination.
WARNING: Navigate on Autopilot may not always
attempt to exit at an off-ramp or change lanes,
even when an exit or lane change is determined by
the navigation route. Always remain alert and be
prepared to manually steer onto an off-ramp, or
make a lane change to prepare for, or to exit at, an
off-ramp or interchange.
Be Ready to Assist
When attempting to change lanes or maneuver Model Y,
or when approaching construction zones, Navigate on Autopilot may be unable to determine the appropriate driving lane (for example, complex clover leafs and
multi-lane
off-ramps) and the touchscreen displays an
alert indicating that Navigate on Autopilot is trying to
maneuver and may require assistance. When you see the
message, be prepared to take immediate action to ensure that it is safe and appropriate to complete the lane change or maneuver.
Navigate on Autopilot
98MODEL Y Owner
Page 105 of 250
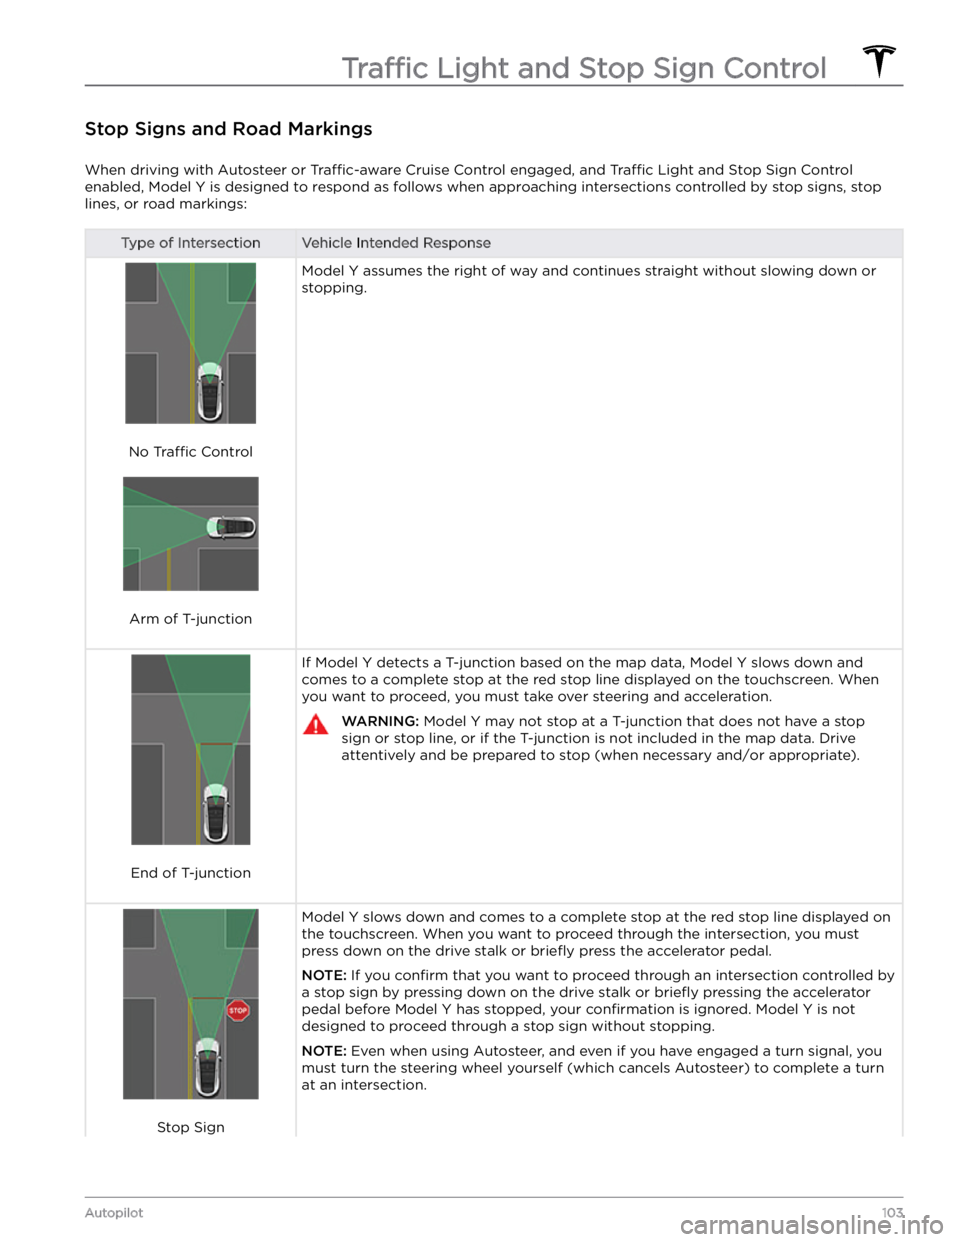
Stop Signs and Road Markings
When driving with Autosteer or Traffic-aware Cruise Control engaged, and Traffic Light and Stop Sign Control
enabled,
Model Y is designed to respond as follows when approaching intersections controlled by stop signs, stop
lines, or road markings:
Type of IntersectionVehicle Intended Response
No Traffic Control
Arm of T-junction
Model Y assumes the right of way and continues straight without slowing down or
stopping.
End of T-junction
If Model Y detects a T-junction based on the map data, Model Y slows down and
comes to a complete stop at the red stop line displayed on the
touchscreen. When
you want to proceed, you must take over steering and acceleration.
WARNING: Model Y may not stop at a T-junction that does not have a stop
sign or stop line, or if the T-junction is not included in the map data. Drive
attentively and be prepared to stop (when necessary and/or appropriate).
Stop Sign
Model Y slows down and comes to a complete stop at the red stop line displayed on
the
touchscreen. When you want to proceed through the intersection, you must
press down on the drive stalk or briefly press the accelerator pedal.
NOTE: If you confirm that you want to proceed through an intersection controlled by
a stop sign by
pressing down on the drive stalk or briefly pressing the accelerator
pedal before
Model Y has stopped, your confirmation is ignored. Model Y is not
designed to proceed through a stop sign without stopping.
NOTE: Even when using Autosteer, and even if you have engaged a turn signal, you
must turn the
steering wheel yourself (which cancels Autosteer) to complete a turn
at an intersection.
Traffic Light and Stop Sign Control
103Autopilot