screen TESLA MODEL Y 2023 User Guide
[x] Cancel search | Manufacturer: TESLA, Model Year: 2023, Model line: MODEL Y, Model: TESLA MODEL Y 2023Pages: 298, PDF Size: 10.28 MB
Page 26 of 298
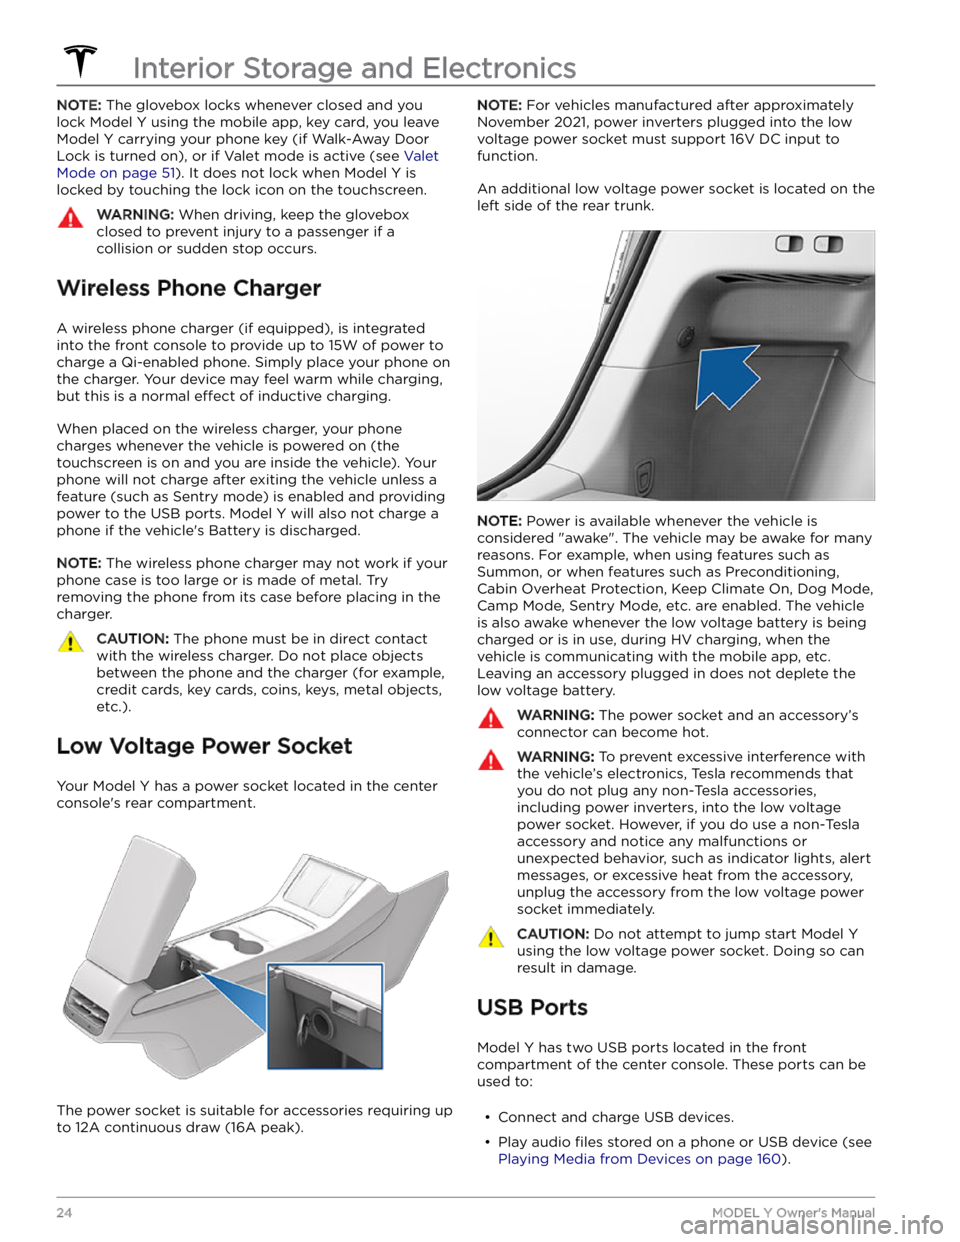
NOTE: The glovebox locks whenever closed and you
lock
Model Y using the mobile app, key card, you leave
Model Y carrying your phone key (if Walk-Away Door
Lock is turned on), or if Valet mode is active (see
Valet
Mode on page 51). It does not lock when Model Y is
locked by touching the lock icon on the touchscreen.
WARNING: When driving, keep the glovebox
closed to prevent injury to a passenger if a
collision or sudden stop occurs.
Wireless Phone Charger
A wireless phone charger (if equipped), is integrated
into the front console to provide up to 15W of power to charge a Qi-enabled phone. Simply place your phone on
the charger. Your device may feel warm while charging, but this is a normal
effect of inductive charging.
When placed on the wireless charger, your phone
charges whenever the vehicle is powered on (the
touchscreen is on and you are inside the vehicle). Your
phone will not charge after exiting the vehicle
unless a
feature (such as Sentry mode) is enabled and providing
power to the USB ports. Model Y will also not charge a
phone if the vehicle
Page 30 of 298
WARNING: Riding in a moving vehicle with the
seat back reclined can result in serious injuries in a
collision, as you could slide under the lap belt or
be propelled into the seat belt. Ensure your seat
back is reclined no more than 30 degrees when
the vehicle is moving.
Calibrating Seats
(If equipped) You can calibrate the driver seat. This is useful if you
find your seat range limited or your driver
profile does not automatically adjust the seat for you.
Navigate to
Controls > Service > Driver Seat, Steering &
Mirrors Calibration and follow the instructions on the
touchscreen.
WARNING: Ensure nothing is behind or
underneath the driver seat during calibration.
Failure to do so may cause serious injury.
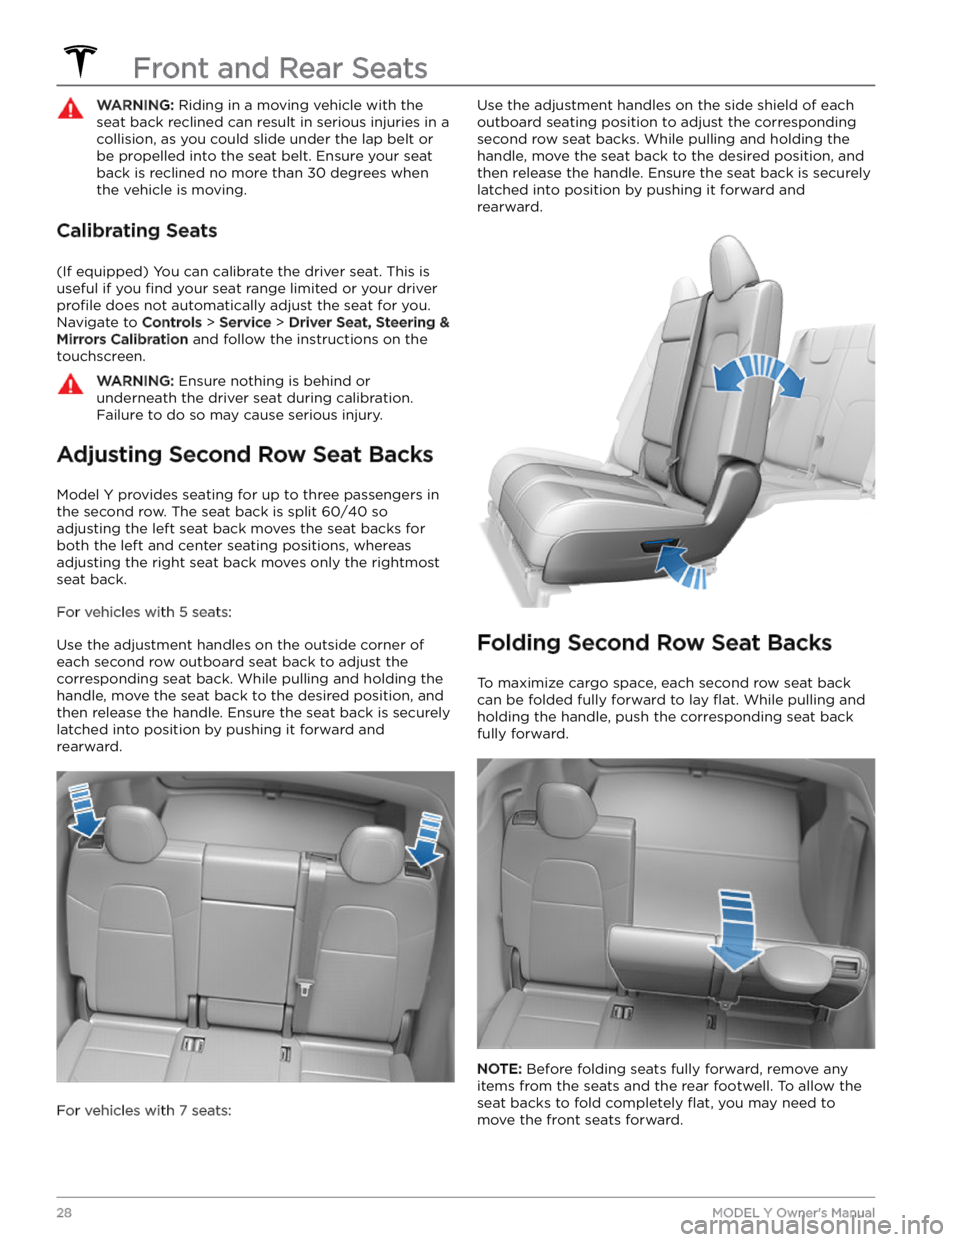
Adjusting Second Row Seat Backs
Model Y provides seating for up to three passengers in
the second row. The seat back is split 60/40 so adjusting the left seat back moves the seat backs for both the left and center seating positions, whereas
adjusting the right seat back moves only the rightmost
seat back.
For vehicles with 5 seats:
Use the adjustment handles on the outside corner of each second row outboard seat back to adjust the corresponding seat back. While pulling and holding the
handle, move the seat back to the desired position, and then release the handle. Ensure the seat back is securely latched into position by pushing it forward and rearward.
For vehicles with 7 seats:
Use the adjustment handles on the side shield of each
outboard seating position to adjust the corresponding second row seat backs. While pulling and holding the
handle, move the seat back to the desired position, and then release the handle. Ensure the seat back is securely latched into position by pushing it forward and rearward.
Folding Second Row Seat Backs
To maximize cargo space, each second row seat back can be folded fully forward to lay
flat. While pulling and
holding the handle, push the corresponding seat back fully forward.
NOTE: Before folding seats fully forward, remove any
items from the seats and the rear footwell. To allow the
seat backs to fold completely
flat, you may need to
move the front seats forward.
Front and Rear Seats
28MODEL Y Owner
Page 32 of 298
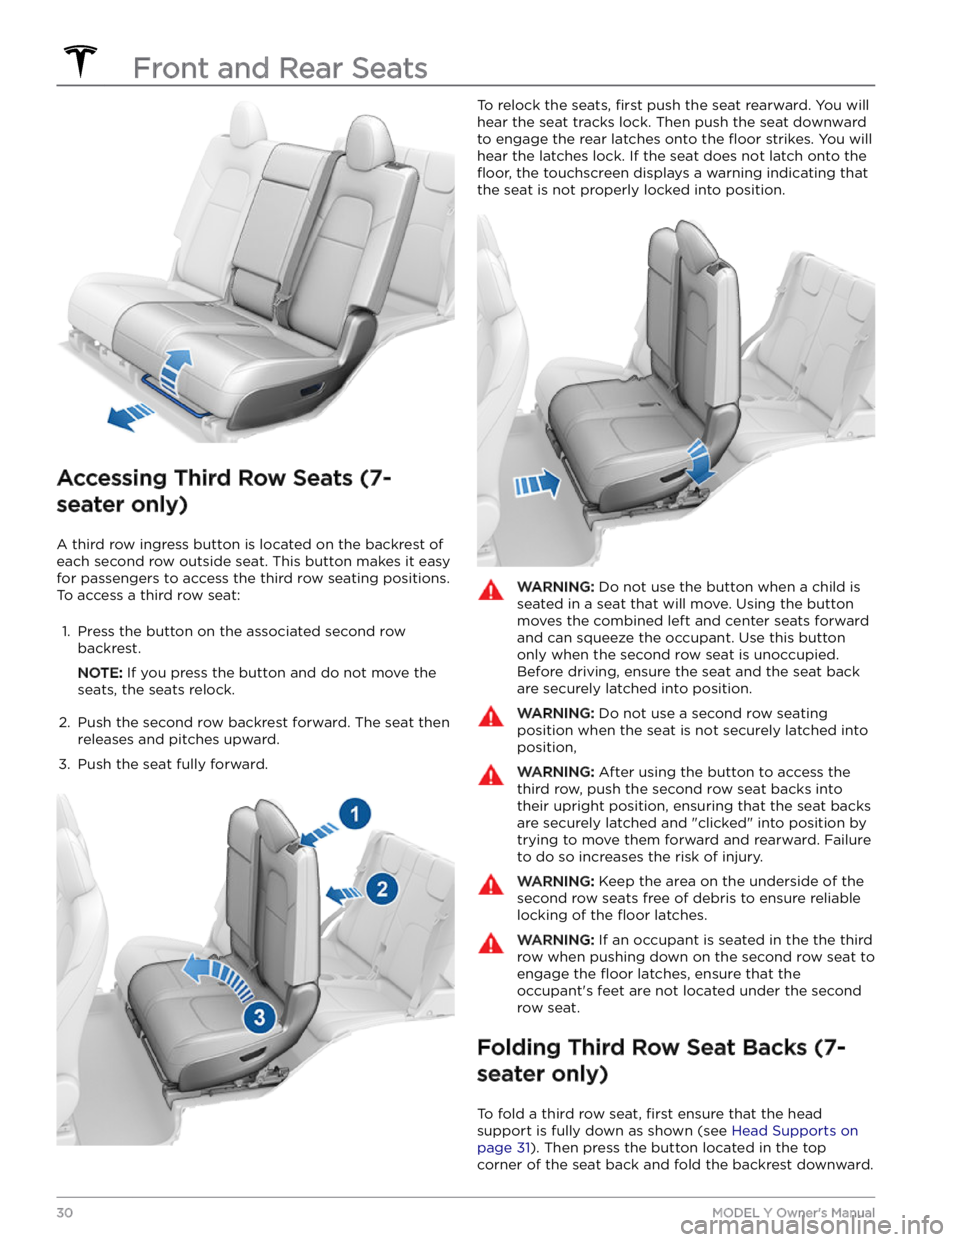
Accessing Third Row Seats (7-
seater only)
A third row ingress button is located on the backrest of each second row outside seat. This button makes it easy for passengers to access the third row seating positions.
To access a third row seat:
1.
Press the button on the associated second row backrest.
NOTE: If you press the button and do not move the
seats, the seats relock.
2.
Push the second row backrest forward. The seat then releases and pitches upward.
3.
Push the seat fully forward.
To relock the seats, first push the seat rearward. You will
hear the seat tracks lock. Then push the seat downward to engage the rear latches onto the
floor strikes. You will
hear the latches lock. If the seat does not latch onto the
floor, the touchscreen displays a warning indicating that
the seat is not properly locked into position.
WARNING: Do not use the button when a child is
seated in a seat that will move. Using the button
moves the combined left and center seats forward
and can squeeze the occupant. Use this button
only when the second row seat is unoccupied.
Before driving, ensure the seat and the seat back
are securely latched into position.
WARNING: Do not use a second row seating
position when the seat is not securely latched into
position,
WARNING: After using the button to access the
third row, push the second row seat backs into
their upright position, ensuring that the seat backs
are securely latched and "clicked" into position by
trying to move them forward and rearward. Failure
to do so increases the risk of injury.
WARNING: Keep the area on the underside of the
second row seats free of debris to ensure reliable
locking of the floor latches.
WARNING: If an occupant is seated in the the third
row when pushing down on the second row seat to
engage the floor latches, ensure that the
occupant
Page 35 of 298

Wearing Seat Belts
Using seat belts and child safety seats is the most
effective way to protect occupants if a collision occurs.
Therefore, wearing a seat belt is required by law in most jurisdictions.
Both the driver and passenger seats are equipped with three-point inertia reel seat belts. Inertia reel belts are automatically tensioned to allow occupants to move
comfortably during normal driving conditions.
To
securely hold child safety seats, all passenger seating
positions are equipped with an automatic locking
retractor (ALR) feature that, by fully extracting the seat
belt (beyond the length needed for a typical adult
occupant), locks the belt into place until the seat belt is
unbuckled.
The seat belt reel automatically locks to prevent
movement of occupants if
Model Y experiences a force
associated with hard acceleration, braking, cornering, or
an impact in a collision.
Seat Belt Reminders
The seat belt reminder on the touchscreen
alerts you if a seat belt for an occupied driver or passenger seat is unbuckled. If all
occupants are buckled up and the
reminder stays on, re-buckle seat belts to
ensure they are correctly latched. Also
remove any heavy objects (such as a
briefcase) from an unoccupied seat. If the
reminder light continues to stay on,
contact Tesla.
You can temporarily disable a seat belt reminder associated with a rear seating position. This is useful when you are carrying an object in a rear seat that
triggers the seat belt reminder alert. To disable the
reminder, touch the associated seat on the seat belt reminder popup message that displays on the touchscreen when a seat belt reminder is active. When a reminder is disabled, the seat belt reminder icon is replaced by a seat icon, for the current drive only. Touch the seat again to re-enable the reminder.
WARNING: Seat belts must be worn by passengers
in all seating positions. Do not disable a seat belt
reminder when the seating position is occupied by
a passenger.
To Fasten a Belt
1.
Ensure correct positioning of the seat (see Correct
Driving Position on page 27).
2.
Draw the belt out smoothly, ensuring the belt lays flat
across the pelvis, chest and mid-point of your collar
bone, between the neck and shoulder.
3. Insert the latch plate into the buckle and press
together until you hear a click indicating it is locked
in place.4.
Pull the belt to check that it is securely fastened.
5.
Pull the diagonal part of the belt toward the reel to
remove excess slack.
To Adjust the Shoulder Anchor
Height
Model Y is equipped with an adjustable shoulder anchor
for each front seat to ensure that the seat belt is positioned correctly. The seat belt should lay
flat across
the mid-point of your collar bone while in the correct driving position
(see Correct Driving Position on page
27). Adjust the height of the shoulder anchor if the seat
belt is not positioned correctly:
1.
Press and hold the button on the shoulder anchor to release the locking mechanism.
2.
While holding the button, move the shoulder anchor up or down, as necessary, to correctly position the seat belt.
3.
Release the button on the shoulder anchor so that it
locks into position.
4.
Without pressing the button, pull on the seat belt webbing and attempt to move the shoulder anchor
downward to check that it is locked into position.
Seat Belts
33Seating and Safety Restraints
Page 47 of 298
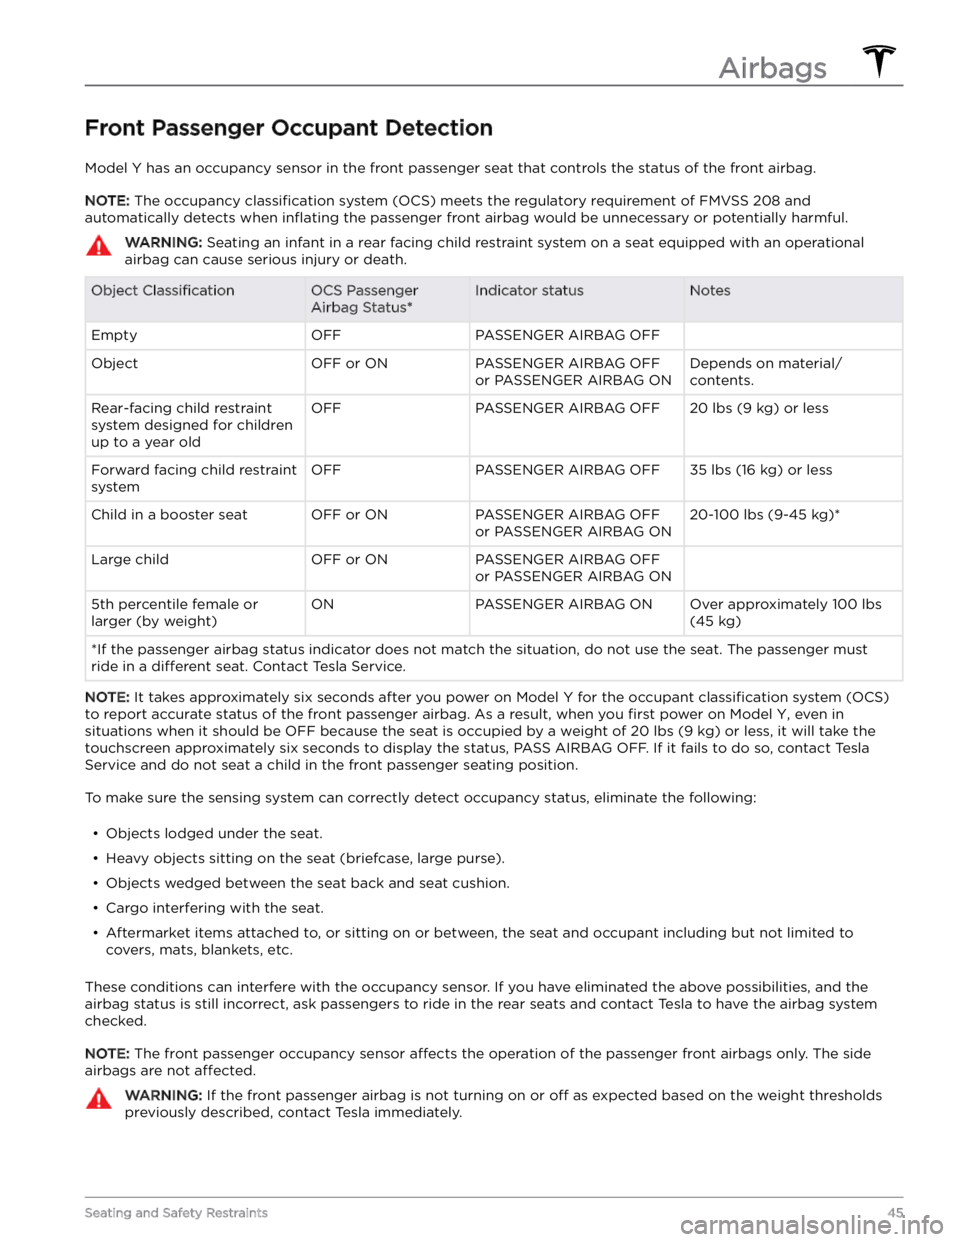
Front Passenger Occupant Detection
Model Y has an occupancy sensor in the front passenger seat that controls the status of the front airbag.
NOTE: The occupancy classification system (OCS) meets the regulatory requirement of FMVSS 208 and
automatically detects when
inflating the passenger front airbag would be unnecessary or potentially harmful.
WARNING: Seating an infant in a rear facing child restraint system on a seat equipped with an operational
airbag can cause serious injury or death.
Object ClassificationOCS Passenger
Airbag Status*Indicator statusNotesEmptyOFFPASSENGER AIRBAG OFF ObjectOFF or ONPASSENGER AIRBAG OFF
or PASSENGER AIRBAG ONDepends on material/
contents.Rear-facing child restraint
system designed for children
up to a year oldOFFPASSENGER AIRBAG OFF20 lbs (9 kg) or lessForward facing child restraint
systemOFFPASSENGER AIRBAG OFF35 lbs (16 kg) or lessChild in a booster seatOFF or ONPASSENGER AIRBAG OFF
or PASSENGER AIRBAG ON20-100 lbs (9-45 kg)*Large childOFF or ONPASSENGER AIRBAG OFF
or PASSENGER AIRBAG ON 5th percentile female or
larger (by weight)ONPASSENGER AIRBAG ONOver approximately 100 lbs
(45 kg)
*If the passenger airbag status indicator does not match the situation, do not use the seat. The passenger must
ride in a
different seat. Contact Tesla Service.
NOTE: It takes approximately six seconds after you power on Model Y for the occupant classification system (OCS)
to report accurate status of the front passenger airbag. As a result, when you
first power on Model Y, even in
situations when it should be OFF because the seat is occupied by a weight of
20 lbs (9 kg) or less, it will take the
touchscreen approximately six seconds to display the status, PASS AIRBAG OFF. If it fails to do so, contact Tesla
Service and do not seat a child in the front passenger seating position.
To make sure the sensing system can correctly detect occupancy status, eliminate the following:
Page 55 of 298

Heated Steering Wheel
To warm up the steering wheel, touch the fan icon on the touchscreen to display climate controls (see
Adjusting Climate Control Settings on page 127), then
touch the steering wheel icon. When on, radiant heat keeps the steering wheel at a comfortable temperature.
NOTE: Depending on date of manufacture, your Model Y
may not be equipped with a heated steering wheel.
Horn
To sound the horn, press and hold the center pad on the
steering wheel.
Steering Wheel
53Driving
Page 57 of 298
Starting
When you open a door to enter Model Y, the
touchscreen powers on and you can operate all controls.
To drive
Model Y:
1.
Press the brake pedal - Model Y powers on and is
ready to drive.
2.
Select a drive mode - move the drive stalk down for
Drive or up for Reverse (see
Shifting on page 56).
NOTE: If the PIN to Drive feature is enabled (see PIN to
Drive on page 138), you must also enter a valid PIN on
the touchscreen before you can drive
Model Y.
Everything you need to know when driving Model Y
displays on the touchscreen.
Drive Disabled - Requires Authentication
If Model Y does not detect a key when you press the
brake (a key fob or phone key is not detected or two
minutes have passed since you used the key card), the touchscreen displays a message telling you that driving requires authentication.
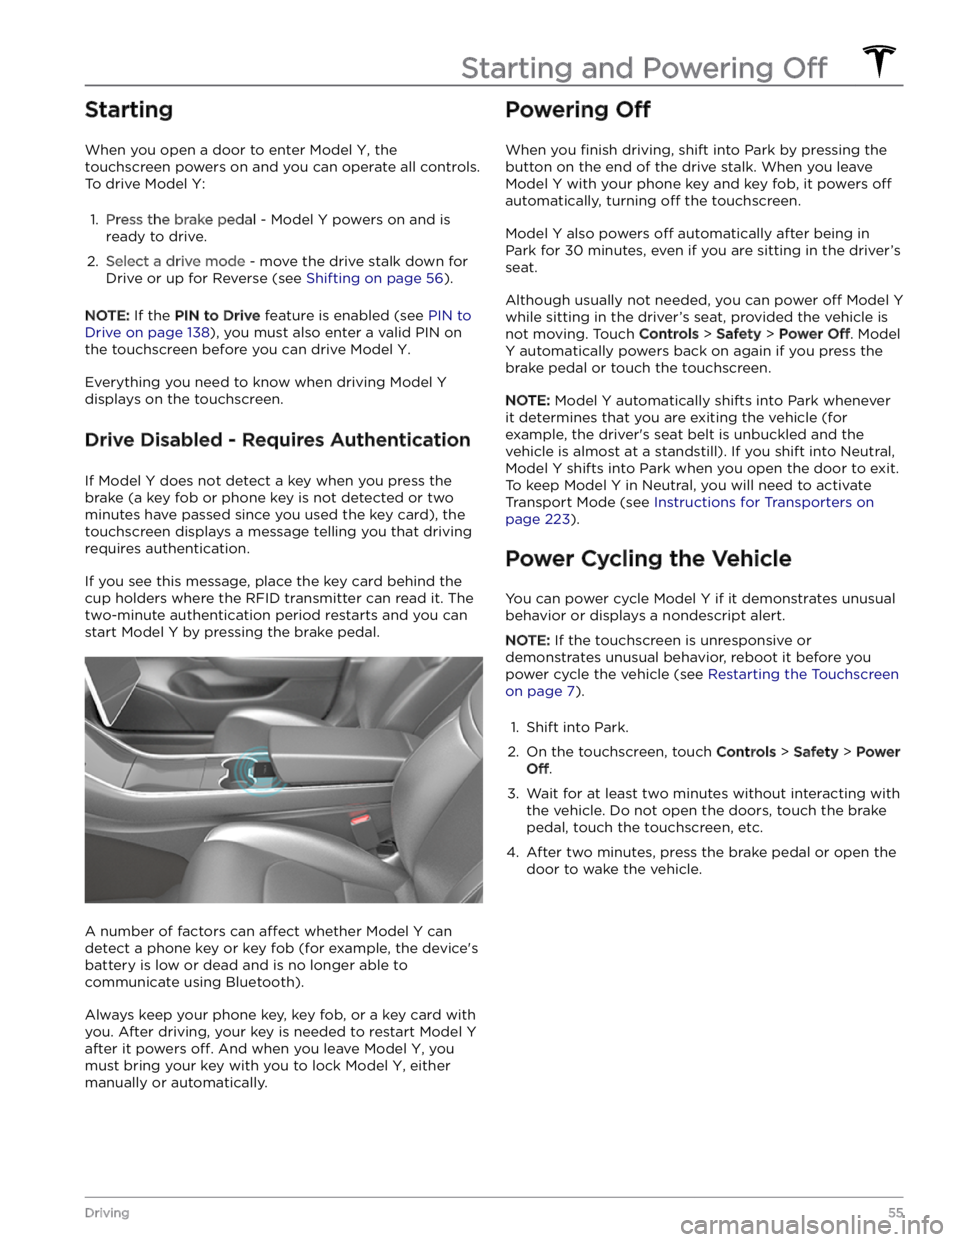
If you see this message, place the key card behind the
cup holders where the RFID transmitter can read it. The
two-minute authentication period restarts and you can start
Model Y by pressing the brake pedal.
A number of factors can affect whether Model Y can
detect a phone key or key fob (for example, the device
Page 60 of 298
Controlling Lights
Touch Controls > Lights on the touchscreen to access all
light controls, both interior and exterior.
You can also pull the turn signal stalk toward you to
display a popup that provides quick access to exterior lights. For example, you can turn the headlights on or
off
continuously (overriding the default Auto High Beam
setting). The lights popup allows you to adjust all
exterior light settings, including parking lights, fog lights
(if equipped), etc. The setting you choose is retained for
the current drive only.
NOTE: If the touchscreen is already displaying the full
Controls screen for lights, pulling the turn signal stalk does not display the quick access popup.
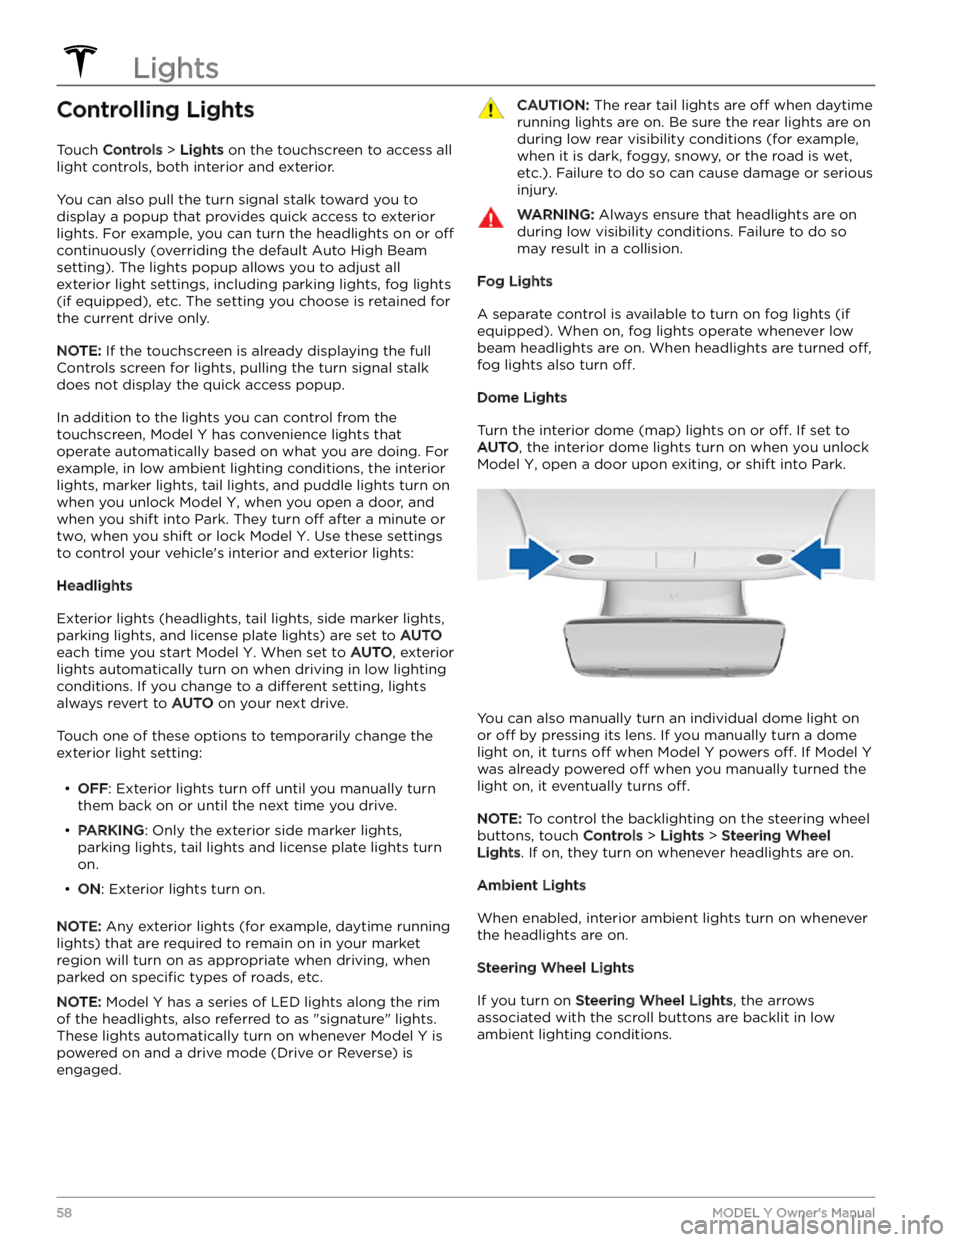
In addition to the lights you can control from the touchscreen,
Model Y has convenience lights that
operate automatically based on what you are doing. For example, in low ambient lighting conditions, the interior lights, marker lights, tail lights, and puddle lights turn on when you unlock
Model Y, when you open a door, and
when you shift into Park. They turn
off after a minute or
two, when you shift or lock
Model Y. Use these settings
to control your vehicle
Page 61 of 298
Reading Lights
There are two reading lights in the second row seating
area, both above the door and next to the coat hangers (see
Coat Hangers on page 26). Turn an individual
reading light on or
off by pressing its lens. The reading
light will automatically turn
off when Model Y powers
off.
High Beam Headlights
By default, Auto High Beam is enabled to allow high
beam headlights to automatically switch to low beam
when there is light detected in front of
Model Y (for
example, from an oncoming vehicle). To control this
feature, touch
Controls > Lights > Auto High Beam or
touch
Auto on the lights popup that displays on the
touchscreen when you pull the turn signal stalk toward
you.
NOTE: Auto High Beam is automatically enabled when
Autosteer is engaged. To switch to low beam headlights, push the turn signal stalk forward and release.
Auto High
Beam is re-enabled every time Autosteer is activated.
In situations where high beam headlights are off (for
example, lights are turned
off, or Auto High Beam is
active and light is detected in front of
Model Y) or you
are driving in daylight, you can temporarily turn on high
beams by pulling the turn signal stalk toward you. When
you release, high beam headlights turn
off (unless of
course, Auto High Beam is engaged and light is not detected in front of you). To
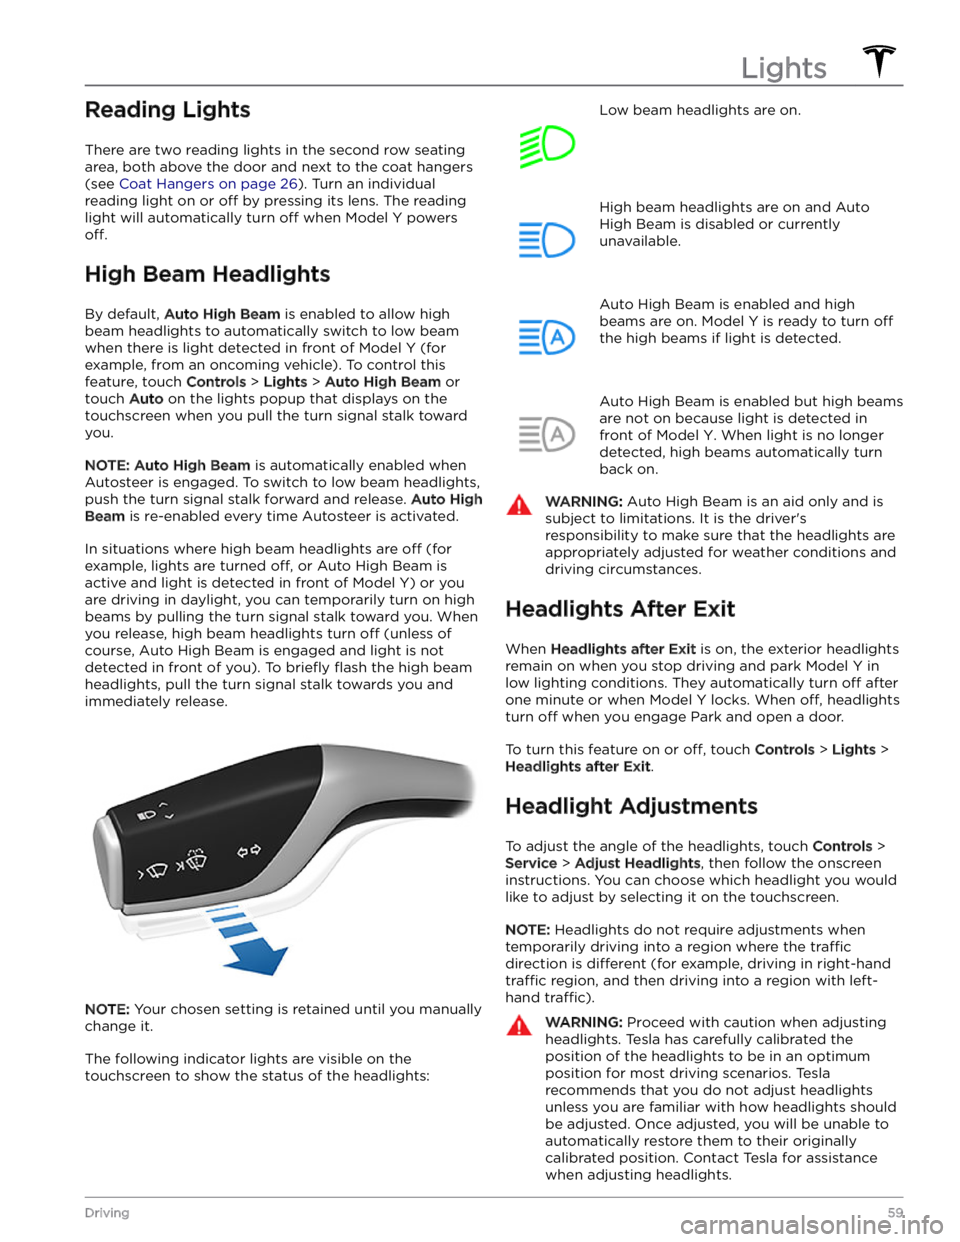
briefly flash the high beam
headlights, pull the turn signal stalk towards you and immediately release.
NOTE: Your chosen setting is retained until you manually
change it.
The following indicator lights are visible on the touchscreen to show the status of the headlights:
Low beam headlights are on.High beam headlights are on and Auto
High Beam is disabled or currently
unavailable.Auto High Beam is enabled and high
beams are on.
Model Y is ready to turn off
the high beams if light is detected.
Auto High Beam is enabled but high beams
are not on because light is detected in front of
Model Y. When light is no longer
detected, high beams automatically turn
back on.
WARNING: Auto High Beam is an aid only and is
subject to limitations. It is the driver
Page 62 of 298
Turn Signals
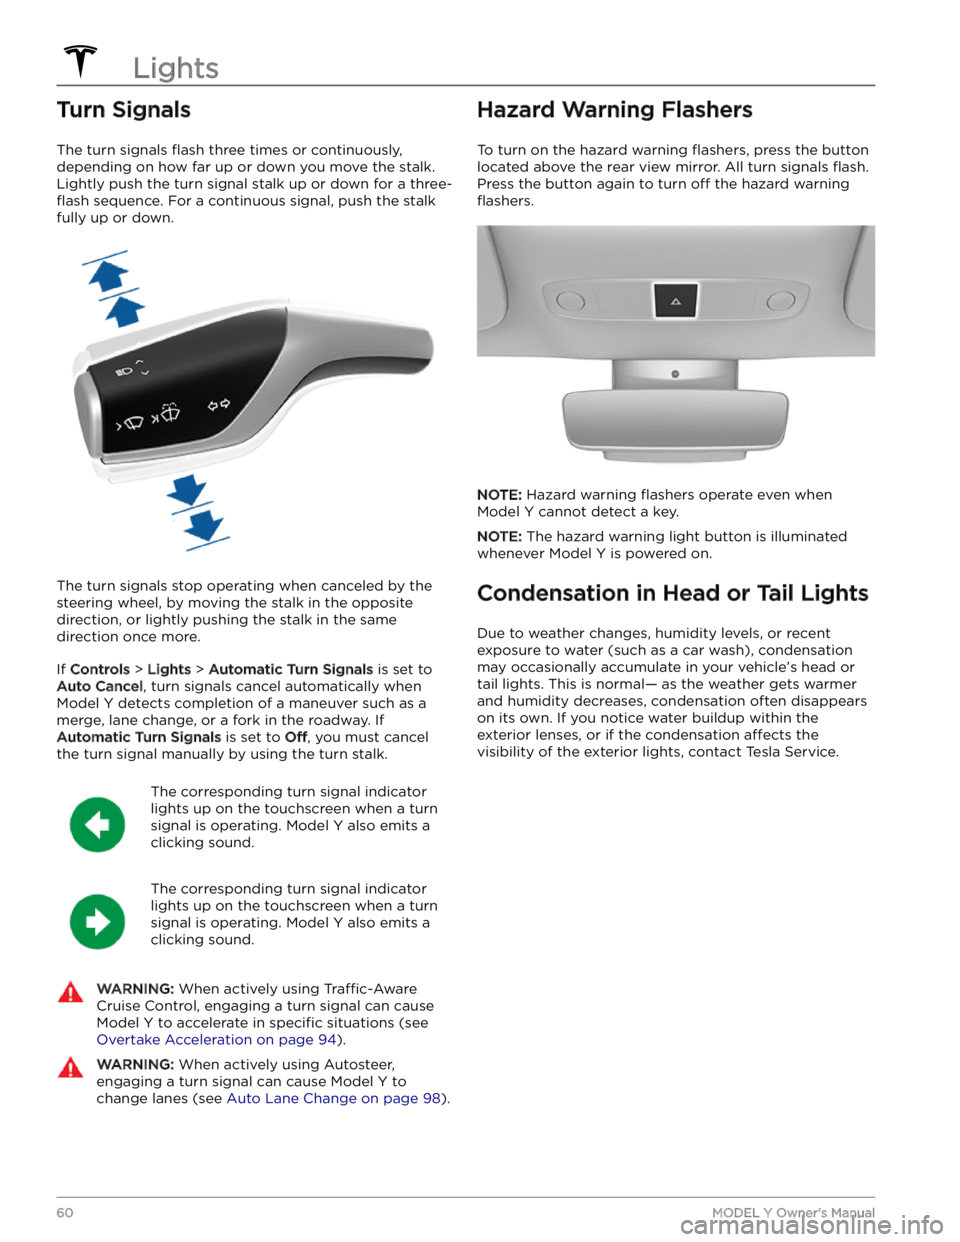
The turn signals flash three times or continuously,
depending on how far up or down you move the stalk.
Lightly push the turn signal stalk up or down for a
three-
flash sequence. For a continuous signal, push the stalk
fully up or down.
The turn signals stop operating when canceled by the steering wheel, by moving the stalk in the opposite direction, or lightly pushing the stalk in the same
direction once more.
If Controls > Lights > Automatic Turn Signals is set to
Auto Cancel, turn signals cancel automatically when
Model Y detects completion of a maneuver such as a
merge, lane change, or a fork in the roadway. If
Automatic Turn Signals is set to Off, you must cancel
the turn signal manually by using the turn stalk.
The corresponding turn signal indicator
lights up on the touchscreen when a turn
signal is operating.
Model Y also emits a
clicking sound.
The corresponding turn signal indicator
lights up on the touchscreen when a turn
signal is operating.
Model Y also emits a
clicking sound.
WARNING: When actively using Traffic-Aware
Cruise Control, engaging a turn signal can cause
Model Y to accelerate in specific situations (see
Overtake Acceleration on page 94).
WARNING: When actively using Autosteer,
engaging a turn signal can cause Model Y to
change lanes (see Auto Lane Change on page 98).
Hazard Warning Flashers
To turn on the hazard warning flashers, press the button
located above the rear view mirror. All turn signals
flash.
Press the button again to turn off the hazard warning
flashers.
NOTE: Hazard warning flashers operate even when
Model Y cannot detect a key.
NOTE: The hazard warning light button is illuminated
whenever
Model Y is powered on.
Condensation in Head or Tail Lights
Due to weather changes, humidity levels, or recent exposure to water (such as a car wash), condensation may occasionally accumulate in your vehicle