lock TESLA MODEL Y 2023 Owners Manual
[x] Cancel search | Manufacturer: TESLA, Model Year: 2023, Model line: MODEL Y, Model: TESLA MODEL Y 2023Pages: 298, PDF Size: 10.28 MB
Page 7 of 298
WARNING: Always pay attention to road and traffic conditions when driving. To minimize driver distraction and
ensure the safety of vehicle occupants as well as other road users, avoid using the touchscreen to adjust
settings while the vehicle is in motion.
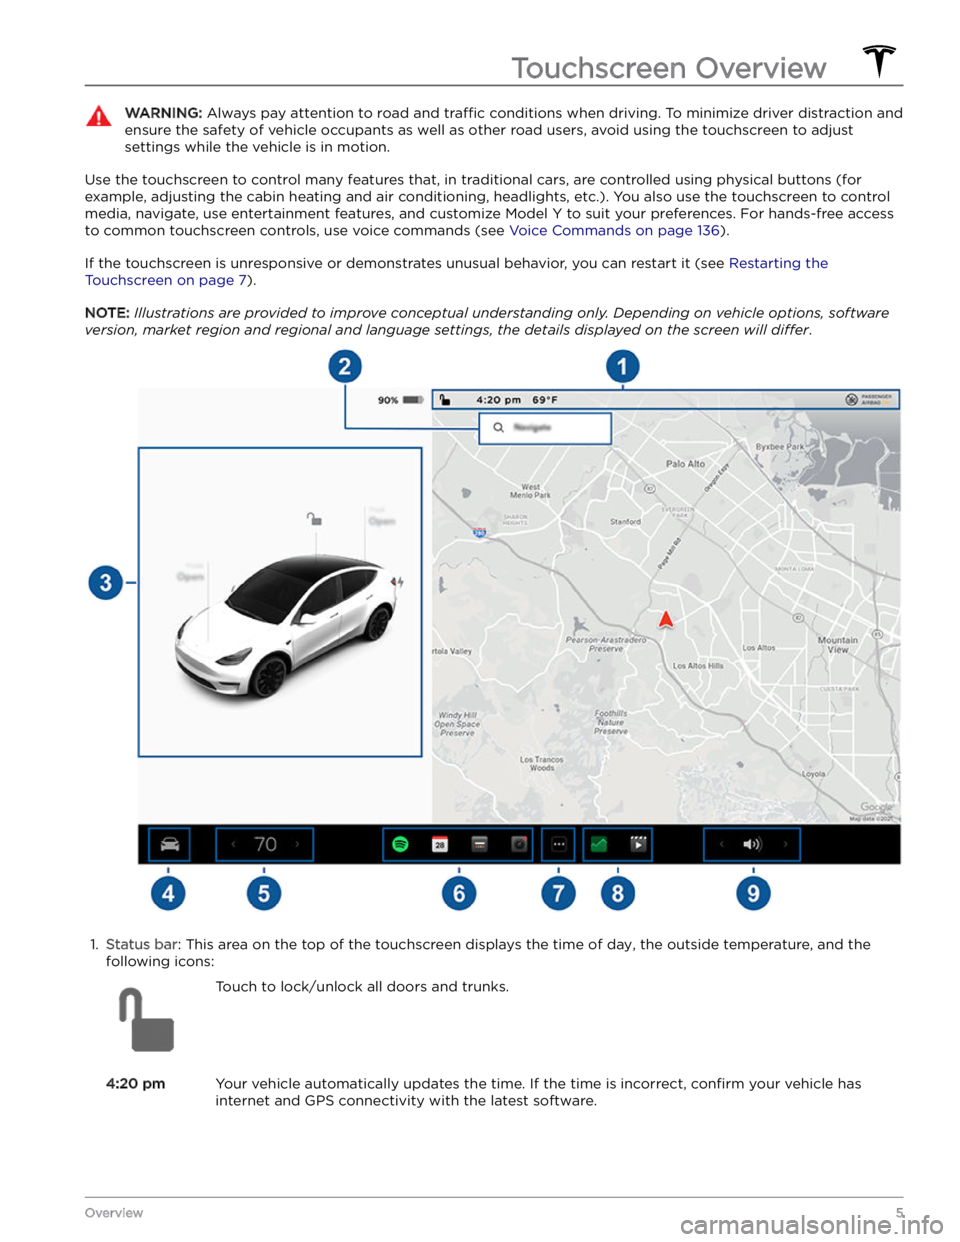
Use the touchscreen to control many features that, in traditional cars, are controlled using physical buttons (for example, adjusting the cabin heating and air conditioning, headlights, etc.). You also use the touchscreen to control
media, navigate, use entertainment features, and customize
Model Y to suit your preferences. For hands-free access
to common touchscreen controls, use voice commands (see
Voice Commands on page 136).
If the touchscreen is unresponsive or demonstrates unusual behavior, you can restart it (see Restarting the
Touchscreen on page 7).
NOTE: Illustrations are provided to improve conceptual understanding only. Depending on vehicle options, software
version, market region and regional and language settings, the details displayed on the screen will differ.
1.
Status bar: This area on the top of the touchscreen displays the time of day, the outside temperature, and the
following icons:
Touch to lock/unlock all doors and trunks.4:20 pmYour vehicle automatically updates the time. If the time is incorrect, confirm your vehicle has
internet and GPS connectivity with the latest software.
Touchscreen Overview
5Overview
Page 13 of 298

To use a key card to unlock or lock Model Y, position the
card as shown and tap it against the card reader located just below the Autopilot camera on the driver
Page 15 of 298

5. Test that the key fob works by unlocking and locking
Model Y.
WARNING: Key fob batteries contain a chemical
burn hazard and should not be ingested. The key
fob contains a coin cell battery. If the coin cell
battery is swallowed, it can cause severe internal
burns within two hours and can lead to death.
Keep new and used batteries away from children. If
the battery compartment does not close securely,
stop using the product and keep it away from
children. If you think batteries might have been
swallowed or placed inside any part of the body,
seek immediate medical attention.
Managing Keys
To display a list of all keys (phone keys, key cards, and key fobs) that can access your
Model Y, touch Controls
> Locks. An icon displays next to each key to indicate
whether the key is a phone key, key card, or key fob. Use
this list to manage keys that have access to your
Model
Y. To add or delete keys, see Adding and Removing Keys
on page 13.
Model Y supports up to 19 keys. When you reach this
limit, you must delete a key before adding a new one.
NOTE: You can use the same key for more than one
Model Y. This prevents you from having to deal with
multiple keys when you switch vehicles. If you customize the name of an authenticated key card or key fob on one
Model Y (by touching the pencil icon), any other Model
Y to which the key card or key fob is authenticated also
displays the changed name.
Adding and Removing Keys
To add a new key card or key fob:
NOTE: When adding a key fob, ensure it is at room
temperature. Pairing a key fob that is very cold can be unsuccessful.
1.
On the touchscreen, touch Controls > Locks > Keys >
Add Key.
2.
Scan your new key card or key fob on the card reader located behind the cup holders on the top of the center console. After the new key card or key fob is recognized, remove it from the card reader.
3.
Scan a key card or key fob that has already been paired to the vehicle to
confirm new key pairing.
4.
When complete, the key list includes the new key.
Touch the associated pencil icon to customize the name of the key.
Removing a key:
When you no longer want a key to access Model Y (for
example, you lost your phone or key card, etc.), follow these steps to remove it.1.
On the touchscreen, touch Controls > Locks.
2.
In the key list, find the key that you would like to
delete and touch its associated trash icon.
3.
When prompted, scan an authenticated key card or key fob on the card reader to
confirm the deletion.
When complete, the key list no longer includes the
deleted key.
NOTE: Model Y requires at least one authenticated key
card or key fob at all times. If only one key card remains on the key list, you cannot delete it.
Keys
13Opening and Closing
Page 16 of 298
Using Exterior Door Handles
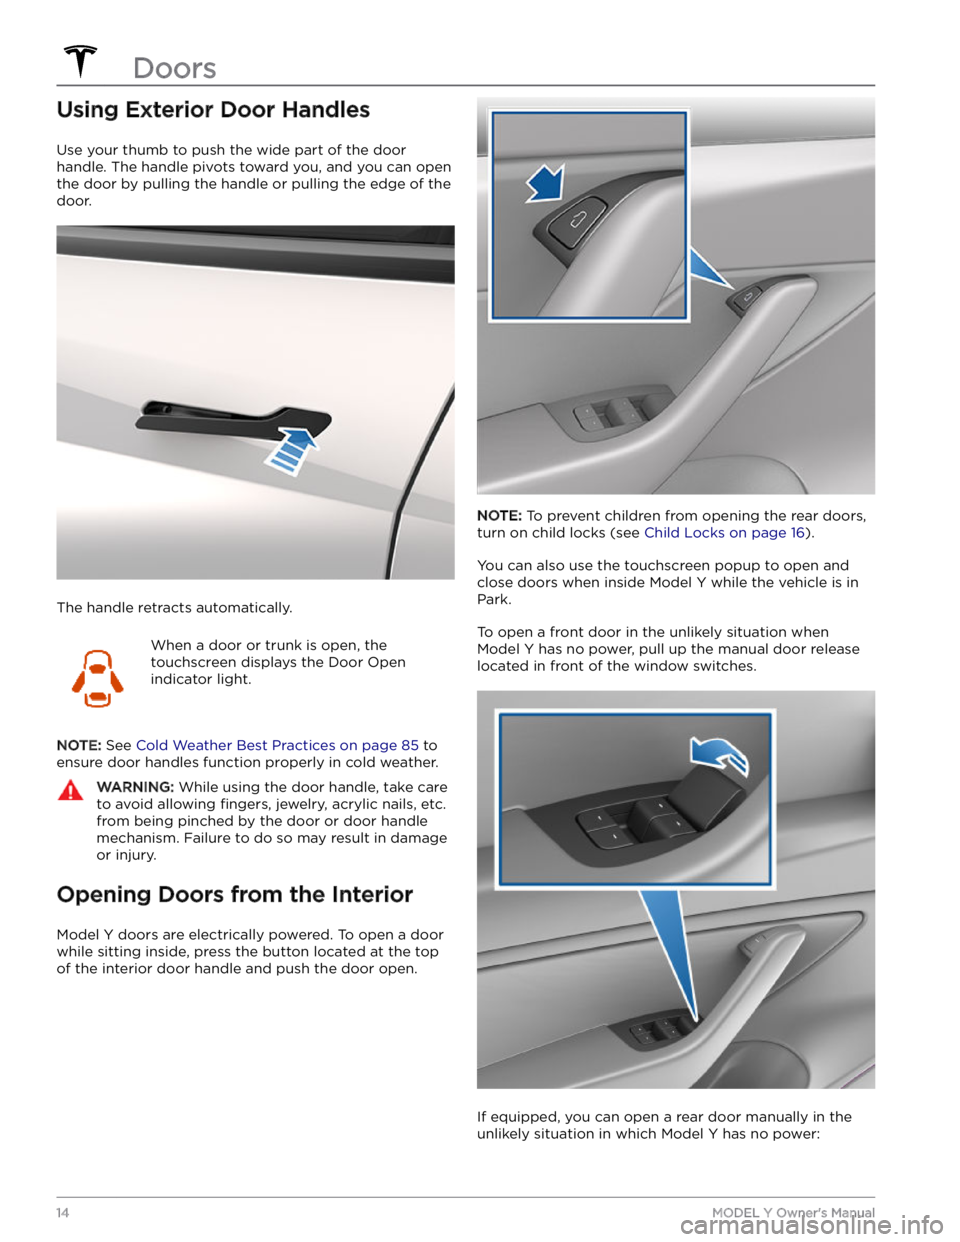
Use your thumb to push the wide part of the door
handle. The handle pivots toward you, and you can open
the door by pulling the handle or pulling the edge of the door.
The handle retracts automatically.
When a door or trunk is open, the
touchscreen displays the Door Open
indicator light.
NOTE: See Cold Weather Best Practices on page 85 to
ensure door handles function properly in cold weather.
WARNING: While using the door handle, take care
to avoid allowing fingers, jewelry, acrylic nails, etc.
from being pinched by the door or door handle
mechanism. Failure to do so may result in damage
or injury.
Opening Doors from the Interior
Model Y doors are electrically powered. To open a door
while sitting inside, press the button located at the top of the interior door handle and push the door open.
NOTE: To prevent children from opening the rear doors,
turn on child locks (see
Child Locks on page 16).
You can also use the touchscreen popup to open and close doors when inside
Model Y while the vehicle is in
Park.
To open a front door in the unlikely situation when
Model Y has no power, pull up the manual door release
located in front of the window switches.
If equipped, you can open a rear door manually in the unlikely situation in which
Model Y has no power:
Doors
14MODEL Y Owner
Page 17 of 298

1.
Remove the mat from the bottom of the rear door pocket.
2.
Press the red tab to remove the access door.
3.
Pull the mechanical release cable forward.
CAUTION: Manual door releases are designed to
be used only in situations when Model Y has no
power. When Model Y has power, use the button
located at the top of the interior door handle.
Interior Locking and Unlocking
While sitting inside Model Y, you can lock and unlock all
doors and trunks by touching the lock icon
on the
touchscreen.
The icon changes to indicate whether
doors are locked or unlocked.
You can also unlock the doors by pressing the Park
button on the end of the drive stalk a second time.
Pressing this button once engages Park and pressing it again unlocks the doors.
Walk-Away Door Lock
Doors and trunks can automatically lock when you walk away carrying your phone key or paired key fob. To turn
this feature on or
off, touch Controls > Locks > Walk-
Away Door Lock.
When the doors lock, the exterior lights flash once and
the mirrors fold (if
Fold Mirrors is on). To also hear a
confirmation sound when Model Y locks, touch Controls
> Locks > Lock Confirmation Sound.
Model Y does not automatically lock if:
Page 18 of 298

Child Locks
Model Y has child locks on the rear doors to prevent
them from being opened using the interior release buttons. On the touchscreen,
touch Controls > Locks >
Child Lock. You can choose Both to engage the child
lock on both rear doors, or you can choose
Left or Right
to engage it on just a specific door.
WARNING: It is recommended that you turn on
child locks when children are seated in the rear
seats.
Unlock on Park
When you stop Model Y and engage Park, you can
choose to unlock all doors. To turn this feature on or
off,
touch Controls > Locks > Unlock on Park.
NOTE: If set to OFF, you can unlock all doors by
pressing the Park button a second time after engaging Park.
Doors
16MODEL Y Owner
Page 19 of 298

Opening and Closing
NOTE: It is your responsibility to ensure windows are
closed after locking the vehicle.
Press down on a switch to lower the associated window.
Window switches operate at two levels:
Page 26 of 298
NOTE: The glovebox locks whenever closed and you
lock
Model Y using the mobile app, key card, you leave
Model Y carrying your phone key (if Walk-Away Door
Lock is turned on), or if Valet mode is active (see
Valet
Mode on page 51). It does not lock when Model Y is
locked by touching the lock icon on the touchscreen.
WARNING: When driving, keep the glovebox
closed to prevent injury to a passenger if a
collision or sudden stop occurs.
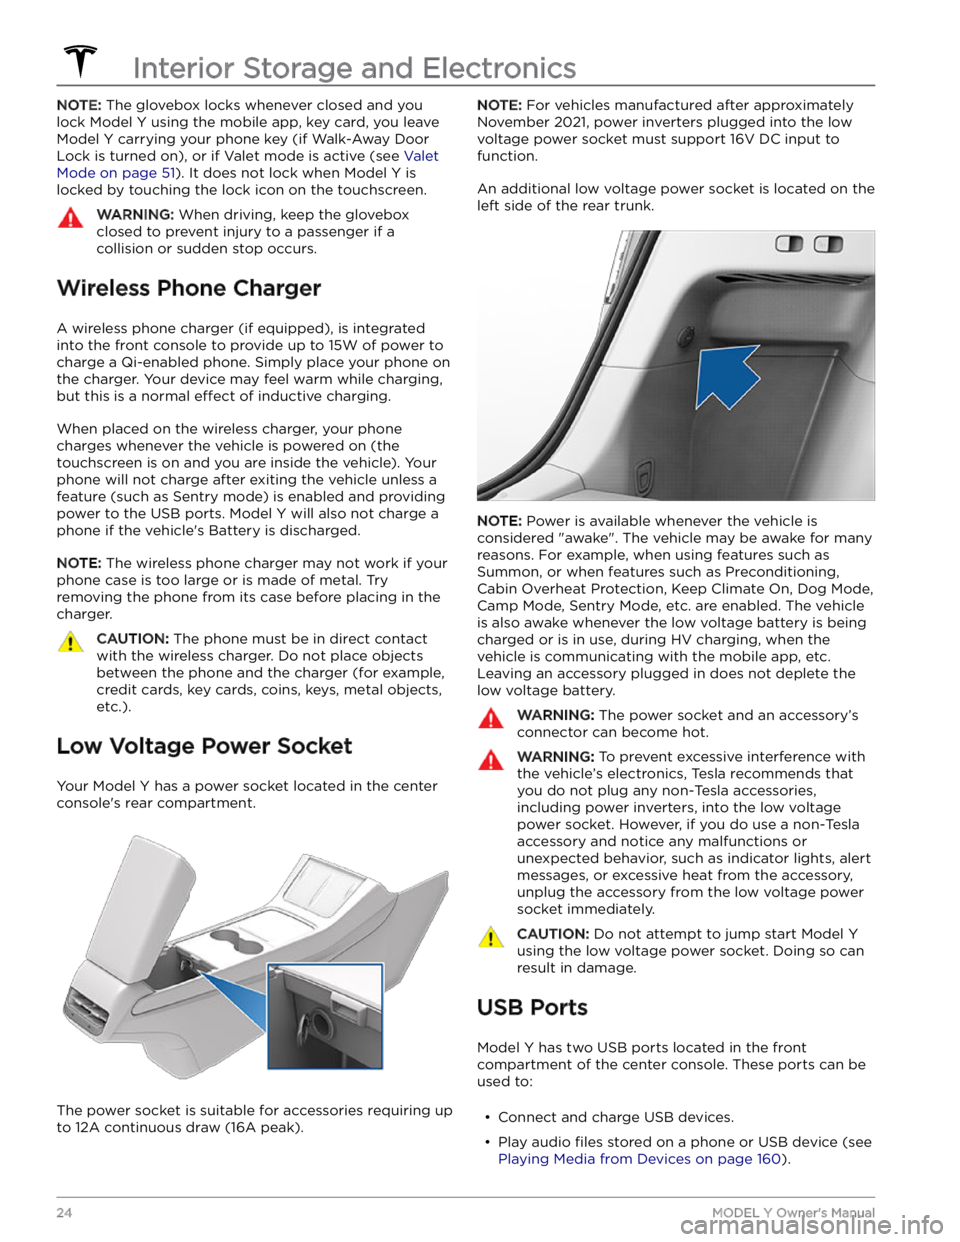
Wireless Phone Charger
A wireless phone charger (if equipped), is integrated
into the front console to provide up to 15W of power to charge a Qi-enabled phone. Simply place your phone on
the charger. Your device may feel warm while charging, but this is a normal
effect of inductive charging.
When placed on the wireless charger, your phone
charges whenever the vehicle is powered on (the
touchscreen is on and you are inside the vehicle). Your
phone will not charge after exiting the vehicle
unless a
feature (such as Sentry mode) is enabled and providing
power to the USB ports. Model Y will also not charge a
phone if the vehicle
Page 31 of 298
NOTE: Driving with second row seats folded forward
may increase perceivable noise and/or vibration coming from the rear of the vehicle (trunk, suspension, etc.).
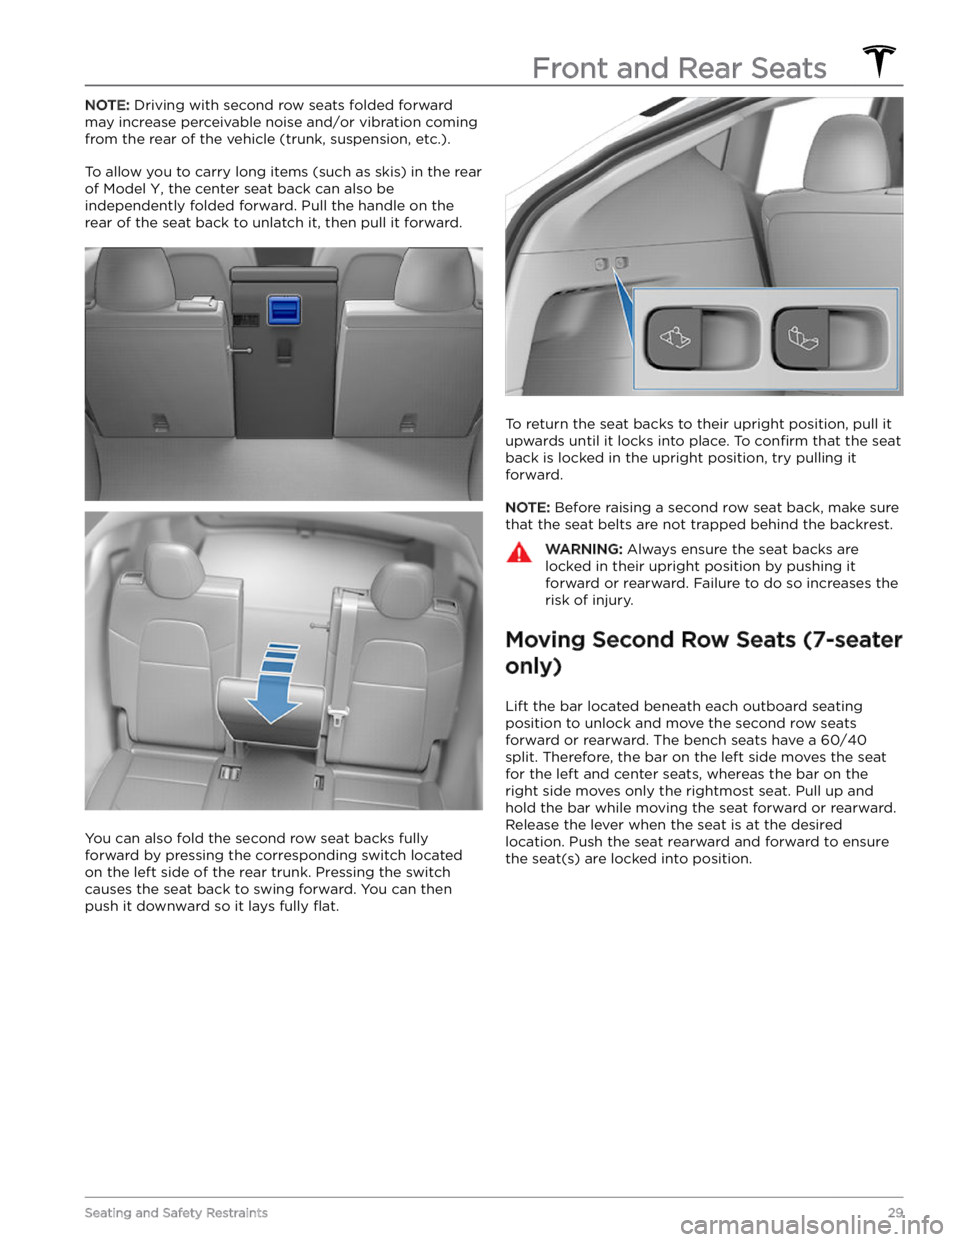
To allow you to carry long items (such as skis) in the rear of
Model Y, the center seat back can also be
independently folded forward. Pull the handle on the
rear of the seat back to unlatch it, then pull it forward.
You can also fold the second row seat backs fully
forward by pressing the corresponding switch located on the left side of the rear trunk. Pressing the switch causes the seat back to swing forward. You can then push it downward so it lays fully
flat.
To return the seat backs to their upright position, pull it
upwards until it locks into place. To
confirm that the seat
back is locked in the upright position, try pulling it forward.
NOTE: Before raising a second row seat back, make sure
that the seat belts are not trapped behind the backrest.
WARNING: Always ensure the seat backs are
locked in their upright position by pushing it
forward or rearward. Failure to do so increases the
risk of injury.
Moving Second Row Seats (7-seater
only)
Lift the bar located beneath each outboard seating position to unlock and move the second row seats
forward or rearward. The bench seats have a 60/40 split. Therefore, the bar on the left side moves the seat for the left and center seats, whereas the bar on the
right side moves only the rightmost seat. Pull up and
hold the bar while moving the seat forward or rearward. Release the lever when the seat is at the desired location. Push the seat rearward and forward to ensure the seat(s) are locked into position.
Front and Rear Seats
29Seating and Safety Restraints
Page 32 of 298
Accessing Third Row Seats (7-
seater only)
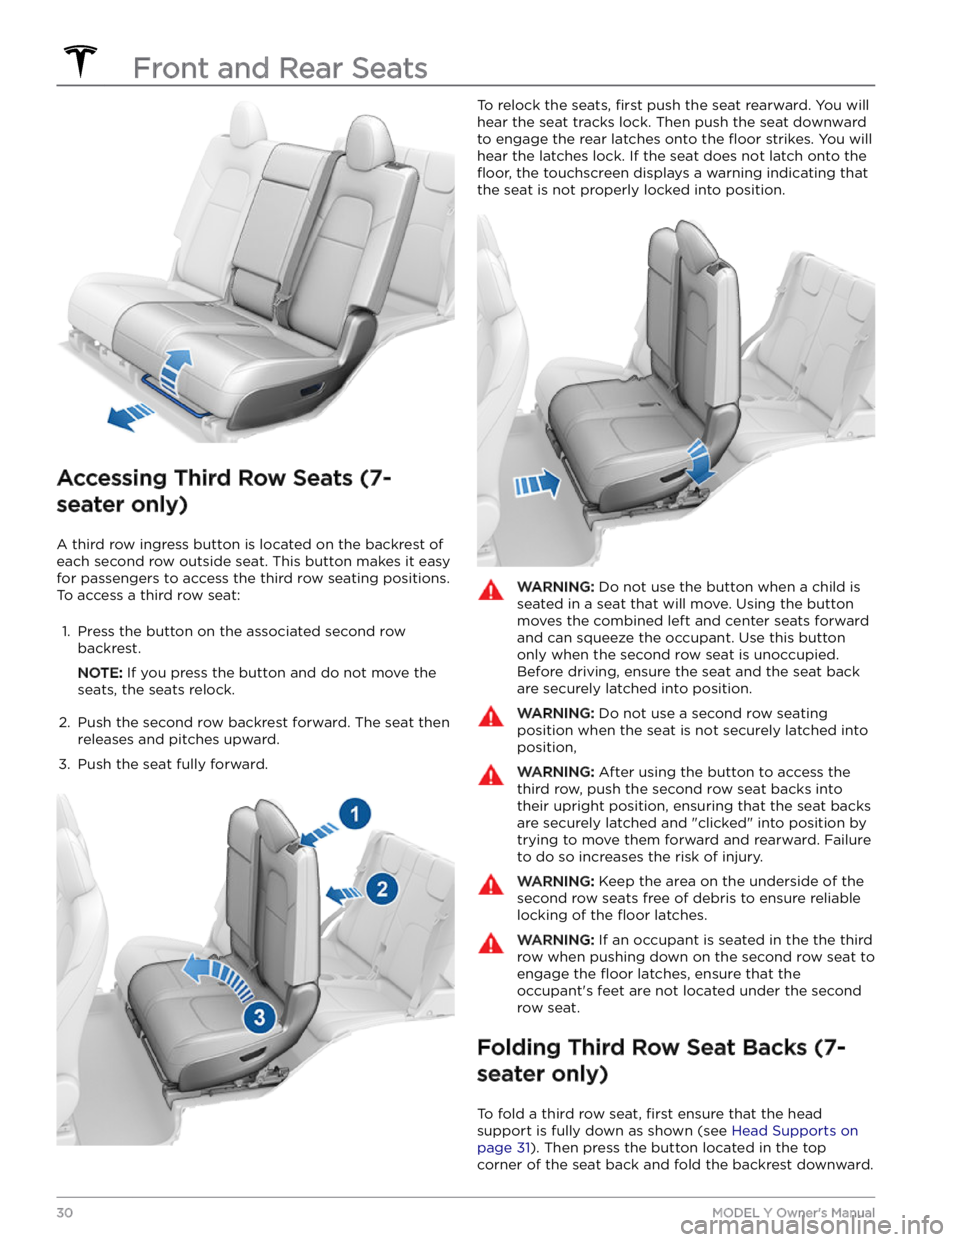
A third row ingress button is located on the backrest of each second row outside seat. This button makes it easy for passengers to access the third row seating positions.
To access a third row seat:
1.
Press the button on the associated second row backrest.
NOTE: If you press the button and do not move the
seats, the seats relock.
2.
Push the second row backrest forward. The seat then releases and pitches upward.
3.
Push the seat fully forward.
To relock the seats, first push the seat rearward. You will
hear the seat tracks lock. Then push the seat downward to engage the rear latches onto the
floor strikes. You will
hear the latches lock. If the seat does not latch onto the
floor, the touchscreen displays a warning indicating that
the seat is not properly locked into position.
WARNING: Do not use the button when a child is
seated in a seat that will move. Using the button
moves the combined left and center seats forward
and can squeeze the occupant. Use this button
only when the second row seat is unoccupied.
Before driving, ensure the seat and the seat back
are securely latched into position.
WARNING: Do not use a second row seating
position when the seat is not securely latched into
position,
WARNING: After using the button to access the
third row, push the second row seat backs into
their upright position, ensuring that the seat backs
are securely latched and "clicked" into position by
trying to move them forward and rearward. Failure
to do so increases the risk of injury.
WARNING: Keep the area on the underside of the
second row seats free of debris to ensure reliable
locking of the floor latches.
WARNING: If an occupant is seated in the the third
row when pushing down on the second row seat to
engage the floor latches, ensure that the
occupant