parking brake TOYOTA 4RUNNER 1997 Owner's Manual
[x] Cancel search | Manufacturer: TOYOTA, Model Year: 1997, Model line: 4RUNNER, Model: TOYOTA 4RUNNER 1997Pages: 223, PDF Size: 4.66 MB
Page 163 of 223
1661. Reduce
your speed gradually, keeping
a straight line. Move cautiously off the
road to a safe place well away from the
traf fic. Avoid stopping on the center di-
vider of a highway. Park on a level spotwith firm ground.
2. Stop the engine and turn on your emergency flashers.
3. Firmly set the parking brake and put the transmission in Pº (automatic) or reverse (manual).
4. Have everyone get out of the vehicle on the side away from traffic.
5. Read the following instructions thor- oughly.
When jacking, be sure to observe
the following to reduce the poss- ibility of personal injury: Follow jacking instructions.
Use the jack only for lifting your
vehicle during wheel changing.
Never get beneath the vehicle
when supported by the jack.
Do not start or run the engine
while your vehicle is supported bya jack. CAUTION
!
NOTICE
Do not continue driving with a deflated tire. Driving even a short
distance can damage a tire beyondrepair.
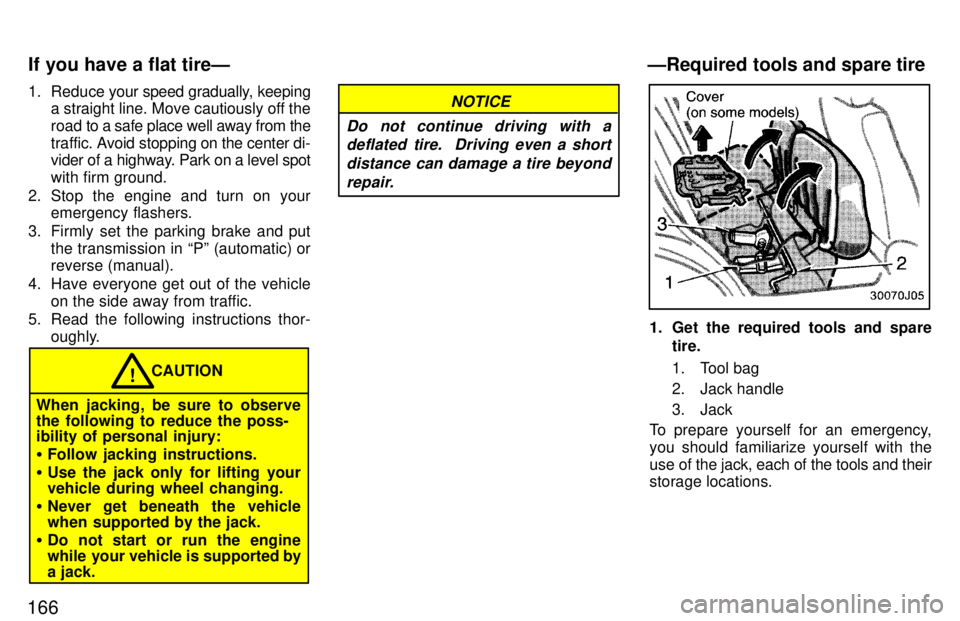
1. Get the required tools and spare tire.
1. Tool bag
2. Jack handle
3. Jack
To prepare yourself for an emergency, you should familiarize yourself with the
use of the jack, each of the tools and their storage locations.
If you have a flat tireÐ
ÐRequired tools and spare tire
Page 170 of 223
173
TOWING PRECAUTIONS: Use a safety chain system for all towing,
and abide by the state/provincial and local
laws. The wheels and axle on the ground
must be in good condition. If they are
damaged, use a towing dolly.
Two-wheel drive modelsÐ
(a) Towing with wheel lift type truck From frontÐ
Manual transmission
We recommend using a towing dolly un-
der the rear wheels. If you do not use a
towing dolly, release the parking brake
and put the transmission in neutral. Automatic transmission:
Use a towing dolly under the rear wheels.
NOTICE
Never tow a vehicle with an automatic transmission from the
front with the rear wheels on theground, as this may cause serious damage to the transmission.
From rearÐ Place the ignition key in the
ACCº position.
NOTICE
When lifting wheels, take care to
ensure adequate ground clear-
ance for towing at the oppositeend of the raised vehicle. Other-wise, the bumper and/or under-
body of the towed vehicle will be damaged during towing.
Do not tow with the key removedor in the LOCKº position, as thesteering lock mechanism is notstrong enough to hold the front
wheels straight while towing.
(b) Using flat bed truck
(c) Towing with sling type truck from front
Follow the instructions for twoing from
front in (b) Towing with wheel lift type truckº. Four-wheel drive modelsÐ
(a) Towing with wheel lift type truck From frontÐ
Manual transmission:
We recommend using a towing dolly un-
der the rear wheels. If you do not use a
towing dolly, release the parking brake,
put the transmission in neutral and set the
transfer in H2º mode. Automatic transmission:
Use a towing dolly under the rear wheels.
NOTICE
Never tow a vehicle with an automatic transmission from the
rear with the front wheels on theground, as this may cause serious damage to the transmission.
From rearÐWe recommend using a tow-
ing dolly under the front wheels. If you do
not use a towing dolly, place the ignition key in the ACCº position, put the trans- mission in neutral and set the transfer inH2º.
Page 172 of 223
175
CAUTION!
Use extreme caution when towing
vehicles. Avoid sudden starts or
erratic driving maneuvers which
would place excessive stress on the
emergency towing hook and towing
cable or chain. The hook and towing
cable or chain may break and cause
serious injury or damage.
NOTICE
Use only a cable or chain specific- ally intended for use in towing
vehicles. Securely fasten the cableor chain to the towing eyelet provided.
Before towing, release the parking brake
and put the transmission in neutral
(manual) or Nº (automatic)And transfer in
H2º (four-wheel drive models). The key
must be in ACCº (engine off) or ONº (en-
gine running).
CAUTION!
If the engine is not running, the
power assist for the brakes and
steering will not work so steering
and braking will be much harder
than usual.
Before emergency towing, check that
the hook is not broken or damaged and
that the installation bolts are not loose.
Fasten the towing cable or chain se-curely to the hook.
Do not jerk the hook. Apply steady and
even force.
To avoid damaging the hook, do not
pull from the side or at a vertical angle.
Always pull straight ahead.
ÐEmergency towing hook precautions
Page 173 of 223
176
If the emergency towing hook is
used to get out when your vehicle
becomes stuck in the mud, sand or
other condition from which the
vehicle can not be driven out under
its own power, make sure to observe
the precautions mentioned below.
Otherwise, excessive stress will be
put on the hook and the towing
cable or chain may break, causing
serious injury or damage. If the towing vehicle can hardly
move, do not forcibly continue the
towing. Contact your Toyota deal-
er or a commercial tow truck ser- vice for assistance.
Tow the vehicle as straight ahead as possible.
Keep away from the vehicle during
towing. CAUTION
!
The following methods are effective to
use when your vehicle is stuck in the mud, sand or other condition from which the ve-
hicle cannot be driven out under its own
power. Use extreme caution when
towing
the vehicle. In addition, keep away from
the vehicles and towing cable or chain
when towing. Remove the soil and sand in the front and the back of the tires.
Place stones or wood under the tires.
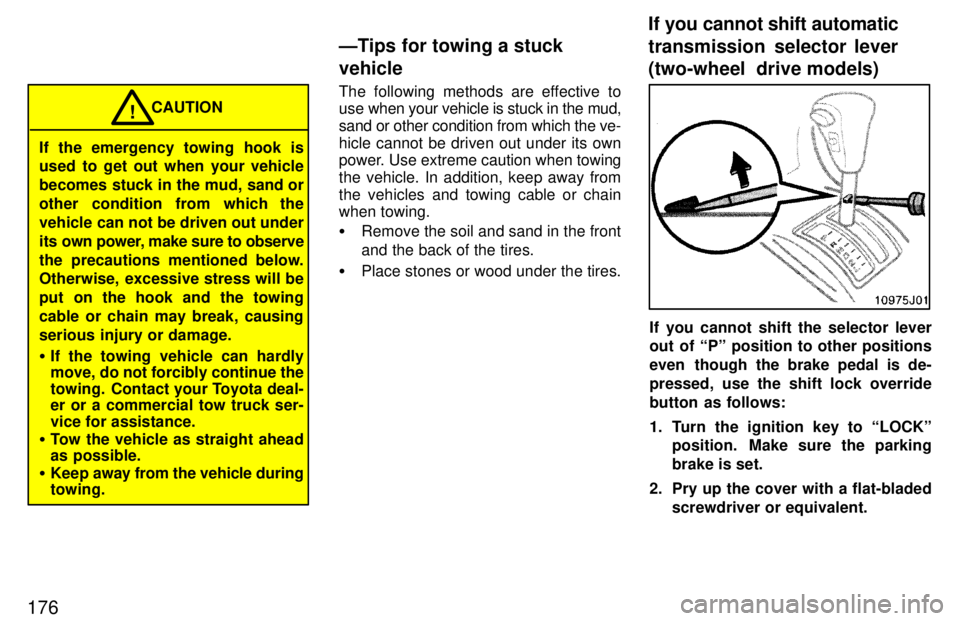
If you cannot shift the selector lever
out of Pº position to other positions
even though the brake pedal is de-pressed, use the shift lock override
button as follows:
1. Turn the ignition key to LOCKº
position. Make sure the parking brake is set.
2. Pry up the cover with a flat-bladed screwdriver or equivalent.
ÐTips for towing a stuck vehicle
If you cannot shift automatic
transmission selector lever
(two-wheel drive models)
Page 174 of 223
177
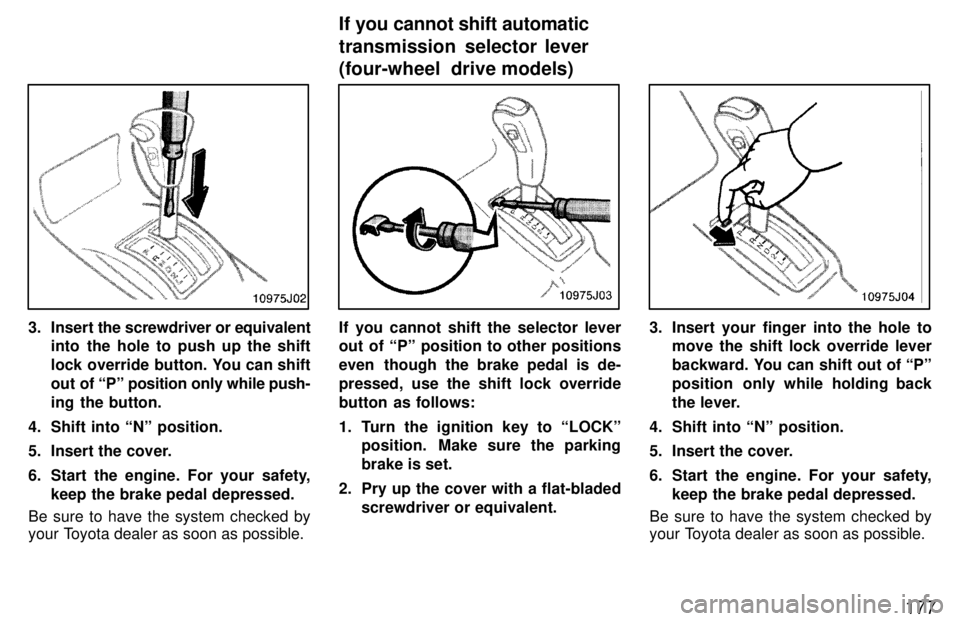
3. Insert the screwdriver or equivalent
into the hole to push up the shift
lock override button. You can shift
out of Pº position only while push-
ing the button.
4. Shift into Nº position.
5. Insert the cover.
6. Start the engine. For your safety, keep the brake pedal depressed.
Be sure to have the system checked by
your Toyota dealer as soon as possible.If you cannot shift the selector lever
out of Pº position to other positions
even though the brake pedal is de-pressed, use the shift lock override
button as follows:
1. Turn the ignition key to LOCKº position. Make sure the parking brake is set.
2. Pry up the cover with a flat-bladed screwdriver or equivalent.3. Insert your finger into the hole tomove the shift lock override lever
backward. You can shift out of Pº
position only while holding back
the lever.
4. Shift into Nº position.
5. Insert the cover.
6. Start the engine. For your safety, keep the brake pedal depressed.
Be sure to have the system checked by
your Toyota dealer as soon as possible.
If you cannot shift automatic
transmission selector lever
(four-wheel drive models)
Page 184 of 223
187
Tire surface and wheel nuts Check the tires carefully
for cuts, damage
or excessive wear. See Chapter 7-2 for
additional information. When checking the tires, make sure no nuts are missing,
and check the nuts for looseness. T ighten
them if necessary.
Tire rotation
Rotate the tires every 12000 km (7500
miles). See Chapter 7-2 for additional in- formation.
Fluid leaks Check underneath for leaking fuel, oil, wa-
ter or other fluid after the vehicle has been
parked for a while. If you smell fuel fumes
or notice any leak, have the cause found
and corrected immediately. Doors and engine hood
Check that all doors including back door
operate smoothly and all latches lock se-
curely. M ake sure the engine hood secon-
dary latch secures the hood from opening
when the primary latch is released. INSIDE THE VEHICLE Items listed below should be checked
regularly, e.g. while performing peri-
odic services, cleaning the vehicle, etc. Lights Make sure the headlights, stop lights, tail lights, turn signal lights, and other lights are all working. Check headlight aim. Service reminder indicators and
warn-
ing buzzers Check that all service reminder indicators
and warning buzzers function properly. Steering wheel
Check that it has the specified freeplay.
Be alert for changes in steering condition, such as hard steering or strange noise. Seats Check that all seat controls such as seat
adjusters, seatback recliner, etc. operate
smoothly and that all latches lock securely
in any position. Check that the head re-
straints move up and down smoothly and
that the locks hold securely in any latched
position. For folding-down rear seat-
backs, swing-up rear seat cushions and
detachable temporary third seat, check
that the latches lock securely. Seat belts
Check that the seat belt system such as
buckles, retractors and anchors operate
properly
and smoothly. Make sure the belt
webbing is not cut, frayed, worn or dam-aged. Accelerator pedal Check the pedal for smooth operation and
uneven pedal effort or catching. Clutch pedal Check the pedal for smooth operation. Brake pedal Check the pedal for smooth operation and
that the pedal has the proper clearance. Check the brake booster function. Brakes
At a safe place, check that the brakes do not pull to one side when applied. Parking brake Check that the lever has the proper travel and that, on a safe incline, your vehicle is
held securely with only the parking brake applied.
Page 218 of 223
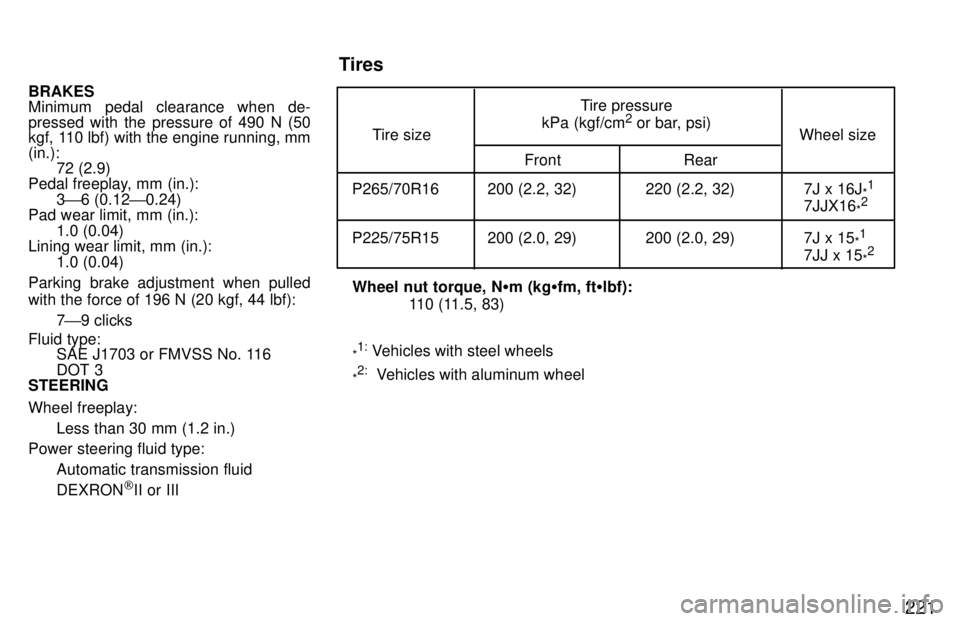
P265/70R16 200 (2.2, 32) 220 (2.2, 32) 7J x 16J*1
7JJX16 *2
P225/75R15 200 (2.0, 29) 200 (2.0, 29) 7J x 15 *1
7JJ x 15 *2
Tire size
Tire pressure
kPa (kgf/cm 2
or bar, psi)
Front Rear Wheel size
Wheel nut torque, N
m (kg fm, ft lbf):
110 (11.5, 83)
* 1:
Vehicles with steel wheels
* 2:
Vehicles with aluminum wheel
221
BRAKES Minimum pedal clearance when de-pressed with the pressure of 490 N (50
kgf, 110 lbf) with the engine running, mm (in.):
72 (2.9)
Pedal freeplay, mm (in.):
3' 6 (0.12 '0.24)
Pad wear limit, mm (in.):
1.0 (0.04)
Lining wear limit, mm (in.):
1.0 (0.04)
Parking brake adjustment when pulled with the force of 196 N (20 kgf, 44 lbf): 7' 9 clicks
Fluid type: SAE J1703 or FMVSS No. 116 DOT 3
STEERING Wheel freeplay:
Less than 30 mm (1.2 in.)
Power steering fluid type:
Automatic transmission fluid DEXRON [
II or III Tires