traction control TOYOTA 4RUNNER 1997 Owners Manual
[x] Cancel search | Manufacturer: TOYOTA, Model Year: 1997, Model line: 4RUNNER, Model: TOYOTA 4RUNNER 1997Pages: 223, PDF Size: 4.66 MB
Page 78 of 223

81
Maximum allowable speeds
To get on a highway or to pass slower traf- fic, maximum acceleration may be neces-
sary.
Make sure you observe the following
maximum allowable speeds in each gear:
Two-wheel drive models gear km/h (mph)
1 48 (29)
2 90 (55)
3 139 (86)
4 165 (102)
Four-wheel drive models
3RZ-FE engine gear km/h (mph) H2º and H4º L4º
1 45 (28) 17 (11)
2 84 (52) 32 (20)
3 130 (81) 50 (31)
4 165 (102) 64 (39)
5VZ-FE engine
gear km/h (mph) H2º and H4º L4º
1 48 (29) 18 (11)
2 89 (55) 34 (21)
3 127 (79) 49 (31)
4 165 (102) 64 (39)
NOTICE
Do not downshift if you are going faster than the maximum allowable
speed for the next lower gear.
Good driving practice � If it is difficult to shift into reverse, put
the transmission in neutral, release
the clutch pedal momentarily, and then
try again.
� When towing a trailer, in order to main-
tain engine braking efficiency, do not
use the fifth gear.
Be careful when downshifting on a
slippery surface. Abrupt shifting
could cause the vehicle to spin or skid. CAUTION
!
NOTICE
Make sure the vehicle is completely stopped before shifting into
reverse.
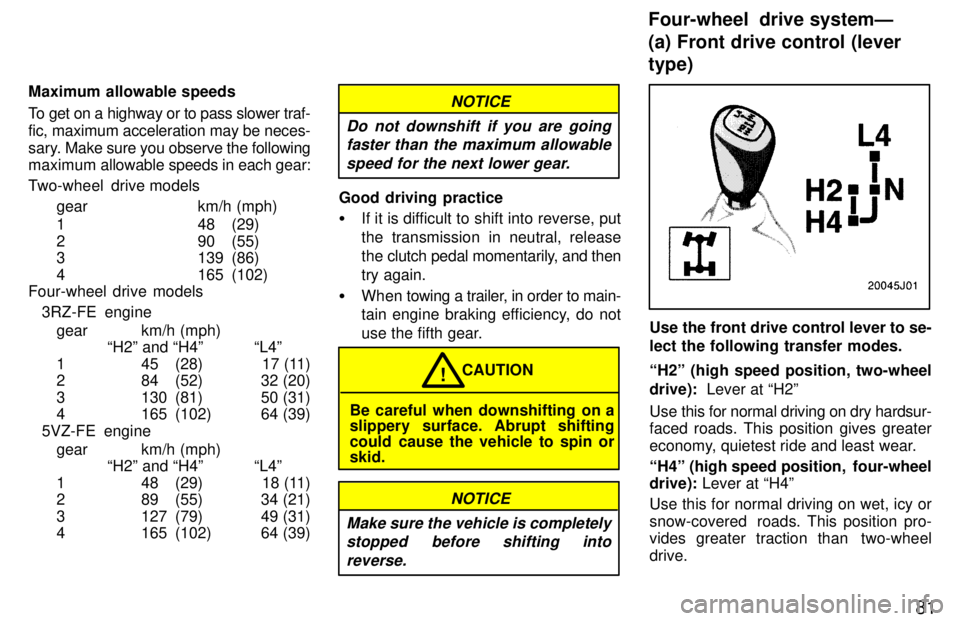
Use the front drive control lever to se-
lect the following transfer modes. H2º (high speed position, two-wheel
drive): Lever at H2º
Use this for normal driving on dry hardsur- faced roads. This position gives greater
economy, quietest ride and least wear.
H4º (high speed position, four-wheel drive): Lever at H4º
Use this for normal driving on wet, icy or
snow-covered roads. This position pro-
vides greater traction than two-wheel drive.
Four-wheel drive systemÐ (a) Front drive control (lever type)
Page 79 of 223

82Nº (neutral position):
Lever at Nº
No power is delivered to the wheels. The vehicle must be stopped.
L4º (low speed position, four-wheel
drive): Lever at L4º
Use the for maximum power and traction.
Use L4º for climbing or descending steep
hills, off-road driving, and hard pulling in
sand, mud or deep snow.
The four-wheel drive indicator light
comes on when the H4º, Nº or L4º mode is selected. See (c) Shifting procedure (lever type)º
for further instructions.
Use the front drive control lever and
4WDº button to select the following transfer modes. H2º (high speed position, two-wheel
drive): Lever at Hº, 4WDº button left out
Use this for normal driving on dry hardsur- faced roads. This position gives greater
economy, quietest ride and least wear.
H4º (high speed position, four-wheel
drive): Lever at Hº, 4WDº button pushed
in.
Use this for normal driving on wet, icy or
snow-covered roads. This position pro-
vides greater traction than two-wheel drive. Nº (neutral position):
Lever at Nº
No power is delivered to the wheels. Thevehicle must be stopped.
L4º (low speed position, four-wheel
drive): Lever at L4º
Use this for maximum power and traction. Use L4º for climbing or descending steep
hills, off-road driving, and hard pulling in
sand, mud or deep snow.
The four-wheel drive indicator light
comes on when the H4º, Nº or L4º mode
is selected.
See (c) Shifting procedure (lever/button
type)º for further instructions.
(a) Front drive control (lever/button type)
Page 143 of 223

146
Your new vehicle carries theft preven-
tion labels which are approximately 56 mm (2.20 in.) by 16 mm (0.63 in.). The purpose of these labels is to reduce
the incidence of vehicle thefts by facilitat- ing the tracing and recovery of parts from
stolen vehicles. The label is designed so
that
once it is applied to a surface, any at-
tempt to remove it will result in destroying
the integrity of the label. Transferring
these la bels intact from one part to anoth-
er, will be impossible.
NOTICE
You should not attempt to remove the theft prevention labels as it may
violate certain state or federal laws.
CAUTION!
Do not modify the suspension/chas-
sis with lift kits, spacers, springs,
etc. It can cause dangerous handling
characteristics resulting in loss ofcontrol. Determine what kind of tires your ve-
hicle is originally equipped with.
1. Summer tires.
Summer tires are high-speed capability
tires best suited to highway driving underdry conditions. Since
summer tires do not have the same
traction performance as snow tires, sum-
mer tires are inadequate for driving on
snow-covered or icy roads. For driving on
snow-covered or icy roads, we recom-
mend using snow tires. If installing snow tires, be sure to replace all four tires.
2. All season tires
All season tires are designed to provide
better traction in snow and to be adequate
for driving in most winter conditions, as
well as for use all year round.
All season tires, however, do not have ad-
equate traction performance compared
with snow tires in heavy or loose snow.
Also, all season tires fall short in accelera-
tion and handling performance compared with summer tires in highway driving.
Suspension and chassis Types of tires
Theft prevention labels (except for Canada)
Page 202 of 223

205
WHEN TO USE SNOW TIRES OR CHAINS
Snow tires or chains are recom-
mended when driving on snow or ice.
On wet or dry roads, conventional tires
provide better traction than snow tires. SNOW TIRE SELECTION
If you need snow tires, select tires of
the same size, construction and load capacity as the original tires on your
Toyota.
Do not use tires other than those men-
tioned above. Do not install studded tires
without first checking local regulations for
possible restrictions.
SNOW TIRE INSTALLATION
Snow tires should be installed on all wheels. Installing snow tires on the front wheels
only can lead to an excessive difference
in road grip capability between the front
and rear tires which would cause loss of
vehicle control.
When storing removed tires, you should
store them in a cool dry place.
Mark the direction of rotation and be sure to install them in the same direction when replacing.
CAUTION!
� Do not drive with the snow tires in- correctly inflated.
� Never drive over 120 km/h (75
mph) with any type of snow tires.
TIRE CHAIN SELECTION
Use the tire chains of correct size and type.
Regulations regarding the use of tire
chains vary according to location or
type of road, so always check then be-
fore installing chains.
CHAIN INSTALLATION
Install the chains on the rear tires as
tightly as possible. Do not use tire
chains on the front tires. Retighten
chains after driving 0.5 '1.0 km
(1/4 '1/2 mile).
When installing chains on your tires, care- fully follow the instructions of the chain
manufacturer.
If wheel covers are used, they will be
scratched by the chain band, so remove the covers before putting on the chains.
� Do not exceed 50 km/h (30 mph)
or the chain manufacturer's rec-
ommended speed limit, which-
ever is lower.
� Drive carefully avoiding bumps,
holes, and sharp turns, which
may cause the vehicle to bounce.
� Avoid sharp turns or
locked-wheel braking, as use of
chains may adversely affect
vehicle handling.
CAUTION!
Installing snow tires and chains
Page 223 of 223

226This
information has been prepared in ac-
cordance with regulations issued by the
National Highway Traffic Safety Adminis-
tration of the U.S. Department of Trans-
portation. It provides the purchasers and/
or prospective purchasers of Toyota
vehicles with information on uniform tire
quality grading.
Your Toyota dealer will help answer any
questions you may have as you read this information.
DOT quality gradesÐAll passenger
vehicle tires must conform to Federal
Safety Requirements in addition to these grades. These quality grades are
molded on the sidewall.
Treadwear ÐThe treadwear grade is a
comparative rating based on the wear
rate of the tire when tested under con-
trolled conditions on a specified govern-
ment test course. For example, a tire
graded 150 would wear one and a half
(1-1/2) times as well on the government course as a tire graded 100. The relative
performance of tires depends upon the
actual conditions of their use, however,
and may depart significantly from thenorm due to variations in driving habits,
service practices and differences in road characteristics and climate. Traction A, B, C
ÐThe traction grades,
from highest to lowest, are A, B, and C,
and they represent the tire's ability to stop
on wet pavement as measured under
controlled conditions on specified govern-
ment test surfaces of asphalt and con-
crete. A tire marked C may have poor trac-
tion performance.
Warning: The traction grade assigned to this tire is based on braking (straight
ahead) traction tests and does not include
cornering (turning) traction.
Temperature A, B, C ÐThe temperature
grades are A (the highest), B, and C, rep-
resenting the tire's resistance to the gen-
eration of heat and its ability to dissipate heat when tested under controlled condi- tions on a specific indoor laboratory test
wheel. Sustained high temperature can cause the material of the tire life, and ex- cessive temperature can lead to sudden
tire failure. The grade C corresponds to a level of performance which all passenger
car tires must meet under the Federal Mo-
tor Vehicle Safety Standard No. 109.
Grades B and A represent higher levels of
performance on the laboratory test wheel
than the minimum required by law. Warning: The temperature grades for this tire
are established for a tire that is proper-
ly inflated and not overloaded. Excessive speed, underinflation, or excessive load- ing, wither separately or in combination, can cause heat buildup and possible tirefailure.
Uniform tire quality grading