TOYOTA 4RUNNER 2012 N280 / 5.G Owners Manual
4RUNNER 2012 N280 / 5.G
TOYOTA
TOYOTA
https://www.carmanualsonline.info/img/14/6107/w960_6107-0.png
TOYOTA 4RUNNER 2012 N280 / 5.G Owners Manual
Trending: wiring, lights, change language, checking oil, USB, ad blue, tow
Page 561 of 700
561
4-3. Do-it-yourself maintenance
4
Maintenance and care
4RUNNER_U
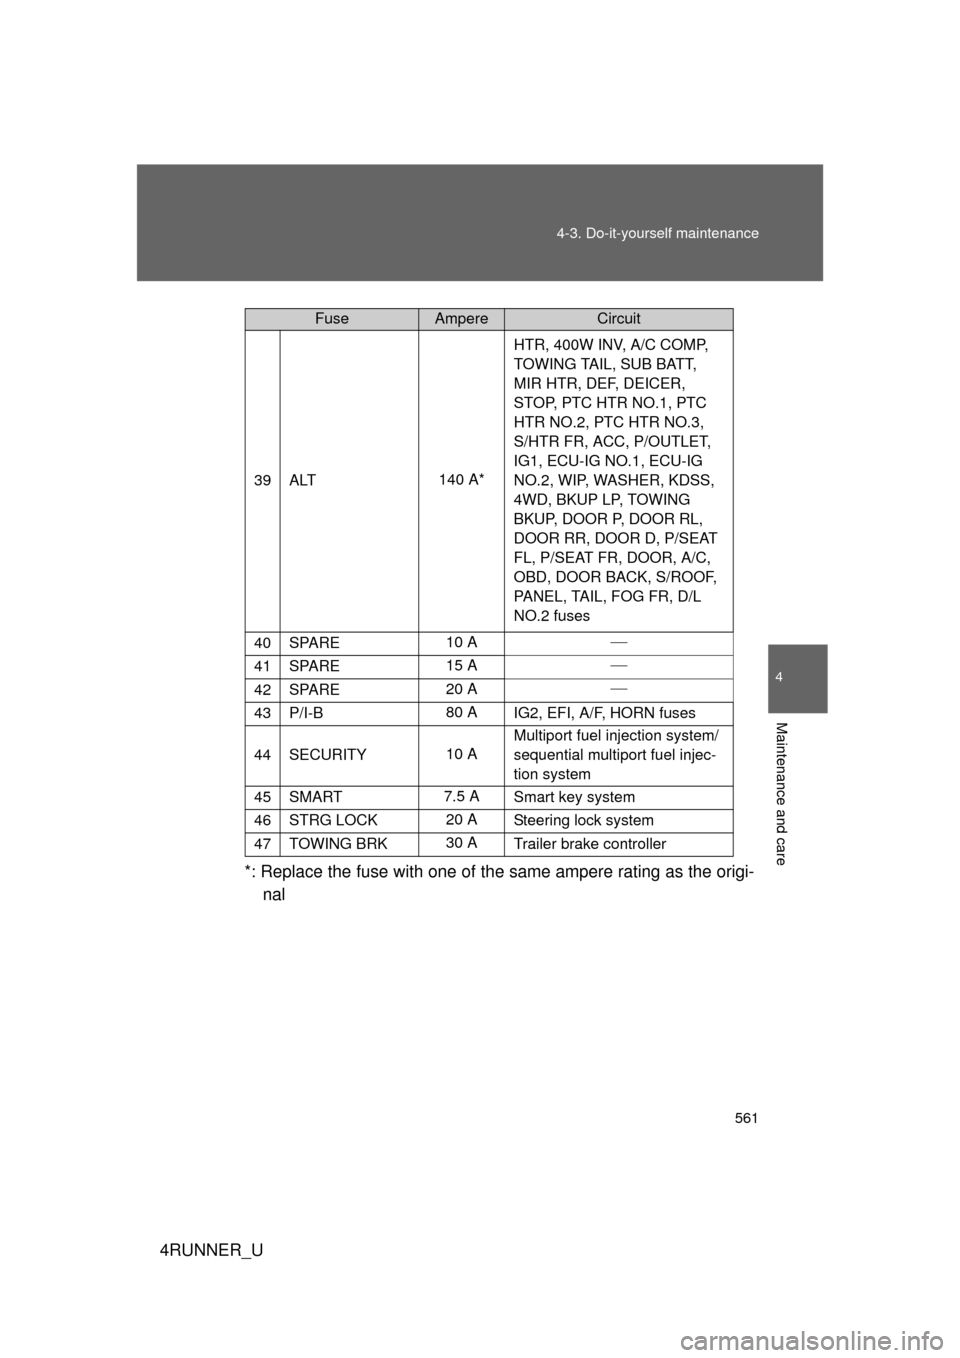
*: Replace the fuse with one of th
e same ampere rating as the origi-
nal
39ALT140 A* HTR, 400W INV, A/C COMP,
TOWING TAIL, SUB BATT,
MIR HTR, DEF, DEICER,
STOP, PTC HTR NO.1, PTC
HTR NO.2, PTC HTR NO.3,
S/HTR FR, ACC, P/OUTLET,
IG1, ECU-IG NO.1, ECU-IG
NO.2, WIP, WASHER, KDSS,
4WD, BKUP LP, TOWING
BKUP, DOOR P, DOOR RL,
DOOR RR, DOOR D, P/SEAT
FL, P/SEAT FR, DOOR, A/C,
OBD, DOOR BACK, S/ROOF,
PANEL, TAIL, FOG FR, D/L
NO.2 fuses
40SPARE10 A
41SPARE15 A
42SPARE20 A
43P/I-B80 A
IG2, EFI, A/F, HORN fuses
44SECURITY10 AMultiport fuel injection system/
sequential multiport fuel injec-
tion system
45SMART 7.5 A
Smart key system
46STRG LOCK 20 ASteering lock system
47TOWING BRK30 A
Trailer brake controller
FuseAmpereCircuit
Page 562 of 700
562 4-3. Do-it-yourself maintenance
4RUNNER_U■
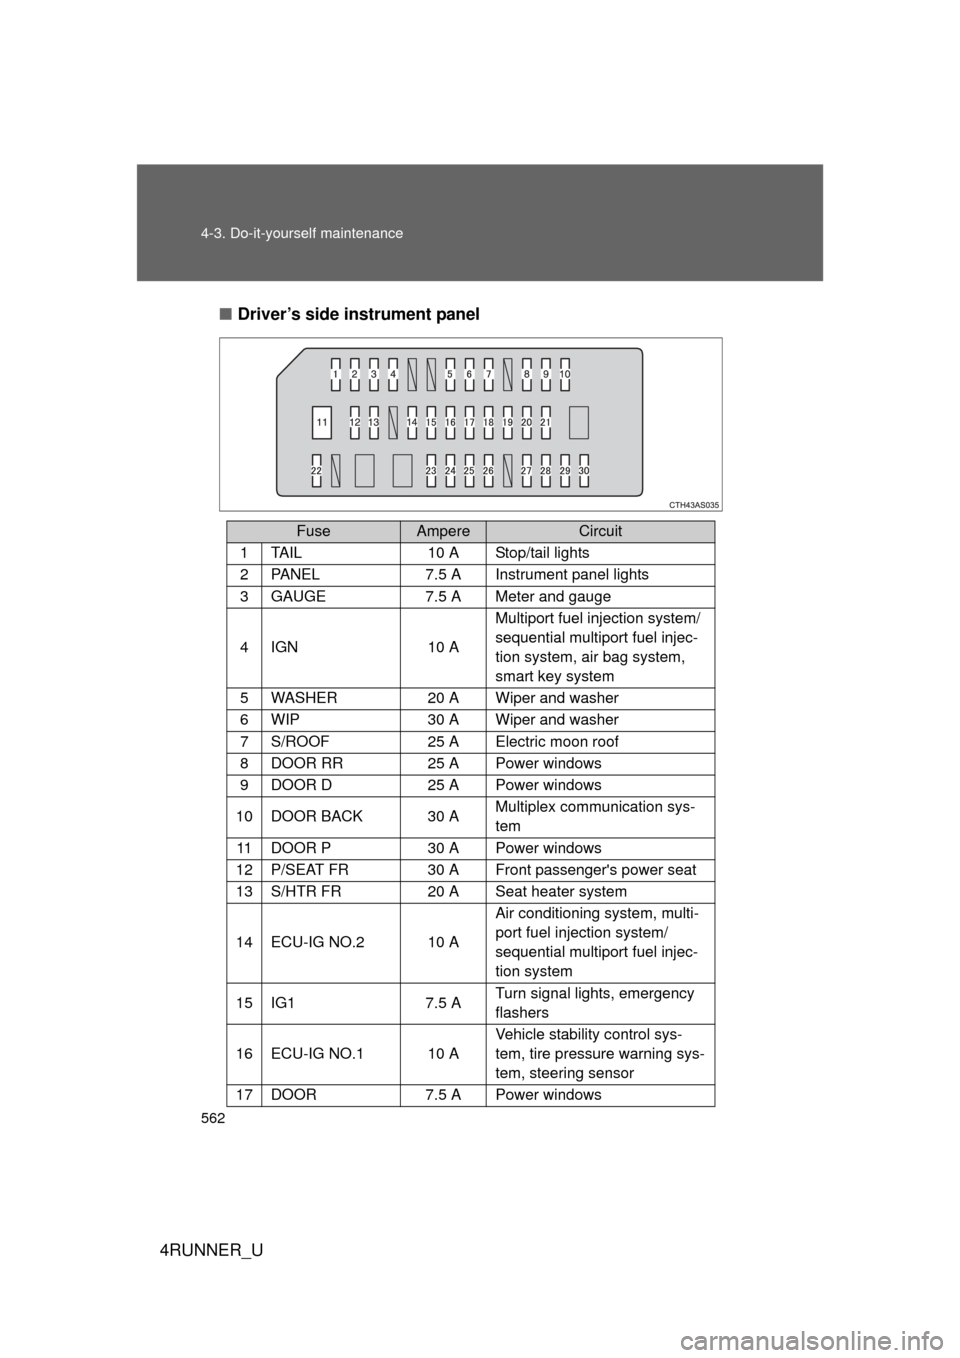
Driver’s side instrument panel
FuseAmpereCircuit
1TA I L10 A Stop/tail lights
2PA N E L7.5 A Instrument panel lights
3GAUGE7.5 A Meter and gauge
4IGN10 A Multiport fuel injection system/
sequential multiport fuel injec-
tion system, air bag system,
smart key system
5WASHER20 A Wiper and washer
6WIP30 A Wiper and washer
7S/ROOF 25 A Electric moon roof
8DOOR RR25 A Power windows
9DOOR D25 A Power windows
10DOOR BACK30 A
Multiplex communication sys-
tem
11DOOR P30 A Power windows
12P/SEAT FR 30 A Front passenger's power seat
13S/HTR FR 20 A Seat heater system
14ECU-IG NO.210 AAir conditioning system, multi-
port fuel injection system/
sequential multiport fuel injec-
tion system
15IG17.5 A
Turn signal lights, emergency
flashers
16ECU-IG NO.110 AVehicle stability control sys-
tem, tire pressure warning sys-
tem, steering sensor
17DOOR7.5 A Power windows
Page 563 of 700
563
4-3. Do-it-yourself maintenance
4
Maintenance and care
4RUNNER_U
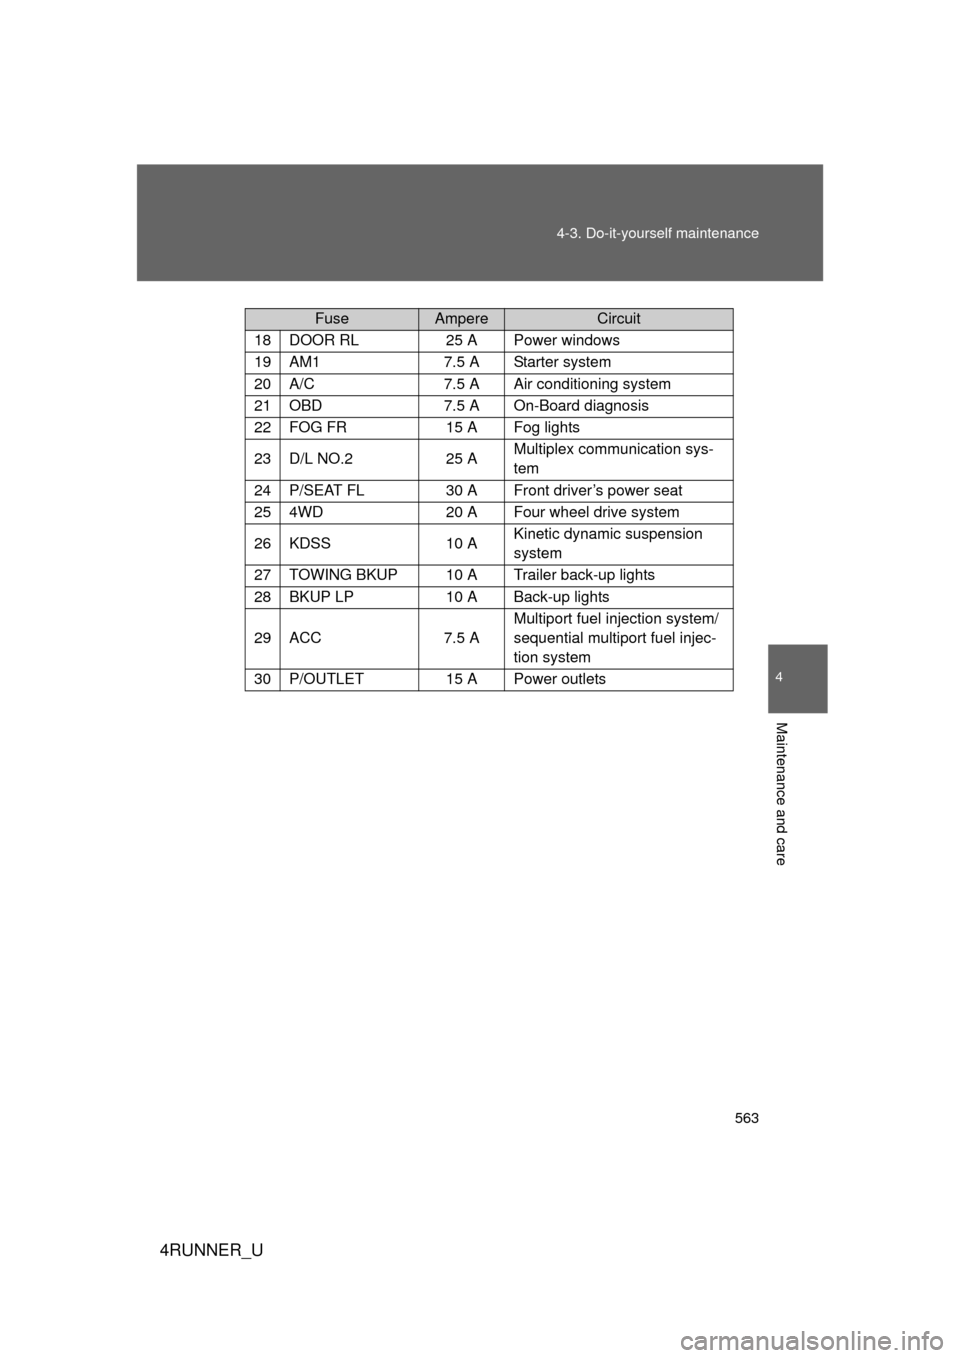
18DOOR RL25 A Power windows
19AM17.5 A Starter system
20A/C7.5 A Air conditioning system
21OBD7.5 A On-Board diagnosis
22FOG FR 15 A Fog lights
23D/L NO.225 A
Multiplex communication sys-
tem
24P/SEAT FL30 A Front driver’s power seat
254WD 20 A Four wheel drive system
26KDSS 10 AKinetic dynamic suspension
system
27TOWING BKUP10 A Trailer back-up lights
28BKUP LP10 A Back-up lights
29ACC7.5 A Multiport fuel injection system/
sequential multiport fuel injec-
tion system
30P/OUTLET15 A Power outlets
FuseAmpereCircuit
Page 564 of 700
564 4-3. Do-it-yourself maintenance
4RUNNER_U
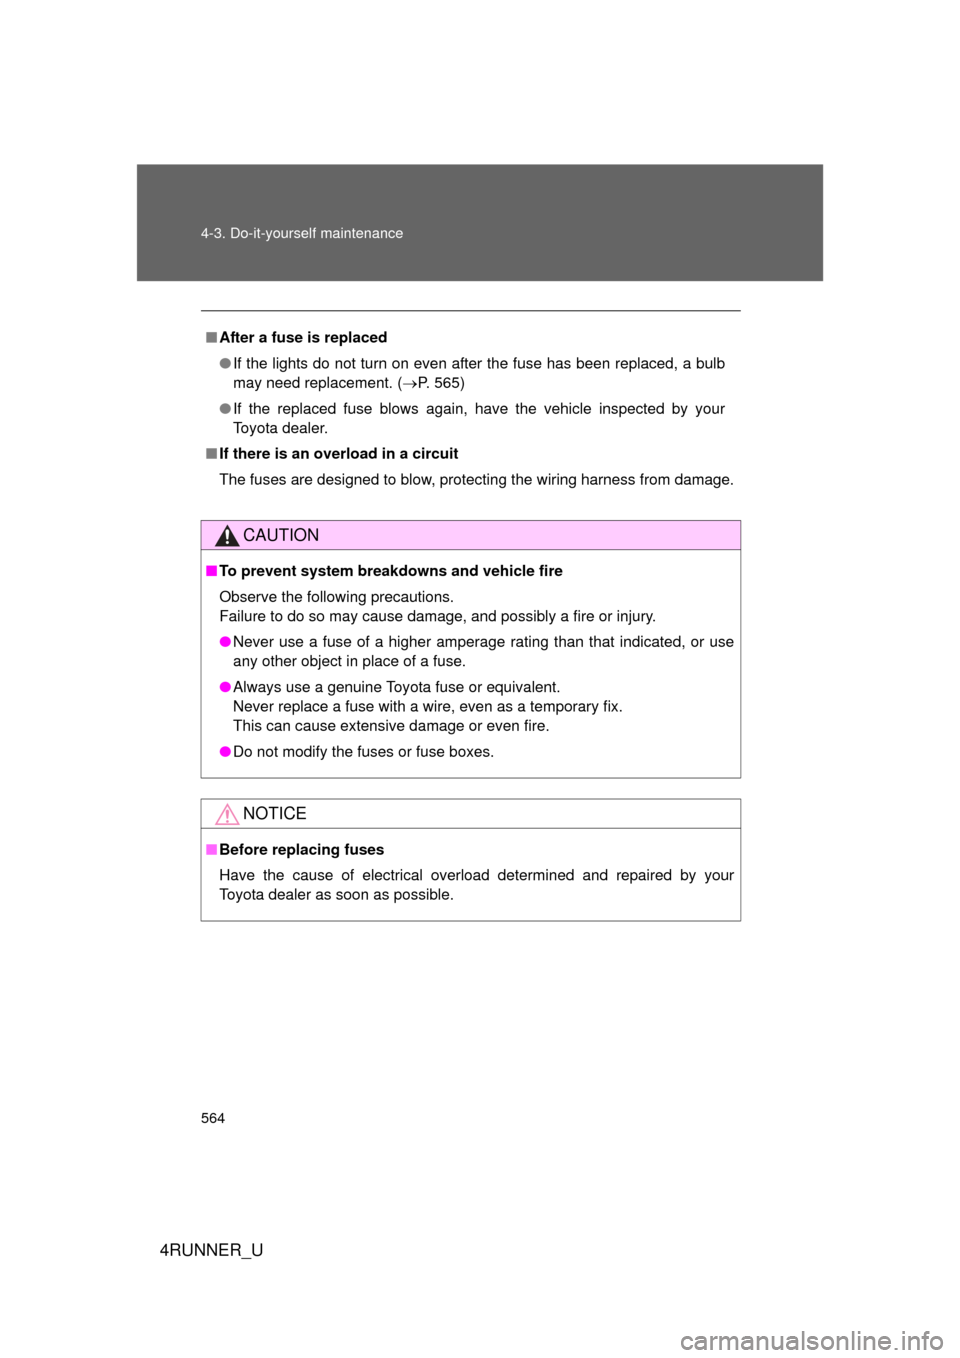
■After a fuse is replaced
● If the lights do not turn on even after the fuse has been replaced, a bulb
may need replacement. (P. 565)
● If the replaced fuse blows again, have the vehicle inspected by your
Toyota dealer.
■ If there is an overload in a circuit
The fuses are designed to blow, protecting the wiring harness from damage.
CAUTION
■To prevent system breakdowns and vehicle fire
Observe the following precautions.
Failure to do so may cause damage, and possibly a fire or injury.
● Never use a fuse of a higher amperage rating than that indicated, or use
any other object in place of a fuse.
● Always use a genuine Toyota fuse or equivalent.
Never replace a fuse with a wire, even as a temporary fix.
This can cause extensive damage or even fire.
● Do not modify the fuses or fuse boxes.
NOTICE
■Before replacing fuses
Have the cause of electrical overload determined and repaired by your
Toyota dealer as soon as possible.
Page 565 of 700
565
4-3. Do-it-yourself maintenance
4
Maintenance and care
4RUNNER_U
Light bulbs
You may replace the following bulbs yourself. The difficulty level of
replacement varies depending on the bulb. If necessary bulb
replacement seems difficult to perfor m, contact your Toyota dealer.
For more information about replacing other light bulbs, contact your
Toyota dealer.
■ Preparing for light bulb replacement
Check the wattage of the light bulb to be replaced. ( P. 644)
■ Removing the engine compartment cover
P. 521
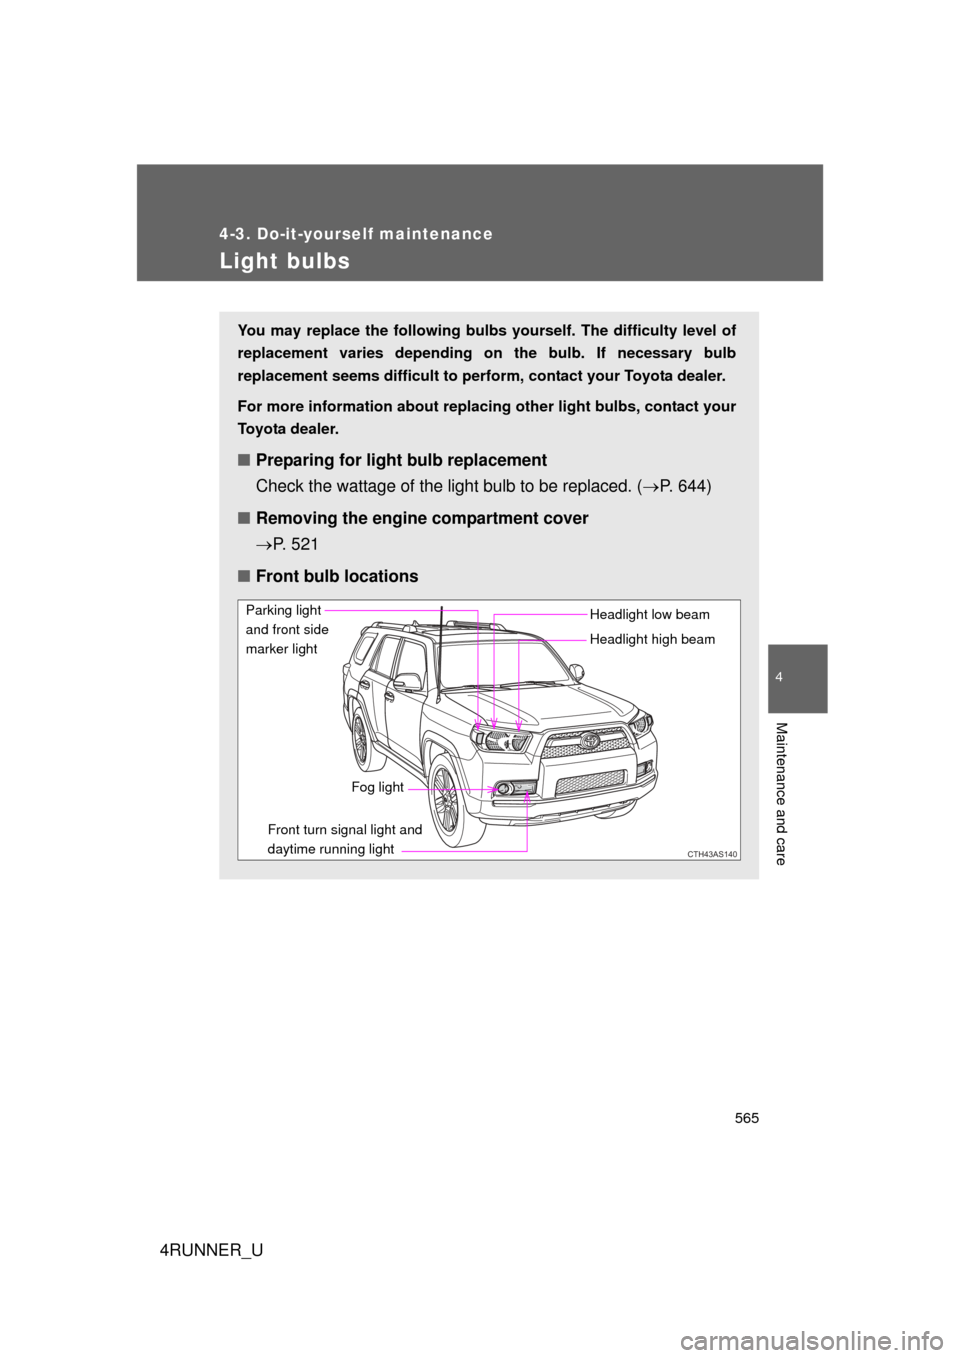
■ Front bulb locations
CTH43AS140
Parking light
and front side
marker light
Fog light Headlight high beam Headlight low beam
Front turn signal light and
daytime running light
Page 566 of 700
566 4-3. Do-it-yourself maintenance
4RUNNER_U
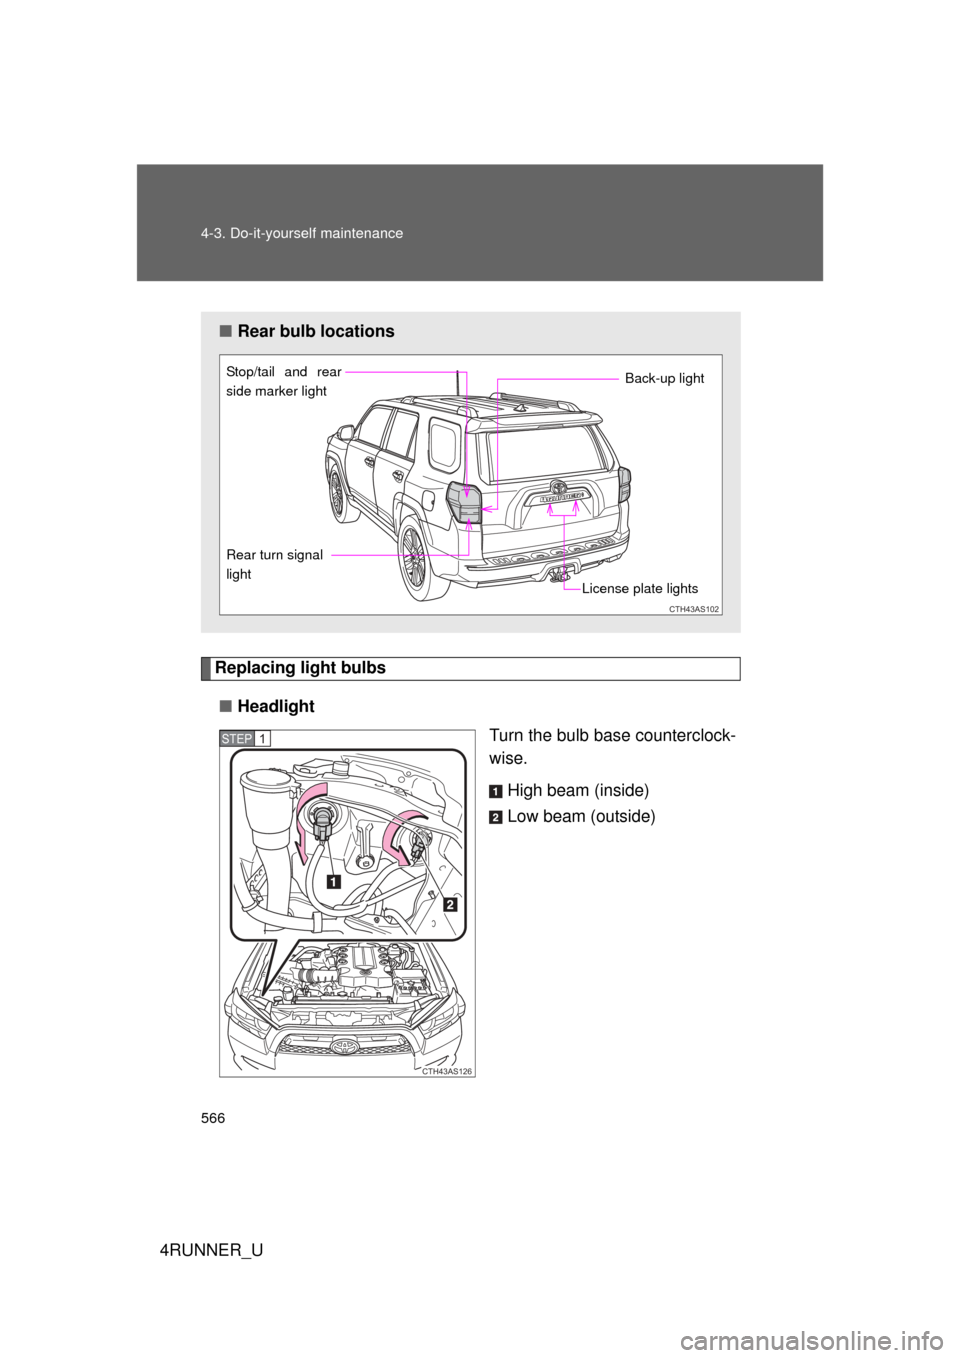
Replacing light bulbs■ Headlight
Turn the bulb base counterclock-
wise.
High beam (inside)
Low beam (outside)
■Rear bulb locations
CTH43AS102
License plate lights
Rear turn signal
light
Back-up light Stop/tail and rear
side marker light
CTH43AS126
STEP 1
Page 567 of 700
567
4-3. Do-it-yourself maintenance
4
Maintenance and care
4RUNNER_U
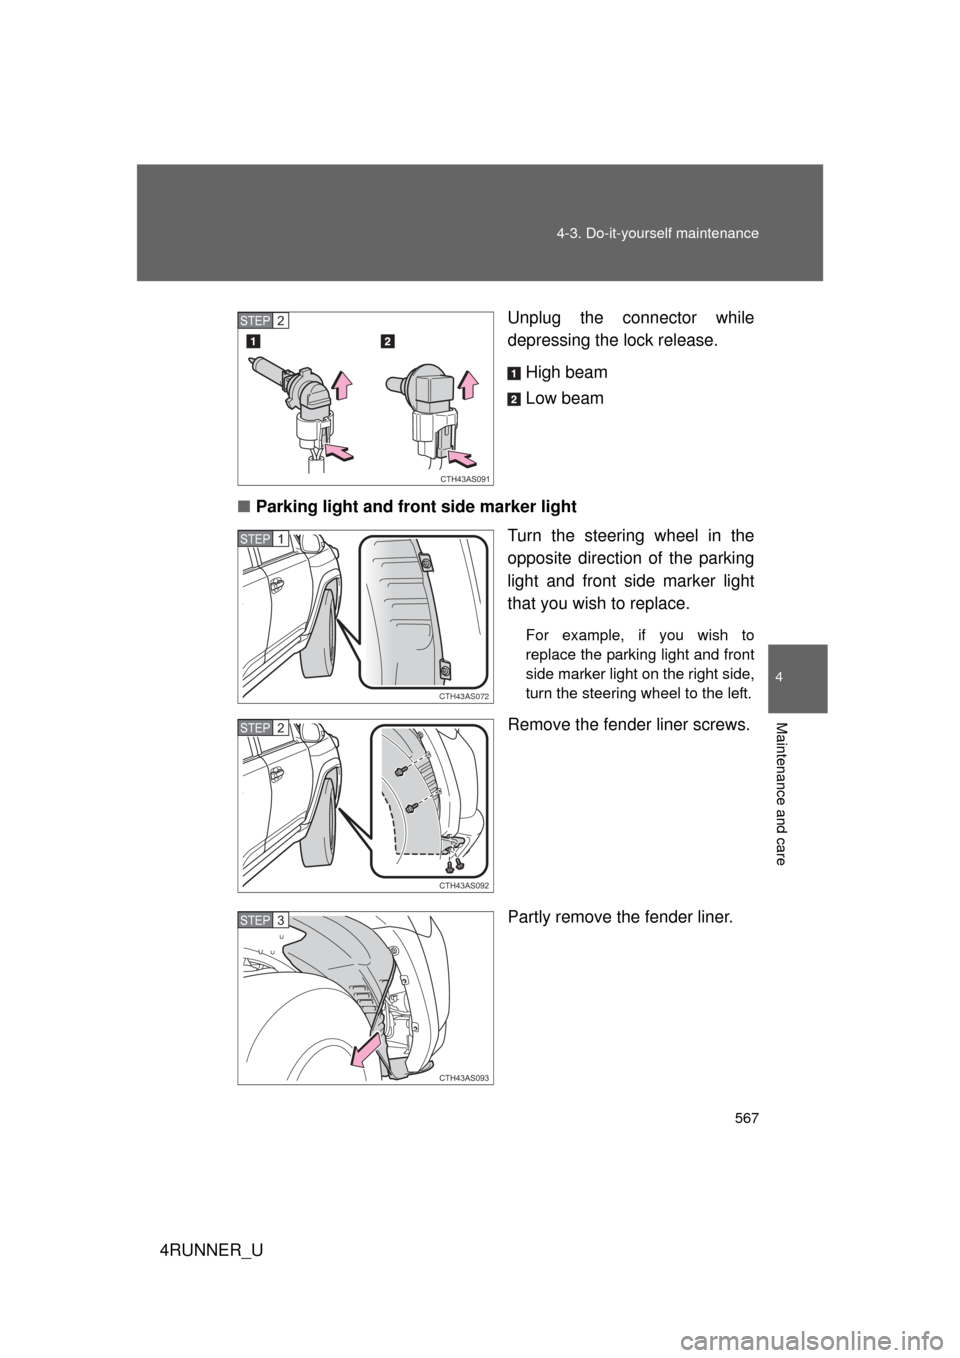
Unplug the connector while
depressing the lock release.
High beam
Low beam
■ Parking light and front side marker light
Turn the steering wheel in the
opposite direction of the parking
light and front side marker light
that you wish to replace.
For example, if you wish to
replace the parking light and front
side marker light on the right side,
turn the steering wheel to the left.
Remove the fender liner screws.
Partly remove the fender liner.
CTH43AS091
STEP 2
CTH43AS072
STEP 1
CTH43AS092
STEP 2
CTH43AS093
STEP 3
Page 568 of 700
568 4-3. Do-it-yourself maintenance
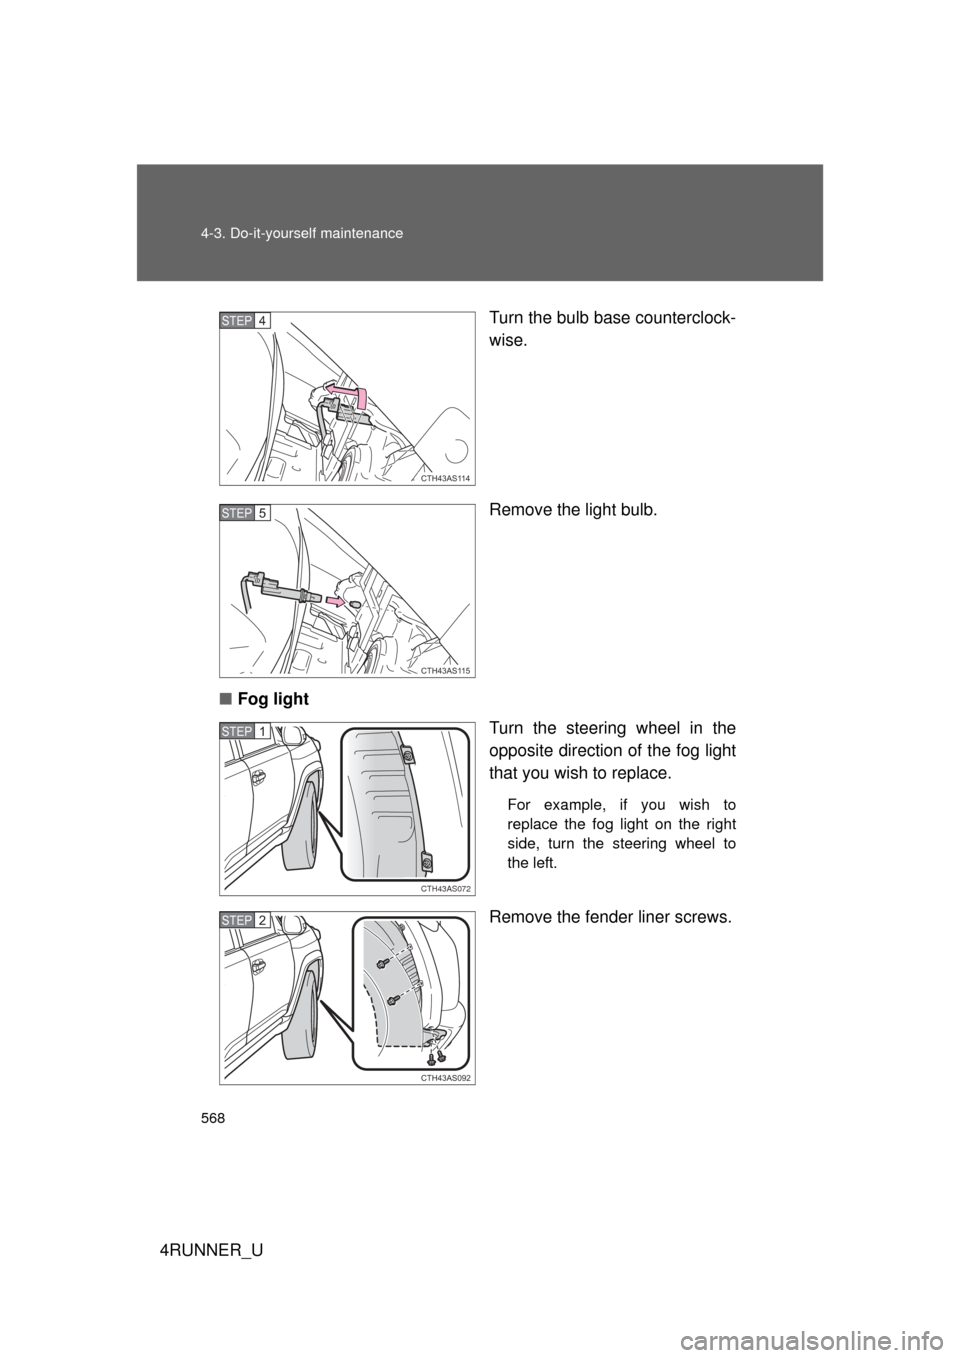
4RUNNER_UTurn the bulb base counterclock-
wise.
Remove the light bulb.
■ Fog light
Turn the steering wheel in the
opposite direction of the fog light
that you wish to replace.
For example, if you wish to
replace the fog light on the right
side, turn the steering wheel to
the left.
Remove the fender liner screws.
CTH43AS114
STEP 4
CTH43AS115
STEP 5
CTH43AS072
STEP 1
CTH43AS092
STEP 2
Page 569 of 700
569
4-3. Do-it-yourself maintenance
4
Maintenance and care
4RUNNER_U
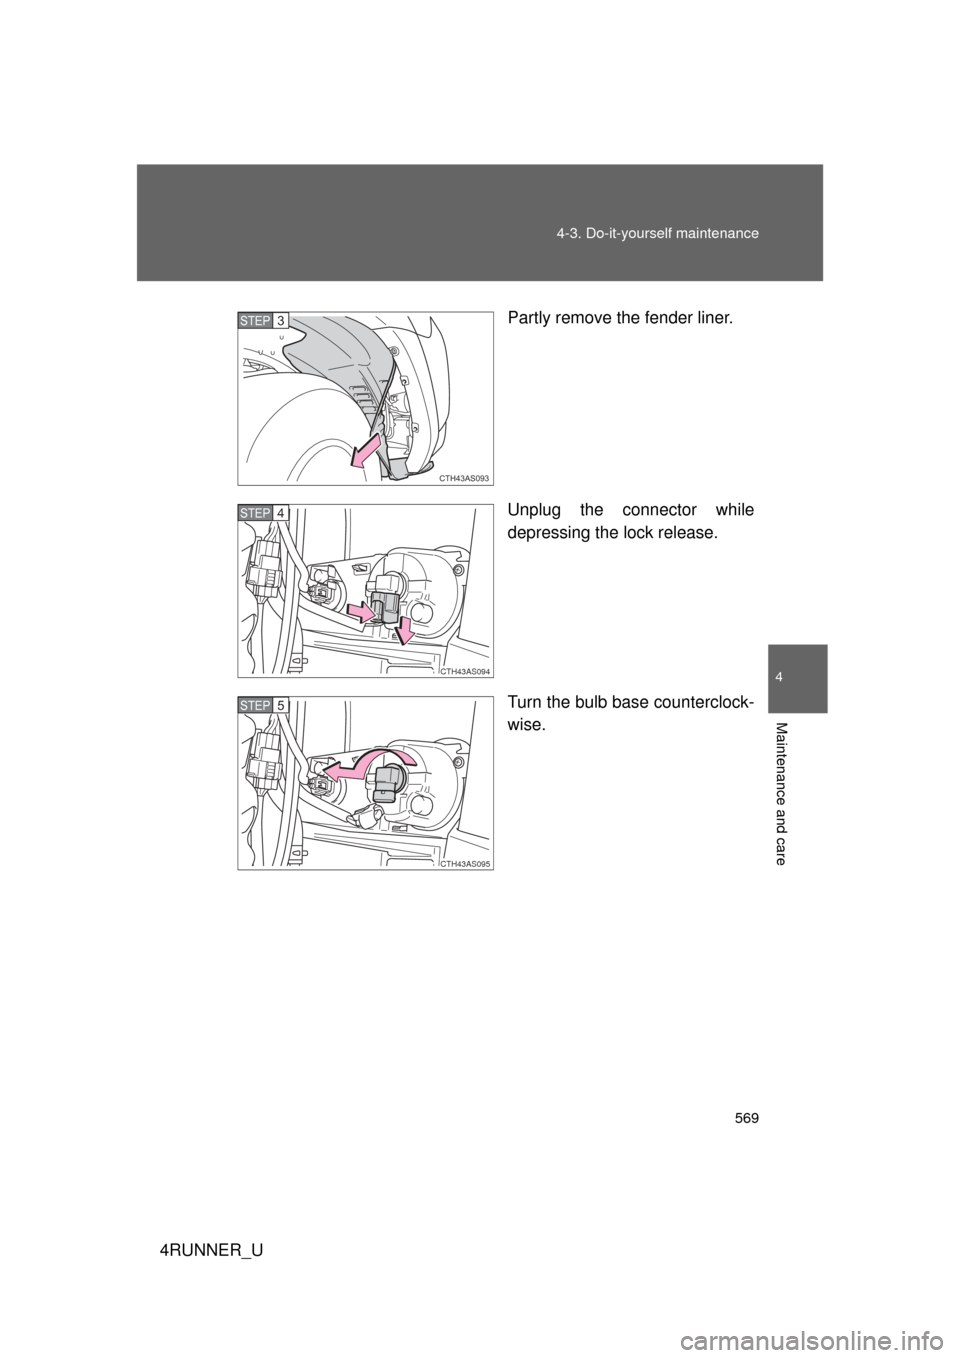
Partly remove the fender liner.
Unplug the connector while
depressing the lock release.
Turn the bulb base counterclock-
wise.
CTH43AS093
STEP 3
CTH43AS094
STEP 4
CTH43AS095
STEP 5
Page 570 of 700
570 4-3. Do-it-yourself maintenance
4RUNNER_U■
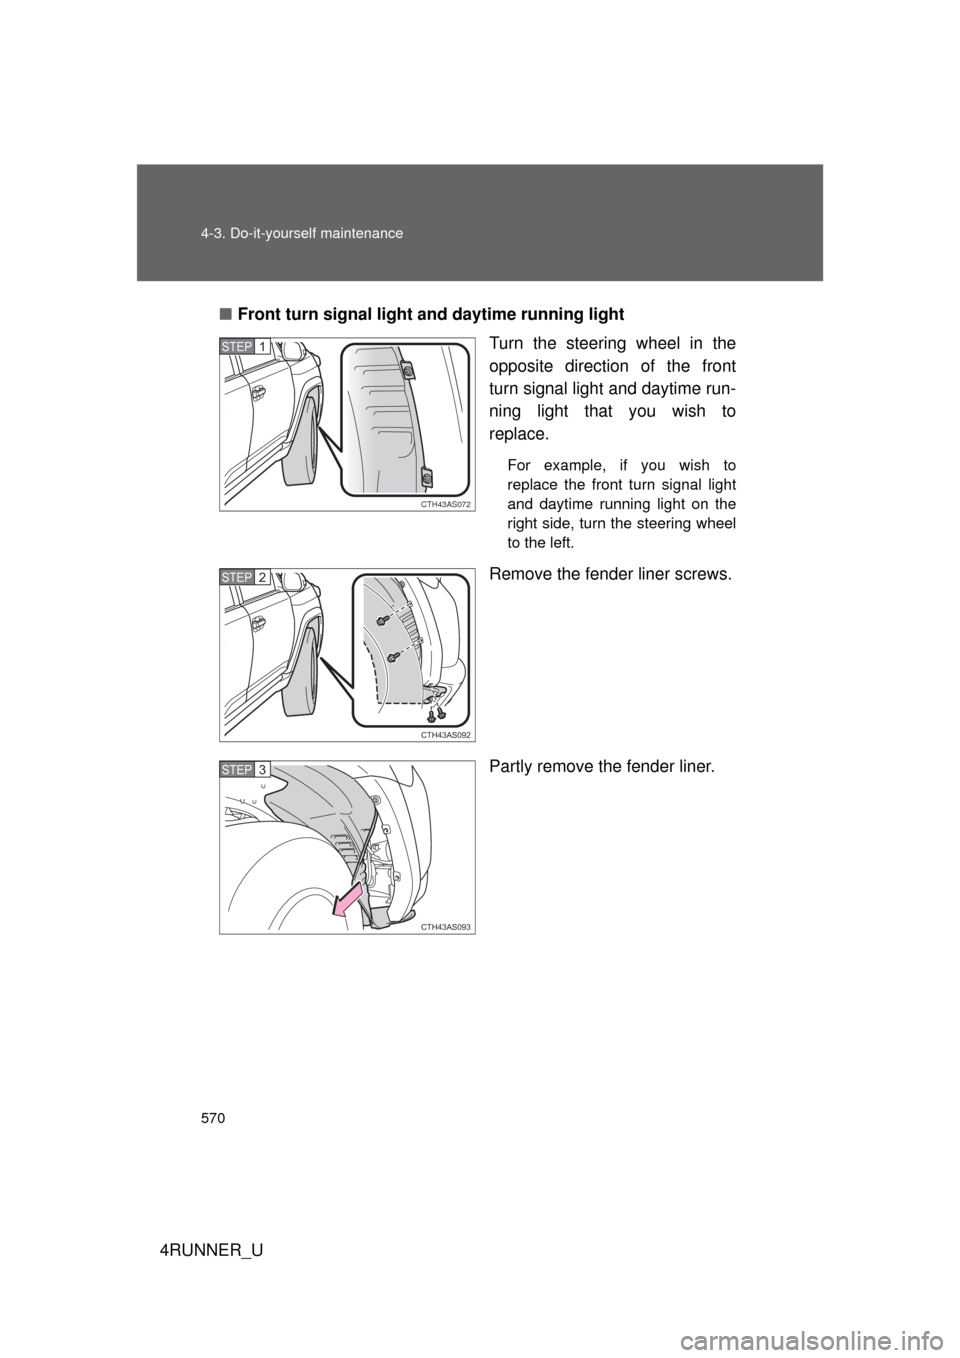
Front turn signal light and daytime running light
Turn the steering wheel in the
opposite direction of the front
turn signal light and daytime run-
ning light that you wish to
replace.
For example, if you wish to
replace the front turn signal light
and daytime running light on the
right side, turn the steering wheel
to the left.
Remove the fender liner screws.
Partly remove the fender liner.
CTH43AS072
STEP 1
CTH43AS092
STEP 2
CTH43AS093
STEP 3
Trending: fog light, ECO mode, brake, spark plugs, service indicator, emergency towing, ignition
