reset TOYOTA 4RUNNER 2022 Owners Manual
[x] Cancel search | Manufacturer: TOYOTA, Model Year: 2022, Model line: 4RUNNER, Model: TOYOTA 4RUNNER 2022Pages: 616, PDF Size: 12.01 MB
Page 91 of 616

912. Instrument cluster
2
Instrument cluster
4RUNNER (U)
Switches between odometer and
trip meter displays. When the trip
meter is displayed, pressing and
holding the button will reset the
trip meter.
The brightness of the instrument panel lights can be adjusted.Brighter
Darker
■The meters and display illuminate when
Vehicles without a smart key system
The engine switch is in the “ON” position.
Vehicles with a smart key system
The engine switch is in IGNITION ON mode.
■ The brightness of the instrument panel lights
When the headlight switch is turned to on, the brightness will be reduced
slightly unless the control dial is turned fully upward.
Changing the display
Instrument panel light control
1
2
NOTICE
■ To prevent damage to the engine and its components
● Do not let the indicator needle of the tachometer enter the red zone, which
indicates the maximum engine speed.
● The engine may be overheating if the engine coolant temperature gauge is
in the red zone (H). In this case, immediately stop the vehicle in a safe
place, and check the engine after it has cooled completely. ( P. 527)
Page 93 of 616
932. Instrument cluster
2
Instrument cluster
4RUNNER (U)
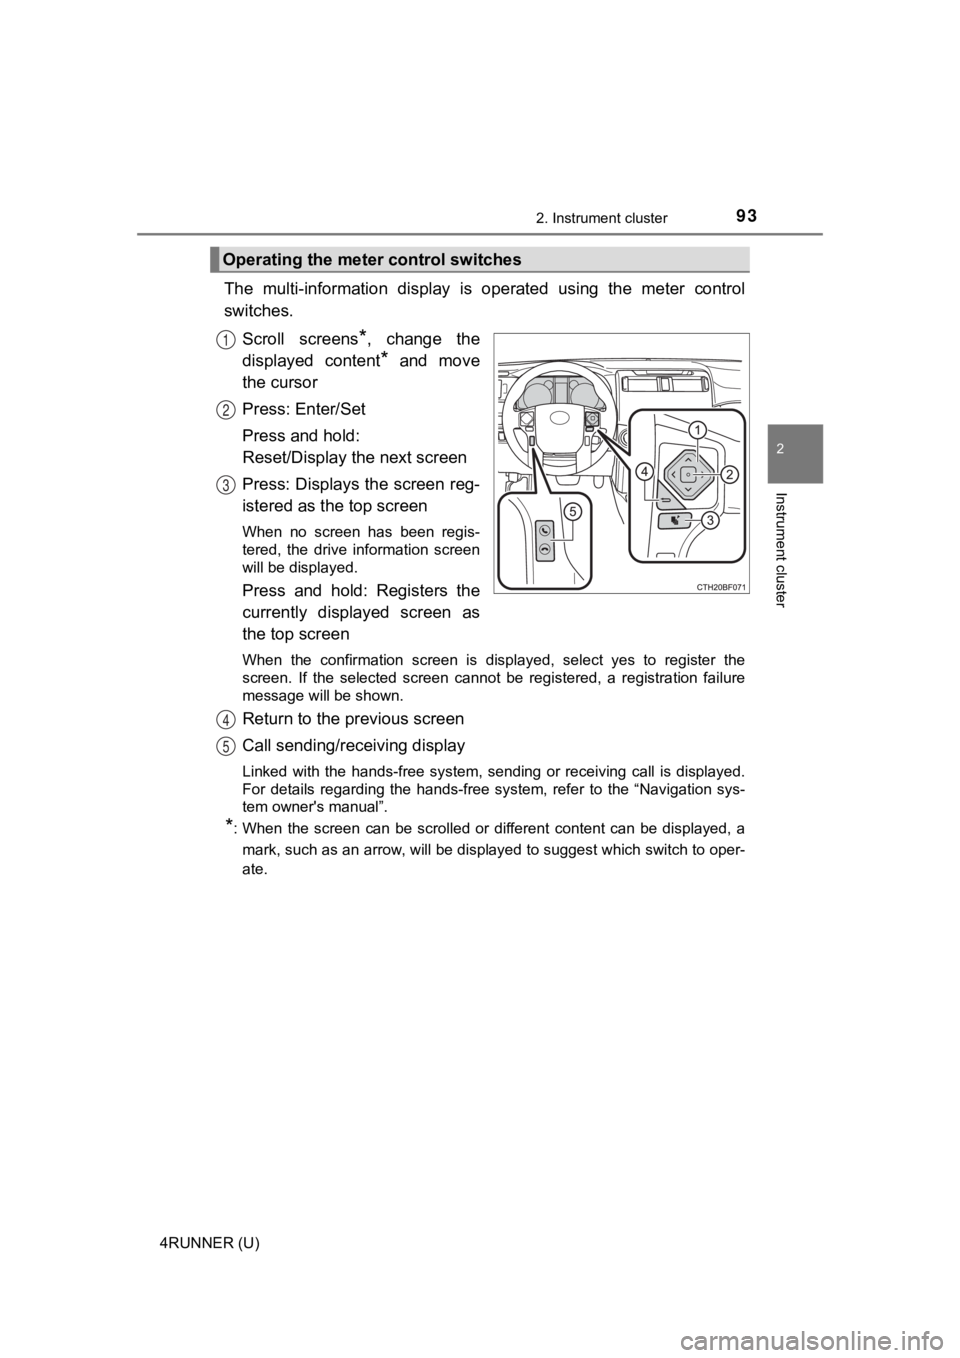
The multi-information display is operated using the meter contr ol
switches.
Scroll screens
*, change the
displayed content
* and move
the cursor
Press: Enter/Set
Press and hold:
Reset/Display the next screen
Press: Displays the screen reg-
istered as the top screen
When no screen has been regis-
tered, the drive information screen
will be displayed.
Press and hold: Registers the
currently displayed screen as
the top screen
When the confirmation screen is displayed, select yes to regist er the
screen. If the selected screen cannot be registered, a registra tion failure
message will be shown.
Return to the previous screen
Call sending/receiving display
Linked with the hands-free system, sending or receiving call is displayed.
For details regarding the hands-free system, refer to the “Navigation sys-
tem owner's manual”.
*: When the screen can be scrolled or different content can be displayed, a
mark, such as an arrow, will be displayed to suggest which switch to oper-
ate.
Operating the meter control switches
1
2
3
4
5
Page 95 of 616
952. Instrument cluster
2
Instrument cluster
4RUNNER (U)
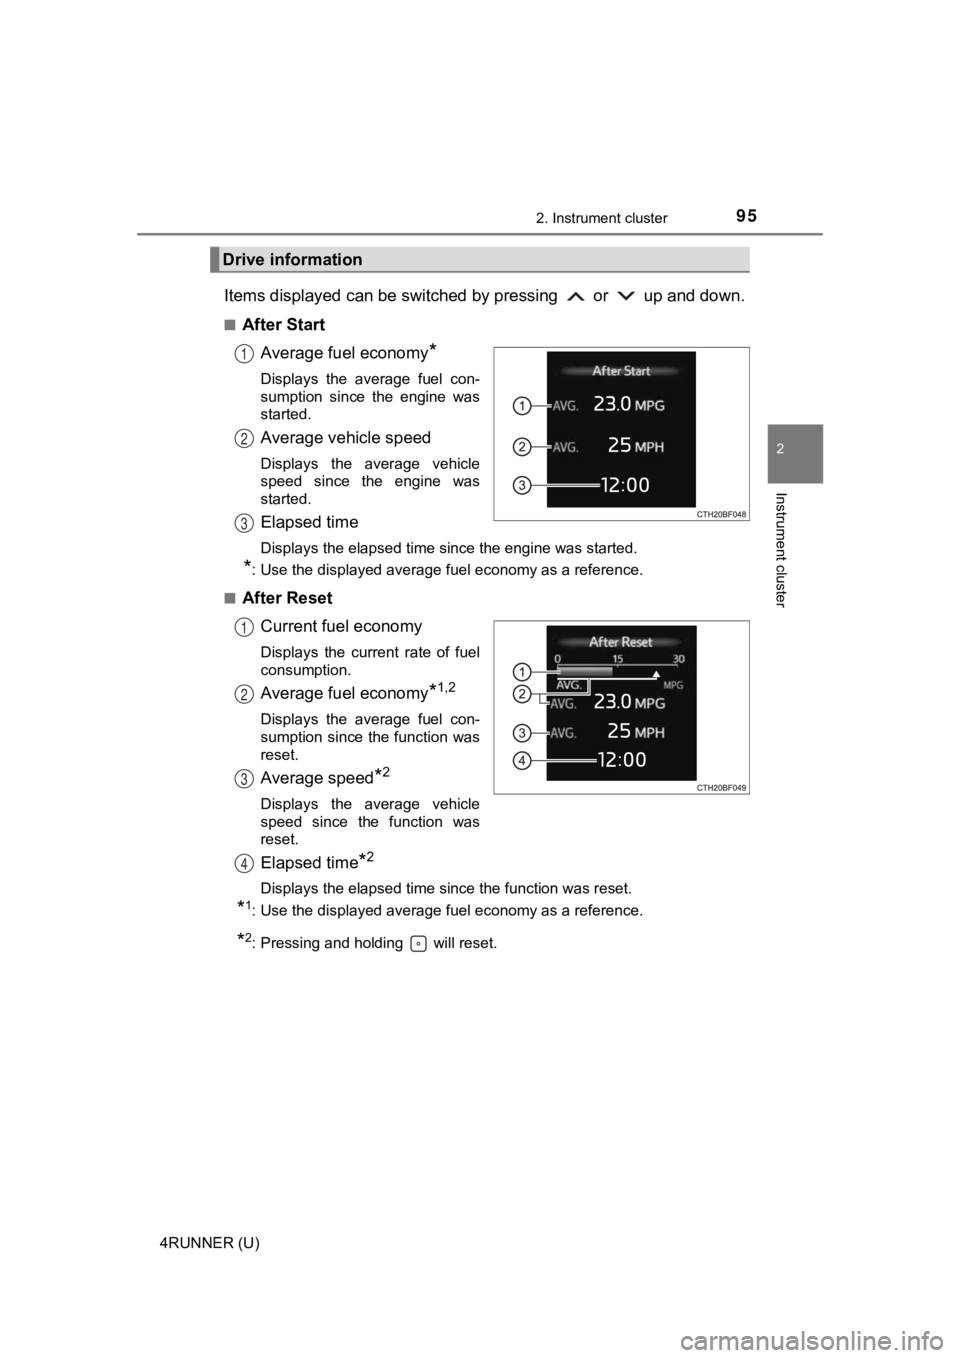
Items displayed can be switched by pressing or up and down.
■After StartAverage fuel economy
*
Displays the average fuel con-
sumption since the engine was
started.
Average vehicle speed
Displays the average vehicle
speed since the engine was
started.
Elapsed time
Displays the elapsed time since the engine was started.
*: Use the displayed average fuel economy as a reference.
■
After Reset Current fuel economy
Displays the current rate of fuel
consumption.
Average fuel economy*1,2
Displays the average fuel con-
sumption since the function was
reset.
Average speed*2
Displays the average vehicle
speed since the function was
reset.
Elapsed time*2
Displays the elapsed time since the function was reset.
*1: Use the displayed average fuel economy as a reference.
*2: Pressing and holding will reset.
Drive information
1
2
3
1
2
3
4
Page 99 of 616

992. Instrument cluster
2
Instrument cluster
4RUNNER (U)
●Meter settings ( P. 5 6 7 )
Select to set the following items.
• Language Select to change the language on the display.
•Units Select to change the unit for measure.
• Eco Driving Indicator Light Select to activate/deactivate the Eco Driving Indicator Light.
(
P. 100)
• switch settings You can register 1 screen as the top screen. To register, press
and hold while the desired screen is displayed.
• Pop-up display Select to set the pop-up displays ( P. 101), which may appear
in some situations, on/off.
• Initialization Select to reset the mete r display settings.
Page 148 of 616
1483-3. Adjusting the seats
4RUNNER (U)
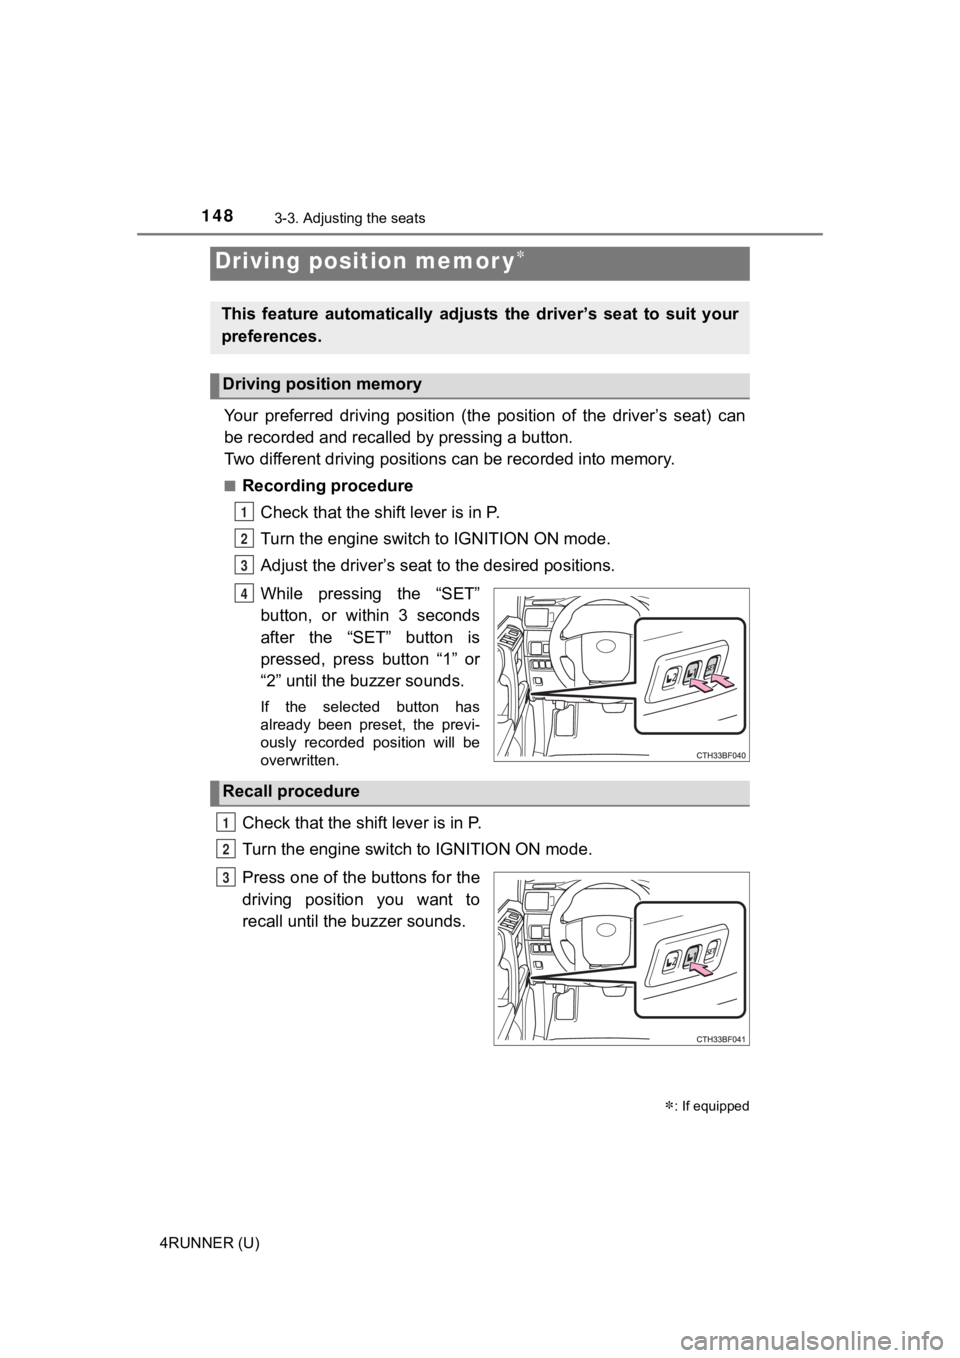
Your preferred driving position (the position of the driver’s seat) can
be recorded and recalled by pressing a button.
Two different driving positions can be recorded into memory.
■Recording procedure
Check that the shift lever is in P.
Turn the engine switch to IGNITION ON mode.
Adjust the driver’s seat t o the desired positions.
While pressing the “SET”
button, or within 3 seconds
after the “SET” button is
pressed, press button “1” or
“2” until the buzzer sounds.
If the selected button has
already been preset, the previ-
ously recorded position will be
overwritten.
Check that the shift lever is in P.
Turn the engine switch to IGNITION ON mode.
Press one of the buttons for the
driving position you want to
recall until the buzzer sounds.
Driving position memor y
: If equipped
This feature automatically adjusts the driver’s seat to suit yo ur
preferences.
Driving position memory
1
2
3
4
Recall procedure
1
2
3
Page 212 of 616
2124-2. Driving procedures
4RUNNER (U)
If the engine is stopped with the shift lever in a position other than P,
the engine switch will not be turned off but instead be turned to
ACCESSORY mode. Perform the following procedure to turn the
switch off:
Check that the park ing brake is set.
Shift the shift lever to P.
Check that “Turn Power Off” is displayed on the multi-informati on
display and then press the engine switch once.
Check that “Turn Power Off” on the multi-information display is
turned off.
■ Auto power off function
If the vehicle is left in ACCESSORY mode for more than 20 minut es or IGNI-
TION ON mode (the engine is not running) for more than an hour with the
shift lever in P, the engine switch will automatically turn off. However, this
function cannot entirely prevent battery discharge. Do not leav e the vehicle
with the engine switch in ACCESSORY or IGNITION ON mode for lon g peri-
ods of time when the engine is not running.
■ Automatic engine shut off feature
●The vehicle is equipped with a feature that automatically shuts off the
engine when the shift lever is in P with the engine running for an extended
period.
● The engine will automatically shut off after approximately 1 hour if it has
been left running while the shift lever is in P.
● The timer for the automatic engine shut off feature will reset if the brake
pedal is depressed or if the shift lever is in a position other than P.
● After the vehicle is parked, if the door is locked with the door lock switch
(P. 113) from the inside or the mechanical key (P. 520) from the outside,
the automatic engine shut off feature will be disabled. The tim er for the auto-
matic engine shut off feature will be re-enabled if the driver’ s door is
opened.
■ Electronic key battery depletion
P. 108
■ Conditions affecting operation
P. 123
■ Notes for the entry function
P. 124
When stopping the engine with the shift lever in a position other
than P
1
2
3
4
Page 385 of 616
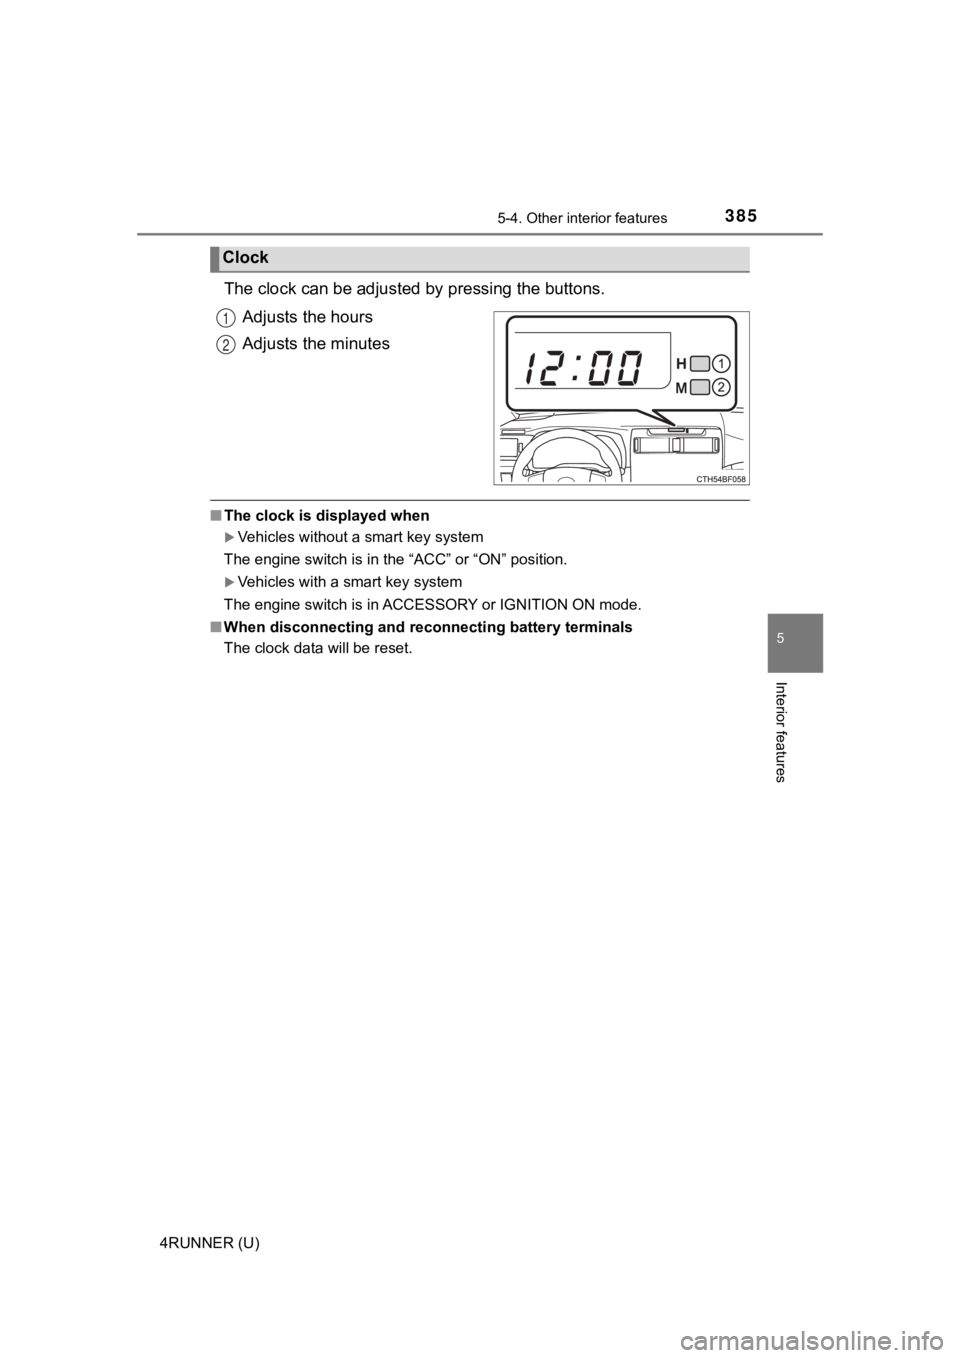
3855-4. Other interior features
5
Interior features
4RUNNER (U)
The clock can be adjusted by pressing the buttons.
Adjusts the hours
Adjusts the minutes
■ The clock is displayed when
Vehicles without a smart key system
The engine switch is in the “ACC” or “ON” position.
Vehicles with a smart key system
The engine switch is in ACCESSORY or IGNITION ON mode.
■ When disconnecting and reco nnecting battery terminals
The clock data will be reset.
Clock
1
2
Page 412 of 616

4126-2. Maintenance
4RUNNER (U)■
Resetting the message indicating maintenance is required (U.S.A. only)
After the required maintenance is performed according to the ma intenance
schedule, please reset the message.
To reset the message, follow the procedures described below:
Turn the engine switch off with the trip meter A reading shown. (P. 91)
Vehicles without a smart key system:
While pressing the display change button ( P. 91), turn the engine switch
to the “ON” position (do not start the engine because reset mode will be
canceled).
Vehicles with a smart key system:
While pressing the display change button ( P. 91), turn the engine switch
to the IGNITION ON mode (do not start the engine because otherw ise the
reset mode will be canceled).
Continue to press and hold the button until the trip meter disp lays “000000”.
■ Allow inspection and repairs to be performed by a Toyota dealer
●Toyota technicians are well-trained specialists and are kept up to date with
the latest service information. They are well informed about the operations
of all systems on your vehicle.
● Keep a copy of the repair order. It proves that the maintenance that has
been performed is under warranty coverage. If any problem shoul d arise
while your vehicle is under warranty, your Toyota dealer will p romptly take
care of it.
WARNING
■ If your vehicle is no t properly maintained
Improper maintenance could result in serious damage to the vehi cle and
possible death or serious injury.
■ Handling of the battery
● Engine exhaust, some of its constituents, and a wide variety of automobile
components contain or emit chemicals known to the State of Cali fornia to
cause cancer and birth defects and other reproductive harm. Work in a
well ventilated area.
● Oils, fuels and fluids contained in vehicles as well as waste produced by
component wear contain or emit chemicals known to the State of Califor-
nia to cause cancer and birth defects or other reproductive har m. Avoid
exposure and wash any affected area immediately.
● Battery posts, terminals and related accessories contain lead and lead
compounds which are known to cause brain damage. Wash your hands
after handling. ( P. 430)
1
2
3
Page 444 of 616

4446-3. Do-it-yourself maintenance
4RUNNER (U)■
The initialization operation
●Make sure to carry out initializ
ation after adjusting the tire inflation pres-
sure.
Also, make sure the tires are co ld before carrying out initialization or tire
inflation pressure adjustment.
●If you have accidentally turned the engine switch to the “LOCK” position
(vehicles without a smart key system) or off (vehicles with a s mart key
system) during initialization, it is not necessary to press the reset switch
again as initialization will rest art automatically when the engine switch
has been turned to the “ON” posi tion (vehicles without a smart key sys-
tem) or IGNITION ON mode (vehicl es with a smart key system) for the
next time.
●If you accidentally press the reset switch when initialization is not neces-
sary, adjust the tire inflation pressure to the specified level when the
tires are cold, and cond uct initialization again.
●While the position of each tire is being determined and the inf lation pres-
sures are not being displayed on the multi-information display, if the
inflation pressure of a tire drops, the tire pressure warning l ight will come
on.
■When initialization of the tire pressure warning system has fai led
●Do not move the vehicle backward during initialization. Initialization is
started again from the beginning and it may take longer than usual.
●Initialization may take longer to complete if the vehicle is driven on an
unpaved road.
When performing initialization, drive on a paved road if possib le.
Depending on the driving environment and condition of the tires , initial-
ization will be complet ed in approximately 10 to 30 minutes.
• If initialization is not complet e after driving approximately 30 minutes,
continue driving for a while.
• If initialization is not complet e after driving approximately 1 hour, park
the vehicle in a safe place for approximately 20 minutes. Then drive
straight (with occasional left a nd right turns) at approximatel y 25 mph
(40 km/h) or more
* for approximately 10 to 30 minutes.
• If initialization is still not co mplete, have the vehicle inspected by your
Toyota dealer.
*: Except when making a left/right turn
●In the following situations, the tire inflation pressure will n ot be recorded
and the system will not operate p roperly. Perform initialization again.
• When operating the tire pressure warning reset switch, the tir e pres-
sure warning light does not blink 3 times.
• After performing initialization, the tire pressure warning light blinks for
1 minute then stays on after driving for about 20 minutes.
Page 446 of 616

4466-3. Do-it-yourself maintenance
4RUNNER (U)
WARNING
■When inspecting or replacing tires
Observe the following precautions to prevent accidents.
Failure to do so may cause damage to parts of the drive train as well as
dangerous handling characteristics, which may lead to an accide nt
resulting in death o r serious injury.
●Do not mix tires of different ma kes, models or tread patterns.
Also, do not mix tires of remarkably different treadwear.
●Do not use tire sizes other th an those recommended by Toyota.
●Do not mix differently constructed tires (radial, bias-belted o r bias-ply
tires).
●Do not mix summer, all season and snow tires.
●Do not use tires that have been used on another vehicle.
Do not use tires if you do not kn ow how they were used previous l y.
■When initializing the tire pressure warning system
Do not operate the tire pressure warning reset switch without first
adjusting the tire inflation pressure to the specified level. O therwise, the
tire pressure warning light may not come on even if the tire in flation
pressure is low, or it may come on when the tire inflation pres sure is
actually normal.