manual transmission TOYOTA 86 2018 Owner's Manual
[x] Cancel search | Manufacturer: TOYOTA, Model Year: 2018, Model line: 86, Model: TOYOTA 86 2018Pages: 532, PDF Size: 6.48 MB
Page 201 of 532
201
2-2. Instrument cluster
2
When driving
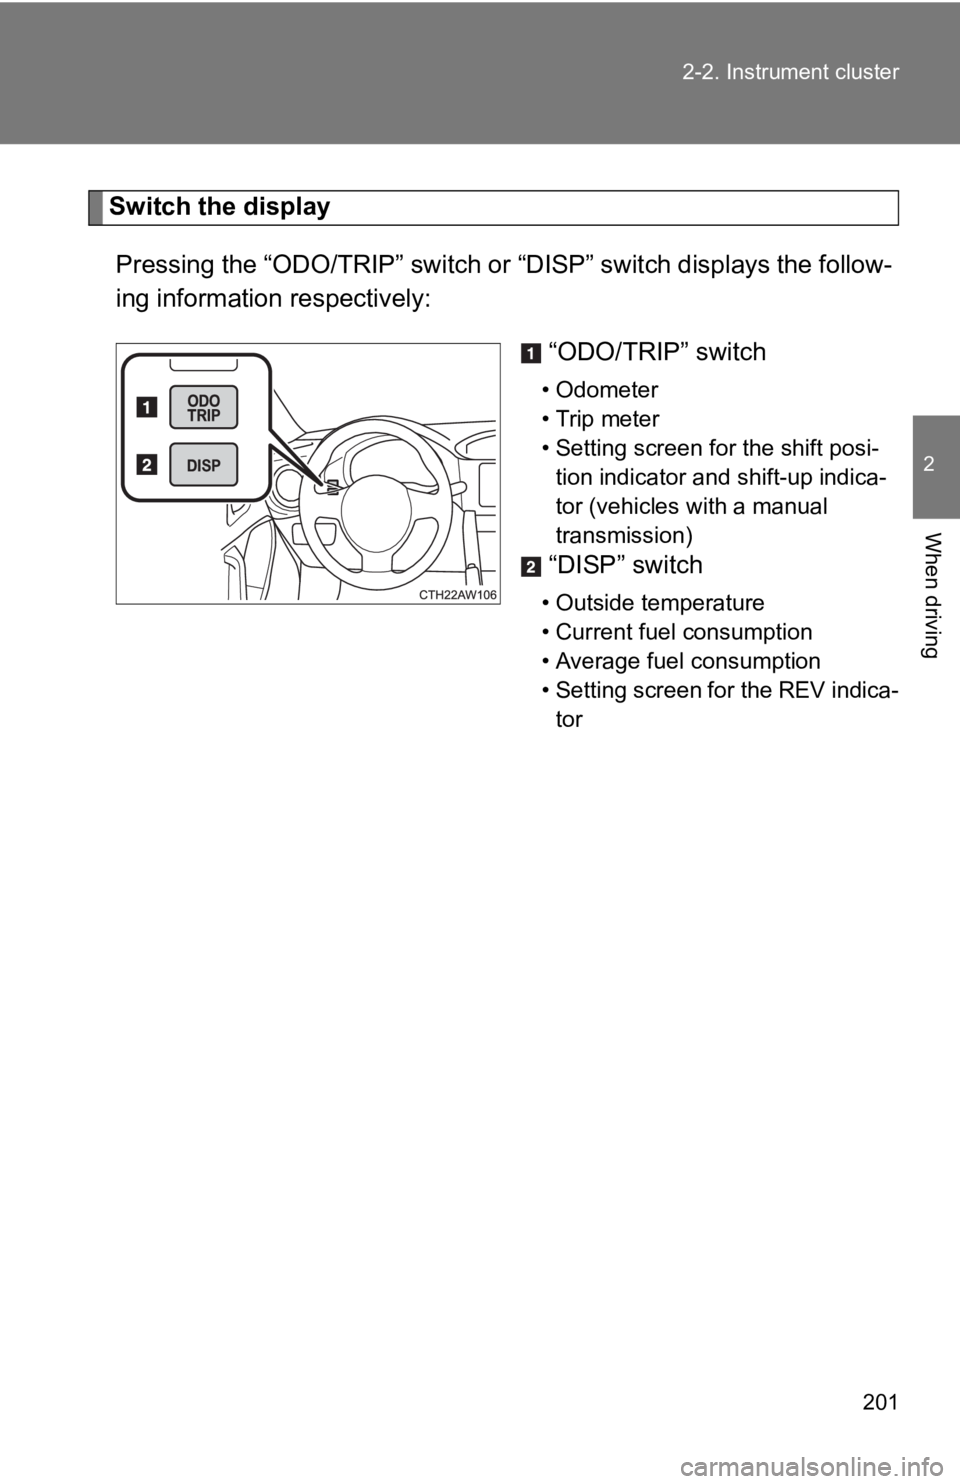
Switch the display
Pressing the “ODO/TRIP” switch or “DISP” switch displays the fo llow-
ing information respectively:
“ODO/TRIP” switch
• Odometer
• Trip meter
• Setting screen for the shift posi-tion indicator and shift-up indica-
tor (vehicles with a manual
transmission)
“DISP” switch
• Outside temperature
• Current fuel consumption
• Average fuel consumption
• Setting screen for the REV indica-tor
Page 202 of 532
202 2-2. Instrument cluster
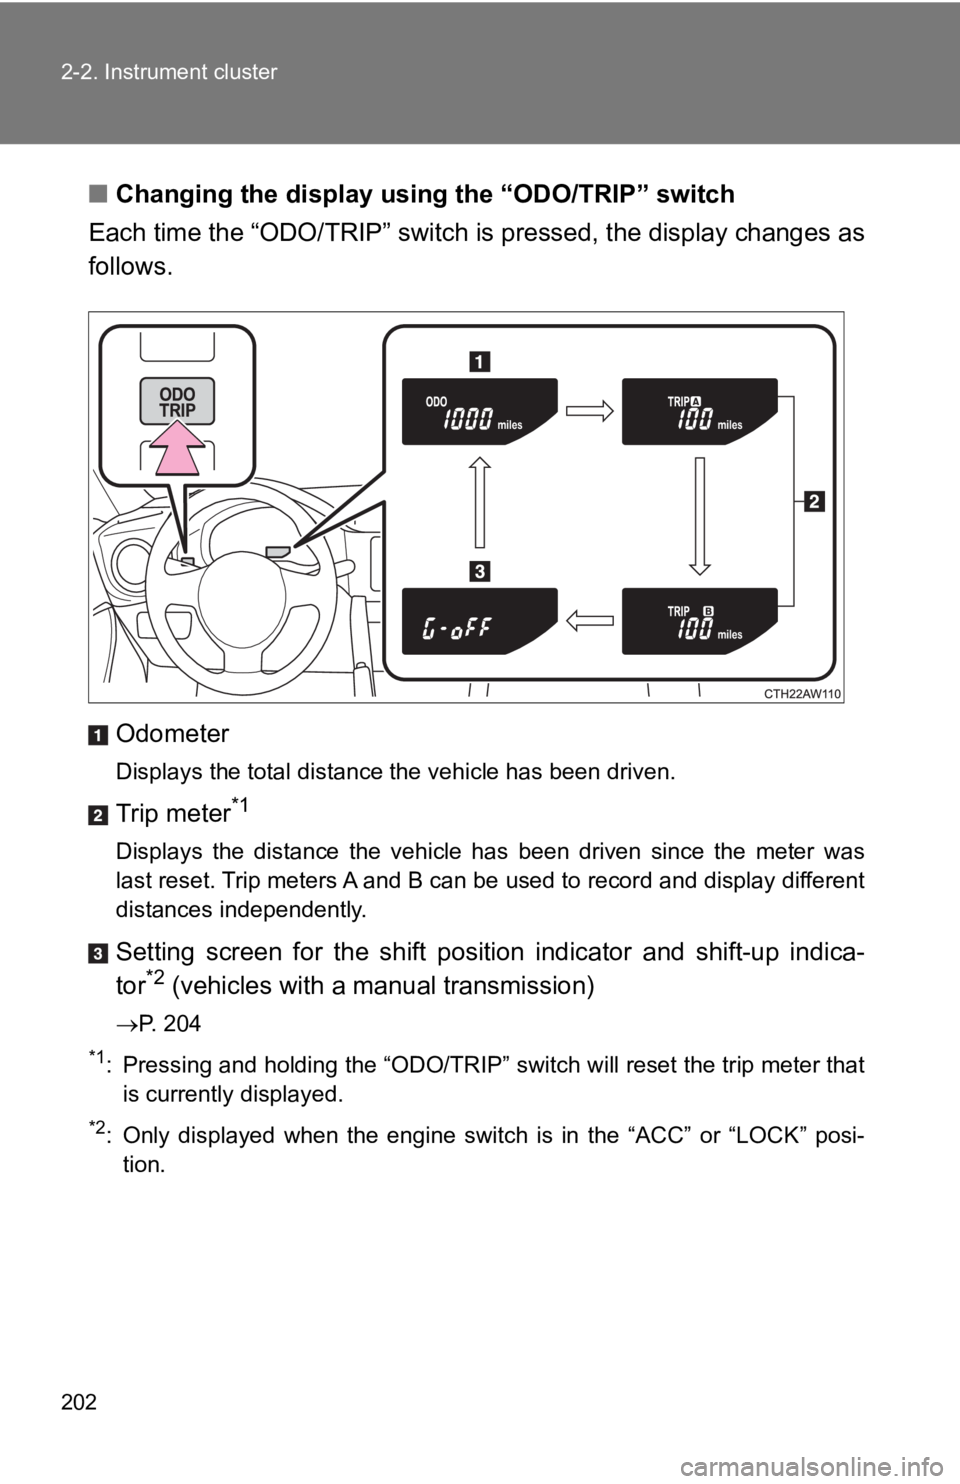
■Changing the display usi ng the “ODO/TRIP” switch
Each time the “ODO/TRIP” switch is pressed, the display changes as
follows.
Odometer
Displays the total distance the vehicle has been driven.
Trip meter*1
Displays the distance the vehicle has been driven since the met er was
last reset. Trip meters A and B can be used to record and display different
distances independently.
Setting screen for the shift position indicator and shift-up in dica-
tor*2 (vehicles with a manual transmission)
P. 204
*1: Pressing and holding the “ODO/TRIP” switch will reset the trip meter that
is currently displayed.
*2: Only displayed when the engine switch is in the “ACC” or “LOCK ” posi-
tion.
Page 204 of 532
204 2-2. Instrument cluster
Setting the shift position indicator and shift-up indicator
(vehicles with a manual transmission)
Displaying of the shift position indicator and shift-up indicat or can be
turned on/off.
Press the “ODO/TRIP” switch repeatedly until the setting
screen is displayed. ( P. 202)
Each time the switch is pressed and held, the display changes
between on/off.
“G-on”: Display on
“G-oFF”: Display off
Setting the REV indicator
■ Changing the REV in dicator settings
The engine speed at which the REV indicator turns on at and
whether a buzzer sounds or not w hen the light turns on can be set.
Engine speed setting range: F rom 2000 to 7400 rpm (r/min)
Press the “DISP” switch repeatedly until the setting screen is
displayed. ( P. 203)
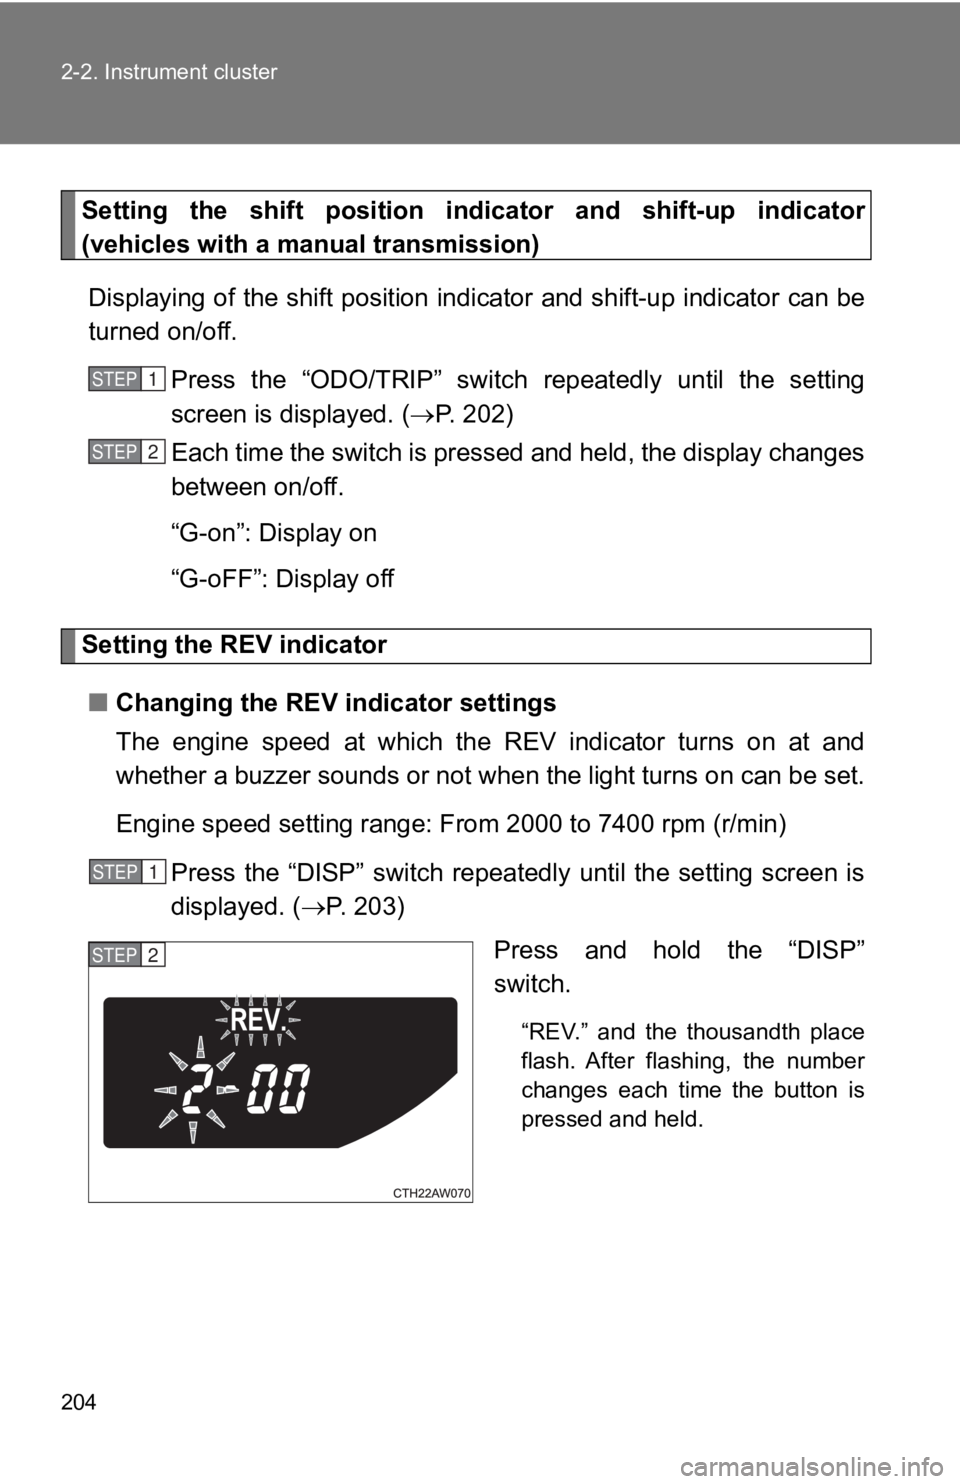
Press and hold the “DISP”
switch.
“REV.” and the thousandth place
flash. After flashing, the number
changes each time the button is
pressed and held.
STEP 1
STEP 2
STEP 1
STEP 2
Page 234 of 532
234 2-4. Using other driving systems
■Cruise control can be set when
Vehicles with an automatic transmission
●The shift lever is in D or M and the vehicle is in the 2
nd gear or higher.
● Vehicle speed is above approximately 25 mph (40 km/h).
Vehicles with a manual transmission
● The vehicle is in the 2
nd gear or higher.
● Vehicle speed is above approximately 25 mph (40 km/h).
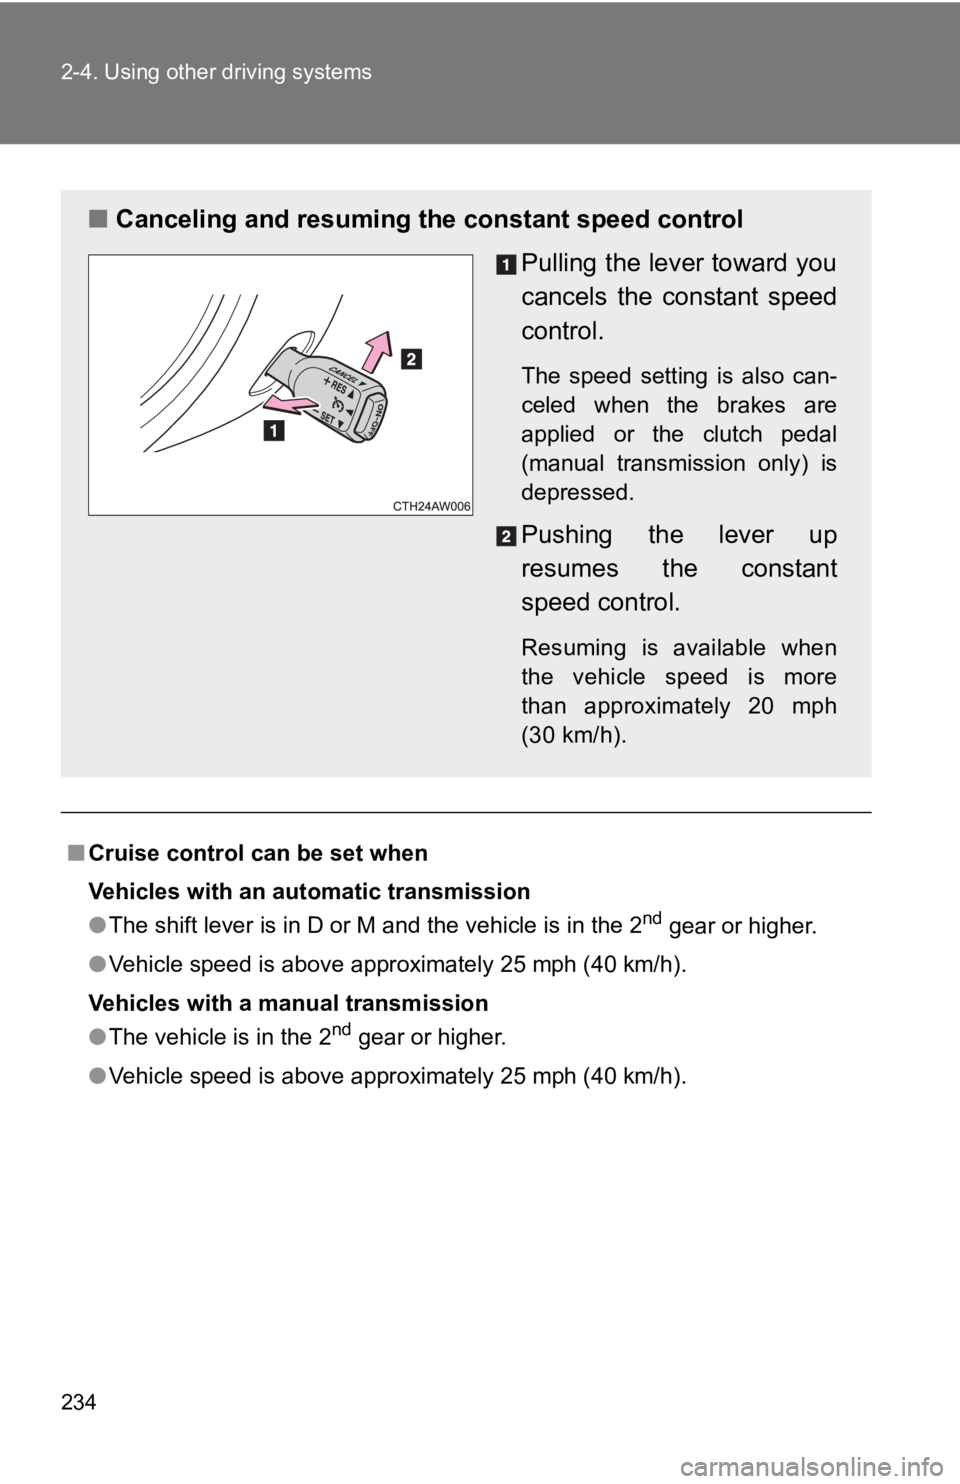
■ Canceling and resuming the constant speed control
Pulling the lever toward you
cancels the constant speed
control.
The speed setting is also can-
celed when the brakes are
applied or the clutch pedal
(manual transmission only) is
depressed.
Pushing the lever up
resumes the constant
speed control.
Resuming is available when
the vehicle speed is more
than approximately 20 mph
(30 km/h).
Page 237 of 532
237
2-4. Using other driving systems
2
When driving
Rear view monitor system
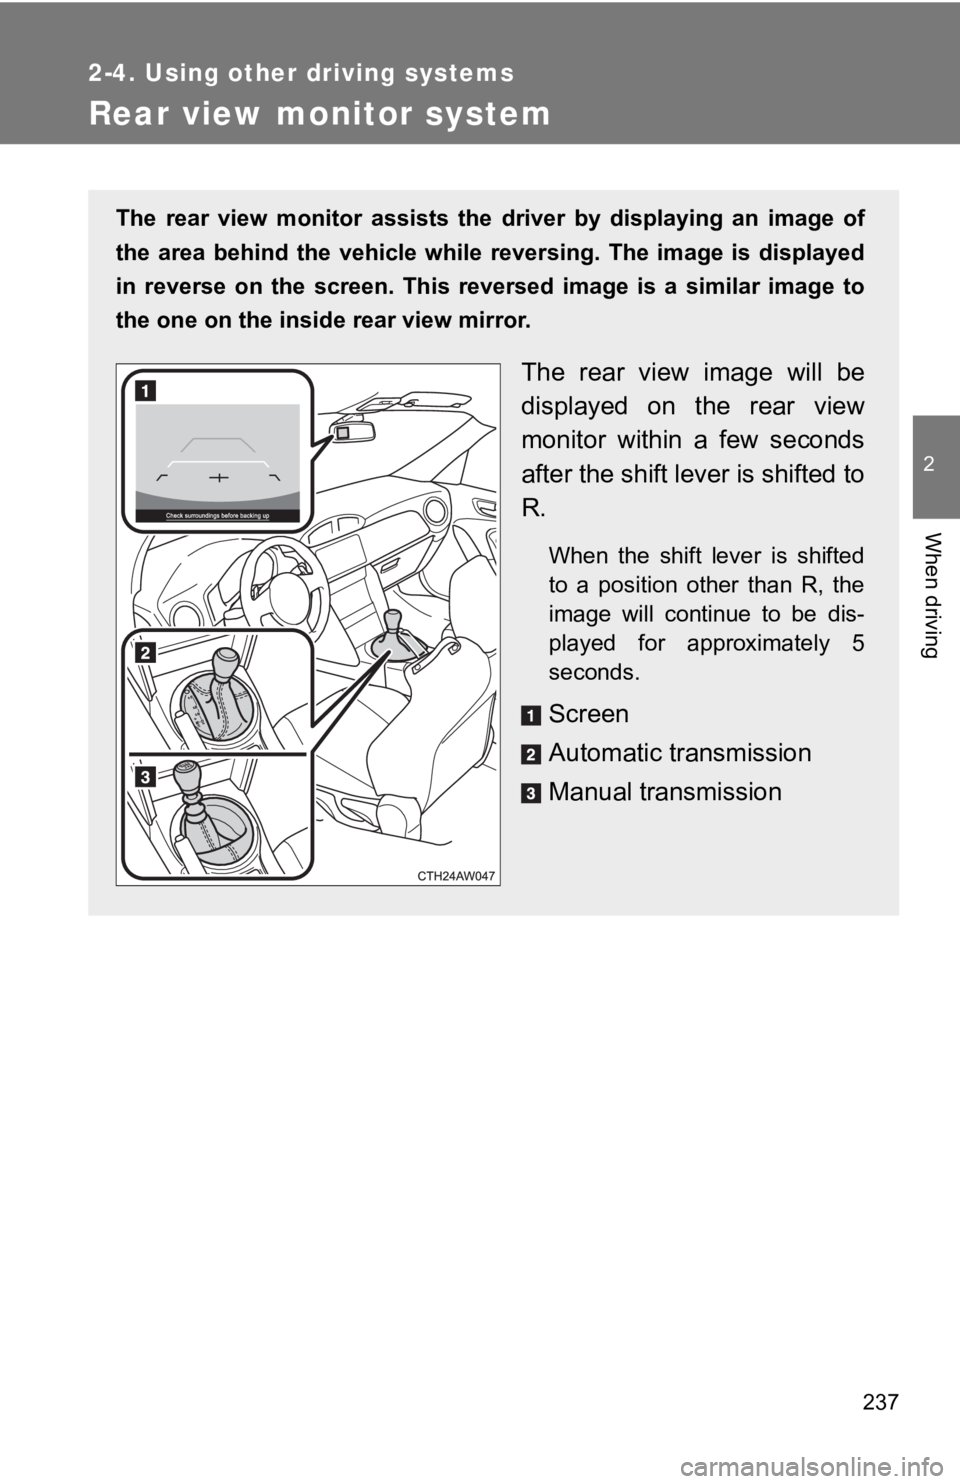
The rear view monitor assists the driver by displaying an image of
the area behind the vehicle while reversing. The image is displ ayed
in reverse on the screen. This reversed image is a similar imag e to
the one on the inside rear view mirror.
The rear view image will be
displayed on the rear view
monitor within a few seconds
after the shift lever is shifted to
R.
When the shift lever is shifted
to a position other than R, the
image will continue to be dis-
played for approximately 5
seconds.
Screen
Automatic transmission
Manual transmission
Page 248 of 532
248 2-4. Using other driving systems
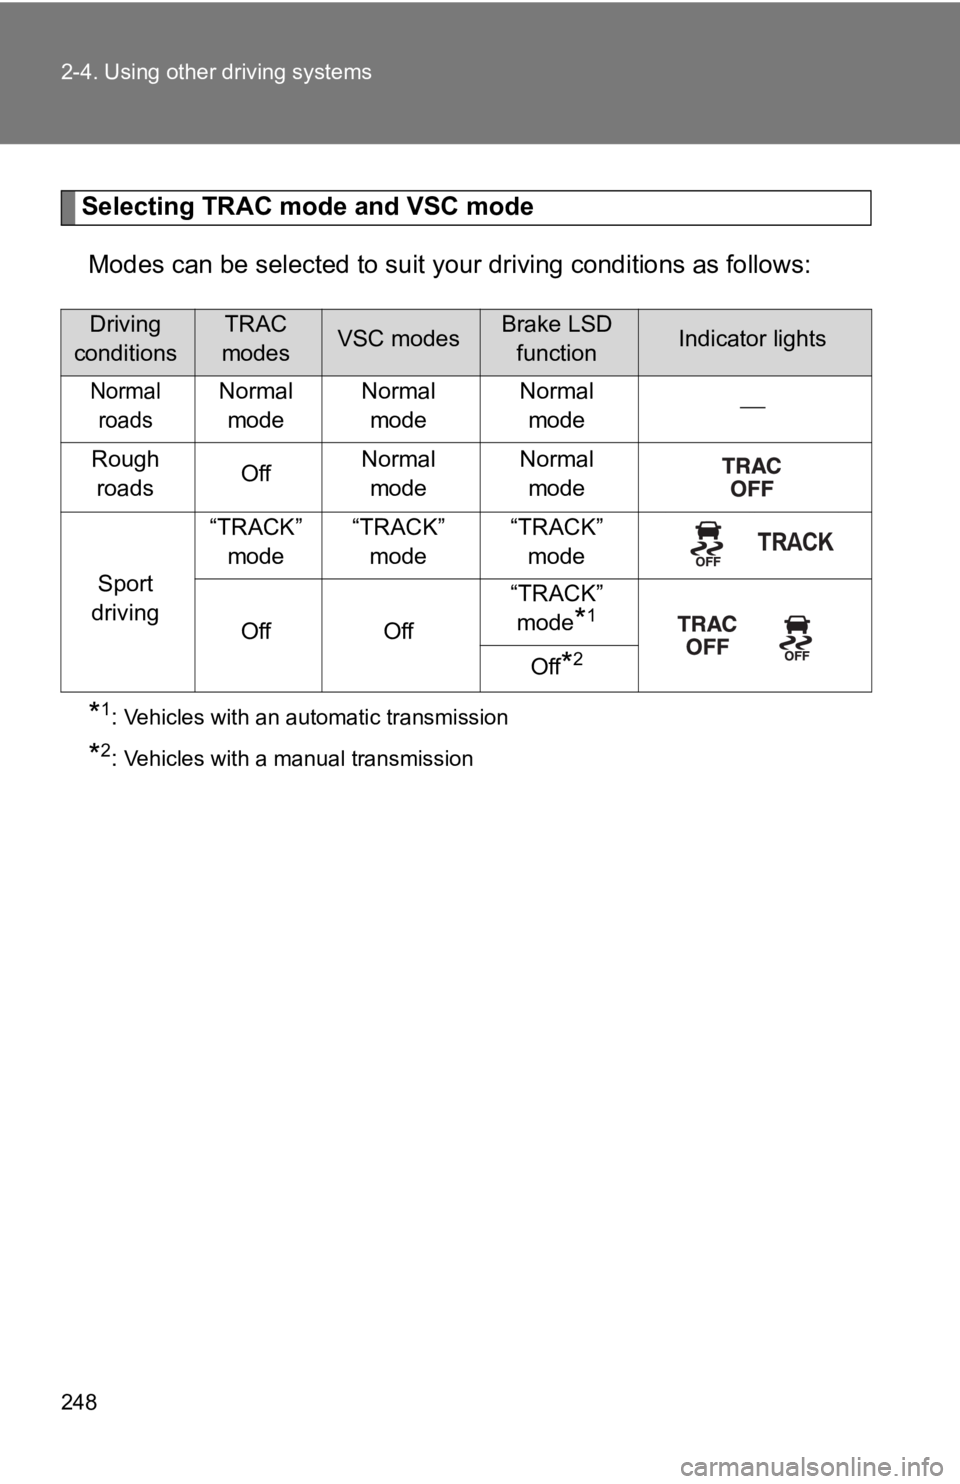
Selecting TRAC mode and VSC modeModes can be selected to suit y our driving conditions as follows:
*1: Vehicles with an automatic transmission
*2: Vehicles with a manual transmission
Driving
conditionsTRAC
modesVSC modesBrake LSD functionIndicator lights
Normal roadsNormal mode Normal
mode Normal
mode
Rough roads OffNormal
mode Normal
mode
Sport
driving “TRACK”
mode “TRACK”
mode “TRACK”
mode
Off Off “TRACK”
mode
*1
Off
*2
Page 254 of 532

254 2-4. Using other driving systems
■Operating conditions of hill-start assist control
When the following conditions are met, the hill-start assist co ntrol will oper-
ate:
● Vehicles with an automatic transmission: The shift lever is in D or M
(when starting off forward on while facing uphill) or in R (whe n starting off
backward while facing downhill).
● Vehicles with a manual transmission: The shift lever is in a po sition other
than R (when starting off forward while facing uphill) or in R (when start-
ing off backward while facing downhill).
● The vehicle is stopped.
● The accelerator pedal is not depressed.
● The parking brake is not engaged.
■ Hill-start assist control will not operate when
Hill-start assist control will not operate when any of the following conditions
are met:
●Vehicles with an automatic transmission: The shift lever is in a position
other than D or M (when facing uphill) or in a position other t han R (when
facing downhill).
● Vehicles with a manual transmission: The shift lever is in R (w hen facing
uphill) or in a position other than R (when facing downhill).
● Vehicles with an automatic transmission: The accelerator pedal is
depressed.
● The parking brake is applied.
● Vehicles with a manual transmission: The clutch is engaged.
● Approximately 2 seconds have elapsed since the brake pedal was
released.
● The hill-start assist control ON indicator is not illuminated.
● Vehicles without a smart key system: The engine switch is turne d to the
“ACC” or “LOCK” position.
● Vehicles with a smart key system: The “ENGINE START STOP” switc h is
turned to ACCESSORY mode or turned off.
Page 262 of 532
262 2-5. Driving information
●If a door is opened and closed wh en its side window is frozen,
the window safety device will operate and the side window
open/close function linked to door operation may not operate
correctly. If this occurs, perform the following after the ice has
melted.
Open the side window until it is approximately halfway open
with the door closed.
Fully close the window by pulling the switch up to the one-
touch closing position and cont inue holding the switch for 1
second or more after the window fully closes.
The window position is reset and the safety device operations w ill
be released.
■ When driving the vehicle
Accelerate the vehicle slowly, keep a safe distance between you
and the vehicle ahead, and drive at a reduced speed suitable to
road conditions.
■ When parking the vehicle (in the winter time or in the cold
latitudes)
Park the vehicle and move the shift lever to P (automatic trans -
mission) or 1 or R (manual transmission) without setting the
parking brake. The parking brake may freeze up, preventing it
from being released. If necessary, block the wheels to prevent
inadvertent sliding or creeping.
STEP 1
STEP 2
Page 304 of 532
304 3-5. Other interior features
WARNING
Observe the following precautions.
Failure to do so may cause the driver's floor mat to slip, possibly interfering
with the pedals while driving. An unexpectedly high speed may result or it may
become difficult to stop the vehicle. This could lead to an acc ident, resulting in
death or serious injury.
■ When installing a floor mat
●Do not use floor mats designed for other models or different mo del year
vehicles, even if they are Toyota Genuine floor mats.
● Driver’s seat floor mat: Only use floor mats designed for the d river's seat.
● Front: Always install the floor mat securely using the retaining hooks (clips)
provided.
● Do not use two or more floor mats on top of each other.
● Do not place the floor mat bottom-side up or upside-down.
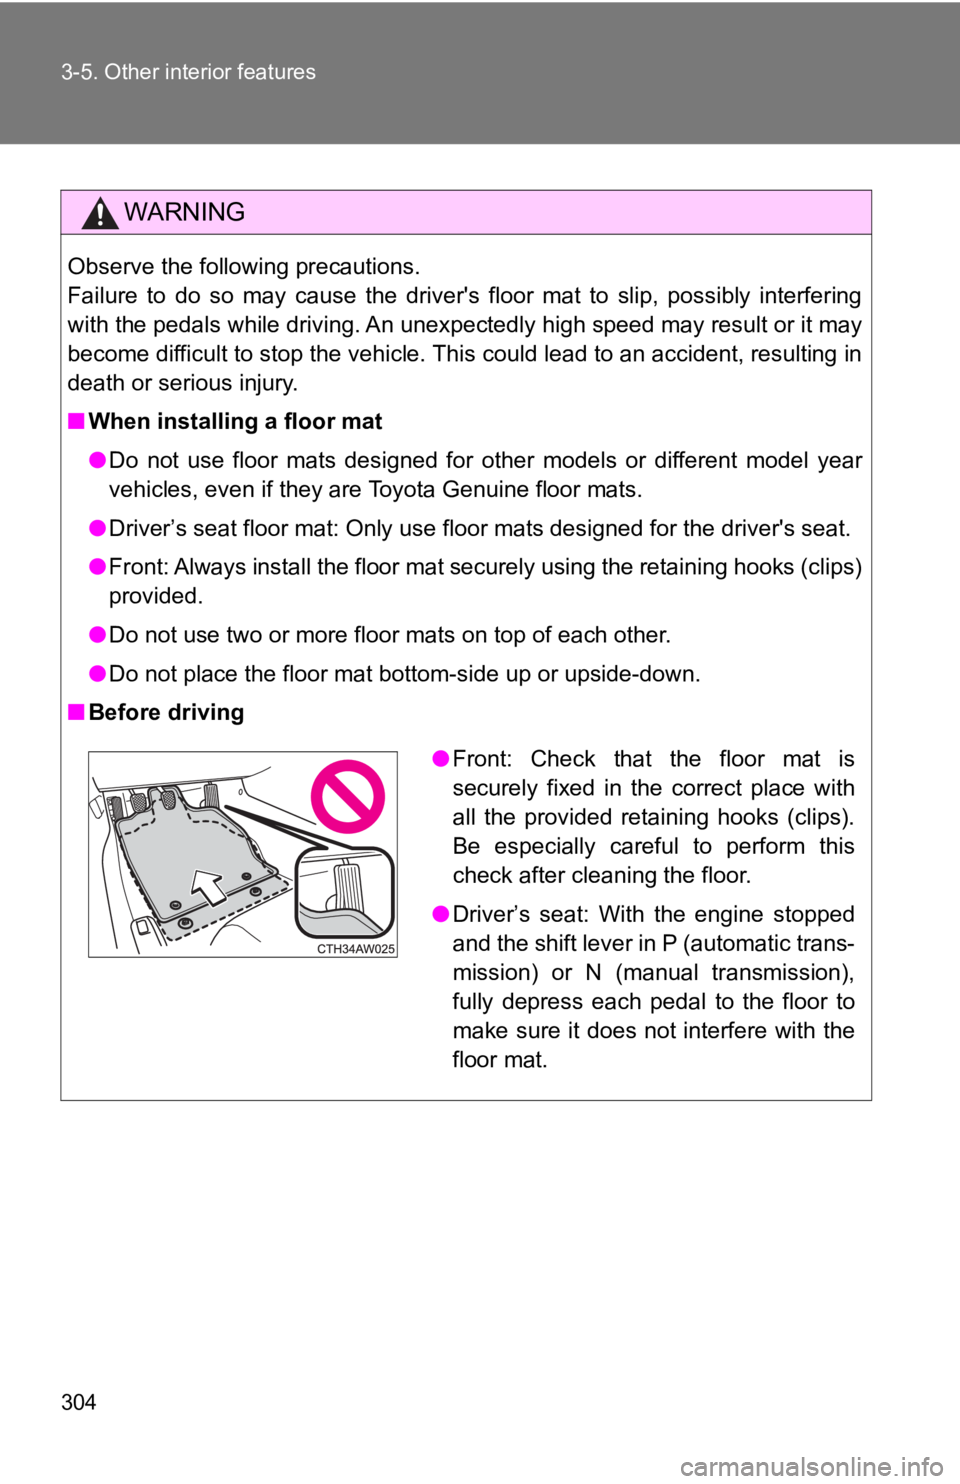
■ Before driving
●Front: Check that the floor mat is
securely fixed in the correct place with
all the provided retaining hooks (clips).
Be especially careful to perform this
check after cleaning the floor.
● Driver’s seat: With the engine stopped
and the shift lever in P (automatic trans-
mission) or N (manual transmission),
fully depress each pedal to the floor to
make sure it does not interfere with the
floor mat.
Page 330 of 532
330 4-3. Do-it-yourself maintenance
WARNING
■When raising your vehicle
Make sure to observe the following precautions to reduce the po ssibility of
death or serious injury:
● When using a floor jack, follow the instructions of the manual provided with
the jack.
● Do not use the jack that was supplied with your vehicle.
● Do not put any part of your body underneath the vehicle when it is sup-
ported only by the floor jack.
● Always use floor jack and/or automotive jack stands on a solid, flat, level
surface.
● Do not start the engine while the vehicle is supported by the floor jack.
● Stop the vehicle on level, firm ground, firmly set the parking brake and shift
the shift lever to P (vehicles with an automatic transmission) or R (vehicles
with a manual transmission).
● Make sure to set the floor jack properly at the jack point.
Raising the vehicle with an improperly positioned floor jack wi ll damage
the vehicle and may cause the vehicle to fall off the floor jac k.
● Do not raise the vehicle while someone is in the vehicle.
● When raising the vehicle, do not place any object on top of or underneath
the floor jack.
● When raising the vehicle, ensure that there is sufficient surrounding space.
The vehicle’s position may change slightly when lowered.
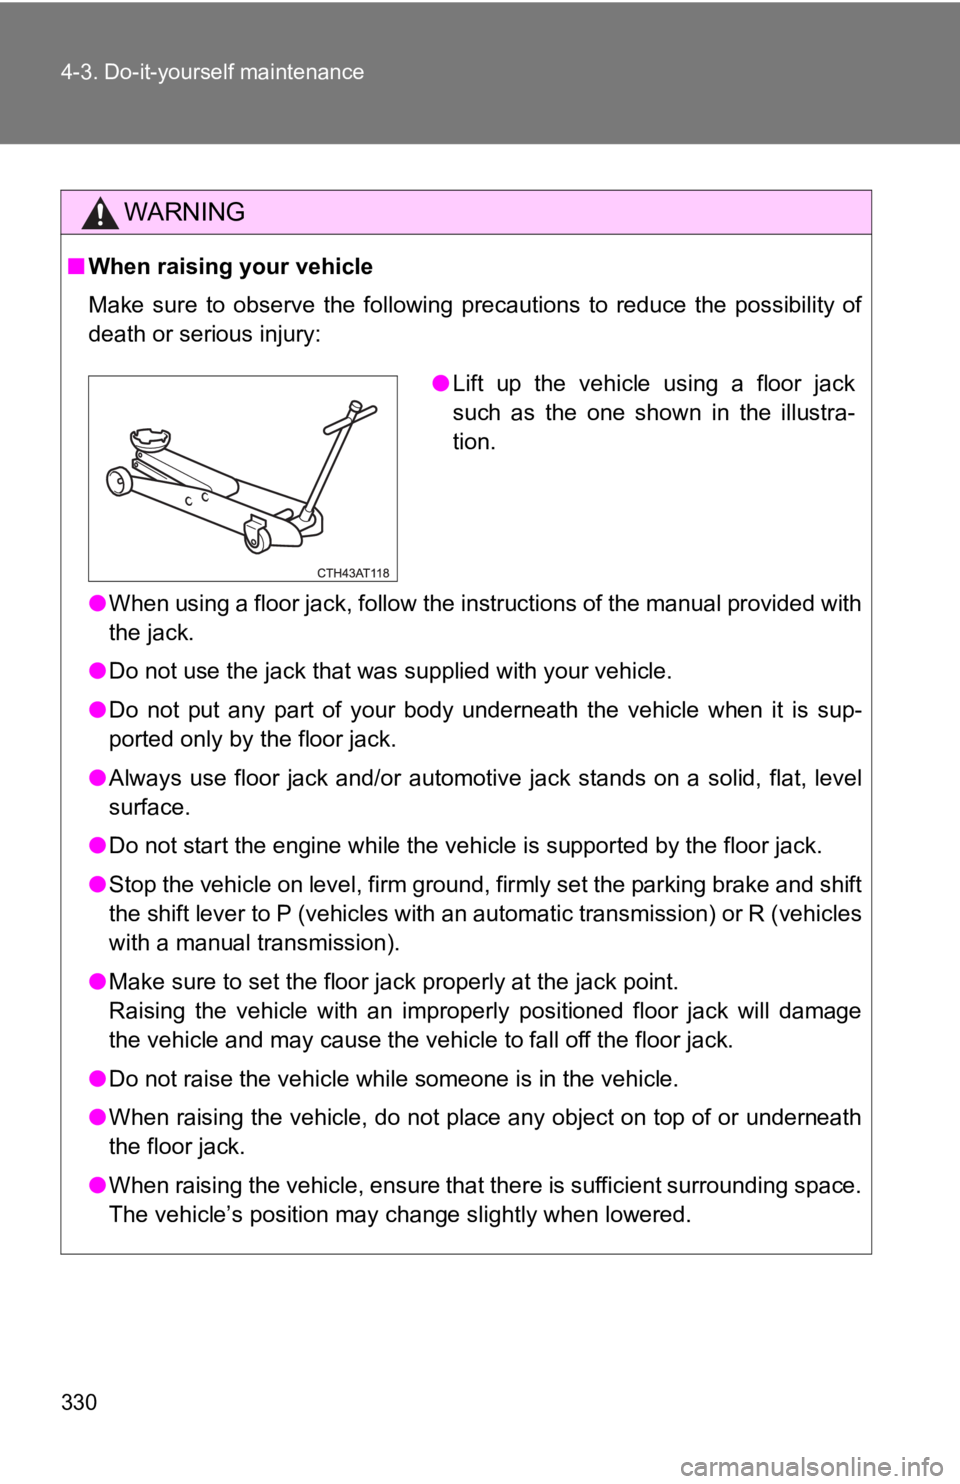
●Lift up the vehicle using a floor jack
such as the one shown in the illustra-
tion.