battery TOYOTA 86 2022 Owners Manual
[x] Cancel search | Manufacturer: TOYOTA, Model Year: 2022, Model line: 86, Model: TOYOTA 86 2022Pages: 449, PDF Size: 8.5 MB
Page 1 of 449

GR 86_U
1
2
3
4
5
6
7
8
9
9
Pictorial indexSearch by illustration
For safety
and securityMake sure to read through them
(Main topics: Child seat, theft deterrent system)
Vehicle status
information and
indicatorsReading driving-related information
(Main topics: Meters, multi-information display)
Before driving
Opening and closing the doors and windows,
adjustment before driving
(Main topics: Keys, doors, seats)
Driving
Operations and advice which are necessary for
driving
(Main topics: Starting engine, refueling)
Interior featuresUsage of the interior features
(Main topics: Air conditioner, storage features)
Maintenance
and careCaring for your vehicle and maintenance
procedures
(Main topics: Interior and exterior, light bulbs)
When trouble
arisesWhat to do in case of malfunction and emergency
(Main topics: Battery discharge, flat tire)
Vehicle
specificationsVehicle specifications, customizable features
(Main topics: Fuel, oil, tire inflation pressure)
For ownersReporting safety defects for U.S. owners, and seat
belt, SRS airbag and headlight aim instructions for
Canadian owners
IndexSearch by symptom
Search alphabetically
Page 3 of 449

3TABLE OF CONTENTS
1
2
3
4
5
6
7
8
9
10
Pre-Collision Braking System......................................... 179
Adaptive Cruise Control ..... 190
Conventional Cruise Control ......................................... 207
Pre-Collision Throttle Manage- ment ................................. 215
Lane Departure Warning .... 219
Lane Sway Warning ........... 221
Lead Vehicle Start Alert ...... 223
List of alert/notification sounds ......................................... 225
EyeSight malfunction and tem- porary stop ....................... 227
4-6. Using other driving systems BSD/RCTA ......................... 231
Reverse Automatic Braking (RAB) system ................... 239
Rear view camera .............. 249
Conventional Cruise Control ......................................... 254
Driving mode select switch ......................................... 257
Hill-start assist control ........ 258
Driving assist systems........ 261
4-7. Driving tips Winter driving tips............... 265
5-1. Using the air conditioning system
Automatic air conditioning sys-
tem ................................... 270
Seat heaters ....................... 276
5-2. Using the interior lights Interior lights list ................. 277
5-3. Using the storage features List of storage features ...... 279
Trunk features .................... 2825-4. Using the other interior fea-
tures
Other interior features ........ 283
6-1. Maintenance and care Cleaning and protecting the vehicle exterior................. 288
Cleaning and protecting the vehicle interior.................. 291
Cleaning and protecting the
Ultrasuede
®area .............. 293
6-2. Maintenance Maintenance requirements......................................... 295
General maintenance......... 296
Emission inspection and mainte- nance (I/M) programs ...... 299
6-3. Do-it-yourself maintenance Do-it-yourself service precau-tions ................................. 300
Hood .................................. 302
Positioning a floor jack ....... 303
Engine compartment .......... 305
Tires ................................... 312
Replacing the tire ............... 319
Tire inflation pressure......... 324
Wheels ............................... 326
Air conditioning filter........... 327
Electronic key battery......... 329
Checking and replacing fuses ......................................... 331
Headlight aim ..................... 333
Light bulbs.......................... 334
7-1. Essential information Emergency flashers ........... 338
5Interior features
6Maintenance and care
7When trouble arises
Page 4 of 449

4TABLE OF CONTENTS
If your vehicle has to be stopped in an emergency .............. 338
If the vehicle is submerged or water on the road is rising......................................... 339
7-2. Steps to take in an emergency If your vehicle needs to be towed......................................... 341
If you think something is wrong ......................................... 346
Fuel pump shut off system ......................................... 347
If a warning light turns on or a warning buzzer sounds .... 348
If a warning message is dis- played .............................. 357
If you have a flat tire ........... 358
If the engine will not start ... 367
If you lose your keys .......... 368
If the fuel filler door cannot be opened ............................. 369
If the electronic key does not operate properly ............... 369
If the vehicle battery is dis- charged ............................ 371
If your vehicle overheats .... 374
If the vehicle becomes stuck ......................................... 376
8-1. Specifications Maintenance data (fuel, oil level, etc.) .................................. 380
Fuel information ................. 388
Tire information .................. 390
8-2. Customization Customizable features ....... 4009-1. For owners
Reporting safety defects for U.S. owners ............................. 408
Reporting safety defects for Canadian owners ............. 409
Seat belt instructions for Cana- dian owners (in French) ... 409
SRS airbag instructions for Canadian owners (in French)
......................................... 411
Headlight aim instructions for Canadian owners (in French)......................................... 422
What to do if... (Troubleshooting) ......................................... 426
Alphabetical Index.............. 429
8Vehicle specifications
9For owners
Index
Page 81 of 449

811-4. Theft deterrent system
1
For safety and security
mately 10 seconds after the
driver’s door has opened.
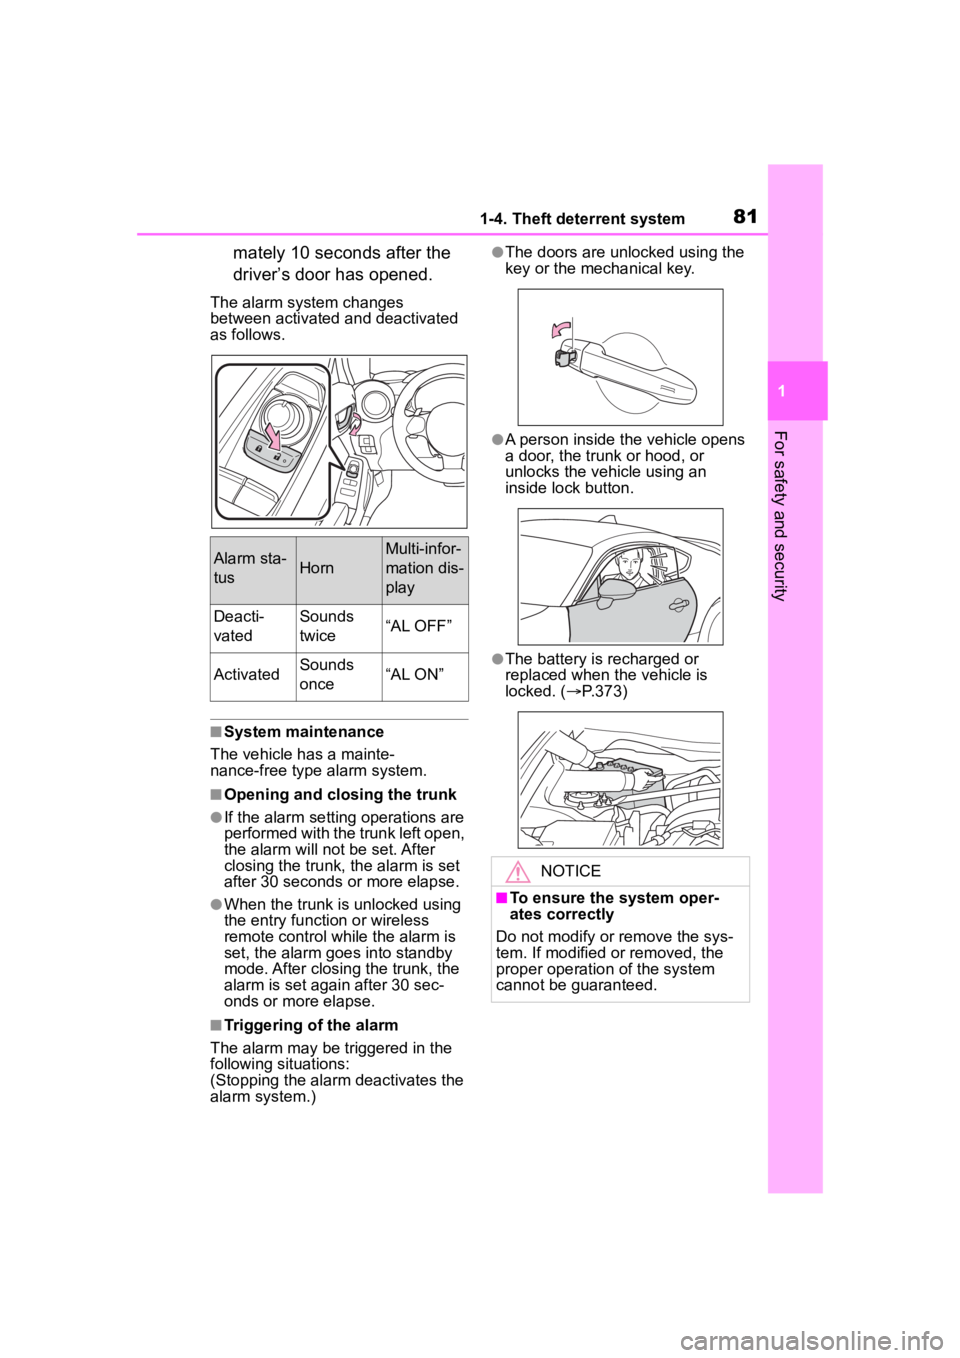
The alarm system changes
between activated and deactivated
as follows.
■System maintenance
The vehicle has a mainte-
nance-free type alarm system.
■Opening and closing the trunk
●If the alarm setting operations are
performed with the trunk left open,
the alarm will not be set. After
closing the trunk, the alarm is set
after 30 seconds or more elapse.
●When the trunk is unlocked using
the entry function or wireless
remote control while the alarm is
set, the alarm goes into standby
mode. After closing the trunk, the
alarm is set again after 30 sec-
onds or more elapse.
■Triggering of the alarm
The alarm may be triggered in the
following situations:
(Stopping the alarm deactivates the
alarm system.)
●The doors are unlocked using the
key or the mechanical key.
●A person inside the vehicle opens
a door, the trunk or hood, or
unlocks the vehicle using an
inside lock button.
●The battery is recharged or
replaced when the vehicle is
locked. ( P.373)
Alarm sta-
tusHorn
Multi-infor-
mation dis-
play
Deacti-
vatedSounds
twice“AL OFF”
ActivatedSounds
once“AL ON”
NOTICE
■To ensure the system oper-
ates correctly
Do not modify or remove the sys-
tem. If modified or removed, the
proper operation of the system
cannot be guaranteed.
Page 95 of 449

952-1. Instrument cluster
2
Vehicle status information and indicators
■Driving information (page 1)
Use the display as a reference.
Vo l t m e t e r
Displays the charging voltage.
As voltage display ed may be differ-
ent from the actual battery voltage,
use the voltmeter as a guideline.
Engine oil temperature
gauge
Displays the engine oil tempera-
ture.
■Driving information (page 2)
Use the display as a reference.
Current fuel consumption
Displays the current rate of fuel
consumption.
Average fuel consumption
Displays the average fuel con-
sumption since the function was
reset.
Driving range
Displays the estimated maximum
distance that can be driven with the
quantity of fuel remaining.
This distance is computed based
on your average f uel consumption.
As a result, the actual distance that
can be driven may differ from that
displayed.
When only a small amount of fuel is
added to the tank, the display may
not be updated. When refueling,
turn the engine switch off. If the
vehicle is refueled without turning
the engine switch off, the display
may not be updated.
■Driving information (page 3)
Use the display as a reference.
Average vehicle speed
Displays the average vehicle speed
since display was reset.
Driving time
Displays the cumulative time the
vehicle has been driven since dis-
play was reset.
Driving distance
Displays the cumulative distance
the vehicle has been driven since
display was reset.
Pressing and holding will
reset the average vehicle
speed/driving time/driving dis-
A
A
C
A
C
Page 102 of 449

1023-1. Key information
3-1.Key information
The following keys are provided
with the vehicle.Electronic keys
• Operating the smart key system ( P. 1 1 1 )
• Operating the wireless remote control function ( P.103)
Mechanical keys
Key number plate
■When riding in an aircraft
When bringing an electronic key
onto an aircraft, make sure you do
not press any buttons on the elec-
tronic key while inside the aircraft
cabin. If you are carrying an elec-
tronic key in your bag etc., ensure
that the buttons are not likely to be
pressed accidentally. Pressing a
button may cause the electronic key
to emit radio waves that could inter-
fere with the oper ation of the air-
craft.
■Electronic key battery depletion
●The standard battery life is 1 to 2
years.
●If the battery becomes low, an
alarm will sound in the cabin and a
message will be shown on the
multi-information display when the
engine is stopped.
●To reduce key battery depletion
when the electronic key is to not
be used for long periods of time,
set the electronic key to the bat-
tery-saving mode. ( P. 1 1 2 )
●As the electronic key always
receives radio waves, the battery
will become depleted even if the
electronic key is not used. The fol-
lowing symptoms indicate that the
electronic key battery may be
depleted. Replace the battery
when necessary. ( P.329)
• The smart key system or the wire-
less remote contro l does not oper-
ate.
• The detection area becomes
smaller.
• The LED indicator on the key sur- face does not turn on.
●To avoid serious deterioration, do
not leave the electronic key within
3 ft. (1 m) of the following electri-
cal appliances that produce a
magnetic field:
• TVs
• Personal computers
• Cellular phones, cordless phones and battery chargers
• Recharging cellular phones or cordless phones
• Table lamps
• Induction cookers
■Replacing the battery
P.329
■Confirmation of the registered
key number
The number of keys already regis-
tered to the vehi cle can be con-
firmed. Ask your Toyota dealer for
details.
Keys
The keys
A
C
NOTICE
■To prevent key damage
●Do not drop the keys, subject
them to strong shocks or bend
them.
Page 104 of 449

1043-1. Key information
■Customization
Some functions can be customized.
( P.400)
To take out the mechanical key,
push the release button and
take the key out.
The mechanical key can only be
inserted in one direction, as the key
only has grooves on one side. If the
key cannot be inserted in a lock cyl-
inder, turn it over and re-attempt to
insert it.
After using the mechanical key,
store it in the electronic key. Carry
the mechanical k ey together with
the electronic key. If the electronic
key battery is dep leted or the entry
function does not operate properly,
you will need the m echanical key.
( P.369)
■If you lose your mechanical
keys
P. 3 6 8
Using the mechanical key
Page 105 of 449

1053-2. Opening, closing and locking the doors and trunk
3
Before driving
3-2.Opening, closing and locking the doors and trunk
■Smart key system
Carry the electronic key to
enable this function.
1 Grip the driver’s door handle
to unlock the door. Grip the
passenger’s door handle to
unlock all the doors.
*
Make sure to touch the sensor on
the back of the handle.
The doors cannot be unlocked for 3
seconds after the doors are locked.
*: The door unlock settings can be
changed.
2 Touch the lock sensor (inden-
tation on the side of the door
handle) to lock the doors.
Check that the door is securely
locked.
■Wireless remote control
1 Locks both side doors
Check that the d oor is securely
locked.
2 Unlocks both side doors
Pressing the button unlocks the
driver’s door. Pressing the button
again within 3 seconds unlocks the
other door.
■Side window open/close func-
tion linked to door operation
In order to make opening and clos-
ing the doors easier, completely
closed windows are linked to door
operations. Therefore, when a door
is opened, its window opens slightly.
When a door is closed, its window
closes completely.
However, if the battery has dis-
charged or is di sconnected, this
function will not operate. ( P.374)
■Operation signals
A buzzer sounds and the emer-
gency flashers flash to indicate that
the doors have been
locked/unlocked. (Locked: once;
Unlocked: twice)
■When the door cannot be
locked by the lock sensor on
the surface of the door handle
If the doors cannot be locked by
touching the lock se nsor with a fin-
ger, touch the lock sensor with the
palm of your hand.
If you are wearing gloves, remove
Doors
Unlocking and locking the
doors from the outside
Page 106 of 449

1063-2. Opening, closing and locking the doors and trunk
them.
■Door lock buzzer
If an attempt to lock the doors using
the entry function or wireless remote
control is made w hen a door is not
fully closed, a buzzer will sound
continuously for 5 seconds. Fully
close the door to stop the buzzer,
and lock the doors again.
■Alarm
Locking the doors will set the alarm
system. ( P.80)
■Conditions affecting the opera-
tion of the smart key system or
wireless remo te control
P. 1 1 2
■If the smart key system or the
wireless remote control does
not operate properly
Use the mechanical key and/or
inside lock buttons to lock and
unlock the doors. ( P.369)
Replace the key battery with a new
one if it is depleted. ( P.329)
■If the battery is discharged
The doors cannot be locked and
unlocked using the smart key sys-
tem or wireless remote control. Lock
or unlock the doors using the
mechanical key. ( P.369)
■Customization
Some functions can be customized.
( P.400)
■Door lock switches (to
lock/unlock)
1 Locks both side doors
2 Unlocks both side doors
WARNING
■To prevent an accident
Ensure that both side doors are
properly closed and locked while
driving the vehicle.
Failure to do so may result in a
door opening and an occupant
being thrown out o f the vehicle,
resulting in death o r serious injury.
■When opening or closing a
door
Check the surroundings of the
vehicle such as wh ether the vehi-
cle is on an incline, whether there
is enough space for a door to
open and whether a strong wind
is blowing. When opening or clos-
ing the door, hold the door handle
tightly to prepare for any unpre-
dictable movement.
■Side window open/close func-
tion linked to door operation
Do not hold the upper edge of the
side window when you close the
door. Otherwise, your fingers or
hand may be caught in the win-
dow.
Unlocking and locking the
doors from the inside
Page 110 of 449

1103-2. Opening, closing and locking the doors and trunk
to be opened until a door is
opened.
■Wireless remote control
Press and hold the switch.
A buzzer sounds.
■Trunk light
The trunk light t urns on when the
trunk is opened.
■Function to prevent the trunk
being locked with the electronic
key inside
●When both side do ors are locked,
closing the trunk lid with the elec-
tronic key left inside the trunk will
sound an alarm.
In this case, the trunk lid can be
opened by pressing the trunk
release button on the trunk lid.
●If the spare electronic key is put in
the trunk with both side doors
locked, the key confinement pre-
vention function is activated so the
trunk can be opened. In order to
prevent theft, take all electronic
keys with you when leaving the vehicle.
●If the electronic key is put in the
trunk with both side doors locked,
the key may not be detected
depending on the location of the
key and the surrounding radio
wave conditions. In this case, the
key confinement
prevention func-
tion cannot be act ivated, causing
the doors to lock when the trunk is
closed. Make sure to check where
the key is before closing the trunk.
●The key confinement prevention
function cannot be activated if
either door is unlocked. In this
case, open the tr unk using the
trunk opener.
■Internal trunk release lever
The trunk lid can b e opened by pull-
ing the glow-in-the-dark lever
located on the inside of the trunk lid
upward.
The lever will contin ue to glow for
some time after the trunk lid is
closed.
■If the smart key system or the
wireless remote control does
not operate properly
Replace the key battery with a new
one if it is depleted. ( P.329)
■Customization
Some functions can be customized.
( P.400)