bulb TOYOTA AURIS 2012 Owners Manual (in English)
[x] Cancel search | Manufacturer: TOYOTA, Model Year: 2012, Model line: AURIS, Model: TOYOTA AURIS 2012Pages: 750, PDF Size: 20.05 MB
Page 7 of 750
5
1
8 7
6
5
4
3
2
UK_AURIS/AURIS_HV_EE (OM12E33E)6-1. Maintenance and care
Cleaning and protecting
the vehicle exterior ..........474
Cleaning and protecting
the vehicle interior ...........478
6-2. Maintenance
Maintenance
requirements....................481
6-3. Do-it-yourself
maintenance
Do-it-yourself service
precautions ......................484
Hood ..................................488
Positioning a floor jack .......490
Engine compartment..........492
12-volt battery ....................514
Tires ...................................519
Tire inflation pressure ........522
Wheels ...............................524
Air conditioning filter ..........526
Wireless remote control/
electronic key battery.......529
Checking and replacing
fuses ................................532
Light bulbs .........................5557-1. Essential information
Emergency flashers .......... 572
If your vehicle has to
be stopped in an
emergency ...................... 573
7-2. Steps to take in an
emergency
If your vehicle needs to
be towed ......................... 575
If you think something is
wrong .............................. 583
Fuel pump shut off
system............................. 584
If a warning light turns
on or a warning buzzer
sounds ............................ 585
If a warning message is
displayed ......................... 599
If you have a flat tire
(vehicles with a
spare tire) ........................ 626
If you have a flat tire
(vehicles with an
emergency tire puncture
repair kit) ......................... 638
If the engine will not
start ................................. 664
If the hybrid system will
not start ........................... 666
6Maintenance and care7When trouble arises
Page 17 of 750
15Pictorial index
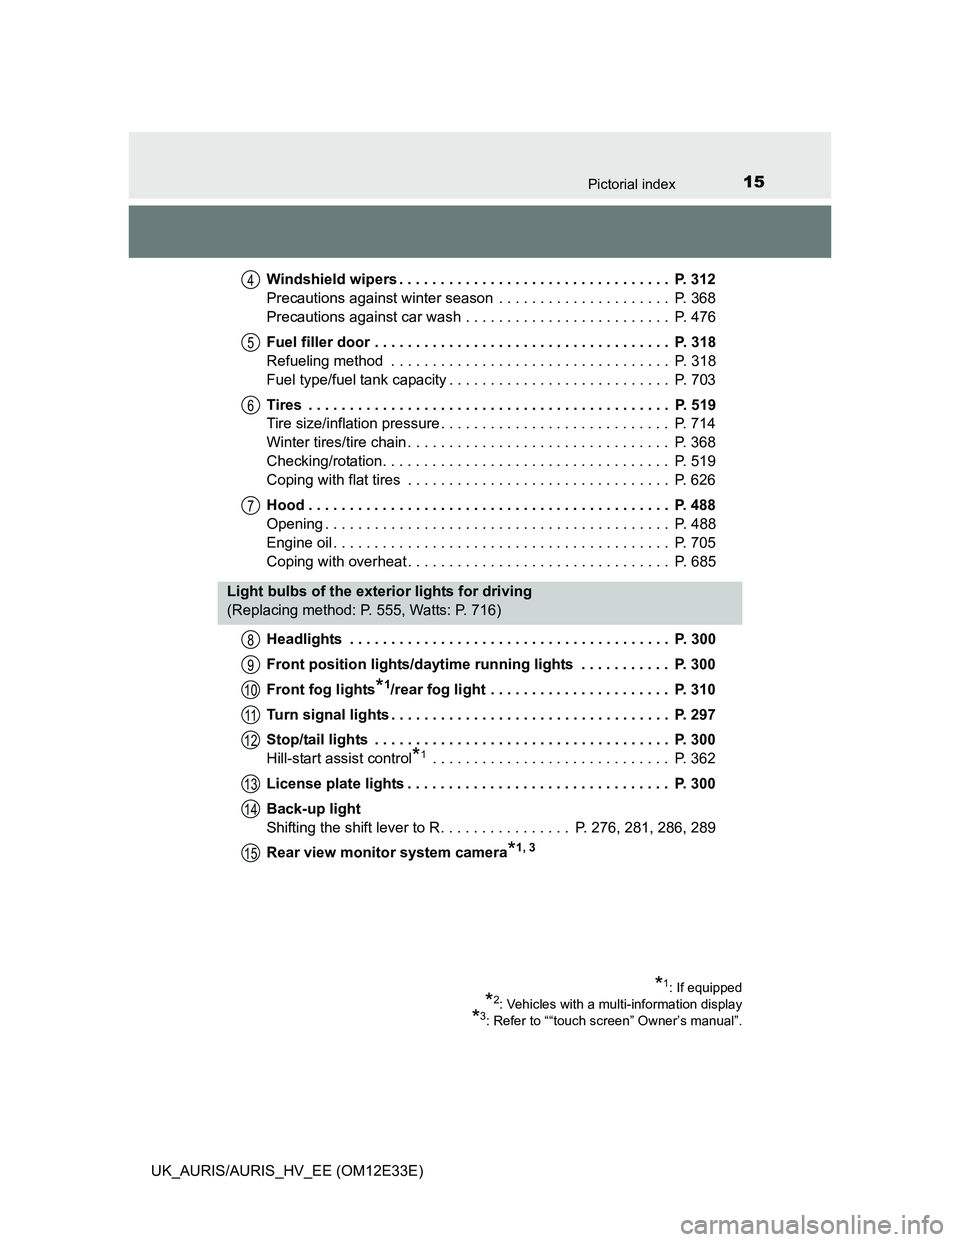
UK_AURIS/AURIS_HV_EE (OM12E33E)Windshield wipers . . . . . . . . . . . . . . . . . . . . . . . . . . . . . . . . . P. 312
Precautions against winter season . . . . . . . . . . . . . . . . . . . . . P. 368
Precautions against car wash . . . . . . . . . . . . . . . . . . . . . . . . . P. 476
Fuel filler door . . . . . . . . . . . . . . . . . . . . . . . . . . . . . . . . . . . . P. 318
Refueling method . . . . . . . . . . . . . . . . . . . . . . . . . . . . . . . . . . P. 318
Fuel type/fuel tank capacity . . . . . . . . . . . . . . . . . . . . . . . . . . . P. 703
Tires . . . . . . . . . . . . . . . . . . . . . . . . . . . . . . . . . . . . . . . . . . . . P. 519
Tire size/inflation pressure . . . . . . . . . . . . . . . . . . . . . . . . . . . . P. 714
Winter tires/tire chain . . . . . . . . . . . . . . . . . . . . . . . . . . . . . . . . P. 368
Checking/rotation. . . . . . . . . . . . . . . . . . . . . . . . . . . . . . . . . . . P. 519
Coping with flat tires . . . . . . . . . . . . . . . . . . . . . . . . . . . . . . . . P. 626
Hood . . . . . . . . . . . . . . . . . . . . . . . . . . . . . . . . . . . . . . . . . . . . P. 488
Opening . . . . . . . . . . . . . . . . . . . . . . . . . . . . . . . . . . . . . . . . . . P. 488
Engine oil . . . . . . . . . . . . . . . . . . . . . . . . . . . . . . . . . . . . . . . . . P. 705
Coping with overheat . . . . . . . . . . . . . . . . . . . . . . . . . . . . . . . . P. 685
Headlights . . . . . . . . . . . . . . . . . . . . . . . . . . . . . . . . . . . . . . . P. 300
Front position lights/daytime running lights . . . . . . . . . . . P. 300
Front fog lights
*1/rear fog light . . . . . . . . . . . . . . . . . . . . . . P. 310
Turn signal lights . . . . . . . . . . . . . . . . . . . . . . . . . . . . . . . . . . P. 297
Stop/tail lights . . . . . . . . . . . . . . . . . . . . . . . . . . . . . . . . . . . . P. 300
Hill-start assist control
*1 . . . . . . . . . . . . . . . . . . . . . . . . . . . . . P. 362
License plate lights . . . . . . . . . . . . . . . . . . . . . . . . . . . . . . . . P. 300
Back-up light
Shifting the shift lever to R. . . . . . . . . . . . . . . . P. 276, 281, 286, 289
Rear view monitor system camera
*1, 3
4
5
6
7
Light bulbs of the exterior lights for driving
(Replacing method: P. 555, Watts: P. 716)
*1: If equipped
*2: Vehicles with a multi-information display
*3: Refer to ““touch screen” Owner’s manual”.
8
9
10
11
12
13
14
15
Page 299 of 750
2974-2. Driving procedures
UK_AURIS/AURIS_HV_EE (OM12E33E)
4
Driving
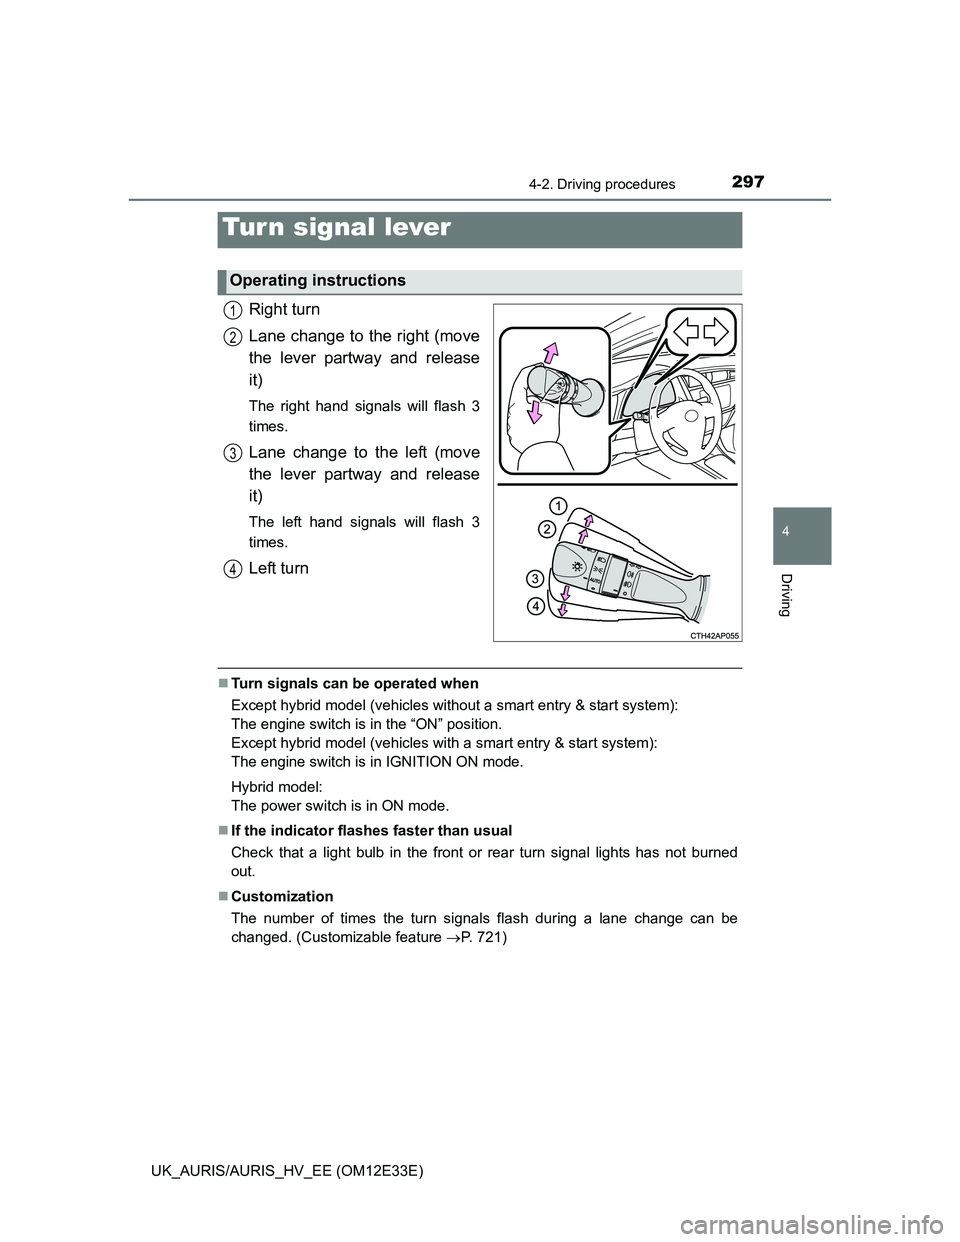
Right turn
Lane change to the right (move
the lever partway and release
it)
The right hand signals will flash 3
times.
Lane change to the left (move
the lever partway and release
it)
The left hand signals will flash 3
times.
Left turn
Turn signals can be operated when
Except hybrid model (vehicles without a smart entry & start system):
The engine switch is in the “ON” position.
Except hybrid model (vehicles with a smart entry & start system):
The engine switch is in IGNITION ON mode.
Hybrid model:
The power switch is in ON mode.
If the indicator flashes faster than usual
Check that a light bulb in the front or rear turn signal lights has not burned
out.
Customization
The number of times the turn signals flash during a lane change can be
changed. (Customizable feature P. 721)
Tur n signal lever
Operating instructions
1
2
3
4
Page 475 of 750
473
6Maintenance and care
UK_AURIS/AURIS_HV_EE (OM12E33E)6-1. Maintenance and care
Cleaning and protecting
the vehicle exterior .......... 474
Cleaning and protecting
the vehicle interior ........... 478
6-2. Maintenance
Maintenance
requirements.................... 481
6-3. Do-it-yourself
maintenance
Do-it-yourself service
precautions ...................... 484
Hood .................................. 488
Positioning a floor jack ....... 490
Engine compartment.......... 492
12-volt battery .................... 514
Tires ................................... 519
Tire inflation pressure ........ 522
Wheels ............................... 524
Air conditioning filter .......... 526
Wireless remote control/
electronic key battery....... 529
Checking and replacing
fuses ................................ 532
Light bulbs ......................... 555
Page 487 of 750
4856-3. Do-it-yourself maintenance
UK_AURIS/AURIS_HV_EE (OM12E33E)
6
Maintenance and care
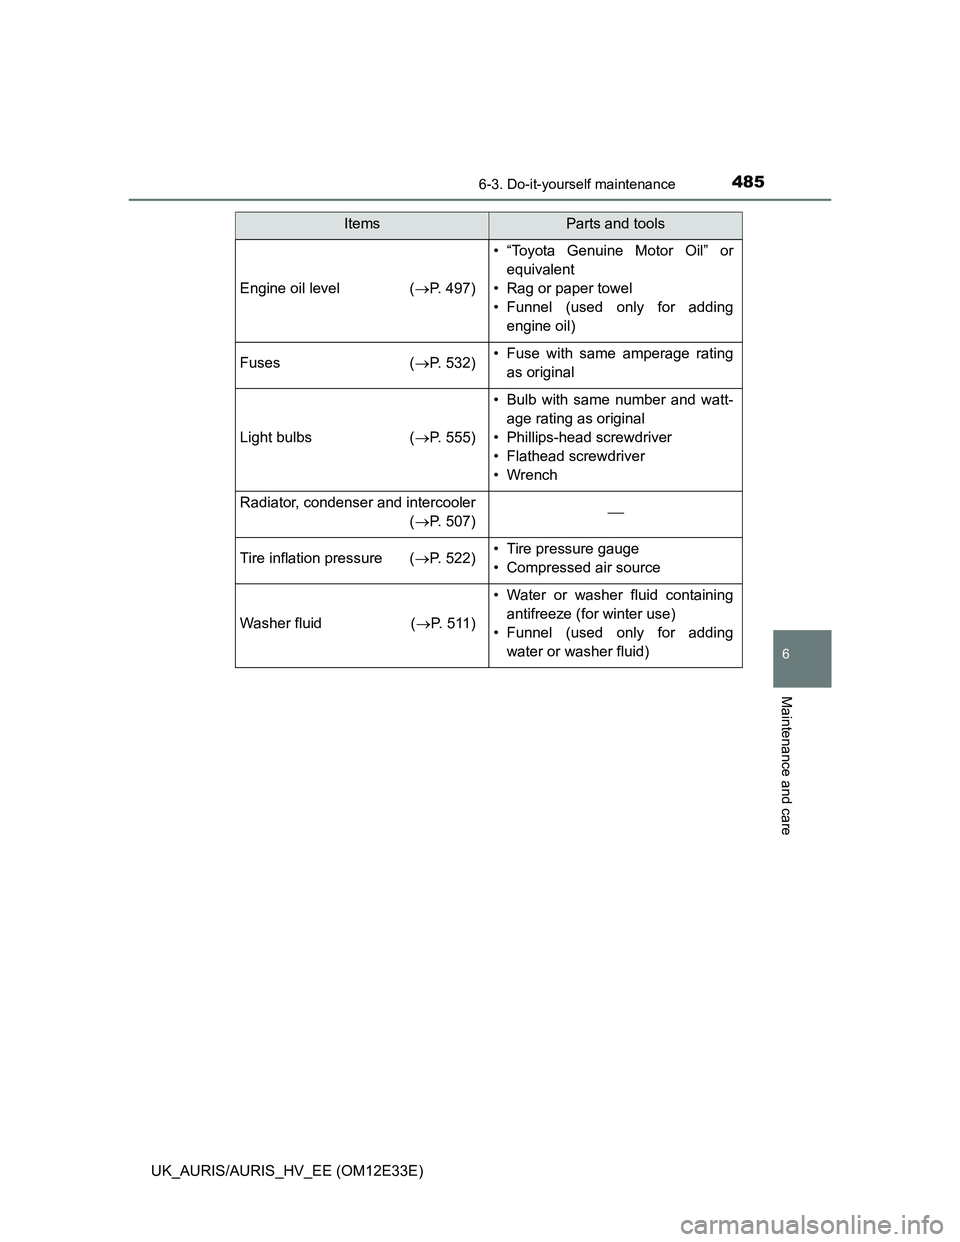
Engine oil level (P. 497)
• “Toyota Genuine Motor Oil” or
equivalent
• Rag or paper towel
• Funnel (used only for adding
engine oil)
Fuses (P. 532)• Fuse with same amperage rating
as original
Light bulbs (P. 555)
• Bulb with same number and watt-
age rating as original
• Phillips-head screwdriver
• Flathead screwdriver
•Wrench
Radiator, condenser and intercooler
(P. 507)
Tire inflation pressure (P. 522)• Tire pressure gauge
• Compressed air source
Washer fluid (P. 511)
• Water or washer fluid containing
antifreeze (for winter use)
• Funnel (used only for adding
water or washer fluid)
ItemsParts and tools
Page 556 of 750
5546-3. Do-it-yourself maintenance
UK_AURIS/AURIS_HV_EE (OM12E33E)
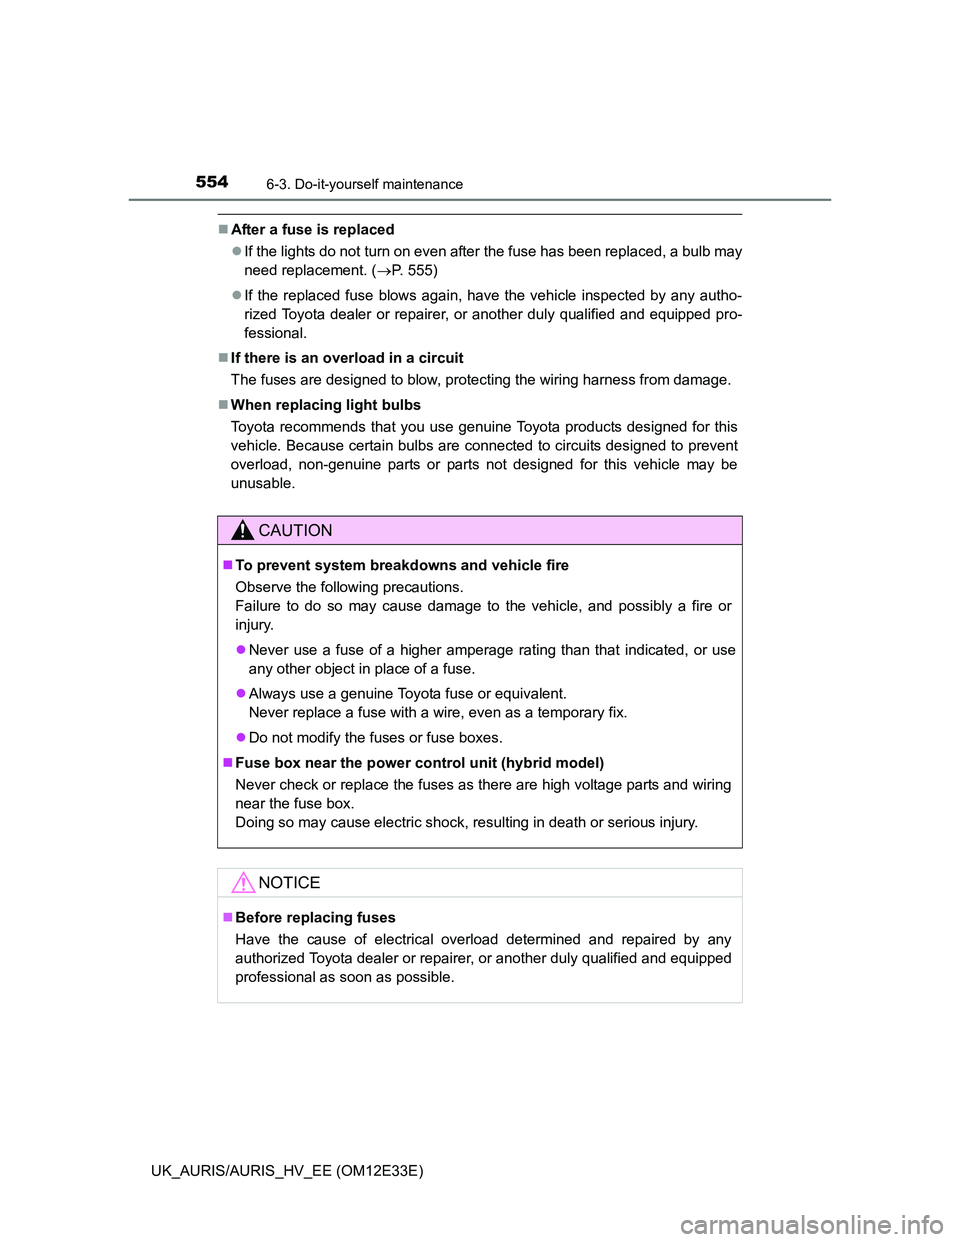
After a fuse is replaced
If the lights do not turn on even after the fuse has been replaced, a bulb may
need replacement. (P. 555)
If the replaced fuse blows again, have the vehicle inspected by any autho-
rized Toyota dealer or repairer, or another duly qualified and equipped pro-
fessional.
If there is an overload in a circuit
The fuses are designed to blow, protecting the wiring harness from damage.
When replacing light bulbs
Toyota recommends that you use genuine Toyota products designed for this
vehicle. Because certain bulbs are connected to circuits designed to prevent
overload, non-genuine parts or parts not designed for this vehicle may be
unusable.
CAUTION
To prevent system breakdowns and vehicle fire
Observe the following precautions.
Failure to do so may cause damage to the vehicle, and possibly a fire or
injury.
Never use a fuse of a higher amperage rating than that indicated, or use
any other object in place of a fuse.
Always use a genuine Toyota fuse or equivalent.
Never replace a fuse with a wire, even as a temporary fix.
Do not modify the fuses or fuse boxes.
Fuse box near the power control unit (hybrid model)
Never check or replace the fuses as there are high voltage parts and wiring
near the fuse box.
Doing so may cause electric shock, resulting in death or serious injury.
NOTICE
Before replacing fuses
Have the cause of electrical overload determined and repaired by any
authorized Toyota dealer or repairer, or another duly qualified and equipped
professional as soon as possible.
Page 557 of 750
5556-3. Do-it-yourself maintenance
UK_AURIS/AURIS_HV_EE (OM12E33E)
6
Maintenance and care
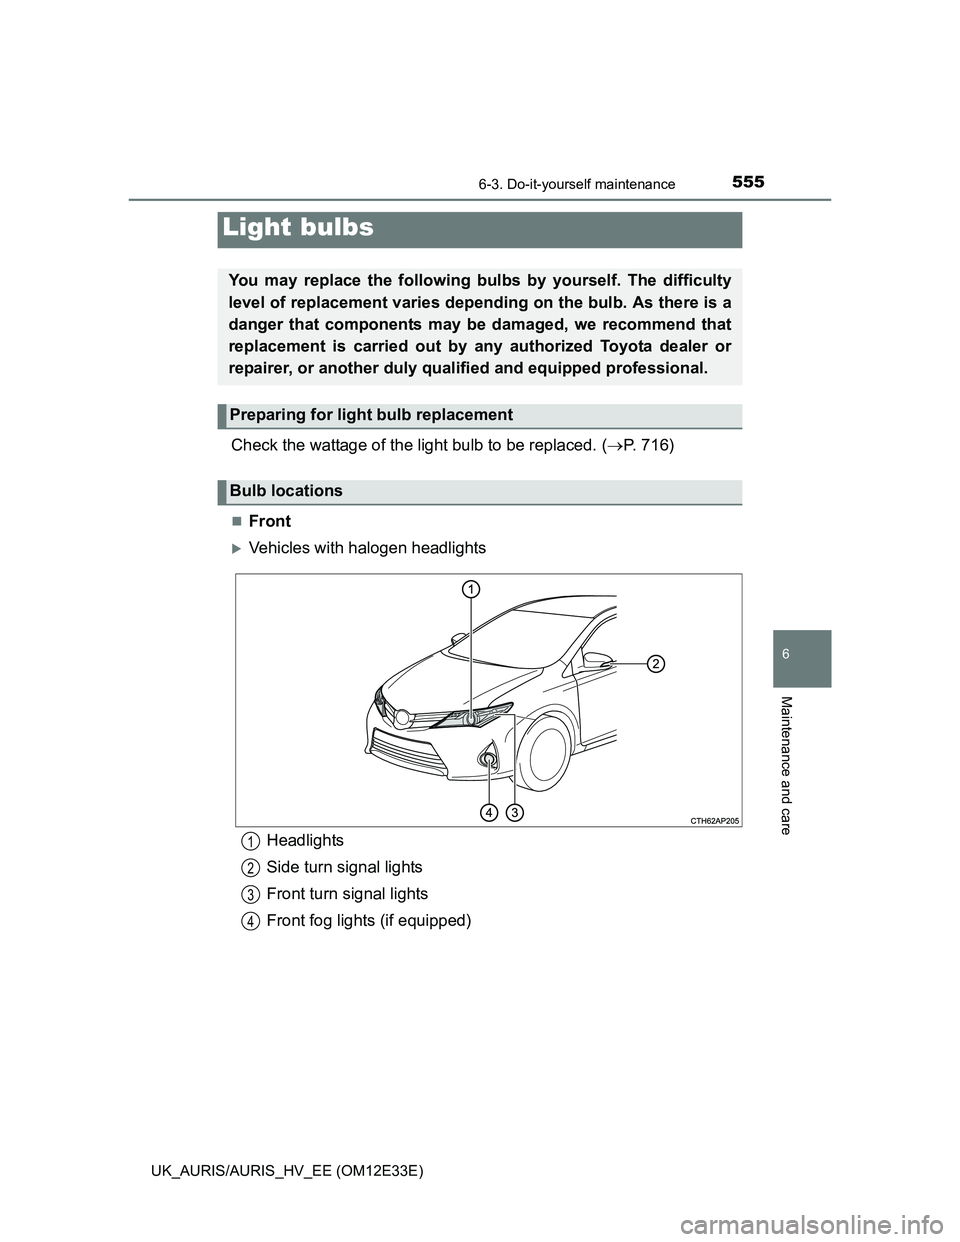
Check the wattage of the light bulb to be replaced. (P. 716)
Front
Vehicles with halogen headlights
Light bulbs
You may replace the following bulbs by yourself. The difficulty
level of replacement varies depending on the bulb. As there is a
danger that components may be damaged, we recommend that
replacement is carried out by any authorized Toyota dealer or
repairer, or another duly qualified and equipped professional.
Preparing for light bulb replacement
Bulb locations
Headlights
Side turn signal lights
Front turn signal lights
Front fog lights (if equipped)1
2
3
4
Page 560 of 750
5586-3. Do-it-yourself maintenance
UK_AURIS/AURIS_HV_EE (OM12E33E)
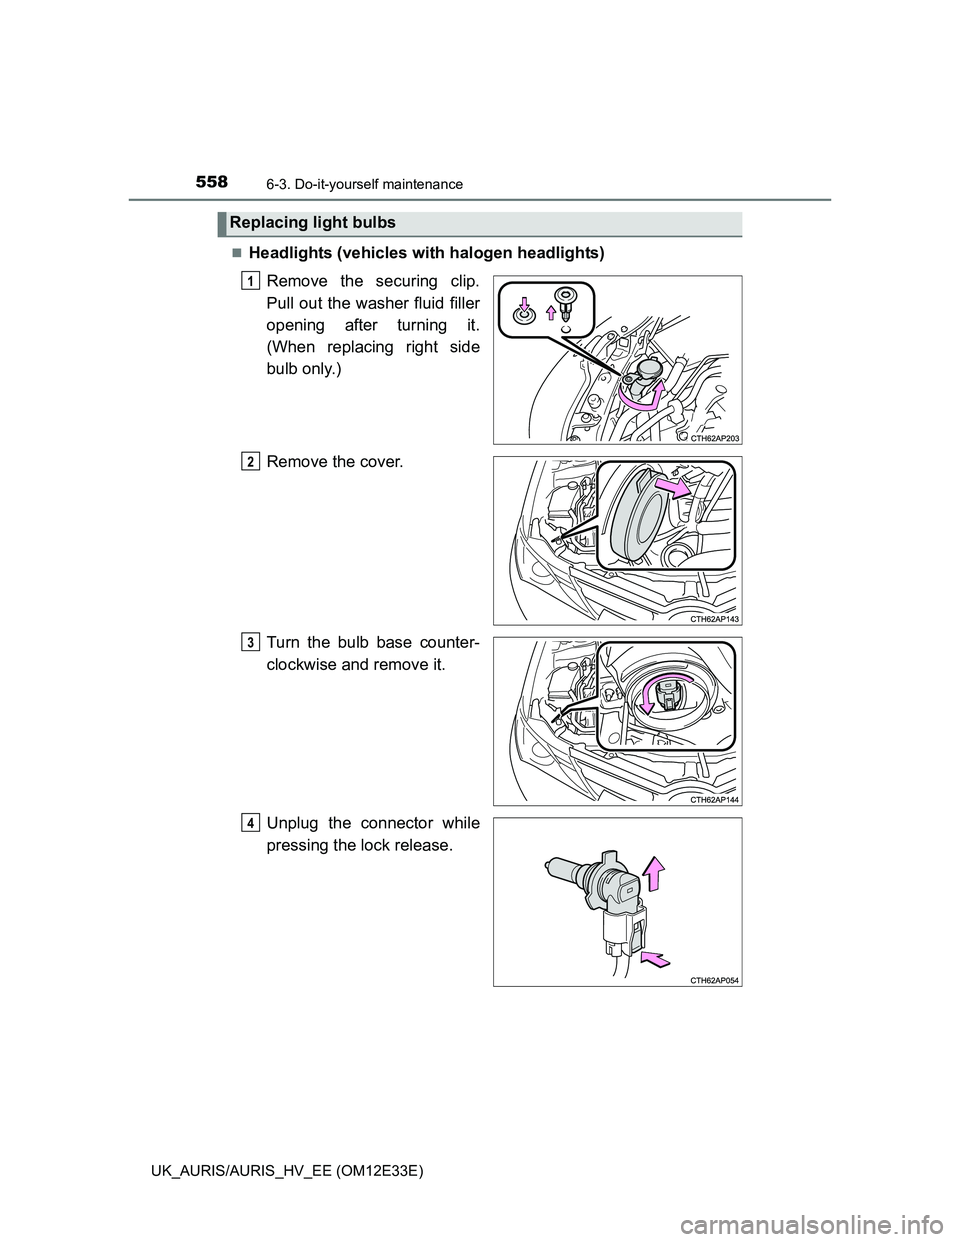
Headlights (vehicles with halogen headlights)
Remove the securing clip.
Pull out the washer fluid filler
opening after turning it.
(When replacing right side
bulb only.)
Remove the cover.
Turn the bulb base counter-
clockwise and remove it.
Unplug the connector while
pressing the lock release.
Replacing light bulbs
1
2
3
4
Page 561 of 750
5596-3. Do-it-yourself maintenance
UK_AURIS/AURIS_HV_EE (OM12E33E)
6
Maintenance and care
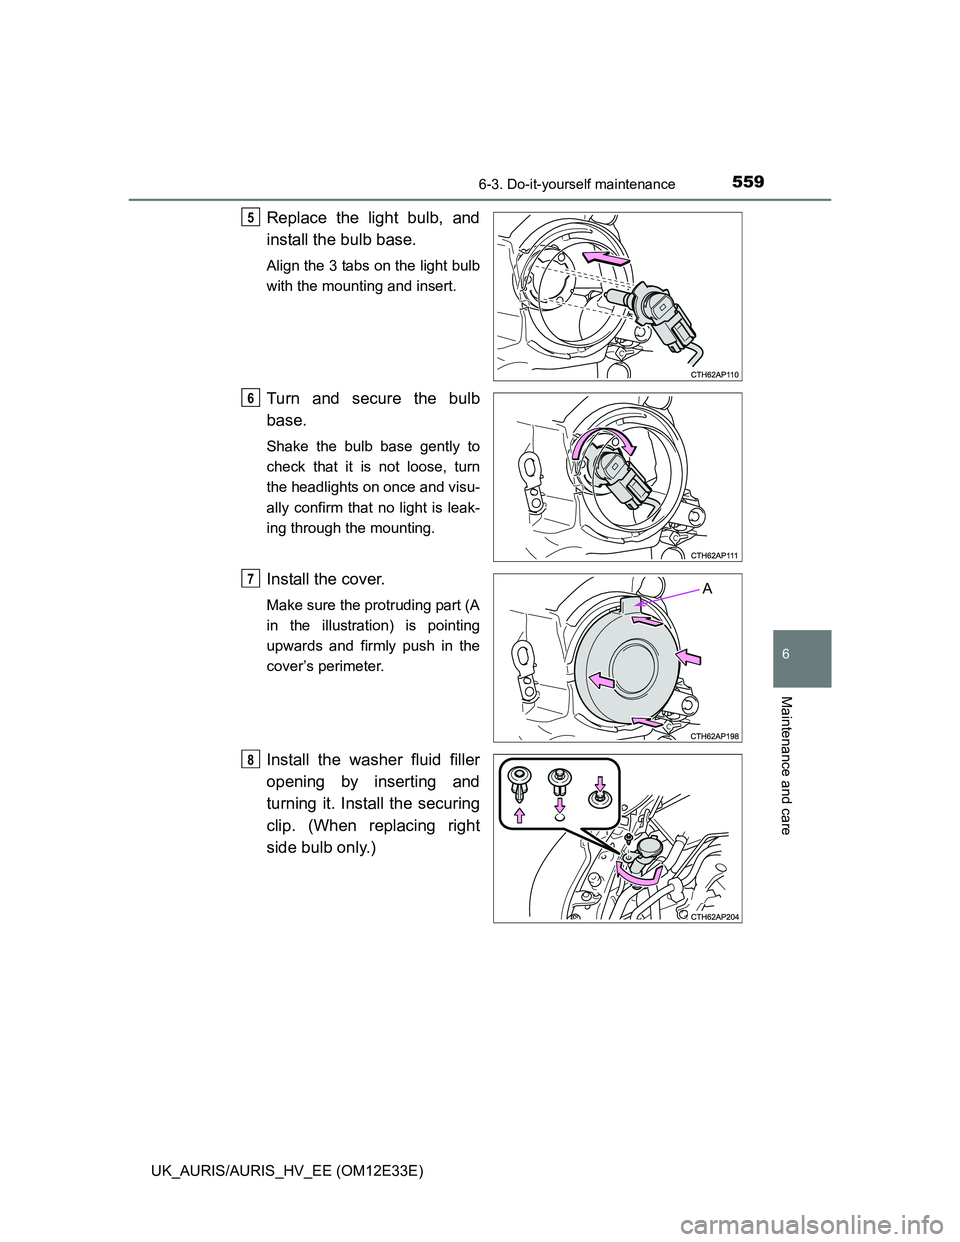
Replace the light bulb, and
install the bulb base.
Align the 3 tabs on the light bulb
with the mounting and insert.
Turn and secure the bulb
base.
Shake the bulb base gently to
check that it is not loose, turn
the headlights on once and visu-
ally confirm that no light is leak-
ing through the mounting.
Install the cover.
Make sure the protruding part (A
in the illustration) is pointing
upwards and firmly push in the
cover’s perimeter.
Install the washer fluid filler
opening by inserting and
turning it. Install the securing
clip. (When replacing right
side bulb only.)
5
6
A7
8
Page 562 of 750
5606-3. Do-it-yourself maintenance
UK_AURIS/AURIS_HV_EE (OM12E33E)
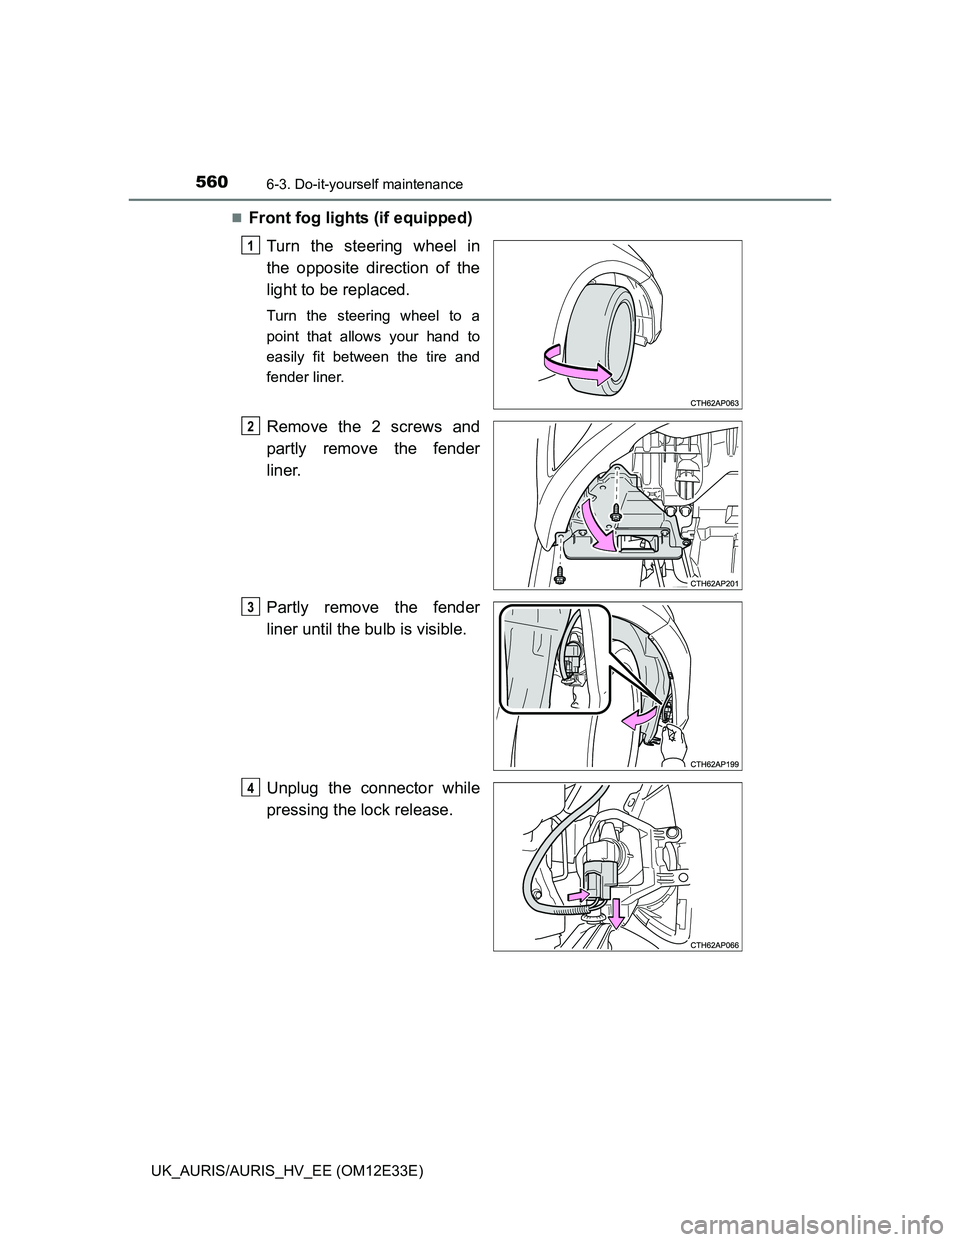
Front fog lights (if equipped)
Turn the steering wheel in
the opposite direction of the
light to be replaced.
Turn the steering wheel to a
point that allows your hand to
easily fit between the tire and
fender liner.
Remove the 2 screws and
partly remove the fender
liner.
Partly remove the fender
liner until the bulb is visible.
Unplug the connector while
pressing the lock release.
1
2
3
4