clock TOYOTA AURIS 2017 Owners Manual (in English)
[x] Cancel search | Manufacturer: TOYOTA, Model Year: 2017, Model line: AURIS, Model: TOYOTA AURIS 2017Pages: 661, PDF Size: 26.83 MB
Page 5 of 661
5
1
9 8
7 5 4
3
2
UK AURIS_HB_EE (OM12K97E)
6
6-1. Using the air
conditioning system
and defogger
Heater system....................404
Automatic air conditioning
system .............................409
Power heater .....................417
Seat heaters ......................419
6-2. Using the interior lights
Interior lights list .................421
• Interior lights ..................422
• Vanity lights ...................422
• Personal lights ...............423
6-3. Using the storage
features
List of storage features ......425
• Glove box ......................426
• Console box ..................426
• Bottle holders ................427
• Cup holders ...................428
• Auxiliary boxes ..............429
Luggage compartment
features............................4316-4. Other interior features
Other interior features ....... 437
• Sun visors ..................... 437
• Vanity mirrors ................ 437
• Clock ............................. 438
• Portable ashtray ............ 438
• Power outlets ................ 439
• Armrest ......................... 440
• Assist grips ................... 441
• Coat hooks .................... 441
• Panoramic roof
shade ............................ 442
7-1. Maintenance and care
Cleaning and protecting
the vehicle exterior .......... 446
Cleaning and protecting
the vehicle interior ........... 450
7-2. Maintenance
Maintenance
requirements ................... 453
6Interior features
7Maintenance and care
UK AURIS_HB_OM_Europe_OM12K97E.book 5 ページ 2016年6月27日 月曜日 午後5時42分
Page 206 of 661
2064-1. Before driving
UK AURIS_HB_EE (OM12K97E)
Your vehicle will handle differently when towing a trailer. In order to
avoid accident, death or serious injury, keep the following in mind
when towing:
■Checking connections between trailer and lights
Stop the vehicle and check the operation of the connection between
the trailer and lights after driving for a brief period as well as before
starting off.
■Practicing driving with a coupled trailer
●Get the feel for turning, stopping and reversing with the trailer
coupled by practicing in an area with no or light traffic.
●When reversing with a coupled trailer, hold the section of the
steering wheel nearest to you and rotate clockwise to turn the
trailer left or counterclockwise to turn it right. Always rotate a little
at a time to prevent steering error. Have someone guide you
when reversing to lessen the risk of an accident.
■Increasing vehicle-to-vehicle distance
At a speed of 10 km/h (6 mph), the distance to the vehicle running
ahead of you should be equivalent to or greater than the combined
length of your vehicle and trailer. Avoid sudden braking that may
cause skidding. Otherwise, the vehicle may spin out of control. This
is especially true when driving on wet or slippery road surfaces.
■Sudden acceleration/steering input/cornering
Executing sharp turns when towing may result in the trailer colliding
with your vehicle. Decelerate well in advance when approaching
turns and take them slowly and carefully to avoid sudden braking.
■Important points regarding turning
The wheels of the trailer will travel closer to the inside of the curve
than the wheels of the vehicle. To make allowance for this, take the
turns wider than you would normally do.
Guidance
UK AURIS_HB_OM_Europe_OM12K97E.book 206 ページ 2016年6月27日 月曜日 午後5時42分
Page 403 of 661
403
6Interior features
UK AURIS_HB_EE (OM12K97E)6-1. Using the air
conditioning system
and defogger
Heater system ................... 404
Automatic air conditioning
system ............................. 409
Power heater ..................... 417
Seat heaters ...................... 419
6-2. Using the interior lights
Interior lights list................. 421
• Interior lights .................. 422
• Vanity lights ................... 422
• Personal lights ............... 423
6-3. Using the storage
features
List of storage
features ........................... 425
• Glove box ...................... 426
• Console box .................. 426
• Bottle holders ................ 427
• Cup holders ................... 428
• Auxiliary boxes .............. 429
Luggage compartment
features ........................... 4316-4. Other interior features
Other interior features ........ 437
• Sun visors...................... 437
• Vanity mirrors ................ 437
• Clock ............................. 438
• Portable ashtray ............ 438
• Power outlets................. 439
• Armrest .......................... 440
• Assist grips .................... 441
• Coat hooks .................... 441
• Panoramic roof
shade............................. 442
UK AURIS_HB_OM_Europe_OM12K97E.book 403 ページ 2016年6月27日 月曜日 午後5時42分
Page 438 of 661
4386-4. Other interior features
UK AURIS_HB_EE (OM12K97E)
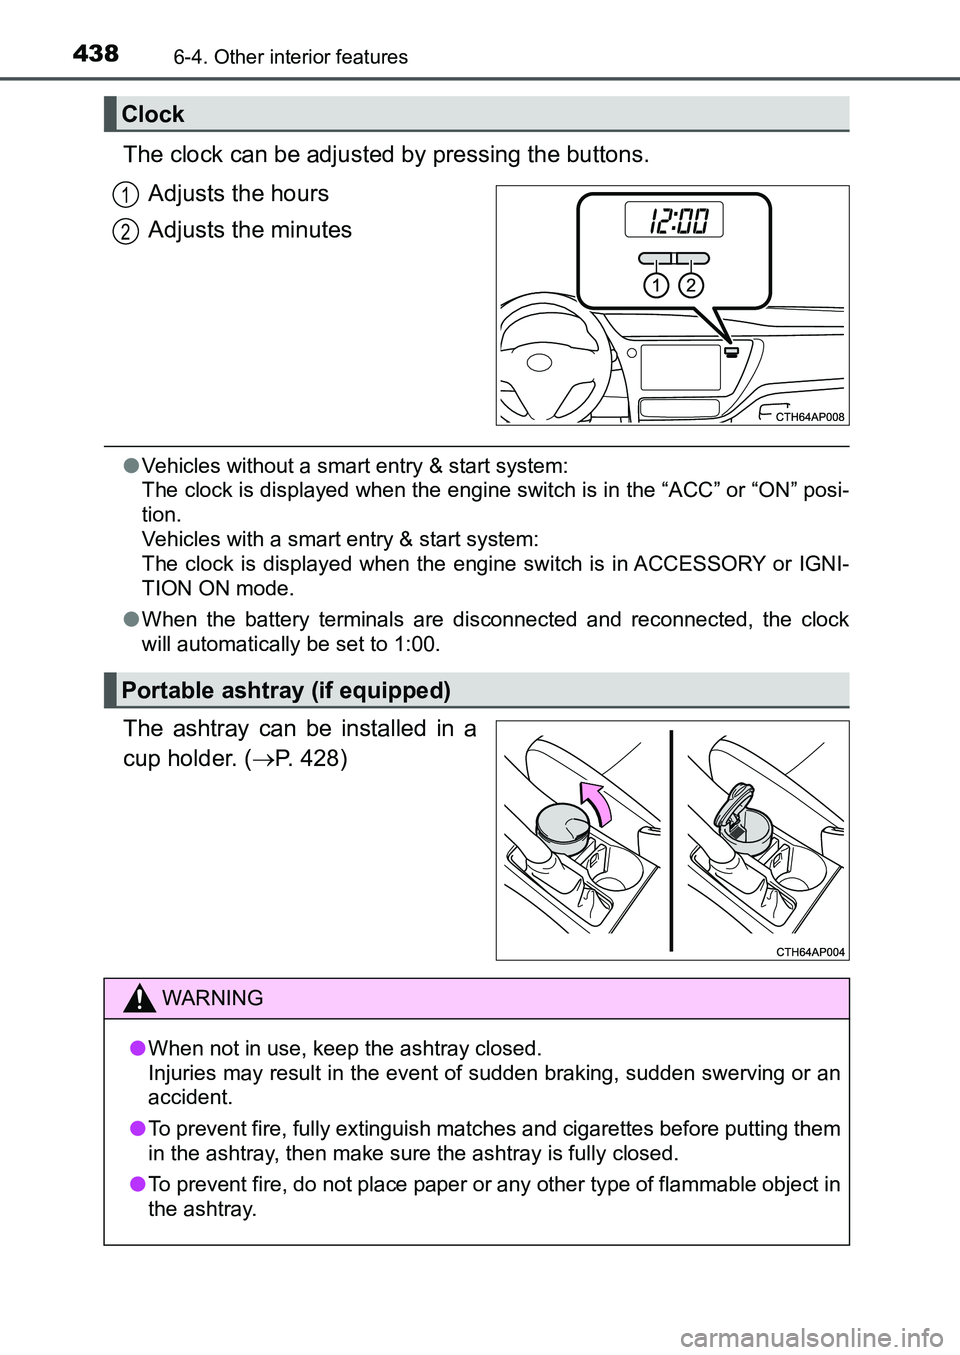
The clock can be adjusted by pressing the buttons.
Adjusts the hours
Adjusts the minutes
●Vehicles without a smart entry & start system:
The clock is displayed when the engine switch is in the “ACC” or “ON” posi-
tion.
Vehicles with a smart entry & start system:
The clock is displayed when the engine switch is in ACCESSORY or IGNI-
TION ON mode.
●When the battery terminals are disconnected and reconnected, the clock
will automatically be set to 1:00.
The ashtray can be installed in a
cup holder. (P. 428)
Clock
1
2
Portable ashtray (if equipped)
WARNING
●When not in use, keep the ashtray closed.
Injuries may result in the event of sudden braking, sudden swerving or an
accident.
●To prevent fire, fully extinguish matches and cigarettes before putting them
in the ashtray, then make sure the ashtray is fully closed.
●To prevent fire, do not place paper or any other type of flammable object in
the ashtray.
UK AURIS_HB_OM_Europe_OM12K97E.book 438 ページ 2016年6月27日 月曜日 午後5時42分
Page 471 of 661
4717-3. Do-it-yourself maintenance
UK AURIS_HB_EE (OM12K97E)
7
Maintenance and care
Remove the oil filler cap by turning it counterclockwise.
Add engine oil slowly, checking the dipstick.
Install the oil filler cap by turning it clockwise.
Engine oil selectionP. 615
Oil quantity
(Low Full)
Gasoline engine
1.5 L (1.6 qt., 1.3 Imp. qt.)
Diesel engine
1.3 L (1.4 qt., 1.1 Imp. qt.)
Items Clean funnel
1
2
3
UK AURIS_HB_OM_Europe_OM12K97E.book 471 ページ 2016年6月27日 月曜日 午後5時42分
Page 482 of 661
4827-3. Do-it-yourself maintenance
UK AURIS_HB_EE (OM12K97E)
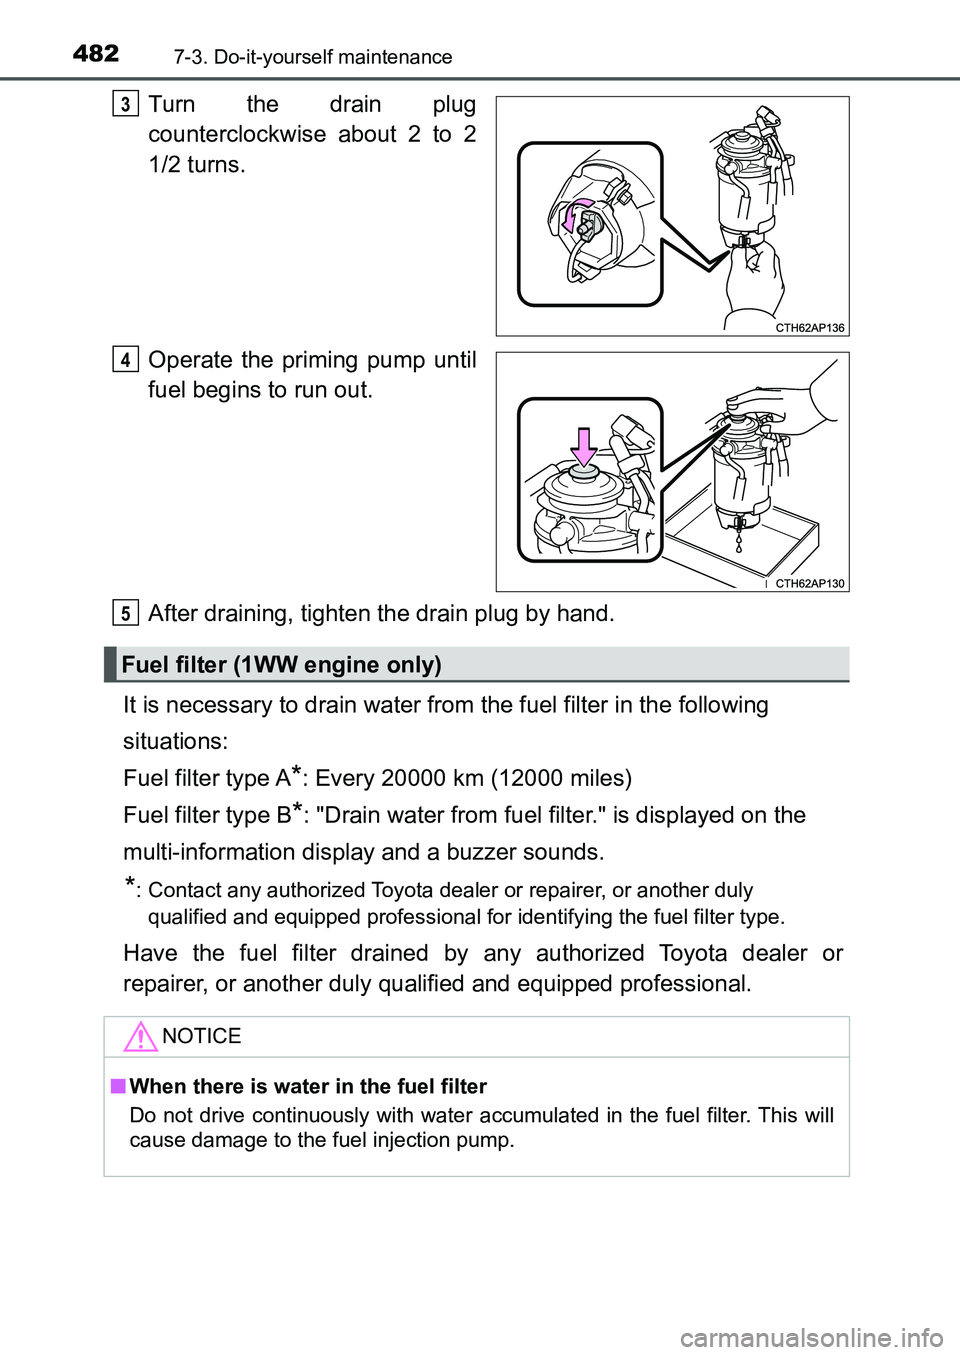
Turn the drain plug
counterclockwise about 2 to 2
1/2 turns.
Operate the priming pump until
fuel begins to run out.
After draining, tighten the drain plug by hand.
It is necessary to drain water from the fuel filter in the following
situations:
Fuel filter type A
*: Every 20000 km (12000 miles)
Fuel filter type B
*: "Drain water from fuel filter." is displayed on the
multi-information display and a buzzer sounds.
*: Contact any authorized Toyota dealer or repairer, or another duly
qualified and equipped professional for identifying the fuel filter type.
Have the fuel filter drained by any authorized Toyota dealer or
repairer, or another duly qualified and equipped professional.
3
4
Fuel filter (1WW engine only)
NOTICE
■When there is water in the fuel filter
Do not drive continuously with water accumulated in the fuel filter. This will
cause damage to the fuel injection pump.
5
UK AURIS_HB_OM_Europe_OM12K97E.book 482 ページ 2016年6月27日 月曜日 午後5時42分
Page 517 of 661
5177-3. Do-it-yourself maintenance
UK AURIS_HB_EE (OM12K97E)
7
Maintenance and care
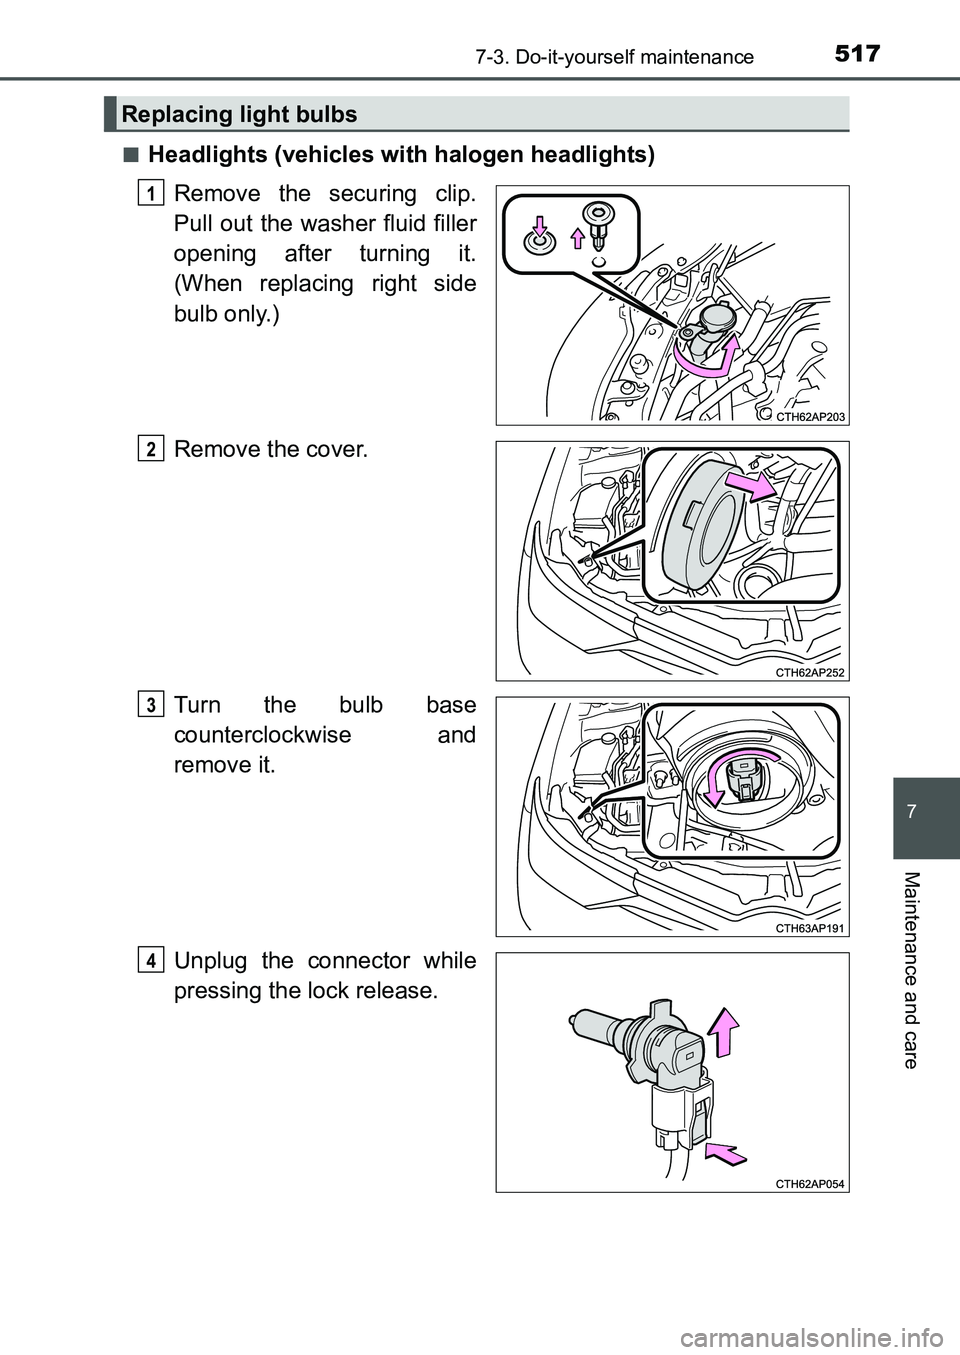
■Headlights (vehicles with halogen headlights)
Remove the securing clip.
Pull out the washer fluid filler
opening after turning it.
(When replacing right side
bulb only.)
Remove the cover.
Turn the bulb base
counterclockwise and
remove it.
Unplug the connector while
pressing the lock release.
Replacing light bulbs
1
2
3
4
UK AURIS_HB_OM_Europe_OM12K97E.book 517 ページ 2016年6月27日 月曜日 午後5時42分
Page 520 of 661
5207-3. Do-it-yourself maintenance
UK AURIS_HB_EE (OM12K97E)
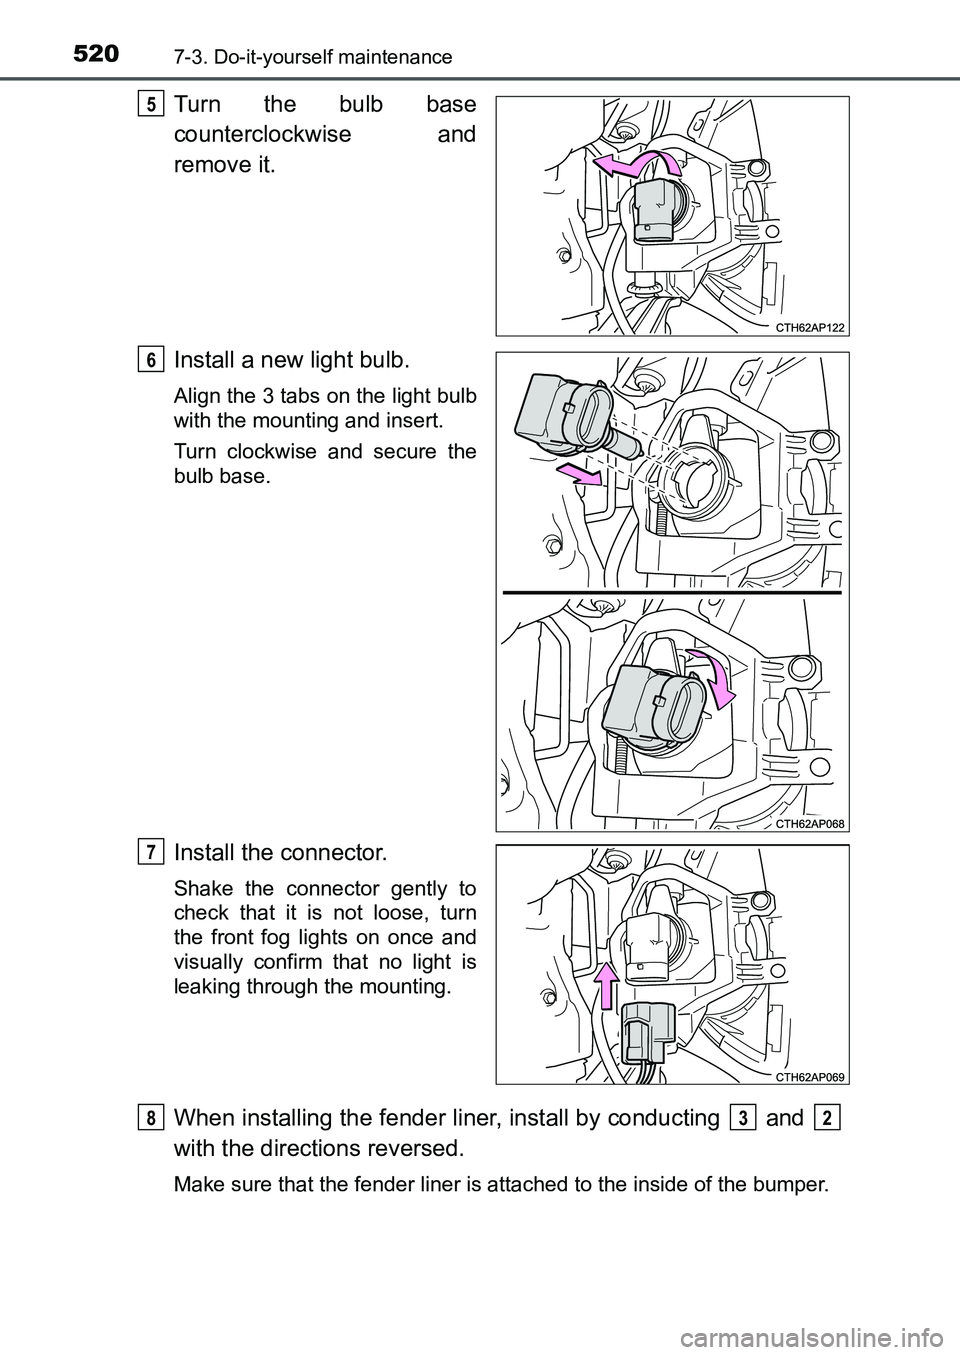
Turn the bulb base
counterclockwise and
remove it.
Install a new light bulb.
Align the 3 tabs on the light bulb
with the mounting and insert.
Turn clockwise and secure the
bulb base.
Install the connector.
Shake the connector gently to
check that it is not loose, turn
the front fog lights on once and
visually confirm that no light is
leaking through the mounting.
When installing the fender liner, install by conducting and
with the directions reversed.
Make sure that the fender liner is attached to the inside of the bumper.
5
6
7
832
UK AURIS_HB_OM_Europe_OM12K97E.book 520 ページ 2016年6月27日 月曜日 午後5時42分
Page 521 of 661
5217-3. Do-it-yourself maintenance
UK AURIS_HB_EE (OM12K97E)
7
Maintenance and care
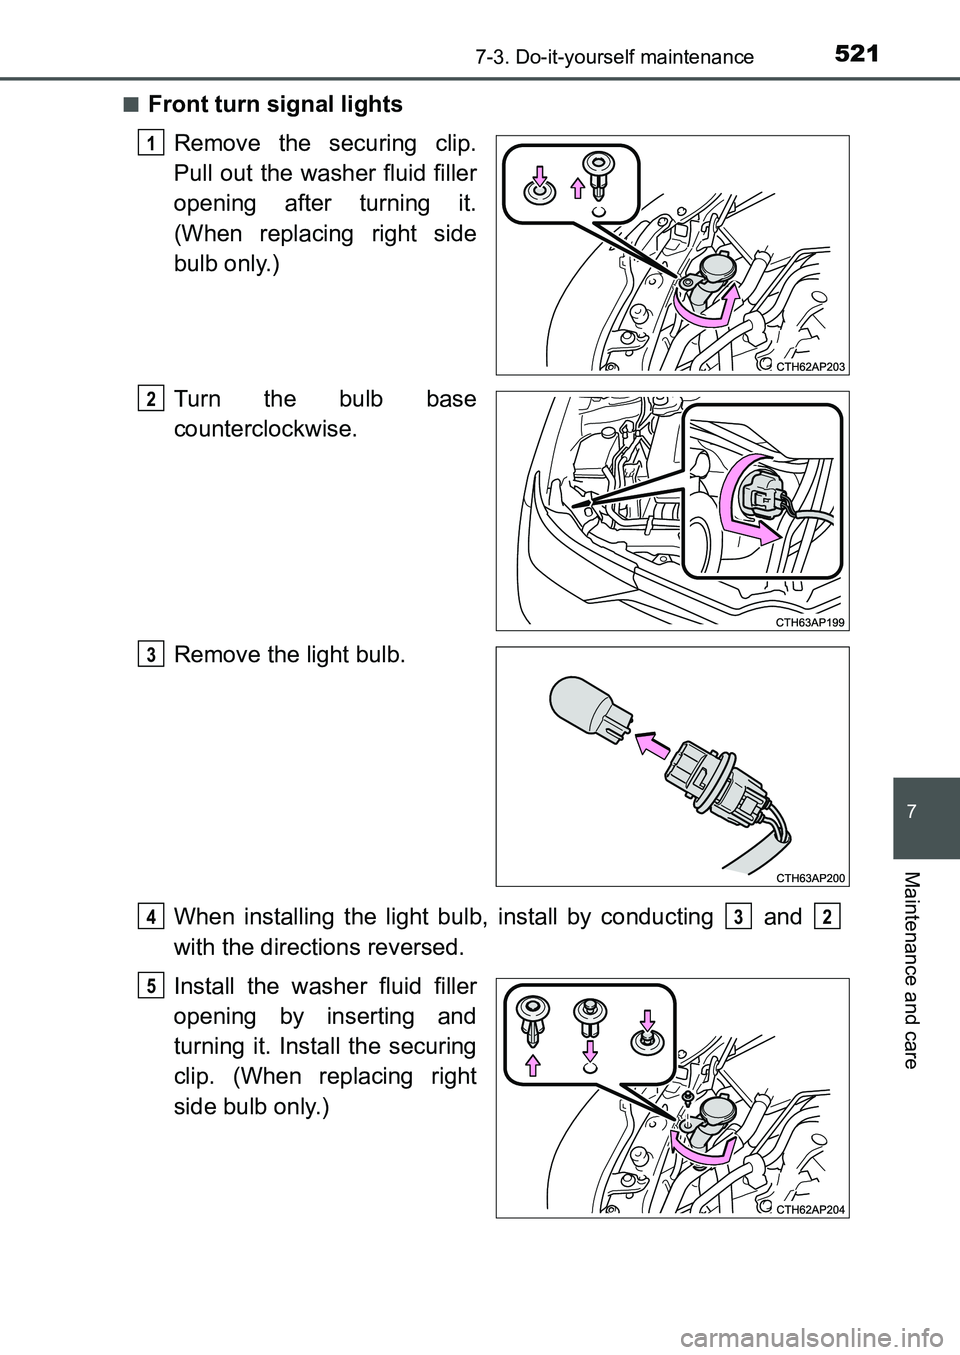
■Front turn signal lights
Remove the securing clip.
Pull out the washer fluid filler
opening after turning it.
(When replacing right side
bulb only.)
Turn the bulb base
counterclockwise.
Remove the light bulb.
When installing the light bulb, install by conducting and
with the directions reversed.
Install the washer fluid filler
opening by inserting and
turning it. Install the securing
clip. (When replacing right
side bulb only.)
1
2
3
432
5
UK AURIS_HB_OM_Europe_OM12K97E.book 521 ページ 2016年6月27日 月曜日 午後5時42分
Page 522 of 661
5227-3. Do-it-yourself maintenance
UK AURIS_HB_EE (OM12K97E)■
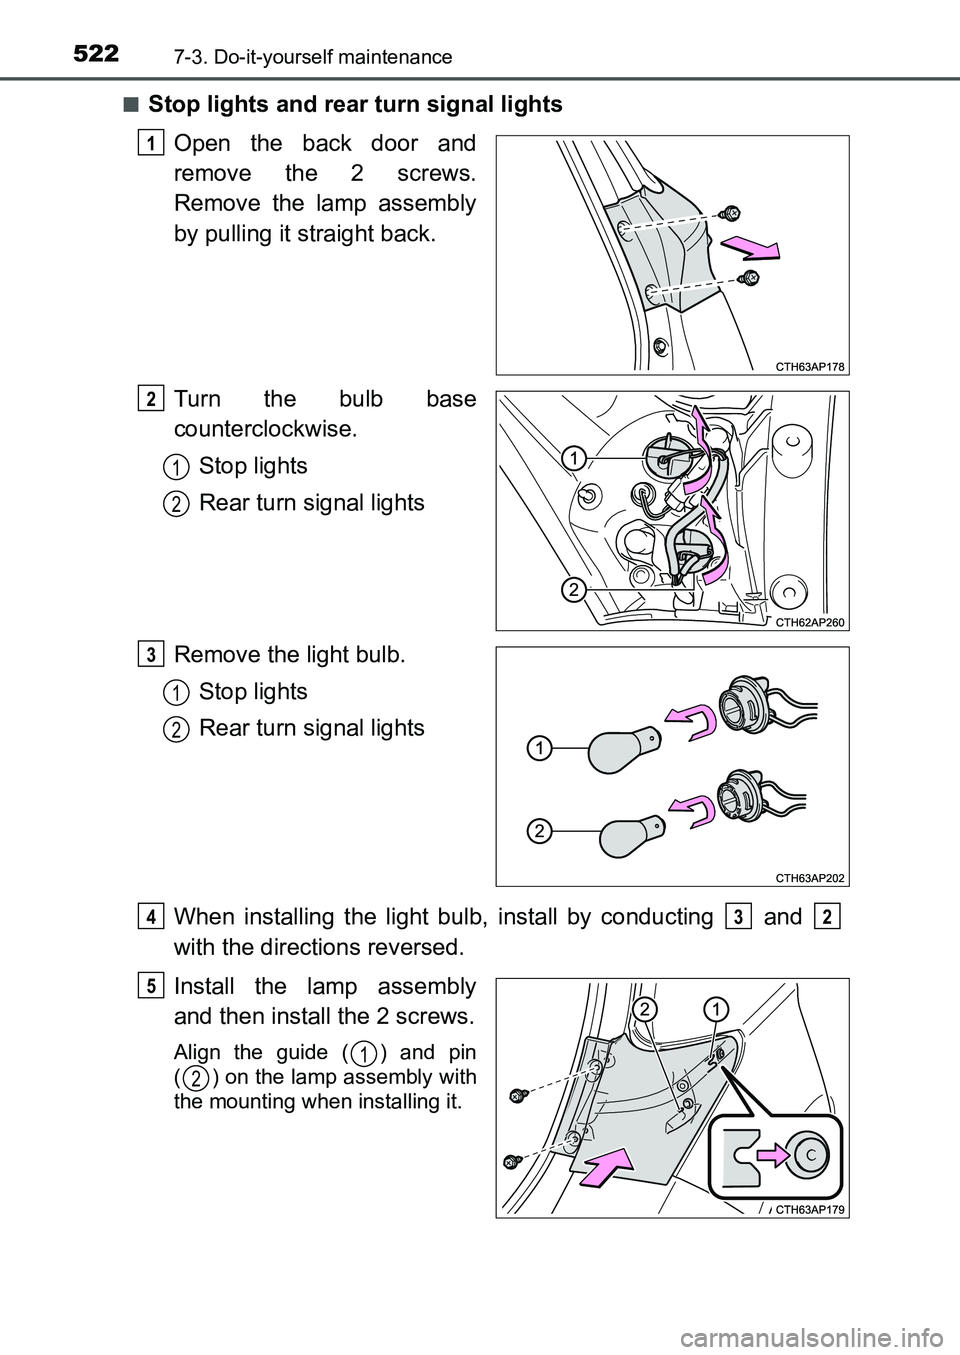
Stop lights and rear turn signal lights
Open the back door and
remove the 2 screws.
Remove the lamp assembly
by pulling it straight back.
Turn the bulb base
counterclockwise.
Stop lights
Rear turn signal lights
Remove the light bulb.
Stop lights
Rear turn signal lights
When installing the light bulb, install by conducting and
with the directions reversed.
Install the lamp assembly
and then install the 2 screws.
Align the guide ( ) and pin
( ) on the lamp assembly with
the mounting when installing it.
1
2
1
2
3
1
2
432
5
1
2
UK AURIS_HB_OM_Europe_OM12K97E.book 522 ページ 2016年6月27日 月曜日 午後5時42分