flat tire TOYOTA AURIS HYBRID 2013 Owner's Manual
[x] Cancel search | Manufacturer: TOYOTA, Model Year: 2013, Model line: AURIS HYBRID, Model: TOYOTA AURIS HYBRID 2013Pages: 768, PDF Size: 21.22 MB
Page 649 of 768
6497-2. Steps to take in an emergency
UK_AURIS/AURIS_HV_EE (OM12F76E)
7
When trouble arises
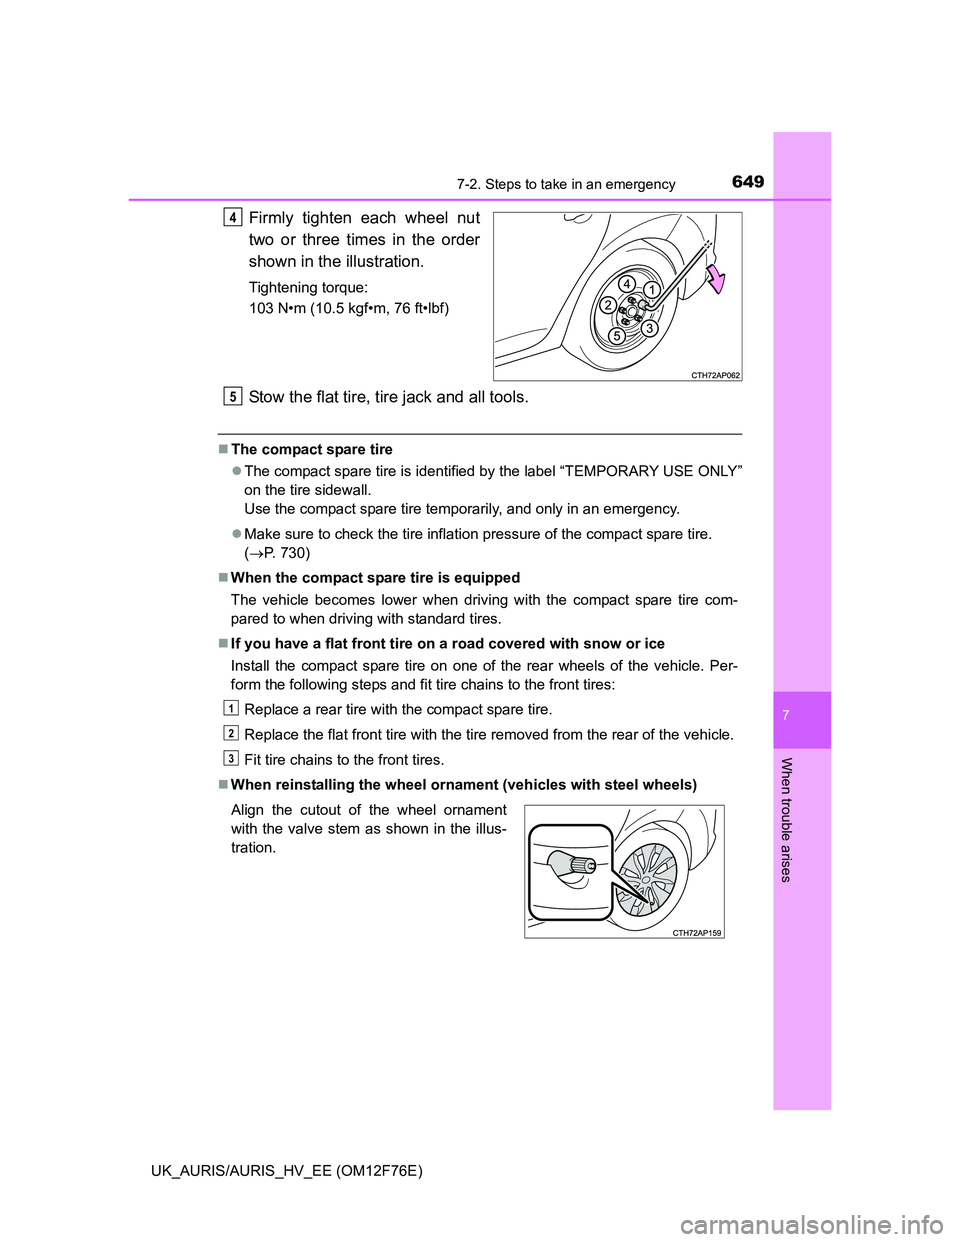
Firmly tighten each wheel nut
two or three times in the order
shown in the illustration.
Tightening torque:
103 N•m (10.5 kgf•m, 76 ft•lbf)
Stow the flat tire, tire jack and all tools.
The compact spare tire
The compact spare tire is identified by the label “TEMPORARY USE ONLY”
on the tire sidewall.
Use the compact spare tire temporarily, and only in an emergency.
Make sure to check the tire inflation pressure of the compact spare tire.
(P. 730)
When the compact spare tire is equipped
The vehicle becomes lower when driving with the compact spare tire com-
pared to when driving with standard tires.
If you have a flat front tire on a road covered with snow or ice
Install the compact spare tire on one of the rear wheels of the vehicle. Per-
form the following steps and fit tire chains to the front tires:
Replace a rear tire with the compact spare tire.
Replace the flat front tire with the tire removed from the rear of the vehicle.
Fit tire chains to the front tires.
When reinstalling the wheel ornament (vehicles with steel wheels)
4
Align the cutout of the wheel ornament
with the valve stem as shown in the illus-
tration.
5
1
2
3
Page 653 of 768
6537-2. Steps to take in an emergency
UK_AURIS/AURIS_HV_EE (OM12F76E)
7
When trouble arises
Before repairing the tire
Stop the vehicle in a safe place on a hard, flat surface.
Set the parking brake.
Except hybrid model: Shift the shift lever to P (vehicles with a
Multidrive) or N (vehicles with a multi-mode manual transmission
and manual transmission).
Hybrid model: Shift the shift position to P.
Except hybrid model: Stop the engine.
Hybrid model: Stop the hybrid system.
Turn on the emergency flashers.
If you have a flat tire (vehicles with an
emergency tire puncture repair kit)
A puncture caused by a nail or screw passing through the tire tread can
be repaired temporarily using the emergency tire puncture repair kit.
(The kit contains a bottle of sealant. The sealant can be used only once
to temporarily repair one tire without removing the nail or screw from
the tire.) Depending on the damage, this kit cannot be used to repair the
tire. (P. 658)
After temporarily repairing the tire with the kit, have the tire repaired or
replaced by any authorized Toyota dealer or repairer, or another duly
qualified and equipped professional. Repairs conducted using the
emergency tire puncture repair kit are only a temporary measure. Have
the tire repaired and replaced as soon as possible.
Page 662 of 768
6627-2. Steps to take in an emergency
UK_AURIS/AURIS_HV_EE (OM12F76E)
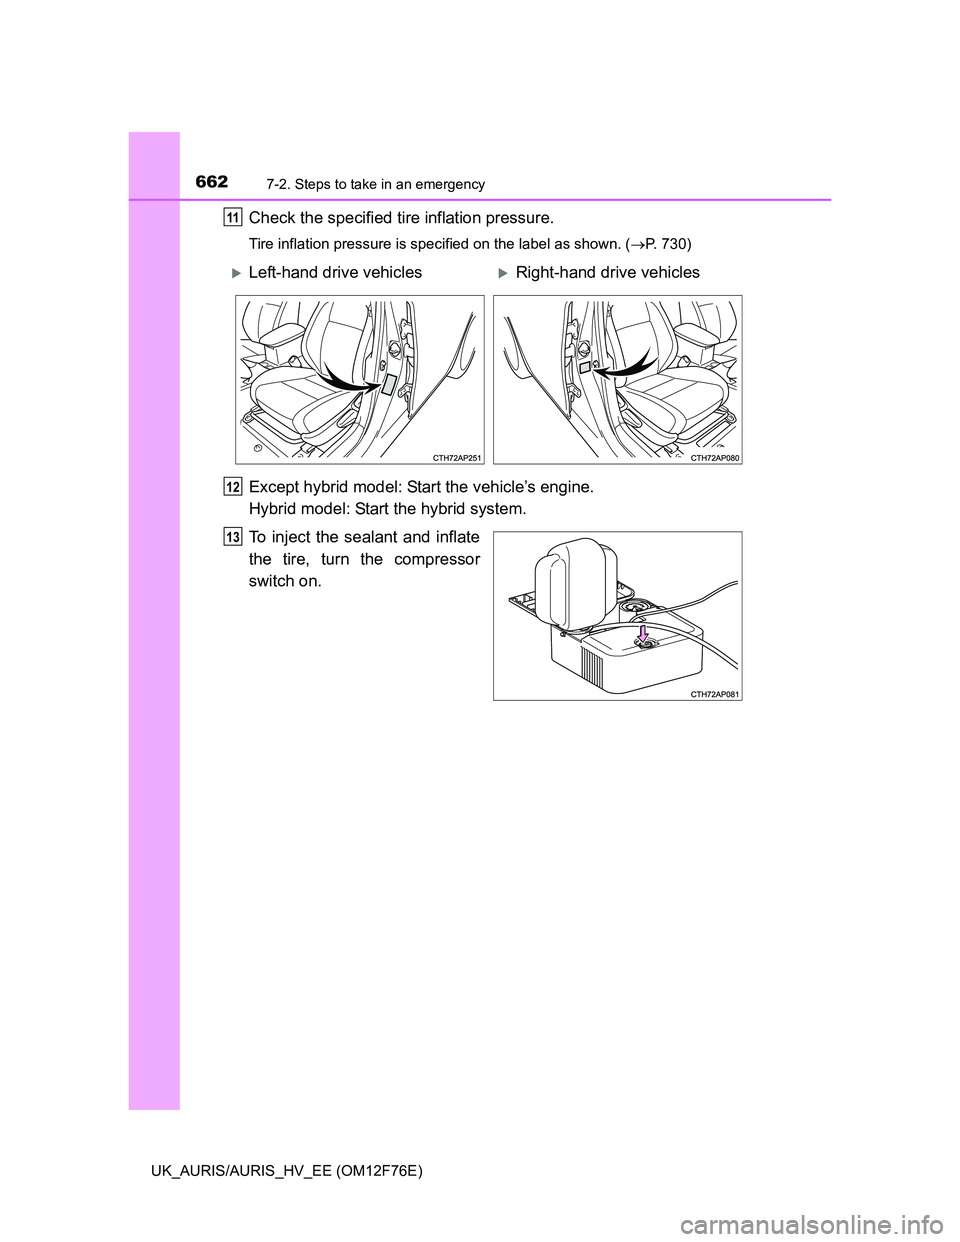
Check the specified tire inflation pressure.
Tire inflation pressure is specified on the label as shown. (P. 730)
Except hybrid model: Start the vehicle’s engine.
Hybrid model: Start the hybrid system.
To inject the sealant and inflate
the tire, turn the compressor
switch on.
11
Left-hand drive vehiclesRight-hand drive vehicles
12
13
Page 663 of 768
6637-2. Steps to take in an emergency
UK_AURIS/AURIS_HV_EE (OM12F76E)
7
When trouble arises
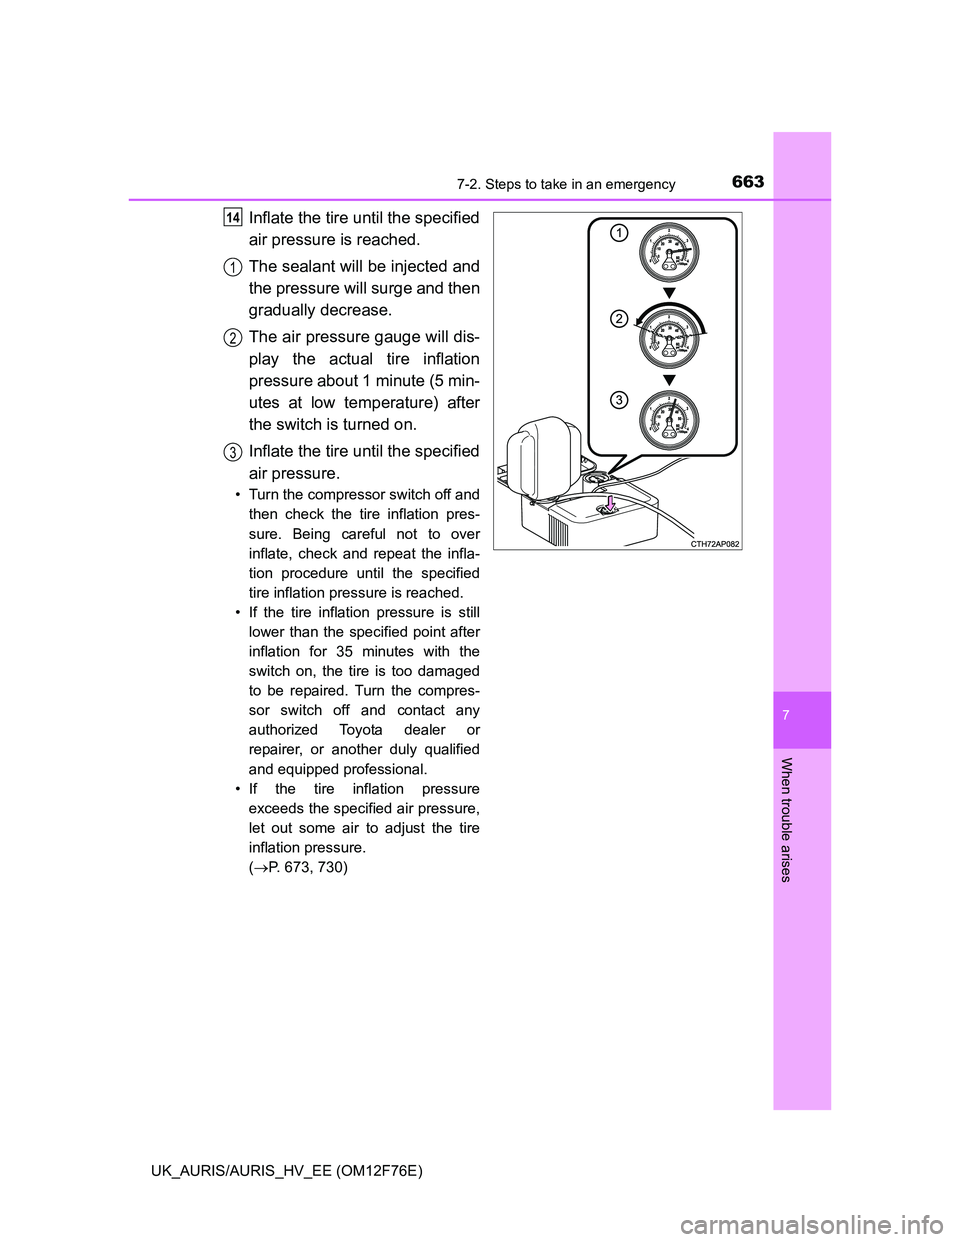
Inflate the tire until the specified
air pressure is reached.
The sealant will be injected and
the pressure will surge and then
gradually decrease.
The air pressure gauge will dis-
play the actual tire inflation
pressure about 1 minute (5 min-
utes at low temperature) after
the switch is turned on.
Inflate the tire until the specified
air pressure.
• Turn the compressor switch off and
then check the tire inflation pres-
sure. Being careful not to over
inflate, check and repeat the infla-
tion procedure until the specified
tire inflation pressure is reached.
• If the tire inflation pressure is still
lower than the specified point after
inflation for 35 minutes with the
switch on, the tire is too damaged
to be repaired. Turn the compres-
sor switch off and contact any
authorized Toyota dealer or
repairer, or another duly qualified
and equipped professional.
• If the tire inflation pressure
exceeds the specified air pressure,
let out some air to adjust the tire
inflation pressure.
(P. 673, 730)
14
1
2
3
Page 664 of 768
6647-2. Steps to take in an emergency
UK_AURIS/AURIS_HV_EE (OM12F76E)
With the compressor switch off, disconnect the hose from the valve
on the tire and then pull out the power plug from the power outlet
socket.
Some sealant may leak when the hose is removed.
Install the valve cap onto the valve of the emergency repaired tire.
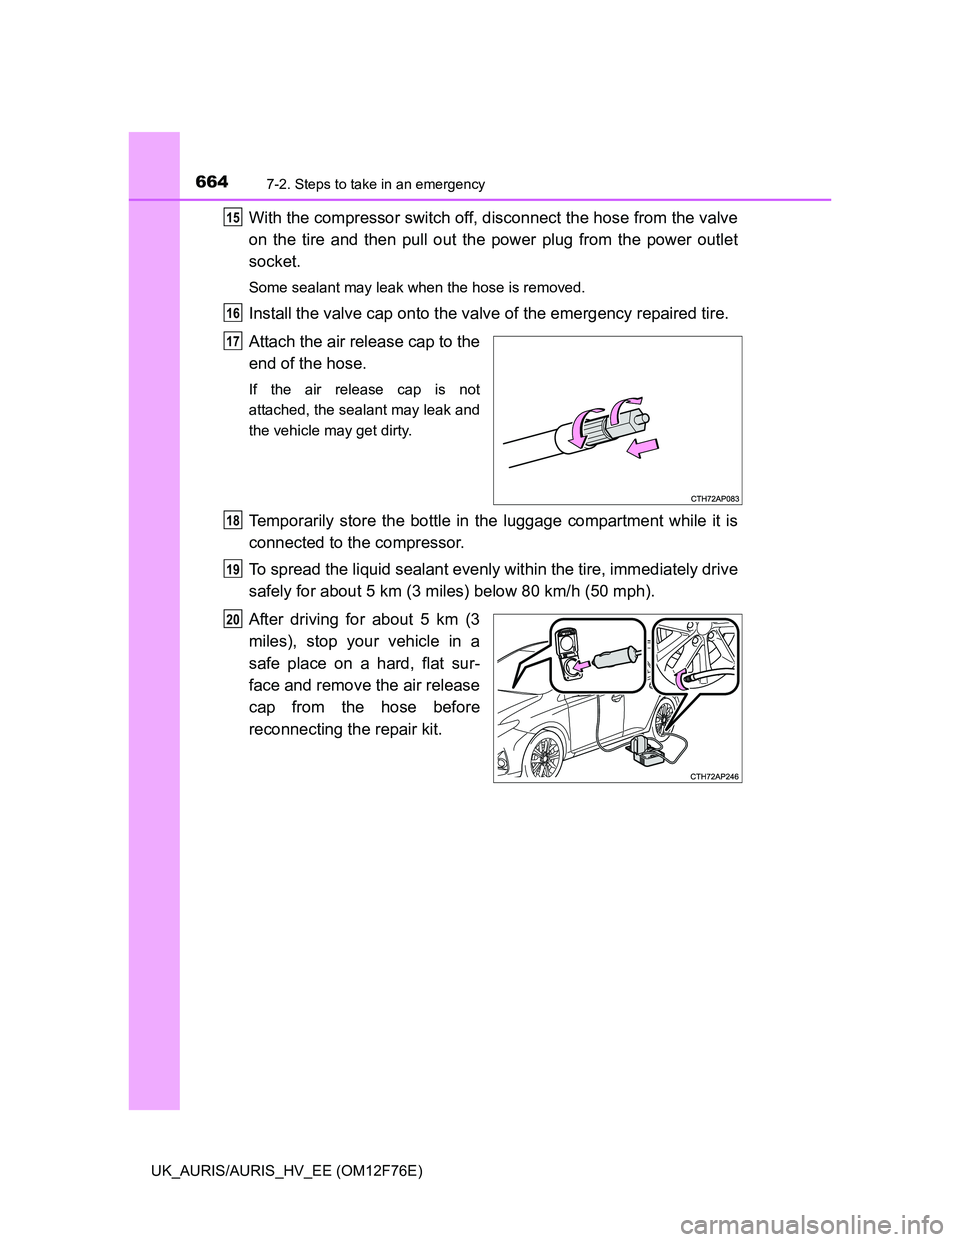
Attach the air release cap to the
end of the hose.
If the air release cap is not
attached, the sealant may leak and
the vehicle may get dirty.
Temporarily store the bottle in the luggage compartment while it is
connected to the compressor.
To spread the liquid sealant evenly within the tire, immediately drive
safely for about 5 km (3 miles) below 80 km/h (50 mph).
After driving for about 5 km (3
miles), stop your vehicle in a
safe place on a hard, flat sur-
face and remove the air release
cap from the hose before
reconnecting the repair kit.
15
16
17
18
19
20
Page 665 of 768
6657-2. Steps to take in an emergency
UK_AURIS/AURIS_HV_EE (OM12F76E)
7
When trouble arises
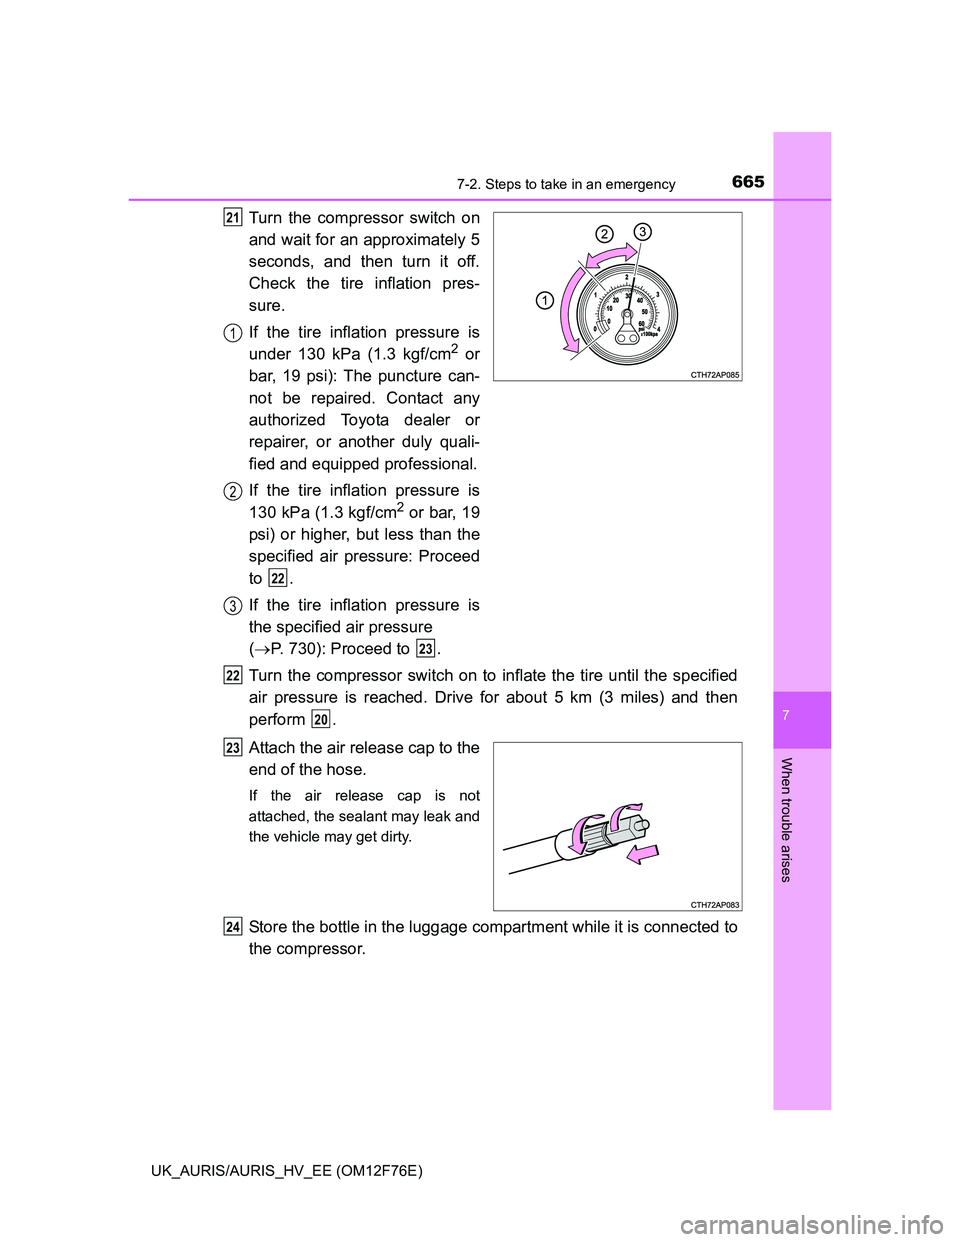
Turn the compressor switch on
and wait for an approximately 5
seconds, and then turn it off.
Check the tire inflation pres-
sure.
If the tire inflation pressure is
under 130 kPa (1.3 kgf/cm
2 or
bar, 19 psi): The puncture can-
not be repaired. Contact any
authorized Toyota dealer or
repairer, or another duly quali-
fied and equipped professional.
If the tire inflation pressure is
130 kPa (1.3 kgf/cm
2 or bar, 19
psi) or higher, but less than the
specified air pressure: Proceed
to .
If the tire inflation pressure is
the specified air pressure
(P. 730): Proceed to .
Turn the compressor switch on to inflate the tire until the specified
air pressure is reached. Drive for about 5 km (3 miles) and then
perform .
Attach the air release cap to the
end of the hose.
If the air release cap is not
attached, the sealant may leak and
the vehicle may get dirty.
Store the bottle in the luggage compartment while it is connected to
the compressor.
21
1
2
22
3
23
22
20
23
24
Page 669 of 768
6697-2. Steps to take in an emergency
UK_AURIS/AURIS_HV_EE (OM12F76E)
7
When trouble arises
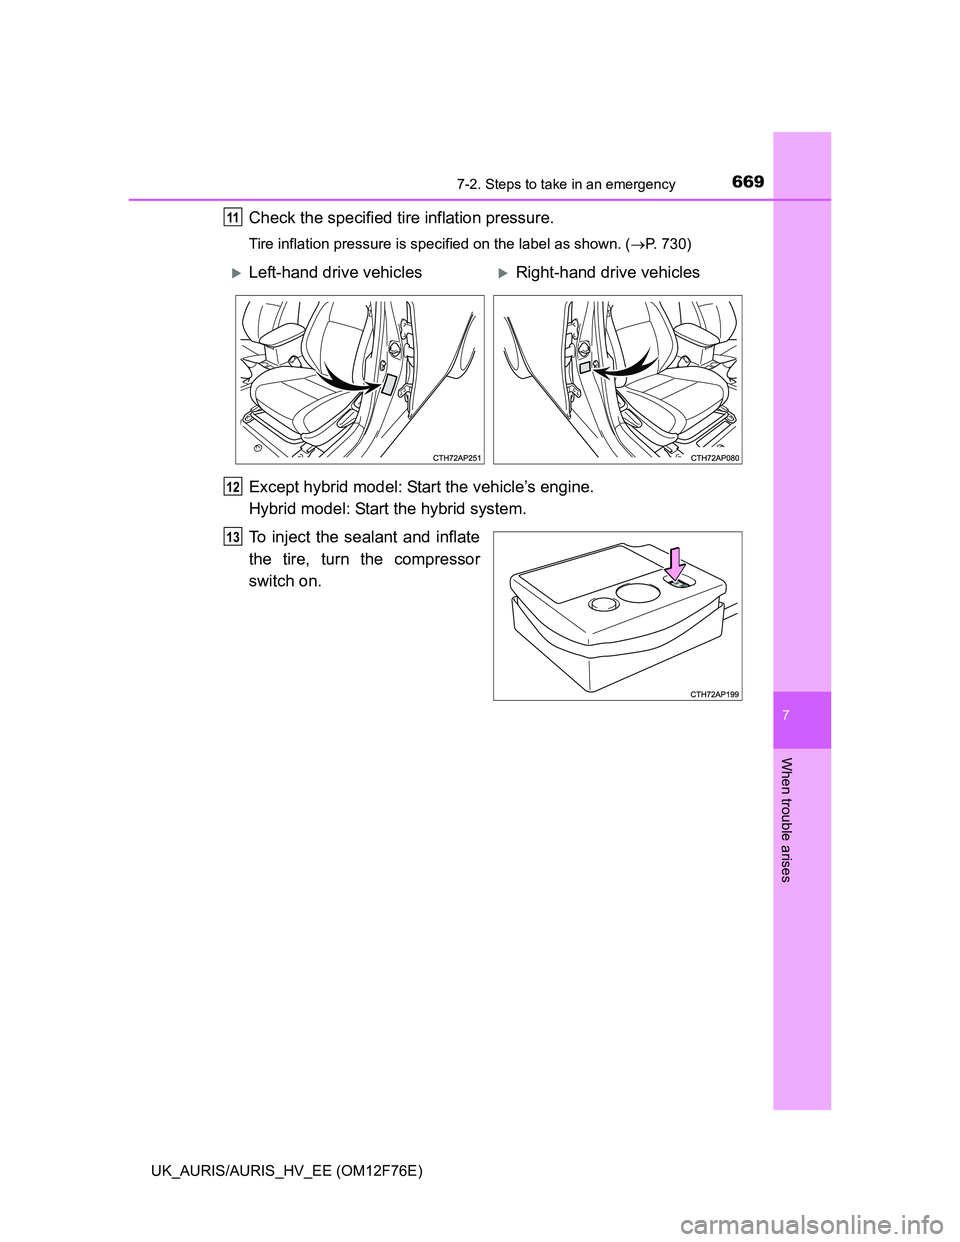
Check the specified tire inflation pressure.
Tire inflation pressure is specified on the label as shown. (P. 730)
Except hybrid model: Start the vehicle’s engine.
Hybrid model: Start the hybrid system.
To inject the sealant and inflate
the tire, turn the compressor
switch on.
11
Left-hand drive vehiclesRight-hand drive vehicles
12
13
Page 670 of 768
6707-2. Steps to take in an emergency
UK_AURIS/AURIS_HV_EE (OM12F76E)
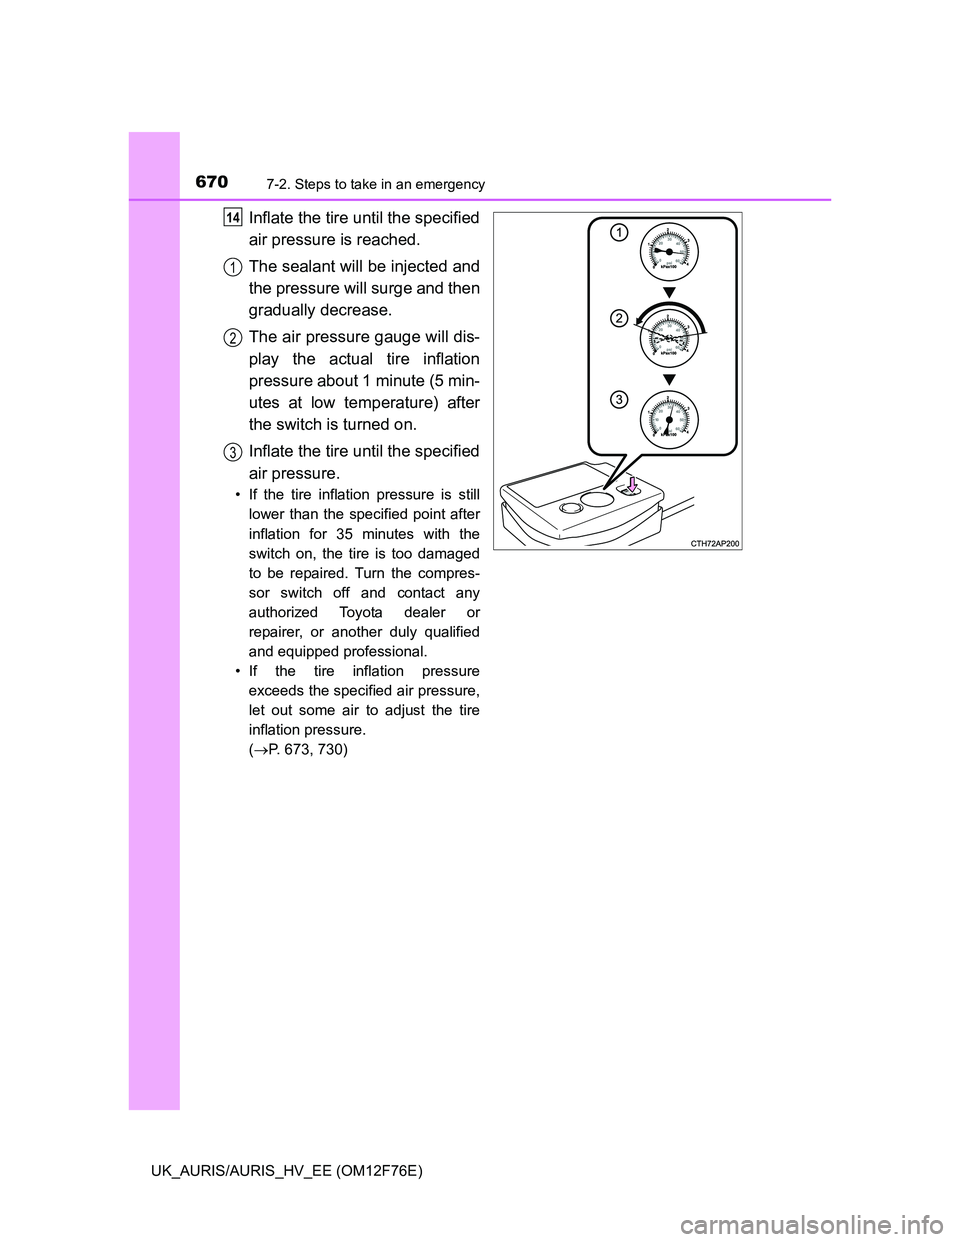
Inflate the tire until the specified
air pressure is reached.
The sealant will be injected and
the pressure will surge and then
gradually decrease.
The air pressure gauge will dis-
play the actual tire inflation
pressure about 1 minute (5 min-
utes at low temperature) after
the switch is turned on.
Inflate the tire until the specified
air pressure.
• If the tire inflation pressure is still
lower than the specified point after
inflation for 35 minutes with the
switch on, the tire is too damaged
to be repaired. Turn the compres-
sor switch off and contact any
authorized Toyota dealer or
repairer, or another duly qualified
and equipped professional.
• If the tire inflation pressure
exceeds the specified air pressure,
let out some air to adjust the tire
inflation pressure.
(P. 673, 730)
14
1
2
3
Page 671 of 768
6717-2. Steps to take in an emergency
UK_AURIS/AURIS_HV_EE (OM12F76E)
7
When trouble arises
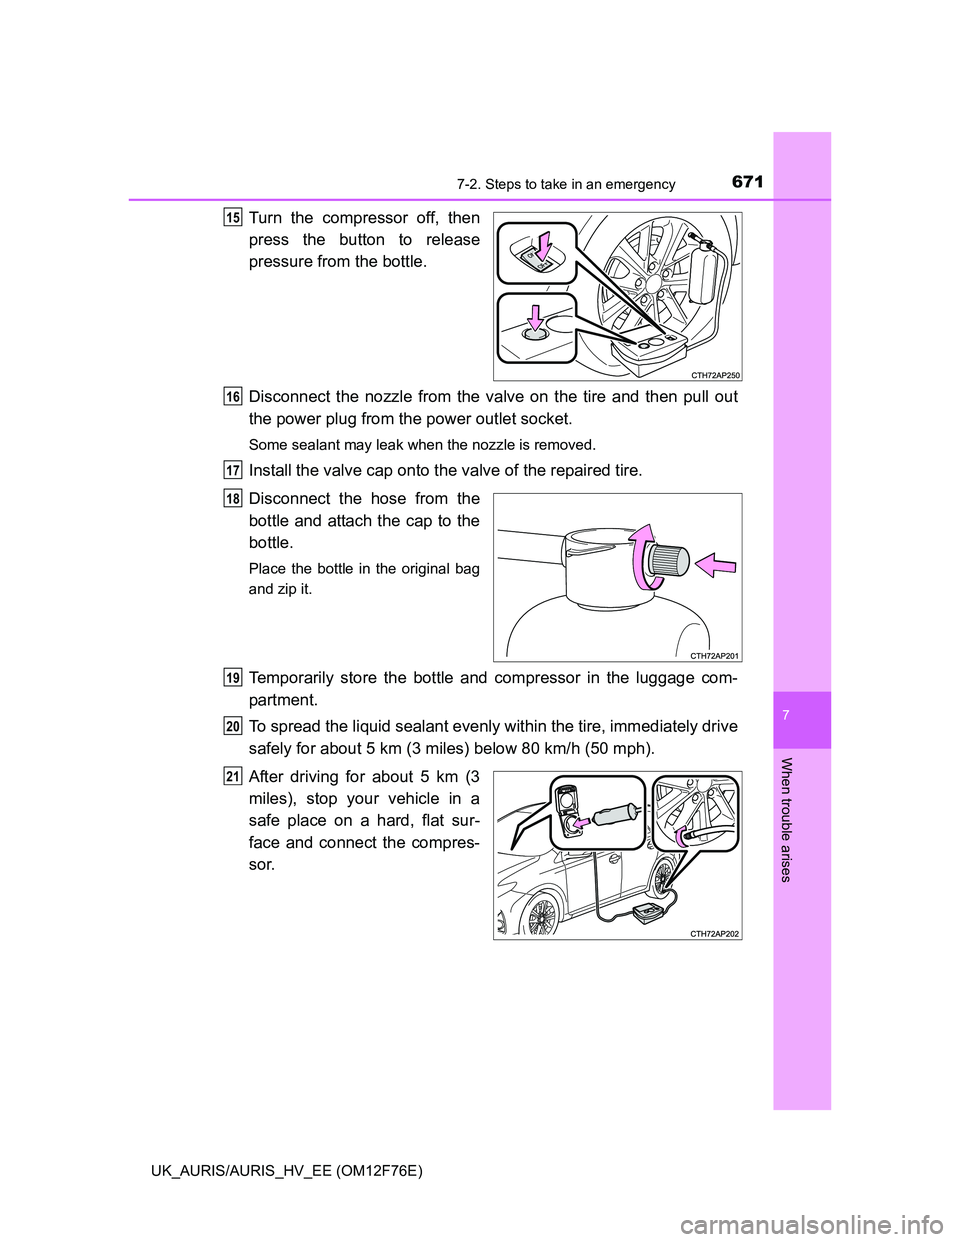
Turn the compressor off, then
press the button to release
pressure from the bottle.
Disconnect the nozzle from the valve on the tire and then pull out
the power plug from the power outlet socket.
Some sealant may leak when the nozzle is removed.
Install the valve cap onto the valve of the repaired tire.
Disconnect the hose from the
bottle and attach the cap to the
bottle.
Place the bottle in the original bag
and zip it.
Temporarily store the bottle and compressor in the luggage com-
partment.
To spread the liquid sealant evenly within the tire, immediately drive
safely for about 5 km (3 miles) below 80 km/h (50 mph).
After driving for about 5 km (3
miles), stop your vehicle in a
safe place on a hard, flat sur-
face and connect the compres-
sor.
15
16
17
18
19
20
21
Page 672 of 768
6727-2. Steps to take in an emergency
UK_AURIS/AURIS_HV_EE (OM12F76E)
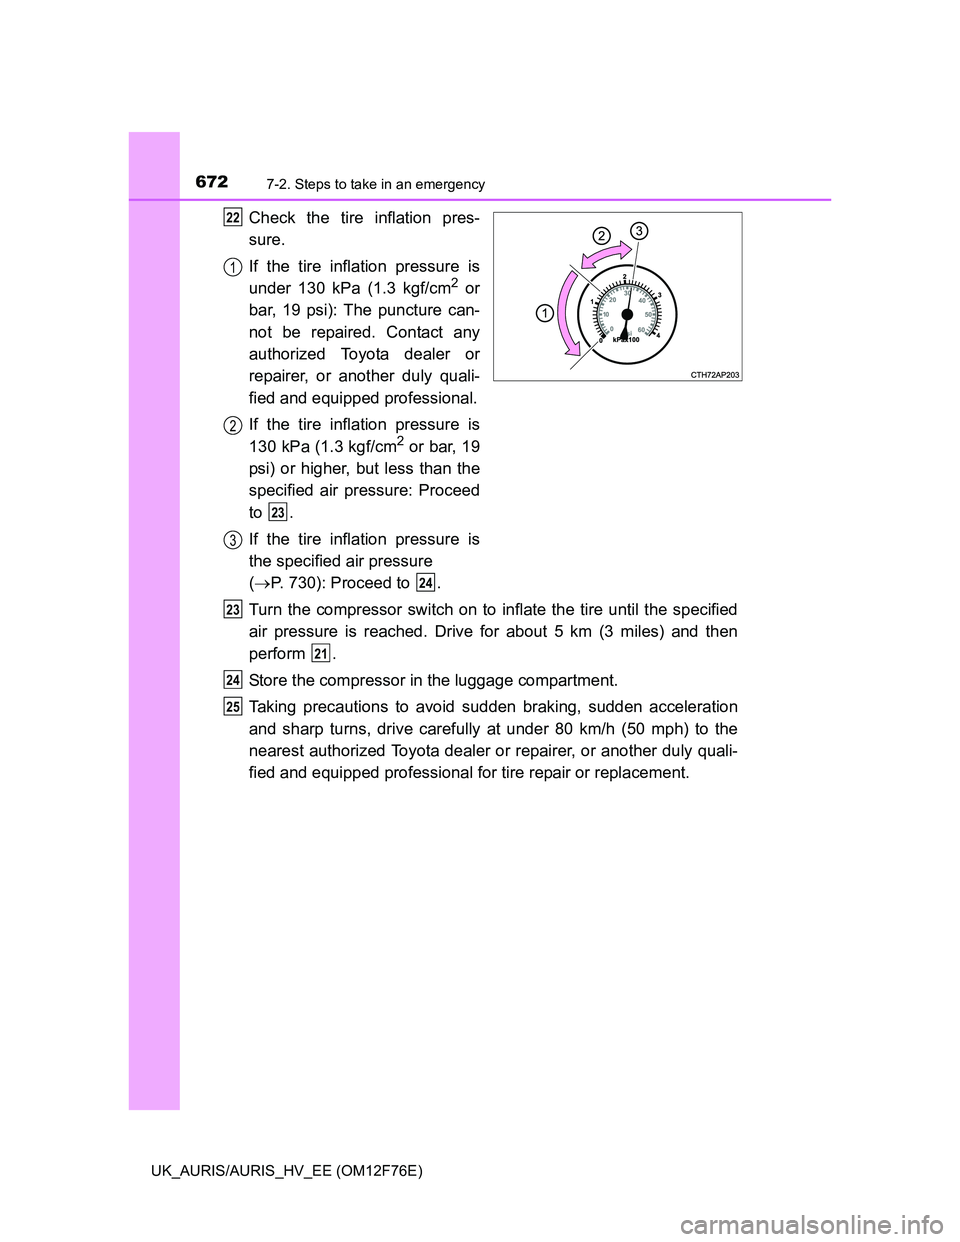
Check the tire inflation pres-
sure.
If the tire inflation pressure is
under 130 kPa (1.3 kgf/cm
2 or
bar, 19 psi): The puncture can-
not be repaired. Contact any
authorized Toyota dealer or
repairer, or another duly quali-
fied and equipped professional.
If the tire inflation pressure is
130 kPa (1.3 kgf/cm
2 or bar, 19
psi) or higher, but less than the
specified air pressure: Proceed
to .
If the tire inflation pressure is
the specified air pressure
(P. 730): Proceed to .
Turn the compressor switch on to inflate the tire until the specified
air pressure is reached. Drive for about 5 km (3 miles) and then
perform .
Store the compressor in the luggage compartment.
Taking precautions to avoid sudden braking, sudden acceleration
and sharp turns, drive carefully at under 80 km/h (50 mph) to the
nearest authorized Toyota dealer or repairer, or another duly quali-
fied and equipped professional for tire repair or replacement.
22
1
2
23
3
24
23
21
24
25