reset TOYOTA AVALON HYBRID 2016 XX40 / 4.G Owners Manual
[x] Cancel search | Manufacturer: TOYOTA, Model Year: 2016, Model line: AVALON HYBRID, Model: TOYOTA AVALON HYBRID 2016 XX40 / 4.GPages: 492, PDF Size: 7.16 MB
Page 20 of 492
20Pictorial index
AVALON_HV_U (01999-07002)
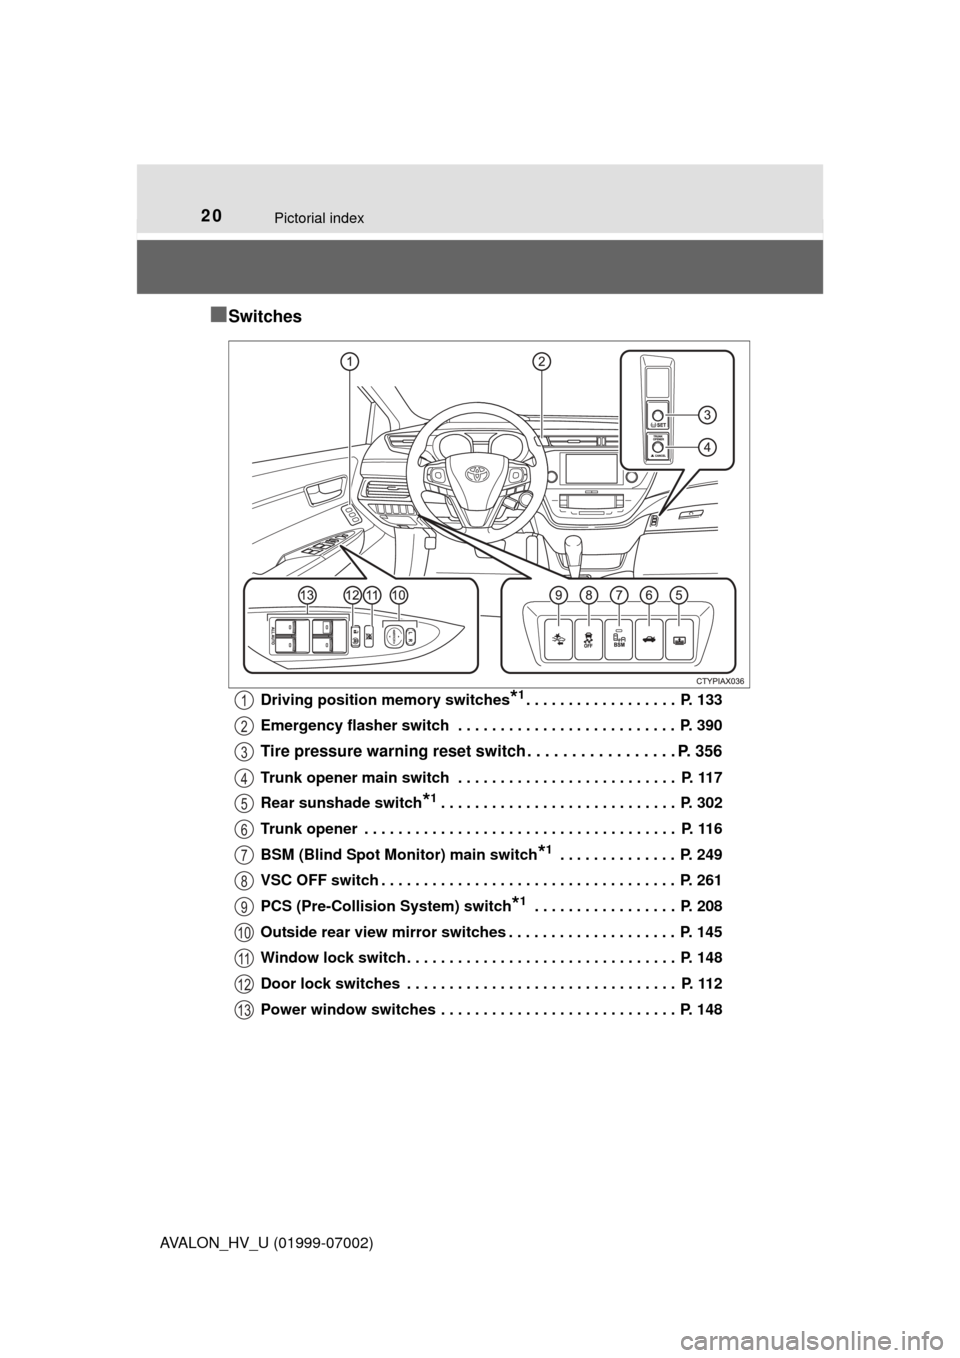
■Switches
Driving position memory switches*1. . . . . . . . . . . . . . . . . . P. 133
Emergency flasher switch . . . . . . . . . . . . . . . . . . . . . . . . . . P. 390
Tire pressure warning reset switch . . . . . . . . . . . . . . . . . P. 356
Trunk opener main switch . . . . . . . . . . . . . . . . . . . . . . . . . . P. 117
Rear sunshade switch
*1. . . . . . . . . . . . . . . . . . . . . . . . . . . . P. 302
Trunk opener . . . . . . . . . . . . . . . . . . . . . . . . . . . . . . . . . . . . . P. 116
BSM (Blind Spot Monitor) main switch
*1 . . . . . . . . . . . . . . P. 249
VSC OFF switch . . . . . . . . . . . . . . . . . . . . . . . . . . . . . . . . . . . P. 261
PCS (Pre-Collision System) switch
*1 . . . . . . . . . . . . . . . . . P. 208
Outside rear view mirror switches . . . . . . . . . . . . . . . . . . . . P. 145
Window lock switch . . . . . . . . . . . . . . . . . . . . . . . . . . . . . . . . P. 148
Door lock switches . . . . . . . . . . . . . . . . . . . . . . . . . . . . . . . . P. 112
Power window switches . . . . . . . . . . . . . . . . . . . . . . . . . . . . P. 148
1
2
3
4
5
6
7
8
9
10
11
12
13
Page 90 of 492
902. Instrument cluster
AVALON_HV_U (01999-07002)
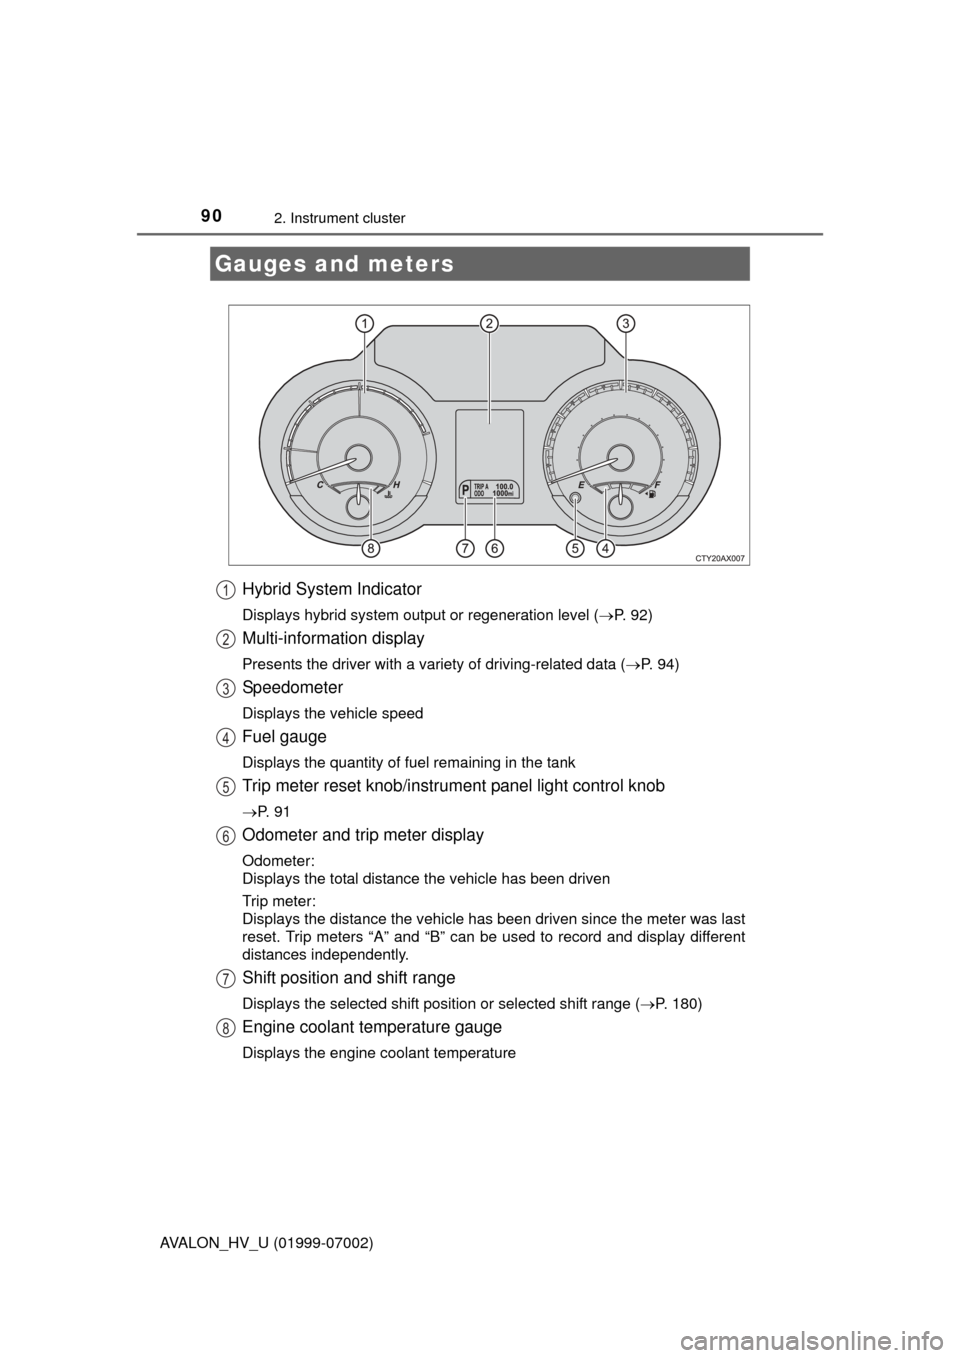
Hybrid System Indicator
Displays hybrid system output or regeneration level (P. 92)
Multi-information display
Presents the driver with a variety of driving-related data ( P. 94)
Speedometer
Displays the vehicle speed
Fuel gauge
Displays the quantity of fuel remaining in the tank
Trip meter reset knob/instrument panel light control knob
P. 9 1
Odometer and trip meter display
Odometer:
Displays the total distance the vehicle has been driven
Trip meter:
Displays the distance the vehicle has been driven since the meter was last
reset. Trip meters “A” and “B” can be used to record and display different
distances independently.
Shift position and shift range
Displays the selected shift position or selected shift range ( P. 180)
Engine coolant temperature gauge
Displays the engine coolant temperature
Gauges and meters
1
2
3
4
5
6
7
8
Page 91 of 492
912. Instrument cluster
2
Instrument cluster
AVALON_HV_U (01999-07002)
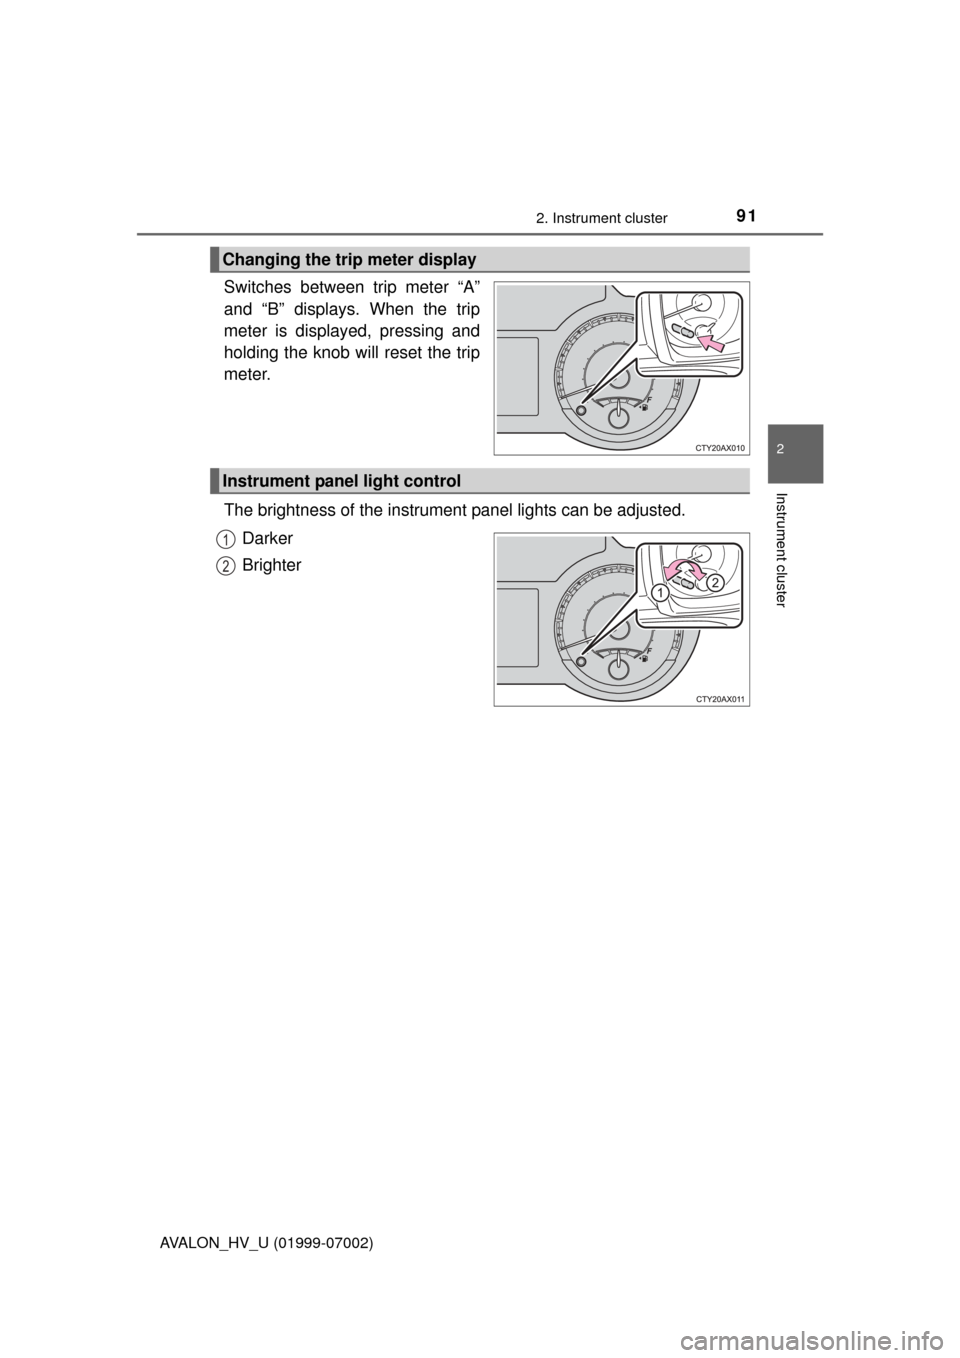
Switches between trip meter “A”
and “B” displays. When the trip
meter is displayed, pressing and
holding the knob will reset the trip
meter.
The brightness of the instrument panel lights can be adjusted.
Darker
Brighter
Changing the trip meter display
Instrument panel light control
1
2
Page 95 of 492

952. Instrument cluster
2
Instrument cluster
AVALON_HV_U (01999-07002)■
Switching the display
Items displayed can be
switched by pressing the
“DISP” button.
■Distance to empty
Displays the estimated maximum distance that can be driven with
the quantity of fuel remaining.
• This distance is computed based on your average fuel consumption. As
a result, the actual distance that can be driven may differ from that dis-
played.
• When only a small amount of fuel is added to the tank, the display may
not be updated.
When refueling, turn the power switch off. If the vehicle is refueled with-
out turning the power switch off, the display may not be updated.
■
Digital speedometer
Displays the current vehicle speed.
■Average fuel economy
Displays the average fuel consum ption since the function was
reset.
• The function can be reset by pressing and holding the “DISP” button\
when the average fuel consumption is displayed.
• Use the displayed average fuel consumption as a reference.
■
Current fuel economy
Displays the current rate of fuel consumption.
■Sway warning (if equipped)
Detects the sway of the vehicle with in a lane, which is often associ-
ated with a decrease in the driver’s attention level, and displays the
decrease in attention us ing a segment display.
The fewer segments lit, the more the driver may need to rest.
This display is a part of the LDA (Lane Departure Alert with steering
control) system. The display is enabled when the operating conditions
of the vehicle sway warning are met. ( P. 221)
Trip information
Page 104 of 492
1042. Instrument cluster
AVALON_HV_U (01999-07002)■
Audio system
Press “APPS”. ( P. 100)
Select “Eco”.
If “Energy Monitor” screen is displayed, touch “Fuel Consumptio\
n”.
If “Trip Information” screen is displayed, touch “Past Record”.
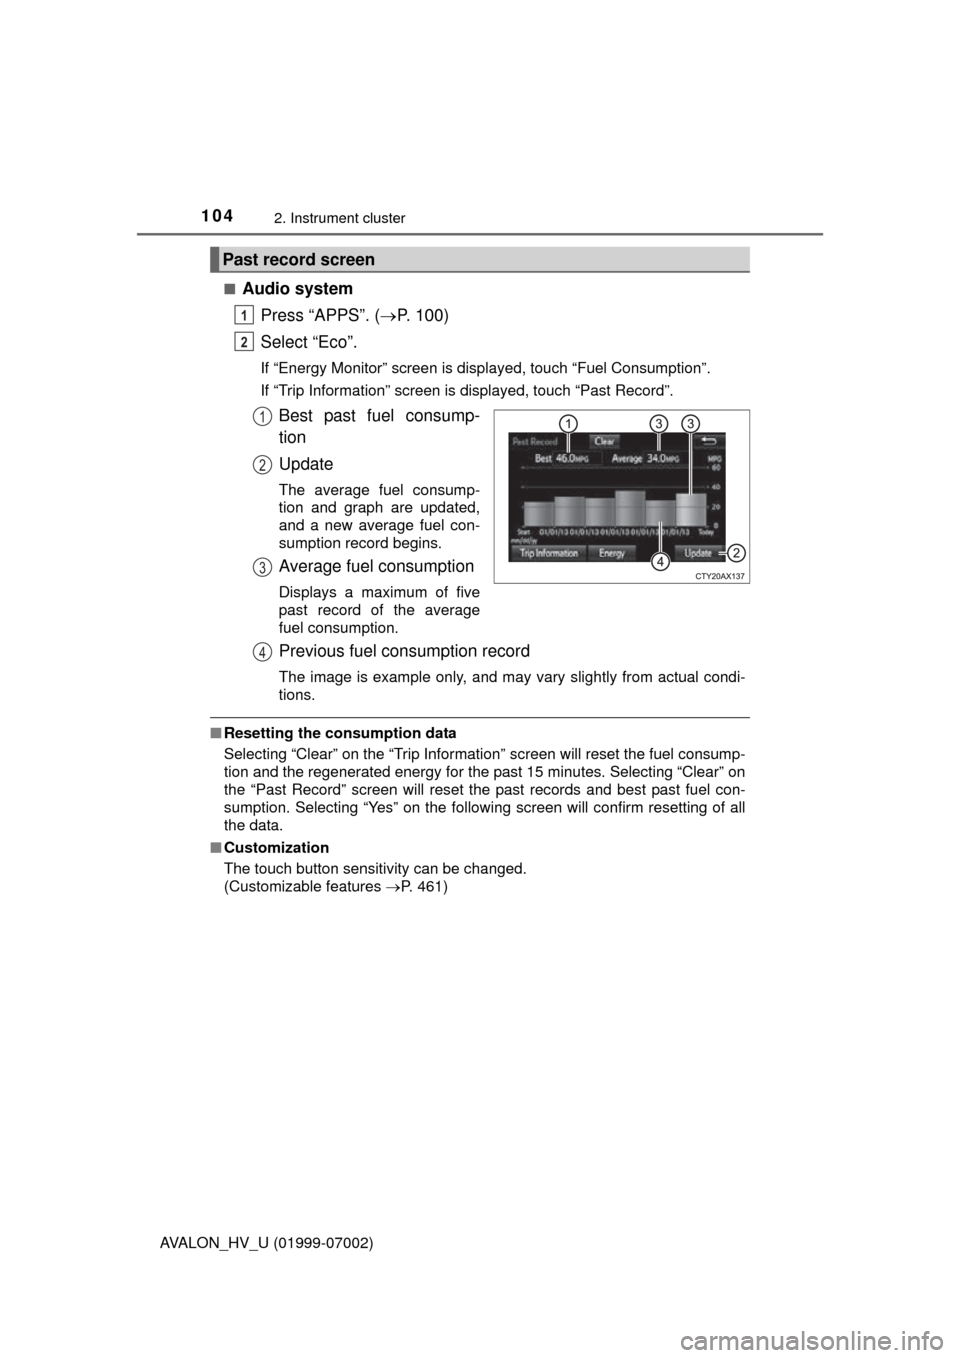
Best past fuel consump-
tion
Update
The average fuel consump-
tion and graph are updated,
and a new average fuel con-
sumption record begins.
Average fuel consumption
Displays a maximum of five
past record of the average
fuel consumption.
Previous fuel consumption record
The image is example only, and may vary slightly from actual condi-
tions.
■ Resetting the consumption data
Selecting “Clear” on the “Trip Information” screen will reset the fuel consump-
tion and the regenerated energy for the past 15 minutes. Selecting “Clear” on
the “Past Record” screen will reset the past records and best past fuel con-
sumption. Selecting “Yes” on the following screen will confirm resetting of all
the data.
■ Customization
The touch button sensitivity can be changed.
(Customizable features P. 461)
Past record screen
1
2
1
2
3
4
Page 134 of 492
1343-3. Adjusting the seats
AVALON_HV_U (01999-07002)
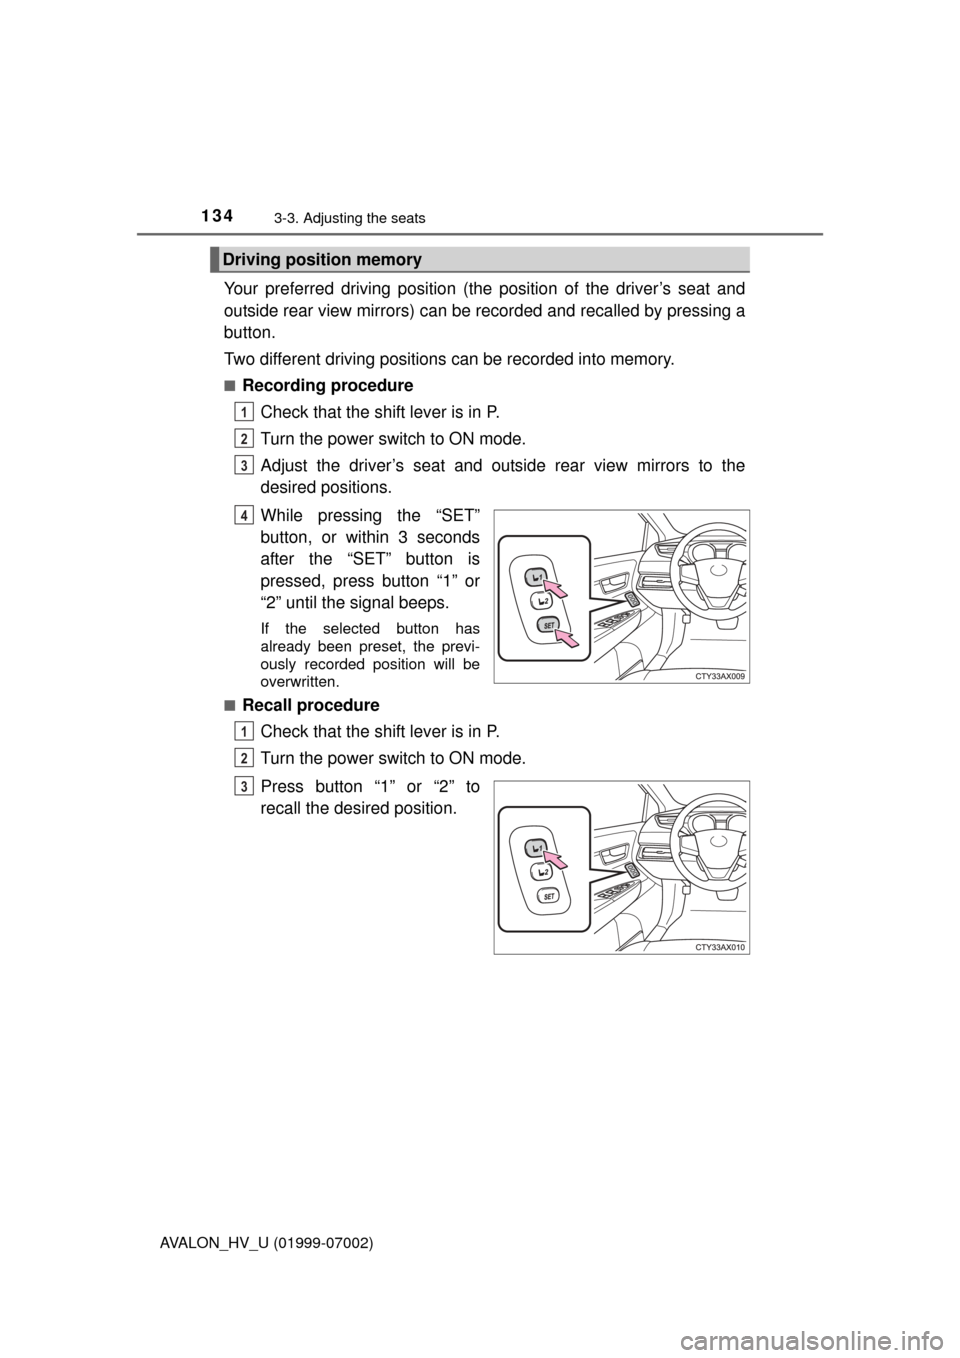
Your preferred driving position (the position of the driver’s seat and
outside rear view mirrors) can be recorded and recalled by pressing a
button.
Two different driving positions can be recorded into memory.
■Recording procedureCheck that the shift lever is in P.
Turn the power switch to ON mode.
Adjust the driver’s seat and outside rear view mirrors to the
desired positions.
While pressing the “SET”
button, or within 3 seconds
after the “SET” button is
pressed, press button “1” or
“2” until the signal beeps.
If the selected button has
already been preset, the previ-
ously recorded position will be
overwritten.
■
Recall procedure
Check that the shift lever is in P.
Turn the power switch to ON mode.
Press button “1” or “2” to
recall the desired position.
Driving position memory
1
2
3
4
1
2
3
Page 247 of 492

2474-5. Using the driving support systems
4
Driving
AVALON_HV_U (01999-07002)
■Cruise control can be set when
●The shift lever is in D or range 4 or higher of S has been selected.
● Vehicle speed is above approximately 25 mph (40 km/h).
■ Accelerating after setting the vehicle speed
●The vehicle can be accelerated normally. After acceleration, the set speed
resumes.
● Even without canceling the cruise control, the set speed can be increased
by first accelerating the vehicle to the desired speed and then pushing the
lever down to set the new speed.
■ Automatic cruise co ntrol cancelation
Cruise control will stop maintaining the vehicle speed in any of the following
situations.
● Actual vehicle speed falls more than approximately 10 mph (16 km/h) below
the preset vehicle speed.
At this time, the memorized set speed is not retained.
● Actual vehicle speed is below approximately 25 mph (40 km/h).
● VSC is activated.
■ If the warning message for the crui se control is shown on the multi-
information display
Press the “ON/OFF” button once to deactivate the system, and then press t\
he
button again to reactivate the system.
If the cruise control speed cannot be set or if the cruise control cancels imme-
diately after being activated, there may be a malfunction in the cruise control
system. Have the vehicle inspected by your Toyota dealer.
Page 331 of 492

3316-2. Maintenance
6
Maintenance and care
AVALON_HV_U (01999-07002)
■Repair and replacement
It is recommended that genuine Toyota parts be used for repairs to ensure
performance of each system. If non-Toyota parts are used in replacement or if
a repair shop other than a Toyota dealer performs repairs, confirm the war-
ranty coverage.
■ Resetting the message indicating maintenance is required
After the required maintenance is performed according to the maintenance
schedule, please reset the message.
To reset the message, follow the procedure described below:
Turn the power switch off with the trip meter A reading shown. ( P. 91)
While pressing the trip meter reset knob ( P. 91), turn the power switch to
ON mode
Continue to press and hold the knob until the trip meter displays “000000”.
■ Allow inspection and repairs to be performed by a Toyota dealer
●Toyota technicians are well-trained specialists and are kept up to date with
the latest service information. They are well informed about the operations
of all systems on your vehicle.
● Keep a copy of the repair order. It proves that the maintenance that has
been performed is under warranty cove rage. If any problem should arise
while your vehicle is under warranty, your Toyota dealer will promptly take
care of it.
WARNING
■ If your vehicle is not properly maintained
Improper maintenance could result in serious damage to the vehicle and
possible death or serious injury.
■ Handling of the 12-volt battery
●Engine exhaust, some of its constituents, and a wide variety of automobile
components contain or emit chemicals known to the State of California to
cause cancer and birth defects and other reproductive harm. Work in a
well ventilated area.
● Oils, fuels and fluids contained in vehicles as well as waste produced by
component wear contain or emit chemicals known to the State of Califor-
nia to cause cancer and birth defects or other reproductive harm. Avoid
exposure and wash any affected area immediately.
● 12-volt battery posts, terminals and related accessories contain lead and
lead compounds which are known to cause brain damage. Wash your
hands after handling. ( P. 350)
1
2
3
Page 356 of 492

3566-3. Do-it-yourself maintenance
AVALON_HV_U (01999-07002)■
How to initialize the tire pressure warning system
Park the vehicle in a safe place and turn the power switch off.
Initialization cannot be performed while the vehicle is moving.
Adjust the tire inflation pressure to the specified cold tire inflation
pressure level. ( P. 443)
Make sure to adjust the tire pressu re to the specified cold tire infla-
tion pressure level. The tire pressure warning system will operate
based on this pressure level.
Turn the power switch to ON mode.
Press and hold the tire pres-
sure warning reset switch
until the tire pressure warn-
ing light blinks slowly 3 times.
“- -” will be displayed for infla-
tion pressure of each tire on
the multi-information display
while the tire pressure warning
system determines the posi-
tion of each tire.
When position of each tire is
determined, the inflation pres-
sure of each tire will be dis-
played on the multi-information
display.
Wait for a few minutes with the power switch in ON mode and
then turn the power switch off.
1
2
3
4
5
Page 358 of 492

3586-3. Do-it-yourself maintenance
AVALON_HV_U (01999-07002)■
Tire types
●Summer tires
Summer tires are high-speed performance tires best suited to highway
driving under dry conditions. Since
summer tires do not have the same
traction performance as snow tires, summer tires are inadequate for
driving on snow-covered or icy ro ads. For driving on snow-covered
roads or icy roads, the use of snow tires is recommended. When install-
ing snow tires, be sure to replace all four tires.
●All season tires
All season tires are designed to provide better traction in snow and to
be adequate for driving in most winter conditions as well as for use
year-round. All season tires, however, do not have adequate traction
performance compared with snow tires in heavy or loose snow. Also, all
season tires fall short in acceleration and handling performance com-
pared with summer tires in highway driving.
●Snow tires
For driving on snow-covered roads or icy roads, we recommend using
snow tires. If you need snow tires, select tires of the same size, con-
struction and load capacity as the or iginally installed tires. Since your
vehicle has radial tires as original equipment, make sure your snow
tires also have radial construction. Do not install studded tires without
first checking local regulations fo r possible restrictions. Snow tires
should be installed on all wheels. ( P. 268)
■Initializing the tire pressure warning system
Initialize the system with the tire infl ation pressure adjusted to the speci-
fied level.
■If the tread on snow tires wears down below 0.16 in. (4 mm)
The effectiveness of the tire s as snow tires is lost.
■If you press the tire pressure warning reset switch accidentally
If initialization is performed, adjust the tire inflation pressure to the speci-
fied level and initialize the tire pressure warning system again.