rear view mirror TOYOTA AVALON HYBRID 2018 Owners Manual (in English)
[x] Cancel search | Manufacturer: TOYOTA, Model Year: 2018, Model line: AVALON HYBRID, Model: TOYOTA AVALON HYBRID 2018Pages: 492, PDF Size: 7.3 MB
Page 2 of 492

TABLE OF CONTENTS2
For your information....................... 8
Reading this manual .................... 14
How to search .............................. 15
Pictorial index .............................. 16
1-1. For safe useBefore driving ...................... 26
For safe driving ................... 28
Seat belts ............................ 30
SRS airbags ........................ 36
Front passenger occupant classification system ......... 48
Safety information for children ............................. 54
Child restraint systems ........ 55
Installing child restraints ...... 59
Exhaust gas precautions ....................... 69
1-2. Hybrid system Hybrid system features ....... 70
Hybrid system precautions ....................... 74
1-3. Theft deterrent system Immobilizer system ............. 79
Alarm ................................... 81
Theft prevention labels ........ 83 2. Instrument cluster
Warning lights and indicators ........................... 86
Gauges and meters ............. 90
Multi-information display ...... 94
Energy monitor/ consumption screen ........ 100
3-1. Key information Keys................................... 106
3-2. Opening, closing and locking the doors
and trunk
Doors ................................. 110
Trunk ................................. 116
Smart key system .............. 121
3-3. Adjusting the seats Front seats......................... 131
Driving position memory ........................... 133
Head restraints .................. 138
3-4. Adjusting the steering wheel and mirrors
Steering wheel ................... 141
Inside rear view mirror ....... 143
Outside rear view mirrors ............................. 145
3-5. Opening, closing the windows and
moon roof
Power windows.................. 148
Moon roof .......................... 151
1For safety and security
2Instrument cluster
3Operation of
each component
Page 16 of 492
16Pictorial index
Pictorial index
■
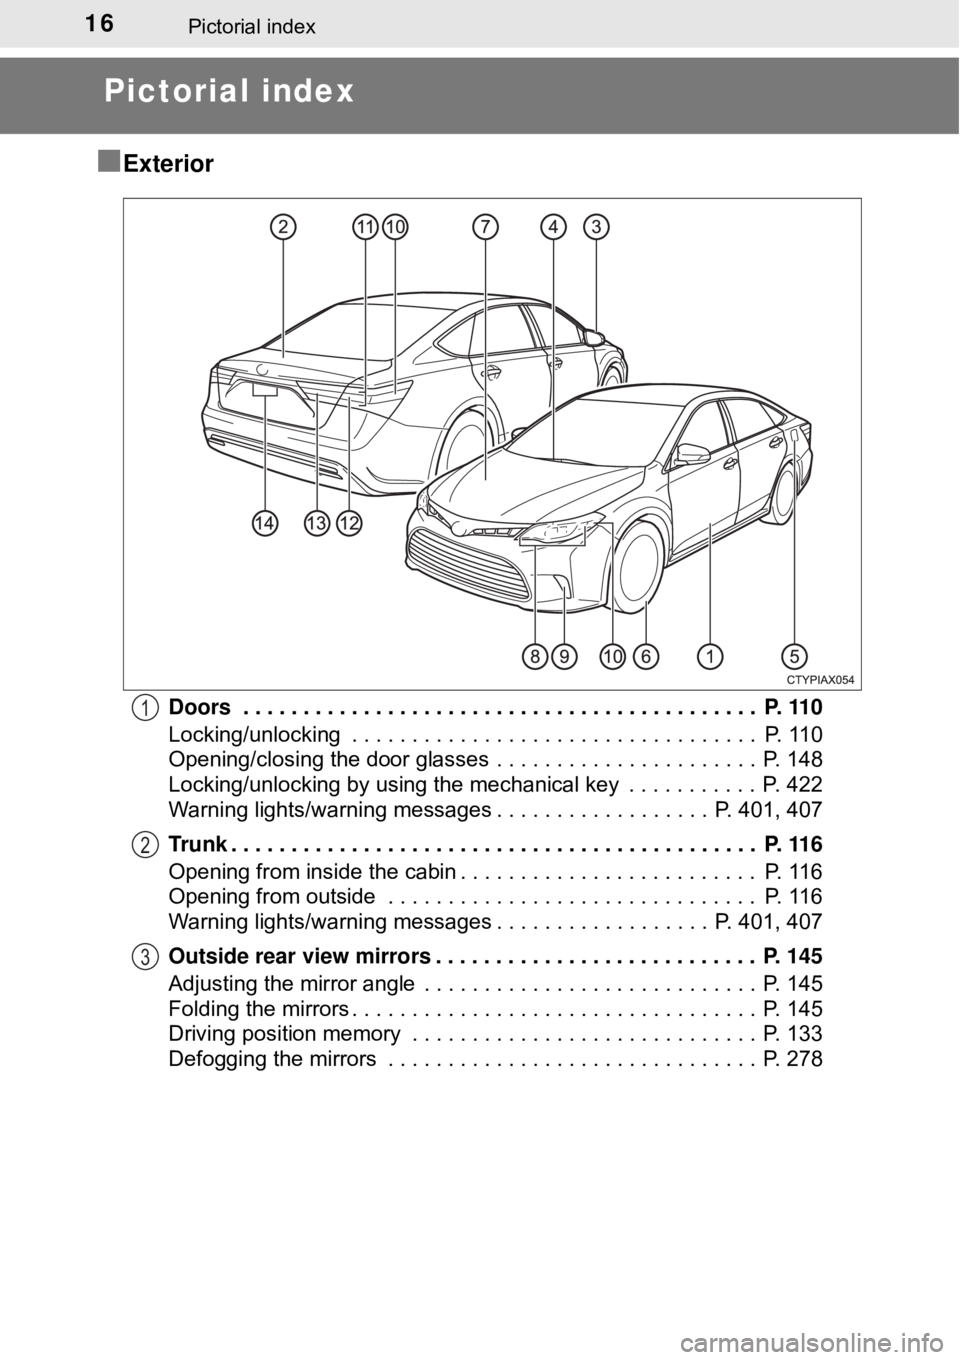
Exterior
Doors . . . . . . . . . . . . . . . . . . . . . . . . . . . . . . . . . . . . . . . . . . . P. 110
Locking/unlocking . . . . . . . . . . . . . . . . . . . . . . . . . . . . . . . . . . P. 110
Opening/closing the door glasses . . . . . . . . . . . . . . . . . . . . . . P. 148
Locking/unlocking by using the mechanical key . . . . . . . . . . . P. 422
Warning lights/warning messages . . . . . . . . . . . . . . . . . . P. 401, 407
Trunk . . . . . . . . . . . . . . . . . . . . . . . . . . . . . . . . . . . . . . . . . . . . P. 116
Opening from inside the cabin . . . . . . . . . . . . . . . . . . . . . . . . . P. 116
Opening from outside . . . . . . . . . . . . . . . . . . . . . . . . . . . . . . . P. 116
Warning lights/warning messages . . . . . . . . . . . . . . . . . . P. 401, 407
Outside rear view mirrors . . . . . . . . . . . . . . . . . . . . . . . . . . . P. 145
Adjusting the mirror angle . . . . . . . . . . . . . . . . . . . . . . . . . . . . P. 145
Folding the mirrors . . . . . . . . . . . . . . . . . . . . . . . . . . . . . . . . . . P. 145
Driving position memory . . . . . . . . . . . . . . . . . . . . . . . . . . . . . P. 133
Defogging the mirrors . . . . . . . . . . . . . . . . . . . . . . . . . . . . . . . P. 2781
2
3
Page 20 of 492
20Pictorial index
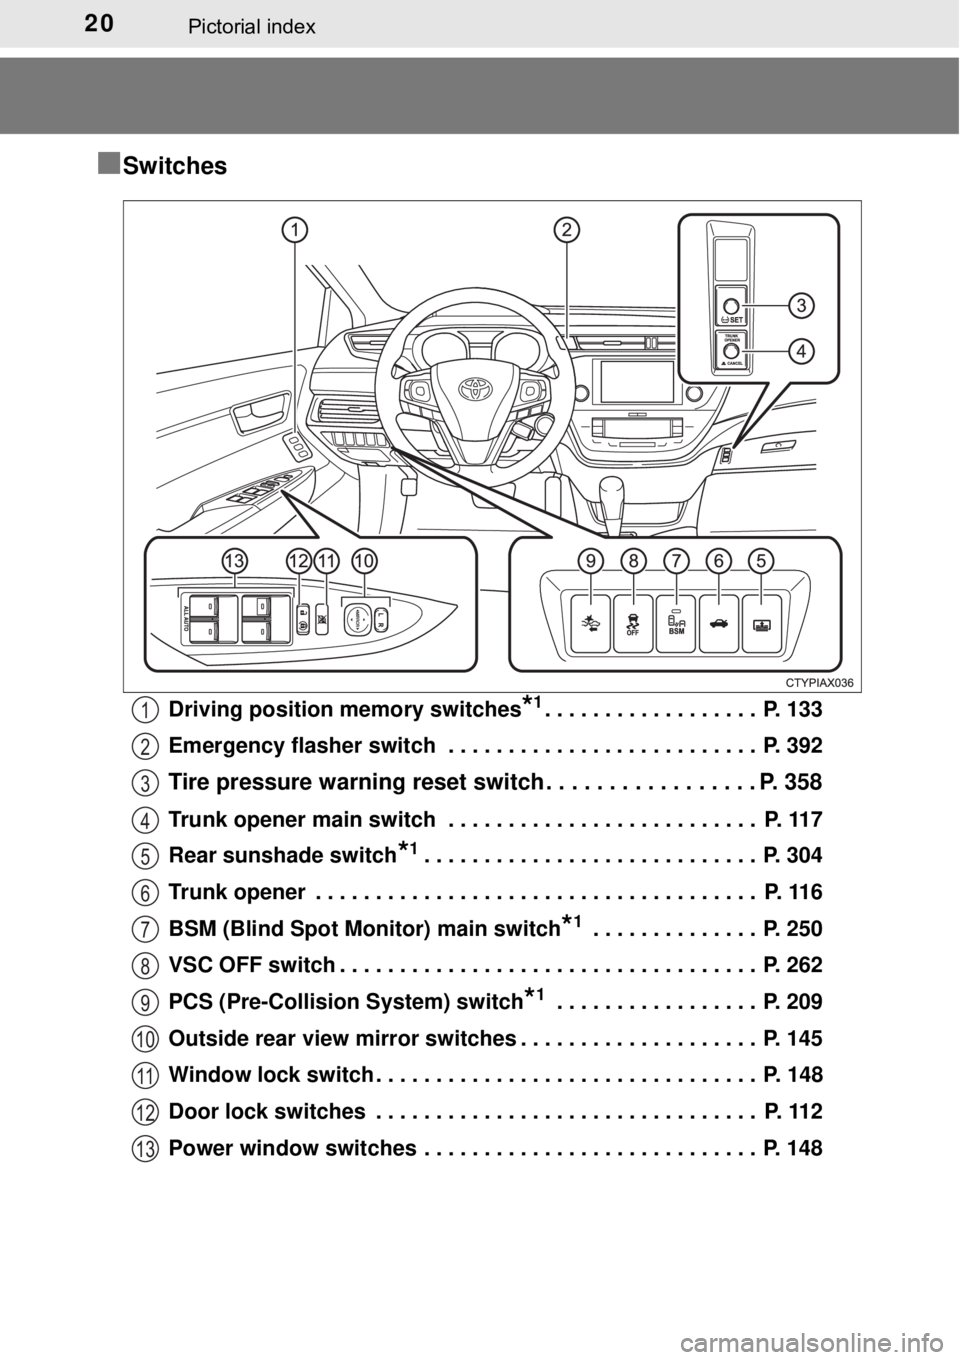
■Switches
Driving position memory switches*1. . . . . . . . . . . . . . . . . . P. 133
Emergency flasher switch . . . . . . . . . . . . . . . . . . . . . . . . . . P. 392
Tire pressure warning reset switch . . . . . . . . . . . . . . . . . P. 358
Trunk opener main switch . . . . . . . . . . . . . . . . . . . . . . . . . . P. 117
Rear sunshade switch
*1. . . . . . . . . . . . . . . . . . . . . . . . . . . . P. 304
Trunk opener . . . . . . . . . . . . . . . . . . . . . . . . . . . . . . . . . . . . . P. 116
BSM (Blind Spot Monitor) main switch
*1 . . . . . . . . . . . . . . P. 250
VSC OFF switch . . . . . . . . . . . . . . . . . . . . . . . . . . . . . . . . . . . P. 262
PCS (Pre-Collision System) switch
*1 . . . . . . . . . . . . . . . . . P. 209
Outside rear view mirror switches . . . . . . . . . . . . . . . . . . . . P. 145
Window lock switch . . . . . . . . . . . . . . . . . . . . . . . . . . . . . . . . P. 148
Door lock switches . . . . . . . . . . . . . . . . . . . . . . . . . . . . . . . . P. 112
Power window switches . . . . . . . . . . . . . . . . . . . . . . . . . . . . P. 148
1
2
3
4
5
6
7
8
9
10
11
12
13
Page 24 of 492
24Pictorial index
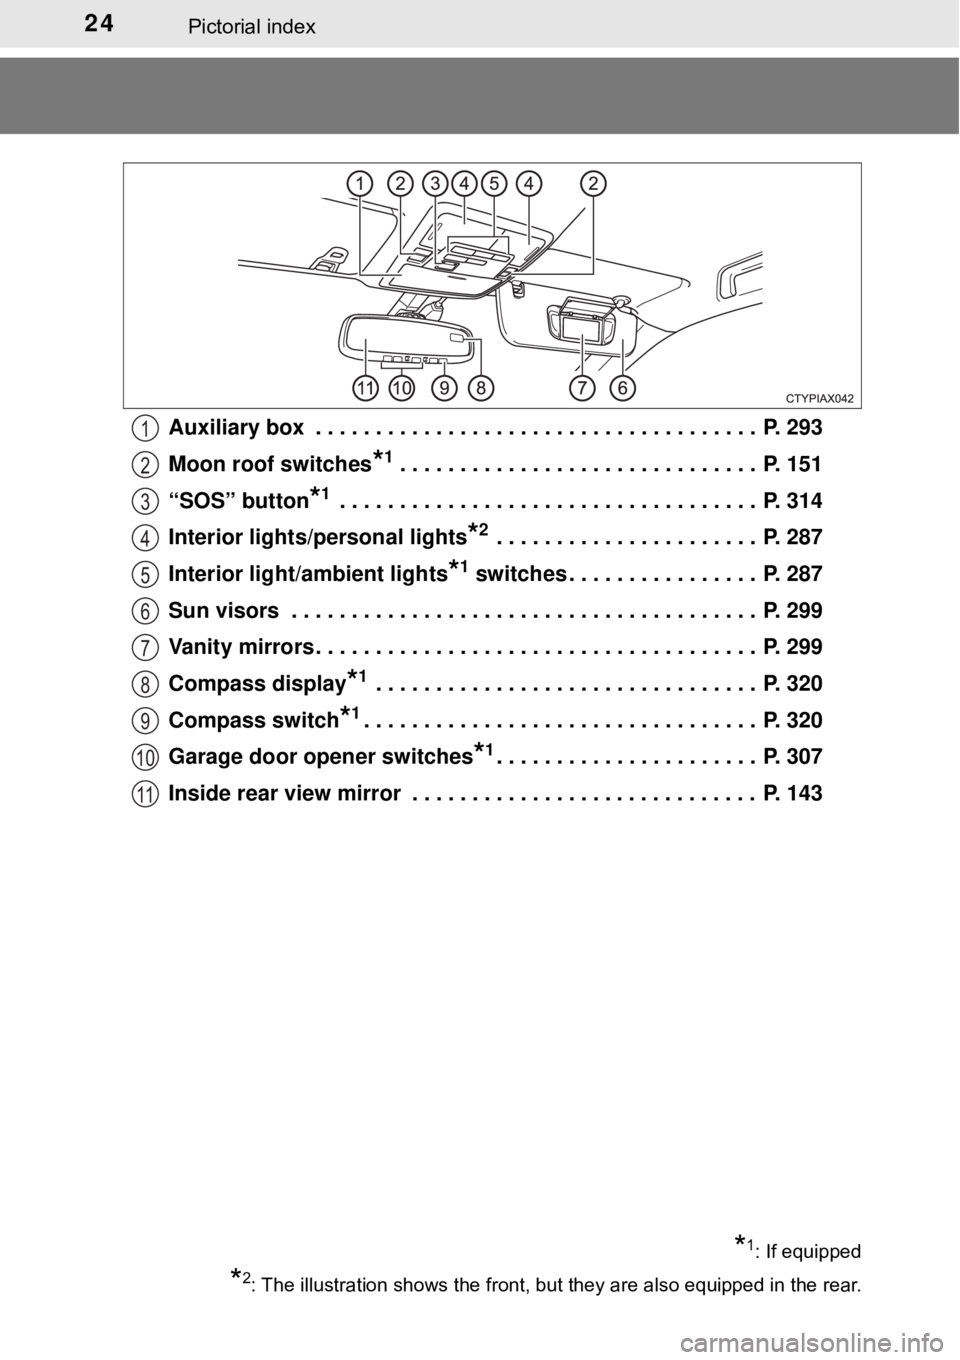
Auxiliary box . . . . . . . . . . . . . . . . . . . . . . . . . . . . . . . . . . . . . P. 293
Moon roof switches
*1 . . . . . . . . . . . . . . . . . . . . . . . . . . . . . . P. 151
“SOS” button
*1 . . . . . . . . . . . . . . . . . . . . . . . . . . . . . . . . . . . P. 314
Interior lights/personal lights
*2 . . . . . . . . . . . . . . . . . . . . . . P. 287
Interior light/ambient lights
*1 switches . . . . . . . . . . . . . . . . P. 287
Sun visors . . . . . . . . . . . . . . . . . . . . . . . . . . . . . . . . . . . . . . . P. 299
Vanity mirrors . . . . . . . . . . . . . . . . . . . . . . . . . . . . . . . . . . . . . P. 299
Compass display
*1 . . . . . . . . . . . . . . . . . . . . . . . . . . . . . . . . P. 320
Compass switch
*1. . . . . . . . . . . . . . . . . . . . . . . . . . . . . . . . . P. 320
Garage door opener switches
*1. . . . . . . . . . . . . . . . . . . . . . P. 307
Inside rear view mirror . . . . . . . . . . . . . . . . . . . . . . . . . . . . . P. 143
*1: If equipped
*2: The illustration shows the front, but they are also equipped in the rear.
1
2
3
4
5
6
7
8
9
10
11
Page 29 of 492
291-1. For safe use
1
For safety and security
Make sure that you can see backward clearly by adjusting the inside
and outside rear view mirrors properly. ( →P. 143, 145)
Adjusting the mirrors
WARNING
Observe the following precautions.
Failure to do so may result in death or serious injury.
●Do not adjust the position of the driver’s seat while driving.
Doing so could cause the driver to lose control of the vehicle.
● Do not place a cushion between the driver or passenger and the seatback.
A cushion may prevent correct posture from being achieved, and reduce
the effectiveness of the seat belt and head restraint.
● Do not place anything under the front seats.
Objects placed under the front seats may become jammed in the seat
tracks and stop the seat from locking in place. This may lead to an acci-
dent and the adjustment mechanism may also be damaged.
● Always observe the legal speed limit when driving on public roads.
● When driving over long distances, take regular breaks before you start to
feel tired.
Also, if you feel tired or sleepy while driving, do not force yourself to con-
tinue driving and take a break immediately.
Page 105 of 492

105
Operation of
each component
3
3-1. Key information
Keys .................................. 106
3-2. Opening, closing and locking the doors
and trunk
Doors ................................ 110
Trunk ................................. 116
Smart key system ............. 121
3-3. Adjusting the seats Front seats ........................ 131
Driving position memory ........................... 133
Head restraints.................. 138
3-4. Adjusting the steering wheel and mirrors
Steering wheel .................. 141
Inside rear view mirror .............................. 143
Outside rear view mirrors ............................. 145
3-5. Opening, closing the windows and
moon roof
Power windows ................. 148
Moon roof .......................... 151
Page 133 of 492
1333-3. Adjusting the seats
3
Operation of each component
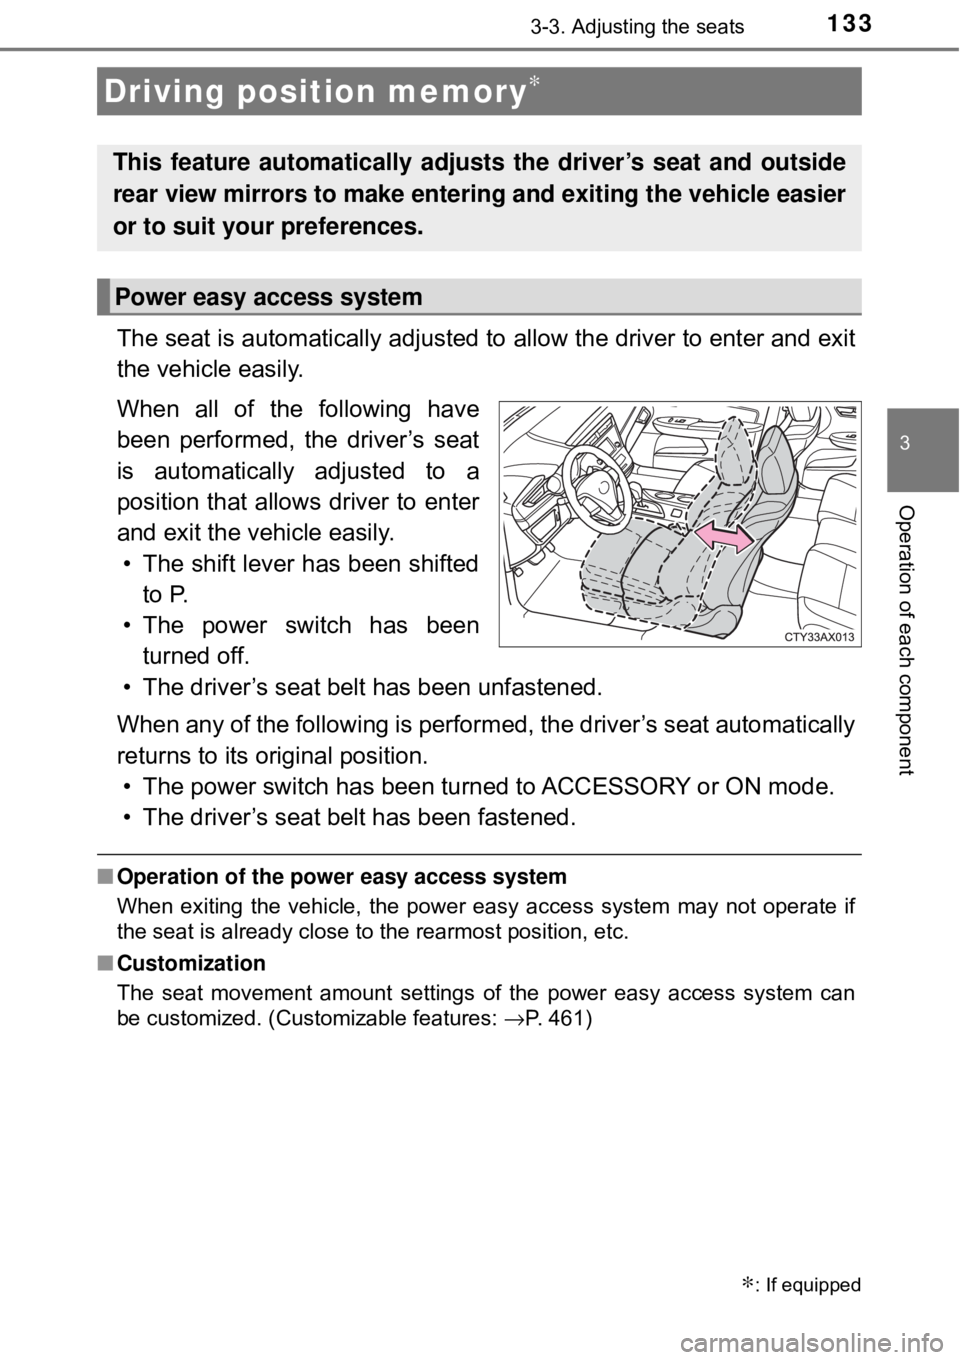
The seat is automatically adjusted to allow the driver to enter and exit
the vehicle easily.
When all of the following have
been performed, the driver’s seat
is automatically adjusted to a
position that allows driver to enter
and exit the vehicle easily.• The shift lever has been shifted to P.
• The power switch has been turned off.
• The driver’s seat belt has been unfastened.
When any of the following is perform ed, the driver’s seat automatically
returns to its original position. • The power switch has been turned to ACCESSORY or ON mode.
• The driver’s seat belt has been fastened.
■ Operation of the power easy access system
When exiting the vehicle, the power easy access system may not operate if
the seat is already close to the rearmost position, etc.
■ Customization
The seat movement amount settings of the power easy access system can
be customized. (Customizable features: →P. 461)
Driving position memory∗
∗: If equipped
This feature automatically adjusts the driver’s seat and outside
rear view mirrors to make entering and exiting the vehicle easier
or to suit your preferences.
Power easy access system
Page 134 of 492
1343-3. Adjusting the seats
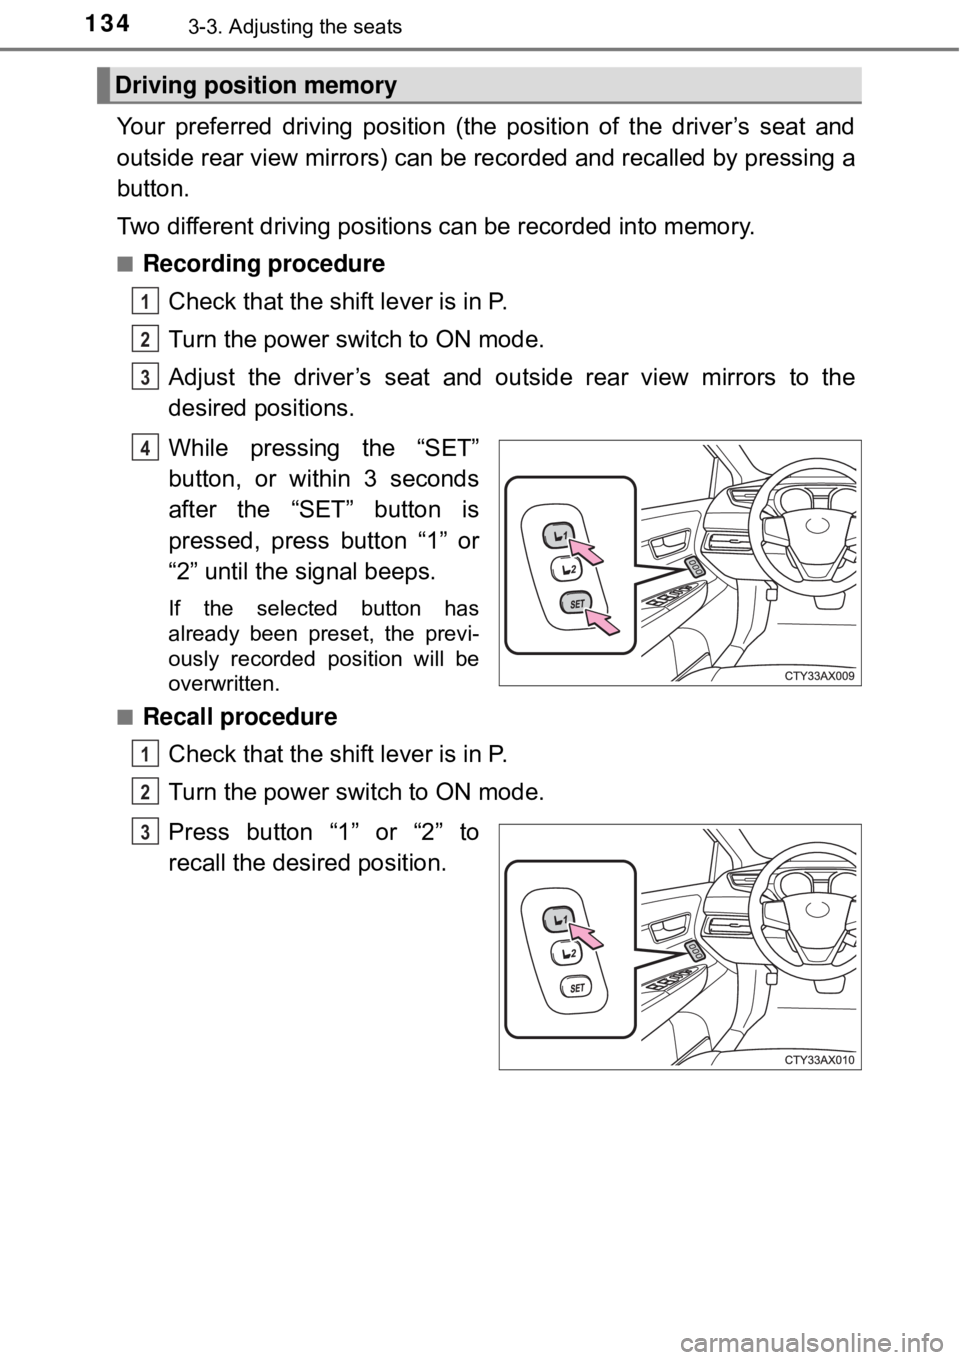
Your preferred driving position (the position of the driver’s seat and
outside rear view mirrors) can be recorded and recalled by pressing a
button.
Two different driving positions can be recorded into memory.
■Recording procedureCheck that the shift lever is in P.
Turn the power switch to ON mode.
Adjust the driver’s seat and outside rear view mirrors to the
desired positions.
While pressing the “SET”
button, or within 3 seconds
after the “SET” button is
pressed, press button “1” or
“2” until the signal beeps.
If the selected button has
already been preset, the previ-
ously recorded position will be
overwritten.
■
Recall procedure
Check that the shift lever is in P.
Turn the power switch to ON mode.
Press button “1” or “2” to
recall the desired position.
Driving position memory
1
2
3
4
1
2
3
Page 136 of 492
1363-3. Adjusting the seats
Each electronic key can be registered to recall your preferred driving
position.
■Registering procedure
Record your driving position to button “1” or “2” before performing
the following:
Carrying only the key to which you want to link the driving position,
shift the shift lever to P and then close the driver’s door.
If 2 or more keys are in the vehicle, the driving position cannot be
linked properly.
Turn the power switch to ON mo de and recall the position which
you want to link.
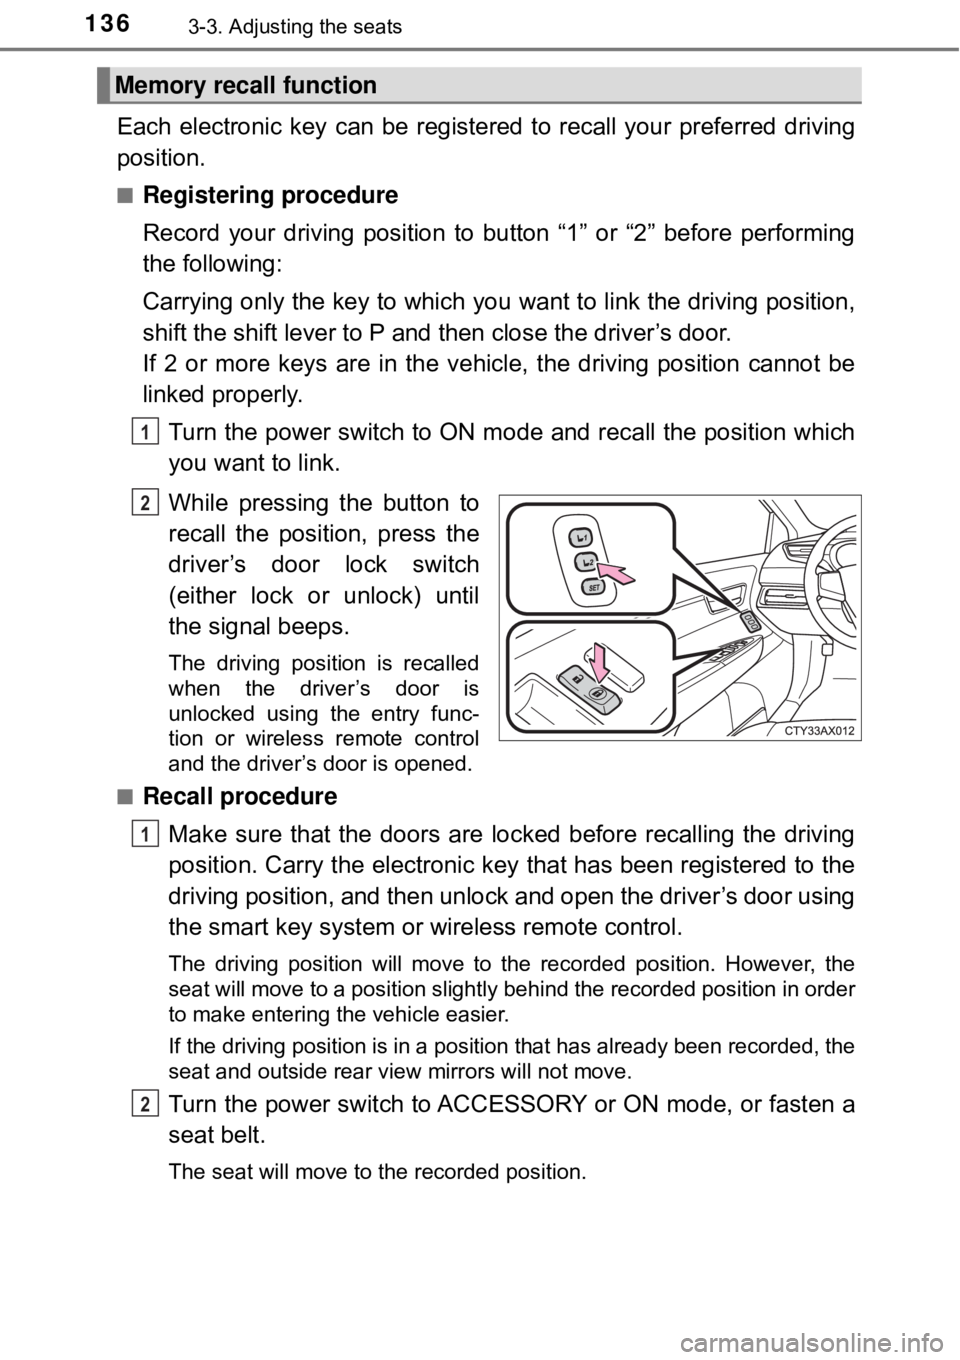
While pressing the button to
recall the position, press the
driver’s door lock switch
(either lock or unlock) until
the signal beeps.
The driving position is recalled
when the driver’s door is
unlocked using the entry func-
tion or wireless remote control
and the driver’s door is opened.
■
Recall procedure
Make sure that the doors are locked before recalling the driving
position. Carry the electronic key that has been registered to the
driving position, and then unlock and open the driver’s door using
the smart key system or wireless remote control.
The driving position will move to the recorded position. However, the
seat will move to a position slightly behind the recorded position in order
to make entering the vehicle easier.
If the driving position is in a position that has already been recorded, the
seat and outside rear view mirrors will not move.
Turn the power switch to ACCESSORY or ON mode, or fasten a
seat belt.
The seat will move to the recorded position.
Memory recall function
1
2
1
2
Page 143 of 492
1433-4. Adjusting the steering wheel and mirrors
3
Operation of each component
The height of the rear view mirror can be adjusted to suit your driving
posture.
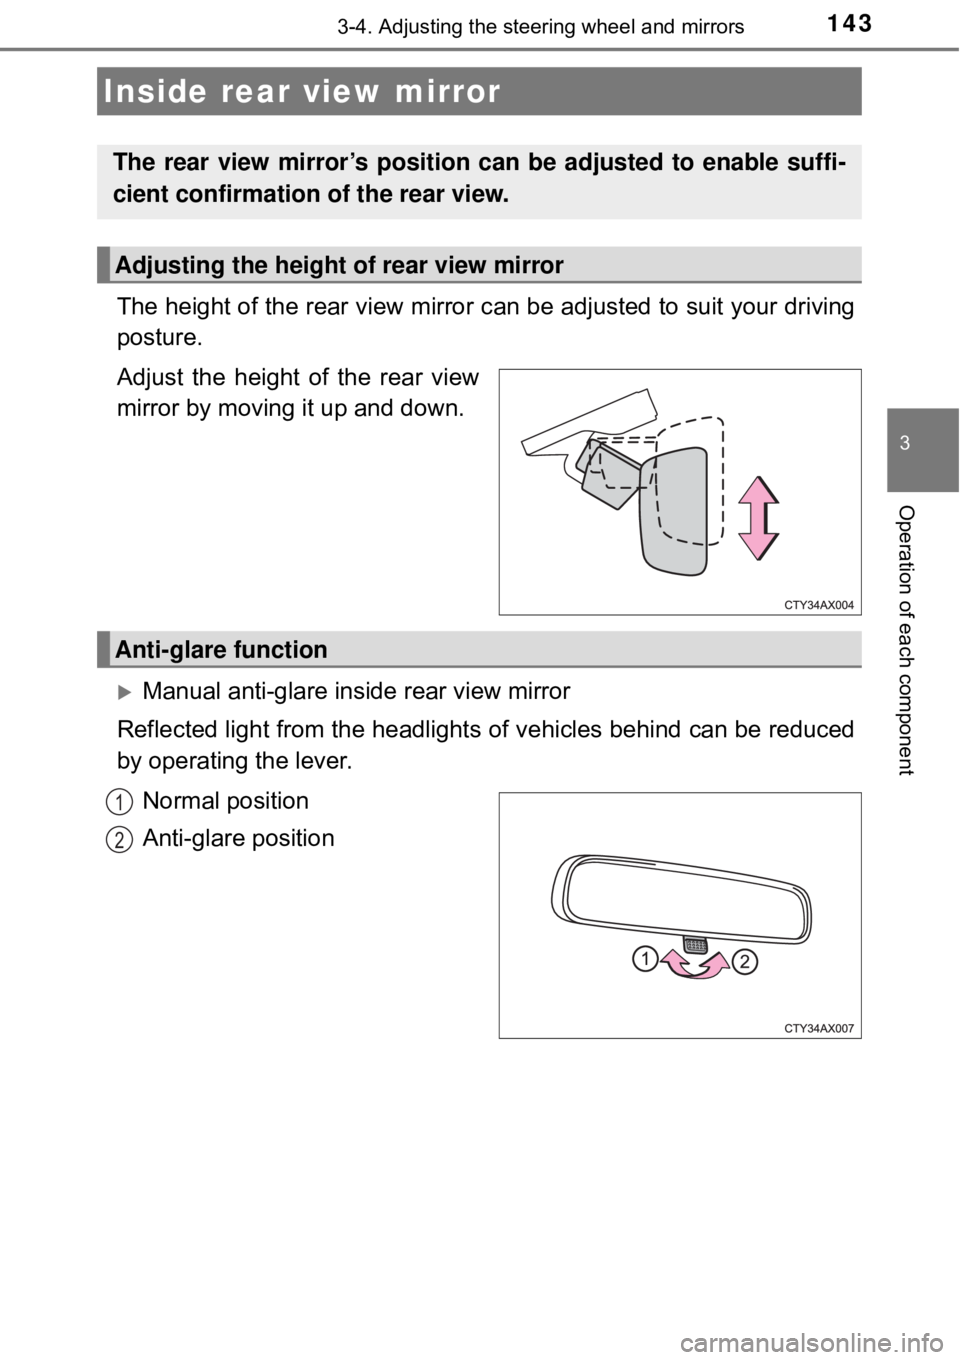
Adjust the height of the rear view
mirror by moving it up and down.
Manual anti-glare inside rear view mirror
Reflected light from the headlights of vehicles behind can be reduced
by operating the lever.
Normal position
Anti-glare position
Inside rear view mirror
The rear view mirror’s position can be adjusted to enable suffi-
cient confirmation of the rear view.
Adjusting the height of rear view mirror
Anti-glare function
1
2