display TOYOTA AYGO 2017 (in English) Owner's Manual
[x] Cancel search | Manufacturer: TOYOTA, Model Year: 2017, Model line: AYGO, Model: TOYOTA AYGO 2017Pages: 480, PDF Size: 40.72 MB
Page 196 of 480
1964-5. Toyota Safety Sense
AYGO_OM_Europe_OM99Q24E
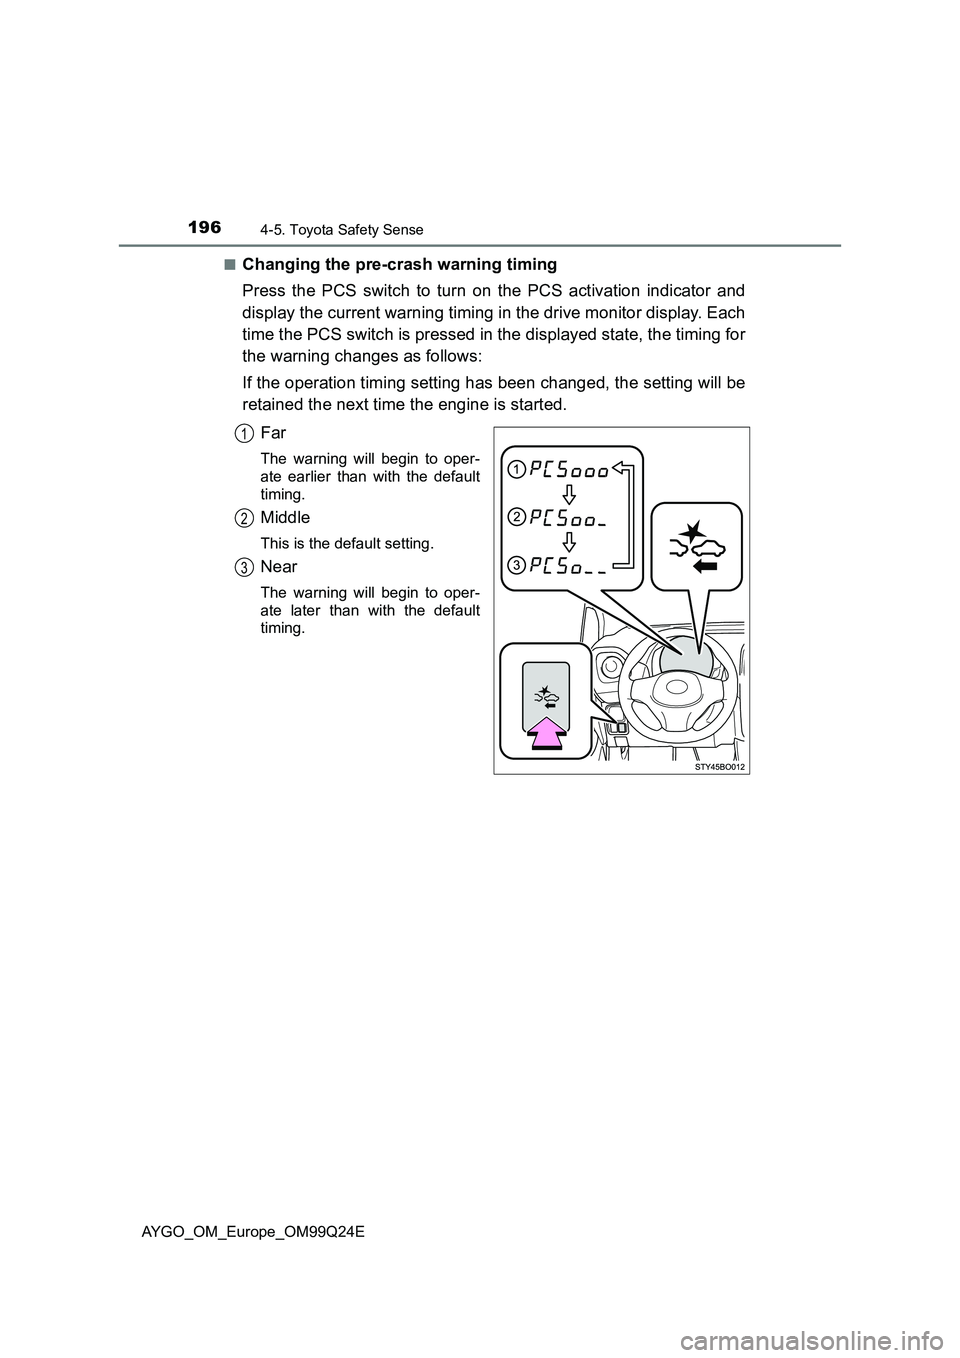
■Changing the pre-crash warning timing
Press the PCS switch to turn on the PCS activation indicator and
display the current warning timing in the drive monitor display. Each
time the PCS switch is pressed in the displayed state, the timing for
the warning changes as follows:
If the operation timing setting has been changed, the setting will be
retained the next time the engine is started.
Far
The warning will begin to oper-
ate earlier than with the default
timing.
Middle
This is the default setting.
Near
The warning will begin to oper-
ate later than with the default
timing.
1
2
3
Page 212 of 480
2124-6. Using the driving support systems
AYGO_OM_Europe_OM99Q24E
Speed limiter
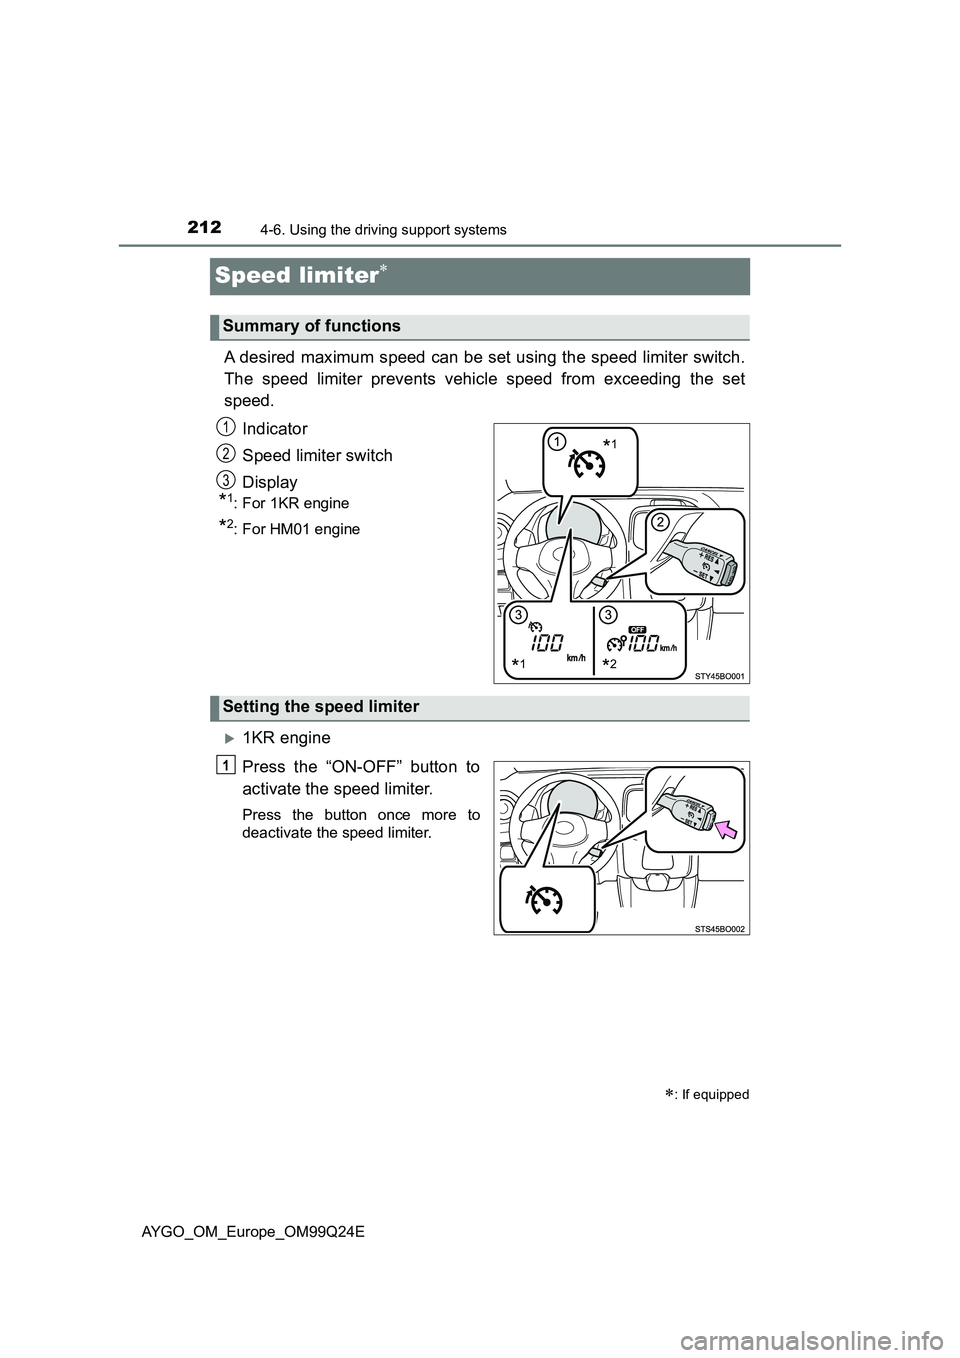
A desired maximum speed can be set using the speed limiter switch.
The speed limiter prevents vehicle speed from exceeding the set
speed.
Indicator
Speed limiter switch
Display
*1: For 1KR engine
*2: For HM01 engine
1KR engine
Press the “ON-OFF” button to
activate the speed limiter.
Press the button once more to
deactivate the speed limiter.
: If equipped
Summary of functions
*1*2
*11
2
3
Setting the speed limiter
Page 214 of 480
2144-6. Using the driving support systems
AYGO_OM_Europe_OM99Q24E
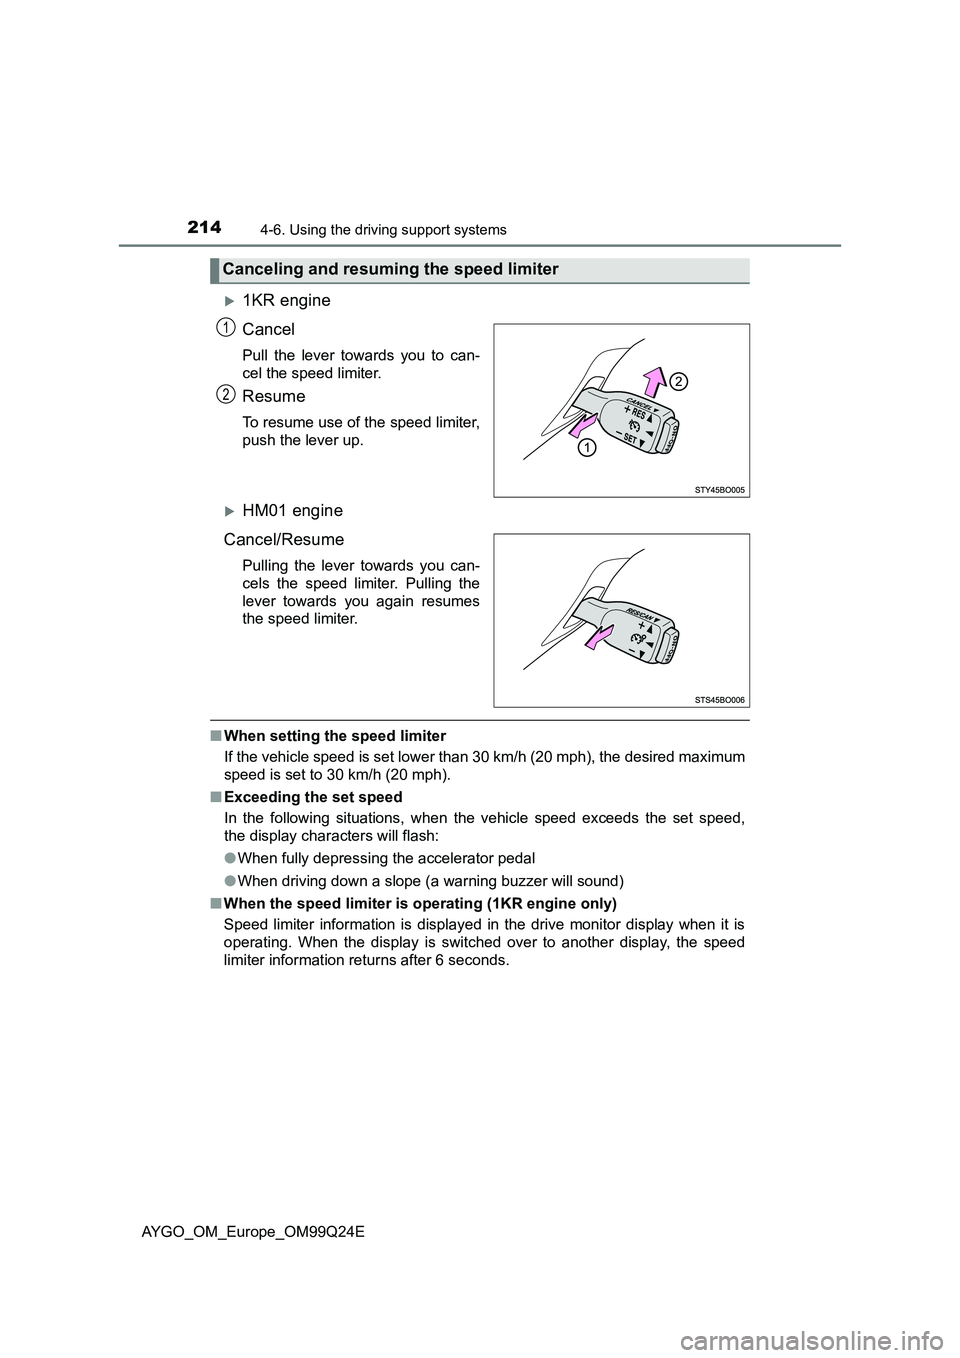
1KR engine
Cancel
Pull the lever towards you to can-
cel the speed limiter.
Resume
To resume use of the speed limiter,
push the lever up.
HM01 engine
Cancel/Resume
Pulling the lever towards you can-
cels the speed limiter. Pulling the
lever towards you again resumes
the speed limiter.
■ When setting the speed limiter
If the vehicle speed is set lower than 30 km/h (20 mph), the desired maximum
speed is set to 30 km/h (20 mph).
■ Exceeding the set speed
In the following situations, when the vehicle speed exceeds the set speed,
the display characters will flash:
● When fully depressing the accelerator pedal
● When driving down a slope (a warning buzzer will sound)
■ When the speed limiter is operating (1KR engine only)
Speed limiter information is displayed in the drive monitor display when it is
operating. When the display is switched over to another display, the speed
limiter information returns after 6 seconds.
Canceling and resuming the speed limiter
1
2
Page 221 of 480
2214-6. Using the driving support systems
4
Driving
AYGO_OM_Europe_OM99Q24E
■ Stop & Start system warning buzzer
If the engine is stopped by the Stop & Start system and the following action is
performed, a buzzer will sound and Stop & Start indicator will flash. This indi-
cates that the engine is only stopped by the Stop & Start system, not that the
engine has been turned off completely.
● The shift lever is shifted into a position other than N with the clutch pedal
released.
Even in this situation, the engine starts if the clutch pedal is depressed.
■ If the Stop & Start cancel indicator continues to flash
The Stop & Start system may be malfunctioning. Contact any authorized
Toyota dealer or repairer, or another duly qualified and equipped professional.
■ If the windshield is fogged up while the engine is stopped by the Stop &
Start system
● Vehicles with a manual air conditioning system: Restart the engine by
depressing the clutch pedal ( P. 216) or by pressing the Stop & Start can-
cel switch, and then set the air outlet selection dial to . ( P. 292)
● Vehicles with an automatic air conditioning system: Turn the windshield
defogger on. (The engine will start due to the automatic engine start func-
tion.) ( P. 298)
If the windshield fogs up frequently, press the Stop & Start cancel switch to
deactivate the system.
■ The Stop & Start system operation time and Stop & Start system total
operation time display
P. 9 2
■ Replacing battery
The installed battery is specific to the Stop & Start system. It should only be
replaced with a battery of identical type and rating.
Ask any authorized Toyota dealer or repairer, or another duly qualified and
equipped professional for further details.
Page 238 of 480
2385-2. Using the audio system
AYGO_OM_Europe_OM99Q24E
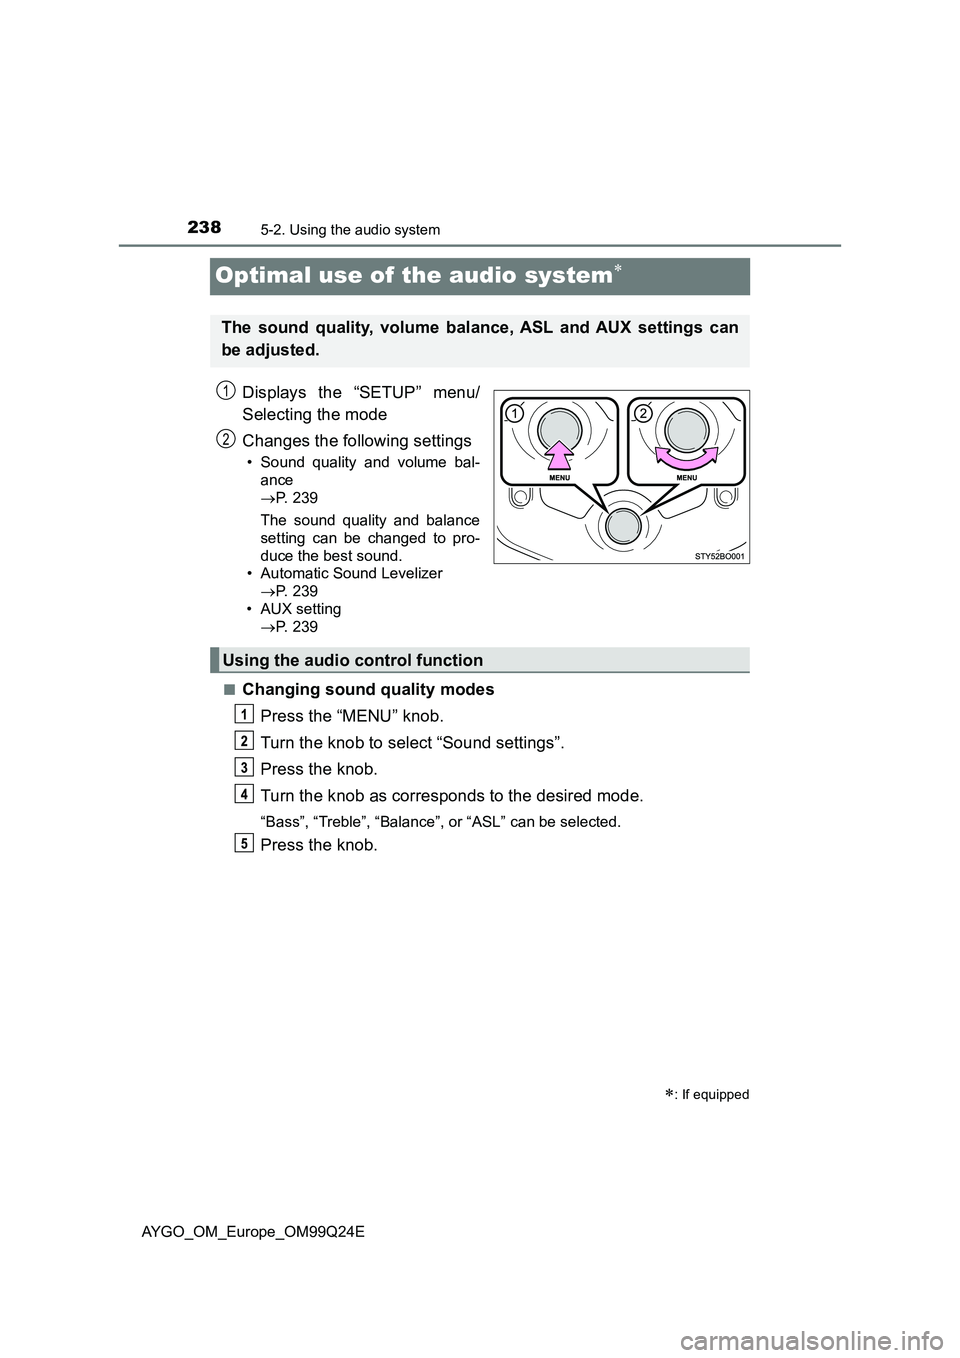
Optimal use of the audio system
Displays the “SETUP” menu/
Selecting the mode
Changes the following settings
• Sound quality and volume bal-
ance
P. 2 3 9
The sound quality and balance
setting can be changed to pro-
duce the best sound.
• Automatic Sound Levelizer
P. 2 3 9
• AUX setting
P. 2 3 9
■Changing sound quality modes
Press the “MENU” knob.
Turn the knob to select “Sound settings”.
Press the knob.
Turn the knob as corresponds to the desired mode.
“Bass”, “Treble”, “Balance”, or “ASL” can be selected.
Press the knob.
: If equipped
The sound quality, volume balance, ASL and AUX settings can
be adjusted.
1
2
Using the audio control function
Page 239 of 480
2395-2. Using the audio system
5
Audio system
AYGO_OM_Europe_OM99Q24E
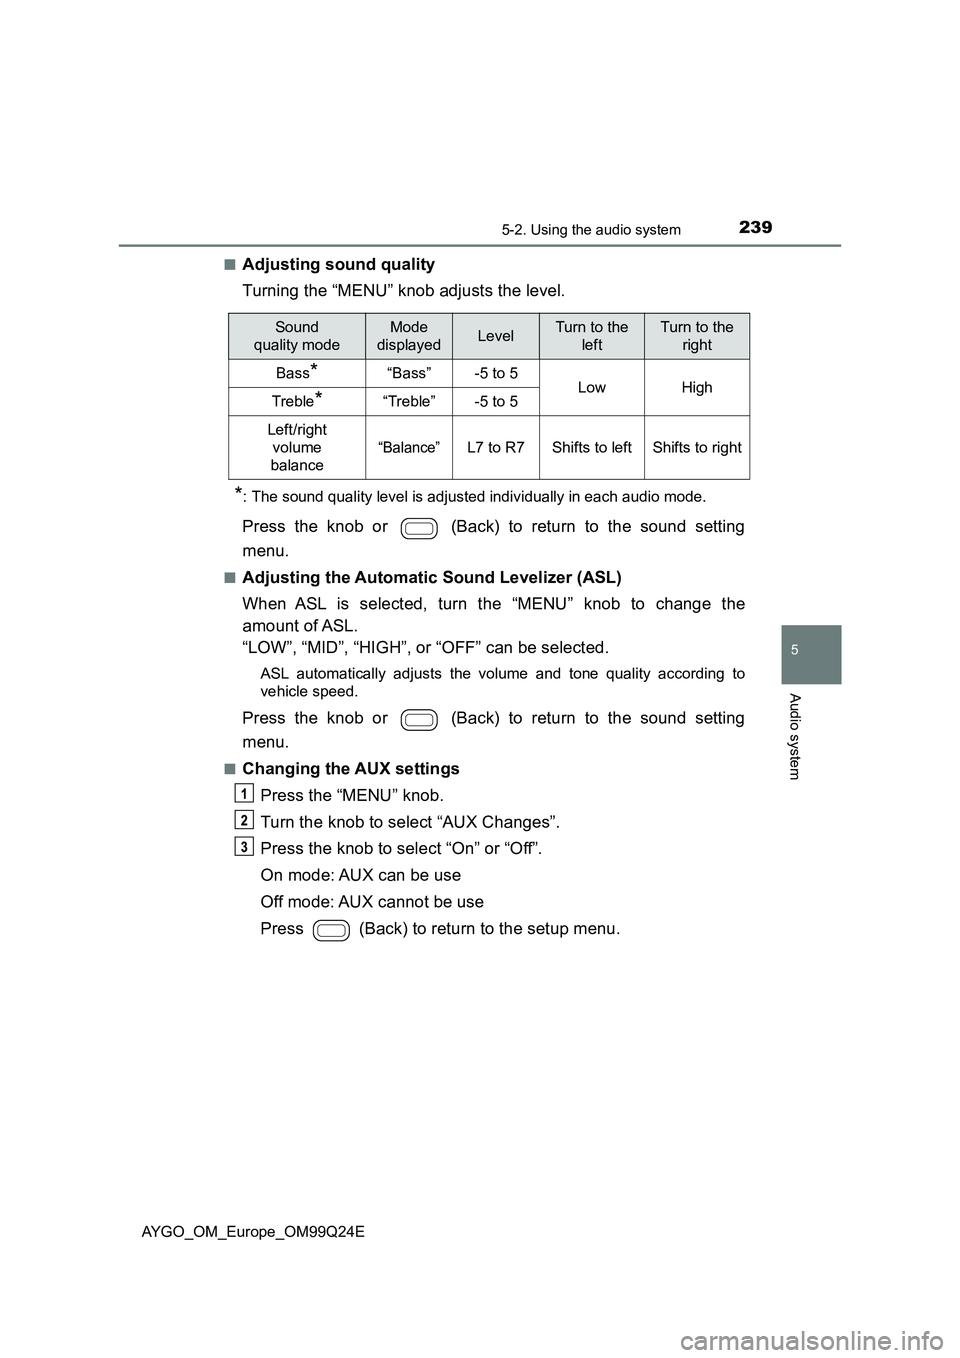
■Adjusting sound quality
Turning the “MENU” knob adjusts the level.
*: The sound quality level is adjusted individually in each audio mode.
Press the knob or (Back) to return to the sound setting
menu.
■Adjusting the Automatic Sound Levelizer (ASL)
When ASL is selected, turn the “MENU” knob to change the
amount of ASL.
“LOW”, “MID”, “HIGH”, or “OFF” can be selected.
ASL automatically adjusts the volume and tone quality according to
vehicle speed.
Press the knob or (Back) to return to the sound setting
menu.
■Changing the AUX settings
Press the “MENU” knob.
Turn the knob to select “AUX Changes”.
Press the knob to select “On” or “Off”.
On mode: AUX can be use
Off mode: AUX cannot be use
Press (Back) to return to the setup menu.
Sound
quality mode
Mode
displayedLevelTurn to the
left
Turn to the
right
Bass*“Bass”-5 to 5LowHighTreble*“Treble”-5 to 5
Left/right
volume
balance
“Balance”L7 to R7Shifts to leftShifts to right
Page 240 of 480
2405-3. Using the radio
AYGO_OM_Europe_OM99Q24E
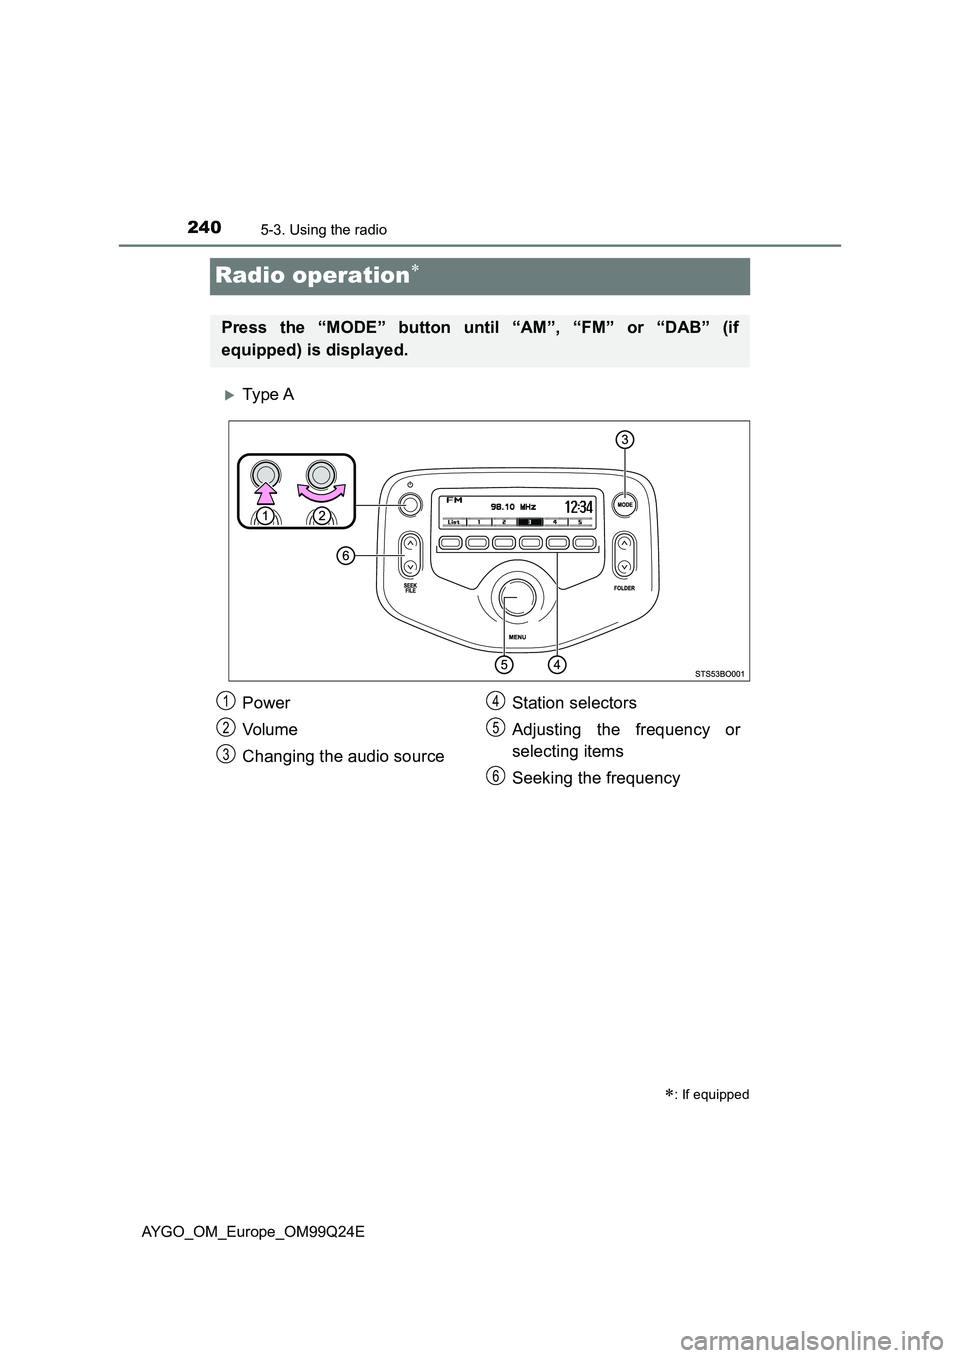
Radio operation
Ty pe A
: If equipped
Press the “MODE” button until “AM”, “FM” or “DAB” (if
equipped) is displayed.
Power
Vo lu m e
Changing the audio source
Station selectors
Adjusting the frequency or
selecting items
Seeking the frequency
1
2
3
4
5
6
Page 242 of 480
2425-3. Using the radio
AYGO_OM_Europe_OM99Q24E
■Updating the station list
Press (List).
The station list will be displayed.
Press (Update) to update the list.
“Updating” is displayed while the searching is in process, and then avail-
able stations will be listed on the display.
To cancel the updating process, press (Back).
■Selecting a station from the station list
Press (List).
The station list will be displayed.
Turn the “MENU” knob to select a station.
Press the knob to tune in the station.
To return to the previous display, press (Back).
This feature allows your radio to receive station.
■Listening to stations of the same network
Press the “MENU” knob.
Turn the knob to “Radio” and press the knob.
Turn the knob as corresponds to the desired mode: “FM AF”,
“Region code” or “DAB AF” (if equipped).
Press the knob to select “On” or “Off”.
FM AF On/DAB AF On (if equipped) mode:
The station among those of the same network with strong recep-
tion is selected.
Region code On mode:
The station among those of the same network with strong recep-
tion and broadcasting the same program is selected.
Using the station list (FM mode only)
RDS (Radio Data System)
Page 245 of 480
245
5
5-4. Using an external device
Audio system
AYGO_OM_Europe_OM99Q24E
Listening to an iPod
P. 2 3 7
Ty pe A
: If equipped
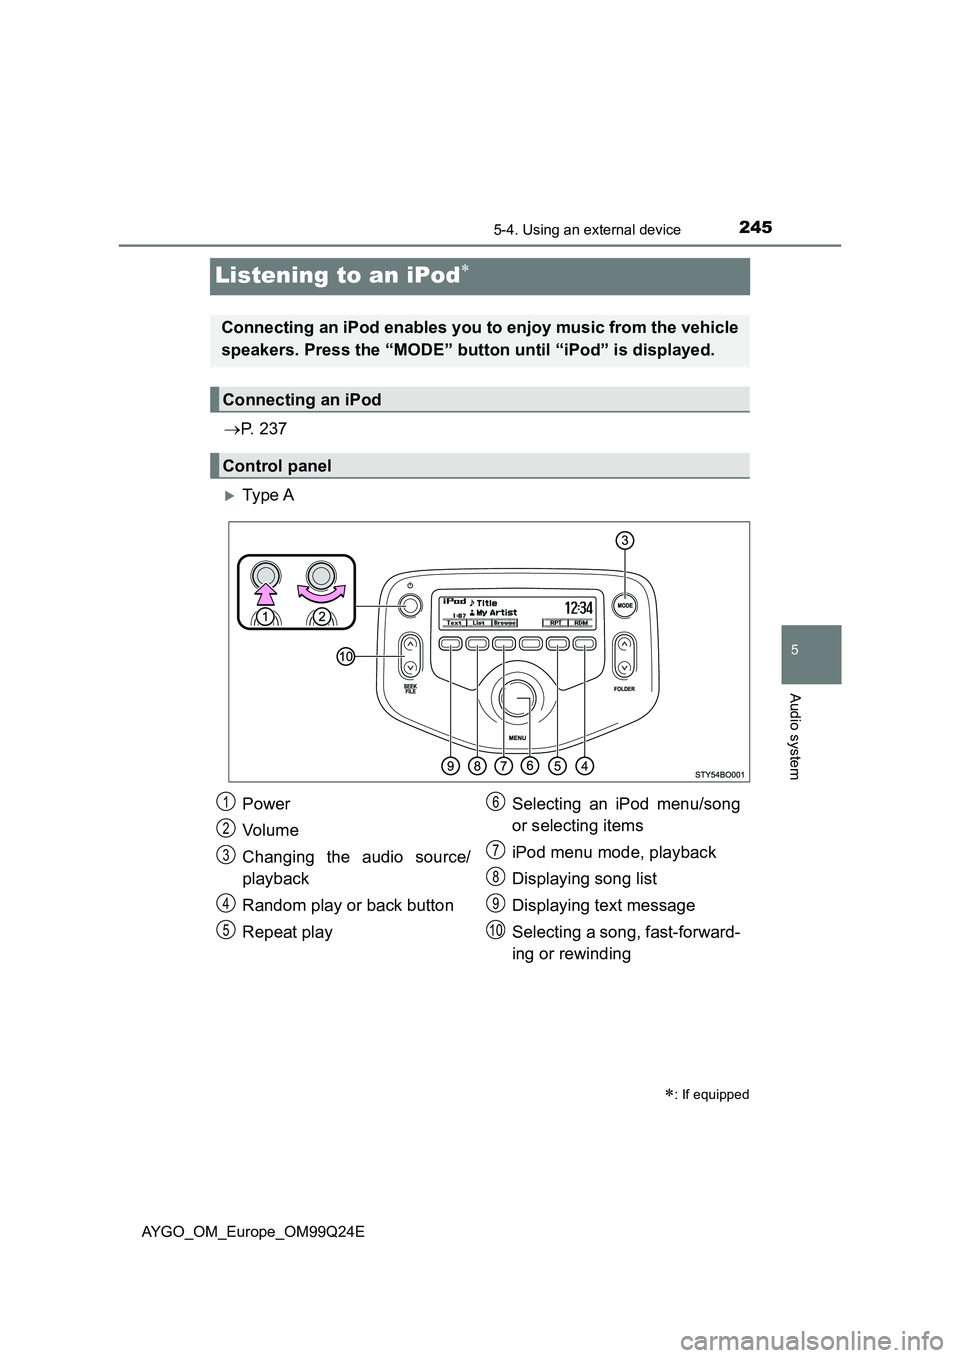
Connecting an iPod enables you to enjoy music from the vehicle
speakers. Press the “MODE” button until “iPod” is displayed.
Connecting an iPod
Control panel
Power
Vo lu m e
Changing the audio source/
playback
Random play or back button
Repeat play
Selecting an iPod menu/song
or selecting items
iPod menu mode, playback
Displaying song list
Displaying text message
Selecting a song, fast-forward-
ing or rewinding
1
2
3
4
5
6
7
8
9
10
Page 246 of 480
2465-4. Using an external device
AYGO_OM_Europe_OM99Q24E
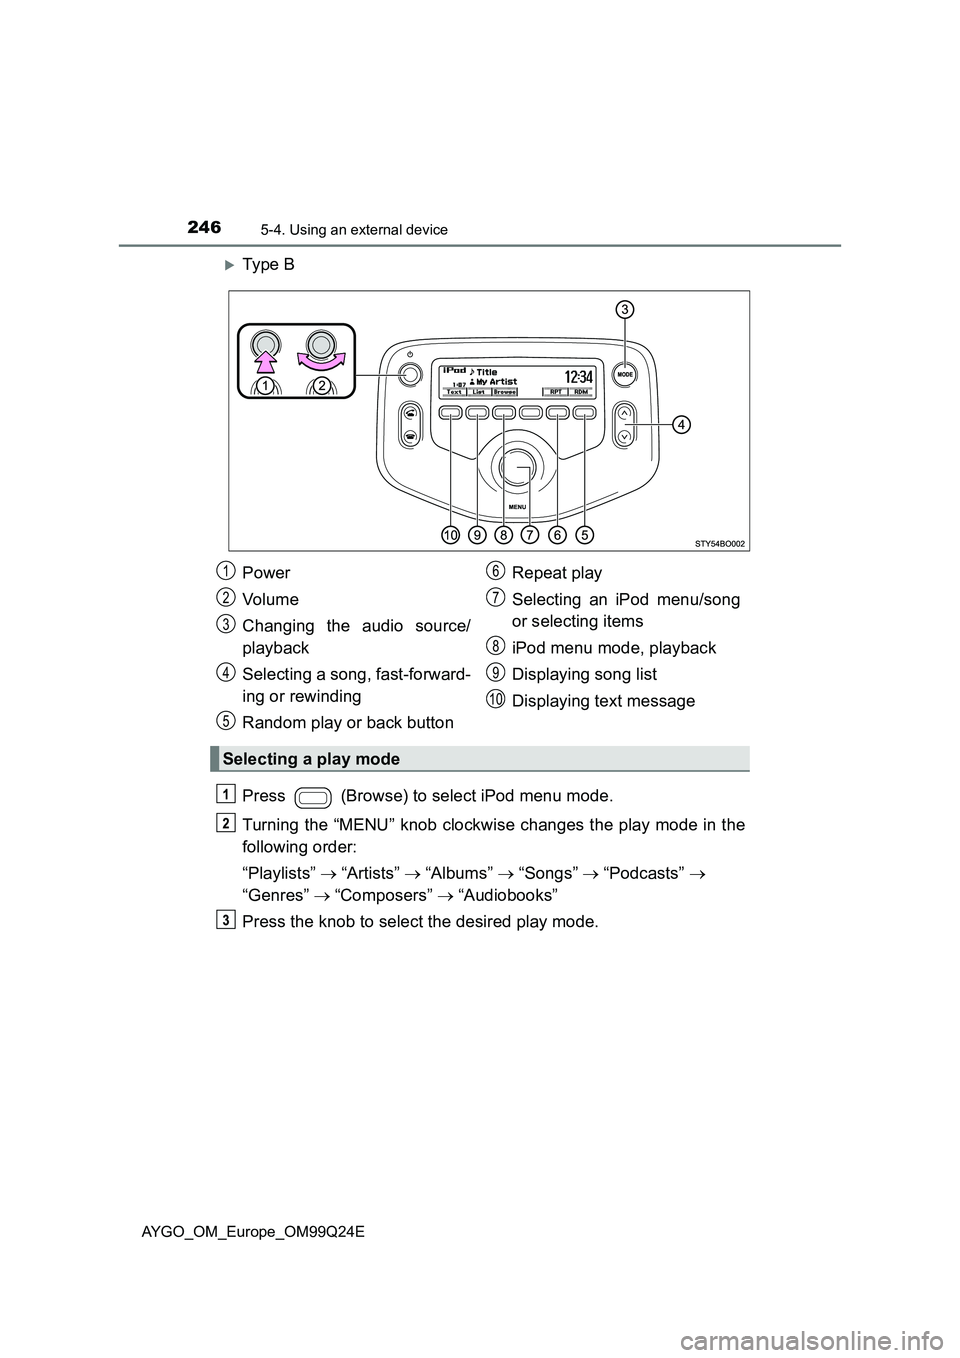
Ty pe B
Press (Browse) to select iPod menu mode.
Turning the “MENU” knob clockwise changes the play mode in the
following order:
“Playlists” “Artists” “Albums” “Songs” “Podcasts”
“Genres” “Composers” “Audiobooks”
Press the knob to select the desired play mode.
Power
Vo lu m e
Changing the audio source/
playback
Selecting a song, fast-forward-
ing or rewinding
Random play or back button
Repeat play
Selecting an iPod menu/song
or selecting items
iPod menu mode, playback
Displaying song list
Displaying text message
Selecting a play mode
1
2
3
4
5
6
7
8
9
10